At this point in the book we’ve covered a lot of ground with both Chef and the Microsoft Azure platforms. So far we have done the following:
Understood how to set up a development workstation for Chef
Looked at Azure’s capabilities, delved into detail on Azure Resource Manager, and used both the Azure CLI and PowerShell cmdlets to accomplish administration tasks in Azure
Utilized the Chef VM Extensions as an efficient way of bootstrapping Chef on multiple machines
Used Chef Provisioning to provision various types of Azure resources and scale out our architectures including both IaaS and PaaS resources
Looked at the Chef testing landscape and the tooling that supports it, including the Test Kitchen driver for Azure Resource Manager
Looked at Chef in the real world, including implications of environments, versioning, and runlists
It’s time to pull all that together and in this advanced-level chapter we will be building a fully working, continuous provisioning pipeline, running in Azure with Chef. We’ll take an incremental approach to building it so that we have something working at each stage. At the end, we’ll have a framework that you can use in your own environment that allows you to add configuration management and release management on top of it.
What are we Aiming for?
To create our solution, we will need to break down our approach into four key phases, as follows:
1. Initial Chef Repository setup
2. Installing and configuring Jenkins
3. Setting up a new Chef repository in GitHub
4. Configuring the Jenkins project and building steps
Our provisioning system will work off code that is checked into source control, so we want our pipeline to have the following attributes:
It will be triggered by commit pushes to our source control system (GitHub) for updates
Where there is an update to a provisioning recipe, the changes will be detected and any new provisioning instructions will be executed
If provisioning results in new servers being added, they are bootstrapped with a Chef client
Any new servers should be assigned a role or runlist so that the first time the Chef client runs, recipes are executed on the target node
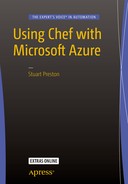
Once all this has been accomplished, we will have a working pipeline. Figure 8-1 shows the components involved. We will create a Dev environment initially and demonstrate how to add further environments that are contained within their own Azure Resource Group.

Figure 8-1. Solution Overview
As you can see we have a lot to do, so let’s get started by setting up an application repository and get some provisioning recipes ready.
Phase 1 - Initial Chef Repository Setup
Note
If you have not set up an Azure Active Directory Service Principal and configured Chef Provisioning with an Azure credentials file, head back to Chapter 4 : Authenticating to Azure Resource Manager and complete that section first.
Initializing the Application Repository
Let’s get started by creating ourselves an application repository to work in:
PS C:UsersStuartPreston> chef generate app chefazure-ch08 --copyright "Stuart Preston" --email "[email protected]"Compiling Cookbooks...Recipe: code_generator::app* directory[C:/Users/StuartPreston/chefazure-ch08] action create[...]
We’ll need the keys and configuration we created in chapter 1. Assuming you extracted the starter kit into a folder ∼/chef-repo, you can use the following commands:
PS C:UsersStuartPreston> cd .chefazure-ch08PS C:UsersStuartPrestonchefazure-ch08> mkdir .chefDirectory: C:UsersStuartPrestonchefazure-ch08Mode LastWriteTime Length Name---- ------------- ------ ----d----- 29/11/2015 16:02 chefPS C:UsersStuartPrestonchefazure-ch08> cd .chefPS C:UsersStuartPrestonchefazure-ch08.chef> cp ∼/chef-repo/.chef/*.* .
We can now open up our application in our preferred development environment (Visual Studio Code in my case):
PS C:UsersStuartPrestonchefazure-ch08.chef> cd ..PS C:UsersStuartPrestonchefazure-ch08> code .
We’ll be using the chefazure-ch08 cookbook within our app to house our provisioning recipes as well as all dependencies for this application. We should now have the structure as shown in Figure 8-2:

Figure 8-2. Required initial repository structure for this chapter
We can now move onto creating and executing the required baseline provisioning recipes.
Add Chef Provisioning Recipes
Azure Resource Groups make perfect boundaries between logical environments as they have their own storage and networking infrastructure. If we want to add another environment later, we won’t affect any of the existing resources that are deployed. Figure 8-3 shows the boundaries we want to keep between logical environments.
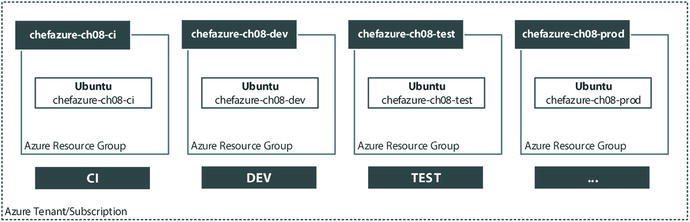
Figure 8-3. Azure Resource Groups to be created
When it comes to adding compute resource such as a VM inside a Resource Group, we need to use a generic Azure Resource Manager template that will allow us to create Windows and Ubuntu machines from it. The recipe associated with this template will need to refer to the Resource Group, and the template itself will need to create a Storage Account as well as a Network and IP address. Via the recipe parameters a Chef VM Extension will be added so that we don’t need to bootstrap the machine manually. Here’s the generic ARM template we can use, which needs to be saved inside the repository:
Note
The files and source code for this chapter can be downloaded from http://bit.ly/chefazure
cookbooks/chefazure-ch08/files/shared/machine_deploy.json
{"$schema": "https://schema.management.azure.com/schemas/2015-01-01/deploymentTemplate.json#","contentVersion": "1.0.0.0","parameters": {"location": {"type": "string","metadata": {"description": "The location where the resources will be created."}},"vmSize": {"type": "string","metadata": {"description": "The size of the VM to be created"}},"newStorageAccountName": {"type": "string","metadata": {"description": "Unique DNS Name for the Storage Account where the Virtual Machine's disks will be placed."}},"adminUsername": {"type": "string","metadata": {"description": "User name for the Virtual Machine."}},"adminPassword": {"type": "securestring","metadata": {"description": "Password for the Virtual Machine."}},"dnsNameForPublicIP": {"type": "string","metadata": {"description": "Unique DNS Name for the Public IP used to access the Virtual Machine."}},"imagePublisher": {"type": "string","defaultValue": "Canonical","metadata": {"description": "Publisher for the VM, e.g. Canonical, MicrosoftWindowsServer"}},"imageOffer": {"type": "string","defaultValue": "UbuntuServer","metadata": {"description": "Offer for the VM, e.g. UbuntuServer, WindowsServer."}},"imageSku": {"type": "string","defaultValue": "14.04.3-LTS","metadata": {"description": "Sku for the VM, e.g. 14.04.3-LTS"}},"imageVersion": {"type": "string","defaultValue": "latest","metadata": {"description": "Either a date or latest."}},"vmName": {"type": "string","defaultValue": "vm","metadata": {"description": "The vm name created inside of the resource group."}}},"variables": {"location": "[parameters('location')]","OSDiskName": "osdisk","nicName": "nic","addressPrefix": "10.0.0.0/16","subnetName": "Subnet","subnetPrefix": "10.0.0.0/24","storageAccountType": "Standard_LRS","publicIPAddressName": "publicip","publicIPAddressType": "Dynamic","vmStorageAccountContainerName": "vhds","vmName": "[parameters('vmName')]","vmSize": "[parameters('vmSize')]","virtualNetworkName": "vnet","vnetID": "[resourceId('Microsoft.Network/virtualNetworks',variables('virtualNetworkName'))]","subnetRef": "[concat(variables('vnetID'),'/subnets/',variables('subnetName'))]"},"resources": [{"type": "Microsoft.Storage/storageAccounts","name": "[parameters('newStorageAccountName')]","apiVersion": "2015-05-01-preview","location": "[variables('location')]","properties": {"accountType": "[variables('storageAccountType')]"}},{"apiVersion": "2015-05-01-preview","type": "Microsoft.Network/publicIPAddresses","name": "[variables('publicIPAddressName')]","location": "[variables('location')]","properties": {"publicIPAllocationMethod": "[variables('publicIPAddressType')]","dnsSettings": {"domainNameLabel": "[parameters('dnsNameForPublicIP')]"}}},{"apiVersion": "2015-05-01-preview","type": "Microsoft.Network/virtualNetworks","name": "[variables('virtualNetworkName')]","location": "[variables('location')]","properties": {"addressSpace": {"addressPrefixes": ["[variables('addressPrefix')]"]},"subnets": [{"name": "[variables('subnetName')]","properties": {"addressPrefix": "[variables('subnetPrefix')]"}}]}},{"apiVersion": "2015-05-01-preview","type": "Microsoft.Network/networkInterfaces","name": "[variables('nicName')]","location": "[variables('location')]","dependsOn": ["[concat('Microsoft.Network/publicIPAddresses/', variables('publicIPAddressName'))]","[concat('Microsoft.Network/virtualNetworks/', variables('virtualNetworkName'))]"],"properties": {"ipConfigurations": [{"name": "ipconfig1","properties": {"privateIPAllocationMethod": "Dynamic","publicIPAddress": {"id": "[resourceId('Microsoft.Network/publicIPAddresses',variables('publicIPAddressName'))]"},"subnet": {"id": "[variables('subnetRef')]"}}}]}},{"apiVersion": "2015-06-15","type": "Microsoft.Compute/virtualMachines","name": "[variables('vmName')]","location": "[variables('location')]","dependsOn": ["[concat('Microsoft.Storage/storageAccounts/', parameters('newStorageAccountName'))]","[concat('Microsoft.Network/networkInterfaces/', variables('nicName'))]"],"properties": {"hardwareProfile": {"vmSize": "[variables('vmSize')]"},"osProfile": {"computerName": "[variables('vmName')]","adminUsername": "[parameters('adminUsername')]","adminPassword": "[parameters('adminPassword')]"},"storageProfile": {"imageReference": {"publisher": "[parameters('imagePublisher')]","offer": "[parameters('imageOffer')]","sku": "[parameters('imageSku')]","version": "[parameters('imageVersion')]"},"osDisk": {"name": "osdisk","vhd": {"uri": "[concat('http://',parameters('newStorageAccountName'),'.blob.core.windows.net/',variables('vmStorageAccountContainerName'),'/',variables('OSDiskName'),'.vhd')]"},"caching": "ReadWrite","createOption": "FromImage"}},"networkProfile": {"networkInterfaces": [{"id": "[resourceId('Microsoft.Network/networkInterfaces',variables('nicName'))]"}]},"diagnosticsProfile": {"bootDiagnostics": {"enabled": "true","storageUri": "[concat('http://',parameters('newStorageAccountName'),'.blob.core.windows.net')]"}}}}]}
We need to extract the parameters from the ARM template into a recipe so that it can be provisioned. We’ll do that by creating a recipe for our CI server in the same way we did in chapter 4. Remember to substitute in the correct Subscription ID in the right place:
cookbooks/chefazure-ch08/recipes/provision_jenkins.rb:
require 'chef/provisioning/azurerm'with_driver 'AzureRM:b6e7eee9-YOUR-GUID-HERE-03ab624df016'azure_resource_group 'chefazure-ch08-ci' dolocation 'West Europe'endazure_resource_template 'jenkins-server' doresource_group 'chefazure-ch08-ci'template_source 'cookbooks/chefazure-ch08/files/shared/machine_deploy.json'parameters location: 'West Europe',vmSize: 'Standard_D1',newStorageAccountName: 'chazch8ci',adminUsername: 'azure',adminPassword: 'P2ssw0rd',dnsNameForPublicIP: 'chefazure-ch08-ci',imagePublisher: 'Canonical',imageOffer: 'UbuntuServer',imageSKU: '14.04.3-LTS',vmName: 'chazch08jenkins'chef_extension client_type: 'LinuxChefClient',version: '1210.12',runlist: 'role[jenkins]'endPS C:UsersStuartPrestonchefazure-ch08> knife cookbook upload chefazure-ch08Uploading chefazure-ch08 [0.1.0]Uploaded 1 cookbook.
Provisioning the CI Server
Having uploaded the cookbook and remembering that our local development workstation is connected to the same Chef organization, we can now run Chef Client on our local provisioning node and explicitly specify the provision_jenkins recipe for our runlist. This will provision our initial machine:
PS C:UsersStuartPrestonchefazure-ch08> chef-client -r recipe[chefazure-ch08::provision_jenkins]Starting Chef Client, version 12.5.1[2016-01-16T00:30:37+00:00] WARN: chef-client doesn't have administrator privileges on node DESKTOP-TIDJ3S8. This might cause unexpected resource failures.resolving cookbooks for run list: ["chefazure-ch08::provision_jenkins"]Synchronizing Cookbooks:- chefazure-ch08 (0.1.0)Compiling Cookbooks...Converging 2 resourcesRecipe: chefazure-ch08::provision_jenkins* azure_resource_group[chefazure-ch08-ci] action create- create or update Resource Group chefazure-ch08-ci* azure_resource_template[jenkins-server] action deploy- adding a Chef VM Extension with name: [variables('vmName')] and location: [variables('location')]- Result: Accepted- Resource Microsoft.Network/publicIPAddresses 'publicip' provisioning status is Running- Resource Microsoft.Storage/storageAccounts 'chazch8ci' provisioning status is Running- Resource Microsoft.Network/virtualNetworks 'vnet' provisioning status is Running- Resource Microsoft.Network/publicIPAddresses 'publicip' provisioning status is Running- Resource Microsoft.Storage/storageAccounts 'chazch8ci' provisioning status is Running- Resource Microsoft.Network/virtualNetworks 'vnet' provisioning status is Running- Resource Microsoft.Storage/storageAccounts 'chazch8ci' provisioning status is Running- Resource Microsoft.Storage/storageAccounts 'chazch8ci' provisioning status is Running- Resource Microsoft.Storage/storageAccounts 'chazch8ci' provisioning status is Running- Resource Microsoft.Compute/virtualMachines 'chazch08jenkins' provisioning status is Running- Resource Microsoft.Compute/virtualMachines 'chazch08jenkins' provisioning status is Running- Resource Microsoft.Compute/virtualMachines 'chazch08jenkins' provisioning status is Running- Resource Microsoft.Compute/virtualMachines 'chazch08jenkins' provisioning status is Running- Resource Microsoft.Compute/virtualMachines 'chazch08jenkins' provisioning status is Running[...]- Resource Microsoft.Compute/virtualMachines 'chazch08jenkins' provisioning status is Running- Resource Microsoft.Compute/virtualMachines/extensions 'chazch08jenkins/chefExtension' provisioning status is Running- Resource Microsoft.Compute/virtualMachines/extensions 'chazch08jenkins/chefExtension' provisioning status is Running- Resource Microsoft.Compute/virtualMachines/extensions 'chazch08jenkins/chefExtension' provisioning status is Running- Resource Microsoft.Compute/virtualMachines/extensions 'chazch08jenkins/chefExtension' provisioning status is Running- Resource Microsoft.Compute/virtualMachines/extensions 'chazch08jenkins/chefExtension' provisioning status is Running- Resource Template deployment reached end state of 'Succeeded'.- deploy or re-deploy Resource Manager template 'jenkins-server'Running handlers:Running handlers completeChef Client finished, 2/2 resources updated in 07 minutes 12 seconds
Now that our provisioning recipe has been executed locally, we can verify that the Resource Group was created successfully by visiting the Management Portal and navigating to Resource Groups, as shown in Figure 8-4:
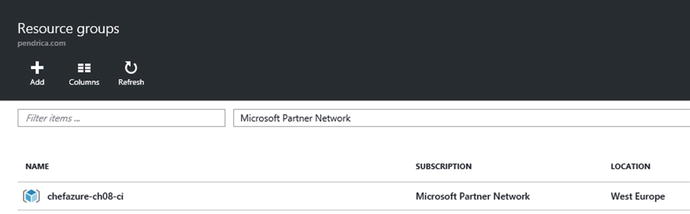
Figure 8-4. Management Portal showing created chefazure-ch08-ci resource group
We can drill down further and find the VM and select Extensions to see which extensions have been installed; this is shown in Figure 8-5:

Figure 8-5. Chef Extension in “Provisioning succeeded” status on a provisioning VM
To check that the machine successfully registered against the Hosted Chef server, we can look on the Hosted Chef server, as shown in Figure 8-6:

Figure 8-6. Hosted Chef server showing the provisioned server
While we specified the jenkins ‘role’ for this server, the role hasn’t yet been uploaded to the Chef Server, so it appears in red for the time being.
Phase 2 - Installing and Configuring Jenkins
There are many Continuous Integration servers out there both running in a managed (hosted) way and on premises. We have chosen the popular tool Jenkins ( http://jenkins-ci.org ) Continuous Integration server, which has a huge list of plug-ins and support for all the popular source control systems.
There is also a publicly available cookbook on the Supermarket for installing and configuring it, which we will use. The cookbook is available at https://supermarket.chef.io/cookbooks/jenkins (as shown in Figure 8-7) and is maintained by the team at Chef, like many other high-profile cookbooks.

Figure 8-7. Jenkins cookbook page on the Chef Supermarket
By clicking on the Dependencies tab, we can see the dependent cookbooks for the Jenkins cookbook, as shown in Figure 8-8.

Figure 8-8. Dependencies for the Jenkins cookbook
Using Berkshelf to Retrieve Public Cookbooks
Managing dependencies can get tricky over time - the more cookbooks you include, the more dependencies get included. Downloading cookbooks is a fairly simple task but when we need to upload them to our server it’s a pain to work out a list of all the dependencies to upload, not to mention the cookbooks themselves clutter your repo. To avoid this pain, we can use Berkshelf, a dependency manager. Berkshelf takes the heavy lifting out of managing community cookbooks. It downloads the cookbooks to a location outside your repo on your local disk, ready for upload to the Chef server. Newer versions of dependencies can be downloaded by the tool automatically and it is also supported by most of the testing tools out there, including RSpec and Test Kitchen. We’ll use Berkshelf to work with the Jenkins cookbook.
Note
More information about Berkshelf can be found at http://berkshelf.com
First, we need to update our Berksfile (a file where you list the dependencies and their sources) so that it knows we have a dependency on the jenkins cookbook. The Berksfile lives in the cookbook folder, rather than the root of the repo. Let’s edit our Berksfile and add the dependency to the Jenkins cookbook as follows (additions in bold):
cookbooks/chefazure-ch08/Berksfile:
source 'https://supermarket.chef.io'metadatacookbook 'jenkins'
To download the cookbook and all dependencies to your local workstation, we can run the berks install command:
Note
berks install should be executed from the cookbook folder rather than the root of the repo
PS C:UsersStuartPrestonchefazure-ch08> cd cookbookschefazure-ch08PS C:UsersStuartPrestonchefazure-ch08cookbookschefazure-ch08> berks installResolving cookbook dependencies...Fetching 'chefazure-ch08' from source at .Fetching cookbook index from https://supermarket.chef.io...Installing apt (2.9.2)Installing jenkins (2.4.1)Using chefazure-ch08 (0.1.0) from source at .Installing packagecloud (0.1.1)Installing runit (1.7.6)Installing yum (3.9.0)
Where did the cookbooks install to? Dependency cookbooks are kept outside of our repo in the ∼/.berkshelf/cookbooks folder:
PS C:UsersStuartPrestonchefazure-ch08cookbookschefazure-ch08> ls ∼/.berkshelf/cookbooksDirectory: C:UsersStuartPreston.berkshelfcookbooksMode LastWriteTime Length Name---- ------------- ------ ----d----- 16/01/2016 06:21 apt-2.9.2d----- 16/01/2016 06:21 jenkins-2.4.1d----- 16/01/2016 06:21 packagecloud-0.1.1d----- 16/01/2016 06:21 runit-1.7.6d----- 16/01/2016 06:21 yum-3.9.0
Creating a Recipe to Install Jenkins
Now that we have successfully added a dependency on the Jenkins cookbook, we need to create a recipe within our cookbook that includes the Jenkins cookbook and any additional configuration we wish to perform.
To start, create a new file cookbooks/chefazure-ch08/recipes/install_jenkins.rb and add the following content to it, to simply include the master recipe from the jenkins cookbook:
cookbooks/chefazure-ch08/recipes/install_jenkins.rb:
include_recipe 'jenkins::master'We also need to add a dependency on the Jenkins cookbook to our metadata file in the cookbook folder. After modification the file should look like the following:
cookbooks/chefazure-ch08/metadata.rb:
name 'chefazure-ch08'maintainer 'Stuart Preston'maintainer_email '[email protected]'license 'all_rights'description 'Installs/Configures chefazure-ch08'long_description 'Installs/Configures chefazure-ch08'version '0.1.1'depends 'jenkins'
Uploading the Cookbook and Dependencies
The neat thing about Berkshelf is that the cookbooks folder in our repo is not littered with cookbooks that we need to keep up to date, and the berks upload command lets us upload all of our dependent cookbooks to the server in one go. Let’s do that, remembering that we run the command from the cookbook folder:
PS C:UsersStuartPrestonchefazure-ch08cookbookschefazure-ch08> berks installPS C:UsersStuartPrestonchefazure-ch08cookbookschefazure-ch08> berks uploadUploaded apt (2.9.2) to: 'https://api.chef.io:443/organizations/pendrica-chefazure'Uploaded chefazure-ch08 (0.1.0) to: 'https://api.chef.io:443/organizations/pendrica-chefazure'Uploaded jenkins (2.4.1) to: 'https://api.chef.io:443/organizations/pendrica-chefazure'Uploaded packagecloud (0.1.1) to: 'https://api.chef.io:443/organizations/pendrica-chefazure'Uploaded runit (1.7.6) to: 'https://api.chef.io:443/organizations/pendrica-chefazure'Uploaded yum (3.9.0) to: 'https://api.chef.io:443/organizations/pendrica-chefazure'
Preparing and Uploading Role Definitions
Remember that Roles consist of attributes (if appropriate) and a run list? We’re going to create the jenkins role we referred to earlier in the chapter and set its runlist to the recipe we just created. That way when we next run the Chef client on the Jenkins server, the recipe should be executed.
Create a new file (and roles folder) roles/jenkins.json
roles/jenkins.json:
{"name": "jenkins","chef_type": "role","json_class": "Chef::Role","default_attributes": {},"description": "jenkins role","run_list": ["recipe[chefazure-ch08::install_jenkins]"],"env_run_lists" : {}}
Now we can upload our Jenkins role to the Chef server so it is ready for use:
PS C:UsersStuartPrestonchefazure-ch08> knife role from file roles/jenkins.jsonUpdated Role jenkins!
If we refresh the Hosted Chef page in our browser, we will see that the runlist for our chczch08jenkins node now expands correctly, as shown in Figure 8-9:

Figure 8-9. Hosted Chef showing expanded Runlist for our Jenkins server
Configuring the Jenkins Server
Let’s run the Chef Client manually on the server so that it picks up our latest changes. To find out what hostname or IP address to connect to, we can have a look in the publicIP resource for our VM in the Azure Management Portal, as shown in Figure 8-10:

Figure 8-10. Azure Management Portal showing the full DNS name of our CI server
The DNS name should take the form <dnsNameForPublicIP>.<location>.cloudapp.azure.com where:
dnsNameForPublicIP was specified in the parameters of the provisioning recipe
location is the short name for the datacenter location, e.g. “westeurope”
Using an SSH client, connect to the server and run sudo chef-client:
azure@chefazurech08ci:∼$ sudo chef-client (note the below output has been abbreviated)
Starting Chef Client, version 12.6.0resolving cookbooks for run list: ["chefazure-ch08::jenkins_ci_install"]Synchronizing Cookbooks:- chefazure-ch08 (0.1.0)- jenkins (2.4.1)- apt (2.9.2)- runit (1.7.6)- packagecloud (0.1.1)- yum (3.9.0)Compiling Cookbooks...Converging 15 resources[...]* apt_package[jenkins] action install* service[jenkins] action restart- restart service service[jenkins]* service[jenkins] action enable (up to date)* service[jenkins] action start (up to date)Running handlers:- AzureExtension::ReportHandlerRunning handlers completeChef Client finished, 15/15 resources updated in 58 seconds
Now we can see if we can verify that Jenkins is running. In a browser, navigate to the DNS name you provided for the CI server earlier (e.g., http://chefazure-ch08-ci.westeurope.cloudapp.azure.com:8080 ). If successful, you should see a dashboard similar to that in Figure 8-11.

Figure 8-11. Jenkins Dashboard
Adding Plug-ins to Jenkins
To start with, we will probably want to use Git, and the popular GitHub and Build Pipeline plug-ins in our Jenkins implementation, and these can be configured from a recipe by adding the content below (in bold) to cookbookschefazure-ch08 ecipesinstall_jenkins.rb:
include_recipe 'jenkins::master'package 'git' doaction :installendjenkins_plugin 'github' doaction :installnotifies :restart, 'service[jenkins]', :delayedendjenkins_plugin 'build-pipeline-plugin' doaction :installnotifies :restart, 'service[jenkins]', :delayedend
As we are now using Berkshelf to manage our uploads, we need to bump the version of our cookbook to version 0.1.1 in cookbookschefazure-ch08metadata.rb (this is because the previous version is locked by Berkshelf, and besides - it is a good practice to get into the habit of incrementing the version number when changes come through the system). The resulting metadata.rb file should look similar to the one below:
cookbookschefazure-ch08metadata.rb:
name 'chefazure-ch08'maintainer 'Stuart Preston'maintainer_email '[email protected]'license 'all_rights'description 'Installs/Configures chefazure-ch08'long_description 'Installs/Configures chefazure-ch08'version '0.1.1'depends 'jenkins'
Now we need to notify Berkshelf of our new version (berks update), and upload it to the server (berks upload):
PS C:UsersStuartPrestonchefazure-ch08cookbookschefazure-ch08> berks updateResolving cookbook dependencies...Fetching 'chefazure-ch08' from source at .Fetching cookbook index from https://supermarket.chef.io...Using apt (2.9.2)Using chefazure-ch08 (0.1.1) from source at .Using jenkins (2.4.1)Using runit (1.7.6)Using yum (3.9.0)Using packagecloud (0.1.1)C:UsersStuartPrestonchefazure-ch08cookbookschefazure-ch08> berks uploadSkipping apt (2.9.2) (frozen)Uploaded chefazure-ch08 (0.1.1) to: 'https://api.chef.io:443/organizations/pendrica-chefazure'Skipping jenkins (2.4.1) (frozen)Skipping packagecloud (0.1.1) (frozen)Skipping runit (1.7.6) (frozen)Skipping yum (3.9.0) (frozen)
We can now execute Chef Client again on our Jenkins server, where we can see at the end of the run, we successfully invoke a restart on the Jenkins service:
azure@chazch08jenkins:∼$ sudo chef-clientStarting Chef Client, version 12.6.0resolving cookbooks for run list: ["chefazure-ch08::install_jenkins"]Synchronizing Cookbooks:- jenkins (2.4.1)- apt (2.9.2)- runit (1.7.6)- packagecloud (0.1.1)- yum (3.9.0)- chefazure-ch08 (0.1.1)Compiling Cookbooks...Converging 18 resourcesRecipe: jenkins::_master_package[...]* service[jenkins] action restart- restart service service[jenkins]Running handlers:- AzureExtension::ReportHandlerRunning handlers completeChef Client finished, 17/39 resources updated in 01 minutes 58 seconds
Verifying Jenkins Plug-in Installation
To verify that the plug-ins were installed we can navigate to Manage Jenkins ➤ Manage Plugins and click on the Installed tab in the browser dashboard; we should see two plug-ins installed as shown in Figure 8-12.

Figure 8-12. Jenkins Dashboard showing plug-ins that are installed
Now that we have our plug-ins installed we can start working with the Jenkins server itself to define jobs relevant to our pipeline.
Securing Access to Jenkins
Before we start configuring Jenkins jobs that potentially contain sensitive data, we should lock down access to the system and create our first account:
From the Jenkins dashboard, select Manage Jenkins, then Configure Global Security.
Click Enable Security. The page will expand to offer a choice of access control.
Select Jenkins’ own user database.
Uncheck Allow users to sign up.
Select Logged-in users can do anything.
The options should look similar to Figure 8-13 below. Do not forget to press the Save button at the bottom of the page.

Figure 8-13. Configure Global Security option in Jenkins
On pressing Save, you will be prompted to create the first account as shown in Figure 8-14:

Figure 8-14. First Account” Sign-up page shown in Jenkins
You will now be logged in automatically.
Adding Chef Dependencies to Jenkins
We need to install some Ruby Gems on our Jenkins server, and to do so we can edit the install_jenkins.rb and use the gem_package resource to add our new dependencies.
cookbookschefazure-ch08 ecipesinstall_jenkins.rb:
include_recipe 'jenkins::master'package 'git' doaction :installendjenkins_plugin 'github' doaction :installnotifies :restart, 'service[jenkins]', :delayedendjenkins_plugin 'build-pipeline-plugin' doaction :installnotifies :restart, 'service[jenkins]', :delayedendpackage 'build-essential' doaction :installendgem_package 'chef-provisioning' doaction :installendgem_package 'chef-provisioning-azurerm' doaction :installendgem_package 'rspec' doaction :installendgem_package 'rake' doaction :installendgem_package 'rubocop' doaction :installend
As we have made a change we need to increment our version number, update the Berkshelf dependencies, and upload the new cookbook to the Chef server:
cookbookschefazure-ch08metadata.rb:
name 'chefazure-ch08'maintainer 'Stuart Preston'maintainer_email '[email protected]'license 'all_rights'description 'Installs/Configures chefazure-ch08'long_description 'Installs/Configures chefazure-ch08'version '0.1.2'depends 'jenkins'
Now we need to notify Berkshelf of our new version (berks update), and upload it to the server (berks upload):
PS C:UsersStuartPrestonchefazure-ch08cookbookschefazure-ch08> berks updateResolving cookbook dependencies...Fetching 'chefazure-ch08' from source at .Fetching cookbook index from https://supermarket.chef.io...Using apt (2.9.2)Using chefazure-ch08 (0.1.2) from source at .Using jenkins (2.4.1)Using runit (1.7.6)Using yum (3.9.0)Using packagecloud (0.1.1)PS C:UsersStuartPrestonchefazure-ch08cookbookschefazure-ch08> berks uploadSkipping apt (2.9.2) (frozen)Uploaded chefazure-ch08 (0.1.2) to: 'https://api.chef.io:443/organizations/pendrica-chefazure'Skipping jenkins (2.4.1) (frozen)Skipping packagecloud (0.1.1) (frozen)Skipping runit (1.7.6) (frozen)Skipping yum (3.9.0) (frozen)
We can now execute Chef Client again on our Jenkins server, where we can see at the end of the run, we successfully invoke a restart on the Jenkins service:
azure@chazch08jenkins:∼$ sudo chef-clientStarting Chef Client, version 12.6.0resolving cookbooks for run list: ["chefazure-ch08::install_jenkins"]Synchronizing Cookbooks:- chefazure-ch08 (0.1.2)- jenkins (2.4.1)- apt (2.9.2)- runit (1.7.6)- yum (3.9.0)- packagecloud (0.1.1)Compiling Cookbooks...Converging 24 resources[...]Running handlers:- AzureExtension::ReportHandlerRunning handlers completeChef Client finished, 7/33 resources updated in 58 seconds
Phase 3 - Setting Up a New Chef Repository in GitHub
For our scenario, we want our Jenkins jobs to be triggered by changes to the master branch in our repo. So we need a hosted Git repository for this.
You may already have your own hosted Git solution, such as Visual Studio Team Services (formerly Visual Studio Online), GitLab, or Atlassian Stash/Bitbucket and a similar procedure will apply to those. The basic steps to upload your repository are as follows.
Log in to GitHub at https://github.com and create an account if necessary.
Click on the plus sign and create a New repository (example values are shown in Figure 8-15).

Figure 8-15. GitHub Create repository screen
Press the Create repository button.
Now that we have a new blank repository on GitHub, we can set this as the ’remote’ for our local repository and push to it. We will need to commit our changes first.
Configuring a .gitignore File to Exclude Sensitive Information
As we do not want to share our keys with the world, we need to add the following line to our Git ignore file so that they won’t get included when we commit changes. Note the .gitignore file is in the root of our repo:
.gitignore:.vagrantBerksfile.lock*∼*#.#*#*#.*.sw[a-z]*.un∼# BundlerGemfile.lockbin/*.bundle/*.kitchen/.kitchen.local.yml.chef/
After saving the file, we can stage our changes for git, and then commit them:
PS C:UsersStuartPrestonchefazure-ch08> git add .PS C:UsersStuartPrestonchefazure-ch08> git commit -m 'initial commit'[master (root-commit) 979f481] initial commit15 files changed, 490 insertions(+)create mode 100644 .gitignorecreate mode 100644 .kitchen.ymlcreate mode 100644 README.mdcreate mode 100644 cookbooks/chefazure-ch08/Berksfilecreate mode 100644 cookbooks/chefazure-ch08/chefignorecreate mode 100644 cookbooks/chefazure-ch08/files/shared/machine_deploy.jsoncreate mode 100644 cookbooks/chefazure-ch08/metadata.rbcreate mode 100644 cookbooks/chefazure-ch08/recipes/default.rbcreate mode 100644 cookbooks/chefazure-ch08/recipes/install_jenkins.rbcreate mode 100644 cookbooks/chefazure-ch08/recipes/provision_jenkins.rbcreate mode 100644 cookbooks/chefazure-ch08/roles/jenkins.jsoncreate mode 100644 cookbooks/chefazure-ch08/spec/spec_helper.rbcreate mode 100644 cookbooks/chefazure-ch08/spec/unit/recipes/default_spec.rbcreate mode 100644 test/integration/default/serverspec/default_spec.rbcreate mode 100644 test/integration/helpers/serverspec/spec_helper.rb
Connecting a Local Git Repo to the Remote
We can now connect our local repository with the remote by using the git remote add command and specifying the URI of the GitHub repo :
PS C:UsersStuartPrestonchefazure-ch08> git remote add origin https://github.com/stuartpreston/chefazure-ch08.gitPS C:UsersStuartPrestonchefazure-ch08> git push -u origin masterUsername for 'https://github.com': stuartprestonPassword for 'https://[email protected]':Counting objects: 32, done.Delta compression using up to 4 threads.Compressing objects: 100% (20/20), done.Writing objects: 100% (32/32), 5.53 KiB | 0 bytes/s, done.Total 32 (delta 0), reused 0 (delta 0)To https://github.com/stuartpreston/chefazure-ch08.git* [new branch] master -> masterBranch master set up to track remote branch master from origin.
We now have our changes committed and pushed to our remote Git repository in GitHub.
Phase 4 - Configuring the Jenkins Project
In Jenkins , a job is a container for the build process including all build steps. We’re going to create and configure a job, using the following steps:
From the home page, press create new jobs.
You are taken to a page to enter the item name and the type of project. We’ll use “Provisioning” as the item name and a Freestyle project as shown in Figure 8-16.

Figure 8-16. Jenkins Create Job/Project creation page
We are then taken to the project creation page as shown in Figure 8-17.

Figure 8-17. Jenkins Job creation screen
Adding a New Project
There are a multitude of settings that we could set; however the key ones for us relate to how we access source control. We can then add a few Build Steps that execute in order based on a trigger. To add a new project, the options we need to set or select are the following:
Project name: Provisioning
GitHub project: (selected)
Project url: https://github.com/stuartpreston/chefazure-ch08
(advanced) Display name: chefazure-ch08
Adding Build Steps
Now we can add some build steps. To keep it as simple as possible for this chapter, our build will be comprised of three steps.
Execute Rubocop
Upload the cookbook to the Chef server using Knife
Execute Chef Provisioning
Execute Rubocop
As we saw in chapter 6, Rubocop is a powerful tool for detecting style and ruby errors in code. It runs very quickly, so it is a prime candidate for being at the top of the Build Steps list:
Add a Build step and as shown in Figure 8-18; in the Command box enter the following command (the -D ensures we get meaningful output with each error or warning that occurs):

Figure 8-18. Rubocop command
/opt/chef/embedded/bin/rubocop -D
Press Save and run the build, by clicking the Build Now link on the Jenkins dashboard for the Provisioning project, as shown in Figure 8-19:

Figure 8-19. Jenkins dashboard
While the build is running, you can visit the Console Output screen as shown in Figure 8-20 to see any output that was written to the console (STDOUT) during the run. If you miss it, don’t worry - the output will be saved for inspection later (you can view it by navigating to any build and pressing Console Output) .

Figure 8-20. Console Output from Jenkins build process
By inspecting the console output, we can see that Rubocop executed, checked the files in our workspace (corresponding to our Chef repo). and hopefully there are no offenses. If there are, then the build will fail and you will need to correct these errors before moving on.
Upload the Cookbook to the Chef Server Using Knife
When the Rubocop step is successful we want to upload the chefazure-ch08 cookbook to the server to make our provisioning recipes available. We can accomplish this using the knife cookbook tool running locally on the Jenkins server.
Before we do that, we need to make our knife configuration (i.e., the content of the ∼/chef-repo/.chef folder, excluding the validation key) available to Jenkins. I find the simplest way to accomplish the required result is to manually copy the files from your machine into the home directory using SCP, SFTP or your preferred tool and then copy them as root (using sudo) into /etc/chef:
azure@chazch08jenkins:$ cd /etc/chefazure@chazch08jenkins:/etc/chef$ sudo cp /home/azure/stuartpreston-pendrica.pem .azure@chazch08jenkins:/etc/chef$ sudo cp /home/azure/knife.rb .
Once the Knife configuration is available on the server, we can add another Build Step to our Jenkins job of type Execute Shell. The format the command takes is as follows:
/opt/chef/embedded/bin/knife cookbook upload <cookbook_name> -c /etc/chef/knife.rb -o ./cookbooks --forceWhere:
<cookbook_name> is the name of the cookbook we wish to upload
-c /etc/chef/knife.rb is the path to our Knife configuration file
-o ./cookbooks is an override to the location of cookbooks that will point to our cookbooks folder during a build
--force is used to overwrite any existing cookbook on the server with the same version
The build step is shown in Figure 8-21 below:

Figure 8-21. Command line for uploading the cookbook using Knife
We can trigger a new build manually by pressing Save and pressing the Build Now button . We should see the output as seen in Figure 8-22 .

Figure 8-22. Knife command running via Jenkins
In the output from this build we can see Rubocop inspecting nine files, followed by Knife uploading the cookbook to the server.
Configuring Jenkins for Chef Provisioning
Before we can execute our first Chef Provisioning recipe via Jenkins, we need to make some modifications to the configuration of the Jenkins server. This is because the keys that the Chef client will need to read are not available to the Chef client when it is executed from Jenkins. We’ll need to change the permissions on the client.pem and validation.pem files. Additionally, we will need a separate client.rb file to use for provisioning purposes. The reason for that is that the client.rb that is installed on the machine through the Azure VM Extension is incompatible with being run as the Jenkins user.
So we’ll need to make some changes as follows - first we need to append two file resources and a template resource to our install_jenkins recipe :
cookbooks/chefazure-ch08/recipes/install_jenkins.rb
file '/etc/chef/client.pem' doowner 'root'group 'jenkins'mode '0640'endfile '/etc/chef/validation.pem' doowner 'root'group 'jenkins'mode '0640'endtemplate '/etc/chef/client-provisioning.rb' dosource 'client-provisioning.erb'owner 'root'group 'jenkins'mode '0640'end
We need to create the .erb template that is referred to in the install_jenkins recipe. We put this template in the templates folder. As you can see from the recipe, at the end we’ll expect all three files to be created with permissions that allow read access to members of the Jenkins group on the server.
cookbooks/chefazure-ch08/templates/client-provisioning.erb:
node_name "<%= Chef::Config[:node_name] %>"chef_server_url "<%= Chef::Config[:chef_server_url] %>"validation_client_name "<%= Chef::Config[:validation_client_name] %>"client_key "<%= Chef::Config[:client_key] %>"validation_key "<%= Chef::Config[:validation_key] %>"file_cache_path "/var/lib/jenkins/.chef"log_location "/dev/stdout"log_level :info
We will also need to update our metadata.rb again with a new version:
metadata.rb:
name 'chefazure-ch08'maintainer 'Stuart Preston'maintainer_email '[email protected]'license 'all_rights'description 'Installs/Configures chefazure-ch08'long_description 'Installs/Configures chefazure-ch08'version '0.1.3'depends 'jenkins'
Once this has been saved, we need to perform a berks updateand berks uploadto the Chef server:
PS C:UsersStuartPrestonchefazure-ch08cookbookschefazure-ch08> berks updateFetching 'chefazure-ch08' from source at .Fetching cookbook index from https://supermarket.chef.io...Using apt (2.9.2)Using chefazure-ch08 (0.1.3) from source at .Using jenkins (2.4.1)Using packagecloud (0.1.1)Using runit (1.7.6)Using yum (3.9.0)PS C:UsersStuartPrestonchefazure-ch08cookbookschefazure-ch08> berks uploadSkipping apt (2.9.2) (frozen)Uploaded chefazure-ch08 (0.1.3) to: 'https://api.chef.io:443/organizations/pendrica-hefazure'Skipping jenkins (2.4.1) (frozen)Skipping packagecloud (0.1.1) (frozen)Skipping runit (1.7.6) (frozen)Skipping yum (3.9.0) (frozen)
Back on our Jenkins server, we can rerun Chef client again (or wait 30 minutes for the changes to take effect from the scheduled Chef client):
azure@chazch08jenkins:/etc/chef$ sudo chef-clientStarting Chef Client, version 12.6.0resolving cookbooks for run list: ["chefazure-ch08::install_jenkins"]Synchronizing Cookbooks:- runit (1.7.6)- apt (2.9.2)- jenkins (2.4.1)- packagecloud (0.1.1)- yum (3.9.0)- chefazure-ch08 (0.1.3)Compiling Cookbooks...Converging 26 resources[...]Recipe: chefazure-ch08::install_jenkins* jenkins_plugin[build-pipeline-plugin] action install (up to date)* apt_package[build-essential] action install (up to date)* gem_package[chef-provisioning] action install (up to date)* gem_package[chef-provisioning-azurerm] action install (up to date)* gem_package[rspec] action install (up to date)* gem_package[rake] action install (up to date)* gem_package[rubocop] action install (up to date)* file[/etc/chef/client.pem] action create- change mode from '0700' to '0640'* file[/etc/chef/validation.pem] action create- change mode from '0700' to '0640'* file[/etc/chef/client.pem] action create (up to date)* file[/etc/chef/validation.pem] action create (up to date)* template[/etc/chef/client-provisioning.rb] action create- create new file /etc/chef/client-provisioning.rb- update content in file /etc/chef/client-provisioning.rb from none to 3e6261--- /etc/chef/client-provisioning.rb 2016-01-16 22:53:17.255588400 +0000+++ /etc/chef/.client-provisioning.rb20160116-14225-7a41z9 2016-01-16 22:53:17.255588400 +0000@@ -1 +1,8 @@+node_name "chazch08jenkins.chefazure-ch08-ci"+chef_server_url https://api.chef.io/organizations/pendrica-chefazure+validation_client_name "pendrica-chefazure-validator"+client_key "/etc/chef/client.pem"+validation_key "/etc/chef/validation.pem"+file_cache_path "/var/lib/jenkins/.chef"+log_location "/dev/stdout"+log_level :info- change mode from '' to '0640'- change owner from '' to 'root'- change group from '' to 'jenkins'Running handlers:- AzureExtension::ReportHandlerRunning handlers completeChef Client finished, 1/36 resources updated in 19 seconds
Execute a Chef Provisioning Recipe
We’re nearly complete on our Jenkins job creation - we need to add our final build step, which is to execute Chef Provisioning. Chef Provisioning typically executes inside a normal Chef client, but in our case we are using a special Chef client configuration that is separate from the one for the Jenkins server itself. That way we can continue to service Jenkins, while sending Provisioning recipes through the Chef Provisioning configuration.
To accomplish this, we need to add another Build Step to our Jenkins job of type Execute Shell. The format the command takes is as follows:
/opt/chef/embedded/bin/chef-client -c /etc/chef/client-provisioning.rb -o recipe[chefazure-ch08::default]Where:
-c /etc/chef/client-provisioning.rb points to our custom configuration file for Chef Provisioning
-o recipe[chefazure-ch08::default] is a run list override - we only want to run the provisioning recipes that are included by the default recipe in our cookbook
The build step is shown in Figure 8-23 below:

Figure 8-23. Command line for executing our custom Chef Client install
Authenticating to Microsoft Azure from Jenkins
To set up authentication from Jenkins to Azure, we need to copy the credentials file we created in chapter 4. The Jenkins home directory is typically /var/lib/jenkins but this may vary in your environment.
If you are logged in as the azure user, you may find it easier to su to the jenkins user to avoid permissions problems as follows:
azure@chazch08jenkins: $ sudo su jenkinsjenkins@chazch08jenkins:∼$ mkdir ∼/.azurejenkins@chazch08jenkins:∼$ vi ∼/.azure/credentials
The credentials file should look similar to the following:
/var/lib/jenkins/.azure/credentials:
[b6e7eee9-YOUR-GUID-HERE-03ab624df016] <- Subscription IDtenant_id = "9c117323-YOUR-GUID-HERE-9ee430723ba3" <- Tenant IDclient_id = "02a2ba0d-YOUR-GUID-HERE-0e7cd312d62b" <- Application IDclient_secret = "my-top-secret-password" <- Application Password
At this point we should have a fully working configuration so let’s test it by adding our first provisioning recipe to our Chef repo, uploading it to GitHub, and then we can execute our job in Jenkins.
Our “dev” environment comprises a single-machine Ubuntu server and assigned to the Apache role. It is mostly a replica of the Jenkins machine, and it reuses the same ARM template. We’ll add the usual Chef VM Extension to it so that it registers with a Chef Server. Ignore the fact that we don’t have an Apache role on our Chef server yet - it can be added later. We are solely interested in the provisioning aspects at this stage.
Let’s add a provision_dev recipe to our cookbook:
cookbooks/chefazure-ch08/recipes/provision_dev.rb
require 'chef/provisioning/azurerm'with_driver 'AzureRM:b6e7eee9-YOUR-GUID-HERE-03ab624df016'azure_resource_group 'chefazure-ch08-dev' dolocation 'West Europe'endazure_resource_template 'chefazure-ch08-dev' doresource_group 'chefazure-ch08-dev'template_source 'cookbooks/chefazure-ch08/files/shared/machine_deploy.json'parameters location: 'West Europe',vmSize: 'Standard_D1',newStorageAccountName: 'chazch8dev',adminUsername: 'azure',adminPassword: 'P2ssw0rd',dnsNameForPublicIP: 'chefazure-ch08-dev',imagePublisher: 'Canonical',imageOffer: 'UbuntuServer',imageSKU: '14.04.3-LTS',vmName: 'chazch08dev'chef_extension client_type: 'LinuxChefClient',version: '1210.12',runlist: 'role[apache]'end
We need to add provision_dev recipe as an include to our default recipe, as our Jenkins job specifies that the default recipe from our cookbook is executed:
cookbooks/chefazure-ch08/recipes/default.rb
include_recipe 'chefazure-ch08::provision_dev' Again as we’ve updated the cookbook we should also update our metadata to reflect the new version:
metadata.rb:
name 'chefazure-ch08'maintainer 'Stuart Preston'maintainer_email '[email protected]'license 'all_rights'description 'Installs/Configures chefazure-ch08'long_description 'Installs/Configures chefazure-ch08'version '0.1.4'depends 'jenkins'
Pushing the changes to GitHub is as simple as adding the files, committing the change locally, and pushing to master in your repo:
PS C:UsersStuartPrestonchefazure-ch08> git add .PS C:UsersStuartPrestonchefazure-ch08> git commit -m 'adding dev server'[master d9bdba3] adding dev server1 file changed, 18 insertions(+)PS C:UsersStuartPrestonchefazure-ch08> git push origin masterUsername for 'https://github.com': stuartprestonPassword for 'https://[email protected]':Counting objects: 6, done.Delta compression using up to 4 threads.Compressing objects: 100% (5/5), done.Writing objects: 100% (6/6), 856 bytes | 0 bytes/s, done.Total 6 (delta 3), reused 0 (delta 0)To https://github.com/stuartpreston/chefazure-ch08.git31d3664..d9bdba3 master -> master
After triggering another build via the Build Now button you should see lines similar to the following in your Console Output log :
[2016-01-16T22:56:55+00:00] INFO: chef-provisioning-azurerm 0.3.2[2016-01-16T22:56:55+00:00] INFO: chef-provisioning 1.5.1[2016-01-16T22:56:55+00:00] INFO: Processing azure_resource_group[chefazure-ch08-dev] action create (chefazure-ch08::provision_dev line 4)[2016-01-16T22:56:56+00:00] INFO: Processing azure_resource_template[chefazure-ch08-dev] action deploy (chefazure-ch08::provision_dev line 8)[2016-01-16T22:58:40+00:00] WARN: Skipping final node save because override_runlist was given[2016-01-16T22:58:40+00:00] INFO: Chef Run complete in 107.734846 seconds[2016-01-16T22:58:40+00:00] INFO: Skipping removal of unused files from the cache[2016-01-16T22:58:40+00:00] INFO: Running report handlers[2016-01-16T22:58:40+00:00] INFO: Report handlers complete[2016-01-16T22:58:40+00:00] INFO: Sending resource update report (run-id: 894abd54-bd28-4836-bb19-b2961c6c9bc4)Finished: SUCCESS
Verifying the Chef Provisioning run
To verify that the Chef run was successful, other than monitoring the output of the Jenkins job, we can look at the Azure management portal to verify the current provisioning state. We should see the Resource Group and Resources that we specified in our recipe visible in the portal, as shown in Figure 8-24.

Figure 8-24. Azure Management Portal showing a Resource Group and Resources
We can also look in Hosted Chef to verify that there is a new Node created for the Dev environment as shown in Figure 8-25.
Figure 8-25. Chef Manage (Hosted Chef) showing a registered Node
Now that we have a fully working end-to-end provisioning process that is driven from source control, we can configure GitHub to send a notification to Jenkins on each build for a fully hands-off provisioning solution.
Triggering a Jenkins Build from GitHub
We can use GitHub’s Webhook system to add a Webhook that notifies our Jenkins server whenever code is pushed to GitHub. For this to happen, your Jenkins server must have an external (public) IP address like the one described in this chapter. Otherwise, to receive events such as this, you will have to configure your Jenkins server to poll GitHub.
To configure GitHub to send notifications we need to visit our job definition in Jenkins again and navigate to Build Triggers as follows:
1. Trigger builds remotely should be ticked (selected).
2. An authentication token needs to be specified. This can be any random selection of characters. Don’t make the token the same as any of your passwords - the default Jenkins configuration runs unencrypted on port 8080.
Once configured, your Build Triggers definition should look similar to that in Figure 8-26. Save the definition.

Figure 8-26. Configuring Build Triggers on the Provisioning job in Jenkins
To configure the GitHub end of things, we need to navigate to the project Settings ➤ Webhooks & Services and follow the steps below (these options are shown in Figure 8-27):
1. Click ‘Add webhook’ then in the Payload URL, specify the URL in the format as seen on the Jenkins Build Triggers page - http://<Jenkins Server>:8080/job/<Job Name>/build?token=<token>
a. Jenkins Server is the external fully qualified domain name of the Jenkins server (e.g. chefazure-ch08-ci.westeurope.cloudapp.azure.com)
b. Job Name is the project name within Jenkins (e.g. Provisioning)
c. Token is the token assigned in the previous step (e.g., chefprovisioning2016)
Example URL: http://chefazure-ch08-ci.westeurope.cloudapp.azure.com:8080/job/Provisioning/build?token=chefprovisioning2016
2. Ensure the Just the push event option is selected.
3. Press Add Webhook.

Figure 8-27. Github webhook configuration
To test the trigger, we can simply browse directly to the URL in a browser and confirm that it triggers a job within Jenkins.
That’s it - we have now configured the Webhook, so let’s start making use of it by pushing two simple changes through the system that exercise all the points of the system from trigger to provisioned resources.
Adding and Destroying a Test Environment
We’re going to create a provision_test recipe with an Azure Resource Group resource specified within it, include it from the default recipe, push our changes, then show how resources are deleted. Let’s create and update some files, starting with our default recipe that needs to be updated to add the provision_test recipe (additions shown in bold). Remember to leave a single blank line at the end of each file to avoid an avoidable Rubocop failure!
cookbooks/chefazure-ch08/recipes/default.rb
include_recipe 'chefazure-ch08::provision_dev'include_recipe 'chefazure-ch08::provision_test'
cookbooks/chefazure-ch08/recipes/provision_test.rb
require 'chef/provisioning/azurerm'with_driver 'AzureRM:b6e7eee9-YOUR-GUID-HERE-03ab624df016'azure_resource_group 'chefazure-ch08-test' dolocation 'West Europe'end
Once those files are saved, we can commit the files and push the commit up to GitHub, in the same way as we have done previously:
PS C:UsersStuartPrestonchefazure-ch08> git add .PS C:UsersStuartPrestonchefazure-ch08> git commit -m 'adding test environment'[master d387a94] adding test environment2 files changed, 7 insertions(+)create mode 100644 cookbooks/chefazure-ch08/recipes/provision_test.rbC:UsersStuartPrestonchefazure-ch08> git push origin masterUsername for 'https://github.com': stuartprestonPassword for 'https://[email protected]':Counting objects: 7, done.Delta compression using up to 4 threads.Compressing objects: 100% (6/6), done.Writing objects: 100% (7/7), 747 bytes | 0 bytes/s, done.Total 7 (delta 3), reused 0 (delta 0)To https://github.com/stuartpreston/chefazure-ch08.git2e2f109..d387a94 master -> master
If we look at the Jenkins server, it should now be executing a job, triggered from a GitHub Webhook. If you look at the list of Resource Groups within the Azure Management Portal once the job has completed, there should be a chefazure-ch08-test Resource Group created. If so, we have successfully configured everything needed for a basic continuous provisioning pipeline.
As our final piece of this chapter, let’s destroy the test environment we just created. Be careful not to describe this as a rollback. It isn’t - all we are doing is specifying a new target state for our test environment (destroy).
To make the changes, we simply need to add a :destroy action to our Resource Group:
cookbooks/chefazure-ch08/recipes/provision_test.rb
require 'chef/provisioning/azurerm'with_driver 'AzureRM:b6e7eee9-YOUR-GUID-HERE-03ab624df016'azure_resource_group 'chefazure-ch08-test' dolocation 'West Europe'action :destroyend
We can push our change to GitHub again:
PS C:UsersStuartPrestonchefazure-ch08> git add .PS C:UsersStuartPrestonchefazure-ch08> git commit -m 'destroying test environment'[master 63b30ab] destroying test environment1 file changed, 1 insertion(+)PS C:UsersStuartPrestonchefazure-ch08> git push origin masterUsername for 'https://github.com': stuartprestonPassword for 'https://[email protected]':Counting objects: 6, done.Delta compression using up to 4 threads.Compressing objects: 100% (5/5), done.Writing objects: 100% (6/6), 491 bytes | 0 bytes/s, done.Total 6 (delta 4), reused 0 (delta 0)To https://github.com/stuartpreston/chefazure-ch08.gitd387a94..63b30ab master -> master
After witnessing that a new job is created for this push, we should see the Azure Resource Group deleted from our subscription.
Summary
By using a combination of Chef, Chef Provisioning, Azure, Chef VM Extensions, GitHub, and Jenkins we are able to implement the beginnings of a sophisticated continuous provisioning pipeline. We understood the following:
How to provision, configure, and maintain a Jenkins server for continuous provisioning using the Chef VM Extensions
How to configure the Chef VM Extension for use with Chef Provisioning
How to add quality gates such as Rubocop linting to the build pipeline
How to use Berkshelf to manage dependencies for an application
How to trigger a Jenkins job from GitHub for a completely hands-off solution driven by changes to the Chef repository
This is just a starting point of the journey with continuous provisioning and provides a framework on which to add quality, configuration management, and release management to your project.