
2. Getting Started with Publisher 2010
This chapter shows you the basics of creating Publisher documents.
Now that you have installed Microsoft Office 2010, I will show you how to use Publisher. In this chapter, I create a new Publisher document and show you how to lay out your document. We won’t actually add any visual elements to the document until the next chapter.
Using Publisher for the First Time
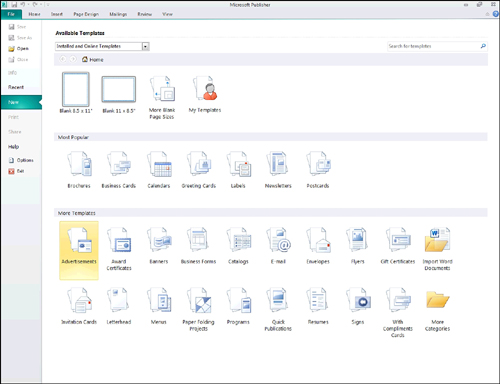
Upon opening Microsoft Publisher, you are taken to the screen shown in Figure 2.1. Publisher’s initial screen enables you to choose from numerous templates. The built-in templates make it easier to create specific types of documents. For example, there are templates for creating brochures, business cards, calendars, and more.
Although templates are one of Microsoft Publisher’s most useful features, I won’t cover them in detail right now. A template lays the groundwork for creating various types of documents. In doing so, templates use some elements that may be unfamiliar to you. So I want to start by showing you how some of these elements work within a blank document. After I do, I’ll return and discuss templates in more detail later in this chapter.
Creating a New Document
As mentioned in the previous section, a template expedites the document creation process. Let’s create a new document by using one of the blank templates.
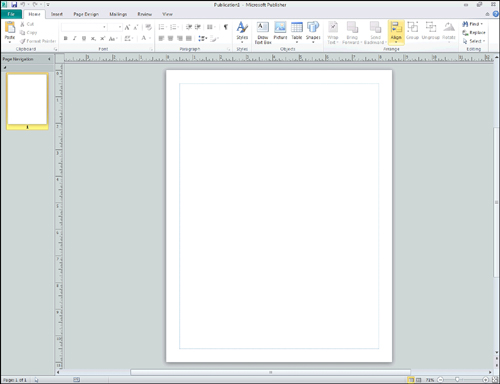
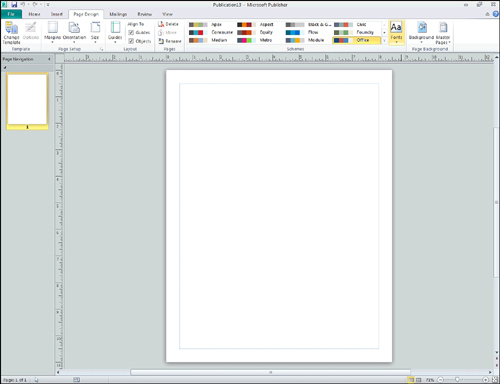
Double-click on the blank 8.5 × 11-inch template. When you do, you will be taken to the Main Publisher interface, as shown in Figure 2.2. The Publisher interface is similar to Microsoft Office applications.
The big white area in the middle of the screen represents a single page of the document that you are creating. Notice a smaller white rectangle in the upper-left portion of the screen. This rectangle displays a preview of the page. Right now, the preview is less than impressive because our document is only one page in length. If a document spans multiple pages, though, the preview area makes it easier to locate an individual page within the document.
Figure 2.1 Microsoft Publisher enables you to create documents from numerous predefined templates.
SHOW ME Media 2.1—Creating a New Document
![]()
Access this video file through your registered Web edition at my.safaribooksonline.com/9780132182591/media.
Page Margins
If you look at Figure 2.2, notice the blue rectangle that appears on the page. This rectangle represents the page margins. By default, Publisher sets the margins to half an inch.
Note that the margins exist only for your guidance. In Microsoft Word, any of the text that you type is placed within the margins. This isn’t always the case with Publisher. It is possible to place text, graphics, or other objects outside the document margins.
Figure 2.2 Main Publisher interface. Note the menu commands at the top.
You might wonder why Microsoft displays the margins at all if it’s so easy to ignore them. Margins exist because many printers are not capable of printing all the way to the edge of the page. Even if your printer can print on page edges, most printed documents don’t look right without margins. Therefore, Microsoft Publisher displays the margins on the screen in an effort to help you create an aesthetically pleasing (and fully printable) document.
Custom Margins
In most cases, the default half-inch margins are acceptable. If you need to adjust the margin size, though, select the Page Design tab, and then choose the Margins option from the toolbar. Publisher then displays several different margins that you can choose from. This menu also gives you the option of creating custom margins.
If you choose the Custom Margins option, the dialog box shown in Figure 2.3 appears. This dialog box provides you with the option of setting the left, right, top, and bottom margins to any size you want.
Figure 2.3 The Layout Guides dialog box enables you to create custom margins.
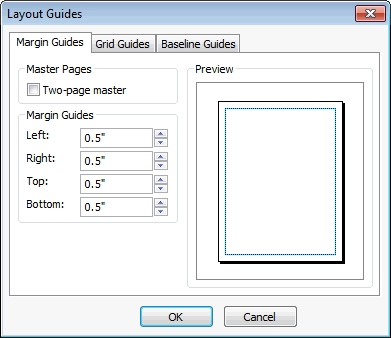
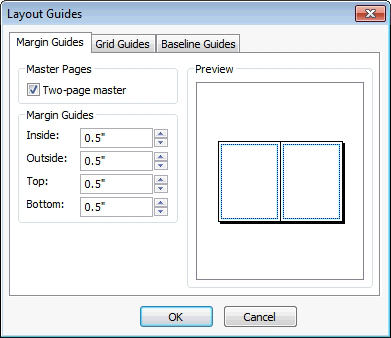
Notice the check box labeled Two-Page Master. Selecting this check box changes the page layout to display two separate pages, as shown in Figure 2.4. The references to the right and left margins have been replaced by inside and outside margins.
Figure 2.4 Margin customizations work differently for two-page layouts.
Grid Guides
As you begin laying out your new Publisher document, you might find that it is tough to place the various design elements on the screen in the exact location. One solution to this problem is to divide the page into a grid.
LET ME TRY IT
![]()
Dividing a Page Into a Grid
To divide a page into a grid, follow these steps:
- Go to Publisher’s Page Design tab.
- Click the Margins icon.
- Choose the Custom Margins option from the Margins menu.
- When the Layout Guides dialog box appears, select the Grid Guides tab.
In Figure 2.5, the Grid Guides tab divides the page into a series of rows and columns. Although similar to the blue lines that represent the page margins, the grid guides only exist as document reference points, and do not show up when you print the document.
Figure 2.5 Grid lines can make it easier to lay out a Publisher document.
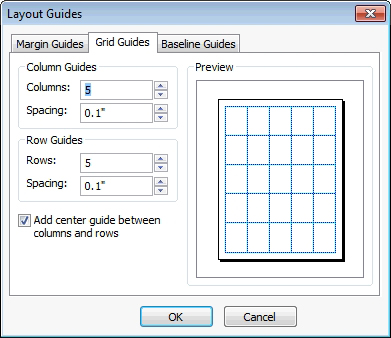
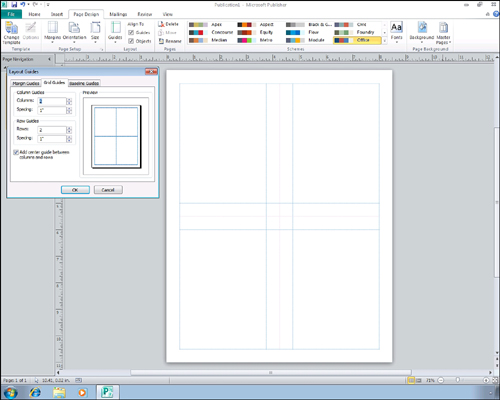
As you can see in the figure, Publisher gives you the option of specifying the number of rows and the number of columns that you want to display on the page. Publisher is quirky about setting up rows and columns, as it creates twice as many rows or columns as you specify. Publisher uses two separate lines to separate the row or column from the one next to it. By default, the lines that publisher creates are a 10th of an inch apart from each other. To rectify this quirk, notice in Figure 2.5 the option to set the spacing for rows and columns. You can increase the spacing to make the lines that separate rows and columns much farther apart. There is also a check box that you can use to add a centerline between the lines that separate rows and columns.
In a default layout, it can be difficult to see that the line separating rows and columns are double lines with spacing between them. As you increase the spacing, though, the double lines become more obvious.
To show you what I am talking about, I have configured Publisher to divide the page into two columns and two rows. I have also increased the spacing to 1 inch and added a centerline between the columns and rows. The results, which are shown in Figure 2.6, clearly display the spacing between the lines as well as the optional centerline.
Figure 2.6 You have the option of increasing line spacing.
Built-In Guides
Having an onscreen grid is handy when placing various design elements within your document. Sometimes, though, you may already have an idea of what your finished document should look like, and a generic grid can only get in the way.
Sometimes, onscreen grids can be counterproductive for another reason. As you begin learning the basics of creating Publisher documents, you will see that the screen becomes cluttered with design elements. That isn’t to say that your finished document will be cluttered, though. Each design element that you add to your document exists within a box. If you put enough of these boxes on the screen at the same time, things start to look too busy. If you throw in a grid too, then you have a mess.
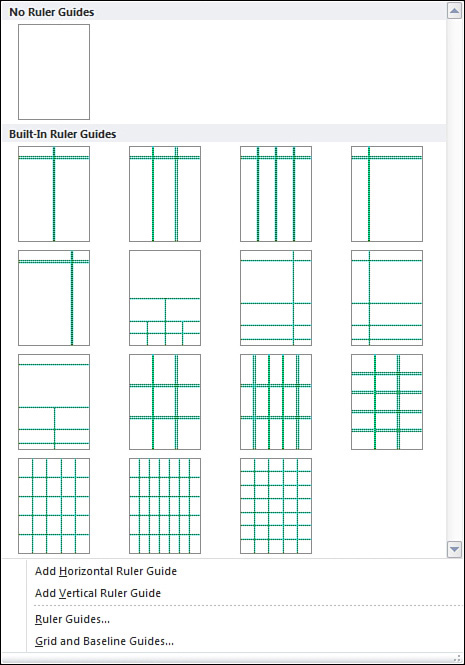
As you have already seen, Microsoft makes the use of grid guides optional. Although it’s nice to turn off the grid guides when you aren’t using them, you may occasionally find that you do need the grid guides but you don’t want the entire document page cluttered with them. For example, you might only need a grid guide on a certain portion of the page. You can accomplish this by using one of the built-in grid guides.
LET ME TRY IT
![]()
Choosing a Grid Guide
To access the alternative sets of grid guides, follow these steps:
- Select Publisher’s Page Design tab.
- Click on the Guides icon, found on the toolbar.
- Select the grid guide that you want to use. You can see the available grid guides in Figure 2.7.
SHOW ME Media 2.2—Grid Guides
![]()
Access this video file through your registered Web edition at my.safaribooksonline.com/9780132182591/media.
Ruler Guides
So far, I have shown you how to divide a document page by using various types of grid guides. These grid guides help you precisely position various design elements. Sometimes, though, you might find that design element placement requires a higher degree of precision than what any of the grid guides can provide. In these situations, use a ruler guide.
Figure 2.7 Publisher includes a variety of grid guides.
A ruler guide is similar to the grid guides that I have already talked about, but with one major difference. Ruler guides are linked to rulers that border the page. As such, you can move a ruler guide to any spot on the page, with a high degree of precision.
LET ME TRY IT
![]()
Enabling Ruler Guides
To enable ruler guides, follow these steps:
- Go to Publisher’s Page Design tab.
- Click the Guides icon.
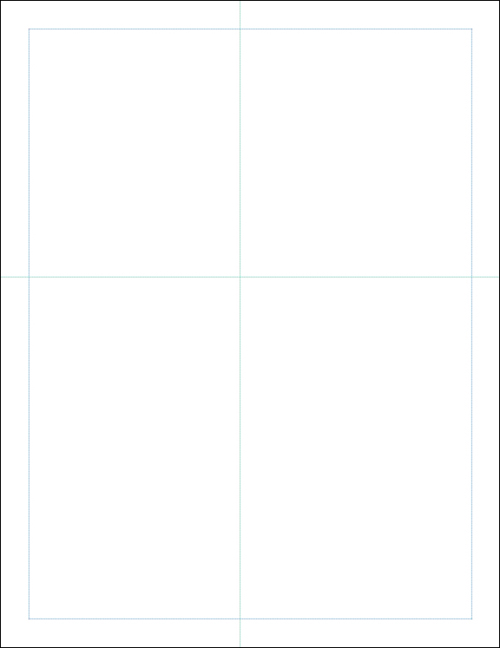
- Choose the Add Horizontal Ruler Guide command from the Guides menu.
- Click the Guides icon.
- Choose the Add Vertical Ruler Guide command from the Guides menu.
The page is now divided into four segments, as shown in Figure 2.8. Although the lines shown in the figure look the same as the grid guides that I have already shown you, they are instead linked to the rulers that appear above and to the left of the document. Click the lines and drag them into the desired position by using markers that will appear on the rulers as you begin moving the guide lines.
Figure 2.8 Ruler guides initially look like grid guides.
High-Precision Guides
Even though dragging and dropping ruler guides works pretty well, drag and drop isn’t exactly a high-precision operation.
LET ME TRY IT
![]()
Setting High-Precision Guides
If you need to set the ruler guides with a higher degree of accuracy, you can do so by completing the following steps:
- Select Publisher’s Page Design tab.
- Click the Guides icon found on the toolbar.
- Choose the Ruler Guides command from the Guides menu.
- When the Ruler Guides dialog box appears, select either the Horizontal or the Vertical tab, depending on which ruler guide you want to position.
- Enter the desired ruler guide position, as shown in Figure 2.9.
- Click OK.
Figure 2.9 Enter the desired location for your ruler guide.
Using Multiple Ruler Guides
Having a horizontal and a vertical ruler guide can be very handy, but when it comes to creating more advanced documents, you might need to do a lot more measuring. Fortunately, you can create additional ruler guides on an as-needed basis using the same steps that we already performed.
LET ME TRY IT
![]()
Creating Additional Ruler Guides
If you want to create an additional horizontal ruler guide, you can do so by completing these steps:
- Select Publisher’s Page Design tab.
- Click the Guides icon, located on the toolbar.
- Choose the Add Horizontal Ruler Guide option from the Guides menu.
Earlier, I showed you how to use the Ruler Guides dialog box to precisely position a ruler guide. You can use this same technique, even after creating multiple ruler guides.
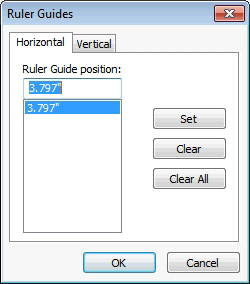
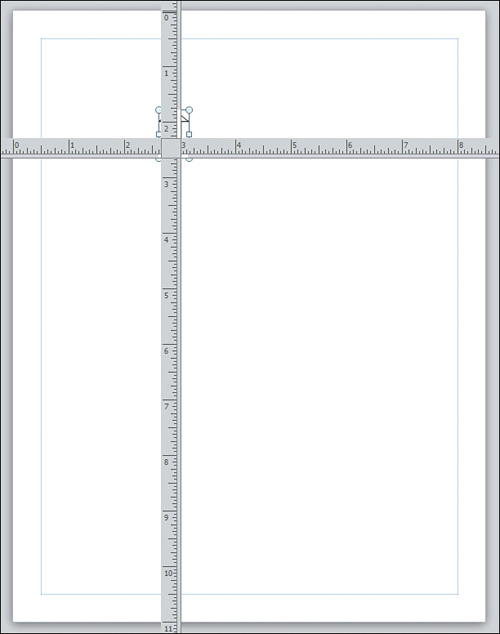
In Figure 2.10, there is a page containing two horizontal ruler guides. The Ruler Guides dialog box displays the current position of each of the ruler guides. To move a ruler guide, select the listing for the guide’s current position, enter a new position, and click the Set button. If you want to completely remove a ruler guide, simply select the listing that displays the guide’s current position, and then click the Clear button. As you would expect, you can use the Clear All button to remove all the ruler guides from the page.
Figure 2.10 You can control the location of multiple ruler guides.
SHOW ME Media 2.3—Using Ruler Guides
![]()
Access this video file through your registered Web edition at my.safaribooksonline.com/9780132182591/media.
Enabling and Disabling Rulers
The rulers should be enabled by default when you use Publisher, but it is always possible that for whatever reason, the rulers might not appear on the screen (especially if you are borrowing someone else’s computer). Likewise, I have known of at least one person who found the rulers to be a distraction and wanted them gone. That being the case, I want to take a moment and show you how to turn the rulers on and off.
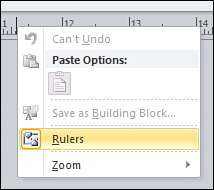
You can hide the rulers by right-clicking on a ruler, and then choosing the Rulers command from the resulting shortcut menu, which you can see in Figure 2.11. Upon doing so, the rulers will immediately disappear.
Figure 2.11 To hide a ruler, right-click it and choose the Rulers option.
Getting the rulers back can seem a little bewildering because there are no rulers to right-click, and there are no ruler options on the Publisher menus. If you want to unhide the rulers, just right-click in the approximate area in which the rulers used to exist. This causes Publisher to display the same menu that you saw in Figure 2.11. Now, just choose the Rulers command and the ruler returns.
Enlarging Rulers
You have probably noticed in the screen captures that the rulers can be small. This isn’t usually a problem if you have a large monitor, but if you have bad vision, a small monitor, or both, you might be looking for a way to enlarge the rulers.
Publisher does not enable you to enlarge the rulers directly. However, you can enlarge your view of the document, which has the effect of enlarging the rulers in the process. There is a slide bar in the lower-right corner of the screen that you can use to adjust the document size.
Changing the Units of Measurement
By default, Publisher’s rulers measure documents in inches. This is fine for many of you, but you might want to measure your documents in centimeters. Similarly, if you are using Publisher to create web content, you might want to measure the document in pixels.
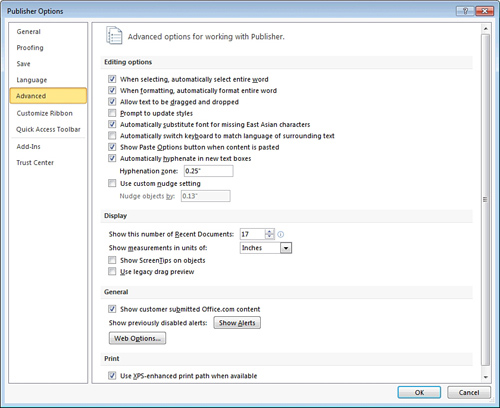
To change the way that Publisher measures your documents, choose the Options command from the File menu. When the Publisher Options dialog box appears, click the Advanced link. When you do, you will find an option to change the units of measurement within the Display section, as shown in Figure 2.12. As you can see in the figure, you can set the ruler to display Inches, Centimeters, Picas, Points, or Pixels.
Figure 2.12 You might want to change the unit of measurement.
Moving Rulers
When you initially begin creating a new document, the rulers are positioned as shown in Figure 2.13. As you can see, the rulers are kind of far away from the document. This might not be a problem because as you move your mouse, markers on the ruler reflect the mouse’s current position.
Figure 2.13 This is how the rulers are positioned by default.
Although there is nothing wrong with the default behavior, some people may prefer to position the rulers so that they are directly against the document page (or even on the document page). Publisher enables you to drag the rulers to a new position, but to do so, hold down the Shift key. If you forget to hold down Shift, Publisher will create a new grid guide instead of moving the ruler.
You can move the rulers individually, as shown in Figure 2.14, but you don’t have to. If you prefer to move both rulers together, simply hold down the Shift key and then drag the rulers from the upper-left corner where they intersect with each other. You can see the results of such a move in Figure 2.15.
Figure 2.14 You can move the rulers independently of each other.
Figure 2.15 The rulers can be moved together.
Moving the Zero Mark
In all the previous screen captures, both rulers have placed the zero mark in the upper-left corner of the page. This is easiest to see in Figure 2.15 because the rulers are placed against the edge of the page. In the earlier screen captures, the zero mark is located in the same position, but the fact that the ruler displays negative numbers to the left of the zero mark can be distracting.
In most cases, placing the zero mark at the upper-left corner of the page makes a lot of sense. By doing so, it becomes very easy to measure any point on the entire page. When you get into some of the more advanced document designs, though, you may find yourself doing a lot of math.
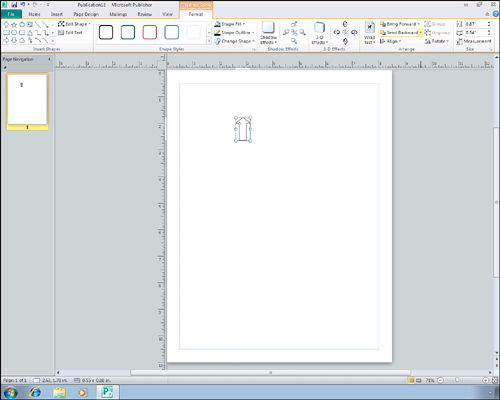
To give you an idea of what I am talking about, take a look at Figure 2.16. In this figure, I have drawn an arrow on the page. If you look at the banner along the bottom of the Publisher window, you can see that the top-left corner of this object is at 2.63 inches horizontally by 1.78 inches vertically. Additionally, you can see that the object itself (the box containing the arrow) is 0.55 inches wide by 0.88 inches tall. Now here comes the tricky part….
Imagine that our design required another object to be placed EXACTLY 1.38 horizontal inches to the right and 4.27 vertical inches from the existing object. Although it would take some work, you could calculate the new object’s location based on the previous object’s location and on the new object’s required proximity to the existing object. In some cases, however, using math won’t help you.
To see why, imagine that one of the requirements in the situation that I just described is that the second object’s location must use the existing object’s lower-right corner as the frame of reference. Well, that complicates things a little bit, but you might still be able to work out the new location mathematically because Publisher provides you with the selected object’s dimensions. In this case, though, the object that we are using as a point of reference is an arrow. This means that the top of the object (the arrow head) is wider than the bottom. The dimensions that Publisher provides for the object pertain to the box around the object, not to the object itself. Therefore, if we use the dimensions provided by Publisher to calculate the lower-right corner’s position, what we are actually calculating is the location of the box’s lower-right corner, not the lower-right corner of the object within the box.
Figure 2.16 The banner along the bottom of the Publisher window tells you the currently selected object’s size and position.
The easiest way to deal with this problem is to move the ruler, and then set the lower-right corner of the arrow as our zero mark. After doing so, it becomes simple to locate the position for the next object that we want to create because all the measurements are based on a common frame of reference.
Begin the process by holding down the Shift button, and then dragging the rulers to the location that you want to use as a frame of reference. As you can see in Figure 2.17, even though we have moved the rulers, the zero mark remains in the upper-left corner of the page.
Now, move your mouse pointer to the point at which the two rulers intersect. Hold down the Shift key, but this time click your right mouse button. When you do, the location where the two rulers intersect will become the new zero mark, as shown in Figure 2.18. We can now find the required position on the page with ease.
Figure 2.17 Move the ruler to your new point of reference.
Page Orientation
Everything so far has been geared toward showing you how to lay out a page so that you can create a document. Sometimes, though, you might find that you have to make some changes to the page itself.
LET ME TRY IT
![]()
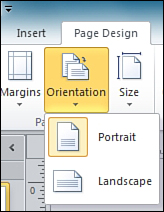
Changing the Page Orientation
One such change involves switching the page orientation. So far we have been working with a blank document in portrait format, but we can easily switch to landscape mode. To do so, follow these steps:
- Select Publisher’s Page Design tab.
- Click the Orientation icon, found on the toolbar.
- Choose the Landscape option, as shown in Figure 2.19.
Figure 2.18 Re-zeroing the rulers can make it easier to find certain points within a document.
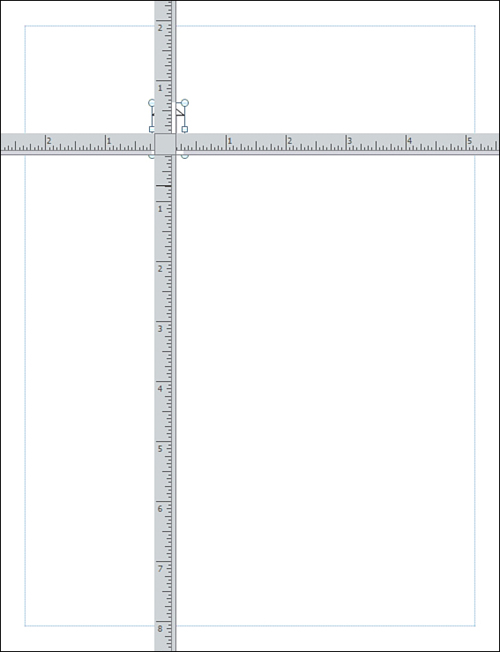
Figure 2.19 Use the Orientation option to switch between portrait and landscape mode.
Page Sizes
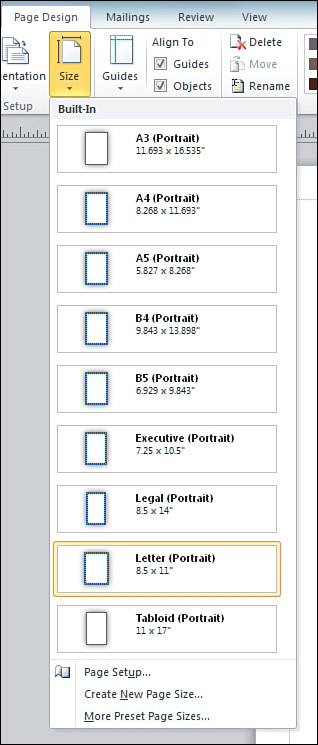
The blank document we are creating is presently formatted to fit on an 8.5 × 11 sheet of paper. Even though this is a standard document size, it is far from being the only page size that Publisher supports. Depending on the type of document you are creating, you may occasionally have to set a different page size before you begin creating your document.
Changing Page Sizes
To do so, follow these steps:
- Select Publisher’s Page Design tab.
- Click the Size icon, found on the toolbar.
- Choose the desired page size from the Size menu.
As you can see in Figure 2.20, Publisher supports several common page sizes. The most common page sizes are displayed directly on the Sizes menu, but there is also a More Preset Page Sizes option that you can select if you can’t locate the page size that you need. Publisher contains presets for most standard paper sizes, but if you need something unusual, you can use the Create New Page Size option to set up a custom page size.
Figure 2.20 Publisher supports several common page sizes.
Page Backgrounds
So far, all the screen captures that I have included in this chapter have shown Publisher documents in which the page is displayed as a white piece of paper. Keep in mind, though, that the page background isn’t really white. The white background simply represents an absence of color. This means that if you put a piece of blue paper into the printer and print a Publisher document, Publisher isn’t going to turn the blue paper white.
LET ME TRY IT
![]()
Changing Page Backgrounds
You aren’t stuck using an empty background, though. Publisher will enable you to fill in a document’s background. To do so, follow these steps:
- Go to Publisher’s Page Design tab.
- Click the Background icon, located in the toolbar.
- Choose the background that you want to use from the Background menu.
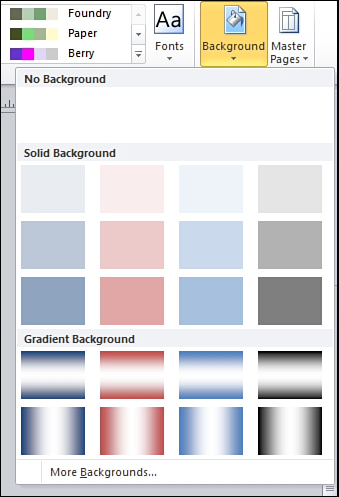
If you look at Figure 2.21, you can see that Publisher really doesn’t initially give you very many choices when it comes to page backgrounds. You can opt for a solid background, a gradient background, or no background. It might also initially appear that you are limited to using red, blue, and gray as background colors.
All is not what it seems, though. The bottom of the Backgrounds menu contains an option labeled More Backgrounds. Choosing this option enables you to fill the background with any color you choose, a gradient color, a gradient made of multiple colors, patterns, pictures, and more.
I’m not going to go into all the individual fill options right now because I will be covering each option in detail in the next chapter when I talk about shapes and captions. For right now, I at least wanted to make you aware of the fact that these options exist.
Templates
At the beginning of this chapter, I showed you that when you open Publisher, you are presented with a screen similar to the one shown in Figure 2.22, asking you what type of template you want to use. As you can see in the figure, some of the more popular templates are designed for things such as brochures, business cards, and calendars. Although the template names are pretty self explanatory, you might be wondering what the templates really do.
Figure 2.21 You can choose a page background from the Backgrounds menu.
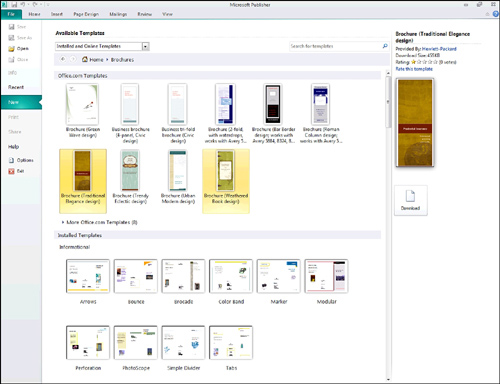
The first thing that you need to understand about the templates shown in Figure 2.22 is that aside from the blank templates you have already been using, most of the templates that are shown in the figure aren’t really templates, but rather template categories. To see what I mean, choose the Brochures template. When you do, you will be taken to the screen shown in Figure 2.23.
Web-Based Templates
The Brochure template isn’t really a template at all, but rather a collection of templates for creating various types of brochures. Also notice in the figure that some of these templates are installed locally, whereas others are available on Office.com. If you select an Internet-based template, the column on the far right displays a preview of the template and provides you with a bit of summary information about it. If you like what you see, you can click the Download button located just beneath the preview.
Figure 2.22 Templates make it easier to create certain types of documents.
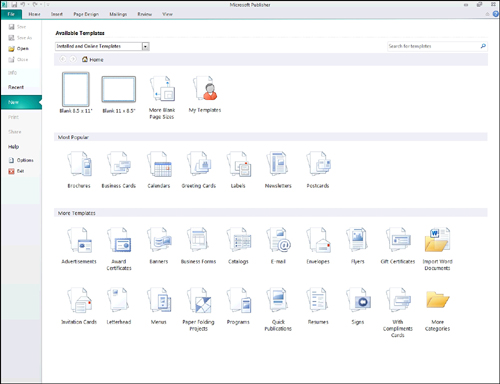
Figure 2.23 The Brochures template is actually a collection of brochure templates.
Locally Installed Templates
As was the case with web-based templates, clicking on a locally installed template causes a preview of the template to be displayed in the column on the far right. As you can see in Figure 2.24, Publisher gives you a few more options for locally installed templates than you have for web-based templates.
Figure 2.24 Clicking on a template displays a preview.
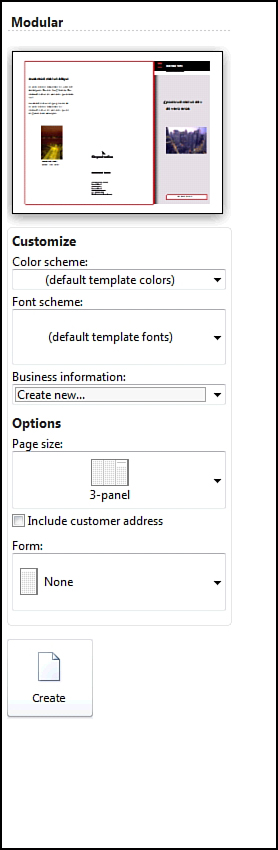
This figure shows that Publisher gives you the option of selecting a different color scheme for use with the template. You also have the option of selecting a different font scheme. A font scheme is a collection of three different fonts that will be used within the document that you are creating from the template.
The Business Information section enables you to automatically insert information about your business. I talk about this feature in more detail in a later chapter.
The Options section enables you to customize the template’s layout. In the case of a brochure, your options include creating a three-panel or four-panel layout. Typically, you would use a three-panel layout if you are going to print the brochure on standard letter-size paper, whereas a four-panel layout would be more appropriate if you are going to print the brochure to legal paper.
The Form section enables you to optionally include a form within the document that you are creating. Publisher offers several different predefined forms. In the case of a brochure, you can include an order form, a response form, or a sign-up form.
When you have selected the options that you want to use with the template, click the Create button, and Publisher will create a new document based on your template. You can see an example of such a document in Figure 2.25.
Figure 2.25 Publisher creates documents based on templates.

SHOW ME Media 2.4—Creating a Document from a Template
![]()
Access this video file through your registered Web edition at my.safaribooksonline.com/9780132182591/media.
The Anatomy of a Template-Based Document
The document shown in Figure 2.25 is an actual Publisher document. You can view it, print it, and edit it, just as if you had created the document from scratch.
As you look at this document, there are a few things that should look familiar to you. For starters, notice that our template-based document contains a margin offset just like our blank document did. There are also four vertical ruler guides present on the document. These ruler guides help to point out where the brochure will eventually be folded.
Besides the margins and ruler guides, the document contains a variety of text and graphic elements, all of which I discuss in the next chapter. Finally, if you look at the document preview, you can see that the document consists of two pages. You can navigate between document pages by clicking on a page within the preview.
Changing Templates
Sometimes when you create a document from a template, you might discover that you really don’t care for the template after all. When this happens, you don’t always have to start completely over from scratch. It is possible to change templates.
LET ME TRY IT
![]()
Switching Templates
To switch to a different template, follow these steps:
- Go to Publisher’s Page Design tab.
- Click the Change Template icon, found on the toolbar.
- Choose the new template that you want to use from the list of available templates.
- Make any necessary customizations to the template, and click OK.
Creating a Custom Template
Earlier you saw that a template is really nothing more than a Publisher document that has been constructed in such a way that you can just fill in the blanks to create a finished document. You aren’t limited to using the templates that Microsoft provides, though—you can create your own. This is useful if you want to create documents in a standardized way.
To give you a better example of what I am talking about, I own the domain name poker-run-boats.com. Before the economy went belly up, I was in the process of creating a website to sell parts for customizing high-performance boats. Although the site has not yet come to fruition, I had an artist design a logo for the site. Eventually, when I do open the site for business, it would probably be useful to have some corporate letterhead. So let’s make some.
Using a Template to Create Letterhead
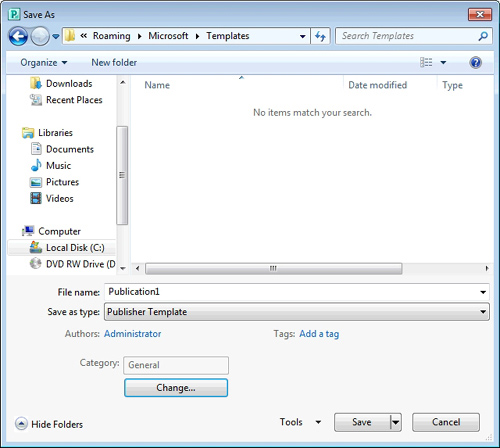
If you look at Figure 2.26, you can see a document on which I have inserted the poker-run-boats.com logo. We will pretend that this is the final design that I want to use for my company’s letterhead. As such, the next step is to turn the document into a template. To do so, complete these steps:
- Choose the Save As command from the File menu.
- When the Save As dialog box opens, set the Save As Type option to Publisher Template.
- By default, the template’s category is set to General, but you can change it by clicking the Change button, shown in Figure 2.27.
- Click the Save button to complete the process.
Figure 2.26 Publisher makes it easy to create your own letterhead.
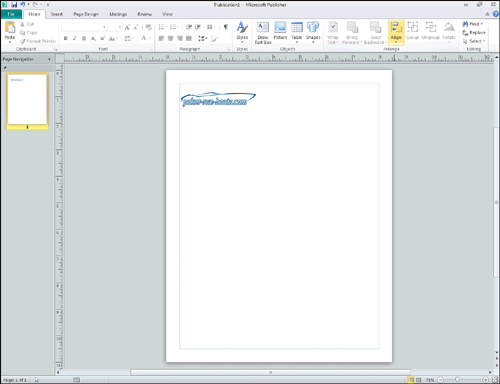
Figure 2.27 You can save your document as a Publisher template.
If you refer to Figure 2.22, you will notice that the last template on the top row was listed as My Templates. Choosing this option reveals templates that you have created. Simply select your custom template and click the Create button to create a document based on your custom template.
Saving Your Documents
If you have ever used any of the other Microsoft Office applications, you know that saving an Office document isn’t exactly rocket science. Like other Microsoft Office applications, Publisher makes the saving process very painless. To save a document, just click the disk icon in the upper-left portion of the window. When you do, Publisher will prompt you to enter the name of the document that you are saving. You also have the option of entering an optional path.
As an alternative, you can also save a Publisher document by clicking the Save command, found on the File menu.
Alternative Document Types
Normally when you save a Publisher document, Publisher saves the document in its own proprietary format. However, you can save your documents in some other formats. That way, you can open your Publisher document using other applications. To save a Publisher document in a nonnative format, choose the Save As command from the File menu. When you do, Publisher displays the Save As dialog box. At first glance, there doesn’t seem to be anything special about this dialog box. However, if you look at Figure 2.28, you can see that Publisher enables you to choose from a variety of file types.
Figure 2.28 Publisher enables you to save documents in a number of different formats.
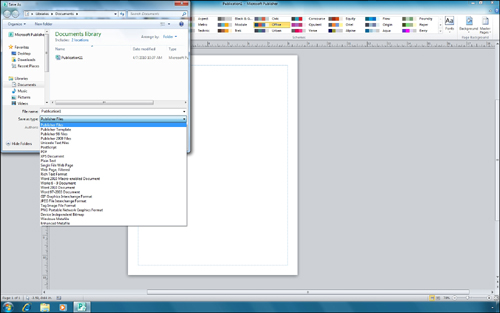
It is important to realize that the only option on the entire list that does not impose limitations on your document is the Publisher Files option. This is Publisher’s native file format. Some of the file formats impose minor limitations. For example, the Publisher 98 and Publisher 2000 Files options will allow your document to be backward compatible with older versions of Publisher. These options are great if you are going to have to do additional editing and will be limited to using a legacy version of Publisher. The downside to using these file formats is that the older file formats do not support Publisher’s newer features. As such, you might see some document elements converted in ways that you do not expect, in an effort to retain backward compatibility.
The Publisher 98 and Publisher 2000 file formats are examples of formats that impose minor limitations. Some of the other file formats are extremely limiting. For instance, Publisher enables you to save documents as a JPEG file. When you do, your document will essentially be converted into a picture. You can still print the document or view it on the screen, but you will no longer be able to edit the document using Publisher. Furthermore, depending on the resolution of the JPEG file, you might find that a hard copy does not look as good as a printout made from the original Publisher document.
Some of the other formats involve similar limitations. For example, Publisher allows you to save a document as a PDF file. PDF documents can be viewed onscreen or printed. If you happen to have a copy of Acrobat (or a competing product), you may do some light editing. However, once a document has been saved as a PDF file, you will not be able to do the degree of editing that is possible natively through Publisher.
You might have noticed in the screen capture that Publisher gives you the option of saving documents as a Microsoft Word file. I discuss conversions between Word and Publisher documents in detail in Chapter 5, “Working with Longer Documents.” Likewise, Publisher offers an option to save documents as a web page. I engage in an in-depth discussion of this option in Chapter 9, “Publishing Online.”
As you have seen, there are limitations associated with all the file formats except for the one that Publisher uses natively. Even so, there is nothing wrong with saving a Publisher document to an alternative format. However, I would caution you to save your documents in the native format first, and then save to your alternative format. That way, if you decide that you need to make a change to your document, you can do so without having to start from scratch.
SHOW ME Media 2.5—Saving Your Document
![]()
Access this video file through your registered Web edition at my.safaribooksonline.com/9780132182591/media.
Creating a New Document
At the beginning of this chapter, I showed you how you could create a brand-new document simply by opening Publisher and double-clicking the type of document you want to create. Occasionally though, you might decide that you need to create a new document while you are working with Publisher.
You don’t have to close and re-open Publisher to create a new document. Instead, simply choose the New command from the File menu. If you presently have a document open, Publisher will ask you whether you want to save your work prior to creating a new document.
You will receive the prompt shown in Figure 2.29, because before Publisher can create a new document, it must close the current document. If you happen to click the New command accidentally, you can always click the Cancel button to return to your work.
Figure 2.29 Clicking the New button causes the current document to be closed.

Clicking the New button isn’t the only way to close the document on which you are working. Other options include choosing the Close command from the File menu or simply closing Publisher.
Opening a Publisher Document
Opening an existing Publisher document is just as easy as saving a document. To do so, choose the Open command from Publisher’s File menu. When the Open Publication dialog box appears, navigate to the location in which the document is located, click on the document that you want to open, and then click the Open button.