
1. An Introduction to Publisher 2010
Installing Microsoft Publisher 2010 is a breeze. Once installed, you can begin exploring all the new features.
Microsoft Office 2010 is the latest version of their flagship productivity suite. Among the applications included in the Microsoft Office Suite is Publisher 2010.
Although Microsoft Publisher 2010 is brand new, the Microsoft Publisher franchise has been around for a long time. The first version of Publisher was released in 1991. Computer-based desktop publishing has been around for even longer, though.
I will never forget the first time that I was exposed to desktop publishing. When I was a kid back in the 1980’s (wow, I feel old!), I saved up the cash that I made mowing lawns and bought a Radio Shack TRS-80 Color Computer 2.
I always thought that the software that was available for the Color Computer (better known as the CoCo) did the machine a big disservice. Although the CoCo was just as well equipped as the Commodore 64 and the PCs of the time, there wasn’t very much software available for it. What little software you could buy really wasn’t very good. Amateur CoCo enthusiasts routinely created freeware that was far better than most of the commercial applications that were available.
One afternoon, I was killing time at Radio Shack when a new application caught my attention. I can’t seem to recall the name of the application, but it was a desktop publisher.
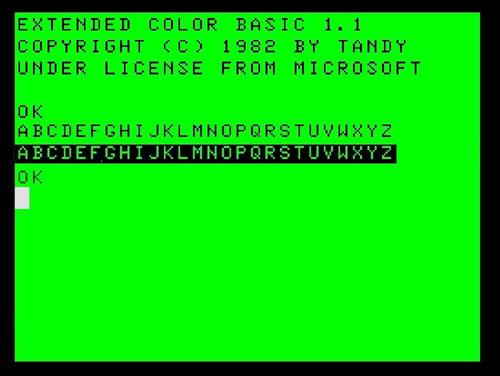
One thing that you have to understand about the CoCo is that although it had plenty of processing power, word processing wasn’t exactly its strong point. In fact, the word processing software that I had would not even display lowercase letters (although it could print them). Capital letters were displayed as black characters against a green background. Lowercase letters were displayed onscreen as green capital letters on a black background (a negative image of a capital letter). You can see what this effect looked like in Figure 1.1.
The desktop publishing software that I held in my hand offered all kinds of features that were absolutely unheard of for the CoCo. Not only did it support true lowercase text (onscreen, no less), but it also included multiple fonts, all of which could be scaled to different sizes. The fact that the software could also format text into columns and that you could add images to your documents was the icing on the cake. I absolutely had to buy the application right then and there.
Figure 1.1 The bottom row of letters shows the CoCo’s native method of displaying lowercase text.
As soon as I got home from the store, I popped the disk into my computer and loaded the program. I had no idea how to use a desktop publisher, so I decided to load the sample document that the program came with, just so that I could see if the program could really produce documents like the ones shown on the box.
To make a long story short, the document that was displayed onscreen did indeed match the one that was shown on the box. Unfortunately, though, it took the computer half an hour to even load the document.
As I began to get my feet wet, it became painfully obvious that desktop publishing wasn’t quite ready for prime time (at least not on the CoCo). Even the simplest actions, such as switching fonts, incurred wait times of several minutes. It didn’t take me long to discover that creating rich documents on my CoCo just wasn’t practical.
A few months later, I had all but forgotten about my desktop publishing software. Eventually, though, a friend asked me if I could help to put together a newsletter for a computer user group that he was starting. Being that the group would be filled with geeks who could truly appreciate what the desktop publishing software could deliver, I decided to give my software another try.
Creating the newsletter was a grueling process, but when I was done, I was extremely satisfied with the results of my hard work. There was just one teensy problem that I hadn’t counted on—the desktop publishing software wasn’t compatible with my printer. Because a new printer wasn’t in my budget, I had to throw in the towel.
It’s absolutely amazing how much things can change in the span of 20 years or so. Microsoft Publisher 2010 is infinitely more powerful than the desktop publishing software that I ran on my CoCo so long ago. More importantly, though, Publisher makes creating and printing high-quality documents absolutely painless. Any reasonably equipped PC is more than adequate for running Microsoft Publisher.
What Is Microsoft Publisher?
If you read the preceding section, you know that Microsoft Publisher is a desktop publishing application. As was the case with the desktop publishing software that I ran on my CoCo back in the ’80s, Microsoft Publisher enables you to create rich documents that use a variety of visual elements, such as fonts and images.
If you have never worked with any of the previous versions of Publisher before, you might be wondering what makes Publisher so special. After all, Microsoft Word also enables you to create elaborate documents that contain a variety of visual elements. So what makes Publisher different from Word?
I will be the first to admit that there is a lot of overlap between the two applications. If you need to create a simple document containing text and a few images, then you could use either program. The similarities end there, though.
Microsoft Word is a word processor. Its main job is to enable you to create text-based documents. You can include images or other visual elements in a Word document if you like, but these types of functions are not Microsoft Word’s primary focus.
In contrast, Microsoft Publisher focuses more on page layout and visual appeal than it does on providing the best possible environment for composing or editing text. Yes, you can compose and edit text in Publisher, but Publisher isn’t exactly the tool of choice for writing long, text-based documents.
To put things a little bit more into prospective for you, consider this: I am using Microsoft Word to write this book. As I write these words, I really don’t care what page of the book they will end up being printed on, nor do I care about this paragraph’s position on the printed page. My goal is only to write the words that you are reading right now (and to capture a few screenshots along the way), and Microsoft Word is by far the best tool for the job.
Once I finish my work, though, I have to send my manuscript and my screen captures to the book’s publisher. It is their job to lay out the book’s pages in a meaningful way. In doing so, they will use either Microsoft Publisher or a similar application to take the raw text and graphics that I have sent to them and turn it into the book that you are reading right now. Although Microsoft Word could technically be used to lay out a book, a desktop publishing application is a better tool for the job because it provides much better control over the page layout and the publication’s final appearance than what is possible using Microsoft Word.
Getting Started
If the entire concept of desktop publishing seems foreign to you, don’t worry. As I explained earlier, there was a time when I didn’t know how to use a desktop publisher either!
My plan for this book is to use this chapter to show you how to install Publisher 2010. The next few chapters are designed to get you up and running quickly. I show you simple techniques that you can use to create professional-looking documents. Toward the end of the book, I discuss some of the more advanced techniques, such as mail merge. I also discuss professional printing and show you how to use Publisher as a tool for creating websites.
System Requirements
For as long as I can remember, Microsoft has always provided a list of both minimum and recommended hardware requirements for their products. In many cases, a computer that was equipped with the minimum hardware requirements just wasn’t practical for actually using the application in an efficient manner.
Microsoft has taken a completely different approach to defining the hardware requirements for Office 2010. According to a Microsoft blog post (http://blogs.technet.com/office2010/archive/2010/01/22/office-2010-system-requirements.aspx), many of Microsoft’s customers found having two separate lists of hardware requirements to be confusing. For example, if an application has a stated minimum requirement of 1 GB of memory but a recommended requirement of 2 GB, when do you really need 1 GB or 2 GB?
That being the case, Microsoft is providing only a list of the minimum hardware requirements for running Office 2010. According to Microsoft, the stated minimums should provide adequate performance to users who are using Microsoft Office 2010 to complete a small job. As always, though, higher performance hardware will generally provide a better experience.
Minimum Hardware Requirements for Office 2010
The stated minimum hardware requirements vary slightly depending on the edition of Microsoft Office 2010 that you are running.
I have chosen to list the minimum hardware requirements for Microsoft Office Professional Plus 2010. I chose this particular edition because it has the most stringent set of requirements (although not by much). Here are the minimum hardware requirements:
• CPU: 500 MHz
• Memory: 256 MB
• Hard Disk: 1.5 GB of available space
• Display: 1024 × 768
• A DirectX 9.0c-compliant video card with 64 MB of video memory
In addition to these general requirements, there are a number of other feature specific requirements and recommendations that do not directly affect Publisher. Here are the additional requirements:
• If you are going to use the inking feature, you will need Windows XP Tablet PC Edition (or later).
• Speech recognition requires a close talk microphone and a sound card.
• Instant Search requires Windows Desktop Search 3.0.
• Some of Outlook’s features are available only when connected to an Exchange mailbox.
• Many of the collaboration features require connectivity to a SharePoint server.
• Internet Explorer 6 or higher is required for Internet-related features.
• Outlook’s instant search feature requires a minimum of 1 GB of memory.
• Word 2010 will not enable grammar and contextual spelling checks unless the computer is equipped with at least 1 GB of memory.
• The Silverlight plug-in is required for some web features.
System Requirements for Publisher 2010
Interestingly, Microsoft publishes an entirely separate list of system requirements for each of the Office 2010 applications. That way, if you only want to install a single application rather than the entire Office suite, you will know what hardware is required.
Microsoft also lists some other requirements that come into play if you use only certain features. These requirements include the following:
• A sound card and a close talk microphone (for speech recognition)
• Windows XP Tablet PC Edition (for inking)
• Internet Explorer 6 (for web-based features)
• Internet connectivity and a Windows Live ID (to share templates and building blocks)
Operating System Requirements
Now that I have talked about the hardware that is required to run Office 2010, I want to talk about the operating system requirements. Office 2010 is the first version of Microsoft Office to offer native 64-bit support. Don’t get me wrong…. It was possible to run Office 2007 on a 64-bit system, but Office 2007 was a 32-bit application and was unable to take advantage of the 64-bit architecture. Microsoft will be offering both 32-bit and 64-bit versions of Office 2010. The 32-bit version will run on both 32-bit and 64-bit versions of Windows. The 64-bit version requires a 64-bit Windows operating system, though.
Microsoft Office 2010 is officially supported on the following operating systems:
• Windows 7
• Windows Vista (with SP1 or higher)
• Windows Server 2008
• Windows Server 2008 R2
• Windows XP with SP3 (32-bit only)
• Windows Server 2003 R2 with MSXML 6.0 (32-bit only)
My Recommendations
In spite of Microsoft’s best efforts to clarify the system requirements for Office 2010, they can still be a bit confusing. This is especially true when you take all the optional requirements into account. That being the case, I wanted to give you my take on the system requirements.
If you are running Office 2007 on your PC right now, you probably will have no trouble running Office 2010. The CPU and memory requirements are identical for both Office 2007 and Office 2010. You will just have to make sure that your computer has enough free hard disk space to load Office 2010 and that you have a decent graphics card. If your computer is running Windows Vista or Windows 7 and the Aero interface is enabled, you probably have the graphics card requirement covered.
So what if you aren’t running Office 2007 right now? If your computer is less than five years old, it will probably be sufficient to run Office 2010, but you do need to take the time to check its hardware capabilities.
Regardless of whether your system is old or new, and in spite of Microsoft’s stated minimum requirements, I would recommend that your PC be equipped with a minimum of 1 GB of memory. Today, memory is cheap, and almost every new PC comes with more than 1 GB of memory. Having at least 1 GB of memory will enable you to get the maximum benefit from Office 2010, and adding extra memory goes a long way toward improving a computer’s performance.
Verifying Your System’s Hardware
There are lots of different ways that you can check the hardware that is installed in your computer. Probably the easiest way is to use the DirectX Diagnostic Tool, which is built into Windows. You can access this tool by entering the DXDIAG command at the computer’s Run prompt.
As you can see in Figure 1.2, the System tab provides you with information about your computer’s CPU and the amount of memory that is installed. You can also verify your DirectX version from this tab.
The DirectX Diagnostic Tool’s Display tab tells you the system’s current display resolution. It also provides you with an estimate of the total amount of video memory that is installed in the system.
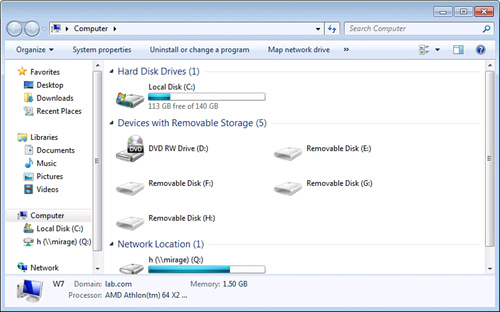
Checking the amount of hard disk space that is available in the system is simply a matter of choosing the Computer option (or the My Computer option, depending on what version of Windows you are running) from the Windows Start menu. The resulting screen will show you how much space is available on your C: drive. The computer in Figure 1.3, for example, has 113 GB of free disk space, which is more than enough to install Office 2010.
Figure 1.2 The DirectX Diagnostic Tool is handy for verifying system hardware.

Figure 1.3 The Computer window shows how much disk space is available.
Installing Office 2010
Now that I have shown you how to verify your computer’s hardware, let’s go ahead and install Office 2010. Office 2010 enables you to perform either a clean installation or an in-place upgrade from Office 2007. I will show you how to perform a clean installation first. If you happen to have Office 2007 currently installed, you can still perform a clean installation, but I recommend upgrading instead because doing so will preserve your customizations.
LET ME TRY IT
![]()
Performing a Clean Installation
Performing a clean installation of Office 2010 is simple. To do so, follow these steps:
1. Insert your Microsoft Office 2010 installation DVD and run Setup.exe if necessary.
2. Click the I Accept the Terms of This Agreement check box.
3. Click Continue.
4. At this point, Setup will ask you if you want to go ahead and install Office 2010, or if you want to customize the installation. You don’t have to make any customizations unless you want to, but go ahead and click the Customize button so that you can see what options are available to you.
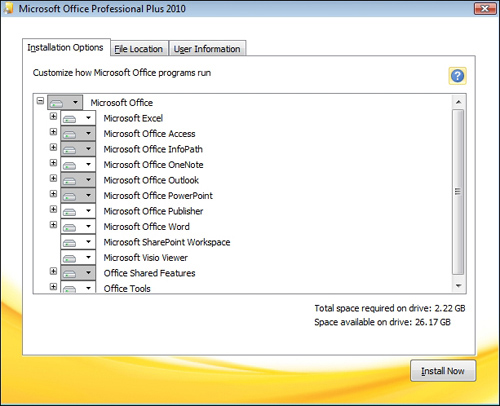
5. The customization screen, shown in Figure 1.4, enables you to choose the components that you want to install, and to provide a custom file location. If you want to make any customizations, do so now.
Figure 1.4 Make any desired customizations, and click the Install Now button.
6. When you are done making any desired customizations, click the Install Now button.
7. When the installation process completes, click Close.
LET ME TRY IT
![]()
Upgrading from Office 2007
SHOW ME Media 1.1—Installing Microsoft Office 2010
![]()
Access this video file through your registered Web edition at my.safaribooksonline.com/9780132182591/media
The process of upgrading from Office 2007 to Office 2010 is similar to performing a clean installation. To upgrade, follow these steps:
- Insert the installation DVD.
- Run Setup.exe if necessary
- When prompted, select the I Accept the Terms of This Agreement check box.
- Click Continue.
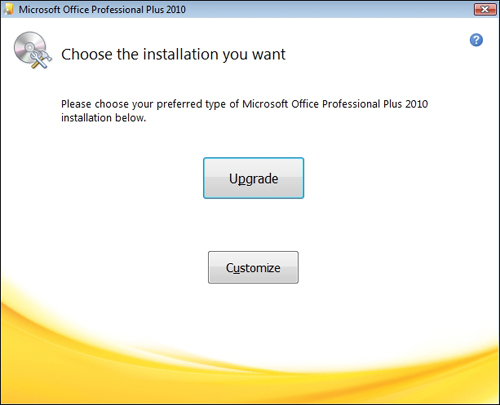
- If Windows contains a previous version of Microsoft Office, you will receive a prompt asking you if you want to upgrade or customize, as shown in Figure 1.5.
- You can click the Upgrade button to begin the installation process. However, I recommend clicking the Customize button instead just to see if there is anything that you want to change.
- After reviewing the customization options and making any desired customizations, click the Upgrade button.
- When the installation process completes, click the Close button.
- Reboot your system prior to using Office 2010.
Figure 1.5 You have the option of performing an upgrade or a custom installation.
LET ME TRY IT
![]()
Uninstalling Office 2010
Because I just showed you how to install Office 2010, it probably seems a bit odd to be talking about uninstalling it so soon. Occasionally, though, the need may arise to uninstall Office 2010, so I wanted to go ahead and show you how to do so.
The actual method that you must use to uninstall Office varies depending on the version of Windows that you are using. The following procedure is based on Windows 7. This procedure works slightly differently in Windows XP and Vista.
To remove Office 2010, follow these steps:
- Click the Windows Start button and choose the Control Panel option.
- When the Control Panel opens, click the Uninstall a Program link.
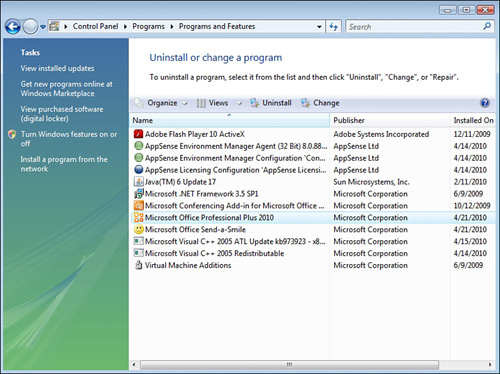
- Select Microsoft Office from the list of installed programs, as shown in Figure 1.6.
- Click the Uninstall button.
- When asked if you want to remove Microsoft Office 2010, click Yes.
- When the process completes, click Close.
- When prompted, reboot your system.
Figure 1.6 Select the option for Microsoft Office 2010 and click the Uninstall button.
SHOW ME Media 1.2—Uninstalling Microsoft Office 2010
![]()
Access this video file through your registered Web edition at my.safaribooksonline.com/9780132182591/media
What’s New in Publisher 2010
Now that you have Office 2010 up and running, you are probably curious as to how Publisher has changed since the previous version. Although there are some things that have changed, Publisher 2010 isn’t vastly different from its predecessor.
The Ribbon
When Microsoft created Office 2007, it introduced a new ribbon design for some, but not all, of the Office applications. Publisher was one of the applications that did not end up getting a facelift. However, Microsoft has decided to incorporate the ribbon design into Publisher 2010.
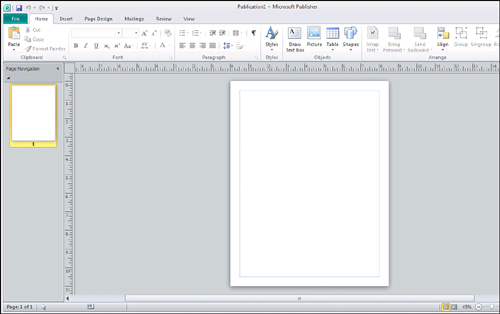
To see how Publisher 2010 compares to Publisher 2007, take a look at Figures 1.7 and 1.8. Figure 1.7 shows what Publisher 2007 looked like. When compared to this image, Publisher 2010’s new ribbon really stands out in Figure 1.8.
Figure 1.7 This is what Publisher 2007 looked like.
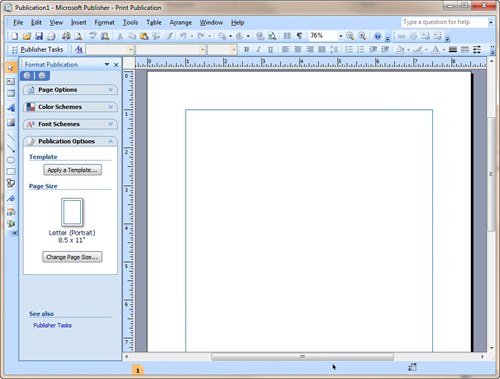
Figure 1.8 Publisher 2010 uses the ribbon design.
How Documents Are Displayed
In Microsoft Publisher, every visual element exists within a box. Text is placed within a text box, and there is also a box that surrounds every image that you include in your Publisher document. These boxes do not appear when the document is printed; they are necessary when working with the Publisher document because they provide control over individual visual elements.
In Publisher 2007, complex documents often took on a very messy appearance because the boxes surrounding every single visual element were all displayed onscreen. In Publisher 2010, Microsoft decided to clean up things a bit by hiding most of these boxes. Now, the only box that is displayed is the one surrounding the visual element that is currently selected. All of the other boxes are hidden until you need them.
Going Backstage
Another cosmetic feature that is new to Publisher 2010 is something called backstage view. The backstage is merely an area that is linked to Publisher’s File menu. It is designed to provide access to things like opening, saving, printing, and sharing documents. The backstage is also where you will find various customization options and access to online help. You can see what the backstage area looks like in Figure 1.9.
Printing
Another area where Microsoft has made a lot of improvements is in printing Publisher documents. Now when you get ready to print a document like the one shown in Figure 1.10, Publisher shows you a large preview of what the document will look like when printed.
As you can see in the figure, there are a number of print options located just to the left of the preview. As you select a different set of print options, the preview will change to reflect the options that you have chosen.
PDF and XPS Support
After the release of Microsoft Office 2007, Microsoft began offering an add-in that would allow documents to be saved as PDF or XPS files. This functionality is natively included in Publisher 2010 without the need for an add-in. Furthermore, Publisher even supports password-protecting PDF documents.
Figure 1.9 The backstage area provides access to common document functions.
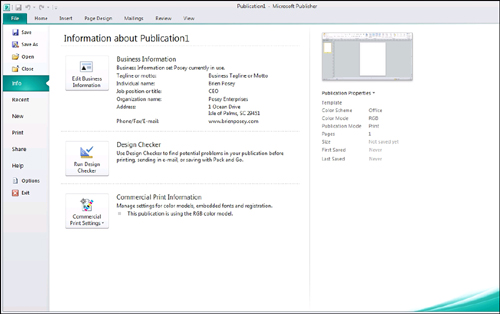
Figure 1.10 The backstage area provides access to common document functions.
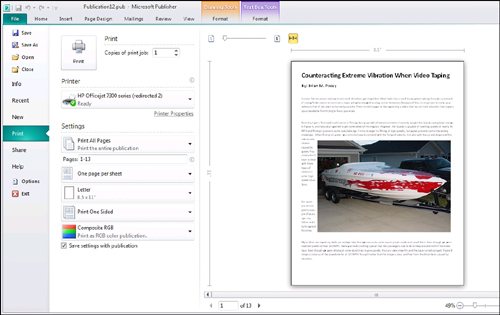
Image Controls
Publisher has always enabled you to include graphic images in your documents and to perform some degree of editing on those images. Microsoft has made several improvements to Publisher’s capability to work with shapes and images.
My favorite of these new image controls is the capability to replace one picture with another, while still retaining the image size and the overall document layout. Similarly, you can now create picture placeholders as a way of reserving a place in a document for an image that will be inserted later. Once the image is added to the document, it will take on the size and shape of the placeholder.
Publisher 2010 enables you to crop images into nonrectangular shapes. You also can now add captions to images. In fact, Publisher provides an entire gallery of captions that you can choose from.
Finally, Publisher 2010 enables you to hide objects that are in the scratch area. Some of the other new features include Smart Guides, Live Preview, and improved page navigation.
Minor Improvements
Besides the improvements I have already mentioned, Microsoft has made a few minor improvements to the merge process in an effort to make it easier to merge business data into Publisher documents.
Another minor improvement worth mentioning has to do with building blocks (which were previously referred to as the Content Library) and templates. Microsoft is in the process of forming an online community in which users will be able to share building blocks and templates that they have created with other Publisher users.
What’s Up with Web Mode?
One Microsoft TechNet article (http://technet.microsoft.com/en-us/library/ee694636(office.14).aspx) states that “Creating new web sites and web publications is not available in Publisher 2010.” This article indicates that this capability has been removed from Publisher, although you can still edit Web content that was created in a previous version of Publisher.
If you have already flipped through this book, you know that I have written an entire chapter on using Publisher to create a website. As it turns out, Publisher 2010 contains some fairly rich web development capabilities. I will say, however, that most of the web development options are not accessible unless you create your web page from a web template.