Objectives
In this chapter you will learn
- How user accounts and groups are used to provide access and security
- The function and structures of the passwd, group, and shadow files in /etc
- To add and delete user accounts using basic useradd and userdel commands
- To add and delete user accounts manually
- To create user-level configurations that replicate for new users
- To lock a user account
- The difference between login shells and nologin shells
Introduction
You are probably asking why I waited so long to talk about managing users. The answer is that many Linux systems today are essentially single-user systems. Very seldom do we see multiple users needing simultaneous access to a Linux computer, but it does happen. In most cases we find that one of several users of a Linux system will log in and su - to root in order to perform some sort of administrative task. In other environments, several users may log in remotely as non-privileged users to a single system to perform normal work – whatever that might be.
Even if you are the only human with access rights to a particular Linux host, you are still dealing with at least two user accounts, root and your own user account. There are also a number of user accounts that belong to various services and programs on a Linux host.
Much of this chapter is about creating and managing user accounts. We will spend a significant amount of time on the files used to manage user accounts, passwords, and security.
The root account
Your Linux computer has many accounts even if no other human actually uses your computer on a regular basis. Most of those accounts are used by Linux when it performs particular functions.
One of the special accounts is that of root. The root account is present on all Linux computers, and it allows the person logged in as root to read, change, and delete any file on the computer regardless of who owns the files. The root account is restricted by file permissions, but root can change the permissions of any file on the computer. The root account can do anything and everything on a Linux computer even changing the password of any user or locking out users. To protect the integrity of the system, the only person who should have the root password to a Linux computer is the system administrator.
We explored working as root in Chapter 11 of Volume 1, including reasons not to use sudo. In this chapter we are more interested in using the root account to manage other users.
Your account
By virtue of logging in using your account ID and password, you are granted access to read and write files that are located in your home directory because you are the owner of those files. You can create new files and directories in your home directory and modify them as you see fit.
Your account does not provide you enough rights to access other user’s home directories let alone view or modify the files located there. Your account does not have sufficient rights to alter any important system files, although you may be able to see some of them and view the contents of some.
There is a common practice to create account names using the first letter of your first name and your last name. Thus, the person Jo User would have an account name of juser. Notice that it is also common practice for the account name to be all lowercase. Case is important in Linux, so the account name JUser is not the same as juser.
Your home directory
Your home directory is where files that belong to you are stored. Another word for directory is folder.
When you create files in your home directory or in any of the subdirectories in your home directory, they are created with the appropriate ownership and permissions to allow you to read and write them. This should allow you to create new documents and spreadsheets and so on and then to be able to modify them as needed and store them back to the disk after they have been modified.
You can also use one of the file managers to change the permissions of the files in your home directory, but we recommend that you do not do so unless you have a very good reason to do so and know exactly why you are doing it.
User accounts and groups
User accounts and groups are the first line of security on your Linux computer. Knowledge of user accounts and file permissions will make it much less frustrating for you as you do your work.
The root account is always UID 0 and the root group is always GID 0.
Historically, all system-level users were assigned a UID and GID between 1 and 99. Convention defined the specific user and group IDs for various programs and services. For a time, Red Hat, and therefore Fedora, recommended starting human user and group IDs at UID 500 and GID 500. That was inconsistent with other Linux distributions and caused some issues.
Today, because of a proliferation of services and system-level account needs, all of the newer standard Linux system- and application-level users are located in the UID range between 100 and 999 which is now reserved for this purpose.1 All application-level users – those required by installed services and applications – should be added in the UID range between 101 and 999. All regular (human) users should be added starting at UID 1000 and above.
The RHEL 7 System Administrator's Guide goes further and recommends starting human user IDs at 50002 to allow for future expansion of the system IDs. However, the current RHEL and Fedora implementations still begin at UID/GID 1000 for human users. The guide does explain how to make this change so that new users are automatically assigned IDs in the recommended range.
Group ID assignments should follow the same practices as UIDs to help ensure consistency and to make troubleshooting easier.
There are some interesting historical anomalies within this structure. For example, GID 100 is reserved for the “Users” group. In some environments it is common for all regular users to be added to this group, but this is not recommended as it constitutes a security risk that would allow users to have access to one another’s files.
For regular users the UID and GID should be identical, that is, a user with UID 1001 should have a GID of 1001 as well. Since each user belongs to its own group, security is enhanced because files are not automatically shared between users. By default, users should not all belong to a single common primary group such as the Users group (GID 100).
Making files available to other users should be accomplished by using secondary group memberships to which the sharing users all belong and a directory where shared files can be stored and which has group ownership by the common group. Group membership should be limited to those who have a specific need to share related files. This allows for more granular management of shared files. We experimented with how to do this in Chapter 18 of Volume 1.
When adding group IDs for things like shared directories and files, I like to choose numbers starting at 5000 and above, as we did in Chapter 18. This allows space for 4000 users with identical UID and GID numbers. That should be more than enough for most Linux installations. Your needs may differ so you should adapt as necessary.
Figure 16-1 shows the conventional and currently common usage assignments for UID and GID ranges. The range from 0 to 999 and the ID 65534 should be considered as completely unusable for use or assignment by the SysAdmin. The range between 1000 and 65533 can be considered flexible and can be used according to local requirements.
Figure 16-1
Recommended UID and GID numeric ranges
User and group ID data are stored in the files /etc/passwd, /etc/shadow, and /etc/group.
The /etc/passwd file
We will start by looking at the user and group information located in the /etc/passwd file. Here we will also look at the other information stored in this file.
Experiment 16-1
Much of this experiment should be performed as root. As the root user, the id command shows us information about our ID.
[root@studentvm1 ~]# id
uid=0(root) gid=0(root) groups=0(root)
[root@studentvm1 ~]#
This shows that the UID and GID for root are both 0 (zero) and that the root user is a member of the root group with a GID of 0.
Now, as the root user, let’s look at the information for the student user.
[root@studentvm1 ~]# id 1000
uid=1000(student) gid=1000(student) groups=1000(student),5000(dev),5001(shared)
The student user has both UID and GID set as 1000. The student user also has group memberships in the dev and shared groups. These memberships allow the student user to share files with other users. Look at the student1 user which also has memberships for these shared groups.
[root@studentvm1 ~]# id 1001
uid=1001(student1) gid=1001(student1) groups=1001(student1),5000(dev),5001(shared)
Now let’s look at the file that defines and contains user information. Enter the following command as root.
[root@studentvm1 ~]# cat /etc/passwd
The result is not sorted in any meaningful way, so let’s make it a bit easier by sorting on the UID. This number is located in the third field of each user. The -t option specifies the field delimiter character and -k specifies starting the sort at field 3, the first character. The -g option specifies the use of a general numeric sort. This results in a data stream that is much easier to read.
[root@studentvm1 etc]# cat /etc/passwd | sort -t: -k3.1 -g
root:x:0:0:root:/root:/bin/bash
bin:x:1:1:bin:/bin:/sbin/nologin
daemon:x:2:2:daemon:/sbin:/sbin/nologin
adm:x:3:4:adm:/var/adm:/sbin/nologin
lp:x:4:7:lp:/var/spool/lpd:/sbin/nologin
sync:x:5:0:sync:/sbin:/bin/sync
shutdown:x:6:0:shutdown:/sbin:/sbin/shutdown
halt:x:7:0:halt:/sbin:/sbin/halt
mail:x:8:12:mail:/var/spool/mail:/sbin/nologin
operator:x:11:0:operator:/root:/sbin/nologin
games:x:12:100:games:/usr/games:/sbin/nologin
ftp:x:14:50:FTP User:/var/ftp:/sbin/nologin
rpcuser:x:29:29:RPC Service User:/var/lib/nfs:/sbin/nologin
rpc:x:32:32:Rpcbind Daemon:/var/lib/rpcbind:/sbin/nologin
mailnull:x:47:47::/var/spool/mqueue:/sbin/nologin
smmsp:x:51:51::/var/spool/mqueue:/sbin/nologin
tss:x:59:59:Account used by the trousers package to sandbox the tcsd daemon:/dev/null:/sbin/nologin
avahi:x:70:70:Avahi mDNS/DNS-SD Stack:/var/run/avahi-daemon:/sbin/nologin
tcpdump:x:72:72::/:/sbin/nologin
sshd:x:74:74:Privilege-separated SSH:/var/empty/sshd:/sbin/nologin
dbus:x:81:81:System message bus:/:/sbin/nologin
pulse:x:171:171:PulseAudio System Daemon:/var/run/pulse:/sbin/nologin
rtkit:x:172:172:RealtimeKit:/proc:/sbin/nologin
abrt:x:173:173::/etc/abrt:/sbin/nologin
systemd-network:x:192:192:systemd Network Management:/:/sbin/nologin
systemd-resolve:x:193:193:systemd Resolver:/:/sbin/nologin
saslauth:x:976:76:Saslauthd user:/run/saslauthd:/sbin/nologin
pipewire:x:977:977:PipeWire System Daemon:/var/run/pipewire:/sbin/nologin
dictd:x:978:978:dictd dictionary server:/usr/share/dict/dictd:/sbin/nologin
systemd-timesync:x:979:979:systemd Time Synchronization:/:/sbin/nologin
dnsmasq:x:980:980:Dnsmasq DHCP and DNS server:/var/lib/dnsmasq:/sbin/nologin
vboxadd:x:987:1::/var/run/vboxadd:/sbin/nologin
colord:x:988:982:User for colord:/var/lib/colord:/sbin/nologin
setroubleshoot:x:989:983::/var/lib/setroubleshoot:/sbin/nologin
nm-openvpn:x:990:984:Default user for running openvpn spawned by NetworkManager:/:/sbin/nologin
nm-openconnect:x:991:985:NetworkManager user for OpenConnect:/:/sbin/nologin
lightdm:x:992:986::/var/lib/lightdm:/sbin/nologin
chrony:x:993:987::/var/lib/chrony:/sbin/nologin
polkitd:x:994:990:User for polkitd:/:/sbin/nologin
openvpn:x:995:991:OpenVPN:/etc/openvpn:/sbin/nologin
sstpc:x:996:992:Secure Socket Tunneling Protocol(SSTP) Client:/var/run/sstpc:/sbin/nologin
geoclue:x:997:993:User for geoclue:/var/lib/geoclue:/sbin/nologin
unbound:x:998:995:Unbound DNS resolver:/etc/unbound:/sbin/nologin
systemd-coredump:x:999:997:systemd Core Dumper:/:/sbin/nologin
student:x:1000:1000:Student User:/home/student:/bin/bash
student1:x:1001:1001:Student1:/home/student1:/bin/bash
student2:x:1002:1002:Student User 2:/home/student2:/bin/bash
nobody:x:65534:65534:Kernel Overflow User:/:/sbin/nologin
Let’s deconstruct the line for the student account, UID 1000. The field separator for this file is the colon (:). Figure 16-2 describes each of the fields in the /etc/passwd file.
Figure 16-2
Deconstructing the /etc/passwd entry for the student user
The password field in account entries is no longer used. Storing a password in this file is a security issue because the file needs to be accessible by all user accounts. Reading a password from this file, even an encrypted password, constitutes a serious security issue. For this reason, passwords have long ago been moved to the /etc/shadow file which is not universally readable and thus is more secure.
nologin shells
Many of the system users in the /etc/passwd file have a nologin shell, /sbin/nologin. This type of shell is a small shell that does not allow a login of any type. This is a security feature as it prevents crackers from accessing a Linux host system by escalating privileges to or beyond these accounts.
The /etc/shadow file
As mentioned previously, the password location for user accounts has been moved from /etc/passwd to /etc/shadow. The shadow file is more secure because it is readable only by root and by system processes that run with the root user ID.
Experiment 16-2
Perform this experiment as the root user. We now look at the /etc/shadow file. Your root terminal session should still have /etc as the PWD.
View the content of the /etc/shadow file. I have indented the long lines to help clarify the data. I have also removed a number of lines to save space.
[root@studentvm1 etc]# cat shadow
root:$6$/VoB.UfR5MtuBi7b$Wnf7nLT/.EFz4W4lA0vq1kSoIXhVR4Mnp8XlDJpRHjEpH2gJw348ZIUhE8rsGFRk7yIuh/ 2pnKbNBbhz9n./y.::0:99999:7:::
bin:∗:17725:0:99999:7:::
daemon:∗:17725:0:99999:7:::
adm:∗:17725:0:99999:7:::
lp:∗:17725:0:99999:7:::
sync:∗:17725:0:99999:7:::
<snip>
sshd:!!:17833::::::
vboxadd:!!:17833::::::
dnsmasq:!!:17833::::::
tcpdump:!!:17833::::::
student:$6$81UxQUSOXIejpASu$ovP6j8Bs/rvyq5j3q/ cWFsajWlhdN8YCySx7glnnBKYEEkBUG9SaAz.mAb8eW.nXewOoWJx4czjIMay6zbDKq0::0:99999:7:::
systemd-timesync:!!:17889::::::
dictd:!!:17910::::::
student1:$6$iUF30xuKzezktM4c$Wxqik.oRHLgoxI9qwV3C02z5/ Q9p7XPgRpHt2qq6D3FlSlSLgUN36FBdIOB9UfxIJz.b3xoQnHyirnZvisky8/:17987:0:99999:7:::
student2:$6$WgztalwLQSIlMM3w$6lxcmrMOXJietxHbsILmRwFfyKwrxV7ye/ 0LPmZz7TTGVUAgHcvFMM2JX.WLTWncNTGhAGJIpnfDViJwDWAVC.:17987:0:99999:7:::
pipewire:!!:18002::::::
saslauth:!!:18018::::::
mailnull:!!:18018::::::
smmsp:!!:18018::::::
Note that only root and other human user accounts have passwords.
Let’s deconstruct the shadow file entry for the student user in Figure 16-3. The entries for this file contain 9 colon (:) separated fields.
Figure 16-3
Deconstructing the /etc/shadow entry for the student user
Fields 4 through 8 are typically used to implement password security policies by forcing users to change their passwords on a regular basis. Notice that the student user has not changed their password.
Experiment 16-3
Perform this experiment as the student user. Change the student user’s password from the command line. Let’s start with a bad password to see what happens.
[student@studentvm1 ~]$ passwd
Changing password for user student.
Current password: <Enter the current password>
New password: mypassword
BAD PASSWORD: The password fails the dictionary check - it is based on a dictionary word
passwd: Authentication token manipulation error
So entering a password that contains a dictionary word or a string of characters that are typically substituted in dictionary words causes an error and does not allow the password to be changed. Try this – the 0 is a zero.
[student@studentvm1 ~]$ passwd
Changing password for user student.
Current password: <Enter the current password>
New password: myp@ssw0rd
BAD PASSWORD: The password fails the dictionary check - it is based on a dictionary word
passwd: Authentication token manipulation error
A non-root user is not allowed to create passwords that do not pass certain minimum criteria. The root user can set any password for any user although the same messages will be displayed as a reminder. But root can do anything.
Let’s change the password for real.
[student@studentvm1 ~]$ passwd
Changing password for user student.
Current password: <Enter old password>
New password: Yu2iyief
Retype new password: Yu2iyief
passwd: all authentication tokens updated successfully.
This works because the password is not too short – it must be at least eight characters in length – and it is a series of random letters, upper- and lowercase, as well as a numeric digit. Now let’s see what happens when root changes the student user’s password with a dictionary word.
[root@studentvm1 etc]# passwd student
Changing password for user student.
New password: myp@ssw0rd
BAD PASSWORD: The password is shorter than 8 characters
Retype new password: myp@ssw0rd
passwd: all authentication tokens updated successfully.
You have new mail in /var/spool/mail/root
Root does not need to enter the current password and, although the bad password message is displayed, the password is changed anyway.
Tip Root has mail in the previous example. This is the daily logwatch email report. Depending upon how fast you are working through this course, you may have seen this already or you may not see it until later.
Now look at the shadow file entry for the student user.
[root@studentvm1 etc]# grep student shadow
student:$6$.9B/0vGhNwsdf.cc$X/Ed1<snip>dDcB4uBHF.HVqA1ZGkJ5L5yB2G/:18041:0:99999:7:::
<snip>
The third field, the date of the last password change, now has a number in it, 18041 on my host. Your number will be different.
Change the password to something you choose.
Note that for a non-root user changing their own password, they must also enter their original password before they can change it. This is a simple security procedure that can prevent passersby from changing a user’s password. Remember, root can do anything, including changing the password of any user without the need to know the old password.
The /etc/group file
The /etc/group file contains a list of all of the groups on the localhost. This includes the standard system groups as well as groups created by the system administrator for specific local use.
We created two groups in Chapter 18 of Volume 1, dev and shared, to allow users to have a place to share files and to work cooperatively. Having already looked at the group file there and earlier in this chapter, there is no need to explore it more.
The /etc/login.defs file
The /etc/login.defs file is used to set certain default configuration items that are incorporated when adding new users. The values in this file include the starting and maximum UIDs and GIDs for new users, the default mail directory location, and the default password expiration options.
Experiment 16-4
Perform this experiment as the root user. View the contents of the /etc/login.defs file. You can read the comments in that file to understand it a bit, but there are two lines that need some discussion.
PASS_MIN_LEN: The minimum length for a password is specified as five characters. This should be set to a minimum of eight to ensure a reasonable amount of security.
PASS_MAX_DAYS: This line is set to 99999 so that the passwords never expire. In a real-world environment, passwords should be set to expire no less frequently than every 30 days.
Remember that, although the root user will still see password warnings, root can ignore them. Non-root users are not able to ignore the warnings and must create a password that meets the length policy set in this file.
Account configuration files
As we have already seen, there are several configuration files that are present in a new account home directory. All user shell configuration files that are located in the /etc/skel directory, such as ~/.bash_profile and ~/.bashrc, are copied into the new account home directory when each new user account is created.
If you have local configuration files that should be in the user’s home directories instead of in one of the system-wide configuration files found in /etc/profile.d, you can place them in /etc/skel and the files will be copied to the new home directory. One reason to place them in the account home directory is so that the user can alter them as needed.
Password security
It is advisable as a good security precaution to change your password about once a month. This prevents other people from using your password for very long even if they happen to discover it. Once you have changed it, they can no longer use your previous password to access the system. You never know when or how someone might obtain or guess your password, so even if you do not think it has been compromised, you should change your password regularly. Of course a password should be changed immediately if you suspect that it has been compromised.
Passwords should be protected and never written down. If a password is stolen, it can be used to access your computer and the network if your computer is so connected and thus compromise your data.
Linux requires passwords to be a specified minimum length. The default is five characters but that can be changed. I recommend that you use a longer password to increase the difficulty of someone guessing your password. Passwords should never be dates, initials, acronyms, words, or easy-to-remember sequences such as “ASDFG” from the left of the middle row of the keyboard. Passwords should be composed of upper- and lowercase alphabetic characters as well as numbers and special characters.
My personal calculations show that an automated attack of 500 access attempts per second on a host with a five-character password can be cracked in anywhere from 6 hours to 21 days depending upon whether the password contains only lowercase alpha or upper- and lowercase as well as numbers. The time to crack a really good randomly generated password that includes special characters (#$%^, etc.) rises to 152 days. This should be set to a minimum of eight to ensure a reasonable amount of security. The time to crack an eight-character password rises to 13 years to over 325,000 years, once again depending upon using upper- and lowercase, numbers, and special characters.
Crackers – bad hackers, people who want to get into your computer – have dictionaries of words, common acronyms, and key sequences that they can try to attempt to crack into your system. They also try easy-to-guess sequences that are available to anyone with a little persistence such as birthdays; anniversaries; the names of spouses, children, pets, or significant others; Social Security numbers; and other possible passwords of this type. The point is that when you change your password, you should choose one that is not based on a dictionary word or one that will be easy to guess or deduce from your personal information. Passwords based on any of these non-random sources will likely be cracked in seconds.
There is a significant downside of changing passwords frequently and setting strict policies that require them to be excessively long and not easily memorized. Such policies will almost certainly result in users who write their passwords on post-it notes and stick them on the display or under the keyboard. There is a fine line between workable security and self-defeating security.
Password encryption
Passwords cannot be safely stored on the hard drive in plain text format as this would leave them open to incredibly easy hacking. In order to ensure that the user accounts are secure, passwords are encrypted using the OpenSSL encryption libraries. The openssl command-line tool can be used to access the encryption libraries from the command line so that we can explore a bit about password encryption.
Experiment 16-5
Perform this experiment as the student user. The openssl passwd command-line utility allows encryption of a plain text string into an encrypted password that can be used when creating a new account. It also lets us explore the structure of the passwords in the /etc/shadow file.
Starting with a simple example and without specifying a specific encryption method, the password is truncated to eight characters and encrypted with the crypt algorithm which is not particularly secure. For most of the examples in this experiment, we will use the string “mypassword” for the password to be encrypted.
[student@studentvm1 ~]$ openssl passwd mypassword
Warning: truncating password to 8 characters
Gvp.W6K7c5FJc
Compare the password generated to that of the student1 password in the /etc/shadow file, which looks like that in the following data. This password hash is much longer than we got from using the default settings.
student1:$6$wVc137Z/fbPCOdrK$VhTwe4ooOxVrYWiZp3Z1mHDSpEBGopGjTho6Odj0YEbzkSNLeoSc5k7njmqdSYbLadnkBqCQcXHxLF.f42sG..:18046:0:99999:7:::
I have highlighted the first three characters of the password because they tell us – and the system password and login utilities – the encryption algorithm used to create the password. $6$ means that the SHA512 bit algorithm was used to create this password. We can specify the SHA512 algorithm with the -6 option.
[student@studentvm1 ~]$ openssl passwd -6 mypassword
$6$uMdQ9QJqEgeQXEEn$mAcO.fzVdtsdLFyZPkNe6HdTI3nqYYn0rf8S9Jz3U.yiDF0oyWtbcbATNmwLzrUyfqsPPHeOlaDXMoax6xZME0
Note the $6$ characters at the beginning of this password indicating that it is SHA512. Now do the same with the SHA256 option.
[student@studentvm1 ~]$ openssl passwd -5 mypassword
$5$TwLEuxmTGPbdZyFn$6yj9vc/0OyKnU4hmZ.x3DWsfRNk5fm3ywtGNYqRLK74
Notice the first three characters are now $5$ and that the password is shorter.
Open the openssl-passwd man page (man openssl-passwd) and view the other encryption options available. Create password hashes using crypt, MD5, apr1, SHA256 (-5), and SHA512 (-6) algorithms.
Let’s get back to the SHA512 algorithm. Run the command several times in sequence.
[student@studentvm1 ~]$ openssl passwd -6 mypassword
Notice that the password hash is always different despite the fact that the password string is the same. This is because the password encryption algorithms use a different random seed for every iteration. This is called the “salt,3” presumably because it spices things up a bit. Normally, the salt is taken from the /dev/urandom data stream. This adds a bit of randomness into the algorithm and produces a different result for every iteration.
We also can specify a salt to use with the algorithm instead of using a random one, using the -salt option. Execute the following command several times; it will always produce the same result.
[student@studentvm1 ~]$ openssl passwd -salt 123456 -6 mypassword
$6$123456$KKcK3jDXxN5TVYNLbMdEIjnfRjaSlbqj5X9bBgryaa4qLD04lrM9kswCpAZL27/WXlbsDQcJ8kBxPjcpips781
Notice that the salt string is included after the algorithm specifier, $6$123456$. Using the same salt string removes the randomness from the algorithm to always produce the same result, given the same password. Using a different string for the salt creates a new password hash.
Go back and look at some of the passwords you created without the -salt option and locate the random string.
Theoretically, the well-known algorithms used to generate password hashes do so in such a way that there is no known algorithm that can reverse the process and generate the plain text password from the password hash. However, if a cracker has access to the hash – which also contains the salt string – a brute force attack could conceivably eventually find the plain text that generated the hash. This would not take long if the password was based on dictionary words, but could take years if good passwords were used.
Generating good passwords
Creating good passwords is a challenge. It can take some thought and effort. Linux has at least one tool that provides us with suggestions for good passwords.
The pwgen utility gives us the ability to specify the number and length of passwords we want to generate as well as to make them relatively easy or impossible to remember. By default, when used without the -s (secure) and -y (use special characters) options, the resulting passwords are alleged to be easy for humans to memorize. My experience is that some are and others not so much.
Experiment 16-6
This experiment can be performed as the student user. We explore the pwgen utility to learn how it can help us create reasonably secure passwords.
Start by using pwgen with no options which, when STDOUT is to a terminal, generates a list of 160 random eight-character passwords using uppercase, lowercase, and numeric characters. I can choose one of the passwords from the list to use.
[student@studentvm1 ~]$ pwgen
Iiqu4ahY Eeshu1ei raeZoo8o ahj6Sei3 Moo5ohTu ieGh6eit Is0Eisae eiVo5Ohv
Gooqu5ji ieX9VoN5 aiy3kiSo Iphaex4e Vait1thu oi5ruaPh eL7Mohch iel2Aih6
Elu5Fiqu eeZ4aeje Ienooj6v iFie2aiN ruu7ohSh foo4Chie Wai5Ap1N ohRae1lu
urahn2Oo eal6Zuey GuX3cho0 iesh1Oot eepha1Ai oe6Chaij ISaeb3ch OK7Iuchu
aeNgee6O Iequit9U OoNgi2oo cohY4Xei Ziengi3E quohTei4 eefe2ieC eong8Qui
Vo5aip8m Eishi0ei Xith9eil aongu4Ai paiFe1zo gaiPh5Ko Be7ieYu2 Fathah9h
Gu7UcePh lee7aiSh aj4AuChe Zo3caeR1 Yo8jei5x maeChe5a Id0baigh Fu4tei4e
geiLeid7 quaeK4Ro ohVoe5iZ AY2Noodi nem0tahJ ahPiw1oh gah6baeH Aa5pohCh
ahShai1h uQu3Hah1 Eth3coo5 EChoboc9 Iey0ahCh Mee3iewu Iek6oMai aePoo2ei
aeVoM8Sh IeR0hohr Duew9ogh toh8AeXu Nohgh0me ain4Ooph ooyuKoh1 huth1Mei
si4ohCao ahthae0I ohquah5F chohpe9G yoiM2noh iePh9iej aij7uXu7 Phoophi8
Bei5iLah uR3aicer oagh2OVo uThox9Xa Gu4ree0v shohNe2a weReth7A Vae4ga3b
Jee9jieX kohjoR6o Zimaish2 ut9mahJ8 ephu8Ray Iep0eiTh ooB3joom Rai1ohzu
em0Eeruv Tu7Phoh1 boh0IFee roh6Phae tauT3ohh LieFiu0a Voo9uvah pahpuiJ1
ohSiaN9a ooBahnu9 Uo2DahS0 oor6Huwe ahs6Och3 aeCai1oo ahw2Lawi oCaeboo8
oshahB8e Xu3iyohx NoX4ohCi oa5aiLih uLah7noo Thopie2a ua6iuQuo ooYab5ai
Gae5ahsh Eech1re7 feeDah4v wou7Oek4 iefoo9AJ zei4ahVi uMiel7sh jae3eiVo
zahC3Tue Eiphei6E ke6GiaJ8 oquieBa0 chi8Ohba ooZ9OC3e deiV7pae sieCho6W
nu1oba1D aiYoh2oo OoluaZ7u Ahg5pee7 Teepha6E ooch0Mod ThaiPui5 Ehui9ioF
ekuina3Z Oafaivi1 Pusuef9g aChoh2Eb Cio7aebe eoP0iepu seGh2kie fiax4Cha
Pipe the data stream through the sort command. The result is a single password. Whenever the data stream of pwgen with no options is sent through a pipe, only a single password is generated. This is ideal for automation scripts.
[student@studentvm1 ~]$ pwgen | sort
Eaphui7K
This behavior can be overridden using the -N option to specify the desired number of passwords.
[student@studentvm1 ~]$ pwgen -N 6 | sort
boot6Ahr
Die2thah
nohSoh1T
reob9eiR
shahXoL6
Wai6aiph
Instead of using options, pwgen recognizes two arguments in the syntax, pwgen pw_length number_of_passwds.
[student@studentvm1 ~]$ pwgen 25 10
Eetahch0hiuvaedodu1iPh5Oh Ahvoosoh5Eifei8eiyahWee1s Hout4ichoh9eiBeip5ChaiRe2
aGuuquaexiet8epao1phi0thu yuwoo3pei5nooQua7koo9kube wa6ahcho8Aey1ahthaegaeB9w
ahg5oo8xeivo6fahw6shila1C een9eeG0quoov3Iegheixahde hae6IeBe1eiZoh2laa9phivae
naengeiHohshaikahghie4aer
Now use the -s and -y options in various combinations.
[student@studentvm1 ~]$ pwgen -s
[student@studentvm1 ~]$ pwgen -y
[student@studentvm1 ~]$ pwgen -sy
[student@studentvm1 ~]$ pwgen -s 25 90
Read the man page for pwgen and check out some of its other options. Of particular interest is the option to remove ambiguous characters, those which can be confused for each other such as I (eye) and 1 (one) or 0 (zero) and O (oh).
Password quality
There is a configuration file that is used to define the quality requirements of new passwords, /etc/security/pwquality.conf. The system defaults are defined to us humans as commented lines in this file. Lines that need to be changed to improve security can be uncommented and the default value for the variable changed to whatever is desired.
For one example, you might wish to change the default password length from eight to ten. So uncomment the # minlen = 8 line and change 8 to 10.
One trick many users try when required to change their passwords is to simply change one character in the existing one. So they change the old password, password3, to password4. The default setting of the difok = 1 allows this, but it is a bad idea.
Experiment 16-7
This experiment will be performed partly as root and partly as the student1 user. First, read the man page for pwquality.conf to get an idea of the variables available that can be changed. Then as root, set the password for student1 to “password1234”. Log in to the student1 account using that password.
As student1, change the password to “password9876”.
Edit the /etc/security/pwquality.conf file and change the line
# difok = 1
to
difok = 5
Now try to change the password for student1 to “password4567”. Note that a reboot is not required. These changes are activated immediately.
[student1@studentvm1 ~]$ passwd
Changing password for user student1.
Current password: password9876
New password: password4567
BAD PASSWORD: The password is too similar to the old one
passwd: Authentication token manipulation error
Another trick users try is to use all one class of characters for their passwords, such as all lowercase or all numbers. The minclass = 0 can be changed to require as many as four classes of characters, uppercase, lowercase, numbers, and special characters. It is a good practice to require at least three different classes of characters.
Change minclass to 3 and try to change the password for student1 to one with one or two classes of characters. Then change the password to one with three classes. This setting does not specify which character classes are required.
Change the altered lines back to their original values and set the password for student1 to your preferred one.
Managing user accounts
Managing user accounts is a very common task for system administrators in many environments. This can include adding new accounts, deleting accounts that are no longer needed, and modifying existing accounts.
There are at least three methods that can be used to create, delete, and modify user accounts. Most desktop environments have some form of GUI tool. There are command-line tools useradd and adduser; the latter is simply a symlink to useradd but is retained for backward compatibility as well as commands to delete and to modify user accounts. And there is also the very retro method of editing the required files by hand.
In the next few experiments, we will manage user accounts using the command line and by manually editing the various files. I liked editing these files by hand when I was first learning because it provided me with knowledge of what the commands actually do as well as all of the files required and their structures.
Creating new accounts
Creating new accounts is easy no matter which method is used.
The useradd command
We start with the easy method. The useradd command is flexible and can allow the SysAdmin to just take the defaults for things like password expiration, the default shell, and more.
Experiment 16-8
Perform this experiment as the root user.
Start by checking one of the files that defines some defaults for new users, /etc/defaults/useradd. These can be set permanently here or overridden at the command line.
[root@studentvm1 ~]# cat /etc/default/useradd
# useradd defaults file
GROUP=100
HOME=/home
INACTIVE=-1
EXPIRE=
SHELL=/bin/bash
SKEL=/etc/skel
CREATE_MAIL_SPOOL=yes
Now add a user using the default settings. The -c (comment) option adds the text in quotes to the GECOS comment field in /etc/passwd.
[root@studentvm1 ~]# useradd -c "Test User 1" tuser1
Set a password for this new user. Then look at the lines for this user in /etc/passwd, /etc/shadow, and /etc/group. Look at the contents of the home directory for tuser1, including hidden files.
Now let’s create a user account with a different shell, zsh, and home directory location, /TestFS/tuser2. We added a number of different shells in Chapter 7 of Volume 1 so the Z Shell should already be installed. The -d option specifies the complete path of the home directory. If the base directory, in this case /TestFS, does not exist, neither it nor the home directory will be created. The -s option specifies the user’s default shell.
[root@studentvm1 etc]# useradd -c "Test User 2" -d /TestFS/tuser2 -s /usr/bin/zsh tuser2
Set the password for this user. Check the lines that were added to the passwd, shadow, and group files. Log in or su - as this user to verify that zsh is the default shell. The command prompt will be a bit different. Notice the difference in command-line editing and the lack of tab completion. Log out from this user account.
Let’s add a user with a password expiration date of today. The -e option specifies the expiration date in YYYY-MM-DD format and does the conversion to days elapsed since Jan 1, 1970, 00:00 UTC. Note that “today” for you will be different from “today” as I write this, so be sure to use your today.
[root@studentvm1 etc]# useradd -c "Test User 3" -e 2019-05-28 tuser3
Set a password for tuser3. As the student user, use su to log in as tuser3 from a terminal session. You could also use a virtual console to log in as tuser3.
[student@studentvm1 ~]$ su - tuser3
Password: <Enter password for tuser3>
Your account has expired; please contact your system administrator
su: User account has expired
Now let’s use the usermod command to set the expiration date to a few days in the future – your future.
[root@studentvm1 etc]# usermod -e 2019-06-05 tuser3
As the student user again, use su to log in as tuser3.
[student@studentvm1 ~]$ su - tuser3
Password: <Enter password for tuser3>
Running /etc/profile
Running /etc/profile.d/myBashConfig.sh
Running /etc/bashrc
Running /etc/bashrc
[student@studentvm1 ~]$
Setting the account expiration date is not tied to the password expiration date. For example, you might hire a contractor to work on a project that will take 6 months. So you can set the account expiration date to 6 months, while the password expiration is set to 30 days. The password will expire every 30 days during that 6 months, but the account will expire at the specified future date. Even if the password has not expired, the user will not be able to log in to an expired account.
Log out of the tuser3 session.
Although the password expiration date can be set using the -K option of the useradd command, these should be system-wide settings and belong in the /etc/login.defs file to ensure consistency in its application.
It is possible to set an initial password, already encrypted, while adding a new account. We can use the openssl command to encrypt the password into a string called a hash, then use the result as an option in the useradd command.
Now we get to adding a new user with an encrypted password.
Experiment 16-9
Perform this experiment as the root user. Add a new user using a password hash to set the password with the useradd command. Enter this command all on one line. Be sure to place the back tics (`) around the openssl passwd command as shown.
[root@studentvm1 ~]# useradd -c "Test User 4" -p `openssl passwd -salt 123456 -6 mypassword` tuser4
Now look at the shadow file and verify that it looks like this. Because we used the same salt and the same password to generate the password hash, the resulting hash should be identical.
tuser4:$6$123456$KKcK3jDXxN5TVYNLbMdEIjnfRjaSlbqj5X9bBgryaa4qLD04lrM9kswCpAZL27/WXlbsDQcJ8kBxPjcpips781:18044:0:99999:7:::
Now log in as tuser4 using the password “mypassword” to verify that this has produced the desired result. Log out as tuser4.
Creating new accounts by editing the files
Although it is a bit more involved and takes a little more time than using the useradd command, editing the files to add a new user can be a helpful learning experience. It is really not all that difficult. It just takes time and knowledge.
Although we would never expect to add a new user in this way, I have had the need to repair a user account. Knowing all of the files involved and how to edit them safely has been useful to me. So this experiment is more about gaining a knowledge of the files that comprise a user account rather than a need to ever add a new user using this method.
Experiment 16-10
This experiment must be performed as the root user. We will add a new user, Test User 5, tuser5, by editing the appropriate configuration files and creating a home directory.
Start by adding the following line to the /etc/passwd file. I just used the Vim editor to copy the line for tuser4 and made the appropriate changes. The account for tuser4 is UID and GID 1006 so the UID and GID for tuser5 will be 1007.
tuser5:x:1007:1007:Test User 5:/home/tuser5:/bin/bash
Edit the /etc/group file by adding the following line. Once again I just copied the line for tuser4 and made the needed changes.
tuser5:x:1007:
Edit the /etc/shadow file and add the following line. Again, I just copied the line for tuser4 and changed the user account name to tuser5. This results in tuser5 having the same password as tuser4.
tuser5:$6$123456$KKcK3jDXxN5TVYNLbMdEIjnfRjaSlbqj5X9bBgryaa4qLD04lrM9kswCpAZL27/WXlbsDQcJ8kBxPjcpips781:18044:0:99999:7:::
Note that when you attempt to save this change, Vim displays an error, “E45: 'readonly' option is set (add ! to override)”. So instead of simply using :wq, you need to add an exclamation mark (!) to force Vim to save the changes, :wq!.
Create the new home directory and set its permissions to 700.
[root@studentvm1 home]# cd /home ; mkdir tuser5 ; ll
total 52
drwxrws--- 2 root dev 4096 Apr 2 09:19 dev
drwx------. 2 root root 16384 Dec 22 11:01 lost+found
drwxrws--- 2 root dev 4096 Apr 2 12:34 shared
drwx------. 27 student student 4096 May 28 16:09 student
drwx------ 4 student1 student1 4096 Apr 2 09:20 student1
drwx------ 3 student2 student2 4096 Apr 1 10:41 student2
drwx------ 3 tuser1 tuser1 4096 May 27 21:48 tuser1
drwx------ 3 tuser3 tuser3 4096 May 28 08:27 tuser3
drwx------ 3 tuser4 tuser4 4096 May 28 17:35 tuser4
drwxr-xr-x 2 root root 4096 May 28 21:50 tuser5
[root@studentvm1 home]# chmod 700 tuser5 ; ll
total 60
<snip>
drwx------ 2 root root 12288 May 28 21:53 tuser5
Copy the files from /etc/skel into the new home directory.
[root@studentvm1 home]# cp -r /etc/skel/.[a-z]* /home/tuser5 ; ll -a tuser5
total 40
drwx------ 3 root root 12288 May 29 07:45 .
drwxr-xr-x. 12 root root 4096 May 28 21:50 ..
-rw-r--r-- 1 root root 18 May 29 07:45 .bash_logout
-rw-r--r-- 1 root root 141 May 29 07:45 .bash_profile
-rw-r--r-- 1 root root 376 May 29 07:45 .bashrc
-rw-r--r-- 1 root root 172 May 29 07:45 .kshrc
drwxr-xr-x 4 root root 4096 May 29 07:45 .mozilla
-rw-r--r-- 1 root root 658 May 29 07:45 .zshrc
Set the ownership of the directory and its contents to the new user.
[root@studentvm1 home]# chown -R tuser5.tuser5 tuser5 ; ll -a tuser5
total 32
drwx------ 3 tuser5 tuser5 4096 May 29 07:51 .
drwxr-xr-x. 12 root root 4096 May 29 07:50 ..
-rw-r--r-- 1 tuser5 tuser5 18 May 29 07:51 .bash_logout
-rw-r--r-- 1 tuser5 tuser5 141 May 29 07:51 .bash_profile
-rw-r--r-- 1 tuser5 tuser5 376 May 29 07:51 .bashrc
-rw-r--r-- 1 tuser5 tuser5 172 May 29 07:51 .kshrc
drwxr-xr-x 4 tuser5 tuser5 4096 May 29 07:51 .mozilla
-rw-r--r-- 1 tuser5 tuser5 658 May 29 07:51 .zshrc
To test this new user with a login, you can use either a virtual console or use su – tuser5 from a student user terminal session. Or do both. Remember that tuser5 has the same password as tuser4, mypassword.
[student@studentvm1 ~]$ su - tuser5
Password: mypassword
Running /etc/profile
Running /etc/profile.d/myBashConfig.sh
Running /etc/bashrc
Running /etc/bashrc
[tuser5@studentvm1 ~]$
That was fairly easy, but using the useradd command is even easier most of the time. Log out of the tuser5 account.
You have now performed all of the steps necessary and modified all of the files involved in creating a new user. This knowledge has been useful in my SysAdmin work. I have sometimes found it easier to simply edit a group or passwd file than to use an appropriate CLI command like usermod. It is also easier to spot a damaged entry in one of these files having edited them by hand.
Locking the password
Is one of your users going on extended vacation? Or is a user leaving the organization or transferring to another location? Sometimes you want to secure an account so that no one – except for you, the SysAdmin, as root – has access, but you do not want to delete it. The need to do this could also be for forensic reasons.
A locked password prevents the user – or anyone else – from logging into the account, but it does not change the password hash. The password can be easily unlocked when necessary. The user can then log in with the original password.
Experiment 16-11
Parts of this experiment will be performed as root and parts as tuser5. Be sure to log out of the tuser5 account. Now lock the tuser5 account. The -l (lowercase ell) option locks the account.
[root@studentvm1 ~]# passwd -l tuser5
Locking password for user tuser5.
passwd: Success
Look at the line for tuser5 in the /etc/shadow file.
[root@studentvm1 ~]# grep tuser5 /etc/shadow
tuser5:!!$6$123456$KKcK3jDXxN5TVYNLbMdEIjnfRjaSlbqj5X9bBgryaa4qLD04lrM9kswCpAZL27/WXlbsDQcJ8kBxPjcpips781:18044:0:99999:7:::
Notice the two exclamation points (!!) at the beginning of the password hash. Now log in to the tuser5 account from a virtual console or using su from a student account terminal session.
[student@studentvm1 ~]$ su - tuser5
Password:
su: Authentication failure
Now unlock the account.
[root@studentvm1 ~]# passwd -u tuser5
Unlocking password for user tuser5.
passwd: Success
Log in to it again to verify that it is unlocked.
We could also have used Vim to edit the /etc/shadow file to add and remove the “!!” from the beginning of the password field.
Deleting user accounts
User accounts are very easy to delete. Depending upon the reason for deletion, you may wish to retain the user’s home directory or to delete it along with the rest of the account.
Experiment 16-12
Perform this experiment as the root user. Use the userdel command to delete tuser3 but leave the home directory.
[root@studentvm1 ~]# userdel tuser3 ; ll /home
total 52
drwxrws--- 2 root dev 4096 Apr 2 09:19 dev
drwx------. 2 root root 16384 Dec 22 11:01 lost+found
drwxrws--- 2 root dev 4096 Apr 2 12:34 shared
drwx------. 27 student student 4096 May 28 16:09 student
drwx------ 4 student1 student1 4096 Apr 2 09:20 student1
drwx------ 3 student2 student2 4096 Apr 1 10:41 student2
drwx------ 3 tuser1 tuser1 4096 May 27 21:48 tuser1
drwx------ 3 1005 1005 4096 May 29 07:53 tuser3
drwx------ 3 tuser4 tuser4 4096 May 28 17:35 tuser4
drwx------ 3 tuser5 tuser5 4096 May 29 07:53 tuser5
Because the tuser3 account no longer exists, the account name is no longer shown in the long listing of the /home directory. The directory and its contents still have UID and GID of 1005 and that is what we see here.
Now delete the account for tuser4 along with its home directory. The -r option removes the home directory for an account.
[root@studentvm1 ~]# userdel -r tuser4 ; ll /home
total 48
drwxrws--- 2 root dev 4096 Apr 2 09:19 dev
drwx------. 2 root root 16384 Dec 22 11:01 lost+found
drwxrws--- 2 root dev 4096 Apr 2 12:34 shared
drwx------. 27 student student 4096 May 28 16:09 student
drwx------ 4 student1 student1 4096 Apr 2 09:20 student1
drwx------ 3 student2 student2 4096 Apr 1 10:41 student2
drwx------ 3 tuser1 tuser1 4096 May 27 21:48 tuser1
drwx------ 3 1005 1005 4096 May 29 07:53 tuser3
drwx------ 3 tuser5 tuser5 4096 May 29 07:53 tuser5
It is also possible to delete user accounts by editing the appropriate files to remove the lines pertaining to the account we want to remove.
Forcing account logoff
Sometimes it may become necessary to force a user account to log off. This may be required because a user has left for the day and the system needs to be updated with no users logged in, the user has left the organization, or there may be one or more runaway processes.
Whatever the reason, there is no “logout other user” command, but there is a simple way to deal with this need to force the termination of all processes belonging to a user. This is, in fact, even more effective than simply forcing a logout.
Experiment 16-13
This experiment will be performed as root and the student1 user. First let’s see if the student1 user is logged in. The pgrep command can be used as root to locate the PIDs of running processes that belong to a specific user account.
[root@studentvm1 ~]# pgrep -U student1
[root@studentvm1 ~]#
In this case the student user is not logged in. If you find that there are no processes belonging to the student1 user or you find only three or four processes, open a terminal session on your desktop and su to the student1 user.
[student@studentvm1 ~]$ su - student1
Password:
Running /etc/profile
Running /etc/profile.d/myBashConfig.sh
Running /etc/bashrc
Running /etc/bashrc
[student1@studentvm1 ~]$
Also log in at a virtual console as student1. As root, look for processes belonging to student1. The specific PIDs you see will be different from those listed here from my VM.
[root@studentvm1 ~]# pgrep -U student1
30774
30775
30780
30781
30785
30831
30840
Now we can kill all of these processes to force the user off the system. This is not a logout; it kills all of the user’s processes, even ones that might be left behind after a logout.
[root@studentvm1 ~]# pkill -KILL -U student1
[root@studentvm1 ~]# pgrep -U student1
[root@studentvm1 ~]#
This will also show “Killed” in the terminal window you had opened.
Setting resource limits
You might think that with huge amounts of disk space, high CPU counts and speeds, gigabytes of RAM, and terabytes of disk space that modern Linux hosts do not have limited resources. That is not true, and I have seen huge systems overburdened by programs in test or even fully released programs that were poorly written. More frequently, I have caused myself problems where a shell script I have written sucks up most or all of some critical resource. You saw how easy that was when we did it intentionally earlier in this course. It seems to be even easier when it is unintentional.
So imagine for a moment that you are the system administrator for a Linux box that has a large number of users. And that one of those user accounts is running resource hogs – large jobs that suck up CPU time and memory which slows the tasks being run by other users to a crawl. They all come complaining to you. What do you do?
These issues can be corrected immediately by killing all of the processes – or at least the offending ones – belonging to the user owning them.
It is even better to prevent these problems by setting limits on the amount of system resources that a user, users, or groups can consume. The /etc/security/limits.conf file can be used to set limits for system resources to levels that will affect other users not at all or at least only marginally. A related option is to add a local config file to the /etc/security/limits.d directory. This prevents making changes to the main configuration file such as might occur during updates or complete reinstallations.
There are soft and hard limits that can be set. A soft limit sends a message when it is met or exceeded, while a hard limit prevents completion of the command that caused it. Both hard and soft limits can be set on a resource so that the user first receives a message and then is prevented from continuing. The limits set in this file are monitored and enforced by the pluggable authentication module (PAM) system which we will encounter again in Chapter 17 of this volume.
Limits can be applied to individual users, to groups such as dev or accounting, and to lists of users or groups, as well as to all users or groups.
Experiment 16-14
This experiment is performed in part as the root user and in part as the student1 user.
First, as the root user, open /etc/security/limits.conf with less and just view its contents for now. Read the comment sections of this file to understand the system resources that can be restricted using this file and its overall structure as well as the syntax used in creating a limit specification. It is fine to leave this file open for reference.
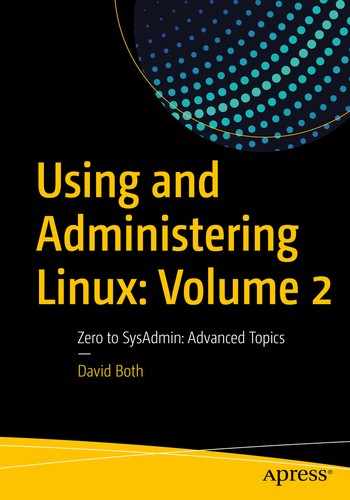
Some of the configurable resources need a bit additional clarification. So, Figure 16-4 lists all of the resources over which we can exert some control and the descriptions as found in the limits.conf file. In some cases I have added comments of my own.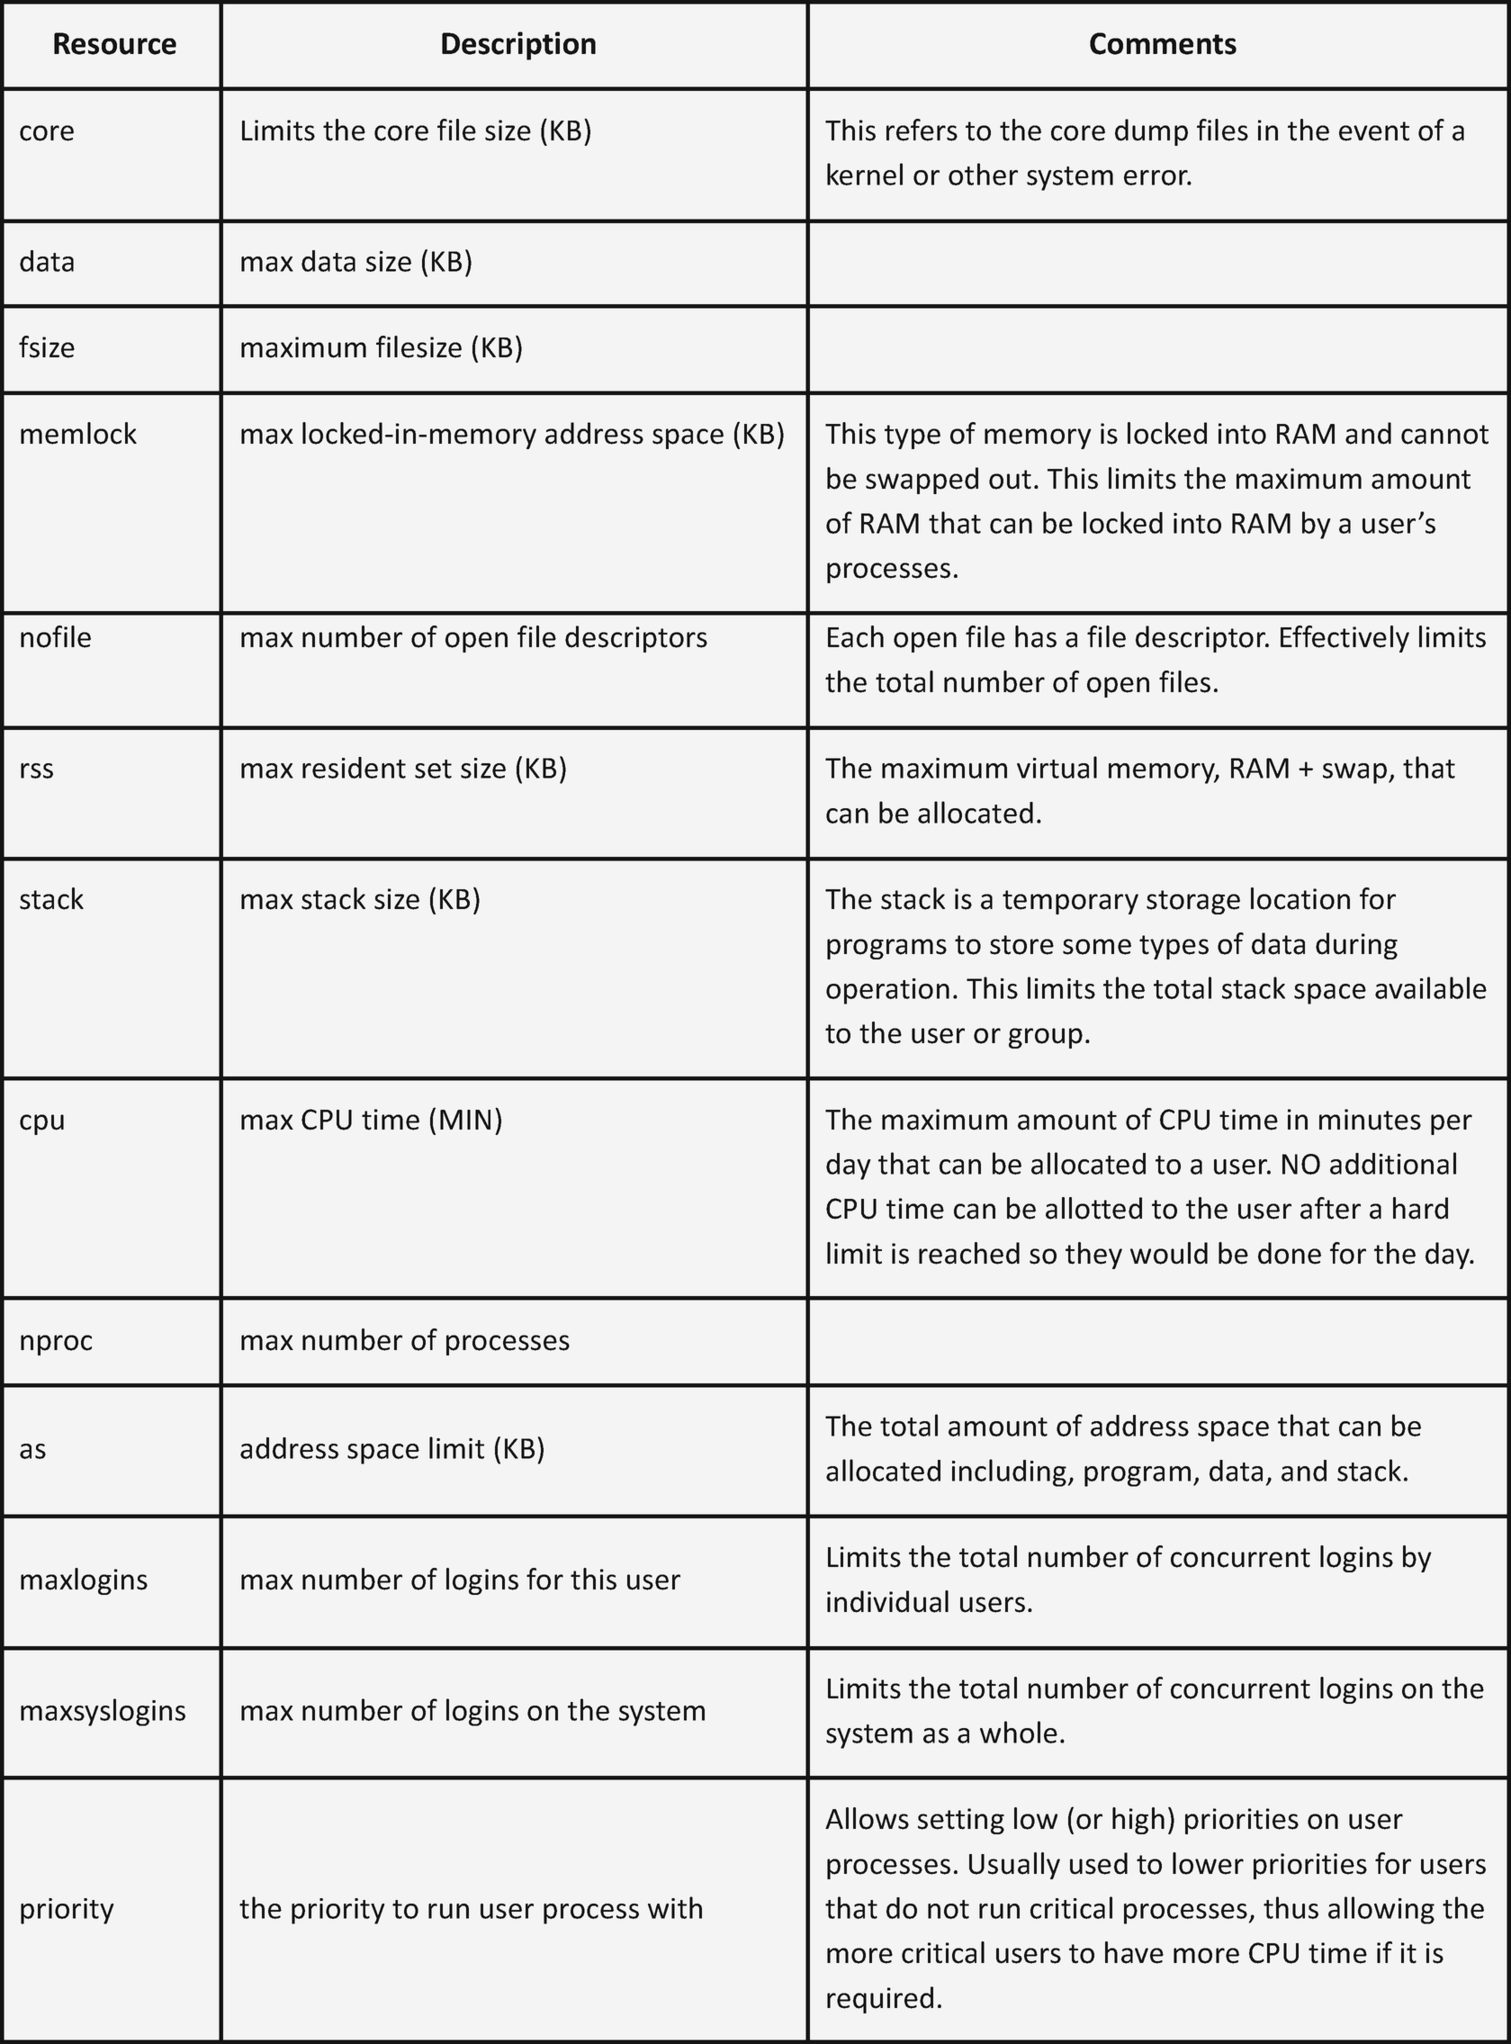
Figure 16-4
The system resources that can be controlled with the limits.conf file
Rather than change the default file, we will add a new file local.conf to the /etc/security/limits.d/ directory. Create the local.conf file there and open it with Vim. Add the following line to set the number of logins for student1 to 3. The settings in this local file override the default settings.
student1 - maxlogins 3
A reboot is not required. However, if a user already has the specified number or more of logins already open, the existing logins are not affected but no additional logins will be allowed.
Use virtual consoles 2 through 5 to log in as the student1 user. If you have those consoles logged in as another user, log out and then log in as student1. When you try to log in on VC5, you will get the following error indicating that the number of logins has been exceeded.
student1@studentvm1's password:
Too many logins for 'student1'.
Permission denied
Look at the number of logins.
[root@studentvm1 limits.d]# w -u student1
14:53:19 up 2 days, 22:12, 13 users, load average: 0.04, 0.03, 0.01
USER TTY LOGIN@ IDLE JCPU PCPU WHAT
student1 tty2 14:34 19:01 0.02s 0.02s -bash
student1 tty3 14:34 18:47 0.02s 0.02s -bash
student1 tty4 14:34 18:36 0.01s 0.01s -bash
This is the maximum number of logins allowed for this user.
Resource limitations must be considered with care, especially when applying them to groups and multiple users. This is an excellent way to ensure that the desires of the few do not outweigh the needs to the many.
Chapter summary
This chapter has taken us through the processes of creation, modification, and deletion of user accounts. We have also explored the various configuration files that support user accounts and their creation. We have created user accounts using the command-line tools and have also used Vim to add a new user by direct editing of the passwd, group, and shadow files.
We have also looked at user account security in general and password security in particular. This included exploring configuration tools that can force users to change their passwords on a regular basis as well as to enforce some aspects of password security policy.
We have also explored multiple methods to deal with resource allocation problems and how to kick users off the system who are abusing resources.
Exercises
Perform these exercises to complete this chapter:
- 1.What are the file modes for /etc/passwd and /etc/shadow?
- 2.Why are the user passwords stored in /etc/shadow?
- 3.Why might a SysAdmin want to generate a password using the pwgen command and pipe it directly to the useradd command, thus creating an initial password that is not known to anyone?
- 4.The command cp -r /etc/skel/.[a-z]* /home/tuser5 ; ll -a tuser5 was used to copy the files from /etc/skel to the home directory of tuser5 in Experiment 16-9. Why is the syntax /etc/skel/.[a-z]* used instead of just /etc/skel/.*?
- 5.Remove the tuser5 account by editing the user account files. Also remove the home directory for the account.
- 6.The tuser3 account was removed in Experiment 16-12 without also removing the account’s home directory. Remove that home directory.
- 7.Set a hard limit of 5 minutes of CPU time on a user other than the student user. You could use the student1 user. Then start a cpuHog program and watch what happens.
- 8.Devise and run an experiment to verify that setting the number of allowed logins on a user to a number smaller than the current number that are open does not affect the open ones.
- 9.Set the shell on the student1 account as /sbin/nologin. What happens when you try to log in as that user?