Objectives
In this chapter you will learn
- The definition of a file
- To understand what “everything is a file” really means and why it is important
- The implications of “everything is a file”
- How to use common Linux file management tools to access hardware as files
This is one of the most important concepts that make Linux especially flexible and powerful: everything is a file. That is, everything can be the source of a data stream, the target of a data stream, or in many cases both. In this chapter you will explore what “everything is a file” really means and learn to use that to advantage as a SysAdmin.
The whole point with "everything is a file" is ... the fact that you can use common tools to operate on different things.—Linus Torvalds in an email.
What is a file?
Here is a trick question for you. Which of the following are files?
- Directories
- Shell scripts
- Running terminal emulators
- LibreOffice documents
- Serial ports
- Kernel data structures
- Kernel tuning parameters
- Hard drives – /dev/sda
- /dev/null
- Partitions – /dev/sda1
- Logical volumes (LVM) – /dev/mapper/volume1-tmp
- Printers
- Sockets
To Unix and Linux, they are all files and that is one of the most amazing concepts in the history of computing. It makes possible some very simple yet powerful methods for performing many administrative tasks that might otherwise be extremely difficult or impossible.
Linux handles almost everything as a file. This has some interesting and amazing implications. This concept makes it possible to copy an entire hard drive, boot record included, because the entire hard drive is a file, just as are the individual partitions.
“Everything is a file” is possible because all devices are implemented by Linux as these things called device files. Device files are not device drivers, rather they are gateways to devices that are exposed to the user.
Device files
Device files are technically known as device special files.1 Device files are employed to provide the operating system and the users an interface to the devices that they represent. All Linux device files are located in the /dev directory, which is an integral part of the root (/) filesystem because they must be available to the operating system during early stages of the boot process – before other filesystems are mounted.
Device file creation
Over the years, chaos overtook the /dev directory with huge numbers of mostly unneeded devices. The udev daemon was created to simplify this problem. Understanding how udev works is key to dealing with devices, especially hot-plug devices and how they can be managed.
The /dev/directory has always been the location for the device files in all Unix and Linux operating systems. In the past, device files were created at the time the operating system was created. This meant that all possible devices that might ever be used on a system needed to be created in advance. In fact, tens of thousands of device files needed to be created to handle all of the possibilities. It became very difficult to determine which device file actually related to a specific physical device or if one were missing.
udev simplification
udev is designed to simplify this problem by creating entries in /dev only for those devices that actually currently exist at boot time or which have a high probability of actually existing on the host. This significantly reduces the total number of device files required.
In addition, udev assigns names to devices when they are plugged into the system, such as USB storage and printers, and other non-USB types of devices as well. In fact, udev treats all devices as plug and play (PnP), even at boot time. This makes dealing with devices consistent at all times, whether at boot time or when they are hot-plugged later. It is not necessary for us as SysAdmins to do anything else for the device files to be created. The Linux kernel takes care of everything. It is only possible to mount the partition in order to access its contents after the device file such as /dev/sdb1 has been created.
Kernel developer and maintainer Greg Kroah-Hartman, one of the creators of udev, has written a paper2 that provides some insight into the details of udev and how it is supposed to work. Note that udev has matured since the article was written and some things have changed, such as the udev rule locations and structure. Regardless, this paper provides some deep and important insight into udev and current device naming strategies which I’ll attempt to summarize in this chapter.
Naming rules
In modern versions of Fedora and CentOS, udev stores its default naming rules in files in the /usr/lib/udev/rules.d directory and its local rules and configuration files in the /etc/udev/rules.d directory. Each file contains a set of rules for a specific device type. CentOS 6 and earlier stored the global rules in /lib/udev/rules.d/. The location of the udev rules files may be different on your distribution.
In earlier versions of udev, there were many local rule sets created, including a set for network interface card (NIC) naming. As each NIC was discovered by the kernel and renamed by udev for the very first time, a rule was added to the rule set for the network device type. This was initially done to ensure consistency before names had changed from “ethX” to more consistent ones.
Rule Change Blues
One of the main consequences of using udev for persistent plug and play naming is that it makes things much easier for the average non-technical user. This is a good thing in the long run; however, there have been migration problems, and many SysAdmins were – and still are – not happy with these changes.
The rules changed over time and there were at least three significantly different naming conventions for network interface cards. That naming disparity caused a great deal of confusion, and many configuration files and scripts had to be rewritten multiple times during the period of these changes.
For example, the name of a NIC that was originally eth0 would have changed from that to em1 or p1p2 and finally to eno1. I wrote an article3 on my web site that goes into some detail about these naming schemes and the reasons behind them.
Now that udev has multiple consistent default rules for determining device names, especially for NICs, storing the specific rules for each device in local configuration files is no longer required to maintain that consistency.
Device data flow
Let's look at the data flow of a typical command to visualize how device special files work. Figure 3-1 illustrates a simplified data flow for a simple command. Issuing the # cat /etc/resolv.conf command from a GUI terminal emulator such as Konsole or xterm causes the resolv.conf file to be read from the disk with the disk device driver handling the device-specific functions such as locating the file on the hard drive and reading it. The data is passed through the device file and then from the command to the device file and device driver for pseudo-terminal 6 where it is displayed in the terminal session.
Of course the output of the cat command could have been redirected to a file in the following manner, cat /etc/resolv.conf > /etc/resolv.bak, in order to create a backup of the file. In that case the data flow on the left side of Figure 3-1 would remain the same, while the data flow on the right would be through the /dev/sda2 device file, the hard drive device driver, and then back onto the hard drive in the /etc directory as the new file, resolv.bak.
Figure 3-1
Simplified data flow with device special files
These device special files make it very easy to use standard streams (STDIO) and redirection to access any and every device on a Linux or Unix computer. They provide a consistent and easy to access interface to every device. Simply directing a data stream to a device file sends the data to that device.
One of the most important things to remember about these device special files is that they are not device drivers. They are most accurately described as portals or gateways to the device drivers. Data is passed from an application or the operating system to the device file which then passes it to the device driver which then sends it to the physical device.
By using these device files which are separate from the device drivers, it is possible for users and programs to have a consistent interface to every device on the host computer. This is how common tools can be used to operate on different things as Linus says.
The device drivers are still responsible for dealing with the unique requirements of each physical device. That is, however, outside the scope of this book.
Device file classification
Device files can be classified in at least two ways. The first and most commonly used classification is that of the type of data stream commonly associated with the device. For example, tty and serial devices are considered to be character based because the data stream is transferred and handled one character or byte at a time. Block-type devices such as hard drives transfer data in blocks, typically a multiple of 256 bytes.
Let's take a look at the /dev/directory and some of the devices in it.
Experiment 3-1
This experiment should be performed as the user student.
Open a terminal session and display a long listing of the /dev/directory.
[student@studentvm1 ~]$ ls -l /dev | less
<snip>
brw-rw----. 1 root disk 8, 0 Jan 30 06:53 sda
brw-rw----. 1 root disk 8, 1 Jan 30 06:53 sda1
brw-rw----. 1 root disk 8, 2 Jan 30 06:53 sda2
brw-rw----. 1 root disk 8, 16 Jan 30 06:53 sdb
brw-rw----. 1 root disk 8, 17 Jan 30 06:53 sdb1
brw-rw----. 1 root disk 8, 18 Jan 30 06:53 sdb2
brw-rw----. 1 root disk 8, 19 Jan 30 06:53 sdb3
brw-rw----. 1 root disk 8, 32 Jan 30 06:53 sdc
<snip>
crw-rw-rw-. 1 root tty 5, 0 Jan 30 06:53 tty
crw--w----. 1 root tty 4, 0 Jan 30 06:53 tty0
crw--w----. 1 root tty 4, 1 Jan 30 11:53 tty1
crw--w----. 1 root tty 4, 10 Jan 30 06:53 tty10
crw--w----. 1 root tty 4, 11 Jan 30 06:53 tty11
crw--w----. 1 root tty 4, 12 Jan 30 06:53 tty12
<snip>
The results from this command are too long to show here in full, but you will see a list of device files with their file permissions and their major and minor identification numbers.
The voluminous output of the ls -l command is piped through the less utility to allow you to page through the results; use the Page Up, Page Down, and up and down arrow keys to move around. Type q to quit and get out of the less display.
The pruned listing of device files shown in Experiment 3-1 are just a few of the ones in the /dev/directory on my StudentVM1 virtual machine. The ones on your VM should be very similar if not identical. They represent disk and tty type devices among many others. Notice the leftmost character of each line in the output. The ones that have a “b” are block-type devices and the ones that begin with “c” are character devices.
The more detailed and explicit way to identify device files is using the device major and minor numbers. The disk devices have a major number of 8 which designates them as SCSI block devices. Note that all parallel ATA (PATA)4 and serial ATA (SATA)5 hard drives and SSDs have been managed by the SCSI subsystem because the old ATA subsystem was deemed many years ago as not maintainable due to the poor quality of its code. As a result, hard drives that would previously be designated as “hd[a-z]” are now referred to as “sd[a-z]”.
You can probably infer the pattern of disk drive minor numbers in the small sample shown earlier. Minor numbers 0, 16, 32, and so on up through 240 are the whole disk numbers. So major/minor 8/16 represents the whole disk /dev/sdb and 8/17 is the device file for the first partition, /dev/sdb1. Numbers 8/34 would be /dev/sdc2.
The tty device files in the preceding list are numbered a bit more simply from tty0 through tty63. I find the number of tty devices a little incongruous because the whole point of the new udev system is to create device files for only those devices that actually exist; I am not sure why it is being done this way. The device files on your host should have a timestamp that is the same as the last boot time.
The Linux Allocated Devices6 file at Kernel.org is the official registry of device types and major and minor number allocations. It can help you understand the major/minor numbers for all currently defined devices.
Fun with device files
Let's take a few minutes now and have some fun with some of these device files. We will perform a couple fun experiments that illustrate the power and flexibility of the Linux device files.
Most Linux distributions have multiple virtual consoles, 1 through 7, that can be used to log in to a local console session with a shell interface. These can be accessed using the key combinations HostKey-F1 for console 1, HostKey-F2 for console 2, and so on. Virtual consoles were introduced in Volume 1, Chapter 7, of this course. The default HostKey is the right Control key, but I have reconfigured mine to be the left Win key, a.k.a. the super key, because I find it easier. You can change the default HostKey with the VirtualBox manager.
Experiment 3-2
In this experiment we will show that simple commands can be used to send data between devices, in this case, different console and terminal devices. Perform this experiment as the student user.
On the StudentVM1 desktop window, press HostKey-F2 to switch to console 2. On some distributions like Fedora, the login information includes the tty (Teletype) device associated with this console, but some do not. It should be tty2 because you are in console 2.
Log in to console 2 as the student user. Then use the who am i command – yes, just like that, with spaces – to determine which tty device is connected to this console.
[student@studentvm1 ~]$ who am i
student tty2 2019-01-30 15:32
This command also shows the date and time that the user on the console logged in.
Before we proceed any further with this experiment, let's look at a listing of the tty2 and tty3 devices in /dev. We do that by using a set [23] so that only those two devices are listed.
[student@studentvm1 ~]$ ls -l /dev/tty[23]
crw--w----. 1 student tty 4, 2 Jan 30 15:39 /dev/tty2
crw--w----. 1 root tty 4, 3 Jan 30 06:53 /dev/tty3
There are a large number of tty devices defined at boot time, but we do not care about most of them for this experiment, just the tty2 and tty3 devices. As device files there is nothing special about them; they are simply character type devices; note the “c” in the first column of the results. We will use these two TTY devices for this experiment. The tty2 device is attached to virtual console 2, and the tty3 device is attached to virtual console 3.
Press HostKey-F3 to switch to console 3 and log in again as the student user. Use the who am i command again to verify that you really are on console 3 and then enter the echo command.
[student@studentvm1 ~]$ who am i
student tty3 2019-01-30 15:38
[student@studentvm1 ~]$ echo "Hello world" > /dev/tty2
Press HostKey-F2 to return to console 2. The string "Hello world" (without quotes) should be displayed on console 2.
This experiment can also be performed with terminal emulators on the GUI desktop. Terminal sessions on the desktop use pseudo-terminal devices in the /dev tree, such as /dev/pts/1, where pts stands for “pseudo-terminal session.”
Return to your graphical desktop using HostKey-F1. Open at least two terminal sessions on the GUI desktop using Konsole, Tilix, Xterm, or your other favorite graphical terminal emulator. You may open several if you wish. Determine which pseudo-terminal device files they are connected to with the who am i command and then choose one pair of terminal emulators to work with for this experiment. Use one to send a message to the another with the echo command.
[student@studentvm1 ~]$ who am i
student pts/9 2017-10-19 13:21 (192.168.0.1)
However, it is possible that you will get no result from the who am i command. This occurs because who am i only seems to work on login terminal sessions and not on a non-login session such as one started from the desktop. So a virtual console session or a remote SSH login session would work with this. But there are at least two ways to circumvent this – as is usual in Linux.
We will use the w command. The w command lists the tasks being run on each terminal session so the terminal session that shows w in the WHAT column is the one you are looking for. In my case it is pts/6, as shown in the following.
[student@studentvm1 ~]$ w
08:47:38 up 1 day, 20:12, 6 users, load average: 0.11, 0.06, 0.01
USER TTY LOGIN@ IDLE JCPU PCPU WHAT
student tty1 Wed12 2days 14.16s 0.06s /bin/sh /etc/xdg/xfce4/xinitrc -- vt
root pts/1 Thu17 10:50m 0.03s 0.03s /bin/bash
root pts/2 Thu17 15:18m 0.02s 0.02s /bin/bash
root pts/3 Thu17 10:48m 0.02s 0.02s /bin/bash
student pts/5 08:45 47.00s 0.02s 0.00s less
student pts/6 08:45 0.00s 0.03s 0.00s w
[student@studentvm1 ~]$
[student@studentvm1 ~]$ echo "Hello world" > /dev/pts/5
On my test host, I sent the text “Hello world” from /dev/pts/6 to /dev/pts/5. Your terminal devices will be different from the ones I have used on my test VM. Be sure to use the correct devices for your environment for this experiment.
Another interesting experiment is to print a file directly to the printer using the cat command. If you do not have a printer attached to your physical host that is available to the VM, you can skip Experiment 3-3.
Experiment 3-3
This experiment should be performed as the student user on StudentVM1.
If you have a USB printer available, plug it into the physical host. Then use the StudentVM1 window’s menu bar to open the Devices ➤ USB menu and then add a check to the printer in the listed USB devices in order to make it available to your VM.
You may need to determine which device is your printer. If your printer is a USB printer which almost all are these days, look in the /dev/usb directory for lp0 which is usually the default printer. You may find other printer device files in that directory as well.
I used LibreOffice Writer to create a short document which I then exported as a PDF file, test.pdf. Any Linux word processor will do so long as it can export to the PDF format.
We will assume that your printer device is /dev/usb/lp0, and that your printer can print PDF files directly, as most can. Be sure to use a PDF file and change the name test.pdf in the command to the name of your own file.
[student@studentvm1 ~]$ cat test.pdf > /dev/usb/lp0
This command should print the PDF file test.pdf on your printer.
The /dev directory contains some very interesting device files that are portals to hardware that one does not normally think of as a device like a hard drive or display. For one example, system memory – RAM – is not something that is normally considered as a “device,” yet /dev/mem is the device special file through which direct access to memory can be achieved.
Experiment 3-4
This experiment must be run as the root user. Because you are only reading the contents of memory, this experiment poses little danger.
If a root terminal session is not already available, open a terminal emulator session and log in as root. The next command will dump the first 200K of RAM to STDOUT.
[root@studentvm1 ~]# dd if=/dev/mem bs=2048 count=100
It may not look like that much and what you do see will be unintelligible. To make it a bit more intelligible – to at least display the data in a decent format that might be interpreted by an expert – pipe the output of the previous command through the od utility.
[root@studentvm1 ~]# dd if=/dev/mem bs=2048 count=100 | od -c
Root has more access to read memory than a non-root user, but most memory is protected from being written by any user, including root.
The dd command provides significantly more control than simply using the cat command to dump all of memory, which I have also tried. The dd command provides the ability to specify how much data is read from /dev/mem and would also allow me to specify the point at which to start reading data from memory. Although some memory was read using the cat command, the kernel eventually responded with the error in Figure 3-2.
You can also log in as a non-root user, student, and try this command. You will get an error message because the memory you are trying to access does not belong to your user. This is a memory protection feature of Linux that keeps other users from reading or writing memory that does not belong to them.
Figure 3-2
The error on the last line was displayed when the cat command attempted to dump protected memory to STDOUT
These memory errors mean that the kernel is doing its job by protecting memory that belongs to other processes which is exactly how it should work. So, although you can use /dev/mem to display data stored in RAM memory, access to most memory space is protected and will result in errors. Only that virtual memory which is assigned by the kernel memory manager to the bash shell running the dd command should be accessible without causing an error. Sorry, but you cannot snoop in memory that does not belong to you unless you find a vulnerability to exploit.
Many types of malware depend upon privilege escalation to allow them to read the contents of memory that they would not normally be able to access. This allows the malware to find and steal personal data such as account numbers, user ID, and stored passwords. Fortunately, Linux protects against memory access by non-root users. It also protects against privilege escalation. But even Linux security is not perfect. It is important to install security patches to protect against vulnerabilities that allow privilege escalation. You should also be aware of human factors such as the tendency people have to write down their passwords, but that is all another book.7
You can now see that memory is also considered to be a file and can be treated as such using the memory device file.
Randomness, zero, and more
There are some other very interesting device files in /dev. The device special files null, zero, random, and urandom are not associated with any physical devices. These device files provide sources of zeros, nulls, and random numbers.
The null device /dev/null can be used as a target for the redirection of output from shell commands or programs so that they are not displayed on the terminal.
Experiment 3-5
I frequently use /dev/null in my bash scripts to prevent users from being presented with output that is irrelevant or that might be confusing to them. Enter the following command to redirect the output to the null device. Nothing will be displayed on the terminal. The data is just dumped into the big bit bucket in the sky.
[student@studentvm1 ~]$ echo "Hello world" > /dev/null
There is really no visible output from the /dev/null because the null device simply returns an end of file (EOF) character. Note that the byte count is zero. The null device is much more useful as a place to redirect unwanted output so that it is removed from the data stream.
The /dev/random and /dev/urandom devices are both useful as data stream sources. As their names imply, they both produce essentially random output – not just numbers but any and all byte combinations. The /dev/urandom device produces a deterministic8 stream of random output and is very fast while /dev/random produces a non-deterministic9 stream but is slower.
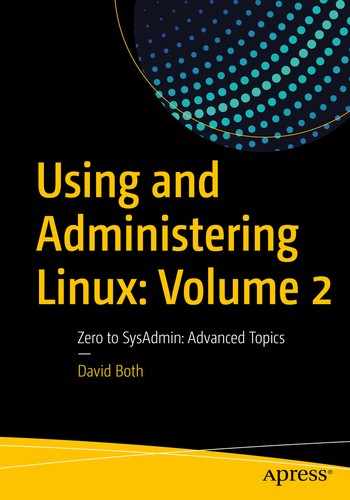
Experiment 3-6
Use this command to view typical output from /dev/urandom. You can use Ctrl-c to break out.
I have shown only a part of the data stream from the command, but it should give you a sense for what you should see on your system.
You could also pipe the output of Experiment 3-6 through the od (Octal Display) command to make it a little more human readable just for this experiment. That makes little sense for most real-world applications because it is, after all, random data.
The man page for od shows that it can be used to obtain data directly from a file as well as specify the amount of data to be read.
Experiment 3-7
In this case I have used -N 128 to limit the output to 128 bytes.
[student@studentvm1 ~]$ od /dev/urandom -N 128
0000000 043514 022412 112660 052071 161447 057027 114243 061412
0000020 154627 105675 154470 110352 135013 127206 103057 136555
0000040 033417 011054 014334 040457 157056 165542 027255 121710
0000060 125334 065600 165447 165245 020756 101514 042377 132156
0000100 116024 027770 000537 014743 170561 011122 173454 102163
0000120 074301 104771 123476 054643 105211 151753 166617 154313
0000140 103720 147660 012644 037363 077661 076453 104161 033220
0000160 056501 001771 113557 075046 102700 043405 132046 045263
0000200
The dd command could also be used to specify a limit to the amount of data taken from the [u]random devices, but it cannot directly format the data.
The /dev/random device file produces non-deterministic random output, but it produces output more slowly. This output is not determined by an algorithm that is dependent only upon the previous number that was generated, but it is generated in response to keystrokes and mouse movements. This method makes it far more difficult to duplicate a specific series of random numbers. Use the cat command to view some of the output from the /dev/random device file. Try moving the mouse to see how it affects the output.
The random data generated from /dev/random and /dev/urandom, regardless of how it is read from those devices, is usually redirected to a file on some storage media or to STDIN of another program. Random data seldom needs to be viewed by the SysAdmin, developer, or the end user. But it does make a good demonstration for this experiment.
As its name implies, the /dev/zero device file produces an unending string of zeros as output. Note that these are octal zeros and not the ASCII character zero (0).
Experiment 3-8
Use the dd command to view some output from the /dev/zero device file. Note that the byte count for this command is non-zero.
[student@studentvm1 ~]$ dd if=/dev/zero bs=512 count=500 | od -c
0000000 � � � � � � � � � � � � � � � �
∗
500+0 records in
500+0 records out
256000 bytes (256 kB, 250 KiB) copied, 0.00126996 s, 202 MB/s
0764000
Back up the master boot record
Consider, for example, the simple task of making a backup of the master boot record (MBR) of a hard drive. I have had, on occasion, needed to restore or recreate my MBR, particularly the partition table. Recreating it from scratch is very difficult. Restoring it from a saved file is easy. So let's back up the boot record of the hard drive.
Note that all of the experiments in this section must be performed as root.
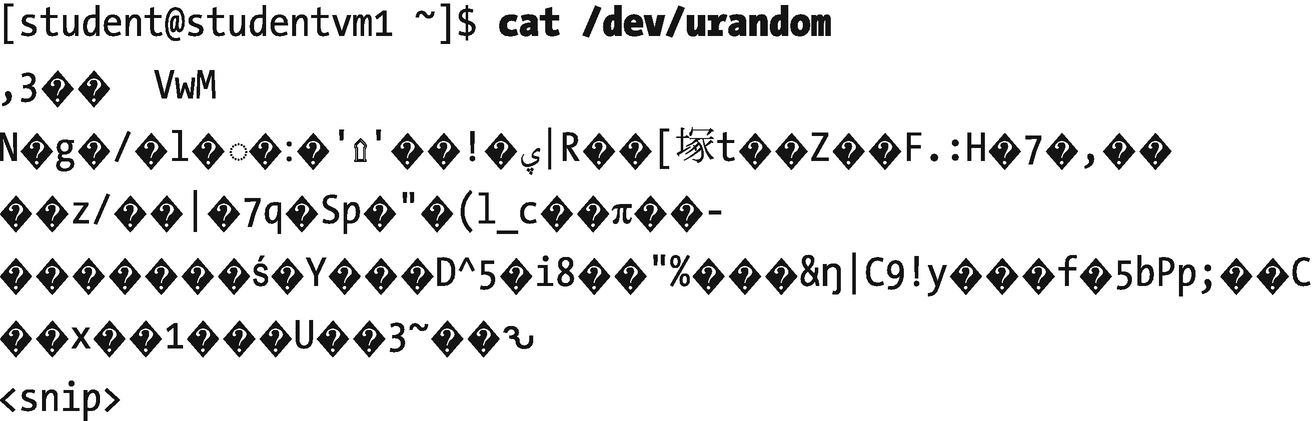
Experiment 3-9
Perform this experiment as the root user. We are going to create a backup of the master boot record (MBR), but we will not attempt to restore it.
The dd command must be run as root because for security reasons non-root users do not have access to the hard drive device files in the /dev directory. The bs value is not what you might think; it stands for block size. Count is the number of blocks to read from the source file.
[root@studentvm1 ~]# dd if=/dev/sda of=/tmp/myMBR.bak bs=512 count=1
This command creates a file, myMBR.bak, in the /tmp directory. The file is 512 bytes in size and contains the contents of the MBR including the bootstrap code and partition table. Look at the contents of the file you just created.

Because there is no end of line character at the end of the boot sector, the command prompt is on the same line as the end of the boot record.
If the MBR were damaged, it would be necessary to boot to a rescue disk and use the command in Figure 3-3 which would perform the reverse operation of the preceding one. Notice that it is not necessary to specify the block size and block count as in the first command because the dd command will simply copy the backup file to the first sector of the hard drive and stop when it reaches the end of the source file.
Figure 3-3
This command would restore the backup of the boot record
So now that you have performed a backup of the boot record of your hard drive and verified the contents of that backup, let's move to a safer environment to destroy the boot record and then restore it.
Experiment 3-10
This is a rather long experiment and it must be performed as root. You will create a new virtual hard drive add a partition, and create a filesystem on it. You will then make a backup of the MBR, and damage the MBR on the device. Then you will try to read the device which will fail, and then restore the MBR and read it again to verify that it works.
Start by creating a new virtual hard drive of 2GB in size using the VirtualBox manager. This virtual hard drive should be dynamically allocated and be named StudentVM1-3.vdi. After creating the new virtual hard drive, verify that its device special file is /dev/sdd. If your new virtual disk is not /dev/sdd, be sure to use the device special file for the one you just created.
The output from dmesg looks like this.
[68258.690964] ata4: SATA link up 3.0 Gbps (SStatus 123 SControl 300)
[68258.691148] ata4.00: ATA-6: VBOX HARDDISK, 1.0, max UDMA/133
[68258.691173] ata4.00: 4194304 sectors, multi 128: LBA48 NCQ (depth 32)
[68258.691300] ata4.00: configured for UDMA/133
[68258.691499] scsi 3:0:0:0: Direct-Access ATA VBOX HARDDISK 1.0 PQ: 0 ANSI: 5
[68258.692828] sd 3:0:0:0: [sdd] 4194304 512-byte logical blocks: (2.15 GB/2.00 GiB)
[68258.692876] sd 3:0:0:0: [sdd] Write Protect is off
[68258.692897] sd 3:0:0:0: [sdd] Mode Sense: 00 3a 00 00
[68258.692909] sd 3:0:0:0: [sdd] Write cache: enabled, read cache: enabled, doesn't support DPO or FUA
[68258.693888] sd 3:0:0:0: Attached scsi generic sg4 type 0
[68258.700966] sd 3:0:0:0: [sdd] Attached SCSI disk
The new drive will also show up with the lsblk command as /dev/sdd.
Look at the boot record to provide a basis for later comparison. Note that there is no data in the boot record of this new drive.
[root@studentvm1 ~]# dd if=/dev/sdd bs=512 count=1
1+0 records in
1+0 records out
512 bytes copied, 0.000348973 s, 1.5 MB/s
Create a partition that fills the entire 2GB of the virtual drive and save the new partition table.
[root@studentvm1 ~]# fdisk /dev/sdd
Welcome to fdisk (util-linux 2.32.1).
Changes will remain in memory only, until you decide to write them.
Be careful before using the write command.
Device does not contain a recognized partition table.
Created a new DOS disklabel with disk identifier 0x39dfcf64.
Command (m for help): p
Disk /dev/sdd: 2 GiB, 2147483648 bytes, 4194304 sectors
Units: sectors of 1 ∗ 512 = 512 bytes
Sector size (logical/physical): 512 bytes / 512 bytes
I/O size (minimum/optimal): 512 bytes / 512 bytes
Disklabel type: dos
Disk identifier: 0x39dfcf64
Command (m for help): n
Partition type
p primary (0 primary, 0 extended, 4 free)
e extended (container for logical partitions)
Select (default p): <press Enter>
Using default response p.
Partition number (1-4, default 1): <press Enter>
First sector (2048-4194303, default 2048): <press Enter>
Last sector, +sectors or +size{K,M,G,T,P} (2048-4194303, default 4194303): <press Enter>
Created a new partition 1 of type 'Linux' and of size 2 GiB.
Command (m for help): w
The partition table has been altered.
Calling ioctl() to re-read partition table.
Syncing disks.
Check the boot record again, which is no longer completely empty.
[root@studentvm1 ~]# dd if=/dev/sdd bs=512 count=1 | od -c
1+0 records in
1+0 records out
512 bytes copied, 0.0131589 s, 38.9 kB/s
0000000 � � � � � � � � � � � � � � � �
∗
0000660 � � � � � � � � f 222 371 261 � � �
0000700 ! � 203 025 P 005 � � � � 370 ? � � �
0000720 � � � � � � � � � � � � � � � �
∗
0000760 � � � � � � � � � � � � � � U 252
0001000
Verify that the partition is /dev/sdd1 and then create an EXT4 filesystem on the partition.
[root@studentvm1 ~]# mkfs -t ext4 /dev/sdd1
mke2fs 1.44.3 (10-July-2018)
Creating filesystem with 524032 4k blocks and 131072 inodes
Filesystem UUID: 3e031fbf-99b9-42e9-a920-0407a8b34513
Superblock backups stored on blocks:
32768, 98304, 163840, 229376, 294912
Allocating group tables: done
Writing inode tables: done
Creating journal (8192 blocks): done
Writing superblocks and filesystem accounting information: done
Mount the new filesystem on the /mnt mount point and store some data on the device. This will verify that the new filesystem is working as it should.
[root@studentvm1 ~]# mount /dev/sdd1 /mnt ; ll /mnt
total 16
drwx------. 2 root root 16384 Jan 31 08:08 lost+found
[root@studentvm1 ~]# dmesg > /mnt/testfile001 ; ll /mnt
total 60
drwx------. 2 root root 16384 Jan 31 08:08 lost+found
-rw-r--r--. 1 root root 44662 Jan 31 08:12 testfile001
[root@studentvm1 ~]#
Copy the MBR.
Now is the fun part. We unmount the partition, overwrite the MBR of the device with one 512-byte block of random data, then view the new content of the MBR to verify the change.
[root@studentvm1 ~]# umount /mnt
[root@studentvm1 ~]# dd if=/dev/urandom of=/dev/sdd bs=512 count=1
512+0 records in
512+0 records out

Let's try a couple more things to test out this state of affairs before we restore this MBR. First we use fdisk to verify that the USB drive no longer has a partition table, which means that the MBR has been overwritten.
[root@studentvm1 ~]# fdisk -l /dev/sdd
Disk /dev/sdd: 2 GiB, 2147483648 bytes, 4194304 sectors
Units: sectors of 1 ∗ 512 = 512 bytes
Sector size (logical/physical): 512 bytes / 512 bytes
I/O size (minimum/optimal): 512 bytes / 512 bytes
[root@studentvm1 ~]#
An attempt to mount the original partition will fail. The error message indicates that the special device does not exist. This shows that most of the special device files are created and removed as necessary, on demand.
[root@studentvm1 ~]# mount /dev/sdd1 /mnt
mount: /mnt: special device /dev/sdd1 does not exist.
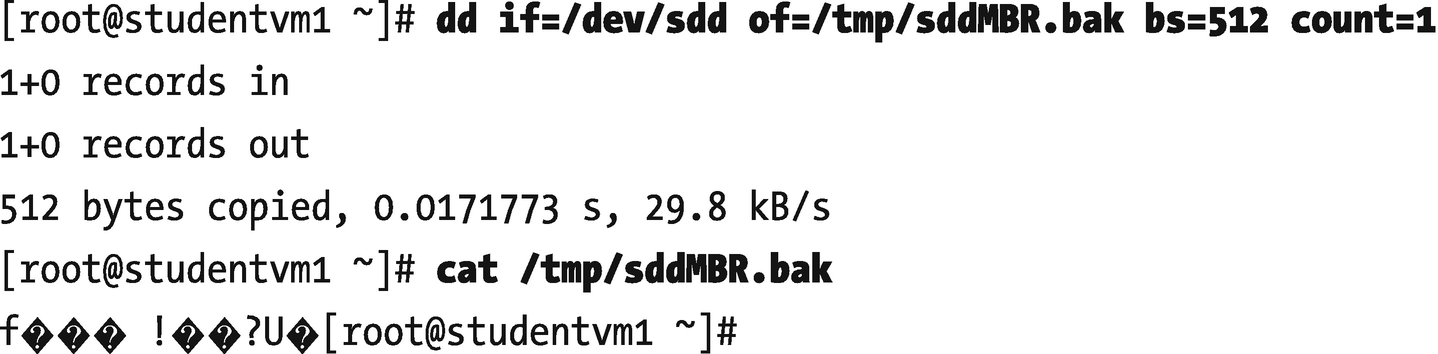
It is time to restore the boot record you backed up earlier. Because you used the dd command to carefully overwrite with random data only the MBR which contains the partition table for the drive, all of the other data remains intact. Restoring the MBR will make it available again. Restore the MBR, view the MBR on the device, then mount the partition and list the contents.
[root@studentvm1 ~]# dd if=/tmp/sddMBR.bak of=/dev/sdd
1+0 records in
1+0 records out
512 bytes copied, 0.0261115 s, 19.6 kB/s
[root@studentvm1 ~]# fdisk -l /dev/sdd
Disk /dev/sdd: 2 GiB, 2147483648 bytes, 4194304 sectors
Units: sectors of 1 ∗ 512 = 512 bytes
Sector size (logical/physical): 512 bytes / 512 bytes
I/O size (minimum/optimal): 512 bytes / 512 bytes
Disklabel type: dos
Disk identifier: 0xb1f99266
Device Boot Start End Sectors Size Id Type
/dev/sdd1 2048 4194303 4192256 2G 83 Linux
[root@studentvm1 ~]#
The fdisk command shows that the partition table has been restored. Now mount the partition and verify that the data we stored there still exists.
[root@studentvm1 ~]# mount /dev/sdd1 /mnt ; ll /mnt
total 60
drwx------. 2 root root 16384 Jan 31 08:08 lost+found
-rw-r--r--. 1 root root 44662 Jan 31 08:12 testfile001
[root@studentvm1 ~]#
Wow – how cool is that! This series of experiments is designed to illustrate that you can use the fact that all devices can be treated like files and therefore use some very common but powerful CLI tools in some very interesting ways.
It is not necessary to specify the amount of data to be copied with the sb= and count= parameters because the dd command only copies the amount of data available, in this case a single 512-byte sector.
Unmount the /dev/sdd1 device because we are finished with it.
Implications of everything is a file
The implications of “everything is a file” are far-reaching and much greater than can be listed here. You have already seen some examples in the preceding experiments. But here is a short list that encompasses those and more:
- Clone hard drives.
- Back up partitions.
- Back up the master boot record (MBR).
- Install ISO images onto USB thumb drives.
- Communicate with users on other terminals.
- Print files to a printer.
- Change the contents of certain files in the /proc pseudo-filesystem to modify configuration parameters of the running kernel.
- Overwrite files, partitions, or entire hard drives with random data or zeros.
- Redirect unwanted output from commands to a null device where it disappears forever.
- etc., etc., etc.
There are so many possibilities here that any list can really only scratch the surface. I am sure that you have – or will – figure out many ways to use this tenet of the Linux Philosophy far more creatively than I have discussed here.
Chapter summary
It is all part of a filesystem. Everything on a Linux computer is accessible as a file in the filesystem space. The whole point of this is to be able to use common tools to operate on different things – common tools such as the standard GNU/Linux utilities and commands that work on files will also work on devices – because, in Linux, they are files.
Exercises
Perform the following exercises to complete this chapter:
- 1.Why does even root have restricted access to RAM memory?
- 2.What is the difference between the device special files /dev/sdc and /dev/sdc1?
- 3.Can the cat command be used to dump the data from a partition?
- 4.Can the cat command be used to dump the data from a hard drive?
- 5.Is it possible to use standard Linux commands to clone complete hard drives in the manner of tools like Ghost, CloneZilla, or Paragon Drive Copy 15 Professional? Don’t worry – skip this question if you are not familiar with any of these tools.
- 6.Create a backup file of the entire partition /dev/sdd1 (or the equivalent device on your VM) and store the data file on /tmp which should have more than enough space to contain this backup file.
- 7.What would happen if the backup file from #6 were restored to a new partition that was created to be larger than the original partition?
Footnotes
2
Greg Kroah-Hartman, Linux Journal, Kernel Korner – udev – Persistent Naming in User Space, www.linuxjournal.com/article/7316
8
Deterministic means the output is determined by a known algorithm and uses a seed string as a starting point. Each unit of output is dependent upon the previous output and the algorithm, so if you know both the seed and the algorithm, the entire data stream can be reproduced. As a result, it is possible, although difficult, for a hacker to reproduce the output if the original seed is known.
9
Non-deterministic results are not dependent upon the previous data in the random data stream. Thus, they are more truly random than if they were deterministic.