
Editing and Assembling a Video
iMovie offers near pro-level video editing to home users like you and me. It’s a powerful application that makes the process fun. Soon it will affect the way you shoot video, too, as you search for establishing shots and other clips that fit well together. When your video is imported, you’ll organize it with the Events Library, work on it with the Project Library, and fine-tune your changes with the Precision Editor. In this chapter, I explain each.
The Project Library
The Project Library organizes and provides access to all your iMovie projects. It provides useful, at-a-glance information like a project’s name, duration, frame rate, and modification date. You can also quickly preview a project from within the Project Library. Figure 4.1 provides an overview of the Project Library.
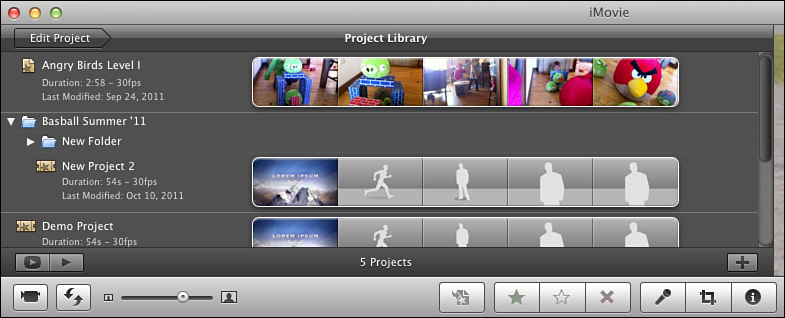
Figure 4.1 A look at several projects in the Project Library.
As you can see, each project in the Project Library provides identical information (with one variation that I’ll describe later in this chapter). On the left side, you’ll find (in order):
• The project’s title—You’ll add this when creating a new project (described later in this chapter). It can be anything you like.
• The project’s duration and frame rate—(For an explanation of frame rates, see Chapter 2, “Movie-Making Basics.”)
• The modification date—This shows the last time an event was modified. That’s to say, it shows the last time changes were saved to a given project. If you simply open and close a project without making edits, this date doesn’t change.
• Several initial frames of the clip—You can scrub over this for a preview of the project, as I explain later in this chapter.
The one variation is the small icon that appears next to each project’s title. The theme you’ve selected determines its appearance. Specifically, a project based on a movie trailer theme displays an icon that looks like a movie ticket, whereas nontrailer projects show an icon that resembles an iMovie document with a corner folded down. You’ll find more on using iMovies themes in Chapter 9, “Creating Movie Themes and Trailers.”
With all of that explained, let’s use iMovie as intended and create a new project.
Create a New Project
This is where it gets fun! Now that you’ve imported your video as described in Chapter 3, it’s time to start the editing process and work toward a final product. Here’s how to create a project, select a theme, and add some video from the Event Library.
To create a new project, click the + button in the lower-right corner of the Project Library (or select New Project from the File menu). A new sheet appears, offering several options (see Figure 4.2).
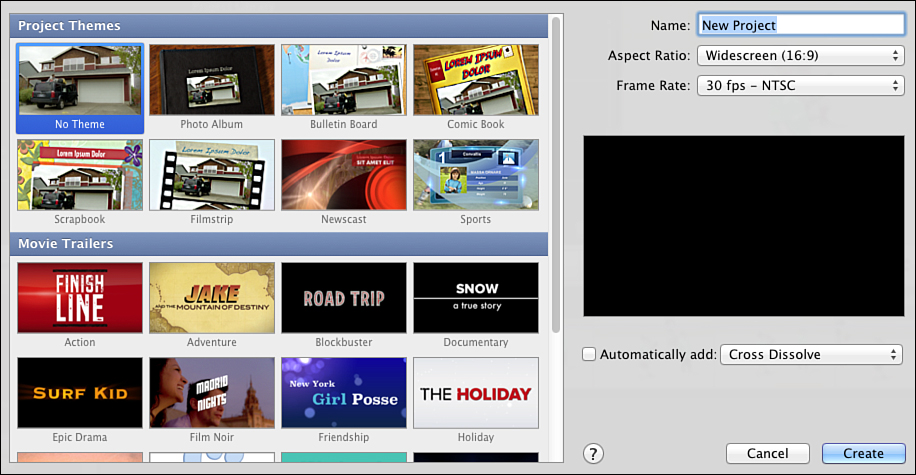
Figure 4.2 The theme selection sheet is divided into themes (top) and trailers (bottom).
On the left side of the sheet are the available themes, which are divided into two categories: Project Themes and Movie Trailers. (I explain themes more in Chapter 9.)
To select a theme, simply click its title (for example, Scrapbook or Filmstrip). When you do, a preview of the theme’s motion or audio elements appears in the preview pane on the right. (Note that the No Theme option lacks preview materials.)
On the right side of the sheet, you can give your project a name in the field labeled Name. Select the desired aspect ratio from the drop-down menu and the frame rate. (You’ll find more on aspect ratios and frame rates in Chapter 2.)
Finally, note the Automatically Add Transitions and Titles check box. When the box is selected, iMovie inserts theme-based transitions and titles into your project. When the box is deselected, you’re left to create your own titles and transitions where you want them to appear.
When you’re satisfied, click Create to add the project to the Project Library.
 SHOW ME Media 4.1—Creating a New Project in iMovie
Access this video through your registered Web edition at my.safaribooksonline.com/9780789749307/media.
![]() LET ME TRY IT
LET ME TRY IT
Create a New Project
To create a new iMovie project, follow these steps:
1. Click the File menu and select New Project.
2. A new sheet appears. Select a theme by clicking on the one you’d like to use.
3. Give your new project a title by entering a name in the field labeled Name.
4. Choose your desired aspect ratio and frame rate via the appropriate drop-down menus.
5. Click Create.
Add Video to a Project
You’ve imported video into iMovie from your camera and created a new project. The next step is to move video into your project. iMovie lets you pick just the portion of each clip you’d like to use while eliminating your less-than-stellar shots. In this section, I explain how to select the portion of a given clip you’d like to add to your project and move that section into your project. Next, I describe basic editing techniques, like assembling clips and using the basic trim function and precision editor. Let’s get started by adding some video to a project.
As I mentioned in Chapter 3, iMovie displays your video in previews called filmstrips. iMovie lets you add an entire filmstrip to a project at once or a specific range(s) of that clip. Here’s how to select a range of a filmstrip for inclusion in your project.
Define a Range of Video
Even professional cinematographers shoot video that they won’t use in their final project. It’s possible that the moments before and after little Janie blows out the candles on her birthday cake, for example, are best left on the cutting room floor. Fortunately, iMovie lets you select just Janie’s triumph over the candles and the resulting applause for inclusion in your project, while leaving the rest behind. This process is known as defining a range of video. Here’s how to do it.
In the Event Library, click on the target filmstrip. A yellow border appears on top of a section of the filmstrip. You can resize that border to define the range of video you’d like to use. There’s a small handle on each end of the border. Click and drag on that handle to increase or decrease the size of your selection. Drag the left handle to the start point and the right handle to the end point. As you drag, you’ll hear the audio corresponding with that section of the clip (see Figure 4.3).
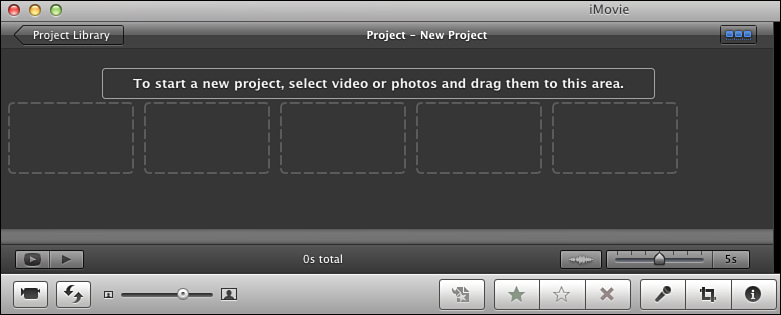
Figure 4.3 Drag the handles on either side of the yellow border to surround the section of the clip you’ll use in your video. Only what’s inside the border is used, so choose carefully.
For precise selection, move the yellow border frame by frame by tapping the arrow keys left and right.
Of course, you can also add a clip in its entirety. There are two ways to do this. The first is to drag the border handles all the way to the beginning and end of a clip. This can be a hassle if a clip is especially long, because it will appear to be split along the Event Library, and the end can be difficult to notice. In that case, simply right-click (or Ctrl-click) on the clip to produce a contextual menu beneath the cursor. Choose Select Entire Clip, and the whole thing will be wrapped in the yellow border (see Figure 4.4).

Figure 4.4 Right-click (or Ctrl-click) on a clip in the Event Library and then choose Select Entire Clip to wrap the yellow border around the entire thing.
SHOW ME Media 4.2—Define a Portion of a Video Clip
Access this video through your registered Web edition at my.safaribooksonline.com/9780789749307/media.
Add a Clip to a Project
The next step is to add your clip to your new project. Each new project displays a guide before you add the first clip. The type of guide presented depends on the theme you’ve chosen. You can find details on using themes in Chapter 7, “Adding to Your Movie: Titles, Maps, and Photos.” For now, I explain the options available when using the default basic theme (see Figure 4.5).
Figure 4.5 A series of guides act as “drop zones” for your video clips.
Before you add a clip, you’ll see the prompt, “To start a new project, select video or photos and drag them into this area.” Beneath that instruction is a series of rectangles with dashed borders.
To begin, drag your clip from the Event Library and drop it into this space in the Project Library. As soon as you do, two things happen.
First, the instruction and boxes disappear. Second, a timeline appears at the bottom of the Project Library, corresponding to the length of your project. For example, if you add an 8.7-second clip to your project, the timeline extends from 0 seconds to 8.7 (see Figure 4.6).
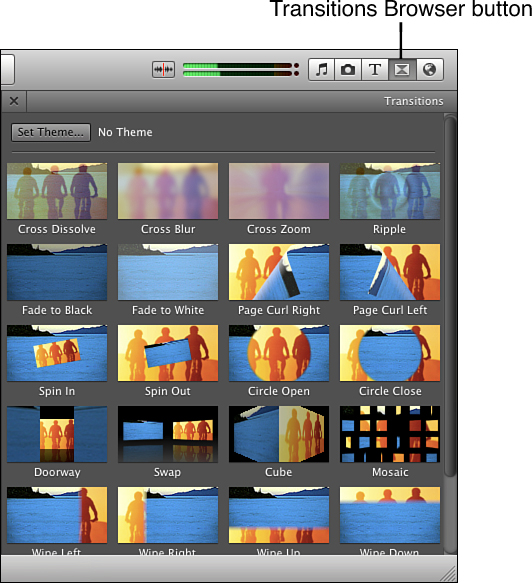
Figure 4.6 When you move a clip to the Project Library, a timeline appears indicating its duration.
A change takes place in the Event Library as well. Even though that clip is now in your project, it still appears in the filmstrip. However, iMovie identifies it as “in use” by underscoring that clip with an orange line (see Figure 4.7).

Figure 4.7 When a clip (or portion of a clip) is added to the Project Library, it receives an orange line in the Event Library.
To add another clip(s), simply repeat the process. By default, each clip is placed to the right of the most recent clip.
SHOW ME Media 4.3—Add Video to an iMovie Project
Access this video through your registered Web edition at my.safaribooksonline.com/9780789749307/media.
Add Video to an iMovie Project
To add video to an iMovie project, follow these steps:
1. Define the section of video you’d like to use, as described in the previous section.
2. Click and hold within the defined yellow border.
3. Drag the clip onto the project in the Project Library and drop it into place.
Basic Video Editing
When Apple introduced iMovie in 1999, it truly was revolutionary. For the first time, home users could digitally edit their own video at a reasonably low cost. Today’s version of iMovie is significantly more capable than its predecessors but just as useful. Its editing capabilities go deep, and subsequent chapters will focus on adding video effects, working with titles and audio, as well as fine-tuning touch-ups. In this chapter, I’ll describe the most common editing techniques.
Ordering Your Clips
iMovie offers nonlinear editing, which means you can reorder video clips any way you’d like. The real benefit is that you needn’t shoot video in sequential order because you can change that in iMovie.
The process is simple. First, choose the clip (or section) that you’d like to move as described earlier in this chapter. Then, click and hold on that clip in the Project Library and move it to the left or right. As you drag around the clip, you’ll see a semi-transparent image representing the clip.
You can move a clip to a spot before or after an existing clip. When you reach either end, a green insertion point appears at the end of the existing clip, and a green + appears next to your cursor. The insertion point identifies where the clip will land when you drop it.
Adding Transitions Between Clips
By default, the video you see jumps directly from the end of one clip to the beginning of the next during playback. While this may be desirable in some situations (the comedic “smash cut,” for example), it’s jarring in others. Perhaps you want to use a basic dissolve between clips, a fade to black, a wipe, or another technique. iMovie offers more than 20 great-looking transitions to choose from, and using one is as simple as drag-and-drop. Here’s how to add tasteful transitions to your iMovie project.
Note that Automatic Transitions must be disabled for this to work. To disable Automatic Transitions, choose Project Theme from the File menu and then de-select Automatically Add Transitions and Titles (see Figure 4.8).
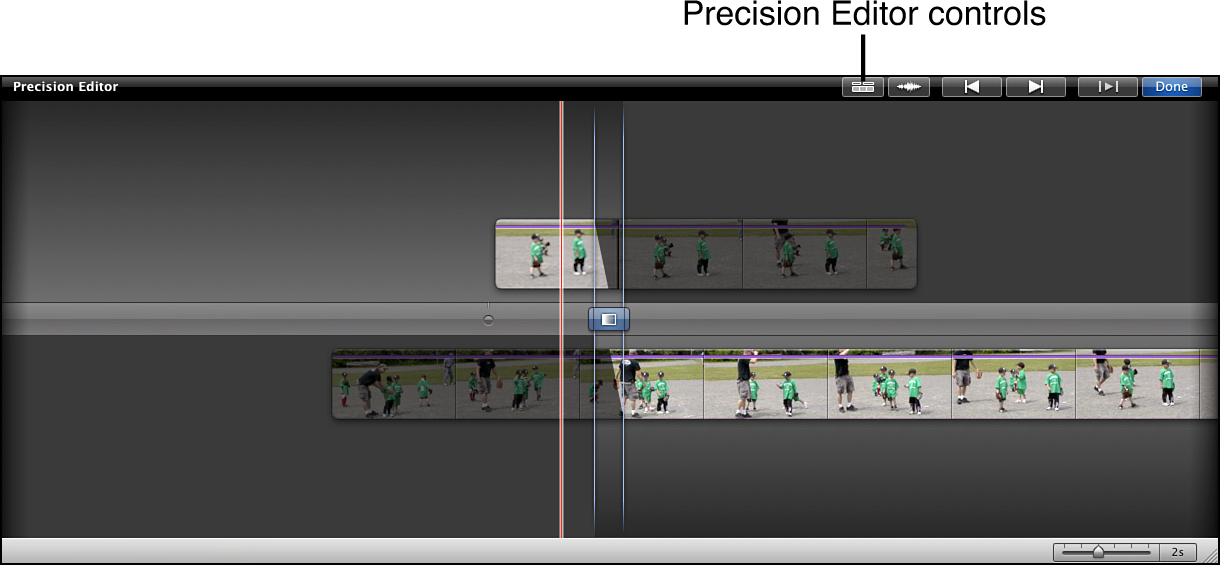
Figure 4.8 When you move a clip to the Project Library, a timeline appears indicating its duration.
First, pull up the Transitions Browser. On the far right of iMovie’s center toolbar is a button that looks like two black triangles next to each other, point to point (see Figure 4.9). Click it to open the Transitions Browser. Alternatively, you can select Transitions from the Window menu or press Command-4 on your keyboard.

Figure 4.9 Click the Transitions Browser button (it looks like two triangles standing next to each other point-to-point) to see a list of the available transitions.
As of this writing, 24 transitions are available. Each is represented with a thumbnail image and a label. You’ll notice that some of the icons show three people on bikes, some show a body of water, and some show a combination of the two. That’s because iMovie lets you preview each transition before you add it to your project. It uses the lake at the beginning of each demo transition and the cyclists at the end.
To preview a transition, simply let your cursor hover above it for two seconds. The thumbnail changes to demonstrate the transition. For example, hover above the Cross Dissolve to see the lake slowly fade into the cyclists. Test out the Page Curl Left transition to see the image of the lake peel away to reveal the cyclists, as if you were turning pages in a magazine.
To add a transition to your project, drag it out of the Transitions Browser and into the Project Library. Move to the small space that exists between the end of one clip and the start of another. The green insertion point appears in that space while the + appears next to your cursor, indicating that something new is about to be added to your project. When you’ve found the right spot, drop the transition into place (see Figure 4.10).
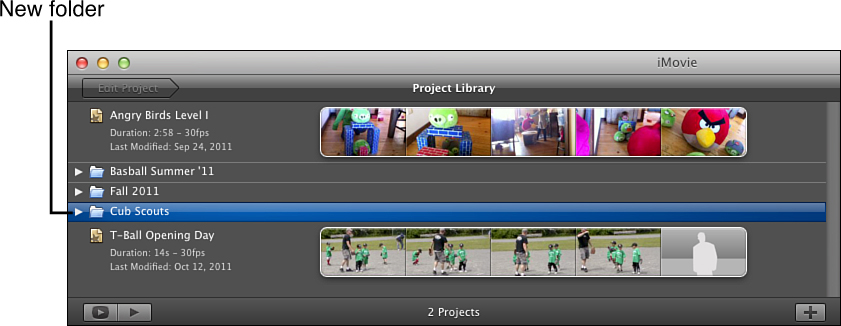
Figure 4.10 Drag a transition between clips and the green insertion point indicates where it will be placed.
A small icon appears between the clips, representing the transition. To preview it live in your project, click on the clip just before the transition and then click the Play button (or press your Mac’s spacebar). The clip plays with the transition intact in the preview window to the right.
SHOW ME Media 4.4—Add a Transition to an iMovie Project
Access this video through your registered Web edition at my.safaribooksonline.com/9780789749307/media.
Add a Transition Between Clips
To add a transition between two clips, follow these steps:
1. Open the Transitions Browser by clicking the button shown in Figure 4.9.
2. Identify the transition you’d like to use.
3. Drag it out of the Transitions Browser and into your project.
4. Drop it into your desired location, using the green insertion point as your guide.
Editing with the Precision Editor Tool
Ordering clips and adding transitions is useful, but power editing begins with the Precision Editor tool. The Precision Editor tool allows for more fine-grained control over the edits in your project, like the transition described earlier in this chapter. When activated, the Precision Editor lets you resize your timeline, alter transitions, and more. Basically, the Precision Editor offers a magnified view of the edit you’re working on. Here’s how to get the most out of it.
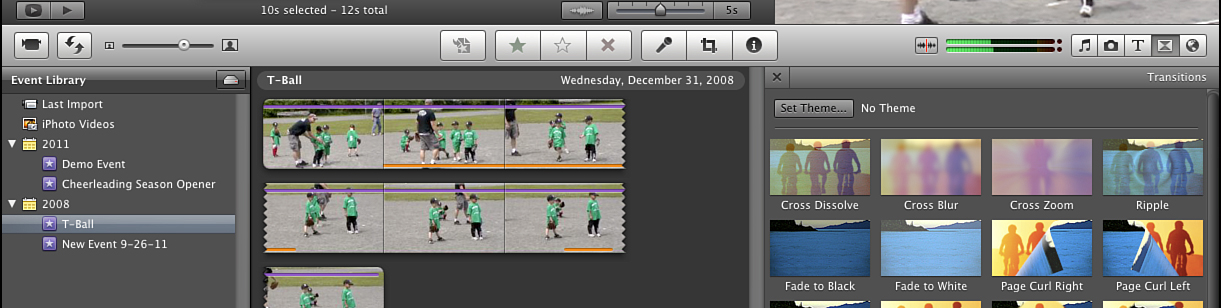
Figure 4.11 Click the action button on a clip in the Project Library to reveal several options, including the Precision Editor.
There are three ways to launch the Precision Editor. The first is to select Precision Editor from the Window menu. Alternatively, you can press Command-/ (that’s a forward slash, found on the question mark key) on your keyboard. The third method involves the Action menu, which is available from clips you’ve added to the Project Library.
Place your cursor over a clip that’s in the Project Library. The Action menu appears in the lower-left corner of the beginning of the clip. It looks like a white gear and downward-facing triangle on a field of blue. Click it to reveal a drop-down menu that provides several options. The first is Precision Editor (see Figure 4.11).
When you launch the Precision Editor, the Event Library is replaced by a different timeline. Instead of showing your project at large, the Precision Editor’s timeline focuses on the edit you have selected. The focus is all about fine-tuning the edits in your project.
The Precision Editor is a timeline like the Project Library, so in that way it’s familiar. There are, however, some key differences (see Figure 4.12).
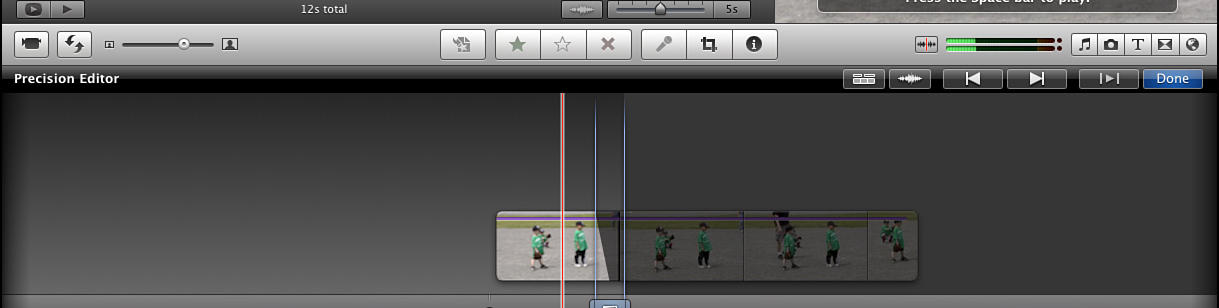
Figure 4.12 Here’s the Precision Editor. Note that the darker sections of video won’t appear in your project but the bright sections will.
In Figure 4.12, you see the Precision Editor and a pair of clips that have been joined with a cross dissolve transition. The clip is presented in two parts: one above and one below. The clip on top represents the video that precedes the transition. Below is the clip that follows it.
It’s important to notice how these clips are shaded. The clip on top is bright at the start and then appears to be grayed out. Likewise, the clip on the bottom, which follows the transition in the project, is gray at its start and then appears well lit following the blue transition point. Here’s why and what that means.
Instead of showing the typical arrangement of clips and elements (clip, transition, clip) that the Event Library presents, the Precision Editor lays them on top of each other.
When you create a transition, iMovie actually makes a transition from one frame to another and edits out the video before and after the transition. The Precision Editor displays those sections as being grayed out.
The benefit is that you can drag and move those clips along left or right, changing the start and end point of the transition. This is much more difficult to do without the Precision Editor.
To change the edit point, simply click on the clip you’d like to change and drag it to the left or the right. You’ll get a live preview of your changes in the preview window in the upper-right corner. When you’re satisfied, click Done to execute your change and exit the Precision Editor.
Before you leave, let’s look at the other controls unique to the Precision Editor. From left to right, here’s what you’ll find:
• Show or Hide Extras—Click to reveal any titles, voiceovers, or sound effects you’ve added to your project.
• Show or Hide Audio Waveforms—This reveals peaks in your clip’s audio, allowing you to more easily line up your music.
• Show Previous Edit and Show Next Edit—Click these buttons to jump to the next edit in your project or the one just before the edit you’re currently working on.
• Play the Current Edit—Clicking this button plays back just the edit you’re working on.
SHOW ME Media 4.5—Using the Precision Editor
Access this video through your registered Web edition at my.safaribooksonline.com/9780789749307/media.
Use the Precision Editor
To use the Precision Editor, follow these steps:
1. Click the edit you’d like to fine-tune.
2. Select Precision Editor from the View menu.
3. Noting where the edit takes place, using the dark/bright clips as your guide, make your desired changes.
4. Jump to the next or previous edits using the appropriate buttons.
5. Click Done when you’re satisfied with your changes.
Create a Storyboard
Before you add video to your project, consider creating a rough storyboard. A storyboard is to a video project what an outline is to a written one. That is to say, it provides a guide for the larger narrative. How will you tell the story of your trip to the lake, for example?
iMovie lets you create placeholders for specific shots, allowing you to visualize how your completed movie will flow and go together. Although creating a storyboard isn’t necessary or even appropriate (for example, if you’re creating a software tutorial), it can be a real time saver. Here’s how to create a storyboard with iMovie.
When you create a new project, show the Map, Background or Animatics Browser by clicking the globe-like button on the right side of iMovie’s main window (see Figure 4.13). The Map, Background and Animatics Browser closely resembles the Transitions Browser described earlier in this chapter.
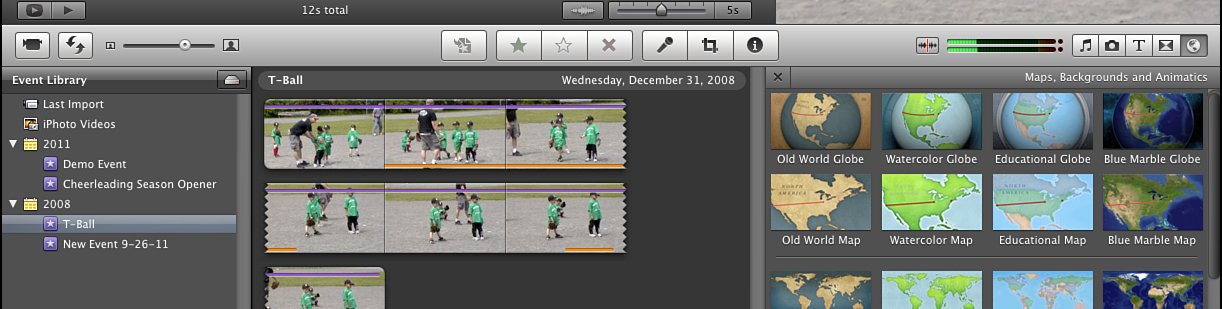
Figure 4.13 Click the globe button to open the Maps, Background and Animatics Browser.
The Map, Background, or Animatics Browser slides into place. Scroll down past the globes, maps, and colors to reach the storyboard elements. They represent grayscale figures of people standing on gray backgrounds. Each is labeled with the type of shot it represents.
For example, the frame representing a close-up (CU) depicts a person’s face and head, whereas the medium shot (MS) shows the figure from the waist up and the long shot shows the figure from head to toe.
Other shots depict multiple people, landscapes, and even animals. To begin planning your shots, drag these frames into your project in the order of your choosing. When that’s done, it’s time to replace them with your clips.
While a storyboard is purely optional, it’s often useful. Consider it a first draft or rough outline of your completed project. Also, it lets you experiment with different shots (long, closeup, action, and so on) and find what works best. This will save time when you’re adding clips from the Event Browser.
SHOW ME Media 4.6—Create a Storyboard
Access this video through your registered Web edition at my.safaribooksonline.com/9780789749307/media.
![]() LET ME TRY IT
LET ME TRY IT
Create a Storyboard
To create a storyboard in iMovie, follow these steps:
1. Click the globe-shaped button to reveal the Map, Background, or Cinematic Browser.
2. Scroll down to the storyboard elements.
3. Identify the shots you’d like to use and drag them, in order, into your project’s timeline.
4. When you’re finished, click the globe button again to hide the Map, Background, or Cinematic Browser.
Organizing Your Projects into Folders
It’s easy to create projects in iMovie, and it’s even easier to outgrow the constraints of the Project Library window. On one hand, it’s rather small. The Project Library window occupies approximately one-quarter of iMovie’s main window and can be found in the upper-left corner (refer to Figure 4.1). Even on a Mac with a large monitor, iMovie displays only a few projects at a time.
Additionally, you might have several projects that are related, like activities enjoyed during a single vacation. Although hiking, canoeing, and grilling are separate videos, they’re all part of the same Vacation project. It would be nice to keep them together. Fortunately, iMovie addresses both issues with folders.
Folders keep related projects together and save precious space in the Project Library window. Here’s how to organize your projects into folders with iMovie.
There are two quick ways to create a folder in the Project Library window. The first is to use the File menu. Click the File menu and then select New Folder. A sheet drops down from the top of iMovie’s main window. Type a name for your folder in the field labeled Folder Name, and then click Create. Your new folder appears among the projects in the Project Library (see Figure 4.14).
Figure 4.14 The newly-created “Cub Scouts” folder keeps all related projects together and organized.
The other method is to right-click (or Ctrl-click) anywhere in the Project Library. A contextual menu will appear, offering several options. The second option on the list is New Folder. Select it, and the rest of the process is the same from there.
From there, simply drag and drop projects into that folder. You can click the gray disclosure triangle immediately to the left of your folder(s) to hide or reveal their contents.
SHOW ME Media 4.7—Move Your Projects into Folders
Access this video through your registered Web edition at my.safaribooksonline.com/9780789749307/media.
![]() LET ME TRY IT
LET ME TRY IT
Create a Folder in the Project Library
To organize your projects with folders within the Project Library, follow these steps:
1. Click the File menu and select New Folder.
2. A new sheet appears. Enter the name of your folder in the field labeled Folder Name.
3. Click Create.
4. The folder appears in the Project Library. Populate it by dragging and dropping projects into it.
5. Use the gray disclosure triangle to the left of each folder to hide or reveal its contents.
Additional Tips and Tricks for Working with Folders
It’s possible to remove a project from a folder. Simply click the folder’s disclosure triangle to reveal its contents and find the project you’d like to remove. Next, drag it out of the folder and drop it anywhere else within the Project Library. The project then exists outside of that folder.
You can create a folder within a folder. For instance, let’s say you’re working on that large vacation project again. In addition to gathering the related videos into a single project, you want to further organize each video by day (Monday’s activities, Tuesday’s activities, and so on). Creating subfolders within the main folder is a good way to do that. Here’s how.
First, select the main folder (I’ll call it the “parent folder”) by clicking it once. Its background turns blue. Next, select New Folder from the File menu, as described earlier in this chapter. Give the folder a name, click Create, and a new folder is created within the folder you had selected.
Finally, you can reorder folders. Just click any folder in the Project Library, drag it to your desired location, and let go. It will remain wherever you drop it.
![]() LET ME TRY IT
LET ME TRY IT
Edit and Assemble a Video
You learned a lot in this chapter: adding video, ordering clips, adding transitions and creating a storyboard. Now let’s put it all together. In the following example, I assemble a project from video I shot of a T-ball game. First, I import the video as described in Chapter 3. The next step is to create a new project.
1. From the File menu, I choose New Project and the theme selection sheet appears.
2. Since I’m working on a T-ball movie, I click the sports theme, give it a new name, and click Create.
3. The new project appears in the Project Library, featuring several available drop zones, ready to receive my clips.
At this point, I can start adding clips. However, I want to get a handle on how my final project will flow by creating a storyboard. Fortunately, iMovie makes it easy. It starts with the Map, Background and Animatic Browser.
4. Click the globe button in iMovie’s central toolbar to open the Map, Background and Animatic Browser. Scroll to the bottom to find the storyboard animatics.
5. I can drag storyboard animatics into the Project Library to play with different types of shots and see the narrative of my movie take place. First, I click and hold on a closeup and drag-and-drop it into the Project Library.
6. The closeup is followed by a medium shot, then an action shot, a landscape shot (this is an overview of the field), a group shot, another action shot, and finally one last closeup.
Now that my animatics are in place, I give the progression some consideration. I can easily re-order them by dragging them around the Project Library. When I’m happy with the arrangement, it’s time to start adding clips. But first, I must select the clips I’ll use.
Back in the Event Library, my raw footage is ready. To select a portion of a clip to use in my project, follow these steps:
1. Click a clip so that the yellow border appears.
2. Drag the handles on either end so that the border is around the portion I’d like to use.
3. Conversely, I can right-click (or Ctrl-click) on any clip in the Event Library and choose Select Entire Clip to use an entire clip at once.
When I define a clip I’d like to use, I can drag it into the Project Library and replace the storyboard animatics. Here’s how:
1. Click on the clip (or portion) in the Event Library and drag it to the Project Library.
2. Move it on top of the first animatic and let go. A pop-up window appears with several options. Select Replace and the clip replaces that particular animatic.
3. Now repeat that process with all your clips, replacing the storyboard animatics one by one.
At this point, my movie is coming together and starting to look pretty good. I’ve identified the best clips from the T-ball game, created an outline with the storyboard animatics, identified the best clips to use, and moved them into place. Now it’s time to add some beautiful transitions:
1. Click the transitions button in iMovie’s central toolbar.
2. A list of all available transitions appears. Since I’m using a theme, the theme-specific transitions are at the top of the list.
3. To add a transition to my project, I click and hold on it in the Transitions Browser window and drag-and-drop it between the two clips that would benefit from a nice transition.
4. With the transition now in place, I move the playhead back a few seconds so I can see how it looks.
Now my movie looks fantastic, but one transition could use some fine-tuning. For that, I use the Precision Editor:
1. To open the Precision Editor, click on the action button on the target transition and select Precision Editor.
2. The Precision Editor appears over the Event Library.
3. From there, I can slide the video immediately before and after the transition back and forth to get it just how I want it. When I’m finished, I click Done.
That’s it! My movie—and probably yours, too—looks great.