Video Effects
Shooting your footage, importing into iMovie, and carefully editing your project to meet your vision are only part of the big picture (if you’ll pardon the pun). Alter the look and feel with video effects to make a clip appear other-worldly, old, or black-and-white. Use jump cuts for a dramatic effect or slow motion for an instant replay of the big play. Finally, special effects like picture-in-picture and green screen mimic the functions of much pricier video editing software. I start by describing the video effects available in the Inspector.
Note that in order for most of these effects to work, you must enable the advanced tools in iMovie. To do so, select Preferences from the iMovie menu, and then click the General tab. Make sure Show Advanced Tools is selected.
Inspector Video Effects
The Inspector offers 19 cool effects that are easy to add to your clips. Fortunately, you can preview each before making a commitment. In typical Apple style, each cool effect is only a click away.
To open the Inspector, first click on the target clip in the Project Library. (A clip must be in the Project Library to receive an effect.) You can apply an effect to an entire clip or just a portion. For details on selecting a portion of a clip, see Chapter 4, “Editing and Assembling a Video.”
Next, open the Inspector by clicking the “i” in iMovie’s central toolbar. The Inspector window appears. Click the Video Effects button to reveal the skim-able palette of video effects (see Figure 6.1).

Figure 6.1 Video effects available from the Inspector window.
Now you have 19 effects to choose from. (The first option in the upper-left corner actually says None and represents the video in its original version.)
The Video effects are divided into five rows of four effects. Each presents a thumbnail of the selected clip and a name, like Flipped, Raster, or Dream. The currently selected effect is identified by a bright, white border, its name highlighted in blue and red playhead, just like that in the Project Library.
Choosing an Effect
iMovie lets you preview each clip before you commit it to your project. To get a look, mouse over a thumbnail to highlight it. Next, move the cursor left and right to see how the clip looks with that effect applied. You can watch on the small effects window thumbnail or in the larger preview window in the upper-right corner of iMovie. You can also press your keyboard’s spacebar key to preview the entire clip with the effect applied.
When you find an effect you like, click it. The Inspector window flips over. Click Done, and that’s it. The effect has been applied to your clip in the Project Library.
 SHOW ME Media 6.1—Adding Inspector Video Clips
Access this video through your registered Web edition at my.safaribooksonline.com/9780789749307/media.
![]() LET ME TRY IT
LET ME TRY IT
Add Inspector Video Effects
Here’s how to add the Inspector’s video effects to clips in your project.
1. Click the target clip in the Project Library to select it.
2. Click the “i” in iMovie’s central toolbar.
3. The Inspector window appears. Click the Video Effect button.
4. The Inspector flips over to reveal the available effects. Click your choice to apply it to the previously selected clip.
One-Step Effects
In addition to the 19 effects found in the Inspector, iMovie offers several more options via the Clip menu. These “one-step” effects are so called because you can add each with a click. There’s no additional window or palette to open and navigate. Here’s a look at iMovie’s one-step effects (see Figure 6.2).
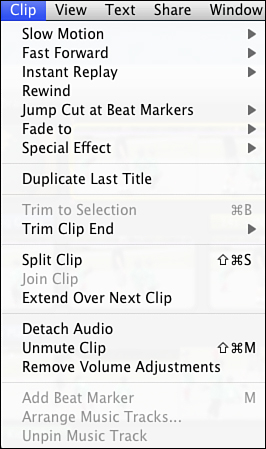
Figure 6.2 Several one-step editing options can be found in iMovie’s Clip menu.
To get started, select the target clip in the Project Library and then select one of the following from the Clip menu:
• Slow Motion—You can reduce a clip’s speed by 10, 25, or 50 percent.
• Fast Forward—Opt to speed up a clip’s playback by 2 times, 4 times, 8 times, or 20 times original speed.
• Instant Replay—This option duplicates the selected clip, plays it back at the designated reduced speed, and puts an “Instant Replay” graphic in the upper-right corner. (You can click Instant Replay to edit what it says.)
• Rewind—Here’s a fun one. Selecting Rewind duplicates the clip, places the duplicate after the original, and plays it backward at a slightly faster speed before repeating the original clip.
• Jump Cut at Beat Markers—Used in conjunction with a music clip, this feature lets you create a somewhat jarring edit that makes your subject appear to change location rather abruptly. This will be described in detail later in this chapter.
• Fade To—Lets you fade a clip to black, sepia, or dream. It’s a nice way to end a clip.
• Special Effect—Here are three nice options. Flash and Hold Last Frame lets you highlight a certain frame of video, while Split at Beat Markers and Flip at Beat Markers let you cut or flip video over vertically, as described in the following section.
Some of the special effects deserve special attention, because they can do some impressive things. Specifically, we’ll look at jump cuts, beat markers, fading options, and the Special Effects options.
Jump Cuts
The jump cut is an editing technique that removes frames from a clip, causing the subject to appear to abruptly “jump” from one point to another. When used well, the jump cut can add an attention-grabbing moment to your movie.
To add a jump cut to your movie, start by identifying the clip you’d like to work with and then add a music clip to the background. (For details on adding music to your projects, see Chapter 8, “Adding and Editing Audio and Sound Effects.”) You’ll use the music to add beat markers, which tells iMovie where to remove frames to make the jump.
The next step is to click the music clip and then select Clip Trimmer from the action menu. Now you’re ready to add beat markers. There are two ways to do this. The first is to play the clip and press the M key wherever you want a beat marker to be. The second is to drag the eighth note icon from the toolbar onto the music clip in the Clip Trimmer wherever you want the marker to be (see Figure 6.3).
Now you’re ready to make your jump cuts. From the Clips menu, select Jump Cut at Beat Markers and then the number of clips you’d like to remove. The options are 3, 5, 10, 20, and 30. Note that the more frames you remove, the more pronounced the jump. Repeat the process to create as many jump cuts as you’d like.
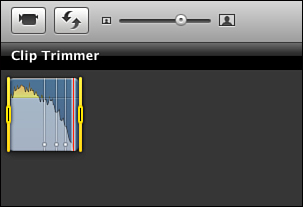
Figure 6.3 iMovie’s Clip Trimmer with a highlighted clip.
SHOW ME Media 6.2—Using Jump Cuts
Access this video through your registered Web edition at my.safaribooksonline.com/9780789749307/media.
![]() LET ME TRY IT
LET ME TRY IT
Using Jump Cuts
Here’s how to use jump cuts in your project:
1. Open the Map, Background and Animatic Browser by clicking the globe icon in iMovie’s central toolbar.
2. Select the type and style that best fits your project.
3. Click and drag the map into your project. Drop it when you find the right spot.
4. To preview the animation, place the playhead just before it and click the Play button (or your keyboard’s spacebar) to watch the animation play out.
Fading Options
Putting a fade between clips achieves an effect that’s the very opposite of the jump cut. Instead of abruptly switching scenes, a fade provides a smooth, easy transition. It’s much less dramatic and jarring for the viewer.
In fact, the most effective transition isn’t noticed at all (unless you are in fact going for a dramatic jump cut). Consider the countless movies and television programs you’ve seen. A nice dissolve transition (one image fades from view just as another fades in) effectively moves you between scenes without prompting you to think, “Gee, nice dissolve.”
When choosing a transition for your movie, consider what you’re trying to accomplish. Do you wish to grab the viewer’s attention in dramatic fashion or guide them through your story? When the answer is the latter, you’ve got many options to choose from.
The fading options are more diverse than they appear. From the clip menu, you can add a fade to black, fade to sepia, or fade to dream to the end of a clip. “Dream” is the term iMovie uses for a transition with a soft, almost ethereal feel. Think of movies that illustrate a character’s transition to a dream sequence to get an idea of how iMovie’s dream effect looks.
Actually, those aren’t the only options. In fact, you can substitute “dream” for any of the video effects options available in the Inspector window.
First, select the clip (or portion) to receive the fade in the Project Library and then select Fade from the Clips menu. By default, there are three options: Black and White, Sepia, and Dream. Make your selection, and the fade-out will be placed as a transition at your insertion point (see Figure 6.4).

Figure 6.4 Select fade options from iMovie’s Clip menu.
As I said, you aren’t limited to those three options. When you make a selection, double-click the transition in the Project Library to bring up the Inspector. From there, click Transition to choose from any of 24 available transitions.
You can make additional adjustments from the Inspector window. Double-click the transition as described and the transition window appears. From there, you can adjust the duration, either to that specific transition or all of them at once. Finally, select the Precision Editor for fine-grain adjustments, as described later in this chapter.
SHOW ME Media 6.3—Using Fading Effects
Access this video through your registered Web edition at my.safaribooksonline.com/9780789749307/media.
![]() LET ME TRY IT
LET ME TRY IT
Using Fading Effects
Here’s how to use iMovie’s fading effects:
1. Click the target clip to select it.
2. Select Fade from the Clips menu.
3. Choose Black and White, Sepia, or Dream.
Special Effects
The impressive option here is Flash and Hold Last Frame. It works by placing a bright flash of white just before the final frame of a clip, which is then presented as a still image with a Ken Burns effect applied. This is great for highlighting a great sports play, for instance, or another moment of importance to your project. You can access these effects from the Clip menu, as shown in Figure 6.5.
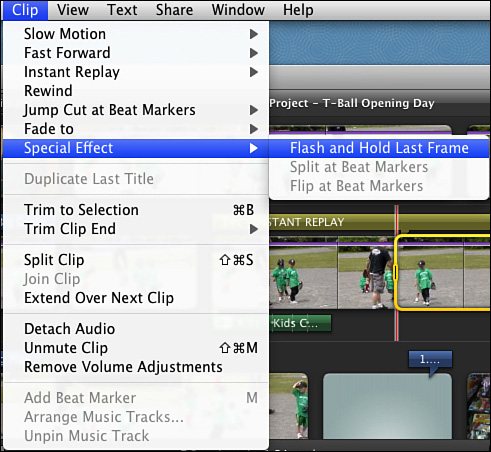
Figure 6.5 Choosing Flash and Hold Last Frame from the Special Effect option of the Clip menu.
A bit about the Ken Burns effect. Its namesake is Mr. Ken Burns, a famous documentarian who developed a signature effect of artificially panning the camera over a still image or photo. The result is a dramatic presentation of the image’s subject(s). Often the camera’s movement, or pan, is synchronized with narration or other audio for enhanced effect. For example, the camera might settle on a person’s face just as the narration describes a significant moment in his/her life.
Used thoughtfully, the Ken Burns effect can have a powerful effect on your project. I’ve described how to use the Ken Burns effect in detail in Chapter 7, “Adding To Your Movie: Titles, Maps, and Photos.”
Click the target clip in the Project Library and then select Flash and Hold Last Frame from the Clip menu. iMovie extracts the final frame, applies the Ken Burns effect, and then places the flash just before the image for you. Of course, you can double-click the final frame to edit the Ken Burns effect to your liking, as described previously in this chapter.
Picture-in-Picture
Picture-in-picture is one of the high-end effects that iMovie offers and, as you’d expect, it’s easy to pull off. It’s especially useful in tutorial videos because you can show, for example, the speaker’s face as well as the lesson being taught. A before-and-after comparison scenario also lends itself to the picture-in-picture technique.
What does it do specifically? The best example I can think of is the nightly news on television. Oftentimes you’ll see the news anchors behind their desks, reading the current headlines while a small video or image appears in a “box” just to the left or right of the anchor’s head. This box appears to float in midair and often displays an image or video to support what’s being said. That’s an example of the picture-in-picture technique, and it’s just what you can create with iMovie. Here’s how (see Figure 6.6).
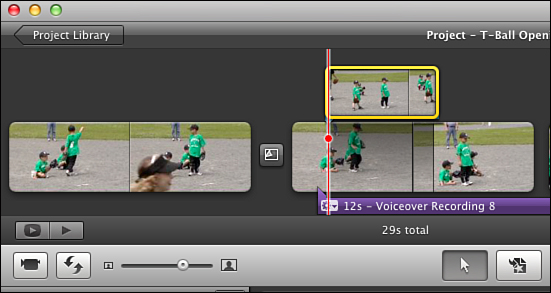
Figure 6.6 When using the Picture-in-Picture effect, the video or image that will appear in the smaller window is shown above the main video in the Project Library.
Note that for this effect to work, you must activate it by opening iMovie’s preferences and selecting Show Advanced Tools.
Defining the Two Videos
You’ll need two things to get started: a main video (this will be the larger of the two) and a secondary video (the one to appear in the smaller frame). Setup is simple indeed.
With your main video in the Project Library, drag the secondary video out of the Events Library and drop it into the main video. As you do, a new menu appears. Select Picture-in-Picture from this menu (see Figure 6.7). The secondary clip appears above the main clip in the Project Library. That’s it. You can test it in the preview pane by clicking the Play button or tapping your keyboard’s spacebar.
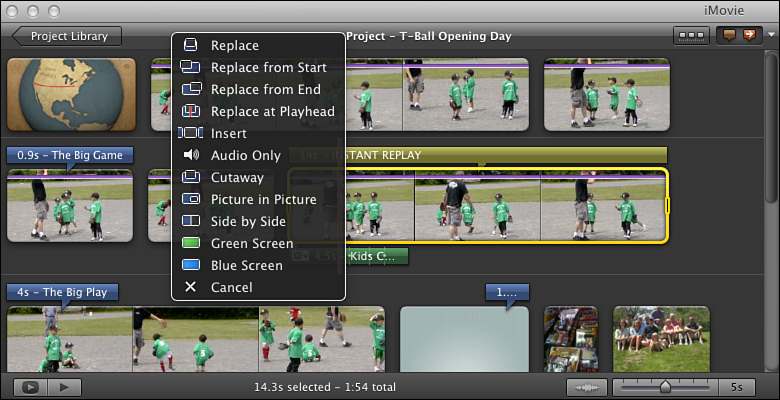
Figure 6.7 Choose Picture in Picture from the Action menu.
Editing the Secondary Video
You have a few options as to how the secondary video appears. To make changes, click the secondary video in the Project Library where it appears above the main video. The small video box gains highlights around each of its corners, indicating that it’s ready to receive edits.
You can reposition it with a drag and drop or resize it by dragging on any of the corners. Preview your changes by clicking the Play button in the preview pane; finally, click Done when you’re satisfied.
SHOW ME Media 6.4—Creating a Picture-in-Picture Effect
Access this video through your registered Web edition at my.safaribooksonline.com/9780789749307/media.
![]() LET ME TRY IT
LET ME TRY IT
Creating a Picture-in-Picture Effect
Here’s how to create a picture-in-picture effect in iMovie.
1. Create both the primary and secondary movie clips.
2. Drag the primary video into the Project Library.
3. Drag the secondary video onto the primary.
4. A pop-up menu appears. Select Picture in Picture.
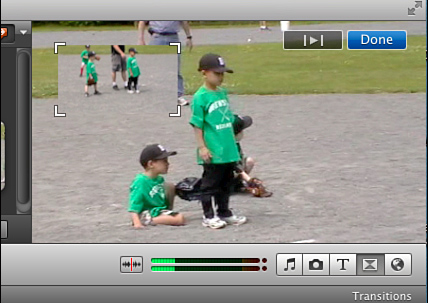
Figure 6.8 The secondary clip is ready for editing in the preview window.
 TELL ME MORE Media 6.5—Fading in the Second Picture Gradually
Access this audio through your registered Web edition at my.safaribooksonline.com/9780789749307/media.
Green Screen
Chroma key compositing (also called chroma key or green screen) is a method of layering images so that they’re presented simultaneously. It’s a technique that has existed since at least the 1940s and has been used in feature films, local weather broadcasts, and everything in between. iMovie makes the process extremely easy and fun. Let’s get started.
Note that for this effect to work, you must activate it by opening iMovie’s preferences and selecting Show Advanced Tools.
What You Need
Before you start assembling your green screen footage in iMovie, you need to shoot it. Unlike basic point-and-shoot recording, a green screen session requires some special setup. You need three things.
• Something green—You’ll need to shoot the top-layer video in front of something green. A sheet will do, as will a wall painted green or even green poster board purchased from a craft supply store.
• Lots and lots of light—The more light, the better. Good fluorescent lights will work, as will construction lights. The most important thing here is balance. Make sure there isn’t too much light on any one side of your scene.
• Chroma key-capable software—Fortunately, iMovie ‘11 meets this requirement.
Of course, you’ll also need the second layer, or the image that will replace the green. I’ll call this the “replacement image.”
Assemble Your Green Screen Shot in iMovie
Now that you’ve shot your green screen footage and imported it into iMovie, you’re ready to put it together. The most important thing to remember is this: you must move the replacement image into the Project Library first. If you put the footage featuring the green screen in first, this will not work.
Next, drag the green screen footage from the Event Browser and drop it on top of your replacement image at the point you want it to pop in. Select Green Screen from the new menu that appears (see Figure 6.9).
The green screen footage will appear above your replacement image in the Project Library timeline, and you should see a nice green screen effect in the preview pane on the right. Click the Play button (or your spacebar) to check it out. In Figure 6.8, you see the secondary clip (upper left) over the main clip, as displayed in the preview area.
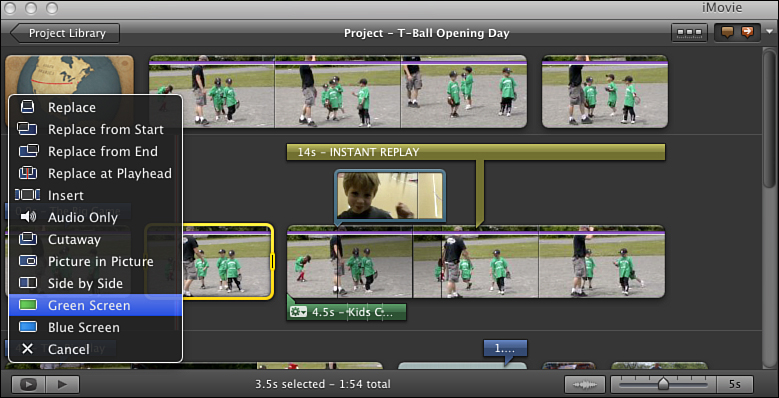
Figure 6.9 Select Green Screen from the Action menu.
Creating a Green Screen Effect
Here’s how to create a green screen effect in iMovie:
1. Create both the primary and secondary movie clips.
2. Drag the primary video into the Project Library.
3. Drag the secondary video onto the primary.
4. A pop-up menu appears. Select Green Screen.