Chapter 4
Understanding Licensing
IN THIS CHAPTER, YOU WILL LEARN TO:
- BECOME FAMILIAR WITH VMWARE LICENSING
- Review the Versions of vSphere
- Review the Licensing Method in vSphere
- MANAGE LICENSES
- Install Licenses
- Assign Licenses
- Unassign and Remove Licenses
- Change Licenses Assigned to Assets
- Install Licenses for Legacy Hosts
- REVIEW INSTALLED LICENSES
- View Licenses by Product
- View Licenses by License Key
- View Licenses by Asset
Software has become a critical component in today’s business environment. Most software vendors include a licensing mechanism to prevent users from installing more instances, or copies, of their product than they’ve purchased. From the vendor’s perspective, the ability to limit the number of installations is vital to their revenue. If an enterprise only had to purchase a single copy of a software package simply to obtain the technology, additional purchases from a technical standpoint would not be required. The licensing model that VMware uses allows for one installation of the software for every license purchased. This chapter will discuss all the vital components of VMware licensing.
Become Familiar with VMware Licensing
How does VMware limit the number of installations a customer has in place? A manageable licensing process is necessary to enforce licensing compliance. Two methods can be used to enforce licensing: serial numbers and a licensing server.
Serial Numbers Serial numbers are typically a complex alphanumeric code that enables software functionality and features. In some cases, serial numbers are associated with a particular email address or user’s name to ensure that the serial number cannot be validated without both pieces of information.
VMware has many different products in their virtualization portfolio. Some products are targeted toward desktop use, while others are targeted at server, or enterprise, use. VMware Workstation, for instance, is a desktop-targeted application. Like many other desktop applications, VMware Workstation uses a simple serial number to unlock the product. This licensing method does not limit the number of systems the application may be installed on. The intended audience for VMware Workstation consists of systems administrators, software developers, and users who wish to use virtual appliances locally.
VMware originally licensed ESX servers using serial numbers the same way as VMware Workstation did. Additional features like virtual symmetric multiprocessing (vSMP) or vMotion required additional license keys. Unfortunately for VMware, this licensing model does not prevent unauthorized product installations.
Since the introduction of Virtual Infrastructure 3 (VI3), basic serial numbers installed on a host are designated as host licenses. Host licenses behave in the same fashion as workstation licenses; they can be installed many times, on separate servers. Licensing ESX in this way is not much different from licensing VMware Workstation.
VMware ESX or ESXi can still be configured with a host license today, but many of the advanced features of vSphere, such as vMotion or Distributed Resource Scheduling, inherently require vCenter control. When coupled with a vCenter installation, only the number of licensed hosts can be managed. This restricts the number of host license installations that can be used in an enterprise.
With the introduction of vSphere 5, VMware also chose to limit the amount of virtual machine memory that can be used in an environment. VMware refers to this as a vRAM entitlement. Each purchased license allows a defined set of virtual machine memory to be consumed on any host in the environment. VMware refers to this as a “pay for consumption” approach. Touted as “cloud-like” and flexible, this model allows organizations as well as public and private cloud providers to tie licensing more closely to end-user workloads rather than to physical machines.
Licensing Server Without a central licensing model, it is difficult to manage advanced features such as High Availability, Distributed Resource Scheduling, and vMotion. Advanced features are often the reason vSphere is chosen over other virtualization platforms on the market. Limiting the use of advanced features is key to VMware’s business model. To this end, VMware uses a central location to manage licensing of all ESXi hosts in the environment, pool the allocated vRAM entitlement, and provide the ability to limit advanced features.
To make license management more flexible, and to enable management of advanced features, VMware uses server-based licenses in conjunction with a licensing server. Serial numbers, or a license file, are loaded into a license server. The sole purpose of this license server is to answer network requests from hosts, grant a license, and enable any advanced features licensed. A VMware host will query the license server for authorization to enable use as well as to unlock licensed features. The license server option ensures that only the number of licenses and vRAM entitlement purchased can be used. When all available licenses have been issued, no additional licenses may be granted. Similarly, when the licensed pool of vRAM is exhausted by powered-on virtual machines, any additional virtual machines that are powered on are said to be out of compliance. The sum total of vRAM entitlements for all vSphere licenses of a single edition determines the total amount of virtual machine memory that can be consumed across all hosts.
NOTE VMware vCenter Essentials is the only product to impose a hard limit on consumed vRAM. vCenter Standard only provides alerts that consumed vRAM is approaching or has surpassed available pooled capacity and will continue to allow virtual machines to be powered on even after the vRAM limit has been reached.
VI3 used a separately installed Macromedia FlexLM service to provide licenses to hosts, but vSphere versions 4 and 5 use vCenter to directly issue licenses. When using vCenter 4 or 5 along with hosts of the same version, you can assign licenses distinctly to hosts, providing additional flexibility when many licenses for multiple editions are used.
Review the Versions of vSphere
To determine which version of vSphere to license, you must know which features are included with which edition. Similarly, to understand how the licensing has changed from vSphere 4 to vSphere 5, you must know which editions and features were available in vSphere 4, what is available in vSphere 5, and how the older offerings relate to the new vSphere editions. It is also important to understand the vRAM entitlement introduced with vSphere 5.
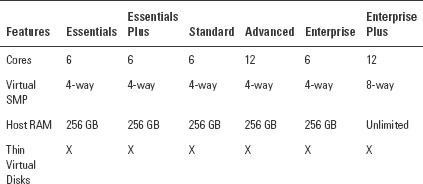
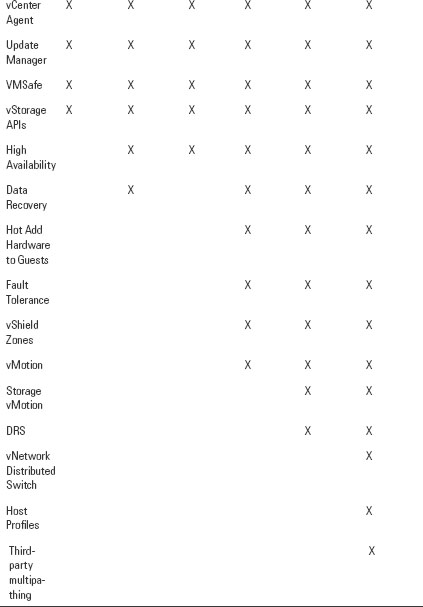
Table 4.1 presents the features available with different editions of vSphere 4.
Table 4.1: vSphere 4 editions
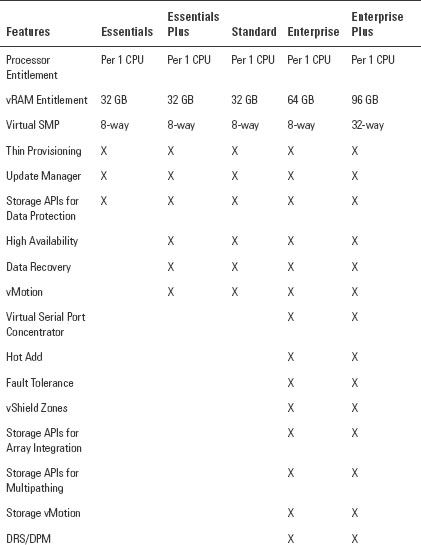
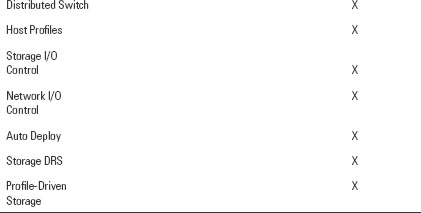
vSphere 5 consolidated the number of editions from six to five, and introduced the concept of pooled vRAM entitlements to remove physical constraints on processor cores and RAM. Each vSphere 5 CPU license entitles the purchaser to a specific amount of vRAM, or memory configured to virtual machines. Table 4.2 outlines the vSphere 5 editions and their features.
Table 4.2: vSphere 5 editions
As you can see, with the exception of new Enterprise Plus additions, features remain largely unchanged from vSphere 4 to vSphere 5. For users who have vSphere 4, it is important to know how licensing has changed, including the move to vRAM entitlements. VMware Support and Subscription (SnS) is required for upgrading from vSphere 4 to vSphere 5. Table 4.3 lists the editions entitled to users who have a current SnS agreement.
Table 4.3: VMware edition upgrades for SnS entitlements
| vSphere 4 Edition |
vSphere 5 Edition |
Added Features |
| Essentials |
Essentials |
8-way vSMP |
| Essentials Plus |
Essentials Plus |
8-way vSMP |
|
|
vMotion |
|
|
High Availability |
| Standard |
Standard |
8-way vSMP |
|
|
vMotion |
| Standard with vMotion and Storage vMotion |
Enterprise |
DRS/DPM |
|
|
Fault Tolerance |
|
|
Hot Add |
|
|
vShield Zones |
| Advanced |
Enterprise |
8-way vSMP |
|
|
DRS/DPM |
|
|
Storage vMotion |
| Enterprise |
Enterprise |
8-way vSMP |
| Enterprise Plus |
Enterprise Plus |
32-way vSMP |
|
|
Storage DRS |
|
|
Profile-Driven Storage |
|
|
Auto Deploy |
As you can see in Table 4.3, there are no SnS upgrades to the Essentials, Essentials Plus, Enterprise, and Enterprise Plus editions. However, VMware has chosen to add features to all editions. These are upgrade paths that VMware has provided to give additional features to existing users, while augmenting existing vSphere 4 product offerings.
Review the Licensing Method in vSphere
VMware has always been very responsive to customer feedback. After learning that the FlexLM licensing engine in VI3 was problematic, VMware completely rewrote their own licensing management mechanism in vSphere 4. The new vCenter integrated engine vastly improved reliability and ease of use over the previous generation. The vCenter integration goes unchanged in vSphere 5.
NOTE The FlexLM license server is still required if you’re using vCenter 4 or vCenter 5 to manage ESX 3.x or ESX 3.5 hosts. It can be downloaded from VMware and installed separately.
When vCenter is initially installed, if no license is provided, it will operate with all features (i.e., Enterprise Plus) enabled for 60 days. If a license is provided, the features available to vCenter will be determined by those associated with the license key purchased.
When you are connected to vCenter, you can enter or install licenses for ESX 4.0, 4.1, ESXi 4.0, 4.1, and 5.0 hosts. To accomplish this, you use the licensing functions in the vSphere Client interface.
If licenses are not installed for ESX and ESXi hosts, they will operate for up to 60 days with no vRAM restrictions and all features enabled. Additional licensed features can be installed into the vCenter license service using the same method used for installing ESX and ESXi host licenses.
Manage Licenses
As mentioned earlier, the process of installing licenses in vSphere 5 is the same as that in vSphere 4, with the exception of vRAM entitlements. In both versions, adding licenses is performed through the vSphere Client that directly interfaces with vCenter.
Install Licenses
To add the license purchased for vCenter and ESX or ESXi hosts:
1. Log in to vCenter using the vSphere Client.
2. Once connected, load Licensing Administration by selecting View ⇒ Administration ⇒ Licensing (see Figure 4.1), or by pressing Ctrl+Shift+L.
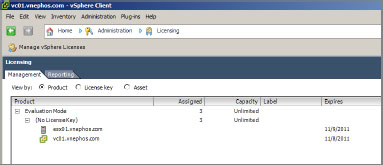
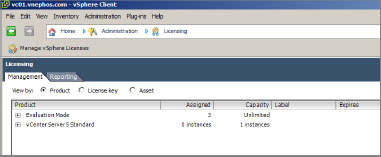
3. The currently installed licenses will be displayed on the licensing management tab, as shown in Figure 4.2, which shows a vCenter Server and an ESXi host in Evaluation mode.
Click Manage vSphere Licenses to manage licenses in the vSphere environment.
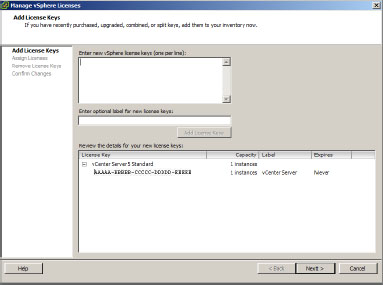
4. The first licensing action available is Add License Keys. Enter a license key in the large window on the right. License keys are not case-sensitive and will be automatically displayed in uppercase when entered.
5. Enter a name for the license, such as vCenter Server License, to identify the type of license being added, and select Add License Keys.
TIP Entering a descriptive name in the label field is extremely helpful, especially in medium to large environments in which license management is complex due to the large quantities and different types of licenses, and the presence of reused/recycled licenses for rolling upgrades.
6. Enter any additional license keys as in steps 4 and 5.
7. Review the licenses in the details window, as shown in Figure 4.3.
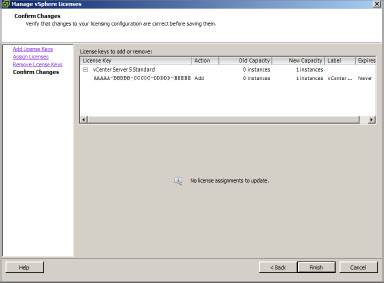
Click Next three times to get to the confirmation window. Figure 4.4 shows the licenses that have been added.
8. Click Finish to complete the license installation.
During initial installation, licenses may also be assigned to resources, including vCenter or hosts. Licenses can also be assigned after installation. That process will be detailed in the next section.
Assign Licenses
For vCenter and hosts to be able to leverage the features purchased, licenses have to be assigned to these resources.
In vSphere, features are granted to hosts by assigning licenses in Licensing Administration. To assign licenses purchased for vCenter and ESX or ESXi hosts:
1. Log in to vCenter using the vSphere Client.
2. Once connected, load Licensing Administration by selecting View ⇒ Administration ⇒ Licensing or by pressing Ctrl+Shift+L.
3. The currently installed licenses will be displayed in the Licensing screen, shown in Figure 4.5.
4. Click Manage vSphere Licenses to manage licenses in the vSphere environment.
5. The first licensing action available is Add License Keys. Click Next to continue to Assign Licenses.
6. The Assign Licenses window can display unlicensed assets, licensed assets, or all assets. Ensure that the Show Unlicensed Assets radio button is selected.
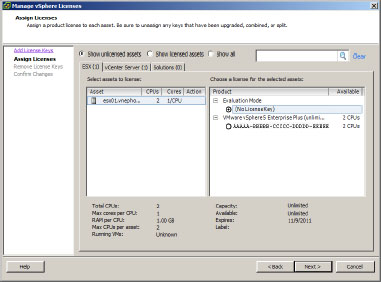
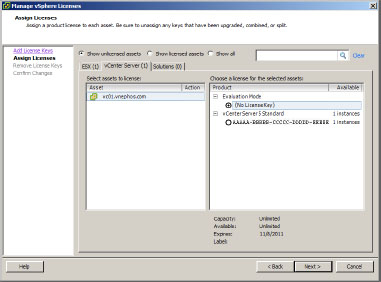
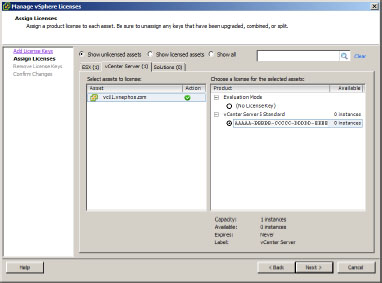
7. To assign licenses to ESX or ESXi hosts, select the ESX tab to display hosts that are currently unlicensed. This can be seen in Figure 4.6. To assign licenses to a vCenter Server, select the vCenter tab instead, as shown in Figure 4.7.
8. To assign a license to a single asset, click on a host in the Select Assets To License window. Then select a radio button next to the desired product in the Choose A License For The Selected Assets window.
9. To assign a license to multiple assets, hold the Ctrl key, and click on each host in the Select Assets To License window. Then select a radio button next to the desired product in the Choose A License For The Selected Assets window.
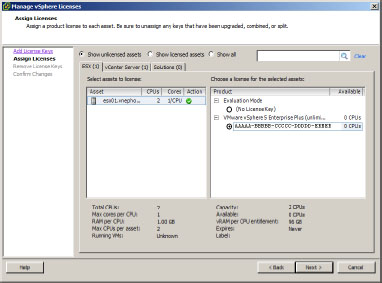
10. Once the licenses have been assigned to the hosts, a green circle with a check mark will be displayed to the right of the host in the Action field. You can see this in Figure 4.8 and Figure 4.9.
11. Select the Show Licensed Assets radio button to verify that the ESX hosts and vCenter Server or servers have been properly licensed.
12. Click Next two times to proceed to the confirmation window.
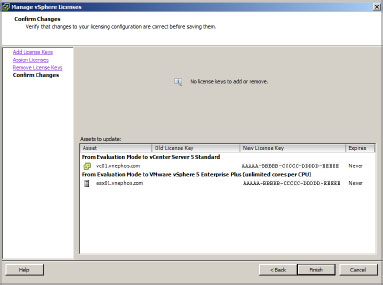
13. The confirmation window will show which licenses have been assigned to which assets, as well as which previous licenses were assigned to those assets. You can see this in Figure 4.10.
14. Click Finish to complete the license assignment process.
Unassign and Remove Licenses
Removing licenses is not a common task. Typically, there’s only one time that licenses would be removed: to replace evaluation licenses with purchased licenses. Licenses cannot be removed while they are assigned to assets because they are currently being used. Assets such as hosts or vCenter Servers must have their licenses unassigned before the licenses can be removed. When licenses are unassigned, they are disassociated from hosts or vCenter Servers. When licenses are removed, they are deleted from the vSphere installation.
To unassign and remove licenses for vCenter and ESX or ESXi hosts:
1. Log in to the vCenter Server using the vSphere Client.
2. Once connected, load Licensing Administration by selecting View ⇒ Administration ⇒ Licensing or by pressing Ctrl+Shift+L. The currently installed licenses will be displayed in Licensing Administration.
3. Click Manage vSphere Licenses to manage licenses in the vSphere environment.
4. The first licensing action available is Add License Keys; click Next to continue to Assign Licenses.
5. The Assign Licenses window will default to displaying unlicensed assets, licensed assets, or all assets. Ensure that the Show Licensed Assets radio button is selected.
6. To unassign licenses from ESX or ESXi hosts, select the ESX tab to display hosts that are currently licensed. To unassign a license from a vCenter Server, select the vCenter tab instead.
7. To unassign a license from a single asset, click on a host in the Select Assets To License window. Then select a radio button next to No License Key in the Choose A License For The Selected Assets window.
NOTE To unassign a license from multiple assets, hold the Ctrl key, and click on each host in the Select Assets To License window. Then select a radio button next to No License Key in the Choose A License For The Selected Assets window.
Once the licenses have been unassigned, a green circle with a check mark will be displayed to the right of the host in the Action field.
8. Select the Show Unlicensed Assets radio button to verify that the ESX or ESXi hosts and vCenter Server have had their licenses unassigned.
9. Click Next to proceed to the Remove Licenses window.
Licenses that are not currently assigned to any assets are now available to be removed from vCenter.
10. Select the check box next to each license that is to be removed.
11. Click Next to proceed to the confirmation window.
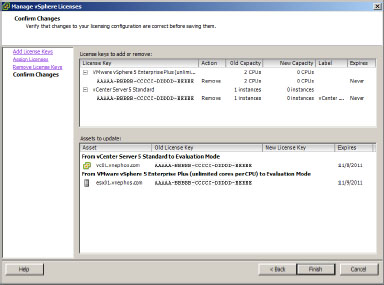
12. Figure 4.11 shows licenses to be removed in the topmost pane. The licenses that have been unassigned from each of the assets, as well as which previous licenses were assigned to those assets, appear in the bottom pane.
13. Click Finish to complete the license removal process.
The process is the same for installing new production licenses and removing evaluation licenses, except that you would assign the new licenses to ESX and vCenter assets, rather than choose No License Key during the unassign process.
Change Licenses Assigned to Assets
Changing licenses assigned to assets can be accomplished in two ways:
- Through the Manage vSphere Licenses action item, as described in several earlier sections of this chapter. Depending on the number of assets in the environment, this might not be the most efficient way to perform the task.
- Through the Management tab in the Licensing component of vCenter.
To change licenses assigned to assets using the Licensing component of vCenter:
1. Log in to the vCenter Server using the vSphere Client.
2. Once connected, load Licensing Administration by selecting View ⇒ Administration ⇒ Licensing or by pressing Ctrl+Shift+L. The currently installed licenses will be displayed in Licensing Administration.
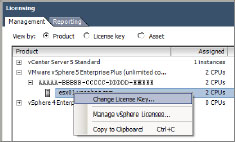
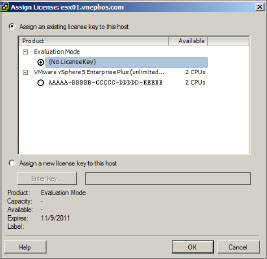
3. Right-click on the asset that will have its license changed, and choose Change License Key, as shown in Figure 4.12.
4. The Assign License dialog box will appear, as shown in Figure 4.13.
5. To assign an existing license, ensure that Assign An Existing License Key To This Host is selected, and select the radio button next to the license that is to be used.
6. To assign a new license key, select Assign A New License Key To This Host and press the Enter key. When prompted by the Add License Key dialog box, enter the new license key.
7. Click OK to complete the license reassignment or addition.
Install Licenses for Legacy Hosts
In VI3, a license server is required for the licensing of vCenter Server, ESX hosts, and ESXi hosts. This is still a requirement when using vCenter for vSphere with 3.5 ESX and ESXi hosts. This is because the previous generation of ESX does not know how to communicate with the integrated licensing of vSphere.
A typical practice when upgrading a VI3 environment is to first upgrade the vCenter Server to the highest possible revision, or build, that will accommodate the newest build of ESX or ESXi in the environment. The license server from the VI3 installation is still required to facilitate the use of ESX or ESXi 3.5 hosts.
If the license server is removed from the upgraded vCenter Server, it must be downloaded from VMware’s website, because it is not included with the vSphere distribution.
TIP It is a VMware best practice to install the license server on the same system as the vSphere vCenter Server. This is less complicated than using another system to host the licensing service, and still fulfills the requirement of only one Windows installation in the environment.
You might wonder, why not upgrade all hosts at the same time as you are upgrading the vCenter Server? Some administrators might feel more comfortable using vCenter for vSphere in production for a short time before upgrading hosts. In other situations, some hosts may not be able to be upgraded because they aren’t included on the vSphere Hardware Compatibility List. Because vSphere hosts are typically more expensive than standard servers, it may not be financially feasible to replace them for a considerable time.
To manage legacy hosts in a vSphere environment:
1. Download the license server from the VMware website, or use the most recent distribution from vCenter Server for VI3 media.
2. Run the license server installation to begin.
3. When proceeding through the installation dialog boxes, choose all the defaults until you reach the Provide Licensing Info window. Enter the path to the license file obtained from the VMware License Portal, or an existing license file. Click Next, then Install, followed by Finish to complete the license server installation.
4. Log in to the vCenter Server using the vSphere Client.
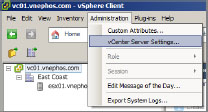
5. Once connected, load vCenter Server Settings by selecting Administration ⇒ vCenter Server Settings, shown in Figure 4.14.
6. Select the Licensing menu from the left pane to access licensing settings.
7. In the License Server section, enter the FQDN or IP address of the system where the license server service is running. This can be the vCenter Server or another system that is running the service, as shown in Figure 4.15.
8. Ensure that the Reconfigure ESX 3 hosts using license servers to use this server check box is selected. This allows vCenter to manage the licenses that the ESX hosts are using.
9. Click OK to accept the changes.
10. To ensure the licenses are installed and recognized by vCenter, load the licensing window in vSphere by pressing Ctrl+Shift+L or selecting View ⇒ Administration ⇒ Licensing.
11. Figure 4.16 shows the License Server and any vSphere licenses. Click the plus (+) sign to the left of the License Server listed to view the licenses that are loaded by the license server.
As you can see, managing licenses for legacy VI3 hosts is slightly more complicated than for ESX or ESXi version 4 and 5 hosts. There are some additional limitations when using legacy hosts. For example, you cannot manage host features from a central location. Legacy hosts have to be configured individually, through each host’s configuration menu, to enable or disable features such as HA, DRS, and vMotion. Another limitation is that a vSphere 4 or 5 vCenter server can point only to a single legacy license server. This means that legacy licenses/license servers must be consolidated.
Review Installed Licenses
In any environment, it is important to know which licenses are currently in use, and whether all licenses are being leveraged appropriately. Once licenses have been installed and assigned, it is important to review them for compliance and to ensure they are assigned appropriately.
New licenses are often purchased along with new equipment. In other situations, equipment is replaced, and it is necessary to reassign licenses from older equipment to newer equipment.
VMware has provided a reporting function in the Licensing component of vCenter Server. Reporting can be viewed by Product, License Key, or Asset. This reporting function replaces the VMware Licensing Portal, which can only be accessed with Internet connectivity to VMware’s website and provides only the ability to view purchased licenses. By using the reporting function in vSphere, you can easily determine which assets are using licenses.
View Licenses by Product
When you are reviewing licensing, it is good to know what products are installed in the environment. Reviewing this information is easy in the License Administration screen:
1. When connected to vCenter, load Licensing Administration by selecting View ⇒ Administration ⇒ Licensing or by pressing Ctrl+Shift+L.
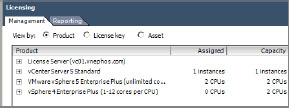
2. The currently installed licenses will be displayed in the management tab of Licensing Administration and appear according to product.
3. By default, the listings display only the product names, the number assigned, and the total number of licenses or capacity. To get a more detailed view, click the plus (+) sign to the left of the product name. For vSphere products, the license key, the number assigned, the capacity, the label assigned to the key, and an expiration of the key, if any, will be displayed.
Figure 4.17 shows a typical view, including vCenter Server, a licensed ESXi 5 host, and unassigned ESX 4 licenses.
You can export this license information by clicking Export. Information organized by product will be exported to one of five different formats: comma-separated values (CSV), Microsoft Excel Workbook (XLS), Extensible Markup Language (XML), or one of two possible Hypertext Markup Language (HTML) options.
View Licenses by License Key
Viewing licensing by license key makes it easy to see which products have assets assigned. To view licenses and the products that have been assigned to those keys:
1. When connected to vCenter, load Licensing Administration by selecting View ⇒ Administration ⇒ Licensing or by pressing Ctrl+Shift+L.
2. The currently installed licenses will be displayed in Licensing Administration and appear according to product.
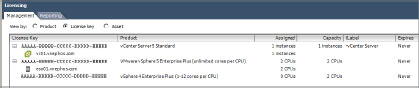
3. Click the License Key radio button to change the report to show license keys and the assets associated with them. By default, the different license keys display the license key, the product, the number assigned, the capacity, the label given, and the expiration date, if any.
4. To get a better view of which vSphere assets are using which licenses, click the plus (+) sign to the left of the product name. For vSphere products, the license key, the number assigned, the capacity, the label assigned to the key, and an expiration of the key, if any, will be displayed.
NOTE Legacy clients will not be visible in the License Key view, because they are not licensed by a key.
Figure 4.18 shows license information with the license key as the primary reporting item. Notice that legacy clients are not visible in this report.
View Licenses by Asset
Viewing licensing by asset simplifies the process of determining which license is assigned to an asset. To view the Assets:
1. When connected to vCenter, load Licensing Administration by selecting View ⇒ Administration ⇒ Licensing or by pressing Ctrl+Shift+L.
2. The currently installed licenses will be displayed in Licensing Administration and appear according to product.
3. Click the Asset radio button to change the report to show assets.
This is the least detailed view, showing only the asset, the product assigned, the license key assigned, and the expiration date.
Figure 4.19 shows each asset in the environment and the licenses associated with each asset. This view is useful when you specifically want to know how an asset is licensed without having to drill down into the product or license keys views.