Chapter 5
Upgrading to vSphere 5
IN THIS CHAPTER, YOU WILL LEARN TO:
- PREPARE FOR THE UPGRADE
- UPGRADE VCENTER SERVER
- Upgrade to vCenter Server 5.0 on the Same System
- Upgrade to vCenter Server 5.0 on a Different System
- Install vCenter Server Appliance
- Perform Postupgrade Tasks
- UPGRADE ESX/ESXI HOSTS
- Upgrade ESX/ESXi Using vCenter Update Manager
- Perform a Manual In-Place Upgrade
- Upgrade with a Fresh ESX/ESXi Installation
- PERFORM POSTUPGRADE TASKS
- Upgrade VMware Tools
- Upgrade Virtual Machine Hardware
This chapter provides information for existing VMware Infrastructure 4 (VI4) customers on how to upgrade to VMware vSphere 5.
Before starting the upgrade from vSphere 4 to vSphere 5, it is prudent to take the time to properly prepare. This section provides some tasks that you should complete before starting the upgrade process. Completing these tasks will help ensure that your upgrade is smooth and successful with a minimum of downtime.
Verify that the vCenter Server 5.0 hardware requirements are met. VMware recommends a minimum of 4 GB of RAM for vCenter Server 5.0. If the database server will be running on the same system, the installed RAM should be even higher. Be sure to double-check the hardware requirements in the VMware vSphere Documentation for vCenter Server 5.0 and ensure that the system that is intended to run vCenter Server 5.0 meets those minimum requirements. It is a VMware best practice to install vCenter Server as a VM.
Verify database compatibility with vCenter Server 5.0. vCenter Server 5.0 adds support for some databases and removes support for other databases.
If you are using one of the older databases, you must complete a database upgrade to a supported version before starting the upgrade to vCenter Server 5.0.
Databases Supported in vCenter Server 5.0 Oracle 10g R2, Oracle 11g, SQL Server 2005 Express, SQL Server 2005, SQL Server 2008 and R2
Databases No Longer Supported in vCenter Server 5.0 Oracle 9i, SQL Server 2000
Make a complete backup of the vCenter Server database. Because the vCenter Server 5.0 upgrade will upgrade the database scheme, you will want to have a complete backup of the vCenter 4.x database before starting the upgrade.
Make a complete backup of the vCenter 4.x SSL certificates. To be able to successfully “roll back” after a failed upgrade, you must have not only a copy of the database, but also a copy of the SSL certificates. Ensure that you have a complete backup of the vCenter 4.x SSL certificates.
Ensure that you have sufficient database permissions to upgrade the database. The upgrade to vCenter Server 5.0 modifies the database schema, and so you need elevated permissions on the database in order for this operation to succeed. Ensure that you have the proper permissions on the external database before starting the upgrade.
- On an Oracle system, the user should have the DBA role.
- On a SQL Server database, the user should have the db_owner role on both the vCenter Server database as well as the MSDB System database.
NOTE The permissions on the MSDB database are required only during the upgrade and can be removed after the upgrade is complete. It is considered a best practice to remove this permission post-upgrade.
Locate and verify the username and password used by vCenter to authenticate to external databases. You must have the login credentials, the database name, and the database server name used for the vCenter Server database. If this information is not available, the vCenter Server upgrade routine will not be able to upgrade the database.
Make sure the name of the vCenter Server computer is less than 15 characters long. vCenter Server 5.0 requires that the name of the computer be less than 15 characters. If the name is longer, you will need to shorten it. If the database server runs on the same computer, access to the database could be impacted by the name change. If you change the name of the computer, be sure to update the Open Database Connectivity (ODBC) Data Source Name (DSN) information appropriately.
Verify the upgrade path to vCenter Server 5.0. VirtualCenter 1.x cannot be upgraded to vCenter Server 5.0. You must perform a fresh installation of vCenter Server 5.0 instead or upgrade from 1.x to 2.5, then upgrade from 2.5.
Ensure that all ESX/ESXi host hardware is listed on the VMware Hardware Compatibility List (HCL). Administrators should verify that all hardware in the ESX/ESXi hosts is listed on the VMware HCL for VMware vSphere 5.0. Hardware components that are not found on the HCL should be replaced with compatible components in order to ensure maximum compatibility and supportability.
NOTE One area that might cause a problem in upgrade scenarios is 64-bit compatibility. Earlier versions of ESX/ESXi ran on 32-bit CPUs, but ESXi 5.0 requires 64-bit CPUs. Be sure to confirm that your server’s CPUs are fully 64-bit-compatible.
Verify the upgrade path to ESXi 5.0. Only environments running ESX 3.0 or later can upgrade to ESXi 5.0. Environments running ESX 2.5.5 might be able to upgrade, depending on the partition layout. ESX 2.5.5 servers with the default partition layout will not be able to upgrade to ESXi 5.0. ESX servers earlier than ESX 2.5.5 do not support an upgrade to ESXi 5.0.
After you have gone through all of the tasks listed in this section, you are ready to proceed with the upgrade of your environment from VI4 to VMware vSphere 5.
The first step in the process of upgrading your environment from vSphere 4 to vSphere 5 is upgrading vCenter Server 4.x to vCenter Server 5.0. After that step is completed, you have a variety of paths to take to get the ESX/ESXi hosts and virtual machines upgraded. You have to complete the upgrade to vCenter Server 5.0 before those options are available, because failing to upgrade vCenter Server 4.x to vCenter Server 5.0 first can result in downtime, a loss of connectivity, and the risk of potential data loss. Always be sure to upgrade vCenter Server before upgrading any other components in the VMware vSphere environment.
In most cases, you’ll want to upgrade vCenter Server on the same system, as described in the next section.
It’s also possible to perform an upgrade from vCenter on one system to vCenter Server 5.0 on a different system. This approach is necessary if, during the upgrade, you want to move to a 64-bit platform (vCenter Server 5.0 supports 64-bit versions of Windows Server). This process is described in the next section.
Upgrade to vCenter Server 5.0 on the Same System
In many cases, you’ll perform the upgrade from vCenter 4.x to vCenter Server 5.0 on the same physical system. You might consider this an in-place upgrade, because vCenter 4.x will be upgraded in place to vCenter Server 5.0.
Before starting the VirtualCenter 4.x upgrade to vCenter Server 5.0, be sure the following tasks have been completed:
- You’ve made a backup of the vCenter database.
- You have a backup copy of the vCenter SSL certificates.
- You have the username and password that will be used for database access.
- You have ensured that the database server software is compatible.
If these tasks have been successfully completed, you are ready to upgrade to vCenter Server 5.0.
To upgrade vCenter 4.x to vCenter Server 5.0, perform these steps:
1. Log in to the computer running vCenter Server 4.x as a user with administrative permissions.
2. Click Start ⇒ Control Panel.
3. Open Administrative Tools, and then double-click Services.
4. Find the VMware vCenter Server service and stop the service.
5. Insert the VMware vCenter media into the DVD drive. Autoplay will automatically launch the VMware vCenter Installer.
6. Click the link to install vCenter Server. This launches the installer for vCenter Server.
7. When prompted, select a language for the installer and click OK.
8. At the Welcome page for the vCenter Server installer, click Next.
9. Select I Agree To The Terms In The License Agreement and click Next.
10. Enter the license key for vCenter Server. If you do not yet have the license key, you can omit the license key to allow vCenter Server to run in evaluation mode. You can license vCenter Server later using vSphere Client. Click Next to continue.
11. Enter the database username and password for authentication to the database specified by the existing DSN. If you are using Windows NT authentication, you can leave the username and password blank. Click Next.
NOTE If you are using Windows NT authentication, the logged-on user during the installation process should be the same user that is used to access the database.
12. Select Yes I Want To Upgrade My vCenter Server Database to upgrade the database schema. This step is required in order to proceed with the upgrade.
13. Select I Have Taken A Backup Of The Existing vCenter Server Database And SSL Certificates and then click Next.
14. Specify the user account under which the vCenter Server service should run. If the database is using Windows NT authentication, this account should be the same account specified earlier in the wizard and the same account that has been configured for access to the database. Click Next to continue.
15. Accept the default port numbers and click Next.
16. Click Install to start the upgrade process.
Upgrade to vCenter Server 5.0 on a Different System
In this scenario, you upgrade vCenter 4.x on one system to vCenter Server 5.0 on a different system.
NOTE vCenter 5.0 uses 64-bit ODBC DSNs.
To upgrade to vCenter Server 5.0 on a different system, follow these steps:
1. Copy the SSL certificates from the source system (the system running vCenter 4.x) to the destination system (the system that will run vCenter Server 5.0). On a Windows Server 2003 system, the SSL certificates are located in %ALLUSERSPROFILE%Application DataVMwareVMware VirtualCenter. On a Windows Server 2008 system, the SSL certificates are located in %ALLUSERSPROFILE%VMwareVMware VirtualCenter.
2. Create a 64-bit DSN that points to the existing database.
3. On the destination system, run the vCenter Server installer and follow the steps outlined in the previous section to install vCenter Server 5.0.
Regardless of the method used, after the vCenter Server upgrade, there are some postupgrade tasks that you need to perform. We’ll describe these tasks next.
Install vCenter Server Appliance
New in vSphere 5.0 is the addition of the vCenter Server Appliance. VSA is an OVF which installs in about five minutes with no need for MS licensing, because it runs on SLES 11 embedded with DB2 Express. The VSA increases efficiency in your lifecycle by management because it does not require an upgrade of vCenter with each version; instead, you simply deploy a new VSA. Supported with this VSA are HA for high availability and snapshots for backup. (See Chapter 1, “Introduction to vSphere,” for more information about new features.)
To install vCenter Server Appliance, follow these steps:
1. From the vSphere Client, choose File ⇒ Deploy OVF Template.
2. Choose the source of the OVF File. You can enter a URL to install the package from the Internet or click the Browse button to locate the package on your computer, a network share, or a CD/DVD drive.
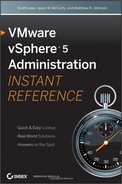
3. Verify the details of the Template (see Figure 5.1).
Figure 5.1: OVF Template details
4. Choose a name for the vCenter Server.
5. Select the datastore the files will be stored on.
6. Choose the format you want to use for the virtual disks (VMDK provisioning type). You can choose Thin Provisioned Format or Thick Provisioned Format.
7. Review details and click Finish.
At this point, vCenter Server Appliance is installed and you can use it to manage the new environment. The embedded DB2 Express is supported for 5 ESXi hosts and 50 Virtual Machines; Oracle is supported as an external database for larger deployments.
Perform Postupgrade Tasks
Once the upgrade to vCenter Server 5.0 is complete, there are a number of postupgrade tasks that administrators need to perform. These tasks include upgrading additional vCenter modules like vCenter Update Manager, vCenter Converter, or Guided Consolidation; upgrading vSphere Client and plug-ins; and verifying license settings. You’ll learn how to perform these tasks in the next few sections.
Upgrade Additional vCenter Modules
When you upgrade to vCenter Server 5.0, you must also upgrade the plug-ins that extend vCenter’s functionality. On the VMware vCenter installation media, VMware provides installers for three vCenter Server plug-ins:
- vCenter Update Manager (VUM)
- vCenter Converter
- Guided Consolidation
If you were using a previous version of any of these plug-ins, you’ll need to upgrade each of these to the version supplied on the VMware vCenter installer media. Refer to the vSphere Upgrade Guide, available from VMware’s website at http://www.vmware.com/support/pubs, for more in-depth information on the upgrade process for each of these plug-ins.
Upgrade vSphere Client
Both ESXi and vCenter Server provide a simple web interface that makes it easy to download vSphere Client. Since at this point in the upgrade process, you’ve only upgraded vCenter Server and not any of the ESXi hosts, you’ll only be able to use vCenter Server’s web interface to download and install vSphere Client.
NOTE It is possible to have both VMware vSphere Client and the older VMware Infrastructure Client installed on the same system at the same time. This might help ease the transition into the newer version of the software.
To download and install vSphere Client, follow these steps:
1. From the system onto which you want to install vSphere Client, open a web browser and navigate to the IP address or hostname of the vCenter Server computer.
2. Click the Download vSphere Client link.
3. Depending on the browser you use, you might be prompted to either save or run the file. If you are allowed to run the file, do so. Otherwise, save the file, and then double-click it after it has finished downloading.
4. Click the Next button on the welcome page of the VMware vSphere Client 5.0 installation wizard.
5. Click the radio button I Accept The Terms In The License Agreement and then click Next.
6. Specify a username and organization name and then click Next.
7. Configure the destination folder and then click Next.
8. Click the Install button to begin the installation.
9. Click the Finish button to complete the installation.
At this point, vSphere Client is installed and you can use it to manage the new environment. If the previous version was left installed, you can use the VI Client to manage older systems.
TIP If you already have the VI Client installed to manage your VI4 environment, you can use it to log in to vCenter Server 5.0 to upgrade to vSphere Client.
Verify License Settings
In the event that you will have a mixed 3.x/4.x/5.0 environment for any length of time, you’ll want to be sure that vCenter Server 5.0’s license settings are correct. VMware vSphere 5 no longer needs or uses a license server, but older ESX/ESXi hosts still need a license server until they are upgraded to version 5.0. Depending on how the upgrade was handled, you might need to install a license server in order to service the older ESX/ESXi hosts.
Consider the following upgrade scenarios:
VirtualCenter with a local license server installed is upgraded to vCenter Server 5.0 on the same computer. In this scenario, the license server for the VI3 environment was installed on the VirtualCenter Server computer before the upgrade to vCenter Server 5.0 on the same computer. The license server is preserved and remains operational after the upgrade is complete. You only need to verify that vCenter Server is using the local license server for ESX/ESXi 3.x hosts.
VirtualCenter with a remote license server is upgraded to vCenter Server 5.0 on the same computer. The license server resides on a separate computer from the VirtualCenter Server computer, so it is unaffected by the upgrade to vCenter Server 5.0 and remains operational after the upgrade is complete. You just have to verify that vCenter Server 5.0 points ESX/ESXi 3.x hosts to the same remote license server.
VirtualCenter with a local license server installed is upgraded to vCenter Server 5.0 on a different computer. The installation routine for vCenter Server 5.0 does not install a license server for legacy ESX/ESXi hosts, so the new computer running vCenter Server 5.0 will not have a functional legacy host license server running. If the old VirtualCenter Server computer is going to be retired, you must install a new license server into the environment and configure vCenter Server 5.0 to use that new license server for ESX/ESXi 3.x hosts.
VirtualCenter with a remote license server is upgraded to vCenter Server 5.0 on a different computer. The license server is unaffected by the vCenter Server 5.0 upgrade and remains fully functional. You only need to configure vCenter Server 5.0 to use the license server for ESX/ESXi 3.x hosts.
To verify that vCenter Server 5.0 is using the correct license server for ESX/ESXi 3.x hosts, follow these steps:
1. With vSphere Client running and connected to a vCenter Server instance, select Administration ⇒ vCenter Server Settings.
2. Select Licensing on the left.
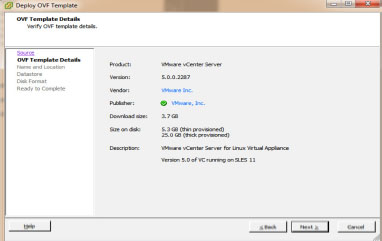
3. At the bottom of the dialog box, in the License Server section, enter the correct license server host name or IP address that vCenter Server should use, as shown in Figure 5.2.
Figure 5.2: Administrators should configure vCenter Server 5.0 to use the correct license server to provide licensing information to pre–vSphere ESX/ESXi hosts.
4. Click OK to save the settings and return to vSphere Client.
After completing these postupgrade tasks, vCenter Server 5.0 should be fully installed and fully operational in your environment. You’re now ready to upgrade your ESX/ESXi hosts to version 5.0, as described in the next section.
Once you have upgraded vCenter Server to version 5.0, the process of upgrading the ESX/ESXi hosts to version 5.0 can start. You have three options for upgrading ESX/ESXi hosts:
- Use vCenter Update Manager (VUM).
- Perform a manual upgrade.
- Perform a fresh installation.
Each approach has its advantages and disadvantages. Table 5.1 compares the three approaches.
Table 5.1: Three approaches to upgrading hosts
| Method | Advantages | Disadvantages |
| Use vCenter Update Manager. | Uses VUM and is integrated into vCenter Server. Maintains consistency. | No support for custom Service Console partitions in ESX. |
| Perform a manual upgrade. | Administrator has full control over the upgrade process and preserves legacy configuration information. | Custom Service Console partitions are not migrated correctly. Old mount points are preserved and additional disk space will be consumed. Lacks consistency and automation. |
| Perform a fresh installation. | Ensures a clean and consistent configuration of the ESXi hosts. Maintains consistency. | Some reconfiguration might be necessary after the installation unless host profiles are used. |
You must evaluate which option best meets your specific needs. For organizations that already leverage vCenter Update Manager, using VUM to upgrade the ESX/ESXi hosts makes a lot of sense. Organizations that plan to use host profiles may find that using the fresh installation approach makes the most sense. Organizations that do not use VUM or host profiles might find that performing a manual upgrade makes the most sense.
The next section describes the first of these three approaches: using vCenter Update Manager to upgrade ESX/ESXi hosts.
Upgrade ESX/ESXi Using vCenter Update Manager
vCenter Update Manager not only provides the ability to patch ESX/ESXi hosts and selected guest operating systems, but also can assist in upgrading ESX/ESXi hosts to version 5.0. vCenter Update Manager will use a special type of baseline, a host upgrade baseline, to identify hosts that are not yet running ESXi 5.0 and specify how to upgrade the identified hosts to ESXi 5.0.
You must create the host upgrade baseline and then attach it to a container within vCenter Server, like a datacenter, folder, or cluster. After you have attached the baseline, a scan will identify those hosts that are not running ESXi 5.0, and initiating remediation will initiate the upgrade to ESXi 5.0 for the identified hosts.
NOTE Upgrading an ESX/ESXi 3.x host to ESXi 5.0 requires an existing Virtual Machine File System (VMFS) volume. Depending on how ESX/ESXi 3.x was installed, the host might not have a VMFS volume. This would force a fresh install instead of an upgrade.
The first step, though, is creating the host upgrade baseline by performing the following steps:
1. In vSphere Client, navigate to the Update Manager Administration area by using the navigation bar or by selecting View ⇒ Solutions and Applications ⇒ Update Manager.
2. Click the Baselines And Groups tab. Make sure the view is set to Hosts, not VMs/VAs. Use the small buttons just below the tab bar to set the correct view.
3. Select the Upgrade Baselines tab.
4. Right-click a blank area of the Upgrade Baselines list and select New Baseline. The New Baseline Wizard starts.
5. Supply a name for the baseline and an optional description, and note that vSphere Client has automatically selected the type as Host Upgrade. Click Next to continue.
6. Select the ESX upgrade ISO and the ESXi upgrade zip files. You can use the Browse button to find the files on the vCenter Server computer or another location accessible across the network.
7. Click Next to upload the files and continue; note that the file upload might take a few minutes to complete.
8. After the file uploads and file imports are completed, click Next.
9. The next screen asks about where to place the storage for the ESX Service Console. The Service Console (referred to here as the COS, or the Console OS) resides within a virtual machine disk file (VMDK file). The upgrade baseline needs to know where to place the VMDK for the COS during the upgrade process.
10. Select Automatically Select a Datastore on the Local Host and click Next.
11. If the upgrade process fails or if the host is unable to reconnect to vCenter Server, VUM offers the option of automatically rebooting the host and “rolling back” the upgrade. You can disable that option on the next screen by deselecting “Try to reboot the host and roll back the upgrade in case of failure.” But for this exercise, leave this option selected and click Next to continue.
12. Review the summary of the options selected in the upgrade baseline. If anything is incorrect, use the Back button to go back and correct it. Otherwise, click Finish.
After you’ve created the host upgrade baseline, you must next attach the host upgrade baseline to one or more hosts, or to a container object like a datacenter, cluster, or folder. Let’s look at attaching a baseline to a specific ESX/ESXi host. The process is much the same, if not identical, to the process for attaching a baseline to a datacenter, cluster, folder, or virtual machine.
Perform the following steps to attach the host upgrade baseline to an ESX/ESXi host:
1. Launch vSphere Client if it is not already running and connect to a vCenter Server instance.
NOTE You cannot manage, attach, or detach VUM baselines when vSphere Client is connected directly to an ESX/ESXi host using vSphere Client. You must be connected to an instance of vCenter Server.
2. From the menu, select View ⇒ Inventory ⇒ Hosts And Clusters, or press the Ctrl+Shift+H keyboard shortcut.
3. In the inventory tree on the left, select the ESX/ESXi host to which you want to attach the host upgrade baseline.
4. From the right pane, use the double-headed arrows to scroll through the list of tabs until you can see the Update Manager tab and then select it.
5. Click the Attach link in the upper-right corner; this link opens the Attach Baseline Or Group dialog box.
6. Select the host upgrade baseline that you want to attach to this ESX/ESXi host and then click Attach.
Next, you must scan the host for compliance with the attached baselines. On the Update Manager tab where you just attached the host upgrade baseline, there is a Scan link; click that link to initiate a scan. Be sure to select to scan for upgrades.
When the scan is complete, the results will show that the host is noncompliant (i.e., not running ESXi 5.0). To upgrade the host, use the Remediate button in the lower-right corner of the Update Manager tab. This launches the Remediate wizard.
To upgrade the host, follow these steps:
1. At the first screen, select the host upgrade baseline and then click Next.
2. Click the check box to accept the license terms and then click Next.
3. Review the settings specified in the host upgrade baseline. A blue hyperlink next to each setting allows you to modify the settings. To leave the settings as they were specified in the host upgrade baseline, simply click Next.
4. Specify a name, description, and a schedule for the upgrade and then click Next.
5. Review the settings and use the Back button to go back if any settings need to be changed. Click Finish when the settings are correct and you are ready to proceed with the upgrade.
vCenter Update Manager proceeds with the upgrade at the scheduled time (the default setting in the wizard is immediately). The upgrade will be an unattended upgrade, and at the end of the upgrade, the ESX/ESXi host automatically reboots. (See Figure 5.3.)
Figure 5.3: The vSphere Update Manager remediates a host for upgrade.

WARNING When you are using host upgrade baselines to upgrade your ESX hosts, custom Service Console partitions are not honored. (ESXi does not have a user-accessible Service Console, so this doesn’t apply.) While the old partitions are preserved (their contents are kept intact and mounted under the /esx3-installation directory), the new Service Console will have a single partition mounted at the root directory. If you want your ESX 5.0 hosts to have a custom partition scheme after the upgrade, you won’t want to use vCenter Update Manager and host upgrade baselines.
As you can see, using vCenter Update Manager creates a streamlined upgrade process. When combined with vCenter Update Manager to upgrade the VMware Tools and the virtual machine hardware, as described in the section titled “Perform Postupgrade Tasks” later in this chapter, this makes for an automated upgrade experience. Administrators who had not considered using vCenter Update Manager should reconsider based on this upgrade functionality.
For organizations that choose not to deploy vCenter Update Manager for whatever reason, their options for upgrading ESX/ESXi hosts are to upgrade with a fresh installation or to perform a manual in-place upgrade.
Perform a Manual In-Place Upgrade
A manual in-place upgrade can be performed from ESX 4.1 to ESXi 5.0 by booting from the ESXi installation CD. Most settings are preserved. Some third-party integration settings are not. For more information on upgrading using the installation CD, see Chapter 2, “Installing and Configuring ESXi.”
Upgrade with a Fresh ESX/ESXi Installation
Technically, this isn’t an upgrade because you aren’t preserving the previous installation. However, this is a valid approach to getting your hosts running ESXi 5.0. Because the ESX/ESXi hosts are typically almost stateless—meaning that there is very little configuration data actually stored on the host—rebuilding an ESX/ESXi host with a fresh installation doesn’t create a significant amount of work for you. Add in the functionality provided by host profiles, which can automate virtually all the configuration of an ESX/ESXi host, and using this approach becomes even more attractive. With host profiles, an administrator can install ESXi with a scripted installation file, join the host to vCenter Server, apply a host profile, and that’s it.
NOTE Chapter 2 provides complete information on how to install ESXi.
To upgrade your hosts with a fresh installation, the overall process would look something like this:
1. Upgrade vCenter Server to version 5.0. (You did this in the previous section of this chapter.)
2. Use vMotion to move all the virtual machines off the ESX/ESXi host.
3. Rebuild that specific host with ESXi 5.0.
4. Rejoin the host to vCenter Server.
5. Repeat steps 2 through 4 on the remaining hosts until all the hosts have been upgraded to ESXi 5.0.
After vCenter Server and all the ESX/ESXi hosts have been upgraded, you are ready to perform some important postupgrade tasks. The next section describes these tasks.
After vCenter Server and the ESXi hosts have been upgraded to version 5.0, there are some additional postupgrade tasks that a VMware vSphere administrator should perform.
Upgrade VMware Tools
As you probably already understand by now, the VMware Tools are an important component that should be installed in every guest operating system instance in your environment. After the ESXi hosts have been upgraded, the VMware Tools in all your guest operating system instances are now out of date and need to be updated to the latest version. This ensures that the guest operating systems are using the latest and most efficient drivers for operating in a virtualized environment.
Administrators can either upgrade VMware Tools manually, or use vCenter Update Manager. The process of manually upgrading VMware Tools is described in Chapter 9, so this section will focus on using vCenter Update Manager to upgrade VMware Tools in your guest operating system instances.
vCenter Update Manager provides a prebuilt upgrade baseline named VMware Tools Upgrade to Match Host. This baseline cannot be modified or deleted, and it works by identifying virtual machines whose VMware Tools version does not match the ESXi host upon which the virtual machine is running. You can attach this baseline to groups of virtual machines and, after performing a scan, vCenter Update Manager will identify which virtual machines are running outdated versions of the VMware Tools. You can then remediate the baseline, which will upgrade the VMware Tools in the affected virtual machines. Most Windows versions require a reboot after upgrading the VMware Tools, so be sure to plan accordingly.
Using vCenter Update Manager with the VMware Tools Upgrade to Match Host baseline is the equivalent of manually initiating an upgrade of the VMware Tools on each virtual machine independently. vCenter Update Manager helps automate the process.
Upgrade Virtual Machine Hardware
This task should only be completed after the VMware Tools have been upgraded to match the ESXi host version. Otherwise, new virtual hardware presented to the guest operating system instance inside the virtual machine may not work properly until the updated version of the VMware Tools is installed. By installing the latest version of the VMware Tools first, you ensure that any new virtual hardware presented to the guest operating system has the drivers necessary to work right away.
The process of manually upgrading the virtual machine hardware from version 4 (the version used by ESX/ESXi 3.x) or version 7 (the version used by ESX/ESXi 4.x) to version 8 (the version used by ESXi 5.0) is described in Chapter 9. You do not have to manually upgrade the virtual machine version, though; you also can use vCenter Update Manager to upgrade the virtual machine hardware version.
Like the VMware Tools, vCenter Update Manager comes with a prebuilt baseline named VM Hardware Upgrade to Match Host. When you attach this baseline, either directly or as part of a baseline group, to a number of virtual machines and then perform a scan, vCenter Update Manager will identify which virtual machines have outdated virtual machine hardware. You can then “remediate” these virtual machines. As part of the remediation, vCenter Server will shut down the virtual machines and perform a virtual machine upgrade.
NOTE The VM Hardware Upgrade to Match Host baseline can only remediate a virtual machine with an outdated virtual machine version when the virtual machine is powered off. If the virtual machine is powered on, no upgrades will occur. As soon as the virtual machine is powered down, any pending tasks will launch and become active.