Demonstrations cover productions ranging from ‘how things are used’, ‘how they are made’, to ‘how they work’. The camerawork involved is often exacting, particularly where very small detail has to be shown clearly.
The main difficulties with most demonstrations, lie in trying to –
• Shoot the subject from the optimum direction.
• Avoid getting in the way of the demonstrator (and vice versa!).
• Get close enough, and avoiding camera shadows.
As you would expect, depth of field limitations can be a major problem. When taking really close shots (e.g. filling the screen with something the size of a hen’s egg), you may find focused depth so restricted that you can only focus sharply on one selected part of the subject. Although localized high intensity lighting would enable you to stop down, it could badly overheat the items being demonstrated.
Let’s recap on ways a demonstrator can help you:
• By putting items on a pre-arranged mark.
• By not moving an object about quickly.
• By not shadowing or obscuring detail.
• By working within a confined area where necessary.
• By offering items up to the camera in an agreed order, rather than jumping between various items at random.
Whenever anyone holds an item up to the camera for a really close shot, you are relying on the steadiness of their hands, and on their holding it there long enough for you to focus and compose the shot before it is taken! If the situation is likely to arise, it might be as well to warn them during rehearsal; otherwise, you’re taking a chance on shots of this sort. Particularly if you are going to zoom into detail, it is far better to shoot all big close-ups (such as marks on silverware) separately, and cut them into place during videotape editing.
Some camera operators prefer to use a narrower lens angle for closer shots, for although depth is more limited and handling coarser, it avoids having to work too close to the action, distortion is not excessive, and there are no shadowing hazards.
When you are shooting displayed objects, restricted depth of field helps to visually isolate them against a defocused background. This not only concentrates the audience’s attention, but tends to blur nearby distractions.
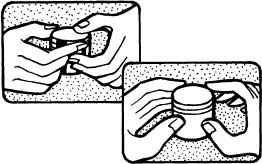
Viewpoint
If the viewpoint is poor, important detail may not be visible.

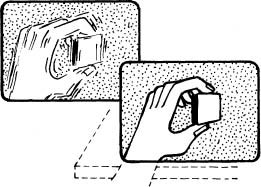
Table marks
If a demonstrator puts items down at random the camera may not have any good shot opportunities. Neat unobtrusive marks on the table can ensure that things are positioned accurately every time.
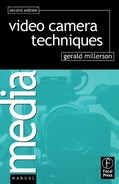
Steadying objects
If items are held in mid-air, pictures are likely to be unsteady and defocused.
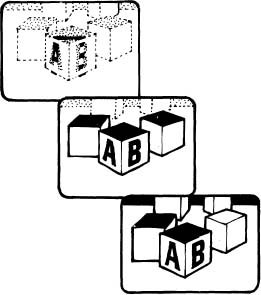
Selective depth
Whether restricted depth of field helps (by isolating an individual item) or hinders (by not showing sufficient detail) depends on the purpose of the demonstration.