Chapter 4. Design and Execution
“The opposite of love is not hate, it’s indifference. The opposite of art is not ugliness, it’s indifference.”
—Elie Wiesel
How important is design to the creation of a media project? The choice to design your piece and create images to fit your design, as opposed to just accepting what is there, is key to the accomplishment of a finished work. If you’ve ever seen a finished media project that was not designed by its creator, you probably realized that not making a choice is making a choice.
For instance, some content creators, especially those who are new to the form, stage their action directly in front of a blank white wall, without thinking about how the color, the contrast, the manipulation of space within the frame, or even the distance between the camera and the subject might influence what the audience understands to be happening in the shot.
Exciting shot compositions that match and balance each other, as well as consistent visual design that creates a world onscreen, don’t happen accidentally. They are the result of a lot of work and high standards by the crew and the bosses who are often willing to say, “No, this isn’t right. This won’t work.”

In this chapter we’ll cover the importance of several areas where exacting standards and attention to detail are needed to complete a polished, interesting piece of work. Casting your project, designing it, costuming it, and lighting it are all key steps to creating a work worth seeing, thinking about, and talking about. However, no matter what level of lighting gear, props, and actors you have access to, the key determinant to the quality of your finished work is your vision and your perfectionism.
If it’s worth doing, it’s worth doing well. Whatever it is, get it right.
Casting a Wide Net
The director is the creative boss of the film crew, and though different theories ascribe to directors more or less responsibility for the ultimate success or failure of the project (the French auteur theory gives them all the credit! Sacré bleu!), few would question that the director is the crew member most responsible for tying together the work of many other talented professionals to create the best, most unified whole.
The director’s three main responsibilities toward the project are as follows:
![]() To visualize the script, designing the camera shots necessary to tell the story and translate the script into pictures and sounds
To visualize the script, designing the camera shots necessary to tell the story and translate the script into pictures and sounds
![]() To cast the best possible actors to play the various roles in the project
To cast the best possible actors to play the various roles in the project
![]() To direct those actors to give performances that are appropriate and build the project to a proper culmination or climax
To direct those actors to give performances that are appropriate and build the project to a proper culmination or climax
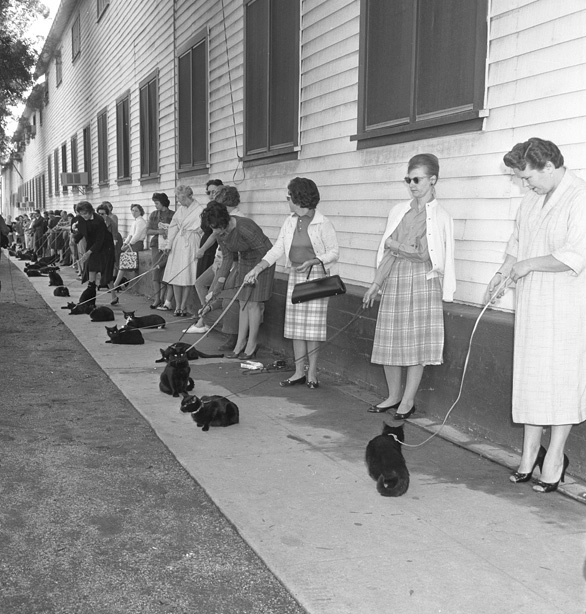
Many directors, including Martin Scorsese, agree with the great theater and film director Elia Kazan that casting—finding just the right actors to play the roles in a project—is 90 percent of their job (see FIGURE 4.1). It has often been said that if a director does that, the rest will work itself out.
Casting for a media project will be done either by the director or by a casting director. The casting director is probably the job known by the fewest people outside of the media industry that carries the most power. They have so much power, in fact, that when playwrite David Rabe wrote his landmark play about Hollywood, Hurlyburly (1984), the three main characters were all casting agents and casting directors.
You might be asking yourself, if casting is one of the three main responsibilities of the director, where does the casting director fit in? Just as the editor applies a fresh set of eyes to the footage shot by the director and the crew, the casting director is the primary crew member trying to connect the director and producers to the right actors. Interestingly, though the job of director is still dominated by men, casting directors tend to be women.
The casting director schedules and oversees auditions, deals with actors’ representatives, and creates a casting breakdown, which will list all the roles that are being cast, like this:
![]() Jenny (mid-20s): A housewife feeling the pressure of domestic life, itching for a little excitement.
Jenny (mid-20s): A housewife feeling the pressure of domestic life, itching for a little excitement.
![]() Balin (early 30s): A career con artist for whom no grift is too big or too small. He’s beginning to feel his age and wonder whether there’s anything for him beyond changing towns and names every few weeks.
Balin (early 30s): A career con artist for whom no grift is too big or too small. He’s beginning to feel his age and wonder whether there’s anything for him beyond changing towns and names every few weeks.
![]() Fenton (late 40s): A master manipulator who plays everyone against everyone else and sits back until the dust clears.
Fenton (late 40s): A master manipulator who plays everyone against everyone else and sits back until the dust clears.
Casting can lift a project or sink it. The director needs to determine during the actor’s audition, or tryout for the role, whether they have the qualities and the abilities to get across whatever the character is feeling, thinking, and doing.
Some actors have a mercurial ability to transform themselves into almost any role. Actress Meryl Streep is the best example of this. She has played a Polish immigrant living in Brooklyn in Sophie’s Choice (1982), the editrix of a major fashion magazine in The Devil Wears Prada (2011), chef Julia Child in Julie & Julia (2011), and British Prime Minister Margaret Thatcher in The Iron Lady (2013). She has been nominated for an incredible 18 Academy Awards for acting and won three.
You can Google “actor’s auditions” and see any number of amazing examples of exactly what an actor did to impress the casting director to think that they could play a role.
One example of this is Rachel McAdams’ audition for the lead role in The Notebook (2008). McAdams, at that point, had appeared in supporting roles in a number of films including Mean Girls (2006), and since she was trying out for a lead role, she was going to really have to nail it to win the role over more well-known actresses.
If you watch this video (available on YouTube), you can see the honesty and emotional reality she brought to the audition, which no doubt impressed the casting director and the director enough to feel confident casting her. Her performance and the worldwide success of that film turned her into a movie star.
Another great casting story involves the film The Public Enemy (1931). Originally, director William Wellman (his film Wings won the first Academy Award in 1927) cast actor Edward Woods in the lead role of gangster Tom Powers and assigned the role of Powers’ sidekick to an unknown actor, James Cagney. However, in rehearsals, the director and producers saw that Cagney had more charisma and seemed more like a forceful and interesting criminal and switched him to the leading role.
Cagney became a movie star.
A final casting example that may be more familiar involves the making of the first Iron Man (2010). Director Jon Favreau wanted actor Robert Downey Jr. to play the main role, and Downey felt very capable to play it; however, the actor’s troubled personal history made the producers reluctant to cast him as a lead in such a big-budget project for which there were high expectations.
Downey agreed to screen test for the role (which he ordinarily might not have done due to his stature as an actor), and everyone could tell from his audition that he was the only actor who could embody the complicated identity of Tony Stark/Iron Man. The decision to go forward with Downey may be the most pivotal piece of casting in 30 years because Iron Man launched a series of the most successful and profitable films in history, the Marvel Cinematic Universe.
The Audition Process
Auditioning can be nerve-wracking regardless of which side of the table you’re sitting on. As a director or casting director, you’re desperate to find the performer who can elevate the character as written on the page and bring them alive onscreen. You may even feel, as some creative types do, that unless you find just the right vessel to create that one-of-a-kind role in your project, you can’t even move forward with it.
As an actor, you’re looking for the chance to get to use your gifts to create someone and something real, beautiful, and memorable...and maybe get paid...and maybe put something out there impressive enough to get you hired for another gig and get even more opportunities.
This is why many actors, when they’re just starting out or even after they’ve been at it a while, are willing to try out for or submit themselves for student films or amateur productions with no pay, where their only compensation is a copy of the finished project that they can showcase on their reel.
In fact, even some well-known actors will participate in a no-budget project if they think the script is really something special or the writer, director, or producer is someone they think they might want to work with in the future.
Most of the time, producers list their breakdowns and project information in periodicals like The Hollywood Reporter or Variety or on websites such as http://backstage.com and http://actorsguide.blogspot.com. More resources for actors are listed in the appendix.
There are several popular formats for auditions. If you are holding auditions for your project, you should decide whether you want to see actors do some or all of the following:
![]() Read prepared monologues (speeches)
Read prepared monologues (speeches)
![]() Read sides (pages) from your script
Read sides (pages) from your script
![]() Perform improvisations based on a general understanding of the characters and situations the actors are trying to portray
Perform improvisations based on a general understanding of the characters and situations the actors are trying to portray
Improvisation means acting spontaneously in character without a script. It’s considered such an important talent for actors, comics, and even writers to have that many acting programs and classes dedicate a considerable amount of time to it.
After auditions, as casting director you may decide to hold a second round of auditions known as callbacks, which continue until you have found the best actors to cast in each role.
Boom! Production Audio
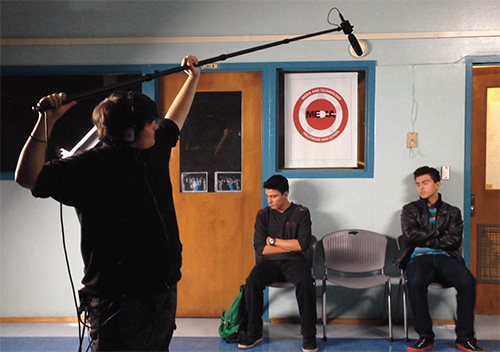
In Chapter 3, we shared some basics on recording audio for a voiceover narration. Here we’ll show you what you’ll need to know about recording production sound, audio that occurs onscreen at the same time you’re recording the picture.
Any production sound you’ve included in your projects so far may have been recorded using the on-camera mic, the microphone built into the camera or one that is mounted on the camera. The sound you record from the on-camera mic can be useful for reference; it may also provide a great source of ambient sound. But when it’s important to hear what someone onscreen is saying, the closer the microphone is, the better. Doing so will take a few more tools and a crewmember dedicated to the job (see FIGURE 4.2).
Managing the Environment
Just as in the exercise in Chapter 2’s “Sound Design” section, notice the different sources of sound around you now. Even in a quiet space, we naturally tune out many sounds that a microphone doesn’t. If you’re a crew member in the sound department of a production, it can become a real chore managing the shooting environment to get the best sound possible.
Unlike humans, microphones and audio-recording devices are objective about the sound they hear and pick up. A microphone can’t tune out unwanted sounds, like we can, to focus on what’s important. One of your jobs during production, if you’re recording sync sound, is to make sure the only sound that can be picked up by the mic is what is most important onscreen.
Recording what is important does not mean recording every sound that would occur onscreen. Let’s elaborate. If you’re shooting a scene where two people are having a conversation in a café or restaurant, realistically there would be environmental sounds including the other patrons’ conversations, kitchen activity, servers moving around, music playing, and so on.
To get the best sound for the scene, every other sound other than the characters’ voices and movement should be silenced. By recording only the voices of your talent isolated from all other sounds, you will have complete control over the balance of volume levels in your sound design.
Then you can add the walla track and source music to your edit after the scene is cut together to maintain the illusion that the scene took place in one uninterrupted moment in time. Walla is the term used for the atmospheric sound effect of a crowd in a particular place. Source music describes music that would authentically be playing where the scene takes place, such as dance music in a club scene or elevator music in an elevator...you get the idea.
![]() Peas, Carrots, and Rutabaga
Peas, Carrots, and Rutabaga
Keeping your crew and background talent quiet is the easiest part of the job of managing the sound where you shoot. A harder task is making sure all fans and air-conditioning are turned off when the camera is rolling. In a tight space, with a lot of people crammed in and perhaps hot lights working like space heaters, this can contribute to an uncomfortable situation.
Here’s a question that may come up a few times during the low-budget production phase of your career: Does the air-conditioning really need to be off when you’re shooting? Yes. Yes, it does. The more noise you allow onto your production audio recording, the more filtering and loss of quality occurs to the audio in postproduction.
There are other common machines that we don’t think about frequently as being noisy, but they do make a difference in the quality of your audio. Look out for computers that aren’t required to be turned on or that will appear onscreen. Unplug any refrigerators nearby, but don’t forget to plug them back in during long breaks and when you wrap, or you’ll have very angry location owners to face and a terrible smell to deal with.
If you’re hearing unwanted sounds from a source outside of your direct control, such as a neighbor playing loud music, it’s time to meet someone new and make a friend. With your most sincere smile, go to the source of the sound you’d like to have stopped and ask ever so kindly if the source of the sound can be put on hold for the specific amount of time you need it to be off. Explain why it’s important to have the area quiet.
We believe most people on this planet of ours are basically good and will understand. Just make sure to thank whomever you asked once more to let them know that the quiet is no longer required.
Which Mic When
When recording audio for a video project, there are a few different types of microphones you should be familiar with and know how and when to use them. Microphones are categorized using different criteria such as what use are they designed for, whether they require power, and in what pattern or shape they pick up sound.
![]() Do What You Say, Say What You Do
Do What You Say, Say What You Do
![]() Tell people beforehand what you are going to do and how long you need them to be quiet. The same individuals who might feel imposed upon if you presume they will be quiet when you tell them to will generally be supportive if you ask nicely.
Tell people beforehand what you are going to do and how long you need them to be quiet. The same individuals who might feel imposed upon if you presume they will be quiet when you tell them to will generally be supportive if you ask nicely.
![]() Cheerlead for your project by building interest and support in the community where you shoot. This could end up helping you in countless ways. All producers have to be public relations experts and get folks excited about their project. People are mostly pretty supportive and curious about shooting crews so long as they’re not causing excess traffic or behaving in other inconsiderate ways.
Cheerlead for your project by building interest and support in the community where you shoot. This could end up helping you in countless ways. All producers have to be public relations experts and get folks excited about their project. People are mostly pretty supportive and curious about shooting crews so long as they’re not causing excess traffic or behaving in other inconsiderate ways.
![]() If you say you’re going to be done in an hour, be done in an hour. Don’t cut corners with the truth to achieve your own production needs. This can be very tough. Producing a large amount of output within a short timeframe is the norm in production, and the pressure can be intense. However, content creation is a relationship business, and the downsides of goal-oriented, short-term deceptions are many. Besides morality itself, you can burn your bridges with whoever gave you access to film. One low-budget crew was allowed to shoot at a restaurant so long as they purchased food there. They didn’t buy enough and were not allowed to return to shoot their coverage shots. They had to reshoot the scene from scratch somewhere else.
If you say you’re going to be done in an hour, be done in an hour. Don’t cut corners with the truth to achieve your own production needs. This can be very tough. Producing a large amount of output within a short timeframe is the norm in production, and the pressure can be intense. However, content creation is a relationship business, and the downsides of goal-oriented, short-term deceptions are many. Besides morality itself, you can burn your bridges with whoever gave you access to film. One low-budget crew was allowed to shoot at a restaurant so long as they purchased food there. They didn’t buy enough and were not allowed to return to shoot their coverage shots. They had to reshoot the scene from scratch somewhere else.
![]() Be proactive and clear in your communication. Don’t assume that anyone new to your production, especially a bystander, knows anything about what you need or about the way production works. Word of mouth plus the quality of your work is what will lead you to your next gig, and anyone who was serious about a career in media has played the long game by being a straight shooter.
Be proactive and clear in your communication. Don’t assume that anyone new to your production, especially a bystander, knows anything about what you need or about the way production works. Word of mouth plus the quality of your work is what will lead you to your next gig, and anyone who was serious about a career in media has played the long game by being a straight shooter.
“How Dynamic!”
One microphone most people are familiar with is a handheld mic used in public address systems (PA systems) and vocal music performances. These microphones are most commonly placed in the dynamic category, which means they do not require power to deliver sound to the recording device (see FIGURE 4.3).

The reason these microphones don’t need power is because they’re designed to be positioned very close to the source of the sound. You may see these microphones used in news-style interviews, held by vocalists singing a song, or used by a public speaker talking to a large audience.
Aside from those examples, there aren’t too many other instances when it’s acceptable to see onscreen talent holding a microphone. Imagine an intimate scene with a couple passing a mic between each other when they need to speak.
For picking up dialogue while maintaining a high standard of sound quality and keeping the microphone out of the frame, there are some other microphones to consider.
“I Call Shotgun!”
A shotgun mic is one of the most essential tools of the audio recordist or mixer on a video production. These mics are so named because they have a long, cylindrical shape and are placed on a mount that has a handle similar to that of a firearm. Most often, they’re placed on a boom pole to get the mic close to the sound source, while keeping it out of the camera frame.
Shotgun mics (see FIGURE 4.4) are in the condenser category. Condenser microphones require power to operate. One example of power used for shotgun mics is phantom power, commonly at 48 volts (V), which moves like a ghostly spirit up from the recorder, or receiving end, through the same microphone cable that brings the audio signal back down. These mics are designed to pick up audio from a distance, which is why they are long and require power.
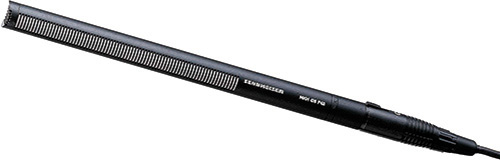
COURTESY SENNHEISER ELECTRONIC CORP.
FIGURE 4.4 The Sennheiser MKH 416 shotgun microphone, the workhorse of the industry
Note
The pattern of what we referred to as unidirectional is technically called hypercardioid, because the pattern is heart-shaped.
Unfortunately, microphones can’t avoid unwanted sounds the way a camera can frame out unwanted objects, although some are built to be more discriminating than others. Shotgun mics are designed to be unidirectional, meaning they have a pickup pattern (or polar pattern) that allows the mic to pick up the sounds from a narrower angle or a single direction. By contrast, omnidirectional mics, like most handheld dynamic mics, pick up sound fairly evenly in all directions (see FIGURE 4.5).

This is both an asset and a liability. There’s great advantage to a mic that muffles down sounds outside of the pickup angle. But it also requires careful and accurate placement of the microphone to ensure a minimally acceptable quality of sound.
“There’s Lava Here?”
Another microphone that you’ll find handy is one that can be clipped directly on the talent. It can be placed in a visible location, or it can be hidden. It is the lavalier microphone, or body mic (see FIGURE 4.6).
Tip
When using a wireless kit for your audio, ask your crew, the talent, and anyone else around to turn off their phones and mobile devices to avoid interference coming through the recorded signal.
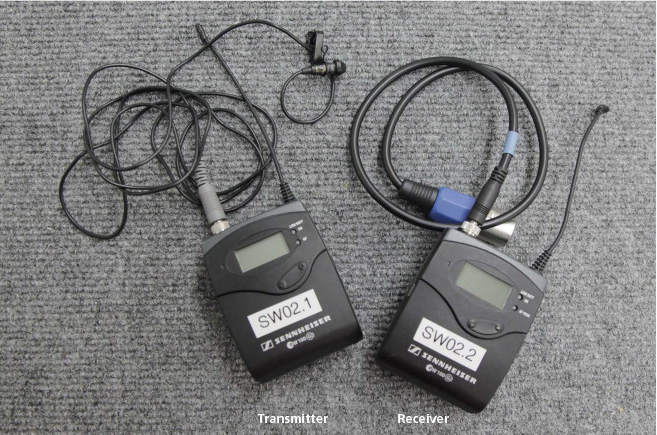
The lavalier microphone can be hardwired or used as part of a wireless kit that consists of a transmitter, which stays with the talent in a pocket or is clipped to a belt or waistband, and a receiver, which is connected to the audio recorder or camera.
A lavalier mic can be either omnidirectional or cardioid. A cardioid lavalier requires careful placement on the subject. Considerable turns of the head can have an undesirable on-mic/off-mic effect.
When putting a mic on your subject, don’t be shy about asking the person to route the lavalier cable up through their top. It’s okay to see the clipped lavalier mic on a subject, but you don’t want to see the wire hanging down over the subject’s top.
A lavalier microphone has a clip for secure placement on clothing. Setting up which direction the clip opens might depend on whether the subject is male or female. The buttons on men’s and women’s apparel are different. For men, the buttons are on the right; for women, they are on the left.
“How Do You Hold This Thing?”
In most shooting circumstances, you will likely ensure the greatest flexibility in microphone placement by using a boom or boompole. A boom is an extension arm to a microphone stand, or a rod alone, to allow the placement of a microphone to be moved during the shot.
The boom operator is responsible for holding and placing the boom where it is needed without getting it into the frame and without creating any shadows in the shot. The boom consists of several parts: a fishpole, a shock mount, and the microphone itself.
A fishpole can have several telescoping sections that allow you to extend the pole to get the microphone into position.
Shock mounts (see FIGURE 4.7) are made in many varieties. Their purpose is to hold the microphone with elastic suspension to keep vibrations on the boom or stand from creating unwanted noise in the signal. Most shock mounts use rubber bands that need to be twisted to hold the microphone firmly in place.

Follow these guidelines to properly operate the boom (see FIGURE 4.8):
![]() Place your control hand (right if right-handed, left if left-handed) on the bottom end of the pole.
Place your control hand (right if right-handed, left if left-handed) on the bottom end of the pole.
![]() Your other arm will be your weight-bearing arm, holding the pole as you would a billiard cue stick.
Your other arm will be your weight-bearing arm, holding the pole as you would a billiard cue stick.
![]() Hold your arms in a “U” shape and directly above your head.
Hold your arms in a “U” shape and directly above your head.
![]() The boom should remain parallel to the ground. If held diagonally, the pole might sneak into the corner of the frame and not be noticed by the camera operator.
The boom should remain parallel to the ground. If held diagonally, the pole might sneak into the corner of the frame and not be noticed by the camera operator.

The job of boom operator requires stamina more than strength. Height and a good reach are helpful too. Operating boom also requires you to have dialogue memorized. In a scene with two people speaking, the microphone has to be pointed at the person who has a line before they speak. If you wait for someone to start speaking before turning the mic, then you risk the beginning of lines being off-mic.
Here are some more considerations when operating the boom:
![]() When extending the fishpole, keep each section in equal lengths to balance the strain of the weight equally.
When extending the fishpole, keep each section in equal lengths to balance the strain of the weight equally.
![]() With twist locks, it’s best to start at the lowest section and then work up when extending. Start at the top and work down when shortening.
With twist locks, it’s best to start at the lowest section and then work up when extending. Start at the top and work down when shortening.
![]() If you need to extend the pole to its furthest length, bring in each section about an inch from fully extended to keep the locks from straining.
If you need to extend the pole to its furthest length, bring in each section about an inch from fully extended to keep the locks from straining.
![]() When not in operation, collapse the fishpole and place it horizontally on a flat surface. Leaning a fully extended boom on a wall is asking for trouble.
When not in operation, collapse the fishpole and place it horizontally on a flat surface. Leaning a fully extended boom on a wall is asking for trouble.
Cables
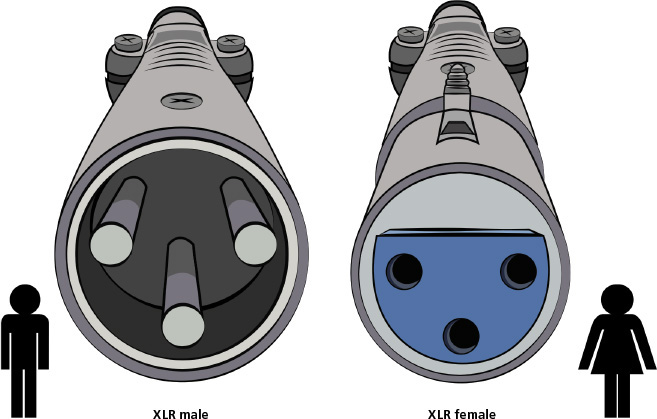
Connecting a microphone to a camera or audio recorder requires use of cables. The most common cable used in professional audio recording is a cable that has XLR connectors with three pins at each end. XLR connectors allow for a balanced audio connection and therefore longer-distance runs with less noise in the signal. A cable with XLR connectors (see FIGURE 4.9) is required for phantom powering a microphone.
A cable is made up of wires. Each wire is made up of thin strands of copper. This design allows for flexibility of the cable, which is why you can loop cables in circles or lay the cable down flat on the ground. The tiny strands in the wires in the cables can break, especially if the cable is wrapped poorly or the cable is bent at sharp angles. The more breakage in the wires, the less quality the signal of audio will transmit. When enough of the strands in a wire breaks, a complete loss of signal occurs, resulting in a short.
![]() Video
Video
To see a demonstration of how to wrap cable using the over/under method, please refer to the video in the chapter files that accompany this book.
To avoid damage to your delicate audio cables, wrap the cables in even and consistent loops, avoiding any figure-eight shapes, knots, or bending. The over/under method of cable wrapping is ideal.
So, if wire strands make up wires and multiple wires make up cables, what happens when two cables are combined into one? You’ve got yourself a duplex cable. A duplex cable has two connections, which allows a boom operator to have a single, beefier cable running to the recorder.
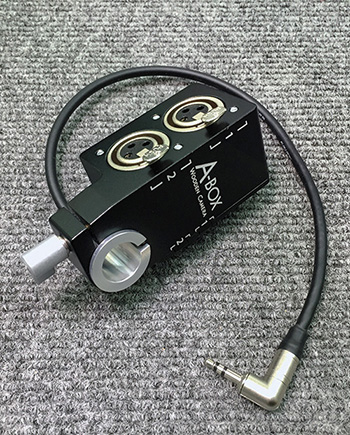
One connection is for the microphone; the other is for the boom operator’s headphones so that they can monitor the audio being recorded. Duplex cables designed for boom have a box with a belt clip (see FIGURE 4.10).

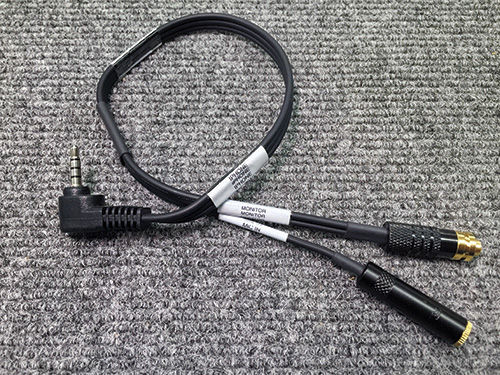
When recording audio on a mobile device, a consumer camcorder, or a DSLR camera, you will likely use cables that have mini connectors, also called mini phone connectors, that have a diameter of 3.5mm or 1/8”. For two-channel stereo connections, the 3.5mm connector is called a mini TRS connector. These are the same connectors used for consumer headphones and earbuds. Another variety of this connector, the kind used for mobile phones that have a built-in microphone, is called a TRRS connector.
![]() We Have to Adapt
We Have to Adapt

Tip
When recording audio on a recorder that doesn’t accept XLR connections, check to see whether the microphone you want to connect requires phantom power. Pass-through phantom power adapter boxes are available but are not inexpensive.
All of these connections are unbalanced audio connections and cannot support phantom powering the microphone. When using these connections, the microphone must be either dynamic or powered by another source, like an AA battery.
Production Design and Art Department
Do you know the name Cedric Gibbons? Well, he is one of the most successful and award-winning art directors in Hollywood history. He won 11 Academy Awards and garnered 39 nominations. In fact, he designed the Oscar statuette itself. He also married (among others) the talented and beautiful Hollywood star Dolores Del Rio. Yet, even though many millions have watched and loved his films, including The Wizard Of Oz (1939), Little Women (1939), and Gaslight (1944), far fewer know his name or many others on the crew beyond the actors and maybe the directors.
The director gets the lion’s share of the credit when a project is successful, but in reality, many artists and technicians must coordinate their magnificent work behind the vision of the director.
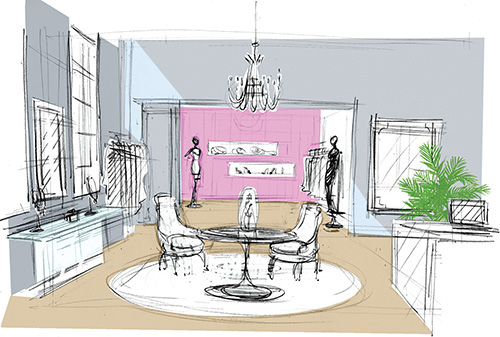
The art director or production designer along with the director of photography are the key crew members who determine along with the director and producers the particular aesthetic or look of the piece: overall dark or light, bright colors or muted, sharp or dream-like, and so on. (see FIGURE 4.14).
In addition, the production designer must serve the script as the director does, including the following:
![]() Making sure each prop and set piece is appropriate to the time and place of the project. Peter Lamont, production designer for the film Titanic (1997), went back to the blueprints of the ship itself to re-create the dining saloon, grand staircase, and other sets as accurately as possible, even contracting with the companies that designed and made the original rugs, furniture, and China plates for the real Titanic. They basically had to re-create the most remarkable ship ever created...again...in order to destroy it for a film.
Making sure each prop and set piece is appropriate to the time and place of the project. Peter Lamont, production designer for the film Titanic (1997), went back to the blueprints of the ship itself to re-create the dining saloon, grand staircase, and other sets as accurately as possible, even contracting with the companies that designed and made the original rugs, furniture, and China plates for the real Titanic. They basically had to re-create the most remarkable ship ever created...again...in order to destroy it for a film.
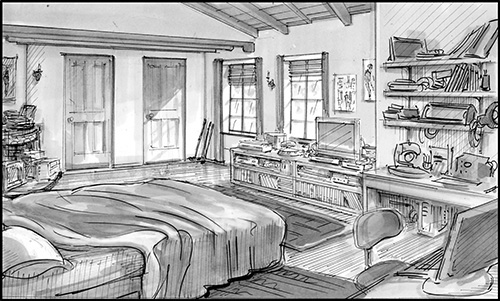
![]() Make sure that every item suggests whatever is necessary about the character or the environment in the scene. In the TV show The Wire (2000), Jimmy NcNulty is an exceptional Baltimore detective whose personal life is a mess, as reflected by his postdivorce studio apartment dominated by a dirty mattress on the floor.
Make sure that every item suggests whatever is necessary about the character or the environment in the scene. In the TV show The Wire (2000), Jimmy NcNulty is an exceptional Baltimore detective whose personal life is a mess, as reflected by his postdivorce studio apartment dominated by a dirty mattress on the floor.
![]() Occasionally, the production designer has to create a whole world from the imagination of the filmmaker. Some directors such as Terry Gilliam (Brazil, 1982) and Tim Burton (Alice In Wonderland, 2012) envision alternate realities in which everything we see is relatable without being familiar. Everything comes from their imagination; everything needs to be designed. If you are the production designer on one of their films, your job will not be finished with a couple of trips to IKEA.
Occasionally, the production designer has to create a whole world from the imagination of the filmmaker. Some directors such as Terry Gilliam (Brazil, 1982) and Tim Burton (Alice In Wonderland, 2012) envision alternate realities in which everything we see is relatable without being familiar. Everything comes from their imagination; everything needs to be designed. If you are the production designer on one of their films, your job will not be finished with a couple of trips to IKEA.
The production designer is responsible for the overall look of the film and coordinates the contributions of key personnel including the art director, the set decorator, and the costume designer to make sure that everything is consistent (see FIGURE 4.15). The art director oversees the art department who make everything that needs to be made for the project. The set decorator decides what needs to be bought and what needs to be made for the sets.
“If clothes make the man, then certainly the costume designer makes the actor!”
—Audrey Hepburn
The costume designer must be every bit as particular as the production designer regarding the wardrobe of the actors. The right costuming can communicate as much about a character’s personality, status, priorities, cultural background, wealth, and even connection with other characters as the actor’s performance.
Like production design, costuming transports us visually and texturally to the world of Jane Austen or Star Wars. Depending on the time period or location of the piece, costume design and creation may involve numerous stages of development, including the following:
![]() Researching the place or period as needed to assure the accuracy of the costumes
Researching the place or period as needed to assure the accuracy of the costumes
![]() Drawing a costume plot or a list of all the costumes required for the shoot for every character
Drawing a costume plot or a list of all the costumes required for the shoot for every character
![]() Agreeing on the fabrics and other materials to be used to create the costumes and finalizing the design
Agreeing on the fabrics and other materials to be used to create the costumes and finalizing the design
![]() Making all costumes, accessories, and so on, for the production
Making all costumes, accessories, and so on, for the production
![]() Keeping track of them throughout production and keeping them clean (or as dirty or worn as they need to, given for the scene that they are part of)
Keeping track of them throughout production and keeping them clean (or as dirty or worn as they need to, given for the scene that they are part of)
Each individual project dictates the specific requirements of costume design. For instance, if one scene features a fight between six characters on a dusty road, each character may need to have multiples of their costume at varying stages of dustiness so that different parts of the scene can be refilmed as necessary. For low- to medium-budget productions, costumes may be purchased rather than made, still within the parameters set by the costume designer.
In the history of costume design, there’s one artist arguably more dominant than the aforementioned Mr. Gibbons. Designer Edith Head won eight Academy Awards out of thirty-five nominations for films including All About Eve (1950), Sabrina (1954), and The Sting (1973). She didn’t design the Oscar, but she did get an Oscar nomination for a film called The Oscar (1966). And, she was turned into animated character Edna Mode in The Incredibles (2004), which is, yes, incredible.
Game, set, match, Head (see FIGURE 4.16).

PHOTO BY DOUG KLINE/CC BY 2.0
FIGURE 4.16 The iconic Ascot dress of Audrey Hepburn in My Fair Lady (1964) designed by Head
So, how, if at all, does all of this apply to either student or low-budget media creation? If your project has a dedicated production designer, consider yourself lucky. Most low-budget productions are forced to take what they can get and shoot within their means.
But that doesn’t mean production design goes out the window. Quite the contrary. Sometimes access to an interesting location or set of props or costumes inspires the production of a media project. The imminent closure of the Thornhill Square Mall in Ontario, Canada, inspired George Romero to use it as the shooting location of Dawn of the Dead (1978), the sequel to his wildly successful zombie flick Night of the Living Dead (1968).
To paraphrase that great professional mentor James Brown, when it comes to making your media project low-budget or no-budget, you have to use what you got to get what you want.
That Look of Film
Analog videotape was introduced and used professionally from the early 1950s onward in television as a cost-saving alternative to shooting on film. Sadly, the process was still so expensive that early videotape was used over and over again, and many hallmarks from the birth of television were simply erased or taped over.
With the developments made by Sony Corporation in the 1960s, shooting on video became standard for certain types of programming including sports, news, and situation comedies shot on sets.
Video production is an entirely different recording medium than film. Film is a chemical process with an electronic component. Video recording was originally done using analog signals. This process was replaced in the early 1990s by digital recording in which images are captured and stored in a binary format (zeros and ones), typically at a rate of 30 frames per second.
The film process, described earlier, involves shooting a set number (usually 24) of individual frames per second (fps) with a camera and then running them back through a projector at the same rate.
Film has a look and a feeling, a grainy texture that video historically lacked. Standard-definition video had a slick, glossy look, but high-definition (HD) video is capable of reproducing the textural look of film. This has made HD the standard for broadcast production.
Note
The 24p frame rate is so popular for those who want to make their video productions look like film that many HD video cameras keep their “cinema filter” (aka 24p button) right next to the power switch for easy access.
However, as we have already acknowledged, nothing stays the same for very long in the world of media creation. Video game producers and visionary film directors James Cameron (Avatar) and Peter Jackson (The Hobbit) have begun filming in a high frame rate (HFR) format running at 48 fps, which creates an almost startlingly lifelike image.
You can change several settings on your HD video camera to create a more filmic look, including the following:
![]() Set your shutter speed at twice the speed of the frame rate: 1/48th of a second (or whatever is closest, 1/50 on most DSLRs)
Set your shutter speed at twice the speed of the frame rate: 1/48th of a second (or whatever is closest, 1/50 on most DSLRs)
![]() Turn off the edge enhancement
Turn off the edge enhancement
![]() Shoot with a shallow depth of field by choosing a fast lens (f2.8 or lower) and adjusting your f-stop appropriately (wide aperture/low number)
Shoot with a shallow depth of field by choosing a fast lens (f2.8 or lower) and adjusting your f-stop appropriately (wide aperture/low number)
![]() Set your frame rate to traditional film rate of 24fps (a.k.a. 24p, 23.976, or 23.98)
Set your frame rate to traditional film rate of 24fps (a.k.a. 24p, 23.976, or 23.98)
—John S. Bartley, ASC, CSC
In the beginning—the beginning of film, anyway—cinematography, or the lighting of the set, was done by the director, the creative boss of the project. Over time, this role split into the director and the camera operator, and the latter job evolved as new lights and lighting gear were developed into the job of the cinematographer.
To this day, the cinematographer, also called the director of photography (DP, or DoP in Europe), is the closest partner to the director in terms of creating a look for the film and visualizing the script. The cinematographer is not just the head of the camera department; they also head up the grip and electric departments. This overall design is supported by thousands of decisions of what to shoot with and how. All these decisions follow from two related questions: Given the goals of this particular project, what do we want to see (or not see), and how should it look—bright or dark, colorful or washed-out, sharp or soft? This is the plan the DP constructs with the director and then executes.
Control the Image
In the previous chapter we focused (pun intended) on using the camera controls of focus, aperture, white balance, shutter speed, gain, and ISO to control and refine your image to be exactly as you want it. To craft the look of a particular media project, the cinematographer makes a number of choices, including the following:
Note
See the appendix for a list of cameras recommended for different uses.
![]() Which camera to use depending on cost, ease of use, durability, image quality, and workflow desired
Which camera to use depending on cost, ease of use, durability, image quality, and workflow desired
![]() What aperture or exposure level, white balance, and shutter speed to set the camera at to record the scene
What aperture or exposure level, white balance, and shutter speed to set the camera at to record the scene
![]() What length of lens to use to record the scene and whether to use one fixed focal length (prime) lens or a zoom lens
What length of lens to use to record the scene and whether to use one fixed focal length (prime) lens or a zoom lens
![]() What lights to use and where to place them
What lights to use and where to place them
![]() What sort of filters, gels, and scrims to place in front of the lights to control the amount of light falling on the scene as well as the color of it
What sort of filters, gels, and scrims to place in front of the lights to control the amount of light falling on the scene as well as the color of it
Masters of Darkness
The cinematographer is the boss of the camera, grip, and electric departments and needs to be clear about how a shot or a scene should look at a particular moment in the story. If your lighting is supposed to be realistic and natural, then you have to ask yourself, where is the light that is illuminating this scene supposed to be coming from? Is it coming from a lamp or the fluorescent lights on the ceiling or from the sun?
The chief lighting technician (CLT) or head electrician of a production is known as the gaffer. The gaffer’s responsibilities include the following:
![]() Implementing the lighting design of the DP and the director (and sometimes contributing to that design)
Implementing the lighting design of the DP and the director (and sometimes contributing to that design)
![]() Managing and coordinating the lighting crew and gear on set to create whatever lighting effect (lightning, projector flicker, sunset) the DP has called for
Managing and coordinating the lighting crew and gear on set to create whatever lighting effect (lightning, projector flicker, sunset) the DP has called for
![]() Delegating some of the responsibility for the proper setting up of lights to their assistant, known as the best boy, who will then oversee the electricians
Delegating some of the responsibility for the proper setting up of lights to their assistant, known as the best boy, who will then oversee the electricians
As a new media creator or as a student, you may not have access to a full range of advanced lighting gear, including light kits, c-stands, flags, and so on. But you’re still going to want to control the lighting to whatever degree you can, both to create the image you have visualized and to match the tone or feeling of the piece.
![]() Safety First, Safety Last, Safety Always
Safety First, Safety Last, Safety Always
![]() Tripods: Are the legs and the tilt control locked down?
Tripods: Are the legs and the tilt control locked down?
![]() Cables: Are they flat on the ground and taped down so no one can trip over them?
Cables: Are they flat on the ground and taped down so no one can trip over them?
![]() Lights: Are they hot?
Lights: Are they hot?
![]() Electric plugs: Are they properly plugged in?
Electric plugs: Are they properly plugged in?
![]() Stands: Are they weighted down with a sandbag?
Stands: Are they weighted down with a sandbag?
This can be done in a variety of ways. You might be surprised at the degree to which, with just the lighting options available to you in a typical room, you can create a wide range of lighting conditions that may serve your project well.
Here’s an experiment you can do. Sit your subject (actor) at a table. Plug in a desk lamp or other open bulb light source so that you’re able to move it around the head of your subject. Light sources, like lamps for home use, are called practical light sources, or practicals for short.
First, place the light directly in front of the subject so that the subject is lit from the front and observe the lighting pattern and shadows across the face of your subject. Observe the effect you get from front-lighting your character with single-source lighting (see FIGURE 4.17).

Now, place the lamp on the side of your actor and see what that does to the light level on the near and far side of their face and the shadows that this directional light creates (see FIGURE 4.18). Notice that any motion of the lamp up or down, rotating around the head of your subject, or moving closer or farther away from their face will change the quality of the light falling on them from hard to soft, as well altering as the shape and contrast of the shadows under their chin, nose, and so on.

Tip
For safety’s sake, don’t place the light too close to the subject or you might blind your subject!
Now lift your light up above the head of your subject so that it shines directly down onto the subject (see FIGURE 4.19). (If you begin to smell smoke, move it further away from their hair!) See what that does to the brightness levels on the top and bottom of the character’s face as well as the contrast levels of the shadows under their eyes, nose, and mouth.

Place the light on the other side of your character’s face and see what that does to the brightness levels on the left and right sides of your character’s face as well as on the shadows.
Tip
“Look carefully” is good advice for every part of the process in video production.
See whether you can notice any difference when you place the light on one side of the actor’s face as opposed to the other side in terms of creating a more suitable look for your project. Look carefully. Most actors, it is said, have a “good side” of their face, which is preferable to film them on.
Finally, try placing the light under the chin of your actor to get that spooky horror movie look (see FIGURE 4.20).
By placing the light closer to your actor, you should achieve a softer quality of light on the subject’s face. By placing the light farther away, you should create a harder shadow and a higher contrast or contrast ratio (the ratio between the lightest and darkest portions of their face) across the face of the actor.
Now repeat your experiment if you can with a small work light from a home improvement store and a China ball (aka paper lantern) by placing that on top of your light (see FIGURE 4.21). This creates a nice, omnidirectional soft light that is pleasing for low-light shooting that will really give your work a professional look (see FIGURE 4.22).


Tip
If you can’t find a photography shop that sells professional-grade light fixtures and China balls, check your local popular Swedish furniture store.
As you can see, when shooting with digital video cameras, there is a lot you can do to control the lighting design of your scene simply by controlling the light that you have access to by positioning the subject relative to the light sources you cannot move. You can also exert greater lighting control on certain types of shots such as close-ups (CUs) and medium close-ups (MCUs) than you can on wide shots (WSs) in this way.
Your key light in these situations is the main light on your subject. Any other lights that you use to fill in from another direction are naturally called your fill lights.
In the following photos, the actors have been staged and lit as if they are in three different genres or styles of film project: comedy, film noir, and drama. All three shots were staged with available light or one stage light and transformed by simply changing the position of the actors and turning the available lights on or off.
The styles of lighting have different names. Studio lighting has a moderate contrast without domination by dark or light areas of the frame and is used most often in dramas (see FIGURE 4.23).

High key lighting, where the overall lighting of a shot is very bright without a lot of contrast, is mainly used for comedies like Bring It On (2000) or Austin Powers (1997) and most sitcoms (see FIGURE 4.24).
Low key lighting frequently uses mainly shadow areas and low light to dominate the frame (see FIGURE 4.25).

All of these philosophies of lighting originated with cinema but remain in use because digital cameras have a dynamic range of up to of 16+ f-stops between the brightest and darkest parts of your frame, allowing high-definition video to be lit like film.
This sensitivity to light lets you see more of your frame without having to light everything. If you’re using lights, you can light your subject more softly without losing picture detail. Best of all, the viewfinder and external monitor will show you immediately what your shot will look like.
How Do We Measure Light? It Moves So Fast!
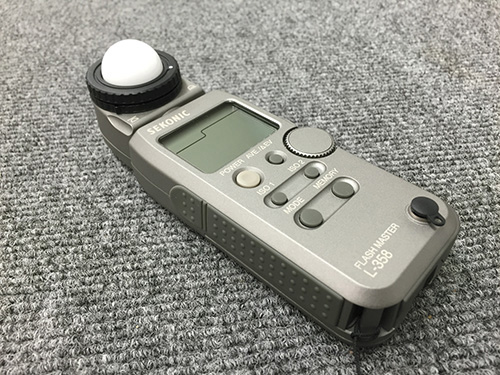
Lighting professionals on a set will use a variety of light meters to measure the amount of light around their subject, including reflectance meters, which measure the light coming off the subject, and incident meters, which measure the light falling on it (see FIGURE 4.26).
Since digital video cameras show you the exact quality of the image that you are going to record on your viewfinder or external monitor, you can rely on what your eyes are showing you as to whether you are recording the quality of light that suits your piece.
If you do find a reason to use a light meter on your media project, once you plug in your ISO and shutter speed, they will show you what aperture to set your lens at by measuring light in footcandles. One footcandle is the amount of light that one candle would throw on an object 1 foot away from it. There are apps for your phone or tablet that are useful light meters we will recommend to you in the appendix (see FIGURE 4.27).

Just as we discussed using a white card directly in front of the camera lens to set the white balance, you may also want to meter light using an 18% gray card to guarantee accurate and consistent exposure from shot to shot.
Doing a Lot with a Little
Just as with production design, you have a lot of opportunities to control your lighting, even if you’re restricted to using available light. Consider positioning your actor in such a way as to take advantage of the quality and the direction of the light that is available. For instance, the strongest lighting source available to you when shooting outdoors is the sun.
Depending on where your action is staged, your actors might wind up with an exposure problem if the bright light of the sun is behind them. This is called being backlit. The contrast of the brightly lit background and your subjects in the shadowy foreground is too high to get a balance of both areas in the shot (see FIGURE 4.28). Either you bring the exposure up to expose the foreground correctly, thus making the background blown out or overexposed, or you expose for the overall image, leaving your foreground subject in silhouette. If your goal is to show that your character is mysterious and shady (another intended pun), then you’re good to go. If that’s not your intention, by repositioning your actors at a different angle relative to the position of the sun and adding a simple tool to your arsenal, you can light them more successfully, depending on the feeling and tone of your scene.

Additionally, one of the simplest pieces of lighting equipment to acquire is a bounce board (see FIGURE 4.29), which is either a white, silver, or gold reflective board you can get in a camera store or a foam board or foamcore you can get at an art or office-supply store. You can use it to reflect sunlight in order to add or fill in light to your subject when you’re filming outside or to fill in the shadow so as to provide a pleasing contrast of light on your subject (see FIGURE 4.30).


What Color Is Your Light? Using the Kelvin Scale
In the previous chapter we covered the Kelvin scale in regard to setting your white balance on your camera. You may remember that the following values correspond to the most common lighting scenarios:
![]() 1,850° K: Candle light (warmer, redder)
1,850° K: Candle light (warmer, redder)
![]() 3,200° K: Studio lights and flood lights
3,200° K: Studio lights and flood lights
![]() 4,000° K: Late-afternoon sunlight
4,000° K: Late-afternoon sunlight
![]() 5,000° K: Fluorescent light
5,000° K: Fluorescent light
![]() 5,600° K: Daylight
5,600° K: Daylight
![]() 6,500° K: Overcast daylight or shadow area on sunny day (cooler, bluer)
6,500° K: Overcast daylight or shadow area on sunny day (cooler, bluer)
Professional film crews have various ways of making the colors of light match when shooting with different types of light sources. They may gel the windows to make the light coming in match the color of the practicals in the room. If you have access to gels, you can do this. Alternately, you can make one of the following accommodations:
![]() Choose to restage your actions in an area lit by only one lighting source
Choose to restage your actions in an area lit by only one lighting source
![]() Use the custom white balance setting and balance on a white card that has a blend of both light sources on it so that neither will appear too far from what the eye would perceive
Use the custom white balance setting and balance on a white card that has a blend of both light sources on it so that neither will appear too far from what the eye would perceive
![]() Set your white balance for the area where most of your action plays in the shot and then color correct the other portion during editing (fix it in post!)
Set your white balance for the area where most of your action plays in the shot and then color correct the other portion during editing (fix it in post!)
If you follow the latter plan or find when watching your footage that the color of the lighting does not match, Apple Final Cut Pro, Adobe Premiere Elements, and Adobe After Effects, among other editing software, have color correction panels that should enable you to match your footage pretty closely.
Postproduction: “We’re Gonna Need a Montage”
In the medium of motion pictures, the most essential part of the process is editing. Think about what it’s like when you watch unedited home videos with your family. It is long, painfully boring, and difficult to see a point in doing so.
Just removing the moments where the camera shakes, the image is out of focus, or nothing important is happening on the screen would improve the viewing experience a lot. Having some music playing underneath would be great too. Actually, having the whole collection of video your aunt shot during a holiday cut down into small bits and fit into one song would make for a memorable and fun video. That video could be called a montage.
The Strategies of Montage
The term montage comes from the French word meaning assembly. Montage describes a sequence that uses a collection of short clips to show a passage of time. This allows a storyteller to show a multitude of related events in a shorter period of time, thus compressing time for the viewer.
This compression of time is what makes the medium of the motion picture so powerful and effective as a method of message delivery. Commercials are a great example of how a message is delivered with a story through compressed time, for instance a limit of 30 seconds.
The most famous example of montage can be found in the film Rocky (1976), where legendary editor Richard Halsey compresses Rocky’s weeks of training into the length of a memorable piece of musical score.
This sequence set the standard for the training montage. Montages are typically named after the type of progression they depict. Another popular montage is the shopping or getting-dressed montage, as seen in Pretty Woman (1990). Yet another is the epiphany montage, where a character recalls moments from throughout the film to come to a major realization, as edited masterfully by John Ottman in The Usual Suspects (1995). Clueless (1995) created a montage that was both a shopping and an epiphany montage.
Making Fast Work
The music video has been credited with the biggest change in proving that a viewing audience can perceive a message through a series of rapidly cut images. MTV (formerly Music Television) premiered in the early 1980s and became at one point the singular platform for the experimentation of a new form of motion picture. Directors who started their careers making music videos and commercials transitioned into feature films and brought their fast-cutting techniques with them.
With directors such as Ridley Scott (Prometheus, 2012), Michael Bay (The Transformers series), David Fincher (The Social Network, 2010), Spike Jonze (Where the Wild Things Are, 2009), Michel Gondry (Be Kind Rewind, 2008), and Gore Verbinski (The Pirates of the Caribbean series) all coming from the fast-paced music video format, it’s no wonder that what we watch today is so much faster-paced than the films we were watching 30 years ago.
A 2011 study by researchers at Cornell University on the change in pace in films over the previous 75 years found that the number of shots in motion pictures has tripled and the average length of each shot has decreased to a third.
Another study, also from Cornell, found that viewers watching a Michael Bay film consumed 65 percent more calories than if they watched a slow-paced talk show. Talk about eye candy!
This increase in the speed of cutting and shortening of shots is obvious in blockbuster action movies, but it has trickled down into an astonishing variety of genres in the world of new media.
Making Short Work
The extent to which media makers have demonstrated how compressed time can be, while still telling an effective story, continues to push beyond the limits of what was thought possible. The comedy film series 5 Second Films took the absurd idea of telling a funny story in five seconds and made a name for themselves doing just that.
Not taking it as a joke, the Vine video-sharing service, starting in 2013, not only challenged the world to tell stories in six seconds but also popularized a new aspect ratio of 1:1 (a perfect square).
The Kuleshov Effect
Soviet film pioneer Lev Kuleshov developed the theory of editing that is the core foundation of the motion picture, which we know as the Kuleshov effect.
The Kuleshov effect is the phenomenon that two images, having no intentional connection or relation to one another, will create new meaning and interpretation simply by being seen sequentially, or juxtaposed. Many filmmakers, including Alfred Hitchcock—who referred to the Kuleshov effect as pure editing—believed that the juxtaposition of shots, more than the composition of any individual shot, was the truest magic of cinema.
The most popular example of Kuleshov’s demonstration of this theory starts with a close-up shot of a man, an actor who stares off-screen with a blank or ambiguous expression. By cutting this shot together with a shot of a bowl of soup, then back to the man, the effect is the audience perceives that the man is hungry (see FIGURE 4.31). The same shot of the man intercut with the shot of a child in a coffin gives the illusion that the man is sad (see FIGURE 4.32). To drive the point home, juxtaposing the same shot of the man with a shot of an attractive woman reclining on a chaise lounge, gives the audience the idea that the man is feeling lustful (see FIGURE 4.33).


Is the man actually feeling any of the suggested emotions? Does it really matter? What matters is that the audience naturally looks for a connection in the images, which means that you as a storyteller have a powerful tool for bypassing your audience’s rationality and reaching them via their subconscious mind. Just remember to use it responsibly.
The Tough Love of Trimming
“If I had more time, I would have written a shorter letter.”
—Blaise Pascal
Sometimes you have to hurt the ones you love. In the same way it is said that writing is rewriting, editing is reediting. The workflows for projects in the previous chapters gave no suggestion to do any trimming, or creating new cuts or drafts of your work.
As you were editing those projects, you may have noticed errors that you corrected. Some common errors include jump cuts, flash frames, and repeated action or dialogue when cutting from one shot to another. Assuming you’re past making these rookie mistakes, let’s talk about trimming at a higher level.
The primary reason a project needs trimming is to control its pace or timing. At a basic level, cutting for a specific program time motivates a cut after the assembly stage. A commercial might need to be exactly 30 seconds. A program that has to fit into a half-hour TV slot needs to have a total running time (TRT) of 22 minutes to allow time for commercials. Student film festivals and video contests commonly have running time limits for submissions.
Perhaps you don’t have those limitations. One of the many great things about new media video platforms is that there are virtually no standards for how long a video should be. The problem is that, according to numerous studies, the human attention span is shrinking. Shiny object! Okay, good, we’ve got your attention again. With the popularity of the Skip Ad button and Vine videos, it might be a good idea to spend some time trimming your project.
Before moving forward and sharing some trimming methods, consider a broader definition of the term trimming. The popular definition of the verb trimming is the clipping or removal of small bits to shorten the project. An alternative definition as a noun is decoration or garnish. Trimming a sequence most certainly will include the shortening of segments in your edit, but we will also label the addition or substitution of footage as trimming, such as when adding decoration or garnish.
![]() AM. Hist. X.
AM. Hist. X.
One more important consideration is to version your sequence or edit. Versioning is the duplication of your edit to keep a backup reference of your edit at a specific point in the workflow.
If your rough cut or assembly is called ProjectName_v1, duplicate the sequence and name the copy ProjectName_v2. You can also add a brief description to the version, such as ProjectName_v1_assembly or ProjectName_v2_directors-cut.
How to Stay Fit and Trim
At the beginning of this section, we mentioned that the definition of trimming is broader than you might think. To understand the various ways to trim your footage, you must become familiar with some terms first.
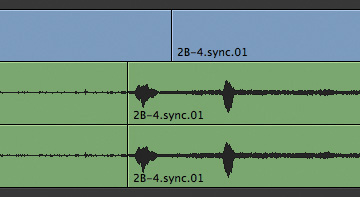
Because of the variety of methods and technology in picture editing evolving over time, there are numerous ways to describe simple editing concepts. For instance, the juncture between two clips or where a cut occurs is called an edit point. Each side of that juncture can also be called an edit point.
Actually, there are many other terms for that single-frame location. The out-point, end, tail, or last frame of an outgoing clip can be called the A-side of a cut. The in-point, start, head, or first frame of an incoming clip can be called the B-side of a cut (see FIGURE 4.34).

Once you get comfortable with the different terms describing an edit point and begin to use them consistently, you can move on to understanding the ways to change those edit points. There are four basic trims that can made to a single clip (see FIGURES 4.35-4.38).


Note
Reordering or swapping clips can also be considered trimming.
At times there will be material in the middle of a clip that you want to remove. In film editing, this was called a lift. In nonlinear editing, a lift, which is performed with the Delete or Backspace key, will leave a gap in your edit. If you’re cutting with a system like Final Cut Pro X that has a magnetic timeline, then deleting a selection or entire clip will not leave a gap. To avoid leaving a gap, you can choose an extract or ripple delete.
Here are two methods to remove, lift, extract, or delete footage from the middle of a clip.
![]() Select a range, either with a range selection tool or with the I and O keys, and then perform a lift, extract, or deletion.
Select a range, either with a range selection tool or with the I and O keys, and then perform a lift, extract, or deletion.
![]() If you like a more tangible approach that feels like you’re actually doing something physical, use a blade tool to cut the clip segment into pieces. You can then select pieces to delete, move, or reorder.
If you like a more tangible approach that feels like you’re actually doing something physical, use a blade tool to cut the clip segment into pieces. You can then select pieces to delete, move, or reorder.
Radio Edit
When cutting a dialogue scene, an effective approach to managing its pacing is a technique called a radio edit. To create a radio edit, play back the assembly version of the scene, but turn off the video track first (see FIGURE 4.39). Can’t turn off the video track in your editing software? Try closing your eyes instead. By focusing only on the audio of the scene, you can more easily notice unnecessary pauses and redundancies in the content of the scene.

Tip
To turn off the video in a track-based NLE, locate the track-enable button in a patch panel or the video track monitor button in the timeline.
You might trim it tighter for a fast-moving scene, or you might find that the pace doesn’t let the audience breathe. Perhaps a line of dialogue doesn’t quite make sense where it was originally intended. Moving some of the lines around in a different order might help you find a different meaning to the scene or just make it weird and incomprehensible. After experimenting, turning the video back on will reveal some issues with the cut, such as continuity errors or jump cuts.
“It’s Time to Split”
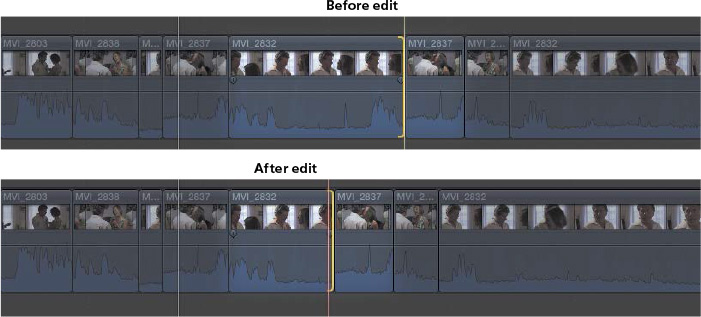
Once you’ve completed your radio edit, a trimming technique that will take your edit to professional-polish level is the split edit, also called L-cuts or J-cuts, named because of the shape the clips resemble after the trim is made.
A split edit is made when you need to leave the audio edit in place but transition the video sooner or later than the audio. This is incredibly useful to see reaction shots that could inform the audience of a character’s thoughts.
In a J-cut, the audio transition occurs before the video transition (see FIGURE 4.40). This is a good way to start hearing an off-screen character while holding the picture on the character who has just finished speaking. J-cuts are commonly used when someone is interrupted and we want to see their reactions before cutting to the person who has taken over speaking.
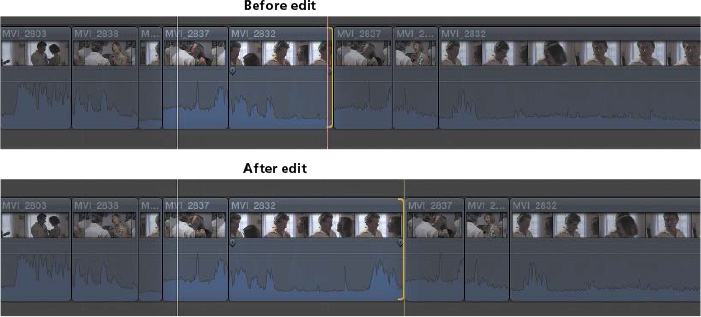
In an L-cut, the video transition occurs before the audio transition (see FIGURE 4.41). Doing this lets you show a character react to another character as they finish speaking. L-cuts are commonly used to see a character at the moment they process what another character is saying, while waiting their turn to speak.

Not every edit point requires a split edit, but it’s good to experiment so that you don’t leave your sequence going back and forth predictably like a tennis match.
![]() A roll edit (also called a dual-roller trim) is a trim that affects two adjoining clips simultaneously. If the A-side is lengthened, the B-side is shortened, and vice versa.
A roll edit (also called a dual-roller trim) is a trim that affects two adjoining clips simultaneously. If the A-side is lengthened, the B-side is shortened, and vice versa.
![]() The slip trim lets you change the content of a clip without changing the duration or location of the clip.
The slip trim lets you change the content of a clip without changing the duration or location of the clip.
![]() The slide trim lets you move the location of the clip, without changing the duration of the clip. Rather, the clip before it and the clip after it are shortened or lengthened, depending on the direction of the move.
The slide trim lets you move the location of the clip, without changing the duration of the clip. Rather, the clip before it and the clip after it are shortened or lengthened, depending on the direction of the move.
Sample Project: The Interrogation
If you’ve watched enough television shows or movies, you’re familiar with the interrogation scene. One room, one detective, one suspect, and many angles, both figuratively and literally. This project is adapted from one that vanguard media educator James Gleason has used for nearly three decades.
Workflow
Congratulations! You have now made it to the point in your video production education where there are enough steps in the workflow of the project to separate them into the specific categories mentioned in Chapter 1.
Development
Start by writing a one-page script where the following events occur. You get to choose the names of the two characters.
1. A suspect sits alone in an interrogation room.
2. A detective walks into an interrogation room holding a piece of evidence.
3. Three questions are asked of the suspect. Each one plays off the answer to the previous question.
4. The suspect answers each question simply, quickly, and without hesitation.
5. Fit in a demand from either the detective or the suspect.
6. Allow the evidence the detective walked in with to be revealed in some way.
7. The shock of the reveal of the evidence silences the suspect.
8. Leave the scene with some ambiguity about the suspect’s guilt or innocence.
Preproduction
With your script complete, it’s time to cast your movie. It’s easy to get a couple of friends to play the parts, but remember your friends may lose focus. You’re better off using your newly learned casting skills to find some talent from a local drama class or theater troop.
Continue the process by following these steps:
1. Plan your shots with an overhead diagram, shot sheet, and storyboards.
2. Find a location that best suits the scene.
3. Sketch out how the location space could transform into a believable interrogation room.
4. Create breakdowns for props, set pieces, and wardrobe.
5. Put together a budget, a crew list, a gear list, a detailed schedule (shot by shot), and a call sheet. Don’t forget to schedule in time for a lunch break!
6. Schedule and arrange a casting session. Invite members of local drama classes and theater troops. (Your friends need to audition too.)
7. Once you’ve cast the parts, hold a rehearsal.
Production
With this project being only a page long, you should expect the shoot to last about four to six hours. Follow your schedule as closely as you can. For variety of coverage, shoot the actions of entire scene in each angle. You might want to capture additional shots that come to mind during the shoot. Hold onto those ideas, but don’t act on them until each scheduled shot is completed. Most importantly, have fun!
Postproduction
Follow these steps to bring all the pieces together:
1. Assemble your rough cut.
2. Get feedback from your cast and crew.
3. Make your trims.
4. Sweeten the sound.
5. Post it online.
6. Read the next chapter.
![]() cinematographer/director of photography
cinematographer/director of photography