This is a hands-on chapter to explore forms and controls in more detail in Visual Basic. While the previous chapter was primarily a language reference, this one will lead directly into the graphics programming coming up in the next chapter. These are important topics that should be studied in order, especially if you are new to Basic or game programming.
Here’s what we’ll cover in this chapter:
Our first example game in this chapter is Dice War, a game that simulates rolling of dice between two players and comparing scores—sort of a dice version of card-based War. There are three rounds during which the score of each player is accumulated, with the winner announced at the end of the third round. I have some personal affection for this game. Although simple in concept, it is a lot of fun and can be a programming challenge. I wrote my first Dice War game on my cousin’s Commodore PET back in the 1980s and it was stored on cassette tape. Sadly, the computer and its tapes are long gone. A year later, I re-created the game on an Apple IIgs in high school computer class—when the class was supposed to be learning about arrays or something, I’d finish the work quickly and then crank out my own game code in the lab. Back then, the dice had to be drawn with vector graphics, but in Visual Basic, we can use a PictureBox control and a bitmap for each of the six sides of the die. Figure 3.1 shows the images—what do you think, not bad for programmer art? I made each die side in GIMP with just rectangle and circle bevels and two-tone fills.
Hint
When a control such as PictureBox has a bitmap loaded via its Image property, that bitmap is stored in the form as a resource and the original bitmap file is no longer needed. Thus, it’s possible to store all game art on a form in order to hide it from users, but the resulting exe file (and memory footprint) will be much larger.
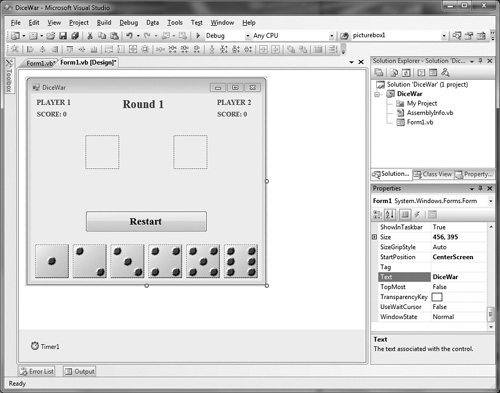
Figure 3.2 shows the control layout on the Dice War form with all of the properties already set, which you may use as a reference when creating the form yourself. Note the Timer1 control in the hidden controls section of the form editor (below the form).
Trick
To make a PictureBox control resize itself to match the loaded Image, set its SizeMode property to AutoSize.
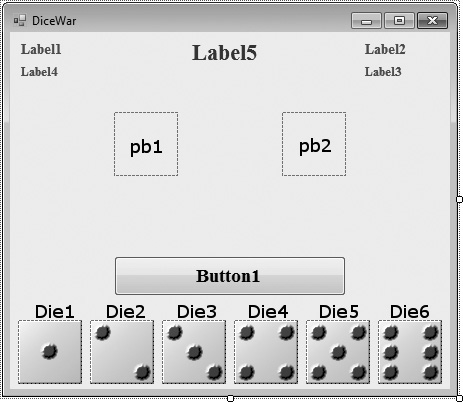
Figure 3.3 shows the form with named controls. For the Die1..Die6 PictureBox controls, there are bitmap files for the die face images available in the project folder. Just choose a bitmap file via the Image property and it will be loaded.
The following global variables are needed by the game, and should be located just below the “Windows Form Designer generated code” section.
Dim Player As Integer = 1
Dim Round As Integer = 1
Dim Rolll As Integer = 1
Dim Rol 12 As Integer = 3
Dim Rolls As Integer
Dim Score1 As Integer
Dim Score2 As Integer
Dim rand As Random
While building a game with Visual Basic, it’s common to double-click some controls to have the function for the default event generated. I will present the source code in the most likely order that you’ll need it as we go along. For instance, double-clicking the form itself generates the Form1_Load function.
Private Sub Form1_Load(ByVal sender As System.Object, _
    ByVal e As System.EventArgs) Handles MyBase.Load
    REM initialize the random number generator
    rand = New Random()
    REM draw initial dice images
    pb1.Image = Die6.Image
    pb2.Image = Die6.Image
End Sub
Now we will go over the code for the Button1 control, which will change depending on the state of the game—which player is rolling, etc. The Text property determines what happens when the button is clicked, causing either a game restart or a roll of the dice. The actual rolling animation is handled by the Timer1 event.
Private Sub Button1_Click(ByVal sender As System.Object, _
    ByVal e As System.EventArgs) Handles Button1.Click
    REM this event handles Restart as well as Roll
    If Button1.Text = "Restart" Then
        RestartGame()
    Else
        REM disable the Roll button
        Button1.Enabled = False

        REM start the rolling dice
        Timer1.Enabled = True
    End If
End Sub
Now, if you double-click the Timer1 control below the form, the default event for Timer is added to the source code in the same manner for visible form controls.
Private Sub Timer1_Tick(ByVal sender As System.Object, _
    ByVal e As System.EventArgs) Handles Timer1.Tick
    REM roll both dice
    RollDie1()
    RollDie2()
    REM increment the roll counter
    Rolls += 1
    REM stop after 30 rolls (3 seconds)
    If RollOver() Then
        REM reset roll counter
        Rolls = 0
        REM disable the rolling dice
        Timer1.Enabled = False
        REM disable the Roll button
        Button1.Enabled = True
        REM display the dice roll for this player
        DisplayRoll(Player)
        REM check for game over
        If GameOver() Then
            Button1.Text = "Restart"
            ShowWinner()
        Else
            REM not end of game, go to the next round
            Label5.Text = "Round " & Round
        End If
    End If
End Sub
That’s the end of the control event functions, so now we can go over the helper functions called by the events. RestartGame() is called by Button1_Click at startup and whenever a game has ended (after three rounds). RollDie1() and RollDie2() are called by Timer1_Tick to get a random number (1 to 6) for each of the two dice—and this number is then used to draw the appropriate die image.
Private Sub RestartGame()
    REM reset the game settings
    Button1.Text = "Player 1 - Roll"
    Score1 = 0
    Score2 = 0
    Label4.Text = "SCORE: " & Score1
    Label3.Text = "SCORE: " & Score2
    Round = 1
    Label5.Text = "Round " & Round
    pb1.Image = Die6.Image
    pb2.Image = Die6.Image
End Sub

Private Sub RollDie1()
    REM generate random roll for die 1
    Roll1 = rand.Next(1, 6)
    REM display the corresponding image (die 1-6)
    Select Case Roll1
        Case 1
            pb1.Image = Die1.Image
        Case 2
            pb1.Image = Die2.Image
        Case 3
            pb1.Image = Die3.Image
        Case 4
            pb1.Image = Die4.Image
        Case 5
            pb1.Image = Die5.Image
        Case 6
            pb1.Image = Die6.Image
    End Select
End Sub

Private Sub RollDie2()
    REM generate random roll for die 2
    Roll2 = rand.Next(1, 6)
    REM display the corresponding image (die 1-6)

    Select Case Roll2
        Case 1
            pb2.Image = Die1.Image
        Case 2
            pb2.Image = Die2.Image
        Case 3
            pb2.Image = Die3.Image
        Case 4
            pb2.Image = Die4.Image
        Case 5
            pb2.Image = Die5.Image
        Case 6
            pb2.Image = Die6.Image
    End Select
End Sub
The RollOver() function is called by Timer1_Tick() to determine when it’s time to stop rolling the dice and display the results. It’s a small helper function that cleans up the code a bit. DisplayRoll() is called at the end of the dice rolling animation to notify the player of the result.
Private Function RollOver() As Boolean
    If Rolls > 30 Then
        RollOver = True
    Else
        RollOver = False
    End If
End Function

Private Sub DisplayRoll(ByVal PlayerNum As Integer)
    REM display total roll message depending on player
    Select Case PlayerNum
        Case 1
            REM give player 1's score
            MsgBox("Player 1, you rolled a " & CInt(Roll1 + Roll2) & ".")
            Score1 += Roll1 + Roll2
            Label4.Text = "SCORE: " & Score1
            REM reset for player 2
            Button1.Text = "Player 2 - Roll"
            Player = 2

        Case 2
            REM give player 2's score
            MsgBox("Player 2, you rolled a " & CInt(Roll1 + Roll2) & ".")
            Score2 += Roll1 + Roll2
            Label3.Text = "SCORE: " & Score2
            REM reset for player 1
            Button1.Text = "Player 1 - Roll"
            Player = 1
            REM player 2 marks end of each round
            Round += 1
        Case Else
            MsgBox("PlayerNum is invalid")
    End Select
End Sub
Finally, GameOver() is a helper that just determines when the third round has ended, while ShowWinner() displays the final results of the dice battle.
Private Function GameOver() As Boolean
    If Round > 3 Then
        GameOver = True
    Else
        GameOver = False
    End If
End Function

Private Sub ShowWinner()
    REM display the winner message
    If Score1 = Score2 Then
        MsgBox("This game is a draw!")
    ElseIf Score1 > Score2 Then
        MsgBox("Player 1 is the winner!")
    ElseIf Score2 > Score1 Then
        MsgBox("Player 2 is the winner!")
    End If
End Sub
Figure 3.4 shows the conclusion to a three-round game of Dice War, with player 2 winning 18 to 16! Do you know what would make this game even more interesting? How about a single-player mode against the computer?

It’s time to ratchet up the difficulty level a few notches! The last project was fun but still just a turn-based game. There’s nothing quite like a real-time game to really experience exciting gameplay, because that requires a constant vigil over the controls and coordination without pause. It’s a totally different experience when you go real-time! The game we’ll create now is a simple version of the classic Atari Breakout ball-and-paddle game, which is really just a step above Pong, but a good example of a real-time game.
Figure 3.5 shows the layout of the Block Buster form. There are two labels at the top, Label1 to display the lives, and Label2 to display the score. There are four rows of colored blocks that are simply PictureBox controls with their BackColor property set to a color. You may use any color you wish for the blocks, so go ahead and design them however you want. The important thing (as far as the source code goes) is the name of the blocks. They are named Block1 to Block20, arranged in four rows and five columns. As long as there are 20 blocks with their names intact, the source code will work with the blocks, so you can move them around if you wish. This game affords some design aspects if we want to take advantage of it!

Ball is another PictureBox control resized to 16x16 with a BackColor of White. The ball moves at a constant X,Y velocity until it hits the edge of the form or strikes the paddle or one of the blocks, at which point it changes direction. Likewise, Paddle is a PictureBox with a size of 96 × 24, and it moves left and right with the mouse cursor—so the game is entirely mouse controlled (see the Form1_MouseMove event).
We’ll go over the source code for the Block Buster game in the most common event order, starting with Form1_Load. Since this is a real-time game with constant movement, a timer is used to keep things moving.
Dim intSpeedX As Integer = 2
Dim intSpeedY As Integer = -2
Dim intScore As Integer
Dim intLives As Integer = 3
Dim intAllGone As Integer

Private Sub Form1_Load(ByVal sender As System.Object, _
    ByVal e As System.EventArgs) Handles MyBase.Load
    Timer1.Interval = 20
    Timer1.Enabled = True
End Sub
Next up is the Timer1_Tick function, which is called every time there is a timer tick. Since it was set to an Interval of 20, the timer will fire an event every 20 milliseconds (which is about 50 frames per second—or 50 Hz). A lot is happening in the timer function—in fact, all of the logic of the game happens here, including movement of the ball and checking for collisions. There are fewer comments this time; can you figure out what each portion of code is doing without comments?
Private Sub Timer1_Tick(ByVal sender As System.Object, _
    ByVal e As System.EventArgs) Handles Timer1.Tick
    AllGone = 0
    CheckCollisions()
    If AllGone = 1 Then
        Timer1.Enabled = False
        MsgBox("You finished the game!", , "CONGRATULATIONS")
    End If
    BallX += SpeedX
    If BallX < 3 Or BallX + Ball.Width > Me.Width - 5 Then
        SpeedX = -SpeedX
    End If

    BallY += SpeedY
    If BallY < 3 Then
        SpeedY = -SpeedY
    End If

    If BallY + Ball.Height > Me.Height - 5 Then
        Timer1.Enabled = False
        UpdateLives()
        BallX = 232
        BallY = 376
        SpeedX = 2
        SpeedY = -2
        If Lives < 1 Then
            MsgBox("You have lost the game.", , "OH NO!")
        Else
            MsgBox("You missed!", , "OH NO")
            Timer1.Enabled = True
        End If
    End If
End Sub
The Form1_MouseMove() function responds to mouse movement over the form, so we can use this to move the paddle left or right based on the mouse’s position.
Private Sub Form1_MouseMove(ByVal sender As Object, _
    ByVal e As System.Windows.Forms.MouseEventArgs) Handles MyBase.MouseMove
    Paddle.Left = e.X - Paddle.Width  2
End Sub
Since the ball (actually a small PictureBox) is smaller than the paddle and the blocks, we can perform simple collision detection to see if the ball is hitting anything. The CheckCollision() function looks at the dimensions of the passed PictureBox control; taking that and the ball’s position on the form, it can be determined whether the ball is intersecting the passed PictureBox. Then it’s just a matter of removing the block and adding points to the player’s score.
Public Sub CheckCollisions()
    CheckCollision(Paddle, False)
    CheckCollision(Block1)
    CheckCollision(Block2)
    CheckCollision(Block3)
    CheckCollision(Block4)
    CheckCollision(Block5)
    CheckCollision(Block6)
    CheckCollision(Block7)

    CheckCollision(Block8)
    CheckCollision(Block9)
    CheckCollision(Block10)
    CheckCollision(Block11)
    CheckCollision(Block12)
    CheckCollision(Block13)
    CheckCollision(Block14)
    CheckCollision(Block15)
    CheckCollision(Block16)
    CheckCollision(Block17)
    CheckCollision(Block18)
    CheckCollision(Block19)
    CheckCollision(Block20)
End Sub

Public Sub CheckCollision(ByRef src As PictureBox, ByVal Hide As Boolean)
    If src.Visible = True Then
        If BallX > src.Location.X And _
            BallX < src.Location.X + src.Size.Width And _
            Ball.Location.Y > src.Location.Y And _
            Ball.Location.Y < src.Location.Y + src.Size.Height Then
            SpeedY = -SpeedY
            UpdateScore()
            If Hide Then
                src.Visible = False
            End If
        End If
        AllGone += 1
    End If
End Sub

REM declare the overloaded version of CheckCollision
Public Sub CheckCollision(ByVal src As PictureBox)
    REM call the original version
    CheckCollision(src, True)
End Sub
Public Sub UpdateScore()
    Score += 10
    Label2.Text = "SCORE: " & Score
End Sub

Public Sub UpdateLives()
    Lives -= 1
    Label1.Text = "LIVES: " & Lives
End Sub
Now we can see how useful a property can be in the source code for a real game. Following are several properties to illustrate the convenience afforded by this fascinating programming feature. We can just as easily use global variables directly in our functions, but use of a property instead of just a global variable is cleaner and allows for more control, not to mention error handling.
Public Property BallX() As Integer
    Get
        Return Ball.Left
    End Get
    Set(ByVal Value As Integer)
        Ball.Left = Value
    End Set
End Property

Public Property BallY() As Integer
    Get
        Return Ball.Top
    End Get
    Set(ByVal Value As Integer)
        Ball.Top = Value
    End Set
End Property

Public Property Lives() As Integer
    Get
        Return intLives
    End Get
    Set(ByVal Value As Integer)
        intLives = Value
    End Set
End Property

Public Property SpeedX() As Integer
    Get
        Return intSpeedX

    End Get
    Set(ByVal Value As Integer)
        intSpeedX = Value
    End Set
End Property

Public Property SpeedY() As Integer
    Get
        Return intSpeedY
    End Get
    Set(ByVal Value As Integer)
        intSpeedY = Value
    End Set
End Property

Public Property Score() As Integer
    Get
        Return intScore
    End Get
    Set(ByVal Value As Integer)
        intScore = Value
    End Set
End Property

Public Property AllGone() As Integer
    Get
        Return intAllGone
    End Get
    Set(ByVal Value As Integer)
        intAllGone = Value
    End Set
End Property
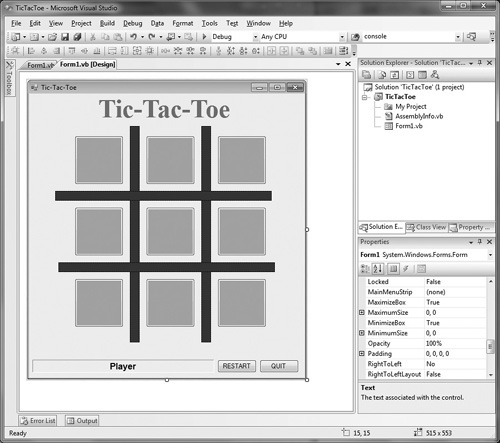
Our last game example is a version of the classic game, Tic-Tac-Toe, also known as Naughts & Crosses. This game has a rudimentary playing board with blue Panel controls used as dividers for the nine squares, which are comprised of Button controls named Button1 to Button9. See Figure 3.6. There is no Timer control in this game because it is turn based. Create the form as shown with the nine buttons. The title control is Label1. The message control at the bottom (which displays game states such as the current player) is called Label2. The button labeled “Restart” is Button10. The button labeled “Quit” is Button11. That should be all that’s needed by the source code.
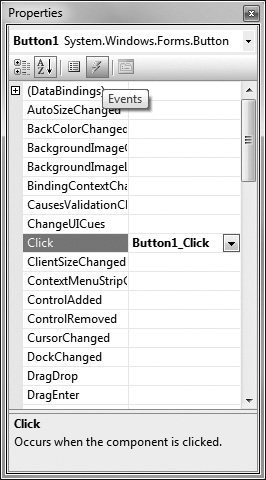
We are going to use a little trick to cut down on the number of event functions in this game. Instead of generating an event for every one of the nine button click events, we’re instead going to have them all use the same event function. This is done using the Property Events window (see Figure 3.7). Double-click the first button, Button1, to generate the first event. Then go back to the form and select the remaining eight gameplay buttons, Button2 to Button9, and set their click events to Button1_Click.
Here is the source code for Button1_Click, which handles click events for all nine gameplay buttons. Note that all nine buttons are listed after the Handles keyword in the event definition. Now, the source code in this function is a bit different from usual. Instead of referring directly to Button1, Button2, etc., we instead use sender as the control. Since this function handles click events for only the controls listed, we needn’t worry about any other controls generating this event and can respond to the event in a generic way. For our gameplay purposes, the Text property of the button is set to Token (which will be either “X” or “O” depending on the current player). Then that button is disabled so it can’t be picked again, and CheckWinner() is called to test for three-in-a-row win conditions.
Private Sub Button1_Click(ByVal sender As System.Object, _
    ByVal e As System.EventArgs) Handles Button1.Click, _

    Button2.Click, Button3.Click, Button4.Click, Button5.Click,-
    Button6.Click, Button7.Click, Button8.Click, Button9.Click
    sender.Text = Token
    sender.Enabled = False
    CheckWinner()
End Sub
Let’s dig in to the rest of the source code now, first with two global variables and the Form1_Load function which calls RestartGame().
Dim Token As Char
Dim Player As Integer
Dim Winner As Boolean

Private Sub Form1_Load(ByVal sender As System.Object, _
    ByVal e As System.EventArgs) Handles MyBase.Load
    RestartGame()
End Sub
Next up are the two event handlers for the Restart and Quit buttons.
Private Sub Button10_Click(ByVal sender As System.Object, _
    ByVal e As System.EventArgs) Handles Button10.Click
    REM restart button
    RestartGame()
End Sub

Private Sub Button11_Click(ByVal sender As System.Object, _
    ByVal e As System.EventArgs) Handles Button11.Click
    REM quit button
    End
End Sub
The CheckWinner() function goes through the rows, columns, and diagonals looking for matching Xs or Os to find a winner (if there is one). The helper function TestThreeInARow() performs the test on three squares at a time to see if there is a match. If no winner is found, then play continues to the next player. It does this by looking at the Text property of each Button control and simply checks whether the three are equal to each other, which means the player has chosen those three in a row.
Private Sub CheckWinner()
    REM check rows
    TestThreeInARow(Button1, Button2, Button3)
    TestThreeInARow(Button4, Button5, Button6)
    TestThreeInARow(Button7, Button8, Button9)
    REM check columns
    TestThreeInARow(Button1, Button4, Button7)
    TestThreeInARow(Button2, Button5, Button8)
    TestThreeInARow(Button3, Button6, Button9)
    REM check diagonals
    TestThreeInARow(Button1, Button5, Button9)
    TestThreeInARow(Button3, Button5, Button7)
    If Not Winner Then
        NextPlayer()
    End If
End Sub

Private Sub TestThreeInARow(ByRef one As Button, _
    ByRef two As Button, ByRef three As Button)
    If one.Text.Length + two.Text.Length + three.Text.Length > 0 _
        And one.Text = two.Text And two.Text = three.Text Then
        one.BackColor = Color.Yellow
        two.BackColor = Color.Yellow
        three.BackColor = Color.Yellow
        Winner = True
        DisplayWinner()
    End If
End Sub
Two helper functions help to keep the code clean and tidy: NextPlayer() goes to the next player by setting the Token and Player variables as appropriate; DisplayWinner() disables all of the buttons (to prevent any further moves) and displays the winner using Label2 on the bottom of the form.
Private Sub NextPlayer()
    If Player = 1 Then
        Token = "X"
        Player = 2
    ElseIf Player = 2 Then
        Token = "O"
        Player = 1

    End If
    Label2.Text = "Player " & Player & " : '" & Token & "'"
End Sub

Private Sub DisplayWinner()
    REM display winner message
    Label2.Text = "Player '" & Token & "' is the winner!"
    REM disable all the buttons
    Button1.Enabled = False
    Button2.Enabled = False
    Button3.Enabled = False
    Button4.Enabled = False
    Button5.Enabled = False
    Button6.Enabled = False
    Button7.Enabled = False
    Button8.Enabled = False
    Button9.Enabled = False
End Sub
Finally, RestartGame() resets the game’s state, gameplay variables, and controls to the initial setting so the game can be played again.
Private Sub RestartGame()
    REM re-enable the buttons
    Button1.Enabled = True
    Button2.Enabled = True
    Button3.Enabled = True
    Button4.Enabled = True
    Button5.Enabled = True
    Button6.Enabled = True
    Button7.Enabled = True
    Button8.Enabled = True
    Button9.Enabled = True
    REM clear the button labels
    Button1.Text = ""
    Button2.Text = ""
    Button3.Text = ""
    Button4.Text = ""
    Button5.Text = ""
    Button6.Text = ""
    Button7.Text = ""
    Button8.Text = ""
    Button9.Text = ""

    REM set the button background colors
    Button1.BackColor = Color.LimeGreen
    Button2.BackColor = Color.LimeGreen
    Button3.BackColor = Color.LimeGreen
    Button4.BackColor = Color.LimeGreen
    Button5.BackColor = Color.LimeGreen
    Button6.BackColor = Color.LimeGreen
    Button7.BackColor = Color.LimeGreen
    Button8.BackColor = Color.LimeGreen
    Button9.BackColor = Color.LimeGreen
    REM set up the new game
    Winner = False
    Player = 2
    Token = "O"
    NextPlayer()
End Sub
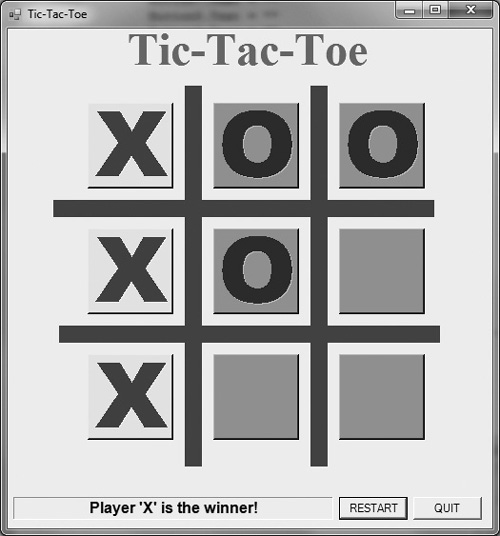
Figure 3.8 shows the Tic-Tac-Toe game running with the first column of Xs giving victory to the X player!
It’s time to level up after learning so many new skills with Visual Basic forms and controls! In this chapter you have studied the intricacies of control programming (and a few special tricks) while building three complete games. As you were working on the games, I’m sure you saw some areas for improvement. After all, these games are kept on the simple side so they are easy to understand. But you are under no such limitation! So, why don’t you see if you can add some new gameplay capabilities to these games to make them more interesting, and ultimately, more playable?