This chapter is a quick overview of Visual Basic: a little theory here, a little source code there, and a lot of new stuff throughout. Visual Basic is an exciting language, and it’s a blast to use! As I’m sure you will find out soon enough, the learning curve for Visual Basic is a shallow one. You’ll be up to speed and able to write your own programs from scratch in no time. I’ll help you through the tough spots and introduce you to key topics and those parts of the language that you need to get things done. The rest is up to you! Software development is highly dependent upon one’s creativity, so don your creative hat.
Here’s what we’ll cover in this chapter:
Visual Basic is a graphical programming language and the top of the class in Rapid Application Development (RAD) tools for Windows. In fact, Visual Basic is the most popular Windows development tool with millions of users. The key to the success of Visual Basic is the fantastic and easy-to-learn Basic language that powers a drag-and-drop visual user interface design tool—called an IDE, or integrated development environment. Visual Basic shares a Windows Form engine with other .NET Framework languages so all of the source code that you write with Visual Basic .NET is compatible with Visual C# .NET and Visual C++ .NET (referring to what’s called “managed code”). But what is a user interface? A graphical user interface, or GUI as it has come to be known, is a visual method of using software, primarily with a mouse. In the old days of UNIX and MS-DOS, computer users had to memorize complex commands, typed into a command prompt. Type a command, hit Enter, and the computer spews out some information (or more commonly, it would beep with a rude error message).
Windows replaced MS-DOS, just as Linux gradually replaced UNIX, and along with the “GUI way” came even more complexity for the programmer, that is. Windows is not an easy operating system to program. Believe it or not, in the old days, Windows programmers had to use Microsoft C, which ran under MSDOS! Talk about ironic. Not only was Windows difficult to program, the development tool didn’t even run under Windows. As you can imagine, those were not the good old days for Microsoft developers. Most veteran Windows programmers have little fondness for the way things used to be. Visual Basic was really written to make Windows programming easier. The ability to drag controls onto a form and mold the controls to your liking using simple properties is a trademark feature of Visual Basic—which revolutionized the software industry.
We aren’t going to get into too much of the technical side of the .NET Framework or anything like intermediate language issues in this book, but we do need to cover the fundamentals. Consider this chapter a quick reference on using the Basic language. If you already have some experience with Basic, you may want to skip this and the next chapter (covering forms and controls) and move on to Chapter 4, “Drawing with GDI+.”
There are cases in which the complexity of software is just too much for a single person to grasp. System maintenance is becoming more important as software continues to evolve. Businesses depend on software for day-to-day work. The days of custom building monumental software systems are coming to an end, because such systems are impossible to maintain. The .NET Framework brings several languages and design tools together into a seamless whole so that people can focus on gathering the requirements for a system, building prototypes, and then completing their applications. The .NET Framework makes it possible to write huge Windows programs without needing a Windows API reference book handy. That is, essentially, the layman’s definition of .NET!
Definition
The .NET Framework is the core architecture behind Visual Basic .NET and the other .NET languages, providing common runtime, compatible code libraries, and a fully integrated Windows API library.
Microsoft, as well as many other software companies, has tried in earnest to come up with a standard for code reuse, such as the Component Object Model (COM). Microsoft’s COM pre-dates .NET. It allows developers to build custom user-interface controls and code component libraries that were reusable across many languages (such as Visual Basic and Borland Delphi—now owned by Embarcadero). The ability to write source code for a component using Visual Basic, and then reuse that component in Delphi was a significant step forward for software engineering. These two languages have very little in common! Visual Basic was originally based on the Basic language, while Delphi was based on Pascal. Many other products support COM as well, and this has only benefited their customers. The .NET Framework goes beyond COM by defining a standard collection of namespaces and classes for Windows development, and is similar to the C++ Standard Library.
The “engine” that works behind the scenes in a Visual Basic program interprets the Windows messaging system, which is how Windows tells your program when something happens to the user interface. The controls are part of theform and therefore have access to all of the messages that the operating system sends the program. For example, when you click a button on a form, Windows sends your program a special message that includes a header pointing to the form and the control that triggered the message. Visual Basic receives this special message from the operating system and routes it to the form containing the specific button that was clicked.
What happens at this point? The form engine—which is part of the runtime library (and also closely tied to the .NET Framework)—looks for a Click event for that button. If so, the event is called; otherwise, the message is discarded. From that point, it is up to you (the programmer) to decide what happens inside that event.
As you can imagine, there are thousands of messages streaming through the Windows operating system, which are being routed to operating system processes and running applications. Visual Basic handles all the details for you by breaking down the complexity into a number of events that are called automatically in your program through the common Windows Forms “engine” and .NET Framework. Visual Basic and Visual C# just tap into that engine.
If you are new to Visual Basic, then we’ll get started right away by writing a simple program. If you’re already familiar with the language, you may skip ahead. Visual Studio uses the concept of a “solution” to “solve programming problems.” Most programs are written, after all, to process data in one way or another, and that data may not be in a suitable format that is useful. Visual Studio treats a project workspace as a solution, and the workspace (or solution) file even has an extension of .sln.
Visual Studio solutions can become quite complex. Not only can you have several Visual Basic projects in the solution, you can have Visual C# projects in the same solution as well! Isn’t that amazing? In previous versions of Visual Studio, it was possible to create ActiveX components and share them between languages—in essence, these were Component Object Model (COM) objects, which is what Visual Studio 6.0 used for controls. That is no longer an issue with the .NET Framework. While you can still use COM and ActiveX, these technologies are now obsolete because it is possible to use .NET languages interchangeably.
Definition
Components are pieces of programs that are written in such a way that they can be used by more than one program. This is called “code reuse” and it is a very important concept that is at the core of Microsoft’s .NET strategy.
Now it’s time to get down to business. Are you tired of theory already? I’m not! This stuff is fun. But theory means nothing without practice. I’ve watched a lot of Jackie Chan movies, but I still don’t know anything about Kung Fu. If you want to master something you have got to practice and start with the basics.
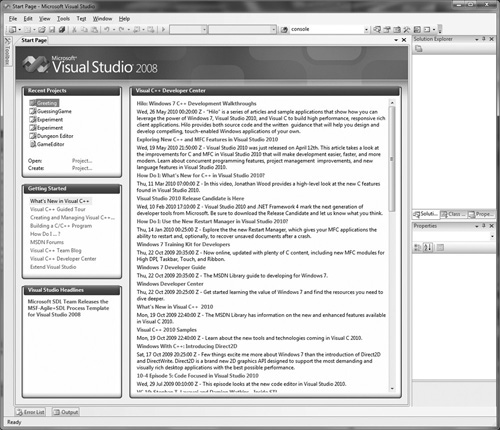
Start Visual Studio by opening Programs, Microsoft Visual Studio 2008, and then choose Microsoft Visual Studio 2008 from the list. The default Start Page should be the first thing that is displayed when Visual Studio starts running (shown in Figure 2.1). The Start Page shows all of the recent solutions that you have worked on (or it could be blank if this is the first time you have used it). There is a button on the Start Page called New Project that you will click in order to start a new project. If, for some reason, the Start Page does not show up by default when you run Visual Studio, just click the File menu at the top of the screen and select New, Project.
Using either method, the New Project dialog should appear. See Figure 2.2. Let’s dissect this New Project dialog before going any further. On the left side of the dialog is a list of Project Types, which will look different depending on the version of Visual Studio you are using. The version shown here is from Visual Studio 2008 Professional. If you are using the free version, Visual Basic 2008 Express, then you will see only Visual Basic project types. On the right side of the dialog is the list of Templates for each project type.
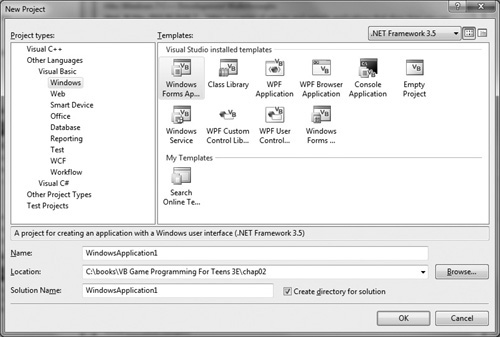
You will notice that each language has its own set of icons for these templates, to make it easier to differentiate between them (usually when you have a large solution with multiple languages). Here is the list of templates for Visual Basic:
Windows Forms Application
Class Library
WPF Application
WPF Browser Application
Console Application
Empty Project
Windows Service
WPF Custom Control Library
WPF User Control Library
Windows Forms Control Library
If you look at the top-right corner of the New Project dialog, you should see two small buttons that affect the layout of the items in the template list. You can switch between Large Icons and Small Icons by pressing either of these two buttons. The Small Icons view is sometimes more convenient because you can see more items in the list than you can when large icons are displayed. Regardless of the view you settle on, for this program you will want to select Console Application. Did you notice how the project name changed when you selected the Console Application template? The name was changed to ConsoleApplication1. Click on the Name field now and change the name of the program to Hello World or Greetings, as shown in Figure 2.3.

The next thing that you might want to do is select where the new project files will be stored on your hard drive. Select the folder by typing it into the Location field or locate an existing folder using the Browse button. You can store the project anywhere you like, although it makes sense to organize your projects under a main folder. You are now ready to create the new project by pressing the OK button.
When you click OK to close the New Project dialog, Visual Studio creates a new solution and a new project for you, as shown in Figure 2.4. Because this is a console application, there’s no form or controls available in this program. What this means is that when you compile the program, you can run it from a Command Prompt. When you run the program from within Visual Studio, a new Command Prompt window automatically appears.
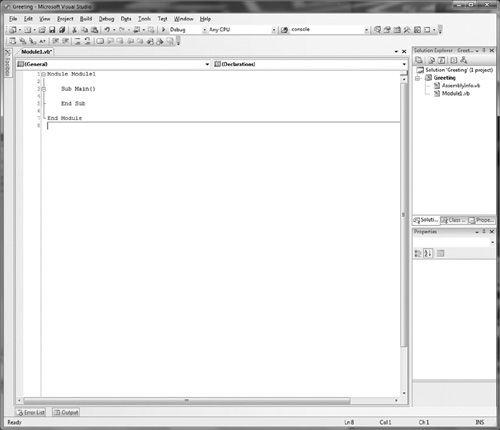
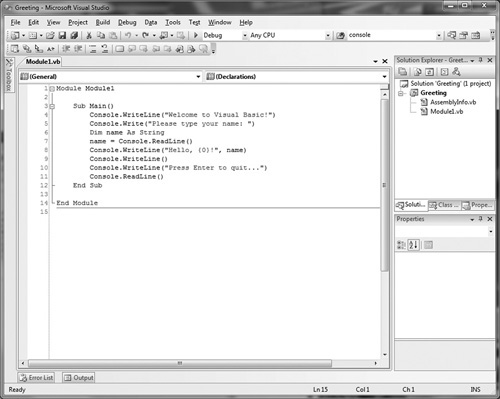
Now let’s add some code to make this program actually do something useful. This program needs to display a line of text and then wait for the user to press Enter to continue. Add the following two lines of code inside Sub Main:
Console.WriteLine("Welcome to Visual Basic!")
Console.ReadLine()
It should be pretty obvious that the first line displays the message “Welcome to Visual Basic!”, but what about the second line? ReadLine is a function that reads a line of characters from the keyboard and is ended with the Enter key.
So this means that you can type in a line of characters, and ReadLine will grab them out of the console. You can see what was typed in because ReadLine returns the characters as a string. In order to receive the string, you need to copy the value returned by ReadLine into a string variable.
Variables must be declared before they are used in Basic. To declare a new variable, you must use the Dim keyword, which is short for “dimension,” referring to the process of reserving memory for the new variable. The process no longer even remotely resembles the Basic language of old (from which Visual Basic was based), but Dim has been around for a long time now. As I mentioned a moment ago, ReadLine returns a string. So this program needs a string variable. Declare the variable like this:
Dim name As String
How about that? You can create any variable you need using Dim. Here is the rest of the source code for the Greeting program. Type the lines in bold between the two existing lines of the program.
Console.WriteLine("Welcome to Visual Basic!")
Console.Write("Please type your name: ")
Dim name As String
name = Console.ReadLine()
Console.WriteLine("Hello, {0}!", name)
Console.WriteLine()
Console.WriteLine("Press Enter to quit...")
Console.ReadLine()
After you have made the changes to the source code, the program should look like Figure 2.5. (The new lines have been highlighted in the code editor window.)
After you type in the new code, save the project by clicking File, Save All (or click the Save All icon on the toolbar). Now go ahead and run the program by pressing F5. Figure 2.6 shows the output of the Greeting program.
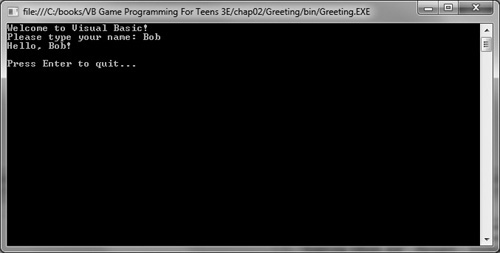
There is one line of this program that displays the characters typed into the console (the user’s name), and it looks kind of funny:
Console.WriteLine("Hello, {0}!'', name)
It’s probably obvious to you what this line of code does from looking at the output, but how does it work? The curly braces surround a number that refers to the variable that follows. This is a feature of the WriteLine function. WriteLine allows you to display the contents of variables in whatever order you want. Just separate each variable by a comma and then refer to them as {0}, {1}, {2}, and so on.
Congratulations, you have successfully run your first Visual Basic program! This program might be simple, but it helped to show you some key features of the Basic language and gave you some experience creating new projects and working with the editor. You can now close the Greeting program by selecting File, Close Solution.
Definition
Visual Basic is not a programming language! The language is Basic, just as C# (pronounced see-sharp) is a language, while its development environment is Visual C#. I know it’s not common practice in many books and online references to address “Basic” without also the “Visual” part, but that is a trademarked product name, not a programming language. So, in this book we will refer more often to the Basic language (and the .NET Framework) when discussing programming issues, and Visual Basic when discussing the product.
Here’s a simple question: What is a variable? A variable is something that can change, with the connotation that it can change unexpectedly. For example, weather forecasters often speak of variable winds and variable temperatures—meaning that the wind and temperature could change without warning. In the context of computers, however, variables only change when told and cannot do anything on their own.
In the old days when programmers used machine language and assembly language, they would create variables by grabbing a chunk of memory and then storing a number in the newly acquired spot. This was called memory allocation, which is a valid term in software today. Reserving a space in the computer’s memory was a manual process, which required the programmer to keep track of exactly where that space was located by creating a pointer—which is where variables came from.
In order to make the task easier, programmers developed assembly languages that permitted the use of mnemonic words to replace the specific addresses of memory in which information is stored. Rather than keep track of the address in memory of a pointer, which in turn points to another address in memory where actual data is located, a mnemonic was used as the pointer. Mnemonics are easier to remember than physical addresses in memory; therefore, this greatly eased the job of writing programs.
Over time, these mnemonic words came to be known as variables. So, when you hear the word “variable,” just remember that it is just a pointer to a location in memory in which some data is stored. Visual Basic keeps track of the type of data stored in that location and does all the hard work for you, but this process is essentially the same with all programming languages.
The Dim command is used to create new variables. The syntax of Dim looks like this:
Dim Variable_Name As Data_Type
Here’s an example of a real Dim statement:
Dim Counter As Integer
This statement creates an Integer variable, which is capable of holding a number that has no decimal point.
Definition
A variable is an entity in a program, identified by name, that can store data based on its data type (such as Integer or String).
In addition to the Dim statement, there are two other ways to declare variables. The Public command causes a variable to be visible to other modules in the program, whereas the Private command prevents other modules from seeing a variable (and is the default when using Dim).
A data type is the attribute of a variable, which determines what kind of data it represents. There are many data types in Visual Basic, as shown in Table 2.1. I have rounded off the values in order to make them easier to comprehend. In my experience, the extreme range of a data type should not be an issue; just declare variables that are certain to be large enough to hold the value.
Table 2.1. Variable Data Types
Data Type | Comment |
|---|---|
| True or False |
| Tiny whole numbers (–128 to 127) |
| Tiny unsigned whole numbers (0 to 255) |
| Small whole numbers (–32,768 to 32,767) |
| Small unsigned whole numbers (0 to 65,535) |
| Large whole numbers (+/– 2 billion) |
| Large unsigned whole numbers (0 to 4 billion) |
| Very large whole numbers |
| Very large unsigned whole numbers |
| Small floating-point numbers |
| Very large floating-point numbers |
| High precision floating-point numbers |
| A date such as Jan 1, 2010 |
| A single character |
| Any text made up of characters |
| Any data type |
Definition
A data type represents the type of data stored in a variable. The data type tells Visual Basic how to handle the data.
In actual practice, don’t be overly concerned about memory usage, just use the most obvious data type to handle the information it will need to remember. Most of the time, I use Integer, Double, or String, which keeps the code simple and gives programs plenty of room to breathe. If you feel comfortable using the more specific data types, by all means use them!
The String data type is the most frequently used type in Visual Basic and deserves special recognition. Without strings, Visual Basic would be hobbled by difficult string-handling functions. The String data type is versatile in that it can contain up to two billion characters. Although it is definitely a possibility, I have never personally seen a two-gigabyte text file! Humorous as that may sound, a string could conceivably grow to that size, although I suspect that Windows would run out of memory before the string was filled to capacity. Most strings rarely exceed a few hundred characters. The String data type requires two bytes for each character (because Visual Basic strings use Unicode to store characters). To create a new String, simply use the Dim statement (or the affiliated Public or Private statements):
Dim FirstName As String
Simple string handling can be accomplished by setting a string equal to a value or another variable. There are two ways to combine strings: using the plus sign (+), or using the ampersand sign (&). Prior versions of Visual Basic required the ampersand when combining strings, but Visual Basic can use either.
Dim String1 As String = "This is String1"
Dim String2 As String = " and this is String2."
Dim String3 As String
String3 = String1 + String2
Console.WriteLine("String3 = {0}", String3);
The result of this snippet of code looks like this:
String3 = This is String1 and this is String2.
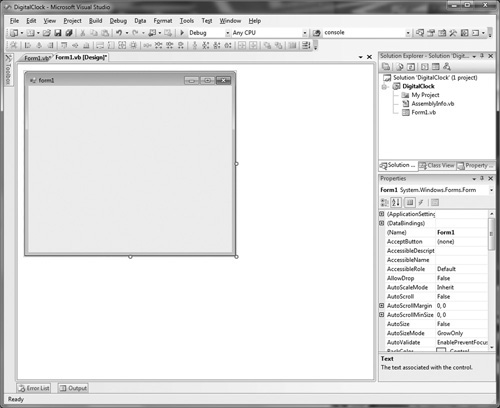
We’re going to create a new Visual Basic project to display the current time by simulating a digital clock. First, create a new project as a Windows Forms Application, as shown in Figure 2.7. Set the Form1.Text property to “Digital Clock,” as this will be how we identify the program in the Windows Taskbar and Task Manager.
Next, open the Toolbox and double-click the Timer control to add one to our form, as shown in Figure 2.8. The Timer control is located in the Components group in the Toolbox. The new Timer control is automatically named Timer1.
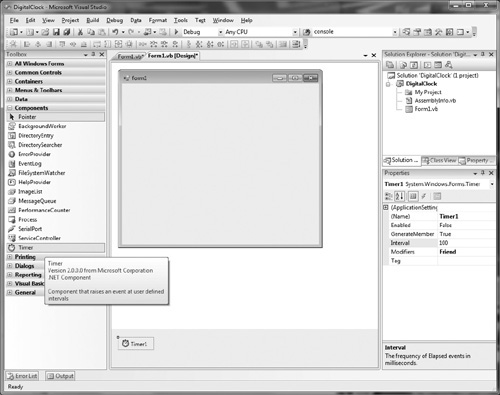
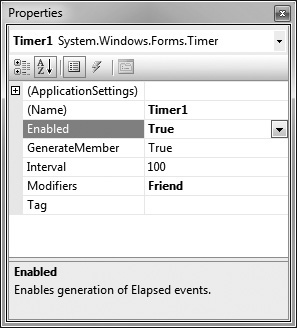
Next, take a look at the properties for the Timer1 control. (If you don’t see the Properties window, press Alt+Enter to bring it up.) Set the Enabled property to True, and Interval to 100, as shown in Figure 2.9.
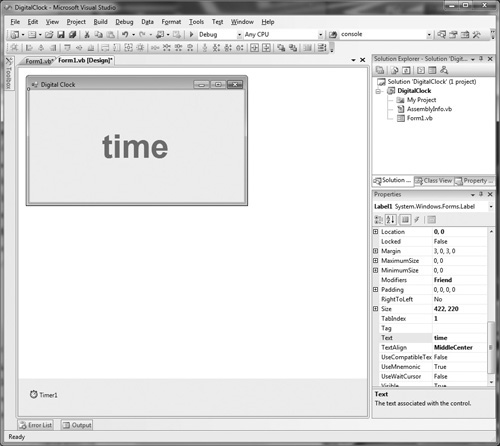
Open the Toolbox again, and look in the Common Controls group for a control called Label—and double-click Label to add a new label to the form. New controls are automatically named, so this one will be called Label1. Set the following properties for Label1, after which the control will resemble the one in Figure 2.10.
Next, double-click the Timer1 control (located below the Form window in the hidden form controls section). This will bring up the default event for the Timer1 control, called Timer1_Tick. Add the following code in the Timer1_Tick event function (noted in bold text):
Private Sub Timer1_Tick(ByVal sender As System.Object, _
    ByVal e As System.EventArgs) Handles Timer1.Tick
    REM get the time
    Dim time As String
    time = Format$(Now, "Long Time")
    REM display the time
    Label1.Text = time
End Sub
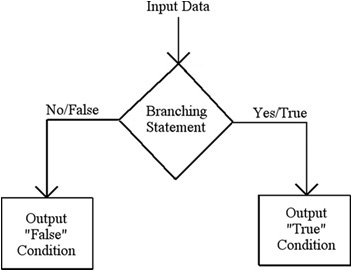
Branching statements are built into programming languages so that programmers can add logic to a program. Without branching (also known as conditional) statements, the program would only be able to forward the input directly to the output, without any processing. Although this may be something that you want the program to do (such as to display a text file on the screen or print a document), it is far more likely that you will need to actually do something with input data. Branching statements allow you to create complex program logic.
The most common branching statement used in programming languages is the If. . .Then statement, which is often called the If. . .Then. . .Else statement. Here is the general syntax of the de-facto logic statement as it is used in Visual Basic:
If "condition is true" Then
    "perform commands based on true result"
Else
    "perform commands based on false result"
End If
Figure 2.12 is an example of an If. . .Then. . .Else statement and shows how input is tested for a true or false condition, whereupon program execution continues down the chosen path.
There is another format you can use with this branching statement, in which the Else and End If parts are not needed. Rather, you can code an If...Then...Else statement on a single line. Although this format is supported by Visual Basic, it is generally considered bad form, due to the lack of a closing statement—this is often a source of bugs in a program and difficult to track down. However, this form does save three lines of code. The real benefit to using this form is when you have to test many conditions in a row and you want to keep the code listing short. Of course, such situations beg for an alternate design altogether.
If "condition" Then "true statement" Else "false statement"
There are times when the If...Then statement is just too unwieldy, particularly when a large number of conditions must be tested. In such circumstances, the Select...Case statement is a good alternative. In fact, you may feel free to use this branching statement instead of If.. .Then at any time; it’s entirely up to you. Some prefer Select...Case because it is easier to add new cases to the condition in the future. I use it anytime there are more than two conditions to be tested. Here is the general format of the Select...Case statement:
Select Case "evaluation"
    Case value-1 [To value-2][, value-3]
        "perform condition-1 statements"
    Case value-1 [To value-2][, value-3]
        "perform condition-2 statements"
    Case value-1 [To value-2][, value-3]
        "perform condition-n statements"
    Case Else
        "perform alternate statements"
End Select
The Select...Case branching statement is versatile in that it is easy to add new cases (as you can see). It is also easier to read than in an If. . .Then statement when dealing with a lot of cases. To demonstrate how Select...Case works, let’s rewrite the previous If...Then code as a Select...Case.
Select Case HoursWorked
    Case Is > 40
        Console.WriteLine("You worked over time.")
    Case Is = 40
        Console.WriteLine ("You worked regular time.")
    Case Else
        Console.WriteLine ("You worked part time.")
End Select
If you type that Select...Case statement into Visual Basic, you will notice that the editor adds the word Is before each condition. For example, if you type Case > 40, the editor will fill in Case Is > 40. This is simply the syntax required in Select...Case statements for Boolean evaluations. If you need only compare a range of values or a single value, the Is isn’t needed. For example:
Select Case Mileage

    Case Is < 10
        Console.WriteLine ("The mileage is terrible.")
    Case 11, 12, 13, 14, 15
        Console.WriteLine ("The mileage is poor.")
    Case 16, 17, 18 To 20
        Console.WriteLine ("The mileage is average.")
    Case 21 To 30
        Console.WriteLine ("The mileage is good.")
    Case 31 To 50
        Console.WriteLine ("The mileage is great.")
    Case Is > 50
        Console.WriteLine ("The mileage is amazing!")
End Select
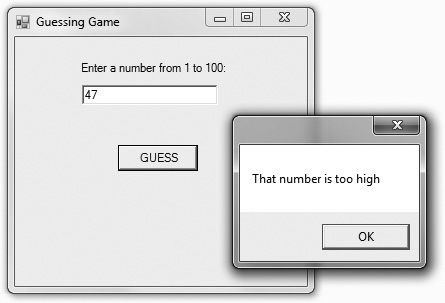
We’ll get some experience with conditional logic by making a simple but fun game. The Guessing Game project’s form is shown in Figure 2.13. There are just three controls on the form, which I will let you add on your own without any help. If you use default names for the controls, then the label will be called Label1, the textbox will be TextBox1, and the button will be Button1. You may position the controls on the form as you wish.
We need two global variables declared just below the “Windows Form Designer generated code” section.
REM declare the number variable
Dim answer As Integer
Dim rand As Random
Next, the Form_Load function, which is the first thing that runs when a program starts up:
Private Sub Form1_Load(ByVal sender As Object, _
    ByVal e As System.EventArgs) Handles MyBase.Load

    rand = New Random()
    answer = rand.Next(1, 100)

End Sub
Lastly, the Button1_Click function. To automatically generate this function, double-click the Button1 control on the form.
Private Sub Button1_Click(ByVal sender As System.Object, _
    ByVal e As System.EventArgs) Handles Button1.Click

    Dim num As Integer
    REM make sure the TextBox contains a number
    Try
        num = Integer.Parse(TextBox1.Text)
    Catch ex As Exception
        MessageBox.Show("Please enter a number between 1 and 100!")
        Exit Sub
    End Try

    REM make sure the number is between 1 and 10
    If num < 1 Or num > 100 Then
        MessageBox.Show("Please enter a number between 1 and 100!")
        Exit Sub
    End If
    REM check for high answer
    If num > answer Then
        MessageBox.Show("That number is too high")
    ElseIf num < answer Then
        MessageBox.Show("That number is too low")
    Else
        MessageBox.Show("That number is CORRECT!")

        End
    End If
End Sub
The conditional logic in this program tests the number entered into the textbox (when the button is pressed), and pops up a message box to tell the user whether the number is too low or too high. When the correct number is entered, then the program ends.
Functions are important for breaking up a large program into smaller, more manageable pieces, leading to better code reuse and legibility. Functions are also important for creating program logic. Quite often, the conditional statements in a branching statement point to a function to keep the branching statement short. If each case in a branching statement includes a page of source code, it’s easy to lose track of each case! Therefore, functions are essential parts of a programming language. A named Sub is a function that does not return a value, while a named Function does return a value.
Basic supports two types of subroutines: Sub and Function. Here is the syntax for a Sub:
[Public/Private] Sub SubName([Parameters])
End Sub
Here is an example of a Sub that does not have a parameter:
Private Sub PrintHello()
    Console.WriteLine("Hello!")
End Sub
Here is an example of a Sub that includes a String parameter:
Private Sub PrintHello(Name As String)
    Console.WriteLine("Hello, " + Name.ToString() + "!")
End Sub
A Function is similar to a Sub, but a Function will return a value while a Sub does not. Here is the syntax for a Function:
[Public/Private] Function FunctionName([Parameters]) As DataType
End Function
Here is an example of a Function that does not have a parameter:
Private Function One() As Integer
      return 1
End Function
Strange as it may appear, this is a legal function! Do you see how the value is returned using the return statement? Note the As Integer part after the function name: this determines the type of value returned. Here is another example of a Function, this time with a parameter:
Private Function TimesTen(Num As Integer) As Integer
      return Num * 10
End Function
The TimesTen function is a little more interesting because you can have it return a value that is based on a parameter! The possibilities are utterly endless on what you can do with the power of subroutines. The return value of a function is determined by the data type of the function, which can be any data type that you use when creating variables, as well as custom data types that you create. Functions can also return an Object, which means that it can return any data type or even a user interface control (odd as that may sound).
Basic provides a good assortment of mathematical operators. These operators are built into the language. Using number conversion functions, such as CInt(), CLng(), and CDbl()—for integer, long, and double, respectively—we can convert any valid data type into a numeric variable for use in calculations using mathematical operations. (Remember, a Long integer is a whole number, while a Double precision floating point has a decimal point.)
Basic can perform number conversion on the fly using functions such as CInt(), based on the result of the operation. Technically, these numeric conversion functions are unique to Basic and not part of the .NET Framework, holdovers from Visual Basic 6.0 that are available via the Microsoft.VisualBasic namespace.
The other, and perhaps recommended way to convert data types is with the Convert class. Convert.ToInt32() and Convert.ToDouble() are common. In the code editor, typing Convert. will bring up the IntelliSense list of conversion functions available in the Convert class. For example:
Dim A As String = "10"
Dim B As Integer = CInt(A)
is equivalent to this:
Dim A As String = "10"
Dim B As Integer = Convert.ToInt32(A)
Since the Convert class is part of the .NET Framework, and therefore also likely to be used with the C# language, I recommend using it instead of the older intrinsic Basic conversion functions.
The plus sign and minus sign are used to add and subtract numbers. This includes variable assignment and formulas used in branching statements. Addition is commonly used to increment the value of a counter variable. For example:
Dim N As Integer = 0
N = N + 10
Note the use of an initializer for the variable, N. Although Visual Basic automatically sets numbers to zero upon initialization, it is sometimes convenient to include the explicit initializer. The second line, N = N + 10, is called a formula, because the variable is receiving the value of an addition operation. You could just as easily use a function to return a number that is assigned to the variable. For example:
Private Function Twelve() As Integer
    return 12
End Function


Dim N As Integer = 0
N = 10 + Twelve()
Visual Basic provides another way to add a number to a variable, called a shortcut operator, which looks like this: += and -=. Here is an example:
Dim N As Integer = 0
N += 10
Multiplication was invented to make adding and subtracting easier, because it allows you to add or subtract many numbers quite easily. Like most programming languages, Visual Basic uses the asterisk (*) for multiplication. Here is an example:
Dim A As Integer = 9
Dim B As Integer = 6
Console.WriteLine("{0} times {1} = {2}", A, B, A * B)
Here is what the Console message looks like:
9 times 6 = 54
As you might have guessed, there is also a shortcut operator for multiplication, and I’ll wager that you can guess what it looks like! If you guessed *=, then you are right!
Dim A As Integer = 12
A *= 12
How about a real-world example? The circumference of a circle is two times the radius times pi, or C = 2πr. Expressed in Visual Basic source code, here is how you can calculate it (note: the last line is a comment showing the result you should get by running this mini program):
Dim Radius As Integer = 10
Dim Circumference As Decimal
Circumference = 2 * System.Math.PI * Radius
Rem the answer is 62.8318530717959
Here is an example of integer division:
Dim A As Integer = 12
Dim B As Integer = 4
Dim C As Integer
C = A  B
There are two ways to divide numbers in Visual Basic. First, standard division uses the forward slash character (/). This is below the question mark on a U.S. keyboard. Second, the backslash character (), which is above the Enter key on a U.S. keyboard, is designed to return just an integer as an answer, dropping any remainder. Be sure to learn the difference between these characters, because the latter one doesn’t work for floating-point numbers (such as Decimal, Single, and Double). Use Table 2.2 as a reference.
Table 2.2. Division Characters
Char | Name | Description |
|---|---|---|
/ | Forward slash | Floating-point division (decimal remainder) |
Backslash | Integer division (no remainder) |
Here is another example of a division operation, this time using a floating-point number:
Dim A As Decimal = 973.65
Dim B As Decimal = 18.50
Dim C As Decimal
C = A / B
Trick
If you have a hard time remembering which division character to use, consider this analogy. The backslash is a downward slope that’s quick and easy (using integers), whereas the forward slash is a hill that’s difficult to climb (using decimals). You can also think of integers as a “downgrade” in precision, while thinking of floats as an “upgrade” in precision.
After talking so much about remainders in floating-point and integer division, it is fitting that the next operator is the modulus, or Mod, operator. This works similarly to the other math operators, except there is no shortcut for modulus, because you must use the word Mod. Here is an example:
Dim A As Integer = 10
Dim B As Integer = 3
Dim C As Integer
C = A Mod B
The result of the last statement is that C = 1. Can you figure out why? When you divide 10 by 3, the answer is 3, but there is a remainder of 1. Mod ignores the answer and returns the remainder. Although this might not seem very useful to you at present, Mod is an extremely powerful math operator that can solve some uniquely difficult problems. One classic example is determining whether a number is an integer or float by looking at the remainder. You can perform that check using the following condition:
If A Mod B = 0 Then
Here is a complete example:
If A Mod 2 = 0 Then
     Console.WriteLine("The variable is a whole number")
Else
   Console.WriteLine ("The variable is a floating-point number")
End If
Note
We’ll use the modulus operator to make sprite animation possible in Chapter 6, “Sprites: The Key To 2D Games.”
The Math Quiz project demonstrates some of the math operators in the context of a little form-based quiz program. This program has a form with several Label controls, a TextBox, and two Buttons—see Figure 2.14 for the layout.
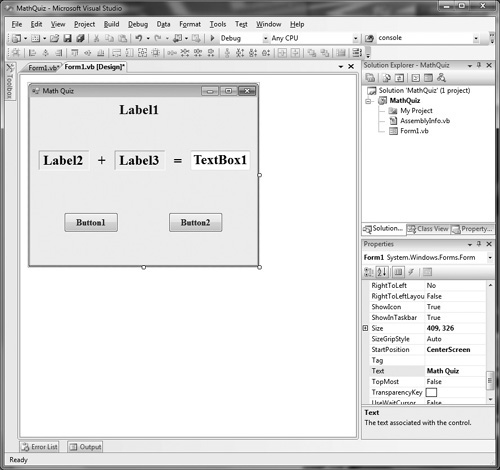
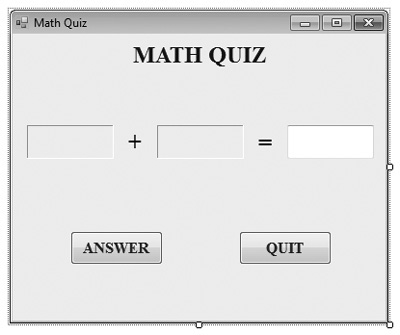
I will let you design the form on your own using this figure as a guide. Figure 2.15 shows the controls as they appear in the example. Note that the “+” and “=” signs are just Labels as well, and both Label2 and Label3 have their BorderStyle property set to Fixed3D to give them a beveled look (similar to a TextBox).
Here is the source code for the Math Quiz program, which should follow the “Windows Form Designer generated code” section in the source code listing.
Dim Answer As Integer
Private Sub Form1_Load(ByVal sender As System.Object, _
    ByVal e As System.EventArgs) Handles MyBase.Load
    REM seed the random number generator
    Randomize()
    REM initialize the game
    CreateMathProblem()
End Sub

Private Sub Button1_Click(ByVal sender As System.Object, _
    ByVal e As System.EventArgs) Handles Button1.Click
    REM make sure answer is a number
    If IsNumeric(TextBox1.Text) = False Then
        REM display error message
        MsgBox("Please enter a number.")
    Else
        REM check the answer
        If Val(TextBox1.Text) = Answer Then
            MsgBox("You got the answer right!", , "CORRECT")
        Else
            MsgBox("Oh no, you missed that one!", , "WRONG")
        End If
    End If
    REM create a new math problem
    CreateMathProblem()
    REM clear the answer field
    TextBox1.Text = ""
End Sub

Private Sub Button2_Click(ByVal sender As System.Object, _
    ByVal e As System.EventArgs) Handles Button2.Click
    REM quit button ends the program
    End
End Sub

Private Sub CreateMathProblem()
    Dim First As Integer
    Dim Second As Integer

    REM randomize the first field
    First = Int(Rnd() * 10)
    Label2.Text = First
    REM randomize the second field
    Second = Int(Rnd() * 10)
    Label3.Text = Second
    REM set the math operator and answer
    Select Case Int(Rnd() * 3)
        Case 0
            REM addition problem
            Label4.Text = "+"
            Answer = First + Second
        Case 1
            REM subtraction problem
            Label4.Text = "-"
            Answer = First - Second
        Case 2
            REM multiplication problem
            Label4.Text = "x"
            Answer = First * Second
    End Select
End Sub
The human mind is capable of seeing the differences and relationships between individual things and groups of things, such as cars in a car lot. By simply driving past a car lot, you are probably able to tell at a glance what types of cars are being offered for sale, such as pickup trucks, compact cars, vans, and sport-utility vehicles.
Computer programs are not blessed with the ability to instantly come to a conclusion with limited information. Rather, computers must evaluate differences at a highly detailed and specific level. For instance, a human might look at two cars and claim that they are absolutely identical. But a computer might examine the same two cars and find that they are made of different components, built in different years, and even point out flaws in the paint. As a result, computers are able to examine things with great precision, something humans are incapable of doing.
Relational operators deal with how values compare to each other, or rather, how they relate to each other. Relational operators are usually found within formulas that result in a Boolean (true or false) value, and are based on simple rules, such as equal, not equal, greater than, and less than. The way that objects relate to each other is determined by their data types. Variables of the same data type can relate directly without any conversion needed. But variables of different data types require some form of conversion before they can be compared using a relational operator.
The actual operators used to perform relational comparisons are covered next, with a description of how to use each one. Table 2.3 provides a quick reference.
Table 2.3. Relational Operators
Operator | Description |
|---|---|
| Equal to |
| Not equal to |
| Less than |
| Greater than |
| Less than or equal to |
| Greater than or equal to |
Here is an example of a test for an equal condition:
If (A = B) Then
    Console.WriteLine("True")
Else
    Console.WriteLine ("False")
End If
Hint
Basic uses the single equal sign, =, to test for equality and for assigning values to variables. The C# language uses double equal signs, ==, for conditional tests and a single one for assignment. This can lead to serious bugs: be mindful of the difference if you intend to learn both Basic and C#.
Looping is a way of repeating something to accomplish a task (such as summarizing or averaging some values) or to process a long list of information. For example, it requires a loop to load a text file and display it in a TextBox, because the program must load each byte of the text file in order. Another example of a repeating process is drawing a picture on the screen, one pixel at a time, as each pixel in the picture file (which might be saved as a JPG, GIF, BMP, or other format) is copied to the screen. Looping is the process of repeating or iterating through a series, from a starting point to a fixed ending point, or upon the completion of a condition. Suppose you have a list of names, as follows:
If you need to print out all this information, you could display each name separately, like this:
Console.WriteLine ("Bob is #1")
Console.WriteLine ("Jane is #2")
Console.WriteLine ("Mary is #3")
Console.WriteLine ("Steve is #4")
That might work for small lists, but what about lists with hundreds, thousands, or millions of entries? Computer databases could easily have millions of records, after all, and there’s no way you can process each one individually. Obviously, a looping command is needed! How might you iterate through a series of sequential numbers? First, you start with a variable that is set to one. Each time through the loop, you add one to the variable. At the end of the loop, the variable will equal some number. Here is the basic concept:
Start with a value.
Add one to the value.
Repeat until a condition is met.
The condition that needs to be met might be a Boolean formula, such as (Num > 100) or (A = B). The condition might also be that the counter variable has reached a certain number. This is what computer science calls a For Loop, odd as that may sound. The reason it is called For Loop is because something happens “for every pass through the loop.”
The Visual Basic For Loop looks like this:
For variable = start To finish
    repeating commands
Next variable
The Do Loop is another form of looping command built into Visual Basic. Whereas For Loops are adept at handling number sequences, Do Loops excel when it comes to relational looping, in which a process will repeatedly loop until some Boolean condition is satisfied. There are four variations of the Do Loop.
The first form of the Do Loop is the Do While...Loop. This version causes the enclosed commands to repeat as long as the condition is true. You can paraphrase it like this: “While the condition is true, continue repeating the commands.” Because of this wording format, it’s possible that the repeating commands might never execute if the condition is false from the start. Here is the format for this version of the Do Loop:
Do While condition
    repeating commands
Loop
The Do While...Loop command is more versatile than the For Loop because you can have multiple conditions applied to the loop through every iteration. For example:
Do While EndOfFile = False
    'process the file
Loop
The Do...Loop While command is the reverse of the Do While...Loop command. The format of the condition and the way this loop handles repetition are similar, but there is one difference.
Here is the format of the command:
Do
     repeating commands
Loop While condition
The third type of Do Loop is the Do Until... Loop command. This one is also similar to the other Do Loops, but this format differs from the Do While...Loop in that it continues to repeat until the condition is met, rather than while the condition is met. It is the negative version of the Do Loop that continues as long as the condition is false. Here is the general format of the Do Until...Loop command:
Do Until condition
     repeating commands
Loop
The fourth version of the Do Loop is Do...Loop Until. This is the late conditional form of the Do Until...Loop, in which the condition is checked at the end of the loop rather than at the beginning. Therefore, this loop is guaranteed to process the repeating commands at least once.
Do
    repeating commands
Loop Until condition
Here is an example:
Do
    'process the file
Loop Until FileOpen = False
Looping commands really start to make sense when dealing with long lists of information, as the preceding section demonstrated. But what happens when you don’t have a ListBox control handy to use as a container for the information? The answer is an array, which is a variable that has many elements. Suppose you have a variable called Age, declared as an Integer, which holds your age. What if you would like to keep track of the age of everyone in your family or your class? You could create many Age variables, as follows:
Dim Age1 As Integer
Dim Age2 As Integer
Dim Age3 As Integer
Dim Age4 As Integer
That is an inefficient way to handle all of the data, and there is an additional problem that arises when you add another variable to the list, such as Age8. When you do that, you have to go back and modify the program so that Age8 is used properly. Obviously, there must be a better way.
The answer is an array. This is how you would declare the Age array:
Dim Ages(8) As Integer
Doesn’t that look a lot more efficient? Not only can you iterate through an array with a looping command, you can also add new elements to an array at will, and if your program is written properly, you won’t have to rewrite anything to add more elements.
Let’s devise a hypothetical situation to help illustrate. There are eight people in your class, and you want to write a program that displays all of their ages using only a few lines of code, because you are in a hurry to get it finished. First, you need to declare an array of names to go along with the Age array:
Dim Names(8) As String
You need to fill the array with some data. For the sake of simplicity, let’s do it the hard way. Here is how you might load the Names and Ages arrays:
Names(0) = "Thomas"
Ages(0) = 32
Names(1) = "James"
Ages(1) = 20
Names(2) = "Percy"
Ages(2) = 24
Names(3) = "Gordon"
Ages(3) = 38
Now that the arrays have been filled with sample data, let’s write a loop to quickly display the arrays:
Dim n As Integer
For n = 0 To 3
    Console.WriteLine("{0} is {1} years old.", Names(n), Ages(n))
Next
The preceding section demonstrated how to combine two arrays of related information in a display. That method did work, but it was inefficient. For one thing, what if the names and ages need to be sorted? Sorting one of the arrays would mess up the sequence of the other arrays. What happens if you need to keep track of several more pieces of information about each person in this hypothetical situation, such as height and weight? Things could become messy in a hurry with four arrays to deal with.
Hint
Pay close attention to this section because we’ll be using both classes and structures in the Celtic Crusader game!
A structure combines several variables into a group, which is then handled as a single entity. The real power of a structure, then, is the ability to create an array of that structure, rather than multiple arrays for each variable. Sound interesting? It is that, and extremely useful as well. Here is the general format of a structure:
Structure struct_name
    variable1 As data_type
    variable2 As data_type
    variable3 As data_type
End Structure
Let’s create a real structure based on the Names and Ages arrays created in the previous section. Here is how you might design the structure in order to incorporate the previous two arrays:
Structure Students
    Dim Name As String
    Dim Age As Integer
End Structure
As you can see, it looks very similar to the individual array declarations for Names and Ages, but I have made the variable names singular. One important point to note is that once inside a structure, variables are referred to as methods.
Once you have created the structure, you can declare an array variable of the structure like this:
Dim people(8) As Students
Filling a structure array differs a little from filling a simple variable array. How do you get to those variables (oops, I mean methods) after you have created the structure array? Well, for starters, take a look at the variable itself, called people. There you will find the clue to accessing the methods within. As with built-in objects in Visual Basic, such as System.Math, Visual Basic provides the IntelliSense drop-down list any time you type in the name of an object followed by a period.
If you have Visual Basic open, go ahead and create a new Console Application project, and type in the preceding structure definition so you can try this out. Now, move the cursor to the blank line under Sub Main() and type in:
people(0).
That’s it, just people(0) followed by a period. Because you declared people to be a structure array, you should see the drop-down list showing the two methods in that structure. But wait, what are those other items in the drop-down list? Equals, GetHashCode, GetType, and ToString don’t belong in there! After all, the structure just has two methods, Name and Age. Don’t worry about those extra methods. They are just standard methods built in that Visual Basic adds to the structure definition for advanced use.
Okay, now you at least have an idea of how to access the methods inside a structure. So, let’s fill in the names and ages in this structure array to see how it works:
people(0).Name = "Thomas"
people(0).Age = 32
people(1).Name = "James"
people(1).Age = 20
people(2).Name = "Percy"
people(2).Age = 24
people(3).Name = "Gordon"
people(3).Age = 38
See how the structure name (people) now references the array index (0 to 7) instead of the method names? It makes more sense to do it this way, and it’s more logical. Now you can add more methods to the structure and reference them like you did with Name and Age. Let’s print out the array so you can see how that looks with a looping command.
Dim n As Integer
For n = 0 To 7
    Console.WriteLine("{0} is {1} years old.", _
        people(n).Name, people(n).Age)
Next
Object-oriented programming (OOP) is a large-scale concept, which is more of a methodology than a specific way of writing programs. Applicable to many different languages, including Visual Basic, OOP has been around for many years. If this is your first exposure to OOP (or to programming, for that matter), it may not be clear how useful it is to be able to reuse source code on later projects or even share source code between projects currently in development. Try to think in the abstract: How can I write this program in such a way that when I’m finished, I can use parts of it again in another project? That way of thinking is a step in the right direction. To accomplish something like that, you need to break down a problem into manageable pieces, and then write the source code for those individual pieces separately, linking them together at the end to form a whole program. If you are new to programming, you can learn how to write OOP code correctly from the start and avoid having to change your way of thinking later. Software evolves; it changes every year.
Encapsulation is the process of pulling all the data, and source code that manipulates that data, inside a self-contained entity (which is easier to refer to as just an object). By keeping all the data inside the object, as well as all the subroutines and functions that work with the data, you prevent others from using the data incorrectly. In addition, encapsulation enables you to design the format of the data, as well as the processes, so that everything follows the object model—if properly designed, it’s a blueprint for the system.
Suppose you have an apple tree in your backyard. You are a kindly neighbor; therefore, you offer free apples to anyone who comes by for a visit. Soon, however, your neighbors begin to help themselves to the apples without even bothering to knock on the door and say hello. They have ignored you completely and helped themselves to the goodies.
To prevent this, what you really need to do is add a layer of control between your neighbors and your apple tree—for instance, a fence with a locked gate. But ideally, you need to pass out the apples yourself. So you do just that; every time a neighbor stops by for an apple, you select a ripe and healthy apple and present it to your neighbor. The neighbor thanks you and goes on his way. You have interfered with the neighbor’s ability to gain direct access to the source of the apples, but in doing so, you made sure the neighbor received only good apples, because you threw out any bad apples beforehand.
This analogy aptly describes encapsulation of data. You want other processes in the program to have access to certain information, but you want to make sure that those processes don’t do something incorrect with the information, possibly causing a bug in the program. Does encapsulation limit or slow down a program? Not really. It takes the outside process just as much time to grab the information stored in a variable as it takes for your own custom process to provide the information to that outside process.
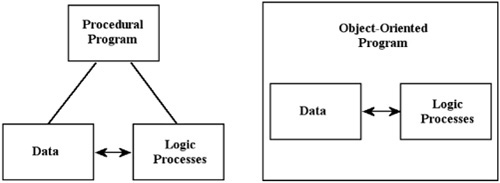
Let me give you an example to help clarify the matter. Figure 2.16 shows the difference between a procedural program (that exposes data and processes) and an object-oriented program (that protects data and processes).
Inheritance is another key component of an OOP program. Inheritance is the ability of one object to borrow things from another object. Inheritance is a play on words; it is more like cloning than receiving money from a departed loved one. I suspect reproduction and cloning sounded too biological, so the word inheritance was used instead. Regardless, the concept is that one object receives the attributes of another object. When the new object is used, it has a copy of the older object inside itself, which is very similar to the way genetics works. The parent passes down genes to offspring. See Figure 2.17.

Polymorphism is the last of the three concepts that comprise an OOP program. Polymorphism as a word means “many shapes” and refers to the ability for the traits inside an object to change in response to different inputs or outputs.
Polymorphism is probably not as important to the overall OOP scheme as encapsulation and inheritance are, but it does play an important role in aiding the other two with multipurpose attributes that can accommodate many different situations. Polymorphism is arguably the least important of the three major traits of an object-oriented program, but it does provide a powerful and useful set of features that are difficult to do without once you have gotten used to them.
Without getting into too much detail at this point, I’d like to show you how to start using OOP. The true power of OOP comes from using classes. A property is a special type of function that behaves like a variable, so you can read and write data to a property as if it were a variable—when, in fact, it is a miniature class that protects its data. Properties can be a very powerful form of encapsulation, allowing you to hide variables and processes behind a simple interface. Here is an example property:
Dim decCirc As Decimal
Property Circumference() As Decimal
    Get
        Return decCirc
    End Get
    Set(ByVal value As Decimal)

        decCirc = value
    End Set
End Property
Note the use of the statements Get and Set—they allow a property to be accessed like a variable. Then, in your program, you can set the Circumference property like this:
Circumference = 100.0
Or you can retrieve the value of the Circumference property like so:
Dim circ as decimal = Circumference
Classes make object-oriented programming possible. A class is a source code blueprint for an object that is created at runtime (when the program is running). An object is a self-contained, functional component in a program, which accomplishes a single task, regardless of whether that task is simple or complex. A well-designed OOP program will utilize many different and versatile objects that work together to accomplish the goals of the program. The real power of this is that over time a programmer (or programming team) will be able to use these objects in more than one project. A professional programming shop will have an assortment of classes collected over time in a class library. The class library may be comprised of many smaller libraries of classes.
Classes can contain any information that you want and can generally be declared Friend or Public. Private classes can also be created, but their scope must fall within another class. Friend classes are visible only within the current namespace (in previous versions of Visual Basic that would have been current project scope). Generally, classes are created so that they can be used and reused in more than one application; therefore, classes are almost universally declared with Public scope. For all practical purposes, here is a sample class definition (with a single member variable) as you will see it most often:
Public Class MyClassName
    Private intVariable As Integer

    REM this is the constructor

    Sub New()
        intVariable = 0
    End Sub

    REM this is a property
    Property Variable() As Integer
        Get
            Return intVariable
        End Get
        Set(ByVal Value As Integer)
            intVariable = Value
        End Set
    End Property
End Class
The first thing you will notice in the sample MyClassName class is the member variable called intVariable. Member variables can be declared with Public, Private, or Protected scope. You are already familiar with the first two; what, then, does Protected mean? Protected member variables are sort of in between Public and Private, accessible to descendant classes but not outside the class. Private member variables, on the other hand, are not visible to other classes (not even descendants). Public variables are visible all the time.
The next thing you will notice in the sample MyClassName class is a constructor called Sub New(). Odd as it may appear, this is how constructors are created in Visual Basic, by overloading the New operator. Remember, when you create a new object, you use New, right? Well, New is just an operator, like +, -, and =. Visual Basic overloads the New operator to act as the constructor for the class. In case you are not familiar with the term, a constructor is a subroutine (method) that runs when the class is first instantiated (which means created).
The most common type of subroutine you will use in a class is a property, although you can add any Sub or Function that you want to a class, and it then becomes a member method of the class. I am a big fan of properties, and I am pleased that properties now play such a big role in Basic’s OOP capabilities. You are free to use a property to do more than just provide access to a private variable. Anytime you need to return a value, for example, it is convenient to use a property, because properties are referenced just like variables in a class (and it’s often difficult to tell the difference), but they afford us an opportunity to do error checking and protect the class variables.
If you were a newcomer to Visual Basic, I trust this chapter provided a good introduction to the language. You learned the basics of variables and data types, subroutines and functions, conditional statements, structures, classes, and many more key concepts. You may want to refer back to this chapter any time you run across code later on that you don’t quite understand. Now, in the next chapter, we will be working even more with forms and controls by creating several even more challenging games.