We arrive at the final development chapter for the Celtic Crusader toolset before embarking on the final project in the next chapter. While an RPG can be devoted entirely to fighting as a means to give the player experience, there isn’t much of a story behind a game devoted solely to combat without a goal for the player to achieve. “Defeat the dragon, save the princess” is an age-old theme that still works today, and that might very well be the goal you will give the player in your own game. Quite simply, it works to motivate the player! But, if you’re looking for steps along the way, then smaller quests are important. The goal of this chapter is to build a quest editor tool. Our game will handle just one quest at a time, with the editor supplying the specific details of each quest, such as the quest giver, conditions that must be met, rewards for success, and so on. Completing a quest might result in gold and/or loot, so we can draw on code developed in Chapter 18 when granting the player his reward for successfully completing each quest. Since the quest system will be linear, the player must finish each quest in order to proceed to the next one. Therefore, it’s important to design the “quest chain” in such a way that it gradually brings the player up to speed so that he or she is eventually able to complete more challenging quests late in the game. Completing the final quest, “saving the girl,” so to speak, should end the game with fanfare.
Here’s what we’ll cover in this chapter:
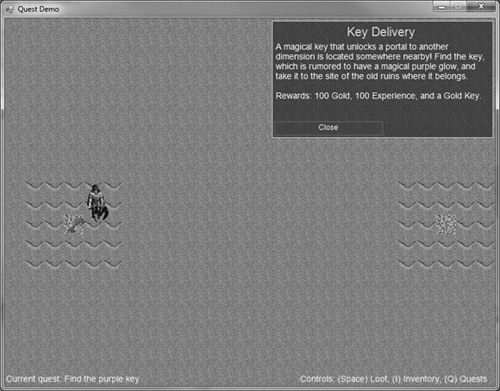
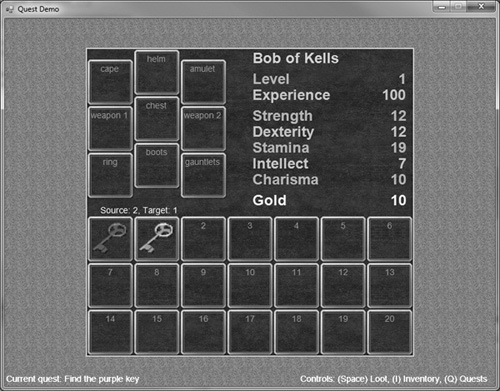
There are two ways to handle quest delivery to the player: by pushing the quest data out via a defined representative (as a character in the quest record), or by pulling the quest data out of the database and presenting it however we want. The “push” approach is attractive because it makes the quest system more self reliant, with the quest giver, conditions, and rewards handled internally. The “pull” approach is more flexible, just data waiting to be used without any other built-in resources. Both forms are appealing in the benefits they afford, with the only drawback to one over another being the amount of game code needed to make quests work. Figure 19.1 shows the quest details displayed by the Quests class while the game is running. We will build this later in the chapter.
The Inventory class in Chapter 18 used the push approach, handling the player’s gear and carry items as well as the inventory screen seen in the game. Similarly, a “push” quest system would read fields in a quest record and assemble whatever is necessary to show the quest to the player, to test for its completion, and give the player a specified reward. The Items class uses more of a “pull” mechanism, supplying data to the program as needed, but doing no extra work such as a user interface. It goes without saying that we need a system to give the player a quest, and then remind the player of the quest conditions needed to complete it. This data needs to be shown in the game somewhere, somehow. So, should it be push or pull? If this were a theoretical chapter about gameplay concepts, I might expound on this thread by citing examples in recent games that used each approach. But this is an applied chapter, with the expectation that we have a working quest system by the end—no “cliffhanger” allowed.
As it turns out, we will be using a combination of both for quests in the game, with a Quests class that loads and supplies quest data through a user interface via a helper Quest class, much like the Inventory class in Chapter 18 used the Item and Items classes. It might have been intriguing to specify the actual quest giver in the editor, by choosing the sprite and so forth, but that restricts the quest system too much. What happens if you use one sprite for a series of quests, and then decide to change that character to better fit the storyline? Then every record that uses the sprite must be edited! Even if there are only a few quests that use a particular sprite for a character as the quest giver, the limitation is there. We want to develop a robust game with versatile tools and classes that support the designer’s vision for a game, not to make the source code easier to write. In order of priority, the player comes first, followed by the designer, and then the engineer. Software should not be designed for the convenience of the programmer, but for the user. Besides, a more generic quest database might be useful for projects using another programming language!
Many games require the player to talk with an NPC in order to get and turn in quests. We can do that also, but in a slightly different manner: instead of talking with an NPC, we need merely walk up to them. The quest system will not be linked to any character, only to drop items and locations on the map. Through some creative design and programming, we can use these two basic requirements to meet almost any conceivable need. For instance, even though a quest turn-in condition is a location on the map, we can make it seem like the turn-in is actually a character by putting a sprite there! The Quests class will display the status of the current quest, so going to the correct location on the map as specified will trigger a “Quest Complete” to be displayed. To receive the reward, acquire the item and/or go to the target location on the map (measured in tiles, not pixels, and for reference there are 128 × 128 tiles in a map). The two conditions are as follows:
Get Item
Go to Location
But, what if you don’t want to deliver an item to some location? What if you want to just have the player pick up an item and that’s it, no requirement to turn it in anywhere? That’s fine, just select “Get item” condition and choose the item from the list.
Hint
If you do not check at least one quest condition, then it will be impossible to complete the quest!
What about a quest where you have to go kill like 10 zombies or something like that, where the condition isn’t an item or a location? That’s also possible, but requires a slight workaround. Instead of keeping track of how many zombies the player kills, we can instead check the player’s inventory for 10 “zombie ears” or some similar item. You would have to add that item to the item database, of course, and then make it a drop item for the zombie character. But then when you kill a zombie, there’s a 25 percent chance that it will drop a “zombie ear,” and there’s your quest solution.
However, that raises another issue: what if the player doesn’t have enough free slots in his inventory to pick up 10 zombie ears? Our inventory system doesn’t handle “item stacks” like some games do. It’s a great feature, for sure, but not something we can support right now. What’s the workaround? Again, this is a matter of game design: if you know the features of the game, then you must work within those known features and account for all the possible scenarios the player is likely to get into (such as the problem of inventory space). Do we want to just go ahead and require 10 zombie ears, or would 5 get the job done just as well? The “inventory bag” can hold 21 items—an odd number that comes from three rows of seven each in the small inventory screen. If that’s not enough for your taste, you could redesign the inventory system to use smaller item slots (say, 32 × 32 or 48 × 48), and then scale the images when drawing them in the slots; Graphics.DrawImage() can do this easily. Since the Inventory class treats the buttons as an array of 30, you would need to enlarge the array. Note also that the gear items share this array, but they are defined after the regular inventory items, so as long as the array size is enlarged the class can handle more items. I’m just not sure this is necessary, though! Why not design the game so that gobs of stuff isn’t needed? Remember my premise over the last two chapters, that gear micro-management tends to ruin the suspense of disbelief for a game, and that’s usually the best measure of a game’s fun factor—its funativity?. Consider the enormous popularity of Nintendo’s Zelda series, which somehow manages to get by without “gigantique bags.” But, hey, if you love loot, who am I to deny you your fun?
The reward is what the player receives upon completing a quest. The reward can be any one or all of the following: Experience, Gold, or an Item. If you don’t want to use one or two of the reward types, just leave them blank and the game will ignore them. You could, for instance, grant 500 experience, 50 gold, and a “Battle Axe” item as the rewards for one quest, or any one of the three. Choose the reward item from the drop-down list, which is read directly from the .item file.
It goes without saying that completing a quest should give the player experience—that’s the motivation driving most players to complete a quest. If you have a quest, though, that simply rewards the player with gold or an item, consider granting at least a token amount of experience to make the game seem more realistic: going through the effort to complete the quest did require some persistence, however great or small, and that should be reflected with experience as well as reward items. Just be sure to keep the amount in balance with your preferred leveling up algorithm—don’t make it too easy for the player to level, or he may very well get bored with the game. Keep the challenge high, but not frustrating. It’s a fine line to balance on but worth it in the end if the gameplay works well. Generally, you want your players to have achieved enough experience and gear to succeed in new challenges without it being so difficult that they just die over and over again. If that happens, then you have failed to balance the gameplay effectively!
The Quest class is a support class used by Quests and by the main program for any purpose related to reading information about a quest. The Quest class is very similar to the Item class developed over the previous two chapters, which worked closely with Items and Inventory.
Public Class Quest
    Private p_title As String
    Private p_summary As String
    Private p_desc As String
    Private p_RequiredItemFlag As Boolean
    Private p_RequiredItemCount As Integer
    Private p_RequiredItem As String
    Private p_RequiredLocFlag As Boolean
    Private p_RequiredLocX As Integer
    Private p_RequiredLocY As Integer
    Private p_RewardXP As Integer
    Private p_RewardGold As Integer
    Private p_RewardItem As String

    Public Sub New()
        p_title = "new quest"
        p_summary = ""
        p_desc = ""
        p_RequiredItemFlag = False
        p_RequiredItemCount = 0
        p_RequiredItem = ""
        p_RequiredLocFlag = False
        p_RequiredLocX = 0
        p_RequiredLocY = 0
        p_RewardXP = 0
        p_RewardGold = 0
        p_RewardItem = ""
    End Sub

Public Overrides Function ToString() As String
    Return p_title
End Function

Public Property Title() As String
    Get
        Return p_title
    End Get
    Set(ByVal value As String)
        p_title = value
    End Set
End Property

Public Property Summary() As String
    Get
        Return p_summary
    End Get
    Set(ByVal value As String)
        p_summary = value
    End Set
End Property

Public Property Description() As String
    Get
        Return p_desc
    End Get
    Set(ByVal value As String)
        p_desc = value
    End Set
End Property

Public Property RequiredItemFlag() As Boolean
    Get
        Return p_RequiredItemFlag
    End Get
    Set(ByVal value As Boolean)
        p_RequiredItemFlag = value
    End Set
End Property

Public Property RequiredItemCount() As Integer
    Get
        Return p_RequiredItemCount
    End Get
    Set(ByVal value As Integer)
        p_RequiredItemCount = value
    End Set
End Property

Public Property RequiredItem() As String
    Get
        Return p_RequiredItem
    End Get
    Set(ByVal value As String)
        p_RequiredItem = value
    End Set
End Property

Public Property RequiredLocFlag() As Boolean
    Get
        Return p_RequiredLocFlag
    End Get
    Set(ByVal value As Boolean)
        p_RequiredLocFlag = value
    End Set
End Property

Public Property RequiredLocX() As Integer
    Get
        Return p_RequiredLocX
    End Get
    Set(ByVal value As Integer)
        p_RequiredLocX = value
    End Set
End Property

Public Property RequiredLocY() As Integer
    Get
        Return p_RequiredLocY
    End Get

        Set(ByVal value As Integer)
            p_RequiredLocY = value
        End Set
    End Property

    Public Property RewardXP() As Integer
        Get
            Return p_RewardXP
        End Get
        Set(ByVal value As Integer)
            p_RewardXP = value
        End Set
    End Property

    Public Property RewardGold() As Integer
        Get
            Return p_RewardGold
        End Get
        Set(ByVal value As Integer)
            p_RewardGold = value
        End Set
    End Property

    Public Property RewardItem() As String
        Get
            Return p_RewardItem
        End Get
        Set(ByVal value As String)
            p_RewardItem = value
        End Set
    End Property

End Class
The quest editor is our fourth and final game development tool. It’s been quite exciting to watch as each new tool (and its supporting classes) was built and added to the Celtic Crusader toolbox. This editor is fairly simple and works on the same user interface principle as the item editor, with a list of quests along the left side and simple list item selection and auto-saving of edited fields. Figure 19.2 shows the quest editor.
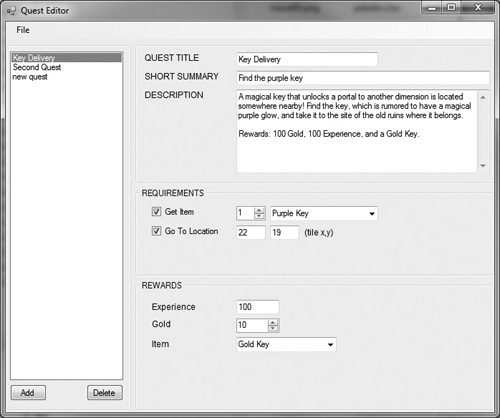
The only thing I want to share with you from the sources are the loadFile() and saveFile() functions, which will show you what all of the XML fields are called for this editor data. The source code is otherwise almost identical to that of the item editor, so we’ll save some paper.
Private Sub loadFile(ByVal filename As String)
    Try
        REM open the xml file
        Dim doc As New XmlDocument()
        doc.Load(filename)
        Dim list As XmlNodeList = doc.GetElementsByTagName("quest")
        For Each node As XmlNode In list

            Dim element As XmlElement = node
            Dim q As New Quest()
            q.Title = getElement("title", element)
            q.Summary = getElement("summary", element)
            q.Description = getElement("description", element)
            q.RequiredItem = getElement("req_item", element)
            q.RequiredItemCount = getElement("req_item_count", element)
            q.RequiredItemFlag = getElement("req_item_flag", element)
            q.RequiredLocFlag = getElement("req_loc_flag", element)
            q.RequiredLocX = getElement("req_loc_x", element)
            q.RequiredLocY = getElement("req_loc_y", element)
            q.RewardGold = getElement("reward_gold", element)
            q.RewardItem = getElement("reward_item", element)
            q.RewardXP = getElement("reward_xp", element)
            lstQuests.Items.Add(q)
        Next
    Catch ex As Exception
        MessageBox.Show(ex.Message)
        Return
    End Try
End Sub

Private Sub saveFile(ByVal filename As String)
    Try
        REM create data type templates
        Dim typeInt As System.Type
        Dim typeBool As System.Type
        Dim typeStr As System.Type
        typeInt = System.Type.GetType("System.Int32")
        typeStr = System.Type.GetType("System.String")
        typeBool = System.Type.GetType("System.Boolean")
        REM create xml schema
        Dim table As New DataTable("quest")
        table.Columns.Add(New DataColumn("title", typeStr))
        table.Columns.Add(New DataColumn("summary", typeStr))
        table.Columns.Add(New DataColumn("description", typeStr))
        table.Columns.Add(New DataColumn("req_item", typeStr))
        table.Columns.Add(New DataColumn("req_item_count", typeInt))
        table.Columns.Add(New DataColumn("req_item_flag", typebool))
        table.Columns.Add(New DataColumn("req_loc_flag", typeBool))

        table.Columns.Add(New DataColumn("req_loc_x", typeInt))
        table.Columns.Add(New DataColumn("req_loc_y", typeInt))
        table.Columns.Add(New DataColumn("reward_gold", typeInt))
        table.Columns.Add(New DataColumn("reward_item", typeStr))
        table.Columns.Add(New DataColumn("reward_xp", typeInt))
        REM copy data into datatable
        For Each q As Quest In lstQuests.Items
            Dim row As DataRow = table.NewRow()
            row("title") = q.Title
            row("summary") = q.Summary
            row("description") = q.Description
            row("req_item") = q.RequiredItem
            row("req_item_count") = q.RequiredItemCount
            row("req_item_flag") = q.RequiredItemFlag
            row("req_loc_flag") = q.RequiredLocFlag
            row("req_loc_x") = q.RequiredLocX
            row("req_loc_y") = q.RequiredLocY
            row("reward_gold") = q.RewardGold
            row("reward_item") = q.RewardItem
            row("reward_xp") = q.RewardXP
            table.Rows.Add(row)
        Next
        REM save xml file
        table.WriteXml(filename)
        table.Dispose()
    Catch es As Exception
        MessageBox.Show(es.Message)
    End Try
End Sub
Now that we have a quest editor—which is admittedly in an early stage but quite usable already—we can begin working with quest data. First, we will need a new Quests class that reads a supplied .quest file to pull in all of the quest data, which will then be made available to the game. Not merely a database like the Items class, our new Quests class will actually maintain the current quest number and return the properties for the current quest, which will be handled internally. We can’t limit the ability to control this process, but we can automate it a bit. A function will allow us to jump to any quest number and then retrieve the current properties at any time without any further lookup function calls. This approach treats the Quests class like a database class and gameplay class combined (where we have two classes, Item and Items, for working with the item database, for instance).
The Quest Demo project in this chapter is a stripped down example that does not include combat, but does still have the inventory system because that is an integral part of completing quests. As a simplified demo, we will not be able to test how quests will work based on monster drop items, but based on the examples we’ve gone over in recent chapters, there’s no reason to worry about that right now; we’ll see that working in the final game coming up in the next chapter.
The Quests (plural) class differs from the Quest (singular) class previously covered in that it handles all of the quests and also draws the quest window in the game. The Quest (singular) class handles the properties and functions for a single quest read in from the quest editor data file. The Quests class begins like so:
Private p_current As Integer
Private p_quest As Quest
Private p_dialog As Dialogue
Private p_game As Game
Private p_enable As Boolean
Public quests As List(Of Quest)

Public Sub New(ByRef game As Game)
    quests = New List(Of Quest)
    p_current = -1
    p_quest = New Quest()
    p_game = game
    p_dialog = New Dialogue(p_game)
    p_enable = False
End Sub
The Quests class is responsible for loading the .quest file passed to its Load() function:
Private Function getElement(ByVal field As String, _
        ByRef element As XmlElement) As String
    Dim value As String = ""

    Try
        value = element.GetElementsByTagName(field)(0).InnerText
    Catch ex As Exception
        REM ignore error, just return empty
        Console.WriteLine(ex.Message)
    End Try
    Return value
End Function

Public Function Load(ByVal filename As String) As Boolean
    Try
        REM open the xml file
        Dim doc As New XmlDocument()
        doc.Load(filename)
        Dim list As XmlNodeList = doc.GetElementsByTagName("quest")
        For Each node As XmlNode In list
            REM get next record in table
            Dim element As XmlElement = node
            Dim q As New Quest()
            REM store fields
            q.Title = getElement("title", element)
            q.Summary = getElement("summary", element)
            q.Description = getElement("description", element)
            q.RequiredItem = getElement("req_item", element)
            q.RequiredItemCount = getElement("req_item_count", element)
            q.RequiredItemFlag = getElement("req_item_flag", element)
            q.RequiredLocFlag = getElement("req_loc_flag", element)
            q.RequiredLocX = getElement("req_loc_x", element)
            q.RequiredLocY = getElement("req_loc_y", element)
            q.RewardGold = getElement("reward_gold", element)
            q.RewardItem = getElement("reward_item", element)
            q.RewardXP = getElement("reward_xp", element)
            REM add new item to list
            quests.Add(q)
        Next
    Catch ex As Exception
        Return False
    End Try
    Return True
End Function
We now have the quest data (via our quest editor tool and the two support classes), a way to display quest information in the game, a function that tests whether the conditions have been met, and a way to give rewards to the player. There’s just one problem: when the game starts up, the first quest is already available. We need to use a flag to selectively enable a quest. That flag is called Quests.Enabled, and is set to True for the Quest Demo. Since this is a global property, it can be set from anywhere in the game’s code. It’s up to the quest writer to make sure the player has enough information to complete it! In this simple example, all you have to do is pick up the key nearby and go to the obvious tile on the right. Obviously, real quests will be more involved than this, but it was necessary to keep it simple while testing the QuestComplete() function.
Public Property Enabled() As Boolean
    Get
        Return p_enable
    End Get
    Set(ByVal value As Boolean)
        p_enable = value
    End Set
End Property
The QuestNumber and QuestItem properties keep the current quest at the forefront so we don’t have to mess with that in the game code.
Public Property QuestNumber() As Integer
    Get
        Return p_current
    End Get
    Set(ByVal value As Integer)
        REM update position
        p_current = value
        If p_current < 0 Then
            p_current = 0
        ElseIf p_current > quests.Count - 1 Then
            p_current = quests.Count - 1
        End If
        REM update active quest
        p_quest = GetQuest(p_current)

    End Set
End Property
Public ReadOnly Property QuestItem() As Quest
    Get
        Return p_quest
    End Get
End Property
The quest window comes up with the ‘Q’ key. This class is using its own Dialogue rather than sharing the global one in the main program. This has a number of advantages, not least of which is getting rid of conflicts with other parts of the game that are vying for the dialogue window. When updating the Quests class, we need to pass it the mouse state like usual, to cause the buttons to highlight and respond to click events. The code to draw the quest window is tasked with setting the properties for the Dialogue object so it displays the desired quest properties.
Public Sub updateMouse(ByVal pos As Point, ByVal btn As MouseButtons)
    p_dialog.updateMouse(pos, btn)
End Sub

Public Sub Draw()
    If Not p_enable Then
        p_dialog.Title = "No Current Quest"
        p_dialog.Message = "You do not have a quest at this time."
        p_dialog.NumButtons = 1
        p_dialog.setButtonText(1, "Close")
    Else
        p_dialog.Title = p_quest.Title
        If QuestComplete() Then
            p_dialog.Title += " (COMPLETE)"
        End If
        p_dialog.Message = p_quest.Description
        p_dialog.NumButtons = 2
        p_dialog.setButtonText(1, "OK")
        p_dialog.setButtonText(2, "Cancel")
    End If
    p_dialog.Draw()
End Sub
In order to tell when a quest’s conditions have been met, we need to add a new feature to the Inventory class that was not foreseen in the previous chapter. Inventory is self-contained and works well, but until now it has not needed to expose any of its items. Now, in order to figure out whether an item quest condition was met, we have to ask Inventory whether it has a certain item (and return the number of items held). These two new functions must be added to the Inventory class:
Public Function HasItem(ByVal name As String) As Boolean
    Dim count As Integer = ItemCount(name)
    If count = 0 Then
        Return False
    Else
        Return True
    End If
End Function
Public Function ItemCount(ByVal name As String) As Integer
    Dim count As Integer = 0
    For Each it As Item In p_inventory
        If name = it.Name Then count += 1
    Next
    Return count
End Function
Hint
The map file is not taken into account when testing the “Go To Location” field. This might be a required field in the quest editor due to the distinct possibility that a portal might take the player into a new map.
Another piece of information we need in order to test for quest conditions is the player’s current location on the map. This has been handled in the Form1 code in all of our demos up to this point, but now the time has come to move that code into the Game class so it can be used for purposes such as this. The Level class has been used with a simple level variable like so:
Private level As Level
But now we need to move this into Game. Let’s call it World, which seems appropriate.
Public World As Level
Now, in the Forml_Load startup function, the level-loading code needs to be modified like so:
game.World = New Level(game, 25, 19, 32)
game.World.loadTilemap("quest demo.level")
game.World.loadPalette("palette.bmp", 5)
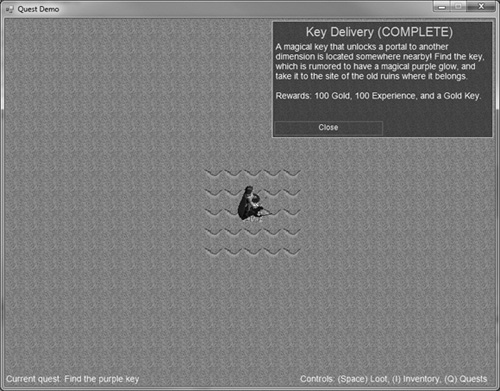
There are other areas in the program code that refer to the old level variable; they have all been changed to game.World. When a quest’s conditions have been met, the window displays a “COMPLETE” message, as you can see in Figure 19.3.
Public Function QuestComplete() As Boolean
    Dim itemcount As Integer
    Dim itemname As String
    Dim sitex, sitey As Integer

    Dim absX, absY As Integer
    Dim tileX, tileY As Integer
    REM look for required quest items
    If p_quest.RequiredItemFlag Then
        itemcount = p_quest.RequiredItemCount
        itemname = p_quest.RequiredItem
        REM check inventory for item
        Dim count = p_game.Inven.ItemCount(itemname)
        If count < itemcount Then Return False
    End If
    REM look for required location
    If p_quest.RequiredLocFlag Then
        sitex = p_quest.RequiredLocX
        sitey = p_quest.RequiredLocY
        absX = p_game.World.ScrollPos.X + p_game.Hero.X + 48
        absY = p_game.World.ScrollPos.Y + p_game.Hero.Y + 48 + 24
        tileX = absX  32
        tileY = absY  32
        If tileX <> sitex Or tileY <> sitey Then Return False
    End If
    Return True
End Function
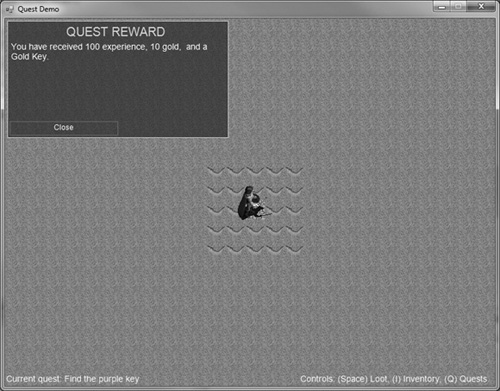
There are a few more helper functions and properties to round out the Quests class, but I’ll let you review the code in the Quests class yourself since it’s pretty basic stuff. One more thing about completing quests: we will need to remove the required quest item from the player’s inventory after the quest is complete. Figure 19.4 shows the reward message.
Over in our main program code, we handle quests with the doQuests() function:
Public Sub doQuests()
    quests.updateMouse(game.MousePos, game.MouseButton)
    quests.Draw()
    If quests.Selection > 0 Then
        quests.Visible = False
        quests.Selection = -1
        If quests.QuestComplete() Then
            Dim q As Quest = quests.QuestItem()
            reward = "You have received "
            If q.RewardXP > 0 Then

    game.Hero.Experience += q.RewardXP
    reward += q.RewardXP.ToString() + " experience"
    If q.RewardGold > 0 Then reward += ", "
End If
If q.RewardGold > 0 Then
    game.Hero.Gold += q.RewardGold
    reward += q.RewardGold.ToString() + " gold"
    If q.RewardItem <> "" Then reward += ", "
End If
If q.RewardItem <> "" Then
    game.Inven.AddItem(items.getItem(q.RewardItem))
    If q.RewardXP > 0 Or q.RewardGold > 0 Then
        reward += " and "
    End If

                reward += "a " + q.RewardItem
            End If
            reward += "."
            showDialogue("QUEST REWARD", reward, "Close")
        End If
    End If
End Sub
The end result after all of this data editing and source code? When the quest has been completed and the reward message is displayed, the reward items are also credited to the player’s assets in the form of experience, gold, and/or an item. The proof is shown in Figure 19.5. It will be unusual to grant all three as the reward for a single quest but this does show that all three reward types are working.
That concludes the quest system for Celtic Crusader. Thanks to the features already in the game, it was a piece of cake to get this up and running quickly using mainly the Dialogue class (which still looks decent but could definitely use a face-lift). A data-driven quest system is a powerful feature in a game. Although our little example didn’t explore a complete quest chain, the foundation has been laid for the example coming up in the next and final chapter.