
Viewing Debug Windows
Knowing what your application is doing is the key to resolving problems efficiently. This has to do with the old adage that knowledge is power. Several portholes allow you to peak into the viscera of your application as it cogitates. I will briefly review these here and leave the experimentation to you.
To provide you with a sufficient amount of code to debug I hacked together an object-oriented calculator. Listing 17.1 provides the code, which also appears in DebugWindowsDemo.sln. The calculator has nested classes, supports keyboard input, and uses classes for operands and polymorphic behavior for operators. For example, multiplication is represented as a MultiplicationOperator class. Because I hacked it together I am sure we will find some errors as we examine it. We will use the debugging capabilities of .NET to sleuth out as many bugs as we can in this chapter. (I'm sure you can find more. If you do find more bugs or contrive some nice revisions with refactoring, please let me know via e-mail at [email protected].)
Listing 17.1. The Verbose Calculator Code for Debugging Practice
1:  Imports System.Text.RegularExpressions
2:
3:  Public Class Form1
4:     Inherits System.Windows.Forms.Form
5:
6:  [ Windows Form Designer generated code ]
7:
8:     Private Sub Number_Click(ByVal sender As System.Object, _
9:       ByVal e As System.EventArgs) Handles Button9.Click, _
10:      Button1.Click, Button2.Click, Button3.Click, _
11:      Button4.Click, Button5.Click, Button6.Click, _
12:      Button7.Click, Button8.Click, Button10.Click
13:
14:      Calculator.SendKey(CType(sender, Button).Tag.ToString())
15:
16:    End Sub
17:
18:    Private Sub ButtonExponent_Click(ByVal sender As System.Object, _
19:      ByVal e As System.EventArgs) Handles ButtonExponent.Click
20:      Calculator.Exponentiate()
21:    End Sub
22:
23:    Private Sub ButtonClearEntry_Click( _
24:      ByVal sender As System.Object, _
25:      ByVal e As System.EventArgs) Handles ButtonClearEntry.Click
26:      Calculator.ClearEntry()
27:    End Sub
28:
29:    Private Sub ButtonEquals_Click(ByVal sender As System.Object, _
30:      ByVal e As System.EventArgs) Handles ButtonEquals.Click
31:      Calculator.Summate()
32:    End Sub
33:
34:    Private Sub ButtonClear_Click(ByVal sender As System.Object, _
35:      ByVal e As System.EventArgs) Handles ButtonClear.Click
36:      Calculator.Clear()
37:    End Sub
38:
39:    Private Sub ButtonDivision_Click( _
40:      ByVal sender As System.Object, _
41:      ByVal e As System.EventArgs) Handles ButtonDivision.Click
42:      Calculator.Divide()
43:    End Sub
44:
45:    Private Sub ButtonAddition_Click( _
46:      ByVal sender As System.Object, _
47:      ByVal e As System.EventArgs) Handles ButtonAddition.Click
48:      Calculator.Add()
49:    End Sub
50:
51:    Private Sub ButtonMultiplication_Click(ByVal sender As _
52:      System.Object, ByVal e As System.EventArgs) _
53:      Handles ButtonMultiplication.Click
54:      Calculator.Multiply()
55:    End Sub
56:    Private Sub MenuItem5_Click(ByVal sender As System.Object, _
57:      ByVal e As System.EventArgs) Handles MenuItem5.Click
58:      Close()
59:    End Sub
60:
61:    Private Sub MenuItem6_Click(ByVal sender As System.Object, _
62:      ByVal e As System.EventArgs) Handles MenuItem6.Click
63:      Clipboard.SetDataObject(TextBox1.Text)
64:    End Sub
65:
66:    Private Sub MenuItem7_Click(ByVal sender As System.Object, _
67:      ByVal e As System.EventArgs) Handles MenuItem7.Click
68:       TextBox1.Text = CType(Clipboard.GetDataObject(). _
69:         GetData(GetType(String)), String)
70:    End Sub
71:
72:    Private WithEvents Calculator As Calculator
73:    Private Sub Form1_Load(ByVal sender As Object, _
74:      ByVal e As System.EventArgs) Handles MyBase.Load
75:      Calculator = New Calculator()
76:      AddHandler Calculator.OnSendKey, AddressOf SendKeyEvent
77:    End Sub
78:
79:    Private Sub SendKeyEvent(ByVal Sender As Object, _
80:      ByVal e As CalculatorEventArgs)
81:
82:      TextBox1.Text = e.Buffer
83:    End Sub
84:
85:    Private Sub Form1_KeyPress(ByVal sender As Object, _
86:      ByVal e As System.Windows.Forms.KeyPressEventArgs) _
87:      Handles MyBase.KeyPress
88:
89:      e.Handled = Calculator.SendKey(e.KeyChar().ToString())
90:    End Sub
91:
92:    Private Sub ButtonSubtraction_Click(ByVal sender As _
93:      System.Object, _
94:      ByVal e As System.EventArgs) Handles ButtonSubtraction.Click
95:      Calculator.Subtract()
96:    End Sub
97:
98:    Private Sub ButtonSign_Click(ByVal sender As System.Object, _
99:      ByVal e As System.EventArgs) Handles ButtonSign.Click
100:     Calculator.SendKey("±")
101:   End Sub
102:
103:   Private Sub ButtonDecimal_Click(ByVal sender As System.Object, _
104:     ByVal e As System.EventArgs) Handles ButtonDecimal.Click
105:     Calculator.SendKey(".")
106:   End Sub
107:
108: End Class
109:
110: Public Class CalculatorEventArgs
111:   Inherits EventArgs
112:   Public Buffer As String
113:   Public Sub New(ByVal NewBuffer As String)
114:     Buffer = NewBuffer
115:   End Sub
116: End Class
117:
118: Public Delegate Sub CalculatorEventHandler( _
119:   ByVal Sender As Object, ByVal e As CalculatorEventArgs)
120:
121:
122: Public Class Calculator
123:
124:   Private FLeftOperand As Operand
125:   Private FRightOperand As Operand
126:   Private FLastOperand As Operand
127:   Private FResult As Operand
128:   Private FOperator As Operator
129:   Private FBuffer As String = String.Empty
130:
131:   Public Event OnClear As EventHandler
132:   Public Event OnClearEntry As EventHandler
133:   Public Event OnAdd As EventHandler
134:   Public Event OnDivide As EventHandler
135:   Public Event OnExponentiate As EventHandler
136:   Public Event OnSubtract As EventHandler
137:   Public Event OnMultiply As EventHandler
138:   Public Event OnSummate As EventHandler
139:   Public Event OnSendKey As CalculatorEventHandler
140:
141:   Public Function SendKey(ByVal Key As String) As Boolean
142:
143:     Select Case Key
144:       Case "0", "1", "2", "3", "4", "5", "6", "7", "8", "9", "."
145:         If (FRightOperand Is Nothing = False) Then
146:           FRightOperand = Nothing
147:           FBuffer = String.Empty
148:         End If
149:
150:         If (IsNumeric(FBuffer + Key)) Then
151:           FBuffer += Key
152:           DoSendKey(FBuffer)
153:         Else
154:           FBuffer = "0."
155:           DoSendKey(FBuffer)
156:         End If
157:       Case "=", Chr(13)
158:         Summate()
159:       Case "+"
160:         Add()
161:       Case "-"
162:         Subtract()
163:       Case "*"
164:         Multiply()
165:       Case "/"
166:         Divide()
167:       Case "^"
168:         Exponentiate()
169:       Case "±"
170:         Multiply(-1)
171:       Case "C"
172:         Clear()
173:       Case "E"
174:         ClearEntry()
175:     End Select
176:   End Function
177:
178:   Private Sub DoSendKey(ByVal Value As String)
179:     RaiseEvent OnSendKey(Me, New CalculatorEventArgs(Value))
180:   End Sub
181:
182:   Private Sub ClearBuffer()
183:     FBuffer = String.Empty
184:     DoSendKey("0.")
185:   End Sub
186:
187:   Public Property LeftOperand() As Double
188:   Get
189:     Return FLeftOperand.Number
190:   End Get
191:   Set(ByVal Value As Double)
192:     FLeftOperand = New Operand(Value)
193:     FLastOperand = FLeftOperand
194:   End Set
195:   End Property
196:
197:   Public Property RightOperand() As Double
198:   Get
199:     Return FRightOperand.Number
200:   End Get
201:   Set(ByVal Value As Double)
202:     FRightOperand = New Operand(Value)
203:     FLastOperand = FRightOperand
204:   End Set
205:   End Property
206:
207:   Public ReadOnly Property Result() As Double
208:   Get
209:     Return FResult.Number
210:   End Get
211:   End Property
212:
213:   Public Sub ClearEntry()
214:     FLastOperand = Nothing
215:
216:     RaiseEvent OnClearEntry(Me, EventArgs.Empty)
217:   End Sub
218:
219:   Public Sub Clear()
220:     FLeftOperand = Nothing
221:     FRightOperand = Nothing
222:     FLastOperand = Nothing
223:     FOperator = Nothing
224:     ClearBuffer()
225:     RaiseEvent OnClear(Me, EventArgs.Empty)
226:   End Sub
227:
228:   Public Sub Add()
229:     If (Not ValidOperation(New AdditionOperator())) Then Return
230:     RaiseEvent OnAdd(Me, EventArgs.Empty)
231:   End Sub
232:
233:   Public Sub Subtract()
234:     If (Not ValidOperation(New SubtractionOperator())) Then Return
235:     RaiseEvent OnSubtract(Me, EventArgs.Empty)
236:   End Sub
237:
238:   Public Sub Divide()
239:     If (Not ValidOperation(New DivisionOperator())) Then Return
240:     RaiseEvent OnDivide(Me, EventArgs.Empty)
241:   End Sub
242:
243:   Public Sub Multiply()
244:     If (Not ValidOperation( _
245:       New MultiplicationOperator())) Then Return
246:     RaiseEvent OnMultiply(Me, EventArgs.Empty)
247:   End Sub
248:
249:   Public Sub Multiply(ByVal Value As Integer)
250:     If (IsNumeric(FBuffer)) Then
251:       FBuffer = (-1 * Convert.ToDecimal(FBuffer)).ToString()
252:       DoSendKey(FBuffer)
253:     End If
254:   End Sub
255:
256:   Public Sub Exponentiate()
257:     If ( Not ValidOperation( _
258:       New ExponentiationOperator())) Then
259:       Return
260:       RaiseEvent OnExponentiate(Me, EventArgs.Empty)
261:     End If
262:   End Sub
263:
264:   Private Function ValidOperation(ByVal Op As Operator)
265:     ' Case where we have a complete equation
266:     If (IsValid()) Then
267:       FLeftOperand = _
268:         FOperator.Perform(FLeftOperand, FRightOperand)
269:       If (TypeOf Op Is SummationOperator = False) Then
270:         FOperator = Op
271:         FBuffer = String.Empty
272:         FRightOperand = Nothing
273:       End If
274:       DoSendKey(FLeftOperand.Text)
275:       Return True
276:     ' Case where we have no operands
277:     ElseIf (FLeftOperand Is Nothing And IsNumeric(FBuffer)) Then
278:       FLeftOperand = New Operand(Convert.ToDecimal(FBuffer))
279:       FOperator = Op
280:       FBuffer = String.Empty
281:       Return True
282:     ' Case with a LeftOperand, no RightOperand, but one is ready
283:     ElseIf (FLeftOperand Is Nothing = False) Then
284:       If (IsNumeric(FBuffer)) Then
285:         FRightOperand = New Operand(Convert.ToDecimal(FBuffer))
286:         Return ValidOperation(Op)
287:       Else
288:         FOperator = Op
289:         FBuffer = String.Empty
290:         Return True
291:       End If
292:     Else
293:       Return False
294:     End If
295:   End Function
296:
297:   Public Sub Summate()
298:     If (Not ValidOperation(New SummationOperator())) Then Return
299:     RaiseEvent OnSummate(Me, EventArgs.Empty)
300:   End Sub
301:
302:   Private Function IsValid() As Boolean
303:     Return (FLeftOperand Is Nothing = False) And _
304:       (FRightOperand Is Nothing = False) And _
305:       (FOperator Is Nothing = False)
306:   End Function
307:
308:   Public Class Operand
309:     Private FNumber As Double
310:     Private FSet As Boolean
311:
312:     Public Sub New(ByVal Value As Double)
313:       Number = Value
314:     End Sub
315:
316:     Public Property Number() As Double
317:     Get
318:       Return FNumber
319:     End Get
320:     Set(ByVal Value As Double)
321:       FNumber = Value
322:       FSet = True
323:     End Set
324:     End Property
325:
326:     Public Overridable Property Text() As String
327:     Get
328:       Return FNumber.ToString()
329:     End Get
330:     Set(ByVal Value As String)
331:       FNumber = Convert.ToDecimal(Value)
332:     End Set
333:     End Property
334:
335:     Public ReadOnly Property IsSet() As Boolean
336:     Get
337:       Return FSet
338:     End Get
339:     End Property
340:
341:     Public Sub ChangeSign()
342:       FNumber *= -1
343:     End Sub
344:
345:     Public Sub Clear()
346:       FNumber = 0.0
347:       FSet = False
348:     End Sub
349:   End Class
350:
351:   Private MustInherit Class Operator
352:     Public Function Perform( _
353:       ByVal Left As Operand, ByVal Right As Operand) As Operand
354:       Return New Operand(GetResult(Left, Right))
355:     End Function
356:
357:     Protected MustOverride Function GetResult( _
358:       ByVal Left As Operand, ByVal Right As Operand) As Double
359:
360:     Public Overridable ReadOnly Property Sign() As String
361:     Get
362:       Return String.Empty
363:     End Get
364:     End Property
365:   End Class
366:
367:   Private Class MultiplicationOperator
368:     Inherits Operator
369:     Protected Overrides Function GetResult( _
370:       ByVal Left As Operand, ByVal Right As Operand) As Double
371:       Return Left.Number * Right.Number
372:     End Function
373:
374:     Public Overrides ReadOnly Property Sign() As String
375:     Get
376:       Return "*"
377:     End Get
378:     End Property
379:   End Class
380:
381:   Private Class DivisionOperator
382:     Inherits Operator
383:     Protected Overrides Function GetResult( _
384:       ByVal Left As Operand, ByVal Right As Operand) As Double
385:       Return Left.Number / Right.Number
386:     End Function
387:
388:     Public Overrides ReadOnly Property Sign() As String
389:     Get
390:       Return "/"
391:     End Get
392:     End Property
393:   End Class
394:
395:   Private Class MultiplicationOperand
396:     Inherits Operator
397:     Protected Overrides Function GetResult( _
398:       ByVal Left As Operand, ByVal Right As Operand) As Double
399:       Return Left.Number * Right.Number
400:     End Function
401:
402:     Public Overrides ReadOnly Property Sign() As String
403:     Get
404:       Return "*"
405:     End Get
406:     End Property
407:   End Class
408:
409:   Private Class SubtractionOperator
410:     Inherits Operator
411:     Protected Overrides Function GetResult( _
412:       ByVal Left As Operand, ByVal Right As Operand) As Double
413:       Return Left.Number - Right.Number
414:     End Function
415:
416:     Public Overrides ReadOnly Property Sign() As String
417:     Get
418:       Return "-"
419:     End Get
420:     End Property
421:   End Class
422:
423:   Private Class AdditionOperator
424:     Inherits Operator
425:     Protected Overrides Function GetResult( _
426:       ByVal Left As Operand, ByVal Right As Operand) As Double
427:       Return Left.Number + Right.Number
428:     End Function
429:
430:     Public Overrides ReadOnly Property Sign() As String
431:     Get
432:       Return "+"
433:     End Get
434:     End Property
435:   End Class
436:
437:   Private Class ExponentiationOperator
438:     Inherits Operator
439:     Protected Overrides Function GetResult( _
440:       ByVal Left As Operand, ByVal Right As Operand) As Double
441:       Return Left.Number ^ Right.Number
442:     End Function
443:
444:     Public Overrides ReadOnly Property Sign() As String
445:     Get
446:       Return "^"
447:     End Get
448:     End Property
449:   End Class
450:
451:   Private Class SummationOperator
452:     Inherits Operator
453:
454:     Protected Overrides Function GetResult( _
455:       ByVal Left As Operand, ByVal Right As Operand) As Double
456:       Return 0
457:     End Function
458:
459:     Public Overrides ReadOnly Property Sign() As String
460:     Get
461:       Return "="
462:     End Get
463:     End Property
464:   End Class
465:
466: End Class
|
I will elaborate on the code in Listing 17.1 as we proceed through the chapter. Normally I hate to put huge listings in a book. (Thick books are hard to carry around.) However, in this case I included everything (except the Windows Form Designer generated code) to illustrate the point that even moderately simple applications can yield huge numbers of lines of code that are extremely difficult to debug if the only tool you have is the ability to read the code. (I am working on a .NET project that will probably be a couple of hundred thousand lines when we are done.) Thus the more tools you can use to debug your code—and the simpler your code is—the more likely you will be able to resolve your problem in a timely manner.
Using the Locals and Autos Windows
Several windows let you examine your code as it runs. When your program is running in the IDE these windows are accessible through the Debug|Windows menu. Two such windows are the Locals and Autos windows. The Locals window shows all the variables defined within the current scope and context. The Autos window shows variables used in the previous and current statements. You can open either of these windows and modify values when your program is in break mode. Another helpful feature is that both the Locals window and the Autos window will show the return results of any functions within a particular function. If you think the return result of a function is causing your problems, you can modify the return result in either window and that new value will be returned from the function.
The most direct use of the Locals and Autos windows is to see what is going on with the currently relevant variables. If you use the Watch window (see the Using the Watch Window subsection below) to view contextually relevant values, you will have to add them to the Watch window, whereas contextually relevant variables are already in the Locals and Autos windows.
I used the Locals window to figure out why my ± button wasn't toggling the sign of the number in the calculator window. I wrote the original code as Calculator.SendKey(241.ToString()). I often get into trouble with things like ASCII key codes. Invoking ToString on a literal digit returns the string representation of that digit. Thus 241.ToString() yields 241. As a result I was sending the literal value 241 when what I wanted to send was the escaped code for ±. Since I couldn't recall how to get the special character into the editor, to get the job done quickly I had cheated and copied the special character from this Word document and pasted it as a string into my application. The Locals window showed me what was wrong—I had 241 instead of ± for the key value. Unfortunately the Locals window didn't tell me how to fix the problem.
Using the QuickWatch Window
The QuickWatch window is the debug window I use habitually. This window is hooked to Shift+F9 if your keyboard scheme is set to Visual Basic 6. (The default is Ctrl+Alt+Q, which is really confusing if people on the same project use different keyboard schemes and you begin typing on their keyboards.)
TIPYou can always access the QuickWatch window by selecting Debug|QuickWatch. |
Select a variable or expression in break mode and open the QuickWatch window. The expression and the evaluated name, value, and data type will be displayed in the window. You can enter new expressions or drill down into existing ones. Figure 17.1 shows the QuickWatch window for the sender argument of an event handler.
Figure 17.1. The QuickWatch window with the sender argument entered as the expression.
To simplify the calculator's code for the numeric keypad I used a trick that many programmers have used. I placed the value of the numeric button in the button's Tag property. The problem I encountered was that I kept getting 8 when I clicked the 9 button. I assumed correctly that I must have placed 8 in the 9 button's Tag property. The application was already running—otherwise I could have inspected Tag in the Properties window—so I added a breakpoint to line 14. By pressing the 9 button I forced the application to break and could quickly check the value of the Tag property.
Using QuickWatch is a good way to quickly verify (or not) an assumption about your application's state. There are some other ways too, but the QuickWatch window is the one I find most useful.
Using the Watch Window
The Watch window plays big brother to the QuickWatch window. The Watch window supports adding many expressions at a time, permitting you to observe the state of every value as your application runs. The items you add to the Watch window can be simple variables, complex objects, or expressions—including method calls—that yield a value. In this context all these things are referred to as expressions.
The Watch window is displayed at runtime from the Debug|Window|Watch menu item. You can add items to the Watch window by right-clicking on some code and selecting Add Watch or by typing the expression directly into the Watch window. The Watch window shown in Figure 17.2 contains an event argument, the value of the calculator's current LeftOperand, and a call to the shared regular expression Regex.IsMatch function. The last watch will let me know if there are any more instances of the Tag property with nonnumeric values. As you can tell from the last watch value, the expressions in the Watch window can be relatively complex. The Watch window will accept most expressions written in Visual Basic. Refer to the Visual Studio .NET help topic “Expressions in Visual Basic” for complete details.
Figure 17.2. Adding expressions to the Watch window.
Up to four Watch windows can be open at once, and you can add expressions to any one of them. I generally use only one Watch window at a time but perhaps slightly younger, more nimble minds can more easily focus on many tasks at a time.
Using the Memory Window
The Memory window shows a memory dump. This kind of window was really quite helpful in assembly language, C, and C++ programming because we used a lot of pointers and addresses in those languages. I don't have occasion to use the Memory window too often in Visual Basic .NET, but it is there if you need it.
Using the Call Stack Window
The Call Stack window shows a stack of the recent method invocations that got you to the current point in your program. If you click on any line in the Call Stack window (Figure 17.3), the IDE will take you to that line of code. If the point in the stack is inside the CLR, you will be taken to a Disassembly window (see the related subsection below). The Disassembly window won't be that helpful even if you read assembly language because you can't modify the CLR. However, lines set in bold in the Call Stack window represent lines of source code you can edit.
Figure 17.3. The Call Stack window showing the recursive nature of the calculator's ValidOperation method.
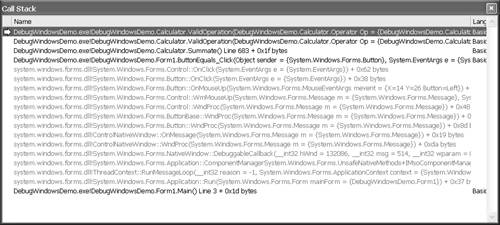
The Call Stack window shows you the actual branch conditions taken by your application as it is running. This window is especially helpful for finding infinite loops because such an error will show up as a long list of calls to the same method.
You can insert breakpoints, run to a specific point in the Call Stack window, or show the Disassembly window all from the Call Stack window's context menu.
Using the Disassembly Window
Some languages like Object Pascal and C++ support integrating assembly language code. For example, Delphi's Object Pascal supports inline assembly interspersed with the Pascal code. However, Visual Basic .NET does not support mixing in assembly. Unless you are curious about what your Visual Basic code looks like as assembly or you want to see how many lines of assembly language a particular algorithm yields, you probably won't need this window much.
Using the Immediate/Command Mode Window
Probably all Visual Basic developers are familiar with the Immediate window. The Immediate window lets you enter VB .NET code directly in this window, and the IDE will execute the code. (Your application has to be running and in break mode for this to work.) What you may not be familiar with is the dual nature of the Immediate window in .NET.
When you select Debug|Window|Immediate, you get the Command window in Immediate mode. When you select View|Other Windows|Command Window, you get the Command window in Command mode. In reality they are the same window with different capabilities. Command mode is indicated by the presence of a > prompt. In Immediate mode that prompt is absent and the Command window caption reads “Command Window - Immediate”. You can switch from Command mode to Immediate mode by typing the command Immed. You can switch from Immediate mode to Command mode by typing >cmd without the quotes.
So what can you do with this dual-mode window? I am glad you asked. In Immediate mode you can do many of the things you could do in VB6's Immediate window. For the most part you can run code, evaluate expressions, and print variable values. In Command mode, however, you can send commands to Visual Studio itself. For example, you can use Command mode to bypass the menus or send commands for menu items that don't appear in the menus.
The number of commands is huge. Fortunately when you begin typing a command an alphabetized drop-down list of commands appears. For example, if you type File.AddNewItem in the Command window, the Add New Item dialog will magically appear. Type just g for Go to resume your application after a breakpoint. If you type alias, you will see a list of shortcut aliases for longer commands, as is the case with alias g for Debug.Start (Figure 17.4). Another command that is not on the menu is Tools.Shell, aliased by shell. For example, shell cmd opens a DOS command prompt, and shell devenv opens another instance of Visual Studio .NET.
Figure 17.4. The alias command will list aliases, display the value of an alias (shown), or set new aliases.

There are many interesting capabilities available directly from the Command window. If you need a break from programming, you may find some commands useful for the way you work. For example, the Tools.LogCommandWindowOutput command (alias log) allows you to send all input to and output from the Command window to an external text file. This might be useful when you need to go back and verify the things you have tried to solve a problem or to double-check the results of expressions you have previously examined. The syntax for log is log filename [on|off] [/overwrite], where filename is the name and path of the log file, on and off indicate whether logging is on or not, and overwrite sets up an overwrite of an existing file with the same name. The complete list of commands is too extensive to cover here; refer to the “Visual Studio Commands” help topic for more details.
NOTEVB6 supported expressions in the Immediate window at design time, whereas VB .NET does not. Another difference you might notice is that the Immediate window in Visual Studio .NET does not support Intellisense. In Visual Studio 6 the equivalent of Intellisense provided information about the objects and methods entered in the Immediate window. |
Using the Output Window
The Output window (accessed by selecting View|Other Windows|Output) is used for a variety of purposes in the IDE. The most common uses are to show the build and compiler information and to display information from Debug.Write and Debug.WriteLine statements. The combobox at the top of the Output window can be used to select Output panes. There may be multiple panes to choose from depending on which tools in the IDE are using the Output window; by default you should see both Debug and Build choices in the panes combobox.