
When it comes to unit testing, Visual Studio has always been tightly tied to the MSTest framework. The inclusion of a unit test framework inside Visual Studio has been excellent. It has encouraged developers to improve their quality by writing tests to prove code functions as expected. On the flip side, many developers regard MSTest as an inferior unit test framework when compared with other test frameworks such as NUnit, XUnit, MbUnit, et al. The problem stems from the fact that MSTest does so much more than unit testing and as a result suffers from poor speed and bloat. Additionally, its assertion methods are fragmented across multiple classes and it has a cumbersome approach to data-driven tests and expected exceptions. MSTest has also been tied to the release cycle of Visual Studio, so updates have been very slow and it lags behind when compared to the other test frameworks.
Microsoft is ending the tight coupling between Visual Studio and MSTest by making the unit test framework pluggable. MSTest is still provided out of the box but now developers can choose the framework that they like most, on the proviso that their choice of framework implements a Visual Studio adapter.
Microsoft is also removing Test Impact Analysis from Visual Studio (it's still there in Microsoft Test Manager) and replacing it with a Continuous Testing style feature instead. Continuous Testing is an approach that has been gaining popularity because of the incredibly rapid feedback cycle it gives developers. The idea is that each time a change is saved in the source files, the unit tests are run to see if anything has broken. This works well with dynamic languages such as Ruby, however as .NET is a static language, this approach is not so simple. In Visual Studio 2012, instead of having all tests run whenever the source is saved, you can have them run automatically each time the code is compiled.
In this recipe, you will use the XUnit testing framework in a test first manner to implement a very simple calculator and you'll see how the Continuous Testing feature works. The important part of this recipe isn't so much the code you will write but in seeing how Visual Studio 2012 can change your development practices when it comes to unit testing. Let's get to it!
Install the xUnit.net runner for Visual Studio 2012 Visual Studio extension. You can do so via the Tools | Extensions and Updates menu option (search for xUnit) or download the .vsix file from the Visual Studio gallery and install it manually (http://visualstudiogallery.msdn.microsoft.com/463c5987-f82b-46c8-a97e-b1cde42b9099).
In Visual Studio 2012, create a new C# Class Library and name it UnitTests.
- Use NuGet to add the
xUnit.netpackage to your project. See the Managing packages with NuGet recipe in this chapter for how to do this. - Rename
Class1.cstoCalculatorOperations.cs. You will be prompted to rename all references toClass1. Click on Yes so that Visual Studio will renameClass1toCalculatorOperationsin the code itself. - In the
CalculatorOperationsclass file add the following test method. Don't worry that the code won't compile yet. In a test-driven approach you write the tests first to work out how your code should behave before you implement anything.
- You now need to add a
Calculatorclass, but you probably don't want it in your test assembly. Add a new C# class library to the Unit Test solution and call itCalculationEngine. - Rename
Class1.cstoCalculator.csand, when prompted, allow Visual Studio to renameClass1toCalculator. - Switch back to the
UnitTestsproject and add a project reference to theCalculatorproject. - Place the cursor on the
Calculator()constructor call in the unit test and either mouse over and click the actions drop down or press Ctrl+. to show the available actions. Select the using CalculationEngine; option to add the requiredusingstatement to your test code. - Now place the cursor on the
Add()method on the next line and bring up the available tasks. Again, do this either by hovering over the code with the mouse and then clicking the options drop down when it appears or by pressing Ctrl+. and selecting the only available option to generate the method stub. - Open the Test Explorer via the Test | Windows | Test Explorer menu option.
- Select the Run All option in the Test Explorer to compile the code and run the tests in the project for the first time.
- The unit test should fail at this point because the method stub you generated for the Add method simply throws a
NotImplementedException.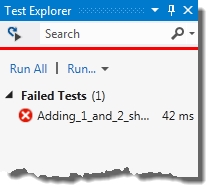
- Turn on the continuous testing option by either selecting Test | Test Settings | Run Tests After Build from the menu or clicking the icon in the top left of the Test Explorer.
- Switch to the
Calculatorclass file and implement theAdd()method by using the code shown in the following screenshot: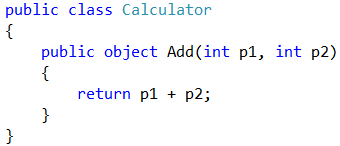
- Press Ctrl+Shift+B to rebuild the solution. Right-clicking the solution and selecting Build All will have the same result.
- Watch the Test Explorer. It will automatically rerun the unit tests without you having to do anything. Fantastic!

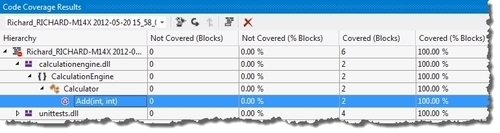
- To wrap things up, check your code coverage. Click on the Run drop-down box in the Test Explorer and select Analyze Code Coverage.
- The solution will be recompiled with coverage enabled, the unit tests will be run again, and the results then displayed in the Code Coverage Results window as shown in the following screenshot:
Visual Studio no longer needs a special project type for unit tests. The test adapters take care of the discoverability aspects for you. The adapter driven approach has also allowed Microsoft to create a unit test optimized version of MSTest that is fast and light and can be used in standard class libraries without a problem. There is no need for special unit test projects any more, or any of the .vsmdi and .testsettings files that you're used to.
You can also mix and match your unit test frameworks. It is entirely valid to have MSTest, xUnit, and NUnit tests in one assembly. For example, you may have a suite of older tests in one framework and you want to transition to a new framework without reworking all those old tests. Now you can, without any problem at all.
Out of the box, Visual Studio 2012 only supports the MSTest framework, however adapters are available in the Visual Studio Gallery for the major test frameworks, and the Chutzpah test adapter adds support for both the qUnit and Jasmine JavaScript unit test frameworks.
As mentioned, MSTest no longer requires a TestSettings file for unit test projects. If you add a new Unit Test project to your solution you simply get a class library project
with a reference already added to Microsoft.VisualStudio.QualityTools.UnitTestFramework.
The changes in the test runner are fairly dramatic and with it come a number of other changes you should be aware of.
In many projects it is common to have unit tests in one test project and integration tests in a second project. Unit tests are considered to be those tests that execute entirely in memory and have no interactions with external systems such as the network, filesystem, screen, or database. Integration tests are those tests that interact with external systems.
If you want to restrict the tests that run so that only unit tests run, and slower integration tests are excluded, you will need to use the Test Explorer filter to limit the tests to run. If you have your unit and integration tests in separate assemblies then the FullName filter is likely to be the filter that will help you the most.
In .NET 4.5, MSTest now supports asynchronous tests that make use of the await keyword.
You can see this in the following code where the method signature is no longer a public void method, but rather an async Task:
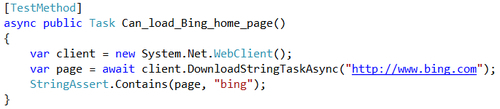
The asynchronous test ensures that the test runner will wait for the test to end before starting the next test. It does not mean that, multiple tests will be run in parallel, just that you can test methods that use async and await.