
With the release of Visual Studio 2010, Microsoft announced that the Visual Studio Installer project template would no longer ship with Visual Studio and, true to their word, there is no Visual Studio Installer project in Visual Studio 2012.
So, what are you meant to do if you need to create an installer package for your application?
If you are creating a Windows Store app then you don't need an installer, as the new deployment model makes installers obsolete. If you are creating a web application then Microsoft would prefer you either use XCopy deployment or the MSDeploy web deployment technology, which means installers are only required for desktop applications, and even for those there's the Click Once deployment technology to make things easier. Even then, there are a set of desktop applications that require installer packagers and if you are building one of those, Microsoft has partnered with InstallShield and included the InstallShield Limited Edition project type in Visual Studio 2012 that you can use. If you don't want to use InstallShield you can always fall back to using WiX for creating projects.
In this recipe we will use InstallShield LE to create an installer package for a simple application.
The recipe assumes you haven't yet installed InstallShield Limited Edition. If you have, then some of the early steps in this recipe will be different.
Simply start Visual Studio 2012, and you're ready to go.
Create an installer using these steps:
- Create a newVisual C# | WPF Application project and name it
SimpleWPFApplication. - Go to the project properties page by right-clicking on the project in Solution Explorer and selecting Properties. In the Application tab set the icon for the application to either an icon of your choice or the icon located at
C:Program Files (x86)Microsoft Visual Studio 11.0Common7IDEItemTemplatesCSharpGeneral1033IconIcon.ico. - Build the solution to make sure it compiles properly. If you have already installed InstallShield Limited Edition you can jump down to step 7.
- Right-click on the solution and add a new project using the Other Project Types | Setup and Deployment | Enable InstallShield Limited Edition template.
- A browser window will appear with instructions on how to enable InstallShield in Visual Studio 2012. Click on the link to redirect to the InstallShield website, register your details, and download the file as directed. When the download completes, save your solution, close Visual Studio 2012, and then run the InstallShield setup executable.
- Restart Visual Studio 2012 and open the solution you created in Step 1.
- Right-click on the solution in Solution Explorer and choose Add | New Project from the context menu. In the Add New Project dialog, choose Other Project Types | InstallShield Limited Edition | InstallShield Limited Edition Project, give it the default name, and then click on OK.
- If this is the first time you have used InstallShield since it was installed you will be asked whether you wish to evaluate or register. Choose to register and activate the product using the serial number you should have received in your e-mail.
- The InstallShield project assistant will appear in the document window.
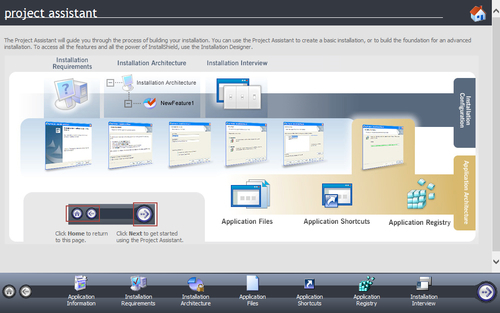
- Click on the right arrow (the "next" button) at the bottom of the project assistant to advance to the Application Information page. Enter a company web address such as www.company.com.
- Advance through the project assistant until you get to the Application Files page. Select the My Product Name node from the tree and then click on Add Project Outputs.
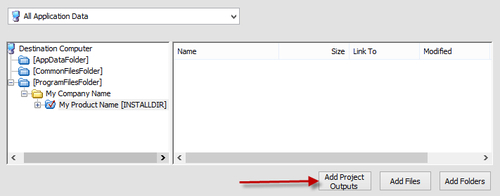
- In the Visual Studio Output Selector dialog, select the Primary output item and click on OK.
- Click on the next button to go to the Application Shortcuts page. Click on the New button to add a shortcut to your application. Choose [ProgramFilesFolder]My Company NameMy Product NameSimple WPF Application.Primary output from the dialog and click on Open.
- The shortcut is named Built by default. That's not very useful, so click the shortcut name to edit it and rename it to
SimpleWPFApplication. - Right-click on the
Setup1project in Solution Explorer and select Install from the menu. If prompted to build out of date projects, click on Yes.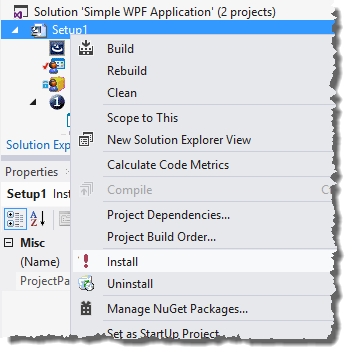
- Step through the setup wizard to install the program. Verify that the program is installed correctly by looking for the application in your Start Menu or Start Page.

- Remove the program from your system by right-clicking on the
Setup1project and selecting Uninstall.
InstallShield reduces the complexity in creating installers by providing a set of sensible default configuration options and an easy to use user interface. It also understands exactly how the Windows installer system works and warns when there are problems in how you have configured the installation process. For example, if you look at the warning outputs from the recipe when the package was built, you would have seen a warning about the .NET Framework and how it would be a good idea if that was included with the setup kit to ensure people who don't have .NET already installed won't have extra setup dependencies.
While you can achieve the same result using WiX, the amount of work required to get the XML written and debugged to achieve the same result would have made this a much, much longer recipe!
A license for the Limited Edition is provided free of charge with Visual Studio 2012 and will be sufficient for the basic installation purposes. If you need a heavily customized installation process then you should investigate the more advanced versions of InstallShield or competing offerings such as Nullsoft's NSIS.