
Chapter 5: Five Handy Tips when Starting Out with Vue
by David Bush
I originally came to the world of Vue from ReactJS. Learning to divide my page up into small, reusable components and how to leverage the component lifecycle represented a shift in approach to problems, but I quickly got proficient.
React Native allowed me to write apps for both major smartphone platforms, which made it a slam dunk for me. But I kept hearing about how great Vue was. Crucially, I noticed no one I spoke to had anything bad to say about it, and experience tells me that the absence of multiple people having qualms with a language or framework means it should be investigated immediately, so I did.
These are the things I wish I’d known when I was starting out.
Incremental Adoption
In my many years of programming, I’ve seldom found it a trivial undertaking to switch out an entire view layer. While I was keen to try Vue, I wasn’t prepared to initiate a whole rewrite to do so. I was exceedingly happy to learn that, with Vue, you don’t have to! You can incrementally add it to projects with a piecemeal rewrite simply by including the library file and adding components. This allows you to add new features and leverage its many strengths without having to throw out your current code, so there’s no excuse not to try it!
Devtools
One thing I found useful was the addition of Vue Devtools to my browser (available on both Firefox and Chrome). It renders superfluous those cumbersome console.log() debug calls by instead showing you the contents of each component in your devtools pane. It also affords you the ability to jump directly to a component in your editor (admittedly with a little tweaking) which I’ve found to be an absolutely killer feature, particularly in larger projects. Here’s a screenshot of it in action:
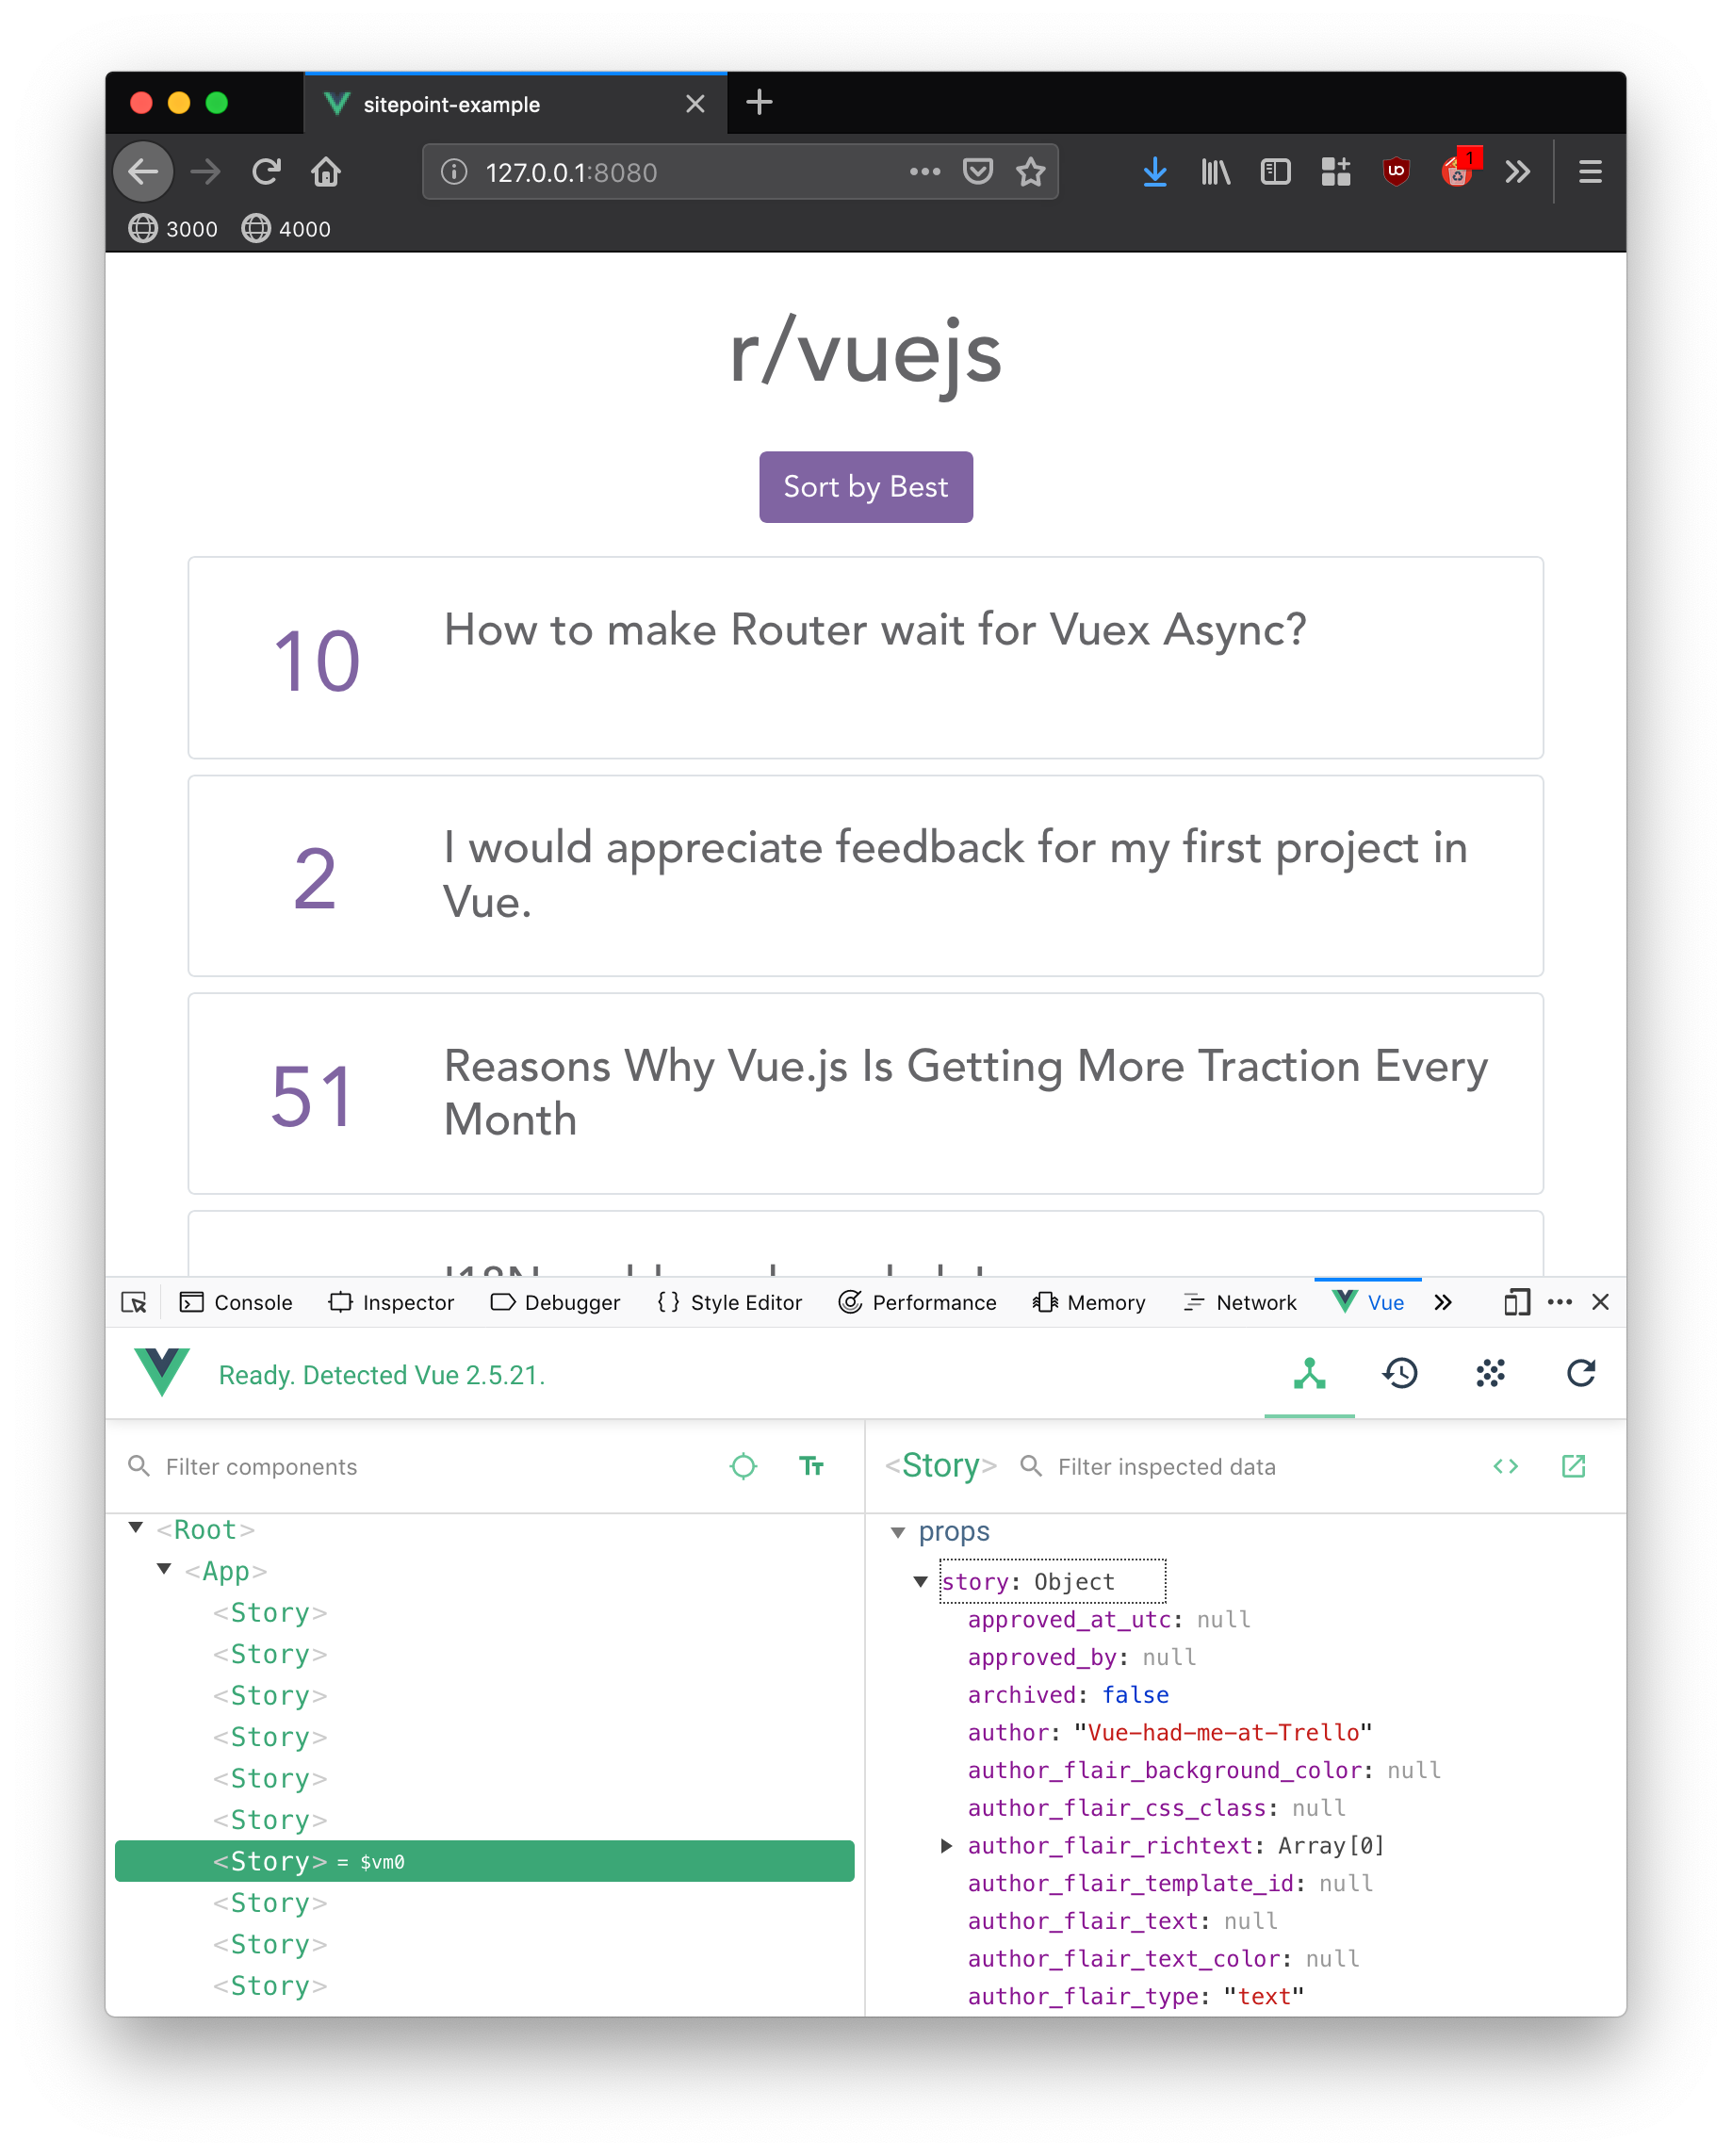
As you can see, everything passed down to the component is immediately visible; there’s no need for debugging code of any sort. But that’s not all! Much like you might be used to doing with rendered HTML or CSS, you can edit Vue components directly in the browser: add values to your props, modify them, or perhaps remove them entirely to see how your app responds. I do almost all of my development in a terminal window, but I’m finding myself taking advantage of this in-browser, instant feedback loop more and more frequently. To my mind, there’s no higher praise than willingly modifying your own workflow to leverage a tool.
Additionally, component navigation is outstanding. Not only is there an Inspect Vue component option in the context menu, there’s also a fuzzy search to filter your components by name, which is a very nice touch. You can also see the history of your Vuex state and “time travel” back to any given point (which is an invaluable tool when debugging issues rooted in complex state changes). Another useful feature is a tab to track Custom Events from your own components (those of the this.$emit('YourEvent') variety), but lamentably not native events like <button v-on:click="counter += 1">Add 1</button>:

Avoid Event Buses
I find Vue’s native mechanism of passing state to be excellent, but inevitably, as your app scales, you’re going to need the same data in multiple different places and that’s going to be unwieldy. The typical example of this is the instance of data sharing between sibling components, or even two components that aren’t related in any way. One project I worked on recently needed to access a category field, both on a list item and in a “grouping” view elsewhere. Vuex is frequently an elegant solution to problems of this nature, because it adroitly sidesteps the constraints inherent in passing data via parent and child relationships.
I must admit that there was a time in my life where I would reach straight for an event bus rather than delve into Flux architecture. I had read from a few people on Hacker News that Flux, and, by extension, Redux and Vuex, were complicated to pick up, and as a result, avoided them for as long as possible. Finally, I sat down to get my head around it and I wish someone had told me this: “It’s just the Command Pattern”. That’s pretty much much all there is to it. As you may know, you write commands (or “Actions” in Flux parlance) which are executed (by the “Dispatcher” in this case), and the result is passed to a receiver (a Store) at a later time. I’m pleased to report that once I need to manage any degree of state that’s more complex than “pass props down the hierarchy”, I reach for Vuex. Try it: it’s really not as complicated as you may have heard!
Vue CLI
Vue CLI is a relatively new addition to the Vue roster, but I can’t speak highly enough of it. I’ve lost many hours over the last couple of years fiddling with configurations and integrating libraries correctly, so to be able to effortlessly scaffold an app and be up and running is a breath of fresh air. Simply run vue create <app_name> and you’ll be prompted to select various options which are installed and configured for you. Out of the box, it will set you up with Babel and ESLint (both are absolute musts to my mind), but you can customize your setup to include a variety of extras out of the box. Here’s a quick rundown of the options available to you (as of version 3.2.1):
- impose a degree of type safety on your project with Typescript
- leverage Progressive Web Apps for mobile support
- seamlessly route your single page app with Vue Router
- manage more complex levels of state with Vuex
- make writing CSS more pleasant with CSS Preprocessors, including Sass/SCSS, Less and Stylus flavors
- pick your linting options from Typescript, various degrees of ESLint strictness (ranging from “error prevention only” all the way to my personal favorite, the Airbnb config)
- ensure code stability with Mocha and its BDD cousin Chai, or Facebook’s Jest
- there’s even end-to-end testing options in Cyprus or Nightwatch
This setup even gives you the option to “Save this as a preset for future projects”, which is useful once you’ve developed a preferred stack. Check out “Getting Started with Vuex: a Beginner’s Guide” in this Vue series for more Vue CLI goodness.
Computed Properties
When I first started using Vue, I put all my rendering helpers in functions and called them from the template. As my projects grew, this quickly became unwieldy and I searched for a better way. Enter computed properties, which are the idiomatic way of declaring more complex logic relating to calculation of anything to be rendered on the page. They have the added benefit of de-cluttering your template (and while it may be an unpopular opinion in modern JS, I firmly believe in separating the concerns of my presentation logic and rendering code where possible). Let’s walk through it with a quick example.
Here’s the VueJS subreddit. I’m going to wget https://www.reddit.com/r/vuejs.json and put that in a file, but if you’re playing along at home, there’s nothing to stop you using this as a basis for writing your own Vue-based Reddit interface and registering for an API key.
Let’s render it on the page:

So far, so good. Now let’s add an option to sort by score. Here’s my code, in case you’d like to emulate it (you’ll want to add Bootstrap to your project).
App.vue
<template>
  <div id="app" class="container">
    <h1 class="list-title">r/vuejs</h1>
    <button v-on:click="sortHottest = !sortHottest" class="btn btn-primary btn-sort">
      {{ sortHottest ? "Sort by Best" : "Sort by Hottest" }}</button>
    <div v-for="story in sortHottest ? sortByHottest : sortByBest" v-bind:key="story.data.id" >
      <Story v-bind:story="story.data" />
    </div>
  </div>
</template>

<script>
import Story from './components/Story.vue'
import stories from './vue_stories.json'

export default {
  name: 'app',
  data: () => {
    return {
      // Submissions from JSON file (but you can switch it for an API call if you set up an API key):
      stories: stories.data.children,
      // Initial sort order of stories:
      sortHottest: true
    }
  },
  components: {
    Story
  },
  computed: {
    sortByBest: function () {
      // Sorts by score, descending. We use slice() to make a copy of the list to avoid mutating state:
      return this.stories.slice().sort((a, b) => b.data.score - a.data.score)
    },
    sortByHottest: function () {
      // The real Reddit 'Hottest' algorithm is a function of votes and submission-time over a delta.
      // We'll skip all that for this example and just return the list as we got it (which was already
      // sorted by 'hottest'!)
      return this.stories
    }
  }
}
</script>

<style>
#app {
  font-family: 'Avenir', Helvetica, Arial, sans-serif;
  -webkit-font-smoothing: antialiased;
  -moz-osx-font-smoothing: grayscale;
  text-align: center;
  color: #656568;
  margin-top: 1.5em;
}
.list-title {
  margin-bottom: 0.5em;
  font-size: 3em;
}

.btn-sort {
  margin-bottom: 0.6em;
  background-color: #8064A2 !important;
  border-color: #8064A2 !important;
}
</style>
components/Story.vue
<template>
    <div class="row border rounded story">
      <div class="col-2">
        <p class="score">{{ story.score }}</p>
      </div>
      <div class="col-10 text-left title">
        <h4>{{ story.title }}</h4>
      </div>
    </div>
</template>

<script>
export default {
  name: 'Story',
  props: {
    story: Object
  }
}
</script>

<style scoped>
.score {
  margin-left: 0.3em;
  margin-top: 0.5em;
  font-size: 2.8em;
  color: #8064A2;
}
.title {
  margin-top: 1.5em;
}

.story {
  margin-top: 0.5em;
  border-width: 3px;
}
</style>
Now although my sorting example is pretty concise (thanks, ES6!), the benefits should be readily apparent: with this implementation, we enjoy uncluttered content in the template and neatly compartmentalized, self-documenting (mostly!) code in the script. This comes with the usual advantages of Vue’s data model in that, by avoiding side effects (like mutating the stories data), we can leverage Vue’s data binding to ensure this is fully reactive. For example, in the event a comment got upvoted sufficiently to overtake the one above it, this would be reflected in our sortByBest() result! So far, this is the same as calling a function directly in your template code, but this is where Vue shines: computed properties are only evaluated in the event that their dependencies change (in this case, stories). If you called this as a function, it would be run on every render, which could be costly in any number of ways (frequently rendered component, large lists to sort, expensive computations on list items, etc.). This is often an easy win when optimizing slow pages, so I always look out for it.
Wrapping Up
Those are the five things I wish I’d known earlier when learning Vue. I hope they help you!