
Chapter 7: Creating a Shopping Cart System with GraphQL
In the previous chapter, we built a travel booking system with Vue 3 and Express. This was the first project where we built from scratch our own backend that is used by the frontend. Having our own backend lets us do a lot more stuff that we can't do otherwise—for example, we can save the data that we like in the database that we created ourselves. Also, we added our own authentication system to authenticate the admin user. On the admin frontend, we protect our routes with the beforeEnter route guard, which checks for the authentication token before the admin user can log in.
In this chapter, we will take a look at the following topics:
- Introducing the GraphQL application programming interface (API)
- Creating a GraphQL API with Express
- Creating the admin frontend
- Creating the customer frontend
Technical requirements
The code for this chapter's project can be found at https://github.com/PacktPublishing/-Vue.js-3-By-Example/tree/master/Chapter07.
Introducing the GraphQL API
In the last chapter, we created a backend with Express. The endpoint accepts JSON data as input and returns JSON data as a response. However, it can take any JSON data, which the backend may not expect. Also, there is no easy way to test our API endpoints without the frontend. This is something that we can solve with GraphQL APIs. GraphQL is a special query language that makes communication easier between the client and server. GraphQL APIs have a built-in data structure validation. Each property has a data type, which can be a simple or complex type, consisting of many properties with simple data types.
We can also test GraphQL APIs with GraphiQL, which is a web page that lets us make our own GraphQL API requests easily. Since there is a data type validation for each request, it can provide an autocomplete feature, according to the definition of the GraphQL API schema. The schema provides us with all the data type definitions that are used with queries and mutations. Queries are requests that let us query for data with our GraphQL API, while mutations are GraphQL requests that let us change data in some way.
We define queries and mutations explicitly with a schema string. The queries and mutations take input types as data types for the input data, and return data with the specified output data types. Therefore, we will never be in any doubt about the structure of the data that we have to send to make a GraphQL request and will never have to guess as to what kind of data a request will return.
GraphQL API requests are mostly just regular HyperText Transfer Protocol (HTTP) requests, except that they have a special structure. All requests go to the /graphql endpoint by default, and we send queries or mutations as a string value of the query property in the JSON requests. The variable values are sent with the variable parameter.
The queries and mutations are named, and all the queries and mutations are sent to the resolver functions with the same names in the code, instead of to route handlers. The functions then take the arguments specified by the schema, after which we can get the request data and do what we want with it in our resolver function code.
With Vue 3 apps, we can use specialized GraphQL API clients to make GraphQL API request creation easier. All we have to do to make a request is pass in a string for the queries and mutations, along with the variables that go with the queries and mutations.
In this chapter, we will create a shopping cart system with an admin frontend and a customer frontend with Vue 3. We will then create a backend with Express and the express-graphql library that takes GraphQL API requests and stores data in a SQLite database.
Setting up the shopping cart system project
To create the vacation booking project, we had to create subprojects for the frontend, the admin frontend, and the backend. To create the frontend and admin frontend projects, we will use Vue CLI. To create the backend project, we will use the express-generator global package.
To set up this chapter's project, we execute the following steps:
- First, we create a folder to house all the projects, and name it shopping-cart.
- We then create admin-frontend, frontend, and backend folders inside the main folder.
- Next, we go into the admin-frontend folder and run npx vue create to add the scaffolding code for the Vue project to the admin-frontend folder.
- If we are asked to create the project in the current folder, we select Y, and then when we're asked to choose the Vue version of the project, we choose Vue 3. Likewise, we run Vue CLI the same way with the frontend folder.
- To create the Express project, we run the Express application generator app. To run it, we go into the backend folder and then run npx express-generator.
This command will add all the files that are required for our project to the backend folder. If you get an error, try running the express-generator package as an administrator.
Now that we have finished setting up the project, we can start working on the code. Next, we will start with creating the GraphQL backend.
Creating a GraphQL API with Express
To start the shopping cart system project, we first create a GraphQL API with Express. We start with the backend since we need it for both frontends. To get started, we have to add a few libraries that are needed to manipulate the SQLite database and add authentication to our app. Also, we need the library to enable Cross-Origin Resource Sharing (CORS) in our app.
CORS is a way to let us make requests from the browser to an endpoint hosted in a different domain from where the frontend is hosted.
To make our Express app accept GraphQL requests, we use the graphql and express-graphql libraries. To install both, we run the following command:
npm i cors jsonwebtoken sqlite3 express-graphql graphql
After installing the packages, we are ready to work on the code.
Working with resolver functions
First, we work on the resolver functions. To add them, we first add a resolvers folder into the backend folder. Then, we can work on the resolver for authentication. In the resolvers folder, we create an auth.js file and write the following code:
const jwt = require('jsonwebtoken');
module.exports = {
login: ({ user: { username, password } }) => {
if (username === 'admin' && password === 'password') {
return { token: jwt.sign({ username }, 'secret') }
}
throw new Error('authentication failed');
}
}
The login method is a resolver function. It takes the user object property with the username and password properties, and we use these to check for the credentials. We check if the username is 'admin' and the password is 'password'. If the credentials are correct, then we issue the token. Otherwise, we throw an error, which will be returned as an error response by the /graphql endpoint.
Adding resolvers for the order logic
We next add the resolvers for the order logic. In the resolvers folder, we add the orders.js file. Then, we work on the resolver function to get the order data. The order data has information about the order itself and also about what has been bought by the customer. To add the resolvers, we write the following code:
const sqlite3 = require('sqlite3').verbose();
module.exports = {
getOrders: () => {
const db = new sqlite3.Database('./db.sqlite');
return new Promise((resolve, reject) => {
db.serialize(() => {
db.all(`
SELECT *,
orders.name AS purchaser_name,
shop_items.name AS shop_item_name
FROM orders
INNER JOIN order_shop_items ON orders.order_id =
order_shop_items.order_id
INNER JOIN shop_items ON
order_shop_items.shop_item_id = shop_items.
shop_item_id
`, [], (err, rows = []) => {
...
});
})
db.close();
})
},
...
}
We open the database with the sqlite3.Database constructor, with the path to the database. Then, we return a promise that queries all the orders with the items that the custom bought. The orders are in the orders table. The store inventory items are stored in the shop_items table, and we have the order_shop_items table to link the order and the items bought.
We make a select query with the db.all method to get all the data, and we join all the related tables with an inner join to get the related data in the other tables. In the callback, we write the following code to loop through the rows to create the order object:
const sqlite3 = require('sqlite3').verbose();
module.exports = {
getOrders: () => {
const db = new sqlite3.Database('./db.sqlite');
return new Promise((resolve, reject) => {
db.serialize(() => {
db.all(`
...
`, [], (err, rows = []) => {
if (err) {
reject(err)
...
const orderArr = Object.values(orders)
for (const order of orderArr) {
order.ordered_items = rows
.filter(({ order_id }) => order_id ===
order.order_id)
.map(({ shop_item_id, shop_item_name: name,
price, description }) => ({
shop_item_id, name, price, description
}))
}
resolve(orderArr)
});
})
db.close();
})
},
...
}
This lets us remove duplicate order entries in the rows. The key is the order_id value, and the value is the order data itself. Then, we get all order values with the Object.values method. We assign the returned array to the orderArr variable. Then, we loop through the orderArr array to get all the shop items that were ordered from the original row's array with the filter method, to look up the items by order_id. We call map to extract the shop item data of the order from the row.
We call resolve on the data to return it as a response from the /graphql endpoint. In the first few lines of the callback, we call reject when err is truthy so that we can return the error to the user, if there is one.
Finally, we call db.close() to close the database once we're done. We can do this at the end, since we used db.serialize to run all the statements in the serialize callback in a series so that the Structured Query Language (SQL) code could be run in sequence.
Adding an order
We add a resolver function to add an order. To do this, we write the following code:
const sqlite3 = require('sqlite3').verbose();
module.exports = {
...
addOrder: ({ order: { name, address, phone, ordered_items:
orderedItems } }) => {
const db = new sqlite3.Database('./db.sqlite');
return new Promise((resolve) => {
db.serialize(() => {
const orderStmt = db.prepare(`
INSERT INTO orders (
name,
address,
phone
...
shop_item_id: shopItemId
} = orderItem
orderShopItemStmt.run(orderId, shopItemId)
}
orderShopItemStmt.finalize()
})
resolve({ status: 'success' })
db.close();
});
})
})
},
...
}
We get the request payload for the order, with the variables we destructured within the argument. We open the database the same way, and we start with the same promise code and the db.serialize call, but inside it we create a prepared statement with the db.prepare method. We issue an INSERT statement to add the data to the order entry.
Then, we call run with the variable values we want to insert, to run the SQL statement. Prepared statements are good since all the variable values we passed into db.run are sanitized to prevent SQL injection attacks. Then, we call finalize to commit the transaction.
Next, we get the ID value of the row that has just been inserted into the orders table with the db.all call, with the SELECT statement. In the callback of the db.all method, we get the returned data and destructure orderId from the returned data.
Then, we create another prepared statement to insert the data for the shop items that were bought into the order_shop_items table. We just insert order_id and shop_item_id to link the order to the shop item bought.
We loop through the orderedItems array and call run to add the entries, and we call finalize to finalize all the database transactions.
Finally, we call resolve to return a success response to the client.
To finish off this file, we add the removeOrder resolver to let us remove orders from the database. To do this, we write the following code:
const sqlite3 = require('sqlite3').verbose();
module.exports = {
...
removeOrder: ({ orderId }) => {
const db = new sqlite3.Database('./db.sqlite');
return new Promise((resolve) => {
db.serialize(() => {
const delOrderShopItemsStmt = db.prepare("DELETE FROM
order_shop_items WHERE order_id = (?)");
delOrderShopItemsStmt.run(orderId)
delOrderShopItemsStmt.finalize();
const delOrderStmt = db.prepare("DELETE FROM orders
WHERE order_id = (?)");
delOrderStmt.run(orderId)
delOrderStmt.finalize();
resolve({ status: 'success' })
})
db.close();
})
},
}
We call db.serialize and db.prepare in the same way as we did before. The only difference is that we are issuing DELETE statements to delete everything with the given order_id in the order_shop_items and orders tables. We need to delete items from the order_shop_items table first since the order is still being referenced there.
Once we get rid of all the references of the order outside the orders table, we can delete the order itself in the orders table.
Getting the shop items
We create a shopItems.js file in the resolvers folder to hold the resolver functions for getting and setting the shop items. First, we start with a resolver function to get all the shop items. To do this, we write the following code:
const sqlite3 = require('sqlite3').verbose();
module.exports = {
getShopItems: () => {
const db = new sqlite3.Database('./db.sqlite');
return new Promise((resolve, reject) => {
db.serialize(() => {
db.all("SELECT * FROM shop_items", [], (err, rows =
[]) => {
if (err) {
reject(err)
}
resolve(rows)
});
})
db.close();
})
},
...
}
We call db.serialize and db.all, as we did before. We just get all the shop_items entries with the query and we call resolve to return the selected data as a response to the client.
Adding a resolver function to add a shop item
We will now add a resolver function to add a shop item. To do this, we write the following code:
const sqlite3 = require('sqlite3').verbose();
module.exports = {
...
addShopItem: ({ shopItem: { name, description, image_url:
imageUrl, price } }) => {
const db = new sqlite3.Database('./db.sqlite');
return new Promise((resolve) => {
db.serialize(() => {
const stmt = db.prepare(`
INSERT INTO shop_items (
name,
description,
image_url,
price
) VALUES (?, ?, ?, ?)
`
);
stmt.run(name, description, imageUrl, price)
stmt.finalize();
resolve({ status: 'success' })
})
db.close();
})
},
...
}
We issue an INSERT statement to insert an entry, with the values destructured from the parameter.
Finally, we add the removeShopItem resolver by writing the following code to let us remove an entry from the shop_items table by its ID:
const sqlite3 = require('sqlite3').verbose();
module.exports = {
...
removeShopItem: ({ shopItemId }) => {
const db = new sqlite3.Database('./db.sqlite');
return new Promise((resolve) => {
db.serialize(() => {
const stmt = db.prepare("DELETE FROM shop_items WHERE
shop_item_id = (?)");
stmt.run(shopItemId)
stmt.finalize();
resolve({ status: 'success' })
})
db.close();
})
},
}
Mapping resolvers to queries and mutations
We need to map the resolvers to queries and mutations so that we can call them when making GraphQL API requests. To do this, we go to the app.js file and add a few things. We will also add some middleware so that we can enable cross-domain communication and token checks for some requests. To do this, we start by writing the following code:
const createError = require('http-errors');
const express = require('express');
const path = require('path');
const cookieParser = require('cookie-parser');
const logger = require('morgan');
const { graphqlHTTP } = require('express-graphql');
const { buildSchema } = require('graphql');
const cors = require('cors')
const shopItemResolvers = require('./resolvers/shopItems')
const orderResolvers = require('./resolvers/orders')
const authResolvers = require('./resolvers/auth')
const jwt = require('jsonwebtoken');
We import everything we need with the require function. We can replace all the stuff at the top of the file with the preceding code block. We import the resolvers, the CORS middleware, the GraphQL library items, and the jsonwebtoken module.
Next, we create the schema for our GraphQL API by calling the buildSchema function. To do this, we write the following code:
...
const schema = buildSchema(`
type Response {
status: String
}
...
input Order {
order_id: Int
name: String
address: String
phone: String
ordered_items: [ShopItem]
}
...
type Query {
getShopItems: [ShopItemOutput],
getOrders: [OrderOutput]
}
type Mutation {
addShopItem(shopItem: ShopItem): Response
removeShopItem(shopItemId: Int): Response
addOrder(order: Order): Response
removeOrder(orderId: Int): Response
login(user: User): Token
}
`);
...
The full schema definition can be found at https://github.com/PacktPublishing/-Vue.js-3-By-Example/blob/master/Chapter07/backend/app.js.
We have the type keyword to define a data type for a response, and we have the Response and Token types to use as the response. The express-graphql library will check the structure of the response against what is specified in the data type, so whatever query or mutation that returns data with the Response type should have a status string property. This is optional since we don't have an exclamation mark after the string.
The input keyword lets us define an input type. An input type is used for specifying the data structure of request payloads. They are defined the same way as output types with a list of properties, with their data type after the colon.
We can nest one data type in another, as we did with the ordered_items property in the OrderOutput type. We specify that it holds an array of objects with the ShopItemOutput data type. Likewise, we specify a similar data type for the ordered_items property in the Order data type. The square brackets indicate that the data type is an array.
Query and Mutation are special data types that let us add the resolver names before the colon and the data type of the output after the colon. The Query type specifies the queries, and the Mutation type specifies the mutations.
Next, we specify the root object with all the resolvers added to it, by writing the following code:
const root = {
...shopItemResolvers,
...orderResolvers,
...authResolvers
}
We just put all the resolvers we imported into the root object and we spread all the entries into the root object to merge them all into one object.
Then, we add authMiddleware to add an authentication check for some GraphQL requests. To do this, we write the following code:
const authMiddleware = (req, res, next) => {
const { query } = req.body
const token = req.get('authorization')
const requiresAuth = query.includes('removeOrder') ||
query.includes('removeShopItem') ||
query.includes('addShopItem')
if (requiresAuth) {
try {
jwt.verify(token, 'secret');
next()
return
} catch (error) {
res.status(401).json({})
return
}
}
next();
}
We get the query property from the JSON request payload to check which query or mutation the GraphQL request is invoking. Then, we get the authorization header with the req.get method. Next, we define a requiresAuth Boolean variable to check if the client is making requests that invoke the restricted queries or mutations.
If that is true, we call jwt.verify to verify the token with the secret. If it's valid, then we call next to proceed to the /graphql endpoint. Otherwise, we return a 401 response. If a query or mutation property doesn't need authentication, then we just call next to proceed to the /graphql endpoint.
Adding the middleware
Next, we add all the middleware we need to enable cross-domain communication, and add the /graphql endpoint to accept GraphQL requests. To do this, we write the following code:
...
const app = express();
app.use(cors())
app.use(logger('dev'));
app.use(express.json());
app.use(express.urlencoded({ extended: false }));
app.use(cookieParser());
app.use(authMiddleware)
app.use('/graphql', graphqlHTTP({
schema,
rootValue: root,
graphiql: true,
}));
...
We write the following line of code to enable cross-domain communication:
app.use(cors())
The following line of code lets us accept JSON requests, which we also need for accepting GraphQL requests:
app.use(express.json());
The following line of code adds the authentication check to restricted GraphQL queries:
app.use(authMiddleware)
The preceding line of code must be added before the following code block:
app.use('/graphql', graphqlHTTP({
schema,
rootValue: root,
graphiql: true,
}));
This way, the authentication check is done before the GraphQL request can be made. Finally, the following code block adds a /graphql endpoint to let us accept GraphQL requests:
app.use('/graphql', graphqlHTTP({
schema,
rootValue: root,
graphiql: true,
}));
The grapgqlHTTP function returns a middleware after we pass in a bunch of options. We set the schema for the GraphQL API. The rootValue property has an object with all the resolvers. The resolver names should match the names specified in the Query and Mutation types. The graphiql property is set to true so that we can use the GraphiQL web app available when we go to the /graphql page in the browser.
To test authenticated endpoints, we can use the ModHeader extension available with Chrome and Firefox to add the authentication header with the token to the request headers. Then, we can test authenticated GraphQL requests easily.
Note
The extension can be downloaded from https://chrome.google.com/webstore/detail/modheader/idgpnmonknjnojddfkpgkljpfnnfcklj?hl=en for Chromium browsers and https://addons.mozilla.org/en-CA/firefox/addon/modheader-firefox/?utm_source=addons.mozilla.org&utm_medium=referral&utm_content=search for Firefox.
The following screenshot shows what the GraphiQL interface looks like. We also have the ModHeader extension to let us add the headers required to make authenticated requests at the top right of the screen:
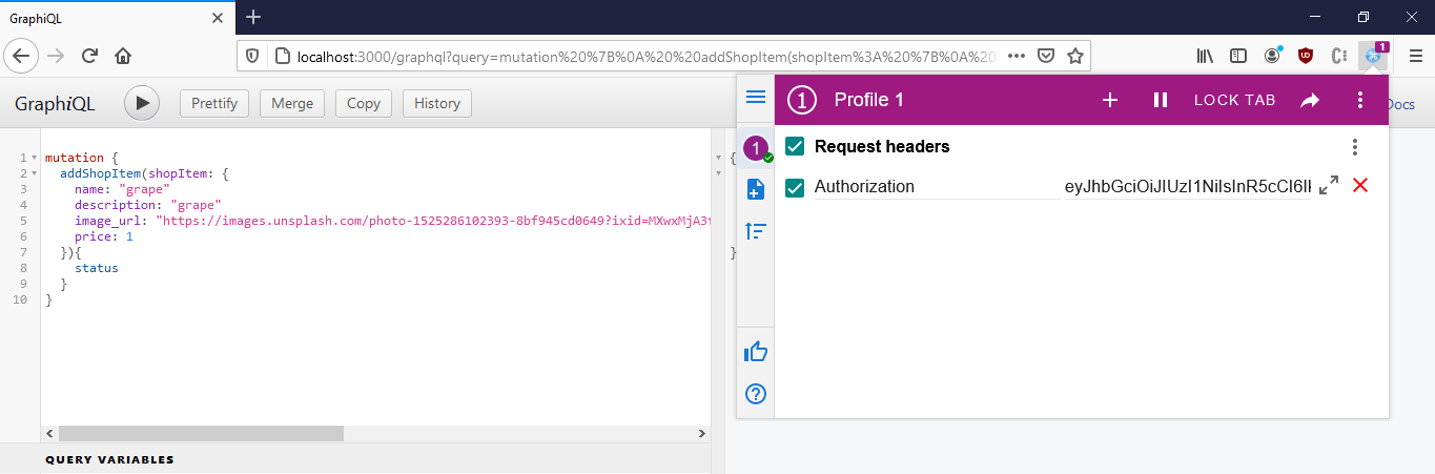
Figure 7.1 – GraphiQL with ModHeader extension
Next, we create a db.sql script to let us create the database we need to use, by writing the following code:
DROP TABLE IF EXISTS order_shop_items;
DROP TABLE IF EXISTS orders;
DROP TABLE IF EXISTS shop_items;
CREATE TABLE shop_items (
shop_item_id INTEGER NOT NULL PRIMARY KEY,
name TEXT NOT NULL,
description TEXT NOT NULL,
price NUMBER NOT NULL,
image_url TEXT NOT NULL
);
CREATE TABLE orders (
order_id INTEGER NOT NULL PRIMARY KEY,
name TEXT NOT NULL,
address TEXT NOT NULL,
phone TEXT NOT NULL
);
CREATE TABLE order_shop_items (
order_id INTEGER NOT NULL,
shop_item_id INTEGER NOT NULL,
FOREIGN KEY (order_id) REFERENCES orders(order_id)
FOREIGN KEY (shop_item_id) REFERENCES
shop_items(shop_item_id)
);
We create the tables that we used in the resolvers script. TEXT lets us store text in a column; INTEGER lets us store integers; FOREIGN KEY specifies a foreign key that references a column specified in the table and column after REFERENCES; NOT NULL makes a column required; DROP TABLE IF EXISTS drops a table, if it exists; CREATE TABLE creates a table; PRIMARY KEY specifies the primary key column.
Creating a SQLite database
To create and manipulate a SQLite database, we use the DB Browser for SQLite (DB4S) program, which we can download from https://sqlitebrowser.org/. This program works with Windows, Mac, and Linux. Then, we can click on New Database and save the db.sqlite database in the backend folder so that the backend can access the database. Then, in the Execute SQL tab, we paste in the script to add the tables to the database. For changes for the database to be written to disk, you have to save them. To do this, click on the File menu and then click on Write Changes. We can also press the Ctrl + S keyboard combination to save the changes.
Finally, in package.json, we change the start script by writing the following code:
{
...
"scripts": {
"start": "nodemon ./bin/www"
},
...
}
We switch nodemon so that the app will restart when we change the code and save it. We run npm I –g nodemon to install nodemon globally.
Now that we are done with the backend, we can move on to the frontend so that we have a complete shopping cart system.
Creating the admin frontend
Now that we have the backend app done, we can move on to working on the frontend. Since we have already created the Vue 3 project earlier for the admin frontend in the admin-frontend folder, we just have to install packages that we need and then work on the code. We need the graphql-request GraphQL package and the GraphQL client library, and the VeeValidate, Vue Router, Axios, and Yup packages.
To install them, we run the following command in the admin-frontend folder:
npm i vee-validate@next vue-router@4 yup graphql graphql-request
After installing the packages, we can start working on the code.
Working with components
First, we start working on the components. In the components folder, we add the TopBar component into the components/TopBar.vue file to hold the route links and the Log Out button by writing the following code:
<template>
<p>
<router-link to="/orders">Orders</router-link>
<router-link to="/shop-items">Shop Items</router-link>
<button @click="logOut">Log Out</button>
</p>
</template>
<script>
export default {
name: "TopBar",
methods: {
logOut() {
localStorage.clear();
this.$router.push("/");
},
},
};
</script>
<style scoped>
a {
margin-right: 5px;
}
</style>
We add the Vue Router router-link components to let the admin user click on them to go to different pages.
The Log Out button runs the logOut method when it is clicked to clear local storage with localStorage.clear and redirects back to the login page with this.$router.push. The / path will map to the login page, as we will see later.
Next, in the src/plugins folder, we add the router.js file. To do this, we write the following code:
import { createRouter, createWebHashHistory } from 'vue-router'
import Login from '@/views/Login'
import Orders from '@/views/Orders'
import ShopItems from '@/views/ShopItems'
const beforeEnter = (to, from, next) => {
try {
const token = localStorage.getItem('token')
if (to.fullPath !== '/' && !token) {
return next({ fullPath: '/' })
}
return next()
} catch (error) {
return next({ fullPath: '/' })
}
}
const routes = [
{ path: '/', component: Login },
{ path: '/orders', component: Orders, beforeEnter },
{ path: '/shop-items', component: ShopItems, beforeEnter },
]
const router = createRouter({
history: createWebHashHistory(),
routes,
})
export default router
We added the beforeEnter route guard to check if the authentication token is stored in local storage. If it is stored already and we are going to an authenticated route, then we proceed to the page by calling next with no arguments. Otherwise, we redirect back to the login page by calling next with an object with the fullPath property set to '/'. If there is any error, we also go back to the login page.
Next, we have the routes array with the route mappings. We map the path to the component so that when we type in the Uniform Resource Locator (URL) in the browser or click a router link on the page, we go to the page we mapped to. We add the beforeEnter route guard to the route that requires authentication.
Then, we call createRouter to create the router object, and we call createWebHashHistory to use hash mode. With hash mode, the hostname and the rest of the URL will be separated by a # sign. We also add the routes array into the object we pass into createRouter, to add the route mappings.
Then, we export the router object so that we can add it to our app later.
Next, we create the login page component. To do this, we create the views folder, add the Login.vue file to it, and then write the following code:
<template>
<h1>Admin Login</h1>
<Form :validationSchema="schema" @submit="submitForm">
<div>
<label for="name">Username</label>
<br />
<Field name="username" type="text"
placeholder="Username" />
<ErrorMessage name="username" />
</div>
<br />
<div>
<label for="password">Password</label>
<br />
<Field name="password" placeholder="Password"
type="password" />
<ErrorMessage name="password" />
</div>
<input type="submit" />
</Form>
</template>
We add the Form component with the validationSchema prop set to the yup schema. We listen for the submit event, which is emitted when all the fields are valid, and we click the Submit button. The submitForm method will have the form field values we entered, and the Field component lets us create a form field.
ErrorMessage displays the error message with the form field. If the name prop values of Field and ErrorMessage match, then any form validation for the field with the given name will be automatically displayed. The placeholder attribute lets us add a form placeholder, and the type attribute sets the form input type.
Next, we add the script portion of our component. To do this, we write the following code:
<script>
import { GraphQLClient, gql } from "graphql-request";
import * as yup from "yup";
import { Form, Field, ErrorMessage } from "vee-validate";
const APIURL = "http://localhost:3000/graphql";
const graphQLClient = new GraphQLClient(APIURL, {
headers: {
authorization: "",
},
});
const schema = yup.object({
name: yup.string().required(),
password: yup.string().required(),
});
...
</script>
We create the GraphQL client object with the GraphQLClient constructor. This takes the GraphQL endpoint URL and various options that we can pass in. We will use it to pass in the required request headers in components that require authentication.
The schema variable holds the yup validation schema, which has the name and password fields. Both fields are strings and they are both required, as indicated by the method calls. The property names must match the name prop value of the Field and ErrorMessage components for the validation to trigger for the field.
Adding the login logic and making our first GraphQL request
Next, we add the login logic by writing the following code:
<script>
...
export default {
name: "Login",
components: {
Form,
Field,
ErrorMessage,
},
data() {
return {
schema,
};
},
...
} = await graphQLClient.request(mutation, variables);
localStorage.setItem("token", token);
this.$router.push('/orders')
} catch (error) {
alert("Login failed");
}
},
},
};
</script>
We register the Form, Field, and ErrorMessage components imported from the VeeValidate package. We have the data method, which returns an object with the schema so that we can use it in the template. Finally, we have the submitForm method, to get the username and password values from the Field components and make the login mutation GraphQL request.
We pass the $username and $password values into the parentheses to pass them into our mutation. The values will be obtained from the variablesvariables object, which we pass into the graphQLClient.request method. If the request is successful, we then get back the token from the request. Once we get the token, we put it in localStorage.setItem to put it into local storage.
The gql tag is a function that lets us convert the string into a query JSON object that can be sent to the server.
If the login request failed, we then display an alert. The following screenshot shows the login screen:
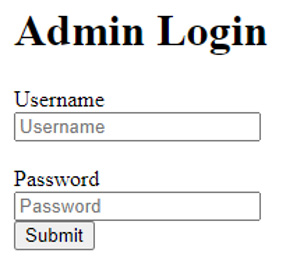
Figure 7.2 – Admin login screen
Creating the orders page
Next, we create an orders page by creating a views/Orders.vue file. To do this, we update the following code:
<template>
<TopBar />
<h1>Orders</h1>
<div v-for="order of orders" :key="order.order_id">
<h2>Order ID: {{ order.order_id }}</h2>
<p>Name: {{ order.name }}</p>
<p>Address: {{ order.address }}</p>
<p>Phone: {{ order.phone }}</p>
<div>
<h3>Ordered Items</h3>
<div
v-for="orderedItems of order.ordered_items"
:key="orderedItems.shop_item_id"
>
<h4>Name: {{ orderedItems.name }}</h4>
<p>Description: {{ orderedItems.description }}</p>
<p>Price: ${{ orderedItems.price }}</p>
</div>
</div>
<p>
<b>Total: ${{ calcTotal(order.ordered_items) }}</b>
</p>
<button type="button" @click="deleteOrder(order)">Delete
Order</button>
</div>
</template>
We add TopBar and loop through the orders with v-for to render the entries. We also loop through ordered_items. We show the total price of the ordered items with the calcTotal method. We also have the Delete Order button, which calls the deleteOrder method when we click it. The key prop must be specified so that Vue 3 can identify the items.
Next, we create a script with the GraphQL client by writing the following code:
<script>
import { GraphQLClient, gql } from "graphql-request";
import TopBar from '@/components/TopBar'
const APIURL = "http://localhost:3000/graphql";
const graphQLClient = new GraphQLClient(APIURL, {
headers: {
authorization: localStorage.getItem("token"),
},
});
...
</script>
This is different from the login page since we set the authorization header to the token we obtained from local storage. Next, we create the component object by writing the following code:
<script>
...
export default {
name: "Orders",
components: {
TopBar
...
{
getOrders {
order_id
name
address
phone
ordered_items {
shop_item_id
name
description
image_url
price
}
}
}
`;
...
await graphQLClient.request(mutation, variables);
await this.getOrders();
},
},
};
</script>
We register the TopBar component with the components property. We have the data method to return an object with the orders reactive property. In the beforeMount hook, we call the getOrders method to get the orders when the component is mounting. The calcTotal method calculates the total price of all the ordered items by getting the price from all the orderedItems objects with map and then calling reduce to add all the prices together.
The getOrders method makes a GraphQL query request to get all the orders. We specify the fields we want to get with the request. We specify the fields for the nested objects we also want to get, so we do the same with ordered_items. Only the fields that are specified will be returned.
Then, we call graphQlClient.request with the query to make the query request, and assign the data returned to the orders reactive property.
The deleteOrder method takes an order object and makes a removeOrder mutation request to the server. orderId is in the variables, so the correct order will be deleted. We call getOrders to get the latest orders again after deleting them.
The following screenshot shows the orders page that the admin sees:

Figure 7.3 – Orders page: admin view
Now that we have added the orders page, we will move on to add a page to let admins add and remove items they want to sell in the shop.
Adding and removing shop items for sale
Next, we add a shop items page to let us add and remove shop items. To do this, we start with the template. We render the shop items by writing the following code:
<template>
<TopBar />
<h1>Shop Items</h1>
<button @click="showDialog = true">Add Item to Shop</button>
<div v-for="shopItem of shopItems"
:key="shopItem.shop_item_id">
<h2>{{ shopItem.name }}</h2>
<p>Description: {{ shopItem.description }}</p>
<p>Price: ${{ shopItem.price }}</p>
<img :src="shopItem.image_url" :alt="shopItem.name" />
<br />
<button type="button" @click="deleteItem(shopItem)">
Delete Item from Shop
</button>
</div>
...
</template>
We add the TopBar component as we did before and we render shopItems, as we did with the orders.
Next, we add a dialog box with the HTML dialog element to let us add shop items. To do this, we write the following code:
<template>
...
<dialog :open="showDialog" class="center">
<h2>Add Item to Shop</h2>
<Form :validationSchema="schema" @submit="submitForm">
<div>
...
<Field name="imageUrl" type="text" placeholder=" Image
URL" />
<ErrorMessage name="imageUrl" />
</div>
<br />
<div>
<label for="price">Price</label>
<br />
<Field name="price" type="text" placeholder="Price" />
<ErrorMessage name="price" />
</div>
<br />
<input type="submit" />
<button @click="showDialog = false" type="button">
Cancel</button>
</Form>
</dialog>
</template>
We set the open prop to control when the dialog box is opened, and we set the class to center so that we can apply styles to center the dialog box and display it above the rest of the page later.
Inside the dialog box, we have the form created in the same way as with the login page. The only difference is the fields that are in the form. At the bottom of the form, we have a Cancel button to set the showDialog reactive property to false to close the dialog, since it's set as the value of the open prop.
Next, we create the script with the GraphQL client and form validation schema (as we did before), as follows:
<script>
import { GraphQLClient, gql } from "graphql-request";
import * as yup from "yup";
import TopBar from "@/components/TopBar";
import { Form, Field, ErrorMessage } from "vee-validate";
const APIURL = "http://localhost:3000/graphql";
const graphQLClient = new GraphQLClient(APIURL, {
headers: {
authorization: localStorage.getItem("token"),
},
});
const schema = yup.object({
name: yup.string().required(),
description: yup.string().required(),
imageUrl: yup.string().required(),
price: yup.number().required().min(0),
});
...
</script>
Then, we add the component options object by writing the following code:
<script>
...
export default {
name: "ShopItems",
components: {
Form,
Field,
ErrorMessage,
TopBar,
},
data() {
return {
shopItems: [],
showDialog: false,
schema,
};
},
beforeMount() {
this.getShopItems();
},
...
};
</script>
We register components and create a data method to return the reactive properties we use. The beforeMount hook calls the getShopItems method to get the shop items from the API.
Next, we add the getShopItems method by writing the following code:
<script>
...
export default {
...
methods: {
async getShopItems() {
const query = gql`
{
getShopItems {
shop_item_id
name
description
image_url
price
}
}
`;
const { getShopItems: data } = await
graphQLClient.request(query);
this.shopItems = data;
},
...
},
};
</script>
We just make a getShopItems query request to get the data with the fields in the braces returned.
Next, we add the submitForm method to make a mutation request to add a shop item entry, by writing the following code:
<script>
...
export default {
...
methods: {
...
async submitForm({ name, description, imageUrl, price:
oldPrice }) {
const mutation = gql`
mutation addShopItem(
$name: String
$description: String
$image_url: String
$price: Float
) {
...
description,
image_url: imageUrl,
price: +oldPrice,
};
await graphQLClient.request(mutation, variables);
this.showDialog = false;
await this.getShopItems();
},
...
},
};
</script>
We get all the form field values by destructuring the object in the parameter, then we call graphQLClient.request to make the request with the variables set from the destructured properties from the parameter. We convert price to a number since price should be a float, according to the schema we created in the backend.
Once the request is done, we set showDialog to false to close the dialog and we call getShopItems again to get the shop items.
The last method we'll add is the deleteItem method. The code for this can be seen in the following snippet:
<script>
...
export default {
...
methods: {
...
async deleteItem({ shop_item_id: shopItemId }) {
const mutation = gql`
mutation removeShopItem($shopItemId: Int) {
removeShopItem(shopItemId: $shopItemId) {
status
}
}
`;
const variables = {
shopItemId,
};
await graphQLClient.request(mutation, variables);
await this.getShopItems();
},
...
},
};
</script>
We make the removeShopItem mutation request to delete a shop item entry. When the request is done, we call getShopItems again to get the latest data.
The admin's view of the shop items page can be seen in the following screenshot:

Figure 7.4 – Shop items page: admin view
In src/App.vue, we write the following code to add the router-view component to show the route component content:
<template>
<router-view></router-view>
</template>
<script>
export default {
name: "App",
};
</script>
In src/main.js, we write the following code to add the router to our app:
import { createApp } from 'vue'
import App from './App.vue'
import router from '@/plugins/router'
const app = createApp(App)
app.use(router)
app.mount('#app')
Finally, in package.json, we change the server script to serve the app from a different port so that it won't conflict with the frontend. To do this, we write the following code:
{
...
"scripts": {
"serve": "vue-cli-service serve --port 8090",
...
},
...
}
We are now finished with the admin frontend and will move on to the final part of this project, which is a frontend for the customer so that they can order items.
Creating the customer frontend
Now that we have finished with the admin frontend, we finish this chapter's project by creating the customer's frontend. This is similar to the admin frontend except that there is no authentication required to use it.
We start by installing the same packages that we installed for the admin frontend. So, we go to the frontend folder and run the following command to install all the packages:
npm i vee-validate@next vue-router@4 yup vuex@4 vuex-persistedstate@ ^4.0.0-beta.3 graphql graphql-request
We need Vuex with the Vuex-Persistedstate plugin to store the shopping cart items. The rest of the packages are the same as for the admin frontend.
Creating the plugins folder
We create a plugins folder in the src folder and add the routes by creating the router.js file in the folder and writing the following code:
import { createRouter, createWebHashHistory } from 'vue-router'
import Shop from '@/views/Shop'
import OrderForm from '@/views/OrderForm'
import Success from '@/views/Success'
const routes = [
{ path: '/', component: Shop },
{ path: '/order-form', component: OrderForm },
{ path: '/success', component: Success },
]
const router = createRouter({
history: createWebHashHistory(),
routes,
})
Next, we create our Vuex store by creating the src/plugins/vuex.js file and then writing the following code:
import { createStore } from "vuex";
import createPersistedState from "vuex-persistedstate";
const store = createStore({
state() {
return {
cartItems: []
}
},
getters: {
cartItemsAdded(state) {
return state.cartItems
}
},
mutations: {
addCartItem(state, cartItem) {
const cartItemIds = state.cartItems.map(c =>
c.cartItemId).filter(id => typeof id === 'number')
state.cartItems.push({
...
state.cartItems = []
}
},
plugins: [createPersistedState({
key: 'cart'
})],
});
export default store
We call createStore to create the Vuex store. In the object that we pass into createStore, we have the state method to return the cartItems state initialized to an array. The getters property has an object with the cartItemsAdded method to return the cartItems state value.
In the mutations property object, we have the addCartItem method to call state.cartItems.push to add a cartItem value to the cartItems state. We get the existing cart item IDs with the map and filter method. We only want the numeric ones. The ID for the new cart item would be the highest one from the cartItemIds array plus 1.
The removeCartItem method lets us call splice to remove a cart item by index, and clearCart resets the cartItems state to an empty array.
Finally, we set the plugins property to an object with the createPersistedState function, to create a Vuex-Persistedstate plugin to store the cartItems state to local storage. The key value is the key to store the cartItem values under. Then, we export the store so that we can add it to our app later.
Creating the order form page
Next, we create an order form page. This has a form to let customers enter their personal information and edit the cart. To create it, we create a src/views folder if one doesn't already exist, and then we create an OrderForm.vue component file. We start by writing the following template code:
<template>
<h1>Order Form</h1>
<div v-for="(cartItem, index) of cartItemsAdded"
:key="cartItem.cartItemId">
<h2>{{ cartItem.name }}</h2>
<p>Description: {{ cartItem.description }}</p>
<p>Price: ${{ cartItem.price }}</p>
<br />
...
<Field name="phone" type="text" placeholder="Phone" />
<ErrorMessage name="phone" />
</div>
<br />
<div>
<label for="address">Address</label>
<br />
<Field name="address" type="text" placeholder="Address"
/>
<ErrorMessage name="address" />
</div>
<br />
<input type="submit" />
</Form>
</template>
We have similar forms to those for the admin frontend. We use the same Form, Field, and ErrorMessage components from VeeValidate.
We loop through the cart items with v-for to render them onto the screen. They're retrieved from local storage via Vuex-Persistedstate with the cartItemsAdded getter.
Next, we create the script the same way by writing the following code:
<script>
import { GraphQLClient, gql } from "graphql-request";
import { mapMutations, mapGetters } from "vuex";
import { Form, Field, ErrorMessage } from "vee-validate";
import * as yup from "yup";
...
export default {
name: "OrderForm",
data() {
return {
schema,
};
},
components: {
Form,
Field,
ErrorMessage,
},
computed: {
...mapGetters(["cartItemsAdded"]),
},
...
};
</script>
We create the GraphQL client and the validation schema, and we register the components in the same way as we did in the shop item page of the admin frontend. The only new thing is to call the mapGetters method to add the Vuex getters as a computed property of our component. We just pass in an array of strings with the name of the getters to map the computed properties to. Next, we add the methods by writing the following code:
<script>
...
export default {
...
methods: {
async submitOrder({ name, phone, address }) {
const mutation = gql`
mutation addOrder(
$name: String
$phone: String
$address: String
$ordered_items: [ShopItem]
...
shop_item_id,
name,
description,
image_url,
price,,
})
),
};
await graphQLClient.request(mutation, variables);
this.clearCart();
this.$router.push("/success");
},
...mapMutations(["addCartItem", "removeCartItem",
"clearCart"]),
},
};
</script>
We have the submitOrder method that gets the inputted data from the order form and makes an addOrder mutation request to the server. In the variables object, we need to remove cartItemId from each ordered_items object so that it matches the ShopItem schema that we created in the backend. We can't have extra properties that aren't included in the schema in an object we send to the server.
Once the request succeeds, we call clearCart to clear the cart, and then we call thus.$router.push to go to the success page. The mapMutation method maps the mutations to methods in our component. The clearCart method is the same as the clearCart Vuex store mutation.
The following screenshot shows the admin view of the order form:

Figure 7.5 – Order form: admin view
Next, we create a src/views/Shop.vue file by writing the following code:
<template>
<h1>Shop</h1>
<div>
<router-link to="/order-form">Check Out</router-link>
</div>
<button type="button" @click="clearCart()">Clear Shopping
Cart</button>
<p>{{ cartItemsAdded.length }} item(s) added to cart.</p>
<div v-for="shopItem of shopItems" :key="shopItem.
shop_item_id">
<h2>{{ shopItem.name }}</h2>
<p>Description: {{ shopItem.description }}</p>
<p>Price: ${{ shopItem.price }}</p>
<img :src="shopItem.image_url" :alt="shopItem.name" />
<br />
<button type="button" @click="addCartItem(shopItem)">Add
to Cart</button>
</div>
</template>
We render the shop items with v-for, as we did with the other components. We also have a router-link component to render a link on the page.
We show the number of cart items added with the cartItemsAdded getter. The clearCart Vuex mutation method is called when we click on Clear Shopping Cart. Next, we add the script for the component by writing the following code:
<script>
import { GraphQLClient, gql } from "graphql-request";
import { mapMutations, mapGetters } from "vuex";
const APIURL = "http://localhost:3000/graphql";
const graphQLClient = new GraphQLClient(APIURL);
...
async getShopItems() {
const query = gql`
{
getShopItems {
shop_item_id
name
description
image_url
price
}
}
`;
const { getShopItems: data } = await
graphQLClient.request(query);
this.shopItems = data;
},
...mapMutations(["addCartItem", "clearCart"]),
},
};
</script>
We create the GraphQL client the same way. In the component, we call getShopItems in the beforeMount hook to get the shopping cart items. We also call mapMutations to map the Vuex mutations we need into methods in our component.
Finally, we shrink the img elements to 100px width by writing the following code:
<style scoped>
img {
width: 100px;
}
</style>
Next, we create an order success page by creating a src/views/Success.vue file and writing the following code:
<template>
<div>
<h1>Order Successful</h1>
<router-link to="/">Go Back to Shop</router-link>
</div>
</template>
<script>
export default {
name: "Success",
};
</script>
The order success page just has some text and a link to go back to the shop's home page.
Next, in src/App.vue, we write the following code to add the router-view component to show the route pages:
<template>
<router-view></router-view>
</template>
<script>
export default {
name: "App",
};
</script>
In src/main.js, we add the following code to add the router and Vuex store to our app:
import { createApp } from 'vue'
import App from './App.vue'
import router from '@/plugins/router'
import store from '@/plugins/vuex'
const app = createApp(App)
app.use(router)
app.use(store)
app.mount('#app')
And finally, we change the port that the app project is served from by writing the following code:
{
...
"scripts": {
"serve": "vue-cli-service serve --port 8091",
...
},
...
}
Our project is now complete.
We can run the frontend projects with npm run serve and the backend projects with npm start.
By working on the shopping cart project, we learned how to create GraphQL APIs, which are JSON APIs that can process GraphQL instructions via queries and mutations.
Summary
We can easily create a GraphQL API with Express and the express-graphql library. To make GraphQL HTTP requests easily, we use the graphql-request JavaScript GraphQL client, which works in the browser. This lets us set request options such as headers, the query to make, and variables that go with the query easily.
The graphql-request GraphQL client is used instead of a regular HTTP client to make requests to the backend from our Vue app. The graphql-request library lets us make GraphQL HTTP requests more easily than when using a regular HTTP client. With it, we can easily pass in GraphQL queries and mutations with variables.
A GraphQL API is created with a schema that maps to resolver functions. Schemas let us define all the data types of our input and output data so that we don't have to guess which data we have to send. If we send any invalid data, then we will get an error telling us exactly what is wrong with the request. We also have to specify the data fields that we want to return with our GraphQL queries, and only the fields that we specified are returned. This lets us return the data that we need to use, making it much more efficient.
Also, we can add authentication to a GraphQL API request with the usual token check before making requests to the /graphql endpoint.
We can easily test GraphQL requests with the GraphiQL interactive sandbox that lets us make the requests we want. To test authenticated requests, we can use the ModHeader extension to set the header so that we can make authenticated requests successfully.
In the next chapter, we will look at how to create a real-time chat app with Laravel and Vue 3.