with Joan Hansen
IMAGINE WALKING down a garden path and gazing at a mass of brilliant color and sunlight glistening on beautiful flowers in bloom. As the fragrance fills the air, you wonder how you can make this moment last forever. By painting a floral image in watercolor! once you’ve learned to see the basic shapes of a flower, you’ll be able to draw and paint any flower you like.
Focusing on Shapes
Every flower, leaf, and stem can be broken down into a few basic shapes: circles, rectangles, squares, and triangles. To draw any flower’s shape, I simply draw the petals’ outlines within those basic shapes, as I did with the circular daisy shown below. And I keep in mind that all the petals always radiate from the center. As I paint, I overlap and curve some of the petals, so they don’t all look exactly the same. These little tricks make my flowers look lifelike and three-dimensional, as you can see in the examples on the opposite page.
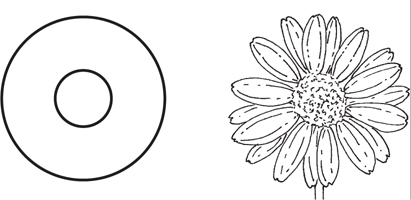
FRONT VIEW Practice drawing a daisy from different angles to learn to see the basic shapes and the way those shapes change as your viewpoint changes. When you look directly at the daisy, you can see a small circle within a larger one.
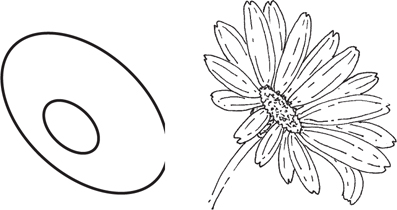
ANGLED VIEW As you turn the flower away from you, the circles become elliptical. Notice that the petals in front look shorter than the others. This is an example of foreshortening—a distortion made to help convey the illusion of depth.

THREE-QUARTERVIEW From this angle, the petals on the left side are even more foreshortened, and the petals on the right curve away from view. The shapes are still ovals, and the inner oval is dramatically off-center.

SIDE VIEW When you look at the daisy in profile, you can see the cup-shaped base of the sepal, and the petals are again of nearly equal size. Notice too how the overlapping petals and irregular spaces help make the drawing look realistic.

DEVELOPING STEMS Stems are essentially yellow-green cylinders. I start with a very diluted layer—a wash—of cadmium yellow. While it is still wet, I paint cerulean blue in the center of the stem. Then I add another layer of phthalo green mixed with a touch of burnt sienna to the center of the second wash. These layers help create the illusion of roundness (see more about form on page 8).

ANATOMY OF A FLOWER You don’t need to memorize all the parts of a flower in order to paint it, but it helps to know a little of its anatomy. The diagram above shows a cross-section of a typical flower and the major elements, demonstrating that all the parts branch out from the center.
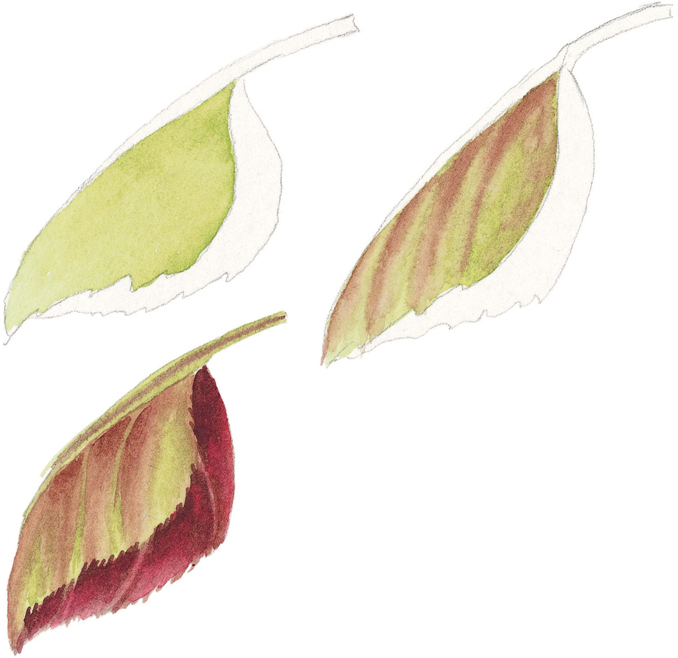
PAINTING A CURLED LEAF First I draw the triangular shape with a pencil; next I wet the shape with clear water and apply a light value of yellow-green to the wet area (called “charging in” color). This is a reddish rose leaf, curled so the green underside is on top. I mix a burnt red color using burnt sienna, permanent magenta, and permanent rose to paint along the veins in the leaf. When dry, I place more red at the bottom of the leaf (the other side of the leaf) and soften it with clear water. I paint a darker value of the red along the top edge of the leaf, rinse the brush, and then brush the color out to the edge with clear water.

PAINTING A FLAT LEAF Again, I start with a base of yellow-green, but this is the top of the leaf, so I will paint over it with red. When dry, I wet the area between each vein with clear water. Then I add a dark value of burnt red at the center vein and the outer edges of the leaf, and I blend it with clear water to reveal some of the yellow-green base. When the red dries, I paint a light layer of permanent rose over the upper side of the leaf and the veins, leaving the lower section highlighted to show where the light strikes.

PETUNIA After drawing the cone-shaped flower, I paint a light graduated wash (dark at one edge and lightening gradually) of mineral violet on the underside of the curled petals. When dry, I wet the top of every other petal. Then I add cerulean blue and mineral violet, lifting out highlights with a clean, damp brush.

When the first petals are dry, I paint the remainder and let them dry. Then I paint the stamen with a yellow-green mix of cadmium yellow and cerulean blue. Next I apply cobalt blue and mineral violet to deepen the value around the stamen, washing over the edge with clear water to soften it.

I add a little permanent rose to the curled edges of the petals for more variety. Then I paint the stem and leaves with different values of yellow-green (mixes of cadmium yellow and ultramarine blue). After the leaves are dry, I wash on a little yellow on the sunlit part of the leaves for highlights.
PETUNIA

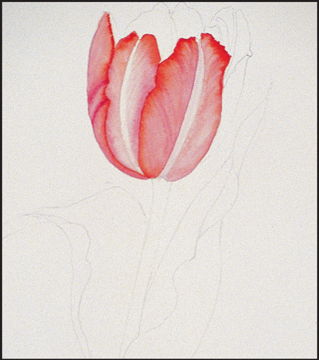
TULIP For the cup-shaped tulip, I start with a light wash of permanent rose on the outer petals. I apply a darker value of permanent rose to the folds, softening the edges with water. Then I add cadmium scarlet to the outside edges, rinse the brush, and stroke along the petal, curving the lines to follow the shape. When dry, I add permanent rose along the vein and soften it with clear water.

For the inside petals, I apply a deeper value of permanent rose from the bottom of the petal to the top, adding more water as I go to create a graduated wash. Then again I add cadmium scarlet along the outer edges, rinse the brush, and stroke along the petal, following its shape. When all the petals are dry, I stroke a very light wash of permanent rose along the center veins.
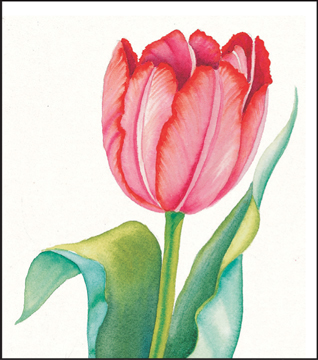
I paint the stems and leaves with mixtures of yellow-green and blue-green, as shown at right. When everything is finished, I study the flower. I decide to add permanent magenta to the base of the inside petals to create a larger value change; that helps “push” the outer petals forward. I also add a light wash of permanent rose to the right petal to improve its overall shape.
TULIP

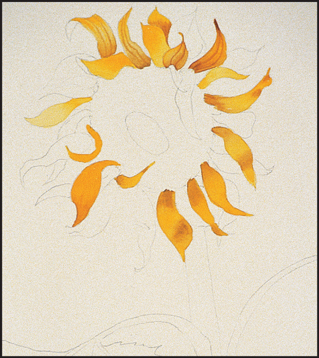
SUNFLOWER The sunflower has a circular shape. I paint the first group of petals with pure cadmium yellow and cadmium yellow mixed with raw sienna. After the petal shapes are dry, I paint the folds with the darker yellow mixture. If there isn’t enough contrast, I add a touch of burnt sienna to the mix. To soften the lines, I paint over them with clear water while the color is still wet.
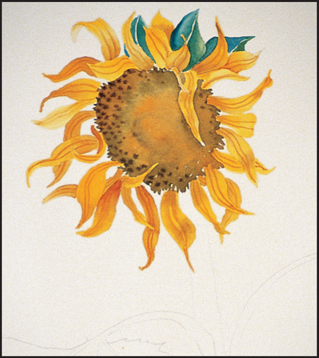
Next I wet the center of the flower and charge in green-yellow and burnished orange mixtures, letting them blend on the paper. While the surface is still wet, I use a #2 round brush to dab in spots of yellows, oranges, browns, and blues to give the center texture. For the spots, I use more pigment on the brush, and I touch it on the paper towel to make it a little drier before applying the color.
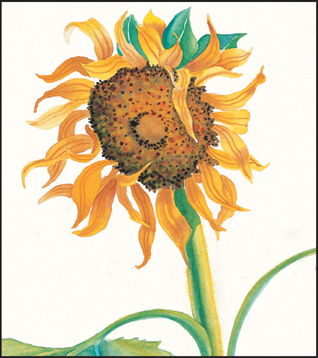
For the leaves, I paint a pale wash of cerulean blue as an undercoat. While the paint is still wet, I charge in cadmium yellow and then allow it to dry. Using a darker value of blue-green, I paint the area between the veins (applying the color to the dry leaf) and then wash over it with clear water. This technique uncovers some of the first layer of color. Then I add the finishing touches to the flower center.
SUNFLOWER
