

✓ | How ASP.NET assemblies can distribute reusable program code, as objects, to many Web pages. |
✓ | How ASP.NET user controls can distribute reusable fragments of HTML and program code, packaged as new HTML tags, to many Web pages. |
✓ | How to develop one simple user control and another of moderate complexity. |
For years, smart developers have learned to recognize, package, and catalog blocks of code they’re likely to use again. Not only is this more productive than creating the same code over and over, it’s also more accurate. The more often programmers use the same piece of code, the more bugs they find and fix. The fixes, of course, appear everywhere the packaged code appears. Shared code also promotes uniformity. If you need to perform exactly the same calculation or process in several places, why not invoke exactly the same piece of code in each place? These are the ideas behind reusable software components, a topic of much discussion in recent years.
Unfortunately, neither HTML nor VBScript nor classic Active Server Pages provides much support for reusable software components. Server-side includes (SSIs) can merge blocks of statements from one file into another, but they’re not very flexible, they add no new capabilities to either HTML or Visual Basic, and they make debugging difficult.
ActiveX controls written in C++ have full access to the Windows API, but are difficult to write. Visual Basic ActiveX controls are easier to write, but they have limited access to the Windows API; also, they require the full Visual Basic product, not just VBScript. No matter how you write an ActiveX control, an administrator needs to register it on the server for you. This leads to further problems. First, administrators are frequently reluctant to install ActiveX controls on shared servers, because unforeseen side effects might create problems for other clients. Second, once the control is registered, any Web site on the same server (rather than just your Web site) can run it.
Fortunately, ASP.NET provides excellent support for reusable components. If your component consists entirely of program modules, assemblies can make them available to as many Web pages as you like. If your component consists largely of HTML code (or primarily creates HTML code), user controls can package them as new HTML tags. Web pages can use user controls in much the same way they use HTML server controls and Web server controls.
Note
Custom server controls and user controls provide two different ways to create your own HTML tags. The primary difference is that you must compile custom server controls ahead of time and store them as assemblies. With user controls, however, you only create source files and ASP.NET compiles them at run time.
In .NET parlance, an assembly is a collection of classes (object types) that other programs can use. You can write assemblies in any .NET programming language you like, including, of course, Visual Basic .NET. All of your code, however, must consist of Class modules—that is, your properties and methods surrounded by statements like these:
Public Class <class-name>
' Your properties and methods go here.
End Class
Between any such pair of lines, you can define as many properties and methods as you like. There are two ways to define properties:
Any variable you code within the class (but not within any other procedure) and declare as Public becomes a property that other modules can read and write. The name of the variable is also the name of the property. Here, for example, is the code required to define a class named Conversion that has a string property named Text:
Public Class Conversion
  Public Text As String
End Class
Any property procedures you code within a class and declare as Public will likewise be available to other programs that use the assembly. Another way to define a Text property, for example, would be as follows:
Public Class Conversion
  Private strText As String
  Property Text() As String
    Get
      Text = strText
    End Get
    Set
      strText = Value
    End Set
  End Property
End Class
The advantage of this approach is that a piece of code runs every time another program (such as your ASP.NET page) reads or writes the property. This is how classes react to changes in property values, or calculate values only on demand.
Note that this example declares the variable strText as Private. This makes it fully accessible within the module that declares it (that is, in this case, within the class), but inaccessible to other programs.
Another module (such as an ASP.NET page) would use the following statements to store a value in the Text property. The first statement creates an instance of the Conversion class, and the second actually stores the property:
Dim objConvert As New Conversion
objConvert.Text = "Other good and valuable considerations."
If you coded Text as a Public variable, the second statement simply stores the given value in it. However, if you coded Text as a property procedure (the second method), setting the Text property executes any code between the Text property procedure’s Set and End Set statements. In the example above, it executes the statement strText = Value. The keyword Value denotes the value that the calling statement provided. Of course, the code between the Set and End Set statements can be as complex—and do as much—as you like.
Retrieving property values works essentially the same way. If you code the property as a Public variable, the statement
strMyText = objConvert.Text
simply copies the current value of the Public variable. If you code a property procedure, retrieving the values executes any statements between the Get and End Get statements. To send a value back to the calling program, assign it to the property name. The Text property procedure in the Conversion class demonstrates this technique.
The advantage of using a property procedure is simply that code within the class can react to changes in the given property. Suppose, for example, that a certain string property should always receive values one character in length. If a property procedure receives a string of any other length, it could use the following statement to throw an exception:
Throw New System.Exception("Describe the problem here.")Property procedures are also good places to perform calculations or take other actions when new property values arrive, or to calculate property values only when another program asks for them.
Any Function or Sub you code within a class and mark as Public becomes a method of that class. The following class, for example, has a method named Clear:
Public Class Excuse
  Public Text As String
  Public Severity as Integer
  Sub Clear()
    Text = ""
    Severity = 0
  End Sub
End Class
To execute this method, you would code
Dim objAlibi As New Excuse

objAlibi.Clear
As you might suspect, Function methods return values and Sub functions don’t.
Of course, both forms can operate directly on variables that the calling program accesses as properties.
The easiest way to use an assembly is to put the code for one or more classes in a file having a .vb filename extension, and then add an @ Assembly directive like the following to each page that uses one or more of those classes:
<%@ Assembly Src="mySource.vb" %>
You can put as many classes as you like in one source file, but as a practical matter, it’s best to put related classes in the same file and unrelated classes in different files. This simplifies maintenance and saves your server from compiling large amounts of unneeded code. A single ASP.NET page can use as many @ Assembly directives as it needs.
It’s also possible to compile assembly files ahead of time. To do this from the command line, open a command window and type
vbc /out:myClasses.dll /target:library [myClasses.vb ...]
Note
The vbc program is part of the .NET Framework software and probably resides in a folder such as C:WINDOWSMicrosoft.NETFrameworkv1.0.3705. The folder name on your system may vary, but unless you add it to your PATH environment variable, you’ll need to type it every time you perform a compilation.
You can specify as many source files as you want; just separate the file names with spaces. The compiler will read in all the files as if you’d combined them into one. If the classes you’re compiling use classes in one or more other assemblies, specify /r:, the path, and the name of each such assembly. For example:
vbc /out:myClasses.dll /target:library myClasses.vb
/r:System.Data.dll /r:myOtherClasses.dll
If you put the resulting .dll file in the /bin folder of your ASP.NET application, the classes it contains will be available to all ASP.NET pages in that application, even if you don’t code an @ Assembly directive. Otherwise, you must code
<%@ Assembly Name="assemblyname" %>Significantly, this form of the @ Assembly directive accepts neither a path nor a filename extension. Instead, ASP.NET searches a predefined series of folders for a .dll file with the name you specify.
For more information about the @ Assembly directive, refer to "Coding the @ Assembly Directive" in Chapter 3. For some examples that use assemblies, refer to Chapter 14.
For years, Web developers have dreamed of the capability to develop their own HTML tags. Well, eureka! ASP.NET provides exactly this capability. ASP.NET calls these tags user controls.
In its simplest form, a user control is a block of HTML code such as the following, located in a file that has a .ascx filename extension:
<p>Buy now. The price will never be less.</p>
Suppose that the salespitch.ascx file contains this line of HTML. To make this code appear in any ASP.NET Web page, you would add the following directive to the top of that page:
<%@ Register TagPrefix="my" TagName="pitch"
             src="salespitch.ascx" %>
Then add the following tag as often as you like to the body of the Web page:
<my:pitch id="pitch01" runat="server" />
The name of this tag, my:pitch, comes from the TagPrefix and TagName attributes of the @ Register directive. The content the tag produces comes from the salespitch.ascx file. (This file name, by the way, can include a relative URL path if necessary.) Congratulations. You’ve just created your first user control.
Just like any other ASP.NET page, user controls can contain program code as well as HTML. Suppose you changed the salespitch.ascx file to contain the following line:
<p>Special price ends <%=Format(Now(),"dd-MMM-yyyy")%>.</p>
The Web visitor would always see the text Special price ends followed by the current date. If 100 pages in your Web site each use salespitch.ascx as a user control, changing that one file will instantly change the content of all 100 pages.
Because this simple example used a code render block, you might wonder whether code declaration blocks are also permissible within a .ascx file. They are. In addition, all the standard events that occur in a complete Web page occur for user controls as well. A Page_Init event occurs when the user control initializes; a Page_Load event when all the controls inside the user controls are finished loading, and so forth.
Did you catch that? The HTML for a user control can itself contain HTML server controls, Web server controls, and other user controls. Code within the same .ascx file can then modify those controls; respond to events; import namespaces, process files and databases; and do almost anything a complete ASP.NET page can do. Once you have this power coded and working, you can add it to as many Web pages as you like. Simply add an @ Register declaration to the top of each Web page that should use the control and a corresponding HTML tag to the body.
ASP.NET creates a new object every time it loads a user control. This means you can use the same user control as often as you like within the same page, and the multiple copies won’t interfere with each other’s internal operation. Of course, if you write a user control that demands exclusive control of some external resource, having two copies active at the same time will present a problem.
To get data into and out of a user control, you must give the control Public properties. As with classes you store in an assembly, two approaches are possible:
Define a Public variable anywhere within a code declaration block, but outside any subroutine, function, or property procedure. Here’s an example:
<script runat="server">

Public Discount As Single = 0

Sub Page_Load (sender As Object, e As EventArgs)
End If
</script>
The statement in blue establishes Discount as a public property of the user control that contains it.
Define a Public property procedure anywhere within a code declaration block. Here’s an example:
<script runat="server">
Private sngDiscount As Single = 0.01
Property Discount() As Single
  Get
    Discount = sngDiscount
  End Get
  Set
    If Value < 1 Then

      sngDiscount = Value
    Else
      sngDiscount = Value / 100

    End If
  End Set
End Property
</script>
Although this technique obviously requires more code, it accomplishes more as well. When the page using the user control sets the control’s Discount property to some value, the code within the Set block treats the incoming property differently depending on its value. If the value is less than 1, such as 0.15, the first blue statement stores it verbatim. Otherwise, the second blue statement divides the value by 100 and stores the result. Consequently, the values 0.15 and 15 both specify a 15-percent discount. You could add additional code to check for negative incoming values, discounts in excess of 100 percent, and so forth. You have no such control over properties you define as Public variables.
As you may have noticed, the preceding discussion hasn’t explained how a Web page actually manipulates the user control’s properties and methods. There are two ways of setting properties and one way of reading them:
First, you can set the value of any Public property simply by coding it as an HTML attribute. Suppose, for example, that a file named showdisc.ascx contains these statements:
<script runat="server">
Public Discount As Single = 0.01
</script>
<p><%=FormatPercent(Discount,1)%>
discount good until
<%=Format(Now,"dd-MMM-yyyy")%>.</p>
Furthermore, suppose that an ASP.NET page contained the following statements:
<%@ Register TagPrefix="my" TagName="discount"
             src="showdisc.ascx" %>

<my:discount Discount=".25" id="disc01" runat="server" />
On the first of June, 2002, this code would display 25% discount good until 1-JUN-2002. The HTML attribute Discount (shown on the last line in blue) sets the value of the user control’s Public variable named Discount (shown earlier in blue). To examine a pair of files that use this technique, open the showdisc.ascx and showdisc.aspx files in the ch09 folder you installed from the companion CD.
The same method works equally well with properties you define by means of Property procedures.
Second, you can both set and read property values using the following syntax:
<tag-id>.<property-name>
Using the same example as before, code in a page containing the tag
<my:discount Discount=".25" id="disc01" runat="server" />
could change the Discount value to 15 percent with this statement:
disc01.Discount = 0.15
Again, this approach works equally well with properties you define by coding Public variables and those you define by coding Property procedures.
If you want a user control to expose methods, code them as Functions or Subs preceded by the word Public. The following code, for example, defines a method that increases the current Discount property by 10 percent. The new code appears in blue:
<script runat="server">
Public Discount As Single = 0.01
Public Sub IncreaseDiscount()
  Discount = Discount * 1.10
  If Discount > 0.99 Then
    Discount = 0.99
  End If
End Sub
</script>
<p><%=FormatPercent(Discount,1)%>
discount good until
<%=Format(Now,"dd-MMM-yyyy")%>.</p>
This code, of course, goes within the user control—that is, within the .ascx file. Assume, as before, that the .aspx file used the following statements to include the user control:
<%@ Register TagPrefix="my" TagName="discount"
             src="showdisc.ascx" %>

<my:discount Discount=".25" id="disc01" runat="server" />
In this case, the statement
disc01.IncreaseDiscount()
would increase the discount from 25 percent to 27.5 percent. To see these concepts in a piece of finished code, open the files showdisc-2.aspx and showdisc-2.ascx in the ch09 folder you installed from the companion CD.
There are just a few rules you need to keep in mind when creating user controls:
A user control can’t use the @ Page directive. Use the @ Control directive instead. Be aware, however, that @ Control supports only the following attributes:
AutoEventWireup, ClassName, CompilerOptions, Debug, Description, EnableViewState, Explicit, Inherits, Language, Src, Strict, WarningLevel
If you wish to specify the following attributes, you must do so on the @ Page directive for the page that contains the user control:
AspCompat, Buffer, ClientTarget, CodePage, ContentType, Culture, EnableSessionState, EnableViewStateMac, ErrorPage, LCID, ResponseEncoding, Trace, TraceMode, Transaction.
Don’t code basic HTML structural tags such as <html>, <head>, and <body> inside a user control. The Web page that uses the user control will provide these.
Similarly, don’t code <form runat="server"> and </form> tags inside a user control. An ASP.NET page can contain only one <form runat="server"> tag, and the top-level ASP.NET page (that is, the .aspx file) will provide it.
The rest of this chapter explains how to create the two user controls shown in the next graphic. The first control displays the page banner, which in turn displays the pictures in the top left and top right corners, the site name Contoso Classified (which is also a picture), and page name (Test Category Selection, in this case).
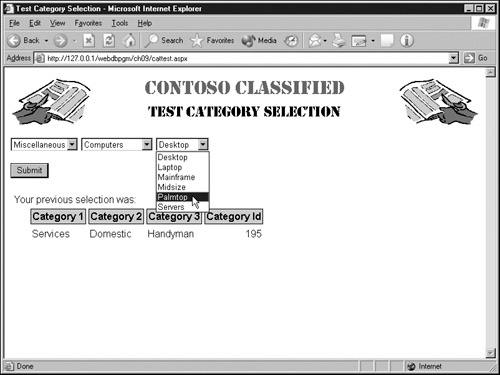
The second control displays the three list boxes, representing three levels of categorization for classified ads. These are cascading list boxes. The leftmost list displays the most general categories, the center list the intermediate categories, and the rightmost list the most specific categories.
When a visitor selects a major category, the center box displays only those subcategories applicable to the major category in question. Similarly, when a visitor selects a subcategory, the rightmost box displays only those sub-subcategories that apply to that subcategory.
The Submit button and the table titled Your Previous Selection Was aren’t part of any user control. They’re simply elements in the overall ASP.NET page.
To support the three-level category scheme, the classified.mdb database uses the two tables shown in the graphic on the next page. The catlist table contains one record for each valid combination of categories from the first, second, and third levels. An AutoNumber field named catlistid identifies each record (that is, each valid combination of categories), and numeric fields named catnr1, catnr2, and catnr3 denote the three category names.
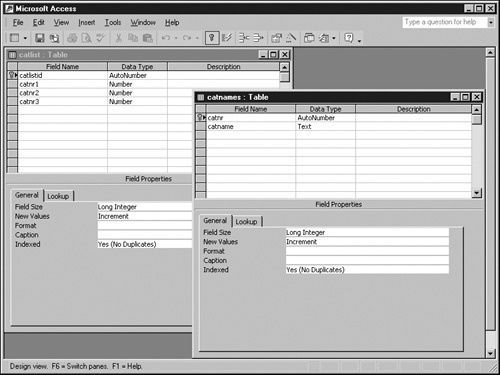
The catnames table translates the numeric values in the catnr1, catnr2, and catnr3 fields into language the Web visitor can understand. This might seem like extra work compared to putting category names, rather than category numbers, in the catlist table, but it has two advantages:
It prevents spelling errors, such as coding one record Auto and another Autos.
One set of category numbers can map to any number of languages: Chinese, English, French, German, Japanese, Spanish, and so forth. Additional columns in the catnames table could easily accommodate such languages.
Note
The use of three category levels is, of course, somewhat arbitrary. A variable number of category levels would be more realistic, but more complex as well: complex enough, in fact, to distract from the task at hand, which is learning the basics of ASP.NET. Therefore, three category levels it is.
The code that defines a user control resides in one file (with a .ascx extension), and the code that displays it resides in another (with a .aspx extension). This presents a minor dilemma in terms of which to create first. In real life, development of both files tends to occur simultaneously. But in this case, based on a coin toss, the page that displays the user control will come first.
If you’d rather look at the finished code than enter it yourself, open the bannertest.aspx page in the ch09 folder you installed from the companion CD. Otherwise, proceed as follows:
Create a new, empty Web page. This should contain the usual <html>, <head>, and <body> tags as well as their usual closing tags. Apply any page-level formatting you want. For example, the sample results include the following statement, which links to a shared cascading style sheet file named normal.css:
<link rel="stylesheet" type="text/css" href="../normal.css">
In the <head> section, insert a set of <title> and </title> tags. Between them, enter the text Test Page Banner.
At the very top of the page, add the customary @ Page directive and an @ Register directive that associates the tag prefix webdbpgm and the tag name banner with the user control file banner.ascx. The top of the page should now look like this:
<%@ Page Language="VB" Explicit="True" %>
<%@ Register TagPrefix="webdbpgm" TagName="banner"
             src="banner.ascx" %>
Just after the <body> tag, add a tag that displays the user control you registered in the previous step. Name the tag banner1, and don’t forget the runat="server" attribute. The <body> section should now look like this:
<body>
<webdbpgm:banner id="banner1" runat="server" />
</body>
Save the page in an executable folder on a Web server that has the .NET Framework installed. For consistency with the book, name the page bannertest.aspx.
This completes the coding for this procedure. The complete HTML listing appears below. The two statements that identify and invoke the user control appear in blue. You can try displaying this page in your Web browser, but because the banner.ascx page doesn’t exist yet, this should produce an error.
<%@ Page Language="VB" Explicit="True" %>
<%@ Register TagPrefix="webdbpgm" TagName="banner"
             src="banner.ascx" %>
<html>
<head>
<title>Test Category Selection</title>
<link rel="stylesheet" type="text/css" href="../normal.css">
</head>
<body>
<webdbpgm:banner id="banner1" runat="server" />
</body>
</html>
This procedure creates a banner.ascx file for the Web page you created in the previous procedure. First, however, you should be aware that visual HTML editors might deal poorly with ascx files. This is because they expect to deal with an entire Web page, not a disconnected fragment of one. All versions of Microsoft FrontPage up to and including FrontPage 2002 share this limitation. As a result, until upgraded software arrives, you should plan on using an ordinary text editor or Visual Studio .NET for any user controls you develop.
If you’d rather look at the finished code than enter it yourself, open the banner.ascx page in the ch09 folder you installed from the companion CD. Otherwise, proceed as follows:
Using any convenient text editor, create a new, blank file.
Add the following directive as the first line in the file:
<%@ Control Explicit="True" %>
Starting at line 2, lay out the page banner any way you like, but don’t add <html>, <head>, <body>, or other such tags. Use only tags that are normally valid inside the <body> section, and don’t use any <form> tags. The example uses a three-column, two-row table with a single cell spanning both rows in columns 1 and 3. Here’s the code:
<table border="0" cellspacing="1" width="100%">
  <tr>
    <td rowspan="2></td>
    <td align="center"></td>
    <td rowspan="2" align="right"></td>
  </tr>
  <tr>
    <td align="center"></td>
  </tr>
</table>
Each cell in the first row will contain a picture. A problem arises when coding these <img> tags, however, in that the relative path to the picture file will be different depending on the location of the page that contains the user control.
The picture that’s supposed to appear in row 1, column 1 is named clad-left.gif, and it’s located in a folder named "images," just off the application’s root. For a Web page located in the application root, the correct picture URL is then images/clad-left.gif. For a Web page located in a subfolder of the application root, however, the correct URL is ../images/clad-left.gif. The more subfolders your application contains, the greater this problem will be.
One common solution is to code URLs relative to the server’s root: /webdbpgm/images/clad-left.gif, for example. This approach fails, however, if your application runs on several different servers (test and production, perhaps) and has a different path on each. It also fails if you have more than one copy of the same application on a single server (in which case the two application paths would surely be different.)
Fortunately, the Request object has a property named ApplicationPath that always provides the URL of the current application’s root. Unfortunately, this property sometimes ends in a slash (as when the root is "/") and sometimes in a folder name (as when the root is a folder such as /webdbpgm). This makes it risky to code
<img src="<%=Server.ApplicationPath%>/images/clad-left.gif">
Therefore, the safest approach is to add the pictures using conventional HTML code, and then write a bit of ASP.NET code that inspects and corrects each picture’s src attribute. To begin, add the three pictures to the first table row. In addition to the usual HTML code, add the following to each <img> tag:
An id= attribute.
The runat="server" attribute.
The enableviewstate="false" attribute.
In the following example, these attributes appear in blue. Note that none of the src= attributes specify paths.
<tr>
    <td rowspan="2"><img
      id=imgLeft src="clad-left.gif"
      runat="server" enableviewstate="false"
      border="0" width="128" height="75"></td>
    <td align="center"><img
      id=imgCenter src="contoso.gif"
      runat="server" enableviewstate="false"
      border="0" width="321" height="23"></td>
    <td align="right" rowspan="2"><img
      id=imgRight src="clad-right.gif"
      runat="server" enableviewstate="false"
      border="0" width="128" height="75"></td>
Add a code declaration block immediately after the directive you coded as line 1. Within that block, create a Page_Load subroutine. The top of the page should now look like this:
<%@ Control Explicit="True" %>
<script runat="server">
Public Sub Page_Load(sender As Object, e As EventArgs)
End Sub
</script>
Within the code declaration block, define a string variable named strAppPath and store the current value of the Request.ApplicationPath property:
Dim strAppPath As String
strAppPath = Request.ApplicationPath
If the value in strAppPath ends in a slash, append the string images/. If it doesn’t, append the string /images/.
If right(strAppPath,1) = "/" Then
  strAppPath = strAppPath & "images/"
Else
  strAppPath = strAppPath & "/images/"
End If
For each picture you added in step 4, modify its src property to begin with the strAppPath value you defined in step 7.
imgLeft.src = strAppPath & imgLeft.src
imgCenter.src = strAppPath & imgCenter.src
imgRight.src = strAppPath & imgRight.src
The reason for coding each <img> tag with the enableviewstate="false" attribute back in step 4 should now be apparent. With ViewState enabled (which is the default), ASP.NET saves and restores the properties of the imgLeft.src, imgCenter.src, and imgRight.src properties from one execution to the next. Thus, on the second and all subsequent executions of the same Web page, all three src properties would already contain path names. Affixing the path name again would create an incorrect path.
The most obvious and efficient solution is to stop ASP.NET from saving and restoring the properties of these objects from one execution to the next, and that’s exactly what specifying enableviewstate="false" does.
Add the following code to the one and only cell in row 2 of the HTML table:
<span style="font-family: Stencil, serif; font-size: 150%"> <script language="JavaScript"> document.write(top.document.title); </script> </span>This code has absolutely nothing to do with ASP.NET; it consists of plain old stuff that’s been around for years. Nevertheless, in case you’re curious, here’s the explanation:
The <span> and </span> tags apply formatting to whatever content they surround. In this case, they tell the browser to use the Stencil font if available and the default serif font if not, and also to display the content at 150 percent of the size of normal text. The JavaScript statement tells the browser to write the title of the current top Web page (that is, whatever appears between its <title> and </title> tags) at the current location within the Web page.
Presuming that you’re going to give each page a proper title, this bit of code saves you from entering it twice: once between the <title> and </title> tags and again somewhere in the body of the Web page.
In a frameset, by the way, the expression top.document.title returns the title of the frameset and not the title of the current Web page. This is usually what you want in a frameset, where a "dummy" page displays the banner in a frame dedicated to that purpose, and pages that appear in other frames have no banners at all. If you always want the title of the current page to appear, drop the top and simply code document.write(document.title).
If the current page isn’t appearing within a frameset, the expressions document.title and top.document.title both return the title of the current page.
Save the file in the same folder where you saved the bannertest.aspx file from the previous procedure. Use the file name banner.ascx.
Copy the files clad-left.gif, clad-right.gif, and contoso.gif from the images folder you installed from the companion CD to an images folder located just inside your application’s root.
This completes the coding for this procedure. The complete HTML listing appears here. The bannertext.aspx file should now invoke and correctly display the page banner.
<%@ Control Explicit="True" %>
<script runat="server">
Public Sub Page_Load(sender As Object, e As EventArgs)
Dim strAppPath As String
strAppPath = Request.ApplicationPath
If right(strAppPath,1) = "/" Then
strAppPath = strAppPath & "images/"
Else
strAppPath = strAppPath & "/images/"
End If
imgLeft.src = strAppPath & imgLeft.src
imgCenter.src = strAppPath & imgCenter.src
imgRight.src = strAppPath & imgRight.src
End Sub
</script>
<table border="0" cellspacing="1" width="100%">
<tr>
<td rowspan="2"><img
id=imgLeft src="clad-left.gif"
runat="server" enableviewstate="false"
border="0" width="128" height="75"></td>
<td align="center"><img
id=imgCenter src="contoso.gif"
runat="server" enableviewstate="false"
border="0" width="321" height="23"></td>
<td align="right" rowspan="2"><img
id=imgRight src="clad-right.gif"
runat="server" enableviewstate="false"
border="0" width="128" height="75"></td>
</tr>
<tr>
<td align="center"><span
style="font-family: Stencil, serif; font-size: 150%">
<script language="JavaScript">
document.write(top.document.title);
</script>
</span>
</td>
</tr>
</table>This procedure creates a user control that displays the three list boxes shown in the screen shot in Create a Contoso Classified Web service. The control populates these list boxes with values from the catlist and catnames tables shown in the graphic in Create a Contoso Classified Web service. A Web page using this control can get the current selection by means of four read-only properties:
Category1 returns the current text selection in the first drop-down list.
Category2 returns the current text selection in the second drop-down list.
Category3 returns the current text selection in the third drop-down list.
CatListId returns the numeric value that identifies the three combined categories.
If you’d rather look at the finished code than enter it yourself, open the selcat.ascx page in the ch09 folder you installed from the companion CD. Otherwise, proceed as follows:
Using any convenient text editor, create a new, blank file.
Add the following directives and a code declaration block as the first five lines in the file:
<%@ Control Explicit="True" Debug="True"%>
<%@ Import Namespace="System.Data" %>
<%@ Import Namespace="System.Data.OleDb" %>
<script runat="server">
</script>
Add the HTML for a five-column, one-row table immediately after the </script> tag you coded in step 2. Add a nonbreaking space character to the cells in columns 2 and 4. Don’t code any <html>, <head>, or <body> tags.
<table border="0" cellspacing="0" cellpadding="0"><tr> <td></td> <td> </td> <td></td> <td> </td> <td></td></tr> </table>
Add a DropDownList Web server control to the first table cell you created in the previous step. In so doing:
Name the control ddlCat1.
Specify that a change to the current selection should generate an immediate postback to the Web server.
Specify that a change to the current selection should run an event handler named ddlCat1Change.
Here’s the code:
<asp:dropdownlist runat="server"
     id=ddlCat1
     AutoPostBack="True"
     onSelectedIndexChanged="ddlCat1Change" />
Copy the four lines you added in step 4 and paste them into the third (and middle) table cell. Then, change the id from ddlCat1 to ddlCat2 and the event handler name from ddlCat1Change to ddlCat2Change:
<asp:dropdownlist runat="server"
     id=ddlCat2
     AutoPostBack="True"
     onSelectedIndexChanged="ddlCat2Change" />
In the fifth and final table cell, add a DropDownList Web server control named ddlCat3. This time, omit the AutoPostBack and onSelectedIndexChanged attributes. The table should then look like this. The code for the three drop-down lists appears in blue.
<table border="0" cellspacing="0" cellpadding="0"><tr> <td><asp:dropdownlist runat="Server" id=ddlCat1 AutoPostBack="True" onSelectedIndexChanged="ddlCat1Change" /></td> <td> </td> <td><asp:dropdownlist runat="Server" id=ddlCat2 AutoPostBack="True" onSelectedIndexChanged="ddlCat2Change" /></td> <td> </td> <td><asp:dropdownlist runat="Server" id=ddlCat3 /></td></tr> </table>
In the procedure you just finished, you specified that when the selection in the ddlCat1 list changes, ASP.NET should run a subroutine named ddlCat1Change. This subroutine will reload the ddlCat2 list.
Similarly, you specified that when the ddlCat2 changes, a subroutine named ddlCat2Change should run. This will reload the ddlCat3 list.
With a little care, the same subroutines can load the lists initially. Here’s how this will work:
The Page_Load subroutine will load the first drop-down list with categories and then fire the ddlCat1Change event handler.
The ddlCat1Change event handler will then load the second drop-down list with categories and fire the ddlCat2Change event handler.
The ddlCat2Change event handler will then load the third drop-down list with categories.
This is all well and good, but it leads to a complication. In which block of code should the control open the database connection? Opening the connection in the Page_Load subroutine works fine when the page first loads, but leads to an exception when the ddlCat1Change event handler is the first to run and the Page_Load subroutine therefore hasn’t yet opened the connection. The same applies to ddlCat2Change.
One solution would be for Page_Load, ddlCat1Change, and ddlCat2Change to each check the database connection’s status and open it if necessary. However, this requires a lot of redundant code, and it doesn’t solve the problem of when and where to close the database connection.
As it turns out, this is a good place to try using the Page_Init and Page_Unload events. Page_Init is guaranteed to run before any other event handlers, and Page_Unload runs after all other processing is completed. So, without further ado, proceed as follows.
Add the following statements inside the code declaration block you created in step 2 of the previous procedure:
Private conClasf As OleDbConnection
' ----------------------------------------
Sub Page_Init(sender As Object, e As EventArgs)
  conClasf = New OleDbConnection( _
            "Provider=Microsoft.Jet.OLEDB.4.0;" & _
            "Data Source=" & _
             Server.MapPath("classified.mdb") & ";")
  conClasf.Open
End Sub
' ----------------------------------------
Sub Page_Unload(sender As Object, e As EventArgs)
  conClasf.Close
  conClasf.Dispose
End Sub
The private conClasf variable points to the connection object that all code elsewhere in the control will use. Because this variable is private, it’s inaccessible outside the user control. Because its declaration is outside any Function, Sub, or Property declaration, the variable is accessible anywhere inside the control.
The statements inside the Page_Init and Page_Unload subroutines involve no new concepts. They open and close the classified.mdb database just as many previous examples have done.
Add a Page_Load subroutine between the Page_Init and Page_Unload subroutines you added in the previous step. For starters, define a string variable named strSQL and an OleDbConnection variable named cmdCat1. Then add an If statement that will run a block of code only when the Web page first loads (that is, when no postback has occurred.)
Sub Page_Load(sender as Object, e as EventArgs)
  Dim strSQL As String
  Dim cmdCat1 As OleDbCommand
  If Not IsPostback Then
'   Statements to load first list box go here.
  End If
End Sub
Replace the comment in step 2 with code that creates a SQL statement, then creates an OleDbCommand object using that SQL statement, then disposes of the OleDbCommand object. The SQL statement should do the following:
For each record in the catlist table, take in the value of the catnr1 field and look up the corresponding category name.
This requires joining the catlist and catnames tables by matching the catnr1 field of the catlist table to the catnr field of the catnames table.
Include only the two fields catlist.catnr1 and catnames.catname in the result set.
Group the result set by the same two fields. In other words, consolidate all records having the same catnr1 and catname values into one.
Sort the result set by category name (that is, by the catname field).
Here’s the required code. Line 6 creates the required OleDbCommand object, specifying the SQL statement from this step and the database connection from step 1.
strSQL = "SELECT catlist.catnr1, catnames.catname " & _
          "FROM catlist INNER JOIN catnames " & _
            "ON catlist.catnr1 = catnames.catnr " & _
      "GROUP BY catlist.catnr1, catnames.catname " & _
      "ORDER BY catnames.catname; "
cmdCat1 = New OleDbCommand(strSQL, conClasf)
'  Code to load first drop-down list will go here.
cmdCat1.Dispose
Loading a DropDownList Web server control from a database turns out to be a relatively simple trick. You point the list’s DataSource property to a data reader, set its DataTextField and DataValueField fields equal to column names in the data source, and then execute the list’s DataBind method. Here’s the required code. Of course you remember that cmdCat1 is the OleDbCommand object you just created and ddlCat1 is the first DropDownList control from the previous procedure.
ddlCat1.DataSource = cmdCat1.ExecuteReader()
ddlCat1.DataTextField = "catname"
ddlCat1.DataValueField = "catnr1"
ddlCat1.DataBind()
ddlCat1.DataSource.Close
Having loaded the first drop-down list box with values, the next task is similarly loading the second drop-down list box. To do this, add the statement shown in blue to the code you created in steps 2, 3, and 4.
If Not IsPostback Then
  strSQL = "SELECT catlist.catnr1, catnames.catname " & _
        "FROM catlist INNER JOIN catnames " & _
          "ON catlist.catnr1 = catnames.catnr " & _
    "GROUP BY catlist.catnr1, catnames.catname " & _
    "ORDER BY catnames.catname; "
  cmdCat1 = New OleDbCommand(strSQL, conClasf)
  ddlCat1.DataSource = cmdCat1.ExecuteReader()
  ddlCat1.DataTextField = "catname"
  ddlCat1.DataValueField = "catnr1"
  ddlCat1.DataBind()
  ddlCat1.DataSource.Close
  cmdCat1.Dispose
  ddlCat1Change(sender, e)
End If
You no doubt recall that in step 4 of the previous procedure you specified ddlCat1Change as the event handler that should run whenever the Web visitor changes the selection in the first list box. As it turns out, responding to a visitor’s change of selection and responding to an initial load of the same list box require exactly the same code.
Of course, the ddlCat1Change routine expects an Object and an EventArgs object as arguments. The blue statement in the foregoing code therefore sends the handiest objects—the ones the Page_Load subroutine received.
Speaking of the ddlCat1Change event handler, now’s as good a time as any to code it. To begin, add the following statements after the End Sub statement that terminates the Page_Load subroutine:
Sub ddlCat1Change(sender As Object, e As EventArgs)
'  Code to load middle drop-down list will go here.
End Sub
As you might suspect, the code that loads the center list box is substantially the same as the code that loads the first list box. Therefore, follow these steps:
Copy all the code from the Page_Load subroutine (excluding the Sub Page_Load and End Sub statements) to the Clipboard.
Delete the comment from step 6 and paste in the code you copied from the Page_Load subroutine.
Delete the If and End If statements.
Change all occurrences of cmdCat1 to cmdCat2 (but only within the ddlCat1Change subroutine).
Likewise, change all occurrences of catnr1 to catnr2.
Finally, change all occurrences of ddlCat1 to ddlCat2.
Add the lines shown in blue in the following code. These lines add a clause to the SQL statement that limits the result set to level-1 categories matching the value of the current selection in the first list box. This code, combined with the previous changes, tells the database system to return all level-2 category numbers (and corresponding category names) that are subordinate to the current level-1 category in the first list box.
Sub ddlCat1Change(sender As Object, e As EventArgs)
  Dim strSQL As String
  Dim cmdCat2 As OleDbCommand
  strSQL = "SELECT catlist.catnr2, catnames.catname " & _
             "FROM catlist INNER JOIN catnames " & _
               "ON catlist.catnr2 = catnames.catnr " & _
            "WHERE (catlist.catnr1 = " & _
                    ddlCat1.SelectedItem.Value & ") " & _
         "GROUP BY catlist.catnr2, catnames.catname " & _
         "ORDER BY catnames.catname; "
  cmdCat2 = New OleDbCommand(strSQL, conClasf)
  ddlCat2.DataSource = cmdCat2.ExecuteReader()
  ddlCat2.DataTextField = "catname"
  ddlCat2.DataValueField = "catnr2"
  ddlCat2.DataBind()
  ddlCat2.DataSource.Close
  cmdCat2.Dispose
  ddlCat2Change(sender, e)
End Sub
The last line of the ddlCat1Change subroutine triggers the ddlCat2Change event handler, which reloads the rightmost, lowest-level list box. Again, the code that loads the low-order list box is substantially the same as the code that loads the first list box. Therefore, follow these steps:
Copy all the code from the ddlCat1Change subroutine (including, this time, the Sub Page_Load and End Sub statements) to the Clipboard.
Paste these statements after the End Sub statement that terminates the ddlCat1Change subroutine.
Change the name of the pasted subroutine from ddlCat1Change to ddlCat2Change.
Change all occurrences of cmdCat2 to cmdCat3.
Change all occurrences of catnr2 to catnr3.
Change all occurrences of ddlCat2 to ddlCat3.
Delete the last line, which should read
ddlCat3Change(sender, e)
Add the lines shown in blue in the following code. These lines add a clause to the SQL statement that limits the result set not only to level-1 categories that match the selection in the first list box, but also to level-2 categories that match the selection in the second list box.
Sub ddlCat2Change(sender As Object, e As EventArgs)
  Dim strSQL As String
  Dim cmdCat3 As OleDbCommand
  strSQL = "SELECT catlist.catnr3, catnames.catname " & _
        "FROM catlist INNER JOIN catnames " & _
          "ON catlist.catnr3 = catnames.catnr " & _
       "WHERE (catlist.catnr1 = " & _
               ddlCat1.SelectedItem.Value & ") " & _
         "AND (catlist.catnr2 = " & _
               ddlCat2.SelectedItem.Value & ") " & _
    "GROUP BY catlist.catnr3, catnames.catname " & _
    "ORDER BY catnames.catname; "
  cmdCat3 = New OleDbCommand(strSQL, conClasf)
  ddlCat3.DataSource = cmdCat3.ExecuteReader()
  ddlCat3.DataTextField = "catname"
  ddlCat3.DataValueField = "catnr3"
  ddlCat3.DataBind()
  ddlCat3.DataSource.Close
  cmdCat3.Dispose
End Sub
Save the file in the same folder where you saved the other files from this chapter. Use the file name selcat.ascx.
At this point, if you added the user control to a Web page, the control would load itself with data. Changing the first list box would reload the second, and changing the second would reload the third. However, the user control still provides no mechanism for code in the surrounding Web page to read the list box values.
To provide such a mechanism, this procedure adds four properties named Category1, Category2, Category3, and CatListId to the user control. The first three each return the selected text from one list box. The CatListId property returns the numeric value that represents the combination of all three. Proceed as follows:
The code that defines the Category1 property is easy. You can put this code before any Sub statement or after any End Sub statement you like, but if you want to reproduce the sample file, put it after the End Sub statement that terminates the Page_Init subroutine.
Public ReadOnly Property Category1 As String
  Get
    Return ddlCat1.SelectedItem.Text
  End Get
End Property
This code simply returns the current value of the ddlCat1.SelectedItem.Text property: that is, the text selected in the first list box.
To define the Category2 and Category3 properties, copy the code you entered in step 1 and paste it twice just after the End Property statement. Then
Returning the CatListId property takes a bit more work. To begin, add the following template after the second End Property statement you pasted in step 2:
Public ReadOnly Property CatListId As Long
  Get
'   Code to obtain and return value will go here.
  End Get
End Property
Replace the comment in step 3 with code that defines a String variable named strSQL, an OleDbCommand variable named cmdCatId, and a Long variable named lngId:
Dim strSQL As String
Dim cmdCatId As OleDbCommand
Dim lngId As Long
Next, construct a SQL statement that searches the catlist table for a record with catnr1, catnr2, and catnr3 values that match the current selections in the left, middle, and right list boxes. The result set should consist of this record’s catlistid value only.
strSQL = _
  "SELECT catlistid " & _
    "FROM catlist " & _
   "WHERE (catnr1 = " & ddlCat1.SelectedItem.Value & ") " & _
     "AND (catnr2 = " & ddlCat2.SelectedItem.Value & ") " & _
     "AND (catnr3 = " & ddlCat3.SelectedItem.Value & ") "
Such a record should always exist. If it didn’t, the corresponding list box selections wouldn’t exist either.
Use this SQL statement and the database connection conClasf to build a new OleDbCommand object named cmdCatId (in accordance with step 4). You remember the conClasf database connection, don’t you? It’s the one that the Page_Init subroutine creates and the Page_Unload subroutine destroys.
cmdCatId = New OleDbCommand(strSQL, conClasf)
By careful arrangement, the value the property procedure needs to return is the first value in the first record of the result set. This is exactly what the ExecuteScalar method of an OleDbCommand object returns. Therefore, run the ExecuteScalar method, save the results in the lngId variable, dispose of the OleDbCommand object, and then return the lngId value to the code that requested the property value. Put this code immediately after the code from the previous step.
lngId = cmdCatId.ExecuteScalar()
cmdCatId.Dispose
Return lngId
Save the file once again in the same folder where you saved the other files from this chapter. Use the file name selcat.ascx.
This completes the code for the selcat user control. The complete HTML listing appears here, but to test it, you’ll need to complete the procedure that follows it.
<%@ Control Explicit="True" Debug="True"%>
<%@ Import Namespace="System.Data" %>
<%@ Import Namespace="System.Data.OleDb" %>
<script runat="Server">
Private conClasf As OleDbConnection
' ----------------------------------------
Sub Page_Init(sender As Object, e As EventArgs)
conClasf = New OleDbConnection( _
"Provider=Microsoft.Jet.OLEDB.4.0;" & _
"Data Source=" & _
Server.MapPath("classified.mdb") & ";")
conClasf.Open
End Sub
' ----------------------------------------
Public ReadOnly Property Category1 As String
Get
Return ddlCat1.SelectedItem.Text
End Get
End Property
' ----------------------------------------
Public ReadOnly Property Category2 As String
Get
Return ddlCat2.SelectedItem.Text
End Get
End Property
' ----------------------------------------
Public ReadOnly Property Category3 As String
Get
Return ddlCat3.SelectedItem.Text
End Get
End Property
' ----------------------------------------
Public ReadOnly Property CatListId As Long
Get
Dim strSQL As String
Dim cmdCatId As OleDbCommand
Dim lngId As Long
strSQL = _
"SELECT catlistid " & _
"FROM catlist " & _
"WHERE (catnr1 = " & ddlCat1.SelectedItem.Value & ") " & _
"AND (catnr2 = " & ddlCat2.SelectedItem.Value & ") " & _
"AND (catnr3 = " & ddlCat3.SelectedItem.Value & ") "
cmdCatId = New OleDbCommand(strSQL, conClasf)
lngId = cmdCatId.ExecuteScalar()
cmdCatId.Dispose
Return lngId
End Get
End Property
' ----------------------------------------
Sub Page_Load(sender as Object, e as EventArgs)
Dim strSQL As String
Dim cmdCat1 As OleDbCommand
If Not IsPostback Then
strSQL = "SELECT catlist.catnr1, catnames.catname " & _
"FROM catlist INNER JOIN catnames " & _
"ON catlist.catnr1 = catnames.catnr " & _
"GROUP BY catlist.catnr1, catnames.catname " & _
"ORDER BY catnames.catname; "
cmdCat1 = New OleDbCommand(strSQL, conClasf)
ddlCat1.DataSource = cmdCat1.ExecuteReader()
ddlCat1.DataTextField = "catname"
ddlCat1.DataValueField = "catnr1"
ddlCat1.DataBind()
ddlCat1.DataSource.Close
cmdCat1.Dispose
ddlCat1Change(sender, e)
End If
End Sub
' ----------------------------------------
Sub ddlCat1Change(sender As Object, e As EventArgs)
Dim strSQL As String
Dim cmdCat2 As OleDbCommand
strSQL = "SELECT catlist.catnr2, catnames.catname " & _
"FROM catlist INNER JOIN catnames " & _
"ON catlist.catnr2 = catnames.catnr " & _
"WHERE (catlist.catnr1 = " & _
ddlCat1.SelectedItem.Value & ") " & _
"GROUP BY catlist.catnr2, catnames.catname " & _
"ORDER BY catnames.catname; "
cmdCat2 = New OleDbCommand(strSQL, conClasf)
ddlCat2.DataSource = cmdCat2.ExecuteReader()
ddlCat2.DataTextField = "catname"
ddlCat2.DataValueField = "catnr2"
ddlCat2.DataBind()
ddlCat2.DataSource.Close
cmdCat2.Dispose
ddlCat2Change(sender, e)
End Sub
' ----------------------------------------
Sub ddlCat2Change(sender As Object, e As EventArgs)
Dim strSQL As String
Dim cmdCat3 As OleDbCommand
strSQL = "SELECT catlist.catnr3, catnames.catname " & _
"FROM catlist INNER JOIN catnames " & _
"ON catlist.catnr3 = catnames.catnr " & _
"WHERE (catlist.catnr1 = " & _
ddlCat1.SelectedItem.Value & ") " & _
"AND (catlist.catnr2 = " & _
ddlCat2.SelectedItem.Value & ") " & _
"GROUP BY catlist.catnr3, catnames.catname " & _
"ORDER BY catnames.catname; "
cmdCat3 = New OleDbCommand(strSQL, conClasf)
ddlCat3.DataSource = cmdCat3.ExecuteReader()
ddlCat3.DataTextField = "catname"
ddlCat3.DataValueField = "catnr3"
ddlCat3.DataBind()
ddlCat3.DataSource.Close
cmdCat3.Dispose
End Sub
' ----------------------------------------
Sub Page_Unload
conClasf.Close
conClasf.Dispose
End Sub
</script>
<table border="0" cellspacing="0" cellpadding="0"><tr>
<td><asp:dropdownlist runat="Server"
id=ddlCat1
AutoPostBack="True"
onSelectedIndexChanged="ddlCat1Change" /></td>
<td> </td>
<td><asp:dropdownlist runat="Server"
id=ddlCat2
AutoPostBack="True"
onSelectedIndexChanged="ddlCat2Change" /></td>
<td> </td>
<td><asp:dropdownlist runat="Server"
id=ddlCat3 /></td></tr>
</table>This procedure will modify the bannertest.aspx file you created earlier in this chapter so that it loads and runs the selcat.ascx user control. This will finally produce the results that appear in the graphic in Create a Contoso Classified Web service.
If you’d rather look at the finished code than enter it yourself, open the cattest.aspx page in the ch09 folder you installed from the companion CD. Otherwise, proceed as follows:
Open the bannertest.aspx page you created earlier in this chapter.
Change the title of the page from Test Page Banner to Test Category Selection.
Add an @ Register declaration for the selcat.ascx file and a code declaration block to the top of the Web page.
<%@ Page Language="VB" Explicit="True" %>
<%@ Register TagPrefix="webdbpgm" TagName="banner"
             src="banner.ascx" %>
<%@ Register TagPrefix="webdbpgm" TagName="selcat"
             src="selcat.ascx" %>
<script runat="server">
</script>
<html>
Add a Web form to the <body> section of the Web page.
<body>
<webdbpgm:banner id="banner1" runat="server" />
<form runat="server">
</form>
</body>
Within the Web form you just created, add a tag that invokes the selcat.ascx user control:
<webdbpgm:selcat id="selcat01" runat="server" />
Follow this with a paragraph that contains an HtmlInputButton control. Give this button the attributes shown here, noting especially the onServerClick value of btnSubClick. This is the name of the event handler that will process clicks from this button.
<p><input type="submit" value="Submit" id="btnSub"
    onServerClick="btnSubClick" runat="server" /></p>
Follow this paragraph with a five-column, three-row table. Add id, runat, and visible attributes to the <table> tag, as shown here:
<table id="tblPrevSel" runat="server" visible="false"
       cellspacing="4" cellpadding="2">
</table>
The id and runat attributes open the table to server-side manipulation. Coding the visible attribute as false initially makes the table invisible to the Web visitor. This is reasonable until the table has data to display.
Code the first table row as a spanned cell five columns wide. Make it display the message shown in blue.
<tr>
  <td colspan="5">Your previous selection was:</td>
</tr>
Make the first cell in the second table row display a spacer picture (that is, an invisible GIF picture). Designate the next four cells as table headings and make them display the text shown in blue.
<tr>
  <td><img border="0" src="../images/trans5x5.gif"
       width="20" height="5"></td>
  <th>Category 1</th>
  <th>Category 2</th>
  <th>Category 3</th>
  <th>Category Id</th>
</tr>
If you don’t have a spacer picture handy, copy the trans5x5.gif file from the images folder you installed from the companion CD.
Add literal controls named litCat1, litCat2, litCat3, and litCatId to cells 2 through 5 in row 3. Right-align cell 5.
<tr>
  <td></td>
  <td><asp:Literal id="litCat1" runat="server"/></td>
  <td><asp:Literal id="litCat2" runat="server"/></td>
  <td><asp:Literal id="litCat3" runat="server"/></td>
  <td align="right"><asp:Literal id="litCatId"
                         runat="server"/></td>
</tr>
This completes visual design of the Web page. However, the btnSubClick event handler you specified in step 6 is still missing. To define this event handler, add the following code to the code declaration block you defined in step 3:
Sub btnSubClick (sender As Object, e As EventArgs)
  litCat1.Text = selcat01.category1
  litCat2.Text = selcat01.category2
  litCat3.Text = selcat01.category3
  litCatId.Text = selcat01.catlistid
  tblPrevSel.visible = True
End Sub
The first statement marks the beginning of the subroutine. The next four lines copy the selcat01 control’s category1, category2, category3, and catlistid properties to the literal controls you created in step 10. Now that there’s data to display, the last line sets the HTML table’s visible property to True.
Save the file in the same folder where you saved the other files from this chapter. Use the file name cattest.aspx.
This completes the code for this chapter. Load the cattest.aspx page into your browser, taking care to specify an http:// URL and a server that has the .NET Framework installed. You should find that
Changing the category selected in the first list box changes the contents of the second and third list boxes.
Changing the category selected in the second list box changes the contents of the third.
Clicking the Submit button reveals the HTML table and displays the current selections.
A complete listing of the cattest.aspx Web page appears next.
<%@ Page Language="VB" Explicit="True" %>
<%@ Register TagPrefix="webdbpgm" TagName="banner"
             src="banner.ascx" %>
<%@ Register TagPrefix="webdbpgm" TagName="selcat"
             src="selcat.ascx" %>
<script runat="server">
Sub btnSubClick (sender As Object, e As EventArgs)
  litCat1.Text = selcat01.category1
  litCat2.Text = selcat01.category2
  litCat3.Text = selcat01.category3
  litCatId.Text = selcat01.catlistid
  tblPrevSel.visible = True
End Sub
</script>
<html>
<head>
<title>Test Category Selection</title>
<link rel="stylesheet" type="text/css" href="../normal.css">
</head>
<body>
<webdbpgm:banner id="banner1" runat="server" />
<form runat="server">
  <webdbpgm:selcat id="selcat01" runat="server" />
  <p><input type="submit" value="Submit" id="btnSub"
     onServerClick="btnSubClick" runat="server" /></p>
  <table id="tblPrevSel" runat="server" visible="false"
         cellspacing="4" cellpadding="2">
    <tr>
      <td colspan="5">Your previous selection was:</td>
    </tr>
    <tr>
      <td><img border="0" src="../images/trans5x5.gif"
           width="20" height="5"></td>
      <th>Category 1</th>
      <th>Category 2</th>
      <th>Category 3</th>
      <th>Category Id</th>
    </tr>
    <tr>
      <td></td>
      <td><asp:Literal id="litCat1" runat="server"/></td>
      <td><asp:Literal id="litCat2" runat="server"/></td>
      <td><asp:Literal id="litCat3" runat="server"/></td>
      <td align="right"><asp:Literal id="litCatId"
                         runat="server"/></td>
    </tr>
  </table>
</form>
</body>
</html>This chapter introduced the concept of assemblies, which are libraries of program objects. You can code such objects in any .NET language, including Visual Basic .NET, and then use the objects in as many Web pages as you like.
The chapter then explained user controls, which contain both program code and HTML. The process of using a user control is very much like that of using an HTML server control or a Web server control; that is, you put an HTML tag where you want the user control to appear and then manipulate its properties. The chapter explained how to code and test two user controls that later chapters will use again.
The next chapter will present some interesting examples that use ASP.NET to perform database queries.