

In this chapter, you’ll learn: | |
✓ | How to get information about files and folders from the server’s file system. |
✓ | How to load, resize, and deliver pictures rather than HTML to the Web visitor’s browser. |
✓ | How to create and use DataTable and DataView objects even when you’re not interacting with a database. |
Now that Part 1 and Part 2 have introduced the fundamental concepts of ASP.NET, Visual Basic .NET, and ADO.NET, it’s time to start using those concepts in Web pages that are closer to real life than the examples you’ve seen so far. To that end, Part 3 explains how to construct a variety of such pages.
You probably wouldn’t use any of these pages in your own site, but that’s not the point. Techniques and proficiency—rather than packaged solutions—are the objective of this book. When using any new programming technique, nothing is so useful as a piece of working code that already does most of what you want.
By now you should understand that ASP.NET overcomes virtually every limitation of classic ASP. Microsoft’s intent is that every .NET programming language will have full access to the common language runtime (CLR), and the CLR will have full access to the entire capability of the Windows operating system. This opens a world of opportunity, including new ways to access the Windows file system and the ability, for the first time, to open, create, manipulate, and deliver graphics as well as text in an Active Server Page (the ASP.NET variety, of course).
Although this chapter is far from a definitive reference on these topics, it does provide an introduction and concrete, working examples. If you’re like most developers, such examples—rather than a mountain of API documentation—are what you need to get started quickly.
important
Speaking of code, this book is about writing ASP.NET code and not about writing HTML. In that spirit, the remaining chapters will provide far more detail about the program code and server objects that make a page work than to the HTML that arranges the results on the page. As you may recall from Chapter 1, basic knowledge of HTML is a prerequisite for this book.
From its very beginning, Visual Basic has provided statements that create, modify, and delete files, folders, and information about both. Over time, however, the syntax and capabilities of these statements have grown increasingly dated. The classic Visual Basic file-handling statements don’t, for example, keep pace with all the file system capabilities present in operating systems such as Windows 2000 and Windows XP.
To resolve this situation, Microsoft introduced a Scripting.FileSystemObject and encouraged programmers everywhere to start using it. To provide an incentive, Microsoft also announced that Visual Basic would eventually drop support for its original file-handling statements.
Unfortunately, the Scripting.FileSystemObject is a COM object, and Microsoft now wants to get rid of COM objects. As a result, there now are three ways for a Visual Basic .NET program to access the file system: the classic Visual Basic file-handling statements (which Microsoft still intends to discontinue), the Scripting.FileSystemObject (another facility Microsoft hopes to discontinue), and a new set of .NET classes in the System.IO namespace.
The table at the end of this paragraph lists the System.IO classes you’re most likely to use in an ASP.NET page. For the most part, the FileInfo and DirectoryInfo classes provide information about files and folders, while the File and Directory classes provide access to the contents of a specific file or folder. These distinctions, however, aren’t absolute. Because each of the four objects has properties that point to one or more of the others, their capabilities tend to overlap.
Class | Description |
|---|---|
Directory | Provides access to the contents of a specific directory. |
DirectoryInfo | Provides information and access to a specific directory. In general, the Directory class is stronger in terms of methods and the DirectoryInfo class is stronger in terms of properties. However, these two classes overlap to some extent. |
File | Provides access to the contents of a specific file. |
FileInfo | Provides information and access to a specific file. In general, the File class is stronger in terms of methods and the FileInfo class is stronger in terms of properties. However, these two classes overlap to some extent. |
Path | Processes directory strings in a cross-platform manner. |
The Path class is the exception in this group; it provides a number of properties and methods designed to operate on file and folder names in a way that’s not specific to any operating system. The next graphic shows a Web page displaying the Path object’s property names and typical values on a Windows XP system. Using these properties instead of hard-coded literals makes your code more portable among operating systems.
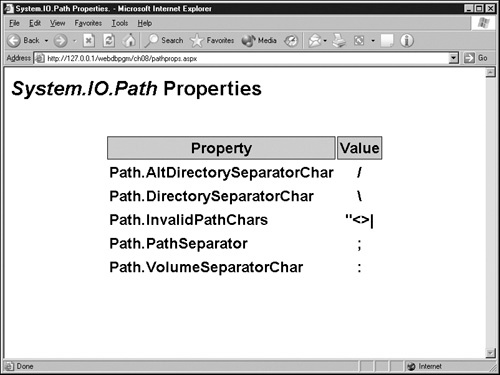
The code for the Web page in this graphic is very simple: the characters in the Value column result from expressions like <%=Path.DirectorySeparatorChar%> that correspond to the names in the Property column. To examine this page, open the file pathprops.aspx in the ch08 folder you installed from the companion CD.
The Path class also provides a handy assortment of methods that manipulate file and folder names. The following table lists each one. For the most part, these are string-handling functions that don’t access the file system itself. The expression Path.GetDirectoryName("myfile.txt"), for example, returns an empty string. It doesn’t convert myfile.txt to a fully qualified path before extracting the directory name.
System.IO.Path Methods | |||
|---|---|---|---|
Result Type | Method | Description | Argument Type |
String | ChangeExtension | Changes a filename extension. | Two strings |
String | Combine | Combines two file paths. | Two strings |
String | GetDirectoryName | Extracts the directory path of a file. | String |
String | GetExtension | Extracts the extension of the specified path. | String |
String | GetFileName | Extracts the name and extension parts of the given path. | String |
String | GetFileName Without Extension | Extracts a file name without its extension. | String |
String | GetFullPath | Expands the specified path to a fully qualified path. | String |
String | GetPathRoot | Gets the root (such as C:) of the specified path. | String |
String | GetTempFileName | Creates an empty temporary disk file and returns its name. | None |
Result Type | Method | Description | Argument Type |
|---|---|---|---|
String | GetTempPath | Gets the path of the current system’s temporary folder. | None |
Boolean | HasExtension | Determines whether a path includes a filename extension. | String |
Boolean | IsPathRooted | Gets a value determining whether the specified path includes the root. | String |
The following code is typical for reading a text file. A TextReader is an object that (what else?) reads text files. The File object’s OpenText method creates a TextReader, and the reader’s ReadLine method returns another line of text every time you call it. When the ReadLine method reads past the end of a file, it no longer returns an object. Testing the result for Is Nothing therefore tests for the end of the file.
Dim trdInput As TextReader
Dim strLine As String

trdInput = File.OpenText(<filename>)
strLine = trdInput.ReadLine()
While Not (strLine Is Nothing)
'   Code to process one line goes here.
  strLine = trdInput.ReadLine()
End While
trdInput.Close()
Other Open statements include Open, OpenRead, and OpenWrite. Open creates a FileStream object that can access the file randomly. OpenRead creates a TextReader that provides read-only access. OpenWrite creates a TextWriter for sequential output. The TextWriter’s Write and WriteByte methods append data to the file. For more information about these objects, search the MSDN Web site (msdn.microsoft.com/library) for the term System.IO.
For examples of retrieving file and folder information, refer to the procedures that constitute the rest of this chapter.
Showing off photographs is one of the most popular applications on the Web. It doesn’t really matter whether the photos are of yourself, your family, your vacation, birds, cars, cactuses, crocodiles, or anything else; nearly everyone likes to show off photographs.
Unfortunately, building a Web site that previews, selects, and displays photos is quite tedious. You have to organize the photos into categories, then create miniature versions of each photo (thumbnails), then arrange the thumbnail pictures on a Web page, and then code hyperlinks from each thumbnail to the full-sized picture. Even then, the results are hard for Web visitors to browse. After viewing a full-sized picture, the visitor must click the Back button before selecting another picture. Click a picture; click Back. Click a picture; click Back. In no time at all, your visitors will be seasick or worse.
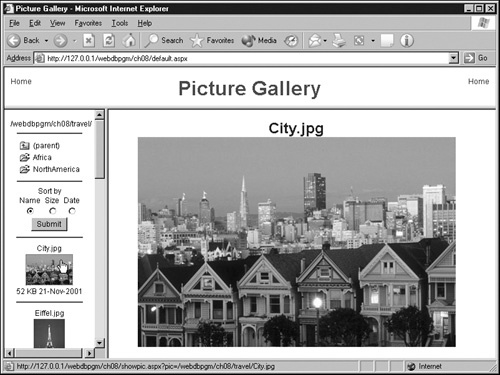
The following Web page changes all that. Simply copy this page and its accompanying files into a folder on your site, fire it up, and navigate to any folder full of pictures you like. The Web page will create, display, and hyperlink a list of thumbnails on the fly. Clicking one of these dynamic thumbnails on the left displays the full-sized picture on the right. What’s more, the visitor can display the thumbnails in order by file name, size, or date.
Constructing this Web page actually requires all of the following files. Only two of them, however, are in any way distinctive: picture.aspx and piclist.aspx.
default.aspx is the page that divides the browser window into three frames. For the most part, this is a perfectly ordinary frames page. It does, however, contain a small amount of ASP.NET code that passes an optional path name from the frames page URL to the piclist.aspx page that occupies the lower left frame.
banner.htm provides the banner that occupies the top frame. This is a perfectly ordinary HTML page.
piclist.aspx occupies the lower left frame and displays the list of thumbnails. It also provides icons the visitor can use to move about the site: that is, to the parent folder or any subfolder of the current path. This is a relatively complex ASP.NET page.
picture.aspx is the page that creates thumbnails on the fly. Calling this file a page is a bit of a misnomer; instead of sending HTML to the browser, it sends a resized GIF or JPEG picture. The following HTML, for example, displays a thumbnail of the butterfly.jpg picture. The thumbnail will be 100 pixels along its longest dimension.
<img src="picture.aspx?size=100&url=butterfly.jpg">
showpic.htm occupies the lower right frame when the frameset initially loads. This is basically a blank page with a background that matches the rest of the application.
showpic.aspx replaces the showpic.htm file and displays any picture that the visitor selects. The ASP.NET code in this page simply retrieves a picture URL from the query string, displays it as a title, and adds it to an <img> tag.
folder-open.gif and folder-up.gif provide folder icons for the piclist.aspx page.
normal.css and small.css provide uniform cascading style sheet rules (and therefore a uniform appearance) for all the .aspx and HTML pages in the application.
If you want to use the Picture Gallery application as is, copy all these files from the ch08 folder you installed from the companion CD into any convenient folder on your .NET-equipped Web server. If you want to create the picture.aspx and piclist.aspx pages yourself, copy all the files except these two.
The complete HTML listing for the default.aspx file appears below. This is perfectly ordinary HTML, except that the URL for the piclist.aspx file contains the query string shown in blue. This query string ensures that if the default.aspx page receives a path= value in its query string, the piclist.aspx page will receive the same value. As you’ll discover later in the chapter, the path= value can specify the first folder location that the piclist.aspx page displays.
<html>
<head>
<title>Picture Gallery</title>
</head>
<frameset rows="64,*">
  <frame name="banner" src="banner.htm"
     target="contents" scrolling="no" noresize>
  <frameset cols="155,*">
    <frame name="contents" target="main"
      src="piclist.aspx?path=<%=request("path")%>"
      scrolling="auto">
    <frame name="main" src="showpic.htm" target="_self">
  </frameset>
  <noframes>
  <body>
  <p>This page uses frames, but your browser doesn't support
     them.</p>
  </body>
  </noframes>
</frameset>
</html>
The showpic.aspx page contains only two shreds of ASP.NET code. First the code shown here in blue modifies an <img> tag to display a picture file that the code retrieves from a query string or form field variable named pic:
<img border=0 src="<%=request("pic")%>">Second, in the heading at the top of the page, the following expression displays the same picture’s file name (but not its path):
<%=Path.GetFileName(request("pic"))%>Because this expression uses the Path object, the following declaration must also appear at the top of the page:
<%@ Import Namespace="System.IO"%>
To view the complete showpic.aspx page, open it from the ch08 folder you installed from the companion CD.
The procedure in this section creates an ASP.NET page that reads a picture from the server’s file system, reduces the picture in size, and sends the result directly to the visitor’s browser. The HTML to invoke this page should be an <img> tag like this:
<img src="picture.aspx?size=100&url=sparrow.jpg">
The size= parameter specifies the number of pixels in the thumbnail’s longest edge. If you want all thumbnails to be the same height or width, code a height= or width= parameter instead of size=. The url= parameter specifies the location of the full-sized picture file, which must reside on the same server as the Picture Gallery page.
If you’d rather look at the finished code than enter it yourself, open the picture.aspx page in the ch08 folder you installed from the companion CD. Otherwise, proceed as follows:
Start your favorite Web page editor and create a new blank page. If the editor initializes the page with any HTML tags, delete them.
Save the blank page. Specify a file name of picture.aspx and the same folder location as the default.aspx page. If the editor persists in adding HTML tags, precede them with the following line of code. Then locate all your ASP.NET code before this line:
<%response.end%>
These precautions are necessary because the finished picture.aspx file shouldn’t contain any HTML tags. If your HTML editor persists in adding <html>, <body>, or other tags, you may as well take countermeasures now.
Add the following directives and a code declaration block at the top of the page. Create a Page_Load subroutine inside the code declaration block. The page needs the System.Drawing and System.Drawing.Imaging namespaces because of the graphics processing it will perform.
<%@ Page Language="VB" Explicit="True" Debug="True"%>
<%@ Import Namespace="System.Drawing" %>
<%@ Import Namespace="System.Drawing.Imaging" %>
<script runat="server">
Sub Page_Load(sender As Object, e As EventArgs)
End Sub
</script>
Add the following declarations to the Page_Load subroutine you just created. bmpInput and bmpThumb will hold the full-sized and thumbnail graphics, respectively. The lngSiz, lngWid, and lngHgt variables will hold any size=, width=, or height= values the Web designer specifies.
Dim bmpInput As Bitmap
Dim bmpThumb As Bitmap
Dim lngSiz As Long = 0
Dim lngWid As Long = 0
Dim lngHgt As Long = 0
Check the Request.QueryString collection for size, width, and height values. If any of these are numeric, convert them to long integers and save them in the variables you just defined. Code these statements immediately after the declarations you coded in the previous step.
If IsNumeric(Request.QueryString("size")) Then
  lngSiz = Clng(Request.QueryString("size"))
End If
If IsNumeric(Request.QueryString("width")) Then
  lngWid = Clng(Request.QueryString("width"))
End If
If IsNumeric(Request.QueryString("height")) Then
  lngHgt = Clng(Request.QueryString("height"))
End If
The HTML that invokes the picture.aspx page presumably specifies a picture file to open. As the introduction to this procedure explained, a query string variable named url should provide this. Convert the given URL to a physical file location, and then open it as a bitmap. The Bitmap.FromFile method reads a picture file from a disk and loads it into memory so add the following code immediately after the code from the previous step.
bmpInput = Bitmap.FromFile( _
  Server.MapPath(Request.QueryString("url")))
The statement in step 6 will throw an exception if the HTML doesn’t specify a url query string variable, of if the variable doesn’t specify a valid picture file. Therefore, surround the statement with a Try ... Catch ... End Try block. If an exception occurs, manufacture a gray rectangle to use instead of a real picture. Blue indicates the new code; the original Bitmap.FromFile statement remains in black.
Try
  bmpInput = Bitmap.FromFile( _
    Server.MapPath(Request.QueryString("url")))
Catch
  bmpInput = New Bitmap(100,50)
  Dim gfxInput As Graphics = Graphics.FromImage(bmpInput)
  gfxInput.FillRectangle( _
    New SolidBrush(Color.FromARGB(255,204,204,204)), _
    0, 0, 100, 50)
  gfxInput.Dispose
End Try
The first statement inside the Catch block creates a new Bitmap object 100 pixels wide and 50 pixels high. The second statement creates a Graphics object that points to the new Bitmap object. This is because you can draw only on a Graphics object, and not on the underlying Bitmap object.
The third statement spans three lines and draws a gray rectangle that fills the entire Bitmap object. The expression Color.FromARGB(255,204,204,204) denotes a color with no transparency and with red, green, and blue components of 204 (where zero indicates no color and 255 indicates maximum). The arguments 0, 0 and 100, 50 specify the top left and bottom right coordinates of the rectangle.
The gfxInput.Dispose statement removes the Graphics object (but not the Bitmap) from memory.
Whatever the result of steps 6 and 7, the Bitmap object bmpInput now contains a valid picture. The next step is to calculate the size of the thumbnail. Assuming that thumbnails should always have the same ratio of height to width as the original picture, the HTML should specify only one thumbnail dimension and the aspx code should calculate the other. Here are the rules:
If the size value is greater than zero, it specifies either the height or the width of the thumbnail, whichever is larger. The code will ignore any height or width values.
If the size value is less than or equal to zero, the code looks for a height value. This value, if greater than zero, directly specifies the height of the thumbnail.
If neither the size value nor the height value is greater than zero, the width value, if greater than zero, directly specifies the width of the thumbnail.
If none of these rules apply, the code will return the full-sized image.
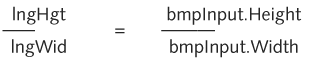
Calculating the missing dimension is a simple exercise in mathematics. The variables lngHgt and lngWid will specify the height and width of the thumbnail. The expressions bmpInput.Height and bmpInput.Width provide the height and width of the original picture. If both pictures are to have the same ratio of height to width, then
You already know bmpInput.Height, bmpInput.Width, and either lngHgt or lngWid. Knowing three values in the equation, you can always calculate the fourth. The code is as simple as this, which you add after the statements you coded in the previous step:
If lngSiz > 0 Then
  If bmpInput.Height > bmpInput.Width Then
    lngWid = (lngSiz * bmpInput.Width)/bmpInput.Height
    lngHgt = lngSiz
  Else
    lngHgt = (lngSiz * bmpInput.Height)/bmpInput.Width
    lngWid = lngSiz
  End If
ElseIf lngHgt > 0 Then
  lngWid = (bmpInput.Width * lngHgt) / bmpInput.Height
ElseIf lngWid > 0 Then
  lngHgt = (bmpInput.Height * lngWid) / bmpInput.Width
End If
If the preceding calculations have failed to produce thumbnail dimensions (that is, if lngSiz, lngHgt, and lngWid are all 0 or less), or if the original picture is smaller than the thumbnail dimensions, write out the original picture. Otherwise, create a new Bitmap object based on the original Bitmap(but using the new height and width), write out the new Bitmap, and then dispose of it. Phew. Here’s the code, which belongs next in sequence after the code from the previous step:
If (lngHgt < 1) Or (bmpInput.height < lngHgt) Then
  WritePicture(bmpInput)
Else
  bmpThumb = New Bitmap(bmpInput, lngWid, lngHgt)
  WritePicture(bmpThumb)
  bmpThumb.Dispose()
End If
Step 11 will explain how to code the WritePicture subroutine.
To complete the Page_Load subroutine, dispose of the Bitmap object that contains the original picture. This statement goes after the code you entered in step 9 and before the Page_Load subroutine’s End Sub statement:
bmpInput.Dispose()
The WritePicture subroutine receives one argument, a Bitmap object, and does so by reference. This saves Visual Basic .NET the work of creating a copy of the Bitmap object for use as the argument. Here’s what happens next:
If the original picture’s file name indicates that it’s a GIF file, the code first sets the Response.ContentType property to image/gif, which is the MIME type code for GIF pictures. It then uses the supplied Bitmap object’s Save method to write the picture into the Response object’s output stream as a GIF file.
Otherwise, the code tells the browser to expect a JPEG picture and then sends a JPEG picture.
Code the subroutine as shown here:
Sub WritePicture(byRef abmpPic As Bitmap)
  If Lcase(right(Request.QueryString("url"),4)) = _
      ".gif" Then
    Response.ContentType = "image/gif"
    abmpPic.Save(Response.OutputStream, ImageFormat.GIF)
  Else
    Response.ContentType = "image/jpeg"
    abmpPic.Save(Response.OutputStream, ImageFormat.JPEG)
  End If
End Sub
This completes the code for the picture.aspx page. This is an unusual page because it doesn’t send HTML to the browser; instead, it sends an electronic picture. To test it, try these steps:
Browse the page by typing an ordinary URL into your browser’s Address field. For example, type
http://127.0.0.1/webdbpgm/ch08/picture.aspx
In response, the browser should display a gray rectangle 100 pixels by 50 pixels in size.
Specify a picture by extending the URL from step 1 with ?url= and the URL of a picture on the same server. Here’s an example:
http://127.0.0.1/webdbpgm/ch08/picture.aspx?url=travel
/City.jpg
The browser should display a full-sized rendering of the picture.
Extend the URL again by appending &size=100 to the URL from the previous test. Unless the original picture’s height and width are both less than 100, this should display a thumbnail version of the picture. Try some additional size values and then try replacing the keyword size with height or width.
Manufacturing thumbnail pictures on the fly undoubtedly consumes more server resources than delivering thumbnail pictures from a disk. However, as your testing should demonstrate, the delay at the browser is imperceptible. And for sure, generating thumbnails on the fly gets you out of the business of generating them ahead of time.
Here’s the complete code listing for this example:
<%@ Page Language="VB" Explicit="True" Debug="True"%>
<%@ Import Namespace="System.Drawing" %>
<%@ Import Namespace="System.Drawing.Imaging" %>
<script runat="server">

Sub Page_Load(sender As Object, e As EventArgs)
  Dim bmpInput As Bitmap
  Dim bmpThumb As Bitmap
  Dim lngSiz As Long = 0
  Dim lngWid As Long = 0
  Dim lngHgt As Long = 0

  If IsNumeric(Request.QueryString("size")) Then
    lngSiz = Clng(Request.QueryString("size"))
  End If
  If IsNumeric(Request.QueryString("width")) Then
    lngWid = Clng(Request.QueryString("width"))
  End If
  If IsNumeric(Request.QueryString("height")) Then
    lngHgt = Clng(Request.QueryString("height"))
  End If

  Try
    bmpInput = Bitmap.FromFile( _
      Server.MapPath(Request.QueryString("url")))
  Catch
    bmpInput = New Bitmap(100,50)
    Dim gfxInput As Graphics = Graphics.FromImage(bmpInput)
    gfxInput.FillRectangle( _
      New SolidBrush(Color.FromARGB(255,204,204,204)), _
      0, 0, 100, 50)
    gfxInput.Dispose
  End Try

  If lngSiz > 0 Then
    If bmpInput.Height > bmpInput.Width Then
      lngWid = (lngSiz * bmpInput.Width)/bmpInput.Height
      lngHgt = lngSiz
    Else
      lngHgt = (lngSiz * bmpInput.Height)/bmpInput.Width
      lngWid = lngSiz
    End If
  ElseIf lngHgt > 0 Then
    lngWid = (bmpInput.Width * lngHgt) / bmpInput.Height
  ElseIf lngWid > 0 Then
    lngHgt = (bmpInput.Height * lngWid) / bmpInput.Width
  End If
  If (lngHgt < 1) Or (bmpInput.height < lngHgt) Then
    WritePicture(bmpInput)
  Else
    bmpThumb = New Bitmap(bmpInput, lngWid, lngHgt)
    WritePicture(bmpThumb)
  End If

  bmpInput.Dispose()
End Sub

Sub WritePicture(byRef abmpPic As Bitmap)
  If Lcase(right(Request.QueryString("url"),4)) = _
      ".gif" Then
    Response.ContentType = "image/gif"
    abmpPic.Save(Response.OutputStream, ImageFormat.GIF)
  Else
    Response.ContentType = "image/jpeg"
    abmpPic.Save(Response.OutputStream, ImageFormat.JPEG)
  End If
End Sub
</script>The next six procedures explain how to code the Web page that occupies the lower left frame of the Picture Gallery frameset. This page has four distinct areas of content, all visible in Add validation controls to the registration page:
The first area is a single line of output that displays the current folder location.
The second area lies between the first and second horizontal lines. It displays an icon that repositions the display to the parent of the current folder, as well as icons that reposition the display to each subfolder within the current folder. (Of course, if no subfolders exist, no such icons will appear.) ASP.NET code loads any subfolder names into a DataTable object so that a Repeater object can display them.
The third area contains three radio buttons and a Submit button. To change the order of the thumbnails in the fourth area, the Web visitor clicks the corresponding radio button and then the Submit button. The third area itself is a typical Web form.
The fourth and final area contains one thumbnail for each picture file in the current folder. Clicking any thumbnail displays the corresponding full-sized picture in the large frame at the right.
To display the list of thumbnails, the Web page creates a second DataTable object, loads it with one row for each picture file in the current folder, creates a sorted view of the DataTable, and displays the view using another Repeater object.
All in all, this page is certainly more complex than the examples you’ve seen up to now. However, it’s very practical, and it illustrates a number of interesting techniques in one concise package.
The instructions that follow clearly explain how to build the page. At the end, you’ll find that the number of lines in this page, counting both Visual Basic .NET and HTML code, is less than the number of lines in most ordinary Web pages. If you’d rather look at the finished code than enter it yourself, open the piclist.aspx page in the ch08 folder you installed from the companion CD.
To begin creating the Web page that displays the folders and thumbnails, proceed as follows:
Create a new, blank Web page containing the usual structural tags, an @ Page directive, @ Import directives for the System.IO and System.Data namespaces, a code declaration block, and a Page_Load subroutine. When you’re done, the top of the file should look like this:
<%@ Page Language="VB" Explicit="True" Debug="True"%>
<%@ Import Namespace="System.IO"%>
<%@ Import Namespace="System.Data"%>
<script runat="server">
Sub Page_Load(sender As Object, e As EventArgs)
'   Page load statements will go here.
End Sub
</script>
<html>
The first time the page loads, code in the Page_Load subroutine needs to check the Request.Params collection for a path value. If the visitor’s request specified such a value—probably by appending ?path=<your-path> to the URL—the page needs to retrieve it. If the path value turns out to be empty, the Web page uses a period ("."), which means "the folder where this page resides." In all cases, the variable strPath now contains an initial folder path. Here’s the code so far:
Sub Page_Load(sender As Object, e As EventArgs)
  Dim strPath As String
  If Not Page.IsPostBack Then
    strPath = Request.Params("path")
    If strPath = "" Then
      strPath = "."
    End If
'    Code to finish Page_Load processing will go here.
  End If
End Sub
Next, the Page_Load subroutine converts the path in strPath to a fully qualified URL path. It does this by running the strPath value through the ResolveURL method, which the Page object conveniently provides. Finally, the code ensures that the strPath value ends in a slash, stores it in a Label control named lblPath, and runs a subroutine named DisplayFolder that displays the contents of the given folder. Replace the comment in the previous step with this code:
strPath = ResolveURL(strPath)
If Right(strPath,1) <> "/" Then
  strPath = strPath & "/"
End If
lblPath.Text = strPath
DisplayFolder()
This completes the code for the Page_Load subroutine. Note that this subroutine performs no processing during postbacks. Within this page, specific event handlers handle all postback events.
Before you forget, add a Label Web server control to the <body> section, and name it lblPath. This will display the first area of content that the introduction described. The <body> section will then look like this:
<body>
<asp:label id="lblPath" runat="server" />
</body>
Define a DisplayFolder subroutine that accepts no arguments. To do this, add the following statements after the End Sub statement that completes the Page_Load subroutine:
Sub DisplayFolder()
End Sub
To begin retrieving information about the current folder, first retrieve its URL from the lblPath Web server control. Convert this value from a URL path to a file system path using the Server.MapPath method, and then use the results to create a new DirectoryInfo object. Here’s the code that does this:
Sub DisplayFolder()
  Dim strPath As String
  Dim dnfCur As DirectoryInfo
'   More declarations will go here
  strPath = lblPath.Text
  dnfCur = New DirectoryInfo(server.mappath(strPath))
'   More statements will go here
End Sub
A DataTable object will contain the list of available subfolders. To begin creating this object, add the following declaration above the first comment in step 6:
Dim dtbDirs As DataTable
To create the DataTable object, a table named Sublist, and a table column named Dirname, add the following statements after the second comment in step 6:
dtbDirs = new DataTable("sublist")
dtbDirs.Columns.Add("DirName", _
     System.Type.GetType("System.String"))
The first statement creates the new DataTable and the new table.
The second statement adds a column (that is, a field) named DirName to the table in the dtbDirs DataTable object. The unlikely expression System.Type.GetType("System.String") returns a value that identifies the new column’s data type as a String.
Write a loop that inspects each subdirectory within the current folder. To do this, add the following declaration after the one from step 7. Then add the next two statements just after those you entered in step 8:
Dim dnfSub As DirectoryInfo

For Each dnfSub In dnfCur.GetDirectories
'  Code to process one subfolder will go here.
Next
The GetDirectories method of a DirectoryInfo object (dnfCur from step 6, in this case) returns a collection of DirectoryInfo objects: one for each subfolder the first DirectoryInfo object contains.
Within the loop you created in step 9, first bypass all folder names that begin with an underscore character ("_"). These are usually private FrontPage folders that your Web visitors would find confusing at best.
For each remaining subfolder, tell the DataTable object dtbDirs to create a new Row object, copy the name of the current subfolder into its DirName field, and then add the row to the table. Here’s the required code. Add the declaration after the one you added in step 9, and add the code inside the loop you created in that step.
Dim rowPix As DataRow

If left(dnfSub.Name,1) <> "_" Then
  rowPix = dtbDirs.NewRow()
  rowPix("DirName") = dnfSub.Name
  dtbDirs.Rows.Add(rowPix)
End If
Make the DataTable object dtbDirs the data source of a Repeater object named repDirs, and then call the Repeater object’s DataBind method to load it with data. The DisplayFolder subroutine should now look like this:
Sub DisplayFolder()
  Dim strPath As String
  Dim dnfCur As DirectoryInfo
  Dim dtbDirs As DataTable
  Dim dnfSub As DirectoryInfo
  Dim rowPix As DataRow
'   Additional declarations will go here
  strPath = lblPath.Text
  dnfCur = New DirectoryInfo(server.mappath(strPath))

  dtbDirs = new DataTable("sublist")
  dtbDirs.Columns.Add("DirName", _
       System.Type.GetType("System.String"))

  For Each dnfSub In dnfCur.GetDirectories
   If left(dnfSub.Name,1) <> "_" Then
      rowPix = dtbDirs.NewRow()
      rowPix("DirName") = dnfSub.Name
      dtbDirs.Rows.Add(rowPix)
    End If
  Next

  repDirs.DataSource = dtbDirs
  repDirs.DataBind
'   More statements will go here
End Sub
At this point, the program code for displaying the list of subfolders is complete. The Repeater object repDirs that actually displays the list, however, is still missing. The next procedure explains how to code this object.
The last step in the previous procedure sent the contents of a DataTable into a Repeater object for display. To create this Repeater, proceed as follows.
To finish the work of displaying subfolders, move to the <body> section of the Web page and create a Web form after the lblPath Web server control you added previously. The attribute style="margin:0" is strictly for appearance; it eliminates the white space that normally surrounds a form.
<body>
<asp:label id="lblPath" runat="server" />
<form method="POST" style="margin:0" runat="server">
</form>
</body>
Add a three-column, seven-row HTML table inside the Web form you created in the previous step. Rows 1, 2, 3, 4, and 7 should contain a single cell spanning three columns. The complete table, in somewhat compressed form, appears here.
<form method="POST" style="margin:0" runat="server">
<table border="0" cellspacing="0" cellpadding="0"
    "style="margin:0" align="center">
  <tr><td colspan="3"></td></tr>
  <tr><td colspan="3"></td></tr>
  <tr><td colspan="3"></td></tr>
  <tr><td colspan="3"></td></tr>
  <tr><td></td><td></td><td></td></tr>
  <tr><td></td><td></td><td></td></tr>
  <tr><td colspan="3"></td></tr>
</table>
</form>
Add horizontal rule elements (<hr> tags) to the table cells in rows 1 and 3. Add the phrase Sort by to the cell in row 4, and the words Name, Size, and Date to the three cells in row 5. The table should now look like this:
<table border="0" cellspacing="0" cellpadding="0"
    "style="margin:0" align="center">
  <tr><td colspan="3"><hr></td></tr>
  <tr><td colspan="3"></td></tr>
  <tr><td colspan="3"><hr></td></tr>
  <tr><td colspan="3">Sort by</td></tr>
  <tr><td>Name</td><td>Size</td><td>Date</td></tr>
  <tr><td></td><td></td><td></td></tr>
  <tr><td colspan="3"></td></tr>
</table>
At this point, you’ll probably want to add a line ending just before each <td> and </tr> tag.
Create an ASP.NET Repeater control named repDirs inside the single table cell that comprises row 2.
<td colspan="3">
  <asp:Repeater id="repDirs" onItemCommand="repDirsCmd"
       runat="server">
    <headertemplate></headertemplate>
    <itemtemplate></itemtemplate>
    <footertemplate></footertemplate>
  </asp:Repeater>
</td>
In line 2, the id attribute assigns the name you planned to use back in step 11 in the previous procedure. The onItemCommand attribute identifies an event handler (that is, a subroutine) that ASP.NET will call if the Web visitor clicks any Submit element that the repeater created. (Microsoft calls this technique command bubbling.) The </asp:Repeater> tag on line 7 marks the end of the repeater. In addition:
The tags in line 4 mark the beginning and end of any content you want the Repeater control to send the browser only once, and before it sends any repeating content.
The tags in line 5 mark whatever content you want the Repeater control to repeat once for each item in its data source.
The tags in line 6 identify any content you want to send the browser only once, after it sends any repeating content.
Add the following code between the <headertemplate> and </headertemplate> tags you added in the previous step. This code begins a new, two-column HTML table and provides content in its first row.
<headertemplate>
  <table border="0" cellpadding="0" cellspacing="4">
  <tr>
    <td><asp:ImageButton id="IbtUp"
          ImageUrl="folder-up.gif"
          CommandArgument=".."
          width="17" height="15" runat="server" /></td>
    <td>(parent)</td>
  </tr>
</headertemplate>
The ImageButton control in the first table cell displays a picture but acts like a Submit button. The CommandArgument attribute specifies a string that the repeater’s onItemCommand event handler will send the repDirsCmd subroutine if the visitor clicks this ImageButton. (Recall that step 4 assigned this subroutine to this event.) The text (parent) in the second table cell is simply a title for the Web visitor.
Insert the code for another HTML table row between the <itemtemplate> and </itemtemplate> tags you created in step 4. In the first cell, display another ImageButton control, this time specifying the folder-open.gif file as the picture.
<itemtemplate>
  <tr>
    <td>
    <asp:ImageButton id="IbtSubFld"
         ImageUrl="folder-open.gif"
         CommandArgument='<%#
            Container.DataItem("DirName")%>'
         runat="server" /></td>
    <td><%# Container.DataItem("DirName")%> </td>
  </tr>
</itemtemplate>
Note the expression <%# Container.DataItem("DirName")%>, which appears in two places. The <%# and %> tags identify this as a data binding expression—that is, one that ASP.NET will evaluate when you invoke the DataBind method of a container (which in this case is the repeater.) Because in step 11 in the previous procedure you made the repeater’s DataSource property point to the DataTable named dtbDirs, the expression <%# Container.DataItem("DirName")%> will retrieve the DirName field from that table.
The first time this expression appears, it specifies the string that the repDirsCmd event handler will receive if the visitor clicks the current ImageButton. The second time, the value is a title for the Web visitor.
Insert a </table> tag between the <footertemplate> and </footertemplate> tags you created in step 4. Here’s how this should look. The blue code is new.
<footertemplate>
  </table>
</footertemplate>
To view the entire block of code that defines the repeater, review the complete HTML listing that appears at the end of the chapter. Otherwise, this is probably a good time to write the repDirsCmd subroutine that the repDirs Repeater object calls whenever a visitor clicks either ImageButton control. The next procedure explains how to do this.
In Step 4 of the previous procedure, the onItemCommand attribute specified that whenever the visitor clicks on a command object within the repDirs repeater, ASP.NET should run a subroutine named repDirsCmd. These command objects appear in two places:
The IbtUp ImageButton you created in step 5 is one such command object. Clicking this button sends a CommandArgument value of "..".
The IbtSubFld ImageButton you created in step 6 is the second, but with a twist. Because this button is between the repeater’s <itemtemplate> and </itemtemplate> tags, ASP.NET will duplicate this button once for each directory. Each of these buttons, however, will have a different CommandArgument value: the name of the relevant directory.
To code the subroutine that handles all these button clicks, proceed as follows.
Add the following statements just before the end of the page’s one and only code declaration block. The new code appears in blue. Note the special object that supplies command event arguments from a Repeater command:
Sub repDirsCmd(source As Object, _
               e As RepeaterCommandEventArgs)
End Sub
</script>
The code for the repDirsCmd subroutine warrants some explanation. The e.CommandArgument property contains the string you coded in the CommandArgument property of the ImageButton that the Web visitor clicked, namely ".." or the name of a subfolder.
If e.CommandArgument is "..", the code needs to check whether the current folder is already "/".
If so, the current folder has no parent folder and the Web page retains "/".
If not, the page uses Visual Basic .NET’s InStrRev function to search the current folder path (in lblPath.Text) from right to left, starting one position from the right, and looking for a "/" character. When it finds a match, it use the Left function to extract all characters up to and including the found "/" and saves them as the new path in lblPath.Text. As you no doubt recall, the lblPath control always contains the name of the current folder.
Suppose, for example, that the current path is /webdbpgm/ch08/. If e.CommandArgument contains "..", the code searches right to left for a "/", starting at the "8". When it finds the "/" at character 10, it extracts the first 10 characters of /webdbpgm/ch08/ to get the new path, /webdbpgm/.
If e.CommandArgument doesn’t contain "..", it must contain a subfolder name. The code therefore appends the subfolder name and a slash to the existing path, runs the result through the ResolveURL method for smoothing, and saves the result as a new path in lblPath.Text.
No matter what, the subroutine always finishes by invoking the DisplayFolder subroutine. This displays the subfolder names and picture thumbnails for the new path in lblPath.Text.
Fortunately, the code for this subroutine is shorter than the text that describes it. Here it is, with new code shown in blue:
Sub repDirsCmd(source As Object, _
                e As RepeaterCommandEventArgs)
  If e.CommandArgument = ".." Then
    If lblPath.Text <> "/" Then
      lblPath.Text = Left(lblPath.Text, _
                     InStrRev(lblPath.Text, "/", _
                     Len(lblPath.Text) - 1))
    End If
  else
    lblPath.Text = _
       ResolveURL(lblPath.Text & e.CommandArgument & "/")
   End If
  DisplayFolder ()
End Sub
Because the last statement in the repDirsCmd subroutine calls the DisplayFolder subroutine, now would be a good time to finish it. Just as this subroutine displays a list of subfolders in the current folder, it also needs to display a list of picture files, including, of course, a thumbnail for each one.
The general approach for displaying the picture files will greatly resemble the approach for displaying subfolders: create a DataTable object, load it with file names, and then use a repeater to display the data. There’s just one additional twist, and that’s creating and displaying a DataView object rather than displaying the DataTable directly. Why not display the DataTable directly? Because you can’t sort DataTables. You can sort only DataViews.
To begin, define a new DataTable object. Name the object dtbPix. Name the table it contains dirlist, and give the table six fields: FileName, FileLocn, FileThum, Length, RawDateTime, and LastWriteTime. Make Length a 32-bit integer, RawDateTime a DateTime field, and everything else a String. Here’s the required code, all of which goes in the DisplayFolder subroutine. Put the declarations after the existing declarations and the code just before the End Sub statement that marks the end of the DisplayFolder subroutine.
Dim dtbPix As DataTable
Dim clmPix As DataColumn

dtbPix = new DataTable("dirlist")
clmPix = dtbPix.Columns.Add("FileName", _
          System.Type.GetType("System.String"))
clmPix = dtbPix.Columns.Add("FileLocn", _
          System.Type.GetType("System.String"))
clmPix = dtbPix.Columns.Add("FileThum", _
          System.Type.GetType("System.String"))
clmPix = dtbPix.Columns.Add("Length", _
          System.Type.GetType("System.Int32"))
clmPix = dtbPix.Columns.Add("RawDateTime", _
          System.Type.GetType("System.DateTime"))
clmPix = dtbPix.Columns.Add("LastWriteTime", _
          System.Type.GetType("System.String"))
Now code a loop that retrieves a FileInfo object for each file in the current folder. Put the declaration after those you added in the previous step and the loop after the code you added in that step.
Dim fnfCur As FileInfo
Dim strExt As String

For Each fnfCur In dnfCur.GetFiles("*.*")
'  Code to check each file name will go here.
Next
For each FileInfo object, get its extension, convert the extension to lowercase, and throw away the leading period (if any). Then, if the extension is gif, jpg, jpeg, or bmp, add a row containing information about that file to the DataTable object dtbPix. Here’s the code: The first and last statements are those you added in the previous step.
For Each fnfCur In dnfCur.GetFiles("*.*")
  strExt = Lcase(fnfCur.Extension)
  If left(strExt,1) = "." Then
    strExt = mid(strExt,2)
  End If
  If (strExt = "gif") _
  Or (strExt = "jpg") _
  Or (strExt = "jpeg") _
  Or (strExt = "bmp") Then
    rowPix = dtbPix.NewRow()
    rowPix("FileName") = fnfCur.Name
    rowPix("FileLocn") = strPath & fnfCur.Name
    rowPix("FileThum") =  "picture.aspx" & _
           "?size=75&url=" & strPath & fnfCur.Name
    rowPix("Length") = Cint(fnfCur.Length/1024)
    rowPix("RawDateTime") = fnfCur.LastWriteTime
    rowPix("LastWriteTime") = _
           Format(fnfCur.LastWriteTime,"dd-MMM-yyyy")
    dtbPix.Rows.Add(rowPix)
  End If
Next
The first blue statement tells the DataTable object dtbPix to create a new, empty row. The next six statements load data into the six table fields:
FileName contains the name of the picture file, without its path. This is for sorting and display.
FileLocn contains the name of the picture file, including its URL path. This will be part of the URL that displays the full-sized picture.
FileThum contains a URL that displays the thumbnail picture. Notice that it uses the picture.aspx file from the earlier procedure in this chapter.
Length contains the size of the file in kilobytes. This is for sorting and display.
RawDateTime contains the file’s data and time of last update as a DateTime value. This is for sorting.
LastWriteTime contains the file’s data and time of last update as a String. This is for display.
The second blue statement adds the new row to the table.
The next task is to create a DataView object that presents the data in the DataTable object dtbPix. This requires only the following lines of code. Put the declaration after the existing declarations and New DataView statement after the existing code.
Dim dvwPix As DataView

dvwPix = New DataView(dtbPix)
Now tell the DataView object to present the data in the order the Web visitor wants. This requires nothing more than setting the DataView object’s Sort property equal to a comma-separated list of column names.
The Web visitor will indicate a sort order by clicking one of three radio buttons named radName, radDate, and radSize. Sorting by name is the default, so if neither radDate nor radSize is checked, the sort should be by file name. Add the following code after the code from the previous step:
If radDate.Checked Then
  dvwPix.Sort = "RawDateTime DESC, FileName"
elseIf radSize.Checked Then
  dvwPix.Sort = "Length DESC, FileName"
else
  dvwPix.Sort = "FileName"
End If
Note that the keyword DESC following any column name sorts that column in descending sequence. Step 1 of the next procedure will create the radio buttons.
Establish the DataView object dvwPix as the data source of a Repeater object named repPix, and then tell the repeater to load itself with data. These will be the last two statements in the DisplayFolder subroutine.
repPix.DataSource = dvwPix
repPix.DataBind()
A subsequent procedure will create the Repeater object repPix that these statements load with data.
This procedure will create the buttons (and the code behind them) that display the thumbnail picture in three different orders. To use this feature, the visitor clicks one of three radio buttons and then clicks a Submit button.
To create the three radio buttons, first locate the following table row, which you created previously:
<tr><td>Name</td><td>Size</td><td>Date</td></tr>
These are the headings for the three radio buttons. The next row in the same table should contain three blank cells. Fill these in with three radio buttons named radName, radDate, and radSize, all in a group named radSort. The <tr>, <td>, </td>, and </tr> tags should already exist, but the align="center" attributes are new.
<tr>
<td align="center"><input type="radio"
         id="radName" name="radSort"
         value="name" runat="server" Checked /></td>
<td align="center"><input type="radio"
         id="radSize" name="radSort"
         value="size" runat="server" /></td>
<td align="center"><input type="radio"
         id="radDate" name="radSort"
         value="date" runat="server" /></td>
</tr>
After choosing a different sort order, the Web visitor will click a Submit button that redisplays the list of thumbnails. Therefore, add a button to the empty table row just below the row you modified in the previous step. The table tags (but not the align="center" attribute) should already exist.
<tr>
  <td colspan="3" align="center"><input type="button"
    value="Submit" name="btnSub"
    onServerClick="btnSubClick" runat="server" /></td>
</tr>
Notice that the button in step 2 specifies a server-side event handler named btnSubClick. To create this handler, add the following subroutine just before the end of the Web page’s code declaration block (that is, just before the </script> tag):
Sub btnSubClick(sender As Object, e As EventArgs)
  DisplayFolder()
End Sub
This procedure will create the Repeater object repPix that actually displays the list of thumbnails. The last two statements in the DisplayFolder subroutine load this repeater with data.
To start constructing the repeater that displays all the thumbnails, add the following tags after the end of the Web form and before the end of the Web page. To satisfy the code in the DisplayFolder subroutine, name this repeater repPix.
</form>
<asp:Repeater id="repPix" runat="server">
  <headertemplate></headertemplate>
  <itemtemplate></itemtemplate>
  <footertemplate></footertemplate>
</asp:Repeater>
</body>
Between the <headertemplate> tags you just created, enter the HTML to start a new table. The repeater will render this content only once, and before it renders any repeated items.
<headertemplate>
  <table border="0" cellpadding="0" align="center">
</headertemplate>
This and the next three steps will define four HTML table rows between the repeater’s <itemtemplate> and </itemtemplate> tags. This tells the repeater to render those four rows once for each record in its data source (which the DisplayFolder subroutine established as the DataView object dvwPic). Here’s the HTML for the first row, which simply displays a horizontal line. The <itemtemplate> and </itemtemplate> tags are the existing ones.
<itemtemplate>
  <tr>
    <td colspan="2"><hr></td>
  </tr>
</itemtemplate>.
The second row of each item grouping displays the file name. Code this row as follows, just before the </itemtemplate> tag.
<tr colspan="2">
  <td colspan="2" align="center">
  <%# Container.DataItem("FileName") %></td>
</tr>
The third row contains a hyperlink to the showpic.aspx page. This hyperlink passes the full-sized picture’s URL path as a query string parameter named pic. The hyperlinked content is, of course, a thumbnail from the picture.aspx page. Add this code between the code from step 3 and the </itemtemplate> tag:
<tr>
  <td colspan="2" align="center"><a target="main"
    href="showpic.aspx?pic=<%#
                Container.DataItem("FileLocn")%>">
  <img src="<%# Container.DataItem("FileThum") %>"
    border="0"></a></td>
</tr>
The last row of each item grouping shows the picture file’s length and the date of its last update. These come straight from fields in the repeater’s data source.
<tr> <td><%# Container.DataItem("Length") %> KB</td> <td align="Right"> <%# Container.DataItem("LastWriteTime") %></td> </tr>The </itemtemplate> tag will immediately follow this code.
As before, the footer for this repeater contains only an end table tag:
<footertemplate>
  </table>
</footertemplate>
This completes the code for the piclist.aspx page. Although this page is more complex than the examples that appeared earlier, it accomplishes a lot using only 225 lines of code. And just imagine: you’ll never need to update another index page of thumbnail pictures! Here’s the complete code listing, slightly formatted for easy inspection:
<%@ Page Language="VB" Explicit="True" Debug="True"%>
<%@ Import Namespace="System.IO"%>
<%@ Import Namespace="System.Data"%>
<script runat="server">
'--------------------------------------------------
Sub Page_Load(sender As Object, e As EventArgs)
Dim strPath As String
If Not Page.IsPostBack Then
strPath = Request.Params("path")
If strPath = "" Then
strPath = "."
End If
strPath = ResolveURL(strPath)
If Right(strPath,1) <> "/" Then
strPath = strPath & "/"
End If
lblPath.Text = strPath
DisplayFolder()
End If
End Sub
'--------------------------------------------------
Sub DisplayFolder()
Dim strPath As String
Dim dnfCur As DirectoryInfo
Dim dtbDirs As DataTable
Dim dnfSub As DirectoryInfo
Dim rowPix As DataRow
Dim dtbPix As DataTable
Dim clmPix As DataColumn
Dim fnfCur As FileInfo
Dim dvwPix As DataView
Dim strExt As String
strPath = lblPath.Text
dnfCur = New DirectoryInfo(server.mappath(strPath))
dtbDirs = new DataTable("sublist")
dtbDirs.Columns.Add("DirName", _
System.Type.GetType("System.String"))
For Each dnfSub In dnfCur.GetDirectories
If left(dnfSub.Name,1) <> "_" Then
rowPix = dtbDirs.NewRow()
rowPix("DirName") = dnfSub.Name
dtbDirs.Rows.Add(rowPix)
End If
Next
repDirs.DataSource = dtbDirs
repDirs.DataBind
dtbPix = new DataTable("dirlist")
clmPix = dtbPix.Columns.Add("FileName", _
System.Type.GetType("System.String"))
clmPix = dtbPix.Columns.Add("FileLocn", _
System.Type.GetType("System.String"))
clmPix = dtbPix.Columns.Add("FileThum", _
System.Type.GetType("System.String"))
clmPix = dtbPix.Columns.Add("Length", _
System.Type.GetType("System.Int32"))
clmPix = dtbPix.Columns.Add("RawDateTime", _
System.Type.GetType("System.DateTime"))
clmPix = dtbPix.Columns.Add("LastWriteTime", _
System.Type.GetType("System.String"))
For Each fnfCur In dnfCur.GetFiles("*.*")
strExt = Lcase(fnfCur.Extension)
If left(strExt,1) = "." Then
strExt = mid(strExt,2)
End If
If (strExt = "gif") _
Or (strExt = "jpg") _
Or (strExt = "jpeg") _
Or (strExt = "bmp") Then
rowPix = dtbPix.NewRow()
rowPix("FileName") = fnfCur.Name
rowPix("FileLocn") = strPath & fnfCur.Name
rowPix("FileThum") = "picture.aspx" & _
"?size=75&url=" & strPath & fnfCur.Name
rowPix("Length") = Cint(fnfCur.Length/1024)
rowPix("RawDateTime") = fnfCur.LastWriteTime
rowPix("LastWriteTime") = _
Format(fnfCur.LastWriteTime,"dd-MMM-yyyy")
dtbPix.Rows.Add(rowPix)
End If
Next
dvwPix = New DataView(dtbPix)
If radDate.Checked Then
dvwPix.Sort = "RawDateTime DESC, FileName"
elseIf radSize.Checked Then
dvwPix.Sort = "Length DESC, FileName"
else
dvwPix.Sort = "FileName"
End If
repPix.DataSource = dvwPix
repPix.DataBind()
End Sub
' --------------------------------------------------
Sub repDirsCmd(source As Object, _
e As RepeaterCommandEventArgs)
If e.CommandArgument = ".." Then
If lblPath.Text <> "/" Then
lblPath.Text = Left(lblPath.Text, _
InStrRev(lblPath.text, "/", _
len(lblPath.text) - 1))
End If
else
lblPath.Text = _
ResolveURL(lblPath.Text & e.CommandArgument & "/")
End If
DisplayFolder()
End Sub
' -------------------------
Sub btnSubClick(sender As Object, e As EventArgs)
DisplayFolder()
End Sub
' -------------------------
</script>
<html>
<head>
<title>Select Thumbnail</title>
<link rel="stylesheet" type="text/css" href="normal.css">
<link rel="stylesheet" type="text/css" href="small.css">
</head>
<body>
<asp:label id="lblPath" runat="server" />
<form method="POST" style="margin:0" runat="server">
<table border="0" style="margin:0" cellspacing="0"
cellpadding="0" align="center">
<tr>
<td colspan="3"><hr></td>
</tr>
<tr>
<td colspan="3">
<asp:Repeater id="repDirs" onItemCommand="repDirsCmd"
runat="server">
<headertemplate>
<table border="0" cellpadding="0" cellspacing="4">
<tr>
<td><asp:ImageButton id="IbtUp"
ImageUrl="folder-up.gif"
CommandArgument=".."
width="17" height="15" runat="server" /></td>
<td>(parent)</td>
</tr>
</headertemplate >
<itemtemplate>
<tr>
<td>
<asp:ImageButton id="IbtSubFld"
ImageUrl="folder-open.gif"
CommandArgument='<%# Container.DataItem("DirName")%>'
runat="server" /></td>
<td><%# Container.DataItem("DirName")%> </td>
</tr>
</itemtemplate>
<footertemplate>
</table>
</footertemplate>
</asp:Repeater>
</td>
</tr>
<tr>
<td colspan="3"><hr></td>
</tr>
<tr>
<td colspan="3" align="center">Sort by</td>
</tr>
<tr>
<td align="center"> Name </td>
<td align="center"> Size </td>
<td align="center"> Date </td>
</tr>
<tr>
<td align="center"><input type="radio"
id="radName" name="radSort"
value="name" runat="server" Checked /></td>
<td align="center"><input type="radio"
id="radSize" name="radSort"
value="size" runat="server" /></td>
<td align="center"><input type="radio"
id="radDate" name="radSort"
value="date" runat="server" /></td>
</tr>
<tr>
<td colspan="3" align="center"><input type="button"
value="Submit" name="btnSub"
onServerClick="btnSubClick" runat="server" /></td>
</tr>
</table>
</form>
<asp:Repeater id="repPix" runat="server">
<headertemplate>
<table border="0" cellpadding="0" align="center">
</headertemplate>
<itemtemplate>
<tr>
<td colspan="2"><hr></td>
</tr>
<tr>
<td colspan="2" align="center">
<%# Container.DataItem("FileName") %></td>
</tr>
<tr>
<td colspan="2" align="center"><a target="main"
href="showpic.aspx?pic=<%#
Container.DataItem("FileLocn")%>">
<img src="<%# Container.DataItem("FileThum") %>"
border="0"></a></td>
</td>
<tr>
<td><%# Container.DataItem("Length") %> KB</td>
<td align="Right">
<%# Container.DataItem("LastWriteTime") %></td>
</tr>
</itemtemplate>
<footertemplate>
</table>
</footertemplate>
</asp:Repeater>
</body>
</html>This chapter introduced the objects, methods, and properties that a program written in any .NET programming language can use to access the Windows file system. These facilities are, of course, available to ASP.NET pages as well. The chapter continued by showing how to use these methods in a collection of Web pages that display picture files organized into folders. The same collection of Web pages introduced some of the graphics methods now available to ASP.NET pages.
The next chapter will explain how to create your own custom server controls. This is a fantastic way to package content, logic, or both for reuse as often as you like on the same Web page or on many Web pages. The classified ad system in later chapters will use these custom controls as components.