

✓ | The basic operating concepts behind Web services. |
✓ | How to create a Web service. |
✓ | How to make use of (that is, consume) a Web service. |
Have you ever looked at the information on a Web page and wished you could get the same information (minus the page layout and advertising) and use it on your own site? Of course you have. Every Web developer in the world wishes he or she could get data or processing services from all over the Web and combine them in new ways to produce exciting new sites. This is the promise that makes Web services so appealing.
At the most basic level, a Web service provides a way that software on one computer can receive requests from, supply processing for, and return results to another computer. The two computers communicate by HTTP, which is the same protocol that browsers use for communicating with Web servers. In the case of Web services, however, the client usually isn’t a browser; it’s an ordinary program that might be totally unaware that it’s making use of network resources.
Programs access Web services by using the same sort of interface they use when accessing any other .NET resource: that of a class. To see how this fits together, the next few topics will review various ways of using classes that you write yourself.
Consider the following class definition written in Visual Basic .NET. Every time you call its Flip method, you randomly get back the word Heads or the word Tails. (Recall that the Rnd function returns a pseudo-random number between 0 and 1.)
Public Class CoinFlip
  Public Function Flip()
    Randomize
    If Rnd() < 0.5 Then
      Return "Heads"
    Else
      Return "Tails"
    End If
  End Function
End Class
If you needed to use this method in an ASP.NET page, you could add this code between any pair of <script runat="server"> and </script> tags and then call it like this:
Dim flpCoin As New CoinFlip
litToss1.Text = flpCoin.Flip
The first statement creates a new CoinFlip object. The second calls its Flip method and puts the result in a Literal Web server control named litToss1. To view a page that flips the coin five times and displays the results, open the coinflip.aspx file in the ch14a folder you installed from the companion CD.
What if you had a lot of pages that needed to make coin flips? You could paste the source code for the CoinFlip class into each page, but that’s redundant and cumbersome to maintain. Instead, you might choose to put one centralized copy of the source code in a file named coinflip.vb and include the following directive in each page:
<%@ Assembly src="coinflip.vb"%>
There’s just one catch: When you create the coinflip.vb file, you must specifically import any namespaces the code uses. ASP.NET will compile the coinflip.vb file separately from each Web page that uses it, and when ASP.NET compiles an assembly, it doesn’t import all the default namespaces that it imports for a full ASP.NET page. The CoinFlip class, for example, requires the Imports statement shown here in blue.
Imports Microsoft.VisualBasic
Public Class CoinFlip
  Public Function Flip()
    Randomize
    If Rnd() < .5 Then
      Return "Heads"
    Else
      Return "Tails"
    End If
  End Function
End Class
Note that this example imports namespaces differently than the ASP.NET pages you’ve seen in earlier chapters. Because the @ Import directive isn’t valid within an assembly, you must use the Visual Basic .NET Imports statement instead.
To review a working example that uses these techniques, open the coinflip2.aspx and coinflip.vb files in the ch14a folder you installed from the companion CD.
What if you decide it’s too error-prone and too much work to code an @ Assembly directive in each page? Once again, ASP.NET provides not only the problem but also the solution. You can compile the source code into a DLL and then put the DLL in the bin folder of your application. Even if you don’t have VisualStudio .NET, you can still compile files from the command line. (For more information about compiling assemblies, refer to "Using Assemblies" in Chapter 9.) Here’s the command for compiling the coinflip.vb assembly:
vbc /target:library /out:coinflip.dll coinflip.vb
The ch14b folder you installed from the companion CD has a file named coinflip3.aspx that uses the compiled assembly coinflip.dll. The only difference between the coinflip2.aspx file and the coinflip3.aspx file is that coinflip3.aspx doesn’t have an @ Assembly directive. Because the coinflip.dll file is in the application’s bin folder, ASP.NET will find it automatically.
If you want to try running the coinflip3.aspx file, be sure to start Internet Services Manager and mark the ch14b folder as an application. Otherwise, the coinflip.dll file, which resides in the ch14b/bin folder, won’t be in the application’s bin folder.
The reason for having separate ch14a and ch14b folders, by the way, is that the coinflip.dll file in the ch14b/bin folder provides a CoinFlip class to every ASP.NET page in the application. The coinflip2.aspx file in the ch14a folder creates its own CoinFlip class by means of an @ Assembly directive that points to the coinflip.vb file. If all these files resided in the same application, the coinflip2.aspx files would fail and display this message:
The name 'CoinFlip' is ambiguous.
What if you want any CoinFlip objects you create to run on a different computer? (Who knows, this might be necessary to obey state gambling laws or something.) Retrieving coin flip results from a distant computer might seem far-fetched, but it provides a great way to introduce the concept of Web services.
Create a new folder on your Web server. Name it ch14svc. It doesn’t need to be an application.
Copy the coinflip.vb file listed in the previous section to the ch14svc folder you just created. Rename the file to coinflip.asmx, open it, and then add the statements shown in blue in the following code. Alternatively, create a new text file containing all these statements and save it as coinflip.asmx. The .asmx file name extension identifies files that create XML Web services.
<%@ WebService Language="VB" Class="CoinFlip" %>
Imports System.Web.Services
Imports Microsoft.VisualBasic
Public Class CoinFlip
  <WebMethod> Public Function Flip()
    Randomize
    If Rnd() < .5 Then
      Return "Heads"
    Else
      Return "Tails"
    End If
  End Function
End Class
The @ WebService directive tells ASP.NET that this file defines a Web service, that the programming language is Visual Basic .NET, and that the class that provides the Web service is CoinFlip.
Note
You can define as many classes as you like within an .asmx file, but only one can be visible through the Web service. However, one Web service class can expose as many Web methods as you like, and those methods are perfectly free to use classes defined anywhere.
The new Imports statement provides access to the generic classes every Web service will need. The <WebMethod> tag makes a function or subroutine available across the network.
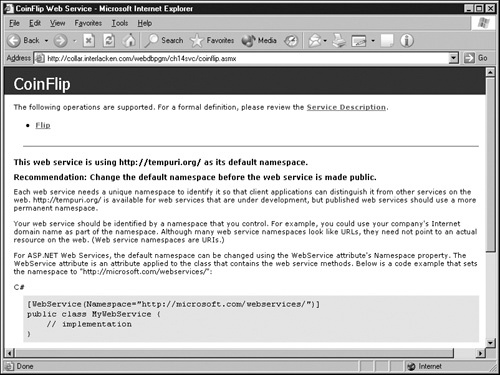
This completes the coding for the coinflip Web service. No, this isn’t a joke; it’s really this easy. Testing a Web service is even easier: so easy you’d probably never think of it. Just use a browser to request the coinflip.asmx file as if it were an ordinary ASP.NET page. You should see a display like the following.
The bottom 80 percent of this display contains a message warning you that the Web service is using a default namespace. You can ignore this warning for now. Follow the instructions that accompany the message if you ever put the coinflip Web service on the Internet.
The top portion of the display contains a link that displays a so-called service description for the Web service and one link for each function or subroutine you flagged with a <WebMethod> tag. The next procedure will explain more about Web service descriptions, so for now, just click the hyperlink for the Flip method.
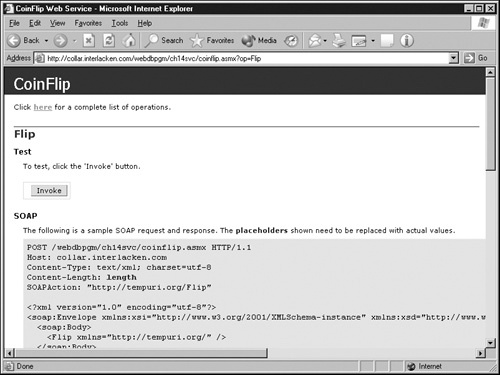
The browser should now display the following Web page. Click the word Here in Click Here For A Complete List Of Operations to display the page that appeared in the previous step.
Under the Test heading, clicking the Invoke button will submit an actual request to the Web service. If you had coded the Flip function to receive arguments, this area would also display text boxes for entering those arguments.
The remainder of the page contains three headings, only one of which is visible in the illustration. These are SOAP, HTTP GET, and HTTP POST. Each heading introduces a sample request to and response from the Web service. This isn’t anything you need to worry about now, although it’s interesting to note the use and complexity of XML code in each case.
Clicking the Invoke button will display a mess of XML code that looks very much like what you see in the next graphic. No doubt this is less artistic than anything you’d want your Web visitors to see, but the important point is that your results should be visible. Note the word Heads just before the </Object> tag in the last line of the graphic, for example. This indicates the result of the most recent coin toss.

Viewing test pages and test results in a browser is useful for testing, but those results probably aren’t the sort of thing you’d want to give your visitors. The next procedure will explain how to create an ASP.NET page that uses the Web service as a component. Don’t close your browser.
Now that the coinflip Web service is running, the next objective is making it easy to use. Accessing the Web service should be no more difficult than accessing a compiled assembly in the application’s bin folder. This, you might recall, is the case where you just load the object by name and proceed blithely forward without so much as an @ Assembly directive. Well, OK, that’s exactly how it’s going to work.
In your browser, display once again the Web page you displayed in step 3 of the previous procedure. Make sure the URL specifies a host name accessible to every client computer that will access the Web service.
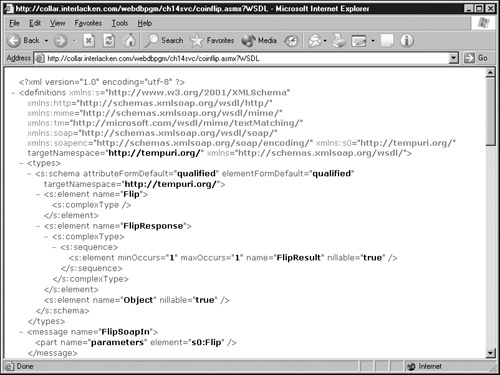
Click the Services Description link. This step should produce the following results:
This arcane pile of XML code describes the Web service in a formal way. Fortunately, you don’t have to code a bit of it; .NET XML Web services are very good at describing themselves. Even if you don’t understand XML, you should recognize certain elements of the coinflip Web service: Flip, FlipResponse, FlipResult, and so forth.
This form of XML, by the way, is called Web Service Description Language (WSDL). When people talk about WSDL, they mean a block of XML that describes a Web service.
Create a proxy class that accesses the Web service by following these steps:
With the WSDL code from step 3 still on display, select the entire contents of the browser’s address bar, right-click it, and then choose Copy from the shortcut menu.
Open a command prompt.
Change to the drive and folder where you want the proxy class source code and DLL to reside.
Type the following, but don’t press Enter. Be sure to type a trailing space.
wsdl /language:vb
Click the command window’s Control button (the C: icon in the far left of the window’s title bar), then click Edit, and then click Paste. The command line should then contain a string like this, all on one line:
wsdl /language:vb http://collar.interlacken.com/webdbpgm/
ch14svc/coinflip.asmx?WSDL
Press Enter. The results should look like this:
Microsoft (R) Web Services Description Language Utility
[Microsoft (R) .NET Framework, Version 1.0.2914.16]
Copyright (C) Microsoft Corp. 1998-2001. All rights re-
served.
Writing file 'C:	empCoinFlip.vb'.
You might get the following error message:
’wsdl’ is not recognized as an internal or external command, operable program or batch file.
In that case, you probably need to add the folder that contains the wsdl.exe program to your path environment variable. By default, this folder is C:Program FilesMicrosoft.NETFrameworkSDKBin.
Keep the command window open because next you’ll need to compile your new proxy class. Here’s the required command. It’s all one line.
vbc /t:library /out:coinflip.dll /r:system.dll
/r:system.web.dll /r:System.web.services.dll
/r:system.Xml.dll coinflip.vb
After entering this line, press Enter. As you can see below, a good compilation produces no success message. No news is good news. A good compilation should also create a file named coinflip.dll in the current directory.
Microsoft (R) Visual Basic .NET Compiler version 7.00.9466
for Microsoft (R) .NET Framework version 1.00.3705
Copyright (C) Microsoft Corp 2001. All rights reserved.
Again, if you get an error like ’vbc’ is not recognized, you probably need to add the folder that contains the vbc.exe program your path environment variable. This will be something like: C:WINNTMicrosoft.NETFrameworkv1.0.3705.
Create a folder named ch14c and use Internet Services Manager to mark it as an application.
Within the new ch14c application, create a folder named bin. Copy the coinflip.dll file from step 4 into this folder.
Copy the coinflip3.aspx file from the ch14b folder to the ch14c folder.
Use an HTTP URL to open the ch14c/coinflip3.aspx file. You should find that it works just as it did in the ch14 folder, where the bin folder contained a local assembly rather than a proxy class that accessed a Web service.
If you have access to a second Web server, you might want to try copying the coinflip.dll file from step 4 into some application’s bin folder on that server, and the coinflip3.aspx file to some other location in the same application. As long as the second Web server can access the first by means of the URL you copied in step 3, the Web service should be fully accessible.
Real-life situations are obviously more complicated than flipping a coin. The procedures in this section will therefore explain how to create a Web service that provides two methods other sites can use in background mode.
Given a word or phrase, the Web service will search for ads containing that string in the description field of the classified.mdb ads table and return a list of matching ad IDs.
Given an ad ID, the Web service will return a status code and the Headline, Description, and AskingPrice fields.
Other sites could use such a service to search for, retrieve, and display Contoso Classified ads along with their own, or combined with ads from other sites. Presumably, all sites wishing to participate in such an arrangement would implement Web services that use standardized methods and properties. That way, the procedure for retrieving ads from any site would be the same regardless of operating system, database type, programming environment, and so forth.
Notice that offering a Web service will, in general, provide better security than offering direct access to the database. A well-written service transmits only the exact data the site operator wants to provide.
As with the coinflip example, the following procedures will develop the Web service first and then the client. You can test the service using a browser, but you can’t test the client without at least a partially operating service.
This procedure will develop a Web service that satisfies two kinds of queries. If you want to look at the finished results rather than create them yourself, open the adsvc.asmx file in the ch14svc file you installed from the companion CD. Otherwise, proceed as follows:
Use your favorite text editor to create a new, blank file. Then add the @ WebService directive, the Imports statements, and the class definition shown here:
<%@ WebService Language="VB" Class="ContosoAdSvc" %>
Imports System
Imports System.DateTime
Imports System.Web.Services
Imports System.Data
Imports System.Data.OleDb
Imports Microsoft.VisualBasic

Public Class ContosoAdSvc
    Inherits WebService
' Code to implement this class will appear here.
End Class
Specifying the class name ContosoAdSvc in the @ WebService directive tells ASP.NET the name of the class that will provide the Web service methods.
Web services don’t automatically import all the standard namespaces that ASP.NET pages do. This limitation accounts for the large number of import statements you see in the preceding code example.
The Inherits WebService statement that follows the ContosoAdSvc definition refers to an optional class of base features for Web services. Any Web service that needs access to common ASP.NET objects like Server, Application, and Session needs to inherit this class.
Replace the comment in the previous step with code that declares an OleDbConnection named conClasf and a subroutine named OpenDb that opens this connection:
Public Class ContosoAdSvc
    Inherits WebService
  Dim conClasf As OleDbConnection

  Sub OpenDb()
    conClasf = New OleDbConnection( _
      "Provider=Microsoft.Jet.OLEDB.4.0;" & _
      "Data Source=" & _
      Server.MapPath("db/classified.mdb") & ";")
    conClasf.Open
  End Sub
' Code for additional methods will go here.
End Class
Note that this code doesn’t retrieve the database location from a Session variable, as recent chapters have done; Web services normally don’t have Session objects, and creating them is a great nuisance.
Between the End Sub statement and the comment you just coded, define a WebMethod function named FindAds that accepts a string argument named astrFind and returns an array of strings. This function should
Determine whether the astrFind argument is empty and, if so, exit the function, returning a string array of one empty element.
Construct a SQL statement that searches the ads table for records containing the given string.
Open the database connection, use that connection and the new SQL statement to create an OLE DB command object, use the command object to open a data reader, and use the data reader to inspect each matching record.
For each matching record, append the value of the adid field to a comma-delimited string.
Split the comma-delimited list of adid values into an array named strMatches and return this array to the calling program.
None of this involves any new concepts, so here’s the code, all in one piece. Recall that the <WebMethod> tag identifies functions and subroutines that should be available through the XML Web service.
<WebMethod> Public Function _
    FindAds(astrFind As String) As String()
  Dim cmdClasf As OleDbCommand
  Dim rdrMembers As OleDbDataReader
  Dim strSQL As String
  Dim strMatchList As String = ""
  Dim strMatches() As String
  Dim strNoMatches() As String = {""}

  If Trim(astrFind) = "" Then
    Return strNoMatches
    Exit Function
  End If
   strSQL = _
       "SELECT * "& _
         "FROM ads "& _
       "WHERE description LIKE '%" & astrFind & "%' "& _
         "AND (startdate <= #" & Date.Today() & "#) "& _
         "AND (enddate   >= #" & Date.Today() & "#) "& _
    "ORDER BY adid "
  OpenDb()
  cmdClasf = New OleDbCommand(strSQL, conClasf)
  rdrMembers = cmdClasf.ExecuteReader

  Do While rdrMembers.Read
    strMatchList &= "," & rdrMembers.Item("adid")
  Loop

  If strMatchList <> "" Then
    strMatchList = Mid(strMatchList,2)
  End If
  strMatches = Split(strMatchList, ",")
  conClasf.Close
  Return strMatches
End Function
This function satisfies the first requirement for the Web service: returning a list of ID values for ads with a given substring in the description field.
The second requirement is for a method that returns four fields for a given ad ID: a Found indicator and the Headline, Description, and AskingPrice fields from the database. To provide an object that contains these four fields, add the following statements immediately after the function you created in the preceding step.
Public Class AdInfo
  Public Found As String
  Public Headline As String
  Public Description As String
  Public AskingPrice As Decimal
End Class
Next, define a WebMethod function named GetInfo that accepts an Integer argument named intAdId and returns an AdInfo object. This function should
Create an AdInfo object named adiCurrent.
Construct a SQL statement that retrieves the requested ad ID.
Open the database connection; use that connection and the new SQL statement to create an OLE DB command object; and use the command object to open a data reader.
If attempting to read a database record returns True, set the Found property of the output AdInfo object to True and set the same object’s Headline, Description, and AskingPrice fields equal to the corresponding database values.
If attempting to read a database record returns False, set the Found property to False, the Headline and Description properties to empty strings, and the AskingPrice property to zero.
Very little of this involves any new concepts, so here again is the code, all in one piece:
<WebMethod(CacheDuration:=5)> _
  Public Function GetInfo(intAdId As Integer) As AdInfo
    Dim cmdClasf As OleDbCommand
    Dim rdrMembers As OleDbDataReader
    Dim strSQL As String
    Dim adiCurrent As AdInfo = New AdInfo()

    strSQL = _
      "SELECT * "& _
        "FROM ads "& _
       "WHERE adid = "& intAdId & ""& _
         "AND (startdate <= #" & Date.Today() & "#) "& _
         "AND (enddate   >= #" & Date.Today() & "#) "

    OpenDb()
    cmdClasf = New OleDbCommand(strSQL, conClasf)
    rdrMembers = cmdClasf.ExecuteReader

    If rdrMembers.Read Then
      adiCurrent.Found = True
      adiCurrent.Headline = rdrMembers.Item("headline")
      adiCurrent.Description =   _
                              rdrMembers.Item("description")
      adiCurrent.AskingPrice =  _
                              rdrMembers.Item("askingprice")
    Else
      adiCurrent.Found = False
      adiCurrent.Headline = "Not found."
      adiCurrent.Description = "Not Found."
      adiCurrent.AskingPrice = 0
    End If
    conClasf.Close
    return adiCurrent
  End Function
The expression (CacheDuration:=5) inside the <WebMethod> tag tells the Web server to cache responses for up to five seconds. This instruction saves the Web service from looking up the same ad twice in any five-second period; instead, the second and all subsequent requests will receive the same results as the first.
Save the file in the ch14svc folder, assigning it a name of adsvc.asmx.
Within the ch14svc folder, create a subfolder named db. Copy the classified.mdb file from Chapter 13 into this subfolder.
Open the ch14svc/adsvc.asmx file in your browser, taking care to specify an HTTP URL. This should display a test page like the one on page 483. Test the page as before and verify that you’re getting reasonable results from both the FindAds and GetInfo methods.
This completes the code for the ContosoAdSvc Web service. Here’s the complete code listing:
<%@ WebService Language="VB" Class="ContosoAdSvc" %>
Imports System
Imports System.DateTime
Imports System.Web.Services
Imports System.Data
Imports System.Data.OleDb
Imports Microsoft.VisualBasic

Public Class ContosoAdSvc
    Inherits WebService
  Dim conClasf As OleDbConnection
' ----------------------------------------

  Sub OpenDb()
    conClasf = New OleDbConnection( _
      "Provider=Microsoft.Jet.OLEDB.4.0;" & _
      "Data Source=" & _
      Server.MapPath("db/classified.mdb") & ";")
    conClasf.Open
  End Sub
' ----------------------------------------

  <WebMethod> Public Function _
      FindAds(astrFind As String) As String()
    Dim cmdClasf As OleDbCommand
    Dim rdrMembers As OleDbDataReader
    Dim strSQL As String
    Dim strMatchList As String = ""
    Dim strMatches() As String
    Dim strNoMatches() As String = {""}

    If Trim(astrFind) = "" Then
      Return strNoMatches
      Exit Function
    End If

    strSQL = _
        "SELECT * "& _
          "FROM ads "& _
        "WHERE description LIKE '%" & astrFind & "%' "& _
          "AND (startdate <= #" & Date.Today() & "#) "& _
          "AND (enddate   >= #" & Date.Today() & "#) "& _
      "ORDER BY adid "

    OpenDb()
    cmdClasf = New OleDbCommand(strSQL, conClasf)
    rdrMembers = cmdClasf.ExecuteReader

    Do While rdrMembers.Read
      strMatchList &= "," & rdrMembers.Item("adid")
    Loop

    If strMatchList <> "" Then
      strMatchList = Mid(strMatchList,2)
    End If
    strMatches = Split(strMatchList, ",")
    conClasf.Close
    Return strMatches
  End Function
' ----------------------------------------
  Public Class AdInfo
    Public Found As String
    Public Headline As String
    Public Description As String
    Public AskingPrice As Decimal
  End Class
' ----------------------------------------
<WebMethod(CacheDuration:=5)> _
  Public Function GetInfo(intAdId As Integer) As AdInfo
    Dim cmdClasf As OleDbCommand
    Dim rdrMembers As OleDbDataReader
    Dim strSQL As String
    Dim adiCurrent As AdInfo = New AdInfo()

    strSQL = _
      "SELECT * "& _
        "FROM ads "& _
       "WHERE adid = "& intAdId & ""& _
         "AND (startdate <= #" & Date.Today() & "#) "& _
         "AND (enddate   >= #" & Date.Today() & "#) "
    OpenDb()
    cmdClasf = New OleDbCommand(strSQL, conClasf)
    rdrMembers = cmdClasf.ExecuteReader
    If rdrMembers.Read Then
      adiCurrent.Found = True
      adiCurrent.Headline = rdrMembers.Item("headline")
      adiCurrent.Description = rdrMembers.Item("description")
      adiCurrent.AskingPrice = rdrMembers.Item("askingprice")
    Else
      adiCurrent.Found = False
      adiCurrent.Headline = "Not found."
      adiCurrent.Description = "Not Found."
      adiCurrent.AskingPrice = 0
    End If
    conClasf.Close
    return adiCurrent
  End Function
' ----------------------------------------
End ClassThis procedure will create and compile a proxy class DLL for the Web service you created in the previous procedure.
Create the source code for the Web service proxy. In other words, open a command window and run the wsdl program as shown here. It’s all one line and you’ll need to adjust the server name and path so that they conform to your environment.
wsdl /language:vb http://collar/webdbpgm/ch14svc/
adsvc.asmx?WSDL
Because the name of the Web Service class in the adsvc.asmx file is ContosoAdSvc, this command will create a file named ContosoAdSvc.vb.
Compile the ContosoAdSvc.vb file from step 1 into a library named ContosoAdSvc.dll. To do so, run the following command. It’s all one line.
vbc /t:library /out:ContosoAdSvc.dll /r:system.dll
 /r:system.web.dll /r:System.web.services.dll
 /r:system.Xml.dll ContosoAdSvc.vb
Copy the ContosoAdSvc.dll file from step 2 into the ch14c/bin folder.
This procedure will create a simple query page that accesses the classified.mdb database through the XML Web service and the proxy class you created in the previous two procedures. Here’s a graphic of the finished page in action.

To use this page, the visitor enters a word or phrase in the Search For Text box and then clicks the Submit button. The page sends the search text to the Web service’s FindAds method and receives an array of matching ad IDs in return. Then the page sends each matching ad ID to the Web service’s GetInfo method and stores the results in an ADO.NET data table. Finally, if the page found any ad IDs, it binds them into a data grid for display.
Here’s how to code this page:
Open your favorite HTML editor, create a new, blank page, and display the HTML for editing.
Add a standard @ Page directive, an @ Register directive for the standard page banner, and an @ Import directive to the System.Data namespace at the top of the page. Then add a code declaration block, a title, and any page-level formatting you want. The top of the page should now look like this:
<%@ Page Language="vb" Debug="true" Explicit="True"%>
<%@ Register TagPrefix="webdbpgm" TagName="banner"
             src="banner.ascx" %>
<%@ Import Namespace="System.Data"%>
<script runat="server">
' Program code will go here.
</script>
<html>
<head>
<title>Web Service Query</title>
<link rel="stylesheet" type="text/css" href="normal.css">
</head>
Add a user control to display the page banner, a Web form, a Literal Web server control named litErrMsg, and a DataGrid named grdAds to the <body> section of the Web page. Here’s the code for these elements; arrange them any way you want.
<webdbpgm:banner runat="server" /> <form runat="server"> </form> <asp:literal id="litErrMsg" EnableViewState="false" runat="server" /> <asp:DataGrid id="grdAds" visible="false" EnableViewState="false" runat="server" />Add an HtmlInputText control named txtFind and an HtmlInputButton named btnSub inside the Web form you created in the previous step, using the new code shown here in blue.
<form runat="server">
<input type="text" id="txtFind" size="20"
       runat="server" />
<input type="submit" id="btnSub" value="Submit"
       runat="server" />
</form>
Replace the comment in step 2 with a Page_Load subroutine. If a postback has occurred and the text box is empty, the subroutine should display an error message. If a postback has occurred and the text box contains data, the code should run another subroutine named SearchForAd. Here’s the required code:
Sub Page_Load(sender As Object, e As EventArgs)
  If Page.IsPostBack Then
    If txtFind.Value = "" Then
      litErrMsg.Text = "Enter an Ad ID."
    Else
      SearchForAd()
    End If
  End If
End Sub
Immediately after the End Sub statement you coded in the previous step, define a subroutine named SearchForAd and containing these declarations:
Sub SearchForAd()
  Dim cadSvc As ContosoAdSvc
  Dim strAdIds() As String
  Dim dtbAds As DataTable
  Dim rowAds As DataRow
  Dim intPos As Integer
  Dim intAdId As Integer
'   Program code will go here.
End Sub
The cadSvc variable will load an instance of the ContosoAdSvc proxy class. The strAdIds array will receive a list of ad IDs from the Web service’s FindAds method. The dtbAds variable will point to a data table that contains information about each found ad; rowAds will temporarily point to each new row in that data table. The intPos variable will step through the strAdIds array one element at a time, and the intAdId variable will contain the current ad ID based on each subscript.
Replace the comment in the previous step with code that creates an instance of the ContosoAdSvc proxy class, calls the Web service’s FindAds method using the txtFind text box value as an argument, and then exits the subroutine if the FindAds method returns an empty array or an empty first element. Here’s the required code:
cadSvc = New ContosoAdSvc
strAdIds = cadSvc.FindAds(txtFind.Value)
If (Ubound(strAdIds) < 0 ) OrElse (strAdIds(0) = "") Then
  litErrMsg.Text = "No matches found."
  Exit Sub
End If
Next, create a new data table object. Name the table it contains ads and store a pointer to the new object in the dtbAds variable. Add columns named AdId, Headline, Description, and AskingPrice. The first three columns will contain strings, and the AskingPrice column will contain a Decimal value. Here’s the required code:
dtbAds = New DataTable("ads")
dtbAds.Columns.Add("AdId", _
      Type.GetType("System.String"))
dtbAds.Columns.Add("Headline", _
      Type.GetType("System.String"))
dtbAds.Columns.Add("Description", _
      Type.GetType("System.String"))
dtbAds.Columns.Add("AskingPrice", _
      Type.GetType("System.Decimal"))
Follow the code from the previous step with a loop that iterates through each element in the strAdIds array. Here’s the code:
For intPos = 0 to Ubound(strAdIds)
' Code to process each ad ID will go here
Next
For each ad ID in the strAdIds array, convert the ID to an integer and use it to call the Web service’s GetInfo method. If the Web service sets the Found property to True, create a new row for the rowAds data table, set the new row’s AdId property to the current ad ID value, and set its Headline, Description, and AskingPrice rows to the values from the Web service’s GetInfo method. Finally, add the new row to the dtbAds data table. To do all this, replace the comment in step 9 with the code shown here:
For intPos = 0 to Ubound(strAdIds)
  intAdId = Cint(strAdIds(intPos))
  If cadSvc.GetInfo(intAdId).Found Then
    rowAds = dtbAds.NewRow()
    rowAds("AdId") = intAdId
    rowAds("Headline") = _
                     cadSvc.GetInfo(intAdId).Headline
    rowAds("Description") = _
                     cadSvc.GetInfo(intAdId).Description
    rowAds("AskingPrice") = _
                     cadSvc.GetInfo(intAdId).AskingPrice
    dtbAds.Rows.Add(rowAds)
  End If
Next
Now that the data table contains all the required data, make the grdAds data grid visible, establish the dtbAds data table as the grid’s data source, and bind the data into the data grid. The statements in blue should follow the Next statement from step 9.
Next
grdAds.Visible = True
grdAds.DataSource = dtbAds
grdAds.DataBind
Save the file in the ch14c folder, giving it the name adclient.aspx.
Copy the banner.ascx file and the normal.css file (if you’re using it) from the ch13 folder to the ch14c folder.
Copy the images folder from the ch13 folder to the ch14c folder.
Load the adclient.aspx page into your browser, taking care to specify an HTTP URL. Enter a text string that exists within the description of at least one ad and then click the Submit button. You should receive a display similar to the one on page 497.
Here’s the complete code listing for the adclient.aspx page. To look at the HTML code, open the adclient.aspx file in the ch14c folder you installed from the companion CD.
<%@ Page Language="vb" Debug="true" Explicit="True"%>
<%@ Register TagPrefix="webdbpgm" TagName="banner"
             src="banner.ascx" %>
<%@ Import Namespace="System.Data"%>
<script runat="server">
'                  ---------------------
Sub Page_Load(sender As Object, e As EventArgs)
  If Page.IsPostBack Then
    If txtFind.Value = "" Then
      litErrMsg.Text = "Enter an Ad ID."
    Else
      SearchForAd()
    End If
  End If
End Sub
'                  ---------------------
Sub SearchForAd()
  Dim cadSvc As ContosoAdSvc
  Dim strAdIds() As String
  Dim dtbAds As DataTable
  Dim rowAds As DataRow
  Dim intAdId As Integer
  Dim intPos As Integer

  cadSvc = New ContosoAdSvc
  strAdIds = cadSvc.FindAds(txtFind.Value)
  If (Ubound(strAdIds) < 0 ) OrElse (strAdIds(0) = "") Then
    litErrMsg.Text = "No matches found."
    Exit Sub
  End If
  dtbAds = New DataTable("ads")
  dtbAds.Columns.Add("AdId", _
        Type.GetType("System.String"))
  dtbAds.Columns.Add("Headline", _
        Type.GetType("System.String"))
  dtbAds.Columns.Add("Description", _
        Type.GetType("System.String"))
  dtbAds.Columns.Add("AskingPrice", _
        Type.GetType("System.Decimal"))

  For intPos = 0 to Ubound(strAdIds)
    intAdId = Cint(strAdIds(intPos))
    If cadSvc.GetInfo(intAdId).Found Then
      rowAds = dtbAds.NewRow()
      rowAds("AdId") = intAdId
      rowAds("Headline") = _
                       cadSvc.GetInfo(intAdId).Headline
      rowAds("Description") = _
                       cadSvc.GetInfo(intAdId).Description
      rowAds("AskingPrice") = _
                       cadSvc.GetInfo(intAdId).AskingPrice
      dtbAds.Rows.Add(rowAds)
    End If
  Next
  grdAds.Visible = True
  grdAds.DataSource = dtbAds
  grdAds.DataBind
End Sub
'                  ---------------------
</script>One problem with using Web services is learning that they exist. One possible solution is a technology called Universal Discovery Description and Integration (UDDI). This is a specification that describes a distributed registry of available Web services. You can think of it as a search engine for Web services.
To view the Microsoft version of this registry and learn more about it, browse uddi.microsoft.com.