

In this chapter, you’ll learn: | |
✓ | How to create Web forms that visitors can use to submit files from their computers. |
✓ | How to create a Web page that receives, validates, and stores uploaded files and any associated information you gather. |
A wide variety of Web applications can benefit by giving Web visitors the ability to upload files. Resumes and hobby photographs are probably the most common examples, but additional applications abound.
From a Web designer’s point of view, the primary reason for supporting Web file uploads usually involves control. Giving Web visitors anonymous FTP access to even part of your site, for example, is risky. If you do this, it should come as no surprise when someone defaces, deletes, or misuses your site. With a properly configured Web upload facility, however, you can authenticate the Web visitor, check the incoming file for validity, store the file safely, and gather information about the file all in one stroke.
Supporting Web file uploads isn’t difficult, but there are several details you must get right:
The browser. All recent Web browsers (specifically, those that support HTML 3.2 and later) support an <input type="file"> tag designed for uploading files to the Web server. In a Web page, this tag looks like an ordinary text box with an ordinary button to its right. Here’s an example:
The <form> tag. As with all <input> tags, you must code the <input type="file"> tag within an HTML form; that is, between a set of <form> and </form> tags. In addition, the <form> tag must specify the attributes method="POST" and enctype="multipart/form-data".
The visitor entry. To upload a file, the visitor must either hand-type its path and file name or click the Browse button to locate a file by navigation. In no way can the Web server select the file to upload.
The Web server. Just because a visitor uploads a file doesn’t mean the server saves it to the server’s file system. The server saves the uploaded file only in memory, and only until it finishes processing the visitor’s request.
If the request triggers a server-side program (an ASP.NET page, for example), that program can inspect the file in memory and write it into the server’s file system. This option provides you with control over what data enters the server and where it goes.
When you use ASP.NET code to receive and process the file, there are two additional requirements. First both the <form> tag and the <input type="file"> tag must contain runat="server" attributes. Second the <input type="file"> tag must contain an id attribute. Here, then, is the minimal HTML for a Web form that uploads a file:
<form method="POST" enctype="multipart/form-data" runat="server">
  <input type="file" id="fupUpload" runat="server" />
  <input type=submit value="Upload" runat="server" />
</form>
When an <input type="file" runat="server"/> tag runs on the server, it creates an HtmlInputFile object. This type of object supports all the normal properties and methods of any other WebControl, HtmlControl, or HtmlInputControl, as well as the properties in the following table.
Property | Type | Mode | Description |
|---|---|---|---|
PostedFile | HttpPostedFile | Read | The content of the uploaded file. |
Accept | String | Read/Write | A comma-delimited list of MIME types that constrains the file types the visitor can select. |
MaxLength | Integer | Read/Write | The maximum acceptable length (including path) for the name of the uploaded file. |
Size | Integer | Read/Write | The width of the text box where the visitor enters the name (including path) of the file to upload. |
You can specify the Accept, MaxLength, and Size properties either as HTML attributes or with code. Browser support for the Accept property varies widely; Internet Explorer seems to ignore it completely. There’s seldom a need to code the MaxLength property, but the Size property is useful for controlling how many characters the text box portion of the control displays. Visitors appreciate having the entire path and file name visible.
The PostedFile property is accessible only from code and useful only after a postback. If the form submission included a file, the PostedFile property will point to an HttpPostedFile object. If the form submission didn’t include a file, the PostedFile property points to the reserved value Nothing. Consider, for example, the following file upload tag. (It’s the same one as before.)
<input type="file" id="fupUpload" runat="server" />
To test whether this object contains an uploaded file, you would code
If fupUpload.PostedFile Is Nothing Then
  <!-- There's no file. -->
Else
  <!-- There is a file. -->

End If
If an uploaded file is present, the properties in the following table are available. The fupUpload.PostedFile.ContentLength property, for example, contains the size of the file in bytes (which, by the way, can be zero). The fupUpload.PostedFile.FileName property contains the fully qualified file name from the visitor’s computer.
Property | Description |
ContentLength | Gets the size in bytes of an uploaded file. |
ContentType | Gets the MIME content type of a file sent by a visitor. |
FileName | Gets the fully qualified name of the file on the visitor’s computer (for example, "C:MyFilesTest.txt"). |
InputStream | Gets a Stream object that contains the uploaded file. |
The InputStream property temporarily holds the actual file contents. A Stream is an abstract object that behaves in most respects like an ordinary flat file. If the InputStream property contains a text file, you can open it and read it as such. Here, for example, is some code that opens the uploaded file for input and displays it in a label control named lblListing. The ch13 folder you installed from the companion CD contains a simple Web page named dispupload.aspx that uses this code.
Dim srdUpload As StreamReader
Dim strUpload As String

lblListing.Text = ""
srdUpload = New StreamReader(fupUpload.PostedFile.InputStream)
Do
  strUpload = srdUpload.ReadLine()
  If strUpload Is Nothing Then
    Exit Do
  End If
  lblListing.Text &= strUpload & "<br>" & vbCrLf
Loop
If the uploaded file is supposed to be a picture, you can try loading it into a System.Drawing.Image object as shown in the following example. If this throws an exception, the picture file is invalid. If loading the picture is successful, you can check its height, width, format, and other properties by inspecting the properties of the imgUpload object.
Dim imgUpload As System.Drawing.Image

imgUpload  = System.Drawing.Image.FromStream( _
               fupUpload.PostedFile.InputStream)
Although eminently useful, the PostedFile.InputStream object is fleeting. It disappears from memory the moment your ASP.NET page terminates. To save the file to a disk, you must call the PostedFile object’s SaveAs method and specify a fully qualified physical path and file name, as shown here:
fupUpload.PostedFile.SaveAs( _
    "c:InbetPubwwwrootwebdbpgmch13pix
ewpic.gif")
Don’t try to save the file in the PostedFile.FileName location. This specifies a path that existed on the visitor’s computer, and such a path is almost certainly incorrect on the Web server. Instead, append the base file name to a server path you know is correct. The following statement, for example, saves a file with the base file name and extension the visitor specified, but in your application’s uploads folder:
fupUpload.PostedFile.SaveAs( _
    Server.MapPath(Request.ApplicationPath & _
    "/uploads/" & _
Path.GetFileName(fupUpload.PostedFile.FileName)))This section will develop a Web page named ad-pic.aspx whereby registered visitors on the Contoso Classified site can provide a picture for any ad they post. The following graphic shows this page in action.
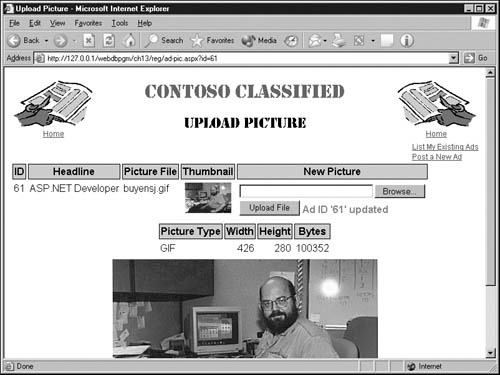
When the visitor first requests this page, its URL must include an id= query string variable. This identifies the ad that will receive the picture. A procedure later in this chapter will add such a link, complete with id= query string variable, to the ad-new.aspx page from Chapter 12.
When the ad-pic.aspx page first appears, the headings ID, Headline, Picture File, and Thumbnail identify current values from the ads table. The picture.aspx page from Chapter 8 displays the thumbnail. To upload a picture, the visitor would enter its path and file name in the file upload control beneath the New Picture heading, and then click the Upload File button.
If the upload is successful, the page displays the properties of the new picture—as well as the picture itself—under the Picture Type, Width, Height, and Bytes headings. More importantly, however, the page also saves the picture in the application’s pix folder and stores its name in the picname field of the ads record for the specified ad. Together, these actions make the picture available whenever a shopper displays the ad-dtl.aspx page from Chapter 10.
For simplicity, the page stores all uploaded pictures in the same folder—pix—and stores them with the file name the visitor specified during the upload. This creates the possibility that one visitor could replace pictures that appear in another visitor’s ad. In a real site, you could avoid this by storing each visitor’s pictures in a different folder or by assigning a new, unique file name to each uploaded picture.
This procedure assumes once again that you want to preserve the application you created in the previous chapter and create a new application for this chapter. If you’d prefer to keep using an existing application, you can skip this procedure. Otherwise, proceed as follows:
Create a new folder on your Web server and name it ch13.
Copy all the files and folders from the ch12 folder into the ch13 folder.
If you think some of the files in your ch12 folder might not be working properly, copy all the files and folders from the ch12 folder you installed from the companion CD.
Mark the ch13 folder as an IIS application. If you need instructions, refer to Chapter 2.
To physically design the ad-pic.aspx page, proceed generally as follows:
Create a new, empty Web page containing the usual structural tags. Apply any overall page formatting you want. Add an @ Page directive like the following as the first line in the file:
<%@ Page Language="VB" Debug="true" Explicit="true" %>
To display the standard page heading, add the @ Register directive as the second line in the page:
<%@ Register TagPrefix="webdbpgm" TagName="banner"
             src="../banner.ascx" %>
<html>
Then add the statement in blue to the <body> section:
<body>
<webdbpgm:banner id="banner" runat="server" />
</body>
After the page banner and before the end of the <body> section, add a Web form. Because this form will contain a file upload control, be sure to specify enctype="multipart/form-data" in the <form> tag. The <body> section should now look like this:
<body>
<webdbpgm:banner id="banner" runat="server" />
<form enctype="multipart/form-data" runat="server">
<!-- Form layout will go here -->
</form>
</body>
Recall that method="POST" is the default for ASP.NET Web forms.
Replace the comment in the previous step with a five-column, two-row HTML table. Use <th> and </th> cells in the first row and insert the titles ID, Headline, Picture File, Thumbnail, and New Picture.
Add the following controls respectively to columns 1 through 4 of row 2. Note that the <img> tag in column 4 is initially invisible, because it has an empty src attribute. If it turns out that a picture is available, code elsewhere in the page will provide a src value and set the Visible attribute to True.
<asp:Literal id="litCurAdId" runat="server" />
<asp:Literal id="litCurHeadline" runat="server" />
<asp:Literal id="litCurPicname" runat="server" />
<img src id="imgThumb" Visible="False" runat="server" />
In row 2, column 5 of the table you created in step 3, create another HTML table having one column and two rows. Name this table tblUpload and make it initially invisible. In the upper cell, add an HtmlInputFile control named fupUpload. This is the single tag that appears in blue in the following code. In the lower cell, add the Upload File button and the two Label controls shown below in blue. Note that clicking the Upload File button fires an event handler named btnUpload_Click.
<table id="tblUpload" visible="false"
         border="0" cellspacing="1" runat="server">
  <tr>
    <td><input id="fupUpload" type="file"
         size="30" runat="server"></td>
  </tr>
  <tr>
    <td>
    <asp:button id="btnUpload" Text="Upload File"
         OnClick="btnUpload_Click" runat="server" />
    <asp:Label class="err" id="lblError"
         EnableViewState="false" runat="server" />
    <asp:Label class="msg" id="lblOkMsg"
         EnableViewState="false" runat="server" />
    </td>
  </tr>
</table>
After the </form> tag you entered in step 2, create an HTML table with one column and two rows. Name the table tblResults, make it initially invisible, and center it on the page. Specify alignments of top and center for both table cells. This requires the code shown here in blue:
</form>
<table id="tblResults" visible="false" align="center"
       runat="server">
  <tr>
    <td valign="top" align="center"></td>
  </tr>
  <tr>
    <td valign="top" align="center"></td>
  </tr>
</table>
</body>
Create a four-column, two-row table inside the first table cell you created in the previous step. Use <th> and </th> cells in the first row, and insert the titles Picture Type, Width, Height, and Bytes.
Within the table you just created, add the following controls, respectively, to columns 1 through 4 of row 2:
<asp:literal id="litPropsType" EnableViewState="false"
             runat="server" />
<asp:literal id="litPropsWidth" EnableViewState="false"
             runat="server" />
<asp:literal id="litPropsHeight" EnableViewState="false"
             runat="server" />
<asp:literal id="litPropsBytes" EnableViewState="false"
             runat="server" />
In the lower table cell you created in step 6, add an <img> control named imgFull. Don’t bother specifying an src value for now; later code will supply this.
<img src id="imgFull" EnableViewState="false"
     runat="server" />
Save the page in the reg subfolder of your application (for example, in the ch13/reg subfolder).
This completes the initial HTML coding for this page. If you load it into your browser, you should receive an error message because the btnUpload_Click event handler doesn’t exist yet. You could solve this problem by performing step 3 of the next procedure; the page would then resemble the layout shown on page 459. However, because it has no program code yet, the page wouldn’t display any data, upload any files, or display any result messages.
The first time it runs, the ad-pic.aspx page should validate the ad ID it receives in the id= query string variable. If the given ID satisfies all checks, the page displays some information to reassure the visitor that he or she is working on the correct ad. It also makes the table that contains the file upload control and the Upload File button visible. If there’s a problem with the given ID, the page simply exits with an error message. To begin coding these features, proceed as follows:
Open the ad-pic.aspx page from the location where you saved it in step 11 of the previous procedure.
Add the declarations shown here in blue just before the existing <html> tag:
<%@ Import Namespace="System.Data" %>
<%@ Import NameSpace="System.Data.OleDb" %>
<%@ Import Namespace="System.Drawing" %>
<%@ Import Namespace="System.Drawing.Imaging" %>
<%@ Import Namespace="System.IO" %>
<html>
The first two declarations are for accessing a non–SQL Server database. The third and fourth are for accessing graphics functions, and the last is for file manipulation.
Follow the code you just entered with a code declaration block that contains the following subroutines: Page_Init, Page_Load, btnUpload_Click, and Page_PreRender. Here’s the required code:
<script runat="server">
Sub Page_Init(sender As Object, e As EventArgs)
End Sub
Sub Page_Load(sender As Object, e As EventArgs)
End Sub
Sub btnUpload_Click(sender As Object, e As EventArgs)
End Sub
Sub Page_PreRender(sender As Object, e As EventArgs)
End Sub
</script>
Immediately after the <script runat="server"> tag you just added, declare an OleDbConnection variable named conClasf and two constants named THUMB_PFX and PICTURE_PFX. This requires the new code shown in blue:
<script runat="server">
Dim conClasf As OleDbConnection
Const THUMB_PFX = "../picture.aspx?size=75&url=pix/"
Const PICTURE_PFX = "../pix/"
Sub Page_Init(sender As Object, e As EventArgs)
The THUMB_PFX constant provides a URL prefix for displaying a thumbnail of a picture in the application’s pix folder. Note that the path to the picture.aspx page must be relative to the current page, and that the path in the url= query string parameter must be relative to the picture.aspx page.
The PICTURE_PFX constant provides a URL prefix for displaying a full-sized picture in the pix folder. Defining these two locations as constants guards against coding their values differently in various parts of the code. It also simplifies ongoing maintenance.
Within the Page_Init subroutine, open a connection to the classified.mdb database. These statements should be quite familiar by now, but here they are in blue:
Sub Page_Init(sender As Object, e As EventArgs)
  conClasf = New OleDbConnection(Session("conClasf"))
  conClasf.Open
End Sub
The Page_Init subroutine is guaranteed to run before the Page_Load subroutine, and also before the btnUpload_Click subroutine. This makes the Page_Init subroutine a great place to open a database connection that either of the other subroutines can use. Because step 4 defined the conClasf variable outside of any subroutine, function, or class, it’s available everywhere within the page.
Close the conClasf database connection within the Page_PreRender subroutine, which is guaranteed to run after the Page_Load and btnUpload_Click subroutines. This requires the code in blue:
Sub Page_PreRender(sender As Object, e As EventArgs)
  conClasf.Close
End Sub
Within the empty Page_Load subroutine, code the declarations shown here in blue:
Sub Page_Load(sender As Object, e As EventArgs)
  Dim strAdId As String
  Dim strSQL As String
  Dim cmdAd As OleDbCommand
  Dim rdrAd As OleDbDataReader
End Sub
The strAdId variable will store a copy of the id= query string variable. The strSQL variable will store a SQL statement. The cmdAd and rdrAd variables will access the classified.mdb database.
If the Page_Load subroutine is running because of a postback, exit immediately. Otherwise, retrieve the id= query string value, remove any leading or trailing spaces, and store the result in the strAdId variable. Finally, copy the value you saved in the strAdId variable into the litCurAdId server control. This control displays the ad ID in the top left corner of the Web page. This code should follow the declarations you entered in the previous step:
If Page.IsPostBack Then
  Exit Sub
End if
strAdId = Trim(Request.Params("id"))
litCurAdId.Text = strAdId
Because query string variables appear openly in the browser’s Address bar, visitors can readily change them. As a result, incoming query string variables usually warrant some scrutiny. For starters, if the strAdId value you just retrieved is blank or nonnumeric, display an error message and exit. Here’s the necessary code, which should follow the code from the previous step:
If strAdId = "" then
  litCurHeadline.Text = "No Ad ID specified."
  Exit Sub
End If
If Not IsNumeric(strAdId) Then
  litCurHeadline.Text = "Ad ID not numeric."
  Exit Sub
End If
The litCurHeadline control normally displays the ad headline in the top left corner of the page. Using this field to display an error message is slightly lazy but undeserving of major punishment.
If the strAdId value passes these checks, use it to retrieve the corresponding record from the ads table. This requires constructing a simple SQL statement, using the SQL statement to construct an OleDbCommand object, and using the command object to open a DataReader. This should follow the code from the previous step:
strSQL = "SELECT * " & _
           "FROM ads " & _
          "WHERE adid = " & strAdId & " "
cmdAd = New OleDbCommand(strSQL, conClasf)
rdrAd = cmdAd.ExecuteReader
Attempt to read one record from the DataReader you just opened. If this returns False, no matching record exists, so report a not found condition. Code these statements next in sequence:
If rdrAd.Read Then
'  Code to process found record will go here.
Else
  litCurHeadline.Text = "Ad ID not found."
End If
If a record matching the given adid does exist, verify that its memberid matches that of the current Web visitor. Return an error message if not. This code replaces the comment in the previous step:
If rdrAd.Item("memberid") = _
    Request.ServerVariables("AUTH_USER") Then
' Code to display current record information will go here.
Else
  litCurHeadline.Text = "This ad doesn't belong to you."
End If
To understand how this statement works, recall that the current Web page resides in the application’s reg folder. The application’s web.config file puts forms-based authentication into effect for this folder, redirecting any visitor who isn’t logged in to the login.aspx page. If the login.aspx page accepts the member ID and password that the visitor enters, it informs ASP.NET that the visitor is authenticated and gives ASP.NET the visitor’s member ID as an identity. This is the identity that shows up in Request.ServerVariables("AUTH_USER").
So, if a visitor logged in as [email protected] tries to modify an ad posted by [email protected], the preceding statements will block the activity.
If the visitor is trying to modify his or her own ad, display the ad headline. Also, if the ad already has a picture, display its name and a thumbnail picture. Finally, make the table that contains the file upload control and the Upload File button visible. To do all this, replace the comment in the previous step with this code:
litCurHeadline.Text = rdrAd.Item("headline") litCurPicname.Text = "" & rdrAd.Item("picname") If "" & rdrAd.Item("picname") <> "" Then imgThumb.src = THUMB_PFX & rdrAd.Item("picname") imgThumb.Visible = True End If tblUpload.Visible = TrueThis completes the database processing in the Page_Load subroutine. Therefore, after the End If statement you coded in step 11, close the data reader rdrAd and dispose of the command object cmdAd. This action requires the statements shown in blue. These will be the last two statements in the Page_Load subroutine.
  End If
  rdrAd.Close
  cmdAd.Dispose
End Sub
Save the page and load it into your browser, taking care to specify an HTTP URL and a proper query string value. Here’s an example, assuming that a Web server runs on your own PC:
http://127.0.0.1/webdbpgm/ch13/reg/ad-pic.aspx?id=61
Remember that the id value must identify an ad posted by the member you log in as. If you specify id=1, for example, then you must be logged in as [email protected], password caboose.
In the previous procedure, the Page_Load subroutine performed a number of validity checks and only then displayed a file upload control and a submit button titled Upload File. This procedure will develop code that responds to that button.
All the code in this procedure is strictly sequential. That is, the code in each step follows the code from the previous one. Proceed as follows:
Add the following declarations inside the btnUpload_Click subroutine you started in step 3 of the previous procedure:
Dim strFileName As String
Dim imgUpload As System.Drawing.Image
Dim strSQL As String
Dim cmdClasf As New OleDbCommand
Dim intRowsAff As Integer
The strFileName variable will store the name of the uploaded file. The imgUpload variable will load a copy of the uploaded file for processing. The last three variables are for updating the ads table: strSQL will contain a SQL statement, cmdClasf will point to an OleDbCommand object, and intRowsAff will contain the number of rows affected by running the SQL statement.
Make sure the table that displays the file upload results is invisible. The HTML always makes this table invisible initially, but if the visitor uploads first a valid picture and then an invalid one, the table will still be visible after the invalid attempt runs. To prevent this, add the following statement:
tblResults.Visible = False
Recall that fupUpload is the name of the file upload control you coded in step 6 of the first procedure. If this object’s PostedFile property doesn’t point to an object, the visitor didn’t upload a file. In that case, display an error message and exit. Here’s the required code:
If fupUpload.PostedFile Is Nothing Then
    lblError.Text = "No File Received"
    Exit Sub
  End If
If the uploaded file has no name (that is, if the length of its name, after dropping any leading and trailing spaces, is less than one), or if the file contains zero bytes, once again display an error message and exit. Here’s the code:
If (fupUpload.PostedFile.FileName.Trim().Length < 1) _
Or (fupUpload.PostedFile.ContentLength < 1) then
  lblError.Text = "Uploaded file is empty."
  Exit Sub
End If
Try loading the uploaded file into the image object imgUpload. If this produces an exception, display an error message and exit. Here’s the necessary code:
Try
  imgUpload = System.Drawing.Image.FromStream( _
              fupUpload.PostedFile.InputStream)
Catch ex As Exception
  lblError.Text = "Uploaded file isn't a valid picture."
  Exit Sub
End Try
Check the picture’s file format. The imgUpload object’s RawFormat property has a method called Equals that makes this relatively easy. If file format is GIF or JPEG, store the type below the Picture Type heading that appears above the uploaded picture. If it’s anything else, display an error message and exit. Here’s the code:
If imgUpload.RawFormat.Equals(ImageFormat.GIF) Then
  litPropsType.Text = "GIF"
ElseIf imgUpload.RawFormat.Equals(ImageFormat.JPEG) Then
  litPropsType.Text = "JPEG"
Else
  lblError.Text = "Uploaded file isn't a valid " & _
                  "picture format."
  Exit Sub
End If
Fill in the remaining three values that appear above the uploaded picture: Width, Height, and Bytes. The width and height in pixels come from the imgUpload object. The file size in bytes comes from the file upload control’s PostedFile.ContentLength property. Add these statements:
litPropsWidth.Text = imgUpload.Width
litPropsHeight.Text = imgUpload.Height
litPropsBytes.Text = fupUpload.PostedFile.ContentLength
Get the file name portion of the uploaded picture’s fully qualified file name and store it in the strFileName variable. The Path.GetFileName method performs this extraction easily; here’s the statement:
strFileName = Path.GetFileName( _
                   fupUpload.PostedFile.FileName)
Next, save the uploaded file using the file name the visitor specified and the physical equivalent of the URL path you coded in the PICTURE_PFX constant. Here’s the necessary statement:
fupUpload.PostedFile.SaveAs( _
              Server.Mappath(PICTURE_PFX) & strFileName)
Note that if the visitor uploaded a file named C:My Picturesschnauzer.jpg, this statement would store it in the physical location that corresponds to ../pix/schnauzer.jpg.
Replace the existing file name and thumbnail picture, if any, that appear under the Picture File and Thumbnail headings in the top left corner of the page. Replacing the picture name is easy; just copy the value in the strFileName variable. Replacing the thumbnail is slightly more complicated: you must update the src property of the imgThumb control to contain the URL prefix from THUMB_PFX plus the file name from strFileName. You should also make sure the imgThumb control is visible. Here’s the code:
litCurPicname.Text = strFileName
imgThumb.src = THUMB_PFX & strFileName
imgThumb.Visible = True
Display the full-sized picture. Doing so requires setting the src property of the imgFull control to the path in PICTURE_PFX plus the file name in strFileName, and then making the tblResults table visible. (The tblResults table contains the imgFull control.) Use the following statements:
imgFull.src = PICTURE_PFX & strFileName
tblResults.Visible = True
Construct a SQL statement that sets the picname field in the ads table equal to the value in strFileName, but only in the record for the adid that the Page_Load subroutine validated. The Page_Load subroutine, you might recall, stored this value in the litCurAdId control. ASP.NET uses the ViewState mechanism—which is fairly resistant to tampering—to store this value between form submissions. Here’s the code:
strSQL = "UPDATE ads " & _
            "SET picname = '" & strFileName & "' " & _
          "WHERE adid = " & litCurAdId.Text & " "
Build an OleDbCommand object that contains this SQL statement. Then use the command object’s ExecuteNonQuery method to update the database. Save the number of affected table rows in the intRowsAff variable. This requires the following code:
cmdClasf = New OleDbCommand(strSQL, conClasf)
intRowsAff = cmdClasf.ExecuteNonQuery
If the number of affected rows is one, display a success message. If the number of affected rows is anything else, display an error message. Here’s the code:
If intRowsAff = 1 Then
  lblOkMsg.Text = "Ad ID '" & litCurAdId.Text & "' updated"
Else
  lblError.Text = intRowsAff & "database records updated."
End If
Dispose of the cmdClasf object using the following statement:
cmdClasf.Dispose
Save the page and test it. You should find that after uploading a picture for an ad, using the ad-dtl.aspx page to display the same ad displays the new picture.
This completes the code for the ad-dtl.aspx page. A listing of the program code follows. To also view the declarations and the HTML portion of the page, open the ad-dtl.aspx page in the ch13/reg folder you installed from the companion CD.
<script runat="server">
Dim conClasf As OleDbConnection
Const THUMB_PFX = "../picture.aspx?size=75&url=pix/"
Const PICTURE_PFX = "../pix/"
' -------------------------------------------------------
Sub Page_Init(sender As Object, e As EventArgs)
  conClasf = New OleDbConnection(Session("conClasf"))
  conClasf.Open
End Sub
' -------------------------------------------------------
Sub Page_Load(sender As Object, e As EventArgs)
  Dim strAdId As String
  Dim strSQL As String
  Dim cmdAd As OleDbCommand
  Dim rdrAd As OleDbDataReader

  If Page.IsPostBack Then
    Exit Sub
  End if
  strAdId = Trim(Request.Params("id"))
  litCurAdId.Text = strAdId
  If strAdId = "" then
    litCurHeadline.Text = "No Ad ID specified."
    Exit Sub
  End If
  If Not IsNumeric(strAdId) Then
    litCurHeadline.Text = "Ad ID not numeric."
    Exit Sub
  End If
  strSQL = "SELECT * " & _
             "FROM ads " & _
            "WHERE adid = " & strAdId & " "
  cmdAd = New OleDbCommand(strSQL, conClasf)
  rdrAd = cmdAd.ExecuteReader
  If rdrAd.Read Then
    If rdrAd.Item("memberid") = _
        Request.ServerVariables("AUTH_USER") Then
      litCurHeadline.Text = rdrAd.Item("headline")
      litCurPicname.Text = "" & rdrAd.Item("picname")
      If "" & rdrAd.Item("picname") <> "" Then
        imgThumb.src = THUMB_PFX & rdrAd.Item("picname")
        imgThumb.Visible = True
      End If
      tblUpload.Visible = True
    Else
      litCurHeadline.Text = "This ad doesn't belong to you."
    End If
  Else
    litCurHeadline.Text = "Ad ID not found."
  End If
  rdrAd.Close
  cmdAd.Dispose
End Sub
' -------------------------------------------------------
Sub btnUpload_Click(sender As Object, e As EventArgs)
  Dim strFileName As String
  Dim imgUpload As System.Drawing.Image
  Dim strSQL As String
  Dim cmdClasf As New OleDbCommand
  Dim intRowsAff As Integer

  tblResults.Visible = False
  If fupUpload.PostedFile Is Nothing Then
    lblError.Text = "No File Received"
    Exit Sub
  End If
  If (fupUpload.PostedFile.FileName.Trim().Length < 1) _
  Or (fupUpload.PostedFile.ContentLength < 1) then
    lblError.Text = "Uploaded file is empty."
    Exit Sub
  End If

  Try
    imgUpload =
System.Drawing.Image.FromStream(fupUpload.PostedFile.InputStream)
  Catch ex As Exception
    lblError.Text = "Uploaded file isn't a valid picture."
    Exit Sub
  End Try
  If imgUpload.RawFormat.Equals(ImageFormat.GIF) Then
    litPropsType.Text = "GIF"
  ElseIf imgUpload.RawFormat.Equals(ImageFormat.JPEG) Then
    litPropsType.Text = "JPEG"
  Else
    lblError.Text = "Uploaded file isn't a valid" & _
                    "picture format."
    Exit Sub
  End If

  litPropsWidth.Text = imgUpload.Width
  litPropsHeight.Text = imgUpload.Height
  litPropsBytes.Text = fupUpload.PostedFile.ContentLength

  strFileName = Path.GetFileName( _
                fupUpload.PostedFile.FileName)
  fupUpload.PostedFile.SaveAs( _
                Server.Mappath(PICTURE_PFX) & strFileName)
  litCurPicname.Text = strFileName
  imgThumb.src = THUMB_PFX & strFileName
  imgThumb.Visible = True
  imgFull.src = PICTURE_PFX & strFileName
  tblResults.Visible = True
  strSQL = "UPDATE ads " & _
              "SET picname = '" & strFileName & "' " & _
            "WHERE adid = " & litCurAdId.Text & " "
  cmdClasf = New OleDbCommand(strSQL, conClasf)
  intRowsAff = cmdClasf.ExecuteNonQuery
  If intRowsAff = 1 Then
    lblOkMsg.Text = "Ad ID '" & litCurAdId.Text & "' updated"
  Else
    lblError.Text = intRowsAff & "database records updated."
  End If
  cmdClasf.Dispose
End Sub
' -------------------------------------------------------
Sub Page_PreRender(sender As Object, e As EventArgs)
  conClasf.Close
End Sub
' -------------------------------------------------------
</script>Many visitors who post a new ad will immediately want to supply a picture for it. A hyperlink that supports this would be very convenient. To provide one, proceed as follows:
Open the ad-new.aspx page.
Choose a spot in the body of the Web page where you want the hyperlink to appear. The sample page uses a location just after the lblOkMsg control, which displays the ad posting success message.
Add the following hyperlink in this location. Note the runat="server" attribute, the id of ancUpload, the lack of an href location, and the lack of visibility.
<a id="ancUpload" href visible="false"
                 runat="server"><b>Upload Picture</b></a>
Add the following statement after the declarations (and before any other statements) in the PostNewAd subroutine. This ensures that the ancUpload hyperlink won’t be visible unless the current ad posting succeeds.
ancUpload.visible = False
Add the following statements shown in blue near the end of the PostNewAd subroutine. The first blue statement sets the target location of the ancUpload hyperlink to the page named ad-pic.aspx followed by the query string identifier id= and the number of the newly posted ad. The second blue statement makes the hyperlink visible.
  lblOkMsg.Text = "Ad " & rowAds("adid") & " posted."
  ancUpload.href = "ad-pic.aspx?id=" & rowAds("adid")
  ancUpload.visible = True
  conClasf.Close
End Sub
This completes the coding for this procedure.
The following graphic shows a page named mbr-ads.aspx that visitors will appreciate while managing their ads.
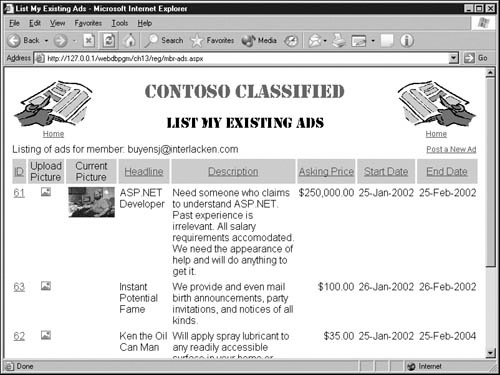
This page is basically a modified version of the ads.aspx page from Chapter 10 with the following changes:
Instead of searching for selectable categories, the mbr-ads.aspx page always searches for ads posted by the current logged-in visitor. To make this change, you would remove the selcat.aspx control and change the WHERE clause to specify
"WHERE (memberid = '" & _
                Request.ServerVariables("AUTH_USER") & "') "
Each row in the DataGrid contains a small hyperlinked picture in the Upload Picture column. The hyperlink points to the ad-pic.aspx page and specifies the ad ID for the current row. The column code that creates this column is as follows:
<asp:BoundColumn HeaderText="Upload Picture"
     DataField="adid"
     DataFormatString="<a href='ad-pic.aspx?id={0}'>
            <img border=0 src='../images/picicon.gif'></a>"
     ItemStyle-HorizontalAlign="center"
     ItemStyle-VerticalAlign="top" />
The third column in the DataGrid displays a thumbnail version of the ad’s picture (if any). The code for this column follows, but creating the column involves one more trick.
<asp:BoundColumn HeaderText="Current Picture"
     DataField="pictag"
     ItemStyle-HorizontalAlign="center"
     ItemStyle-VerticalAlign="top" />
The trick involves the pictag field, which contains either an empty string or an <img> tag that invokes the picture.aspx page to display the thumbnail. If you don’t remember this field being in the database, you’re exactly correct; it’s a calculated field in the Access query shown in the following graphic:
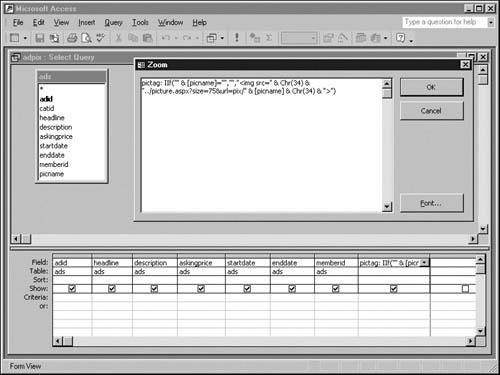
The IIf function accepts three parameters: a Boolean expression and two string expressions. If the Boolean expression is True, IIf returns the first string expression; otherwise, it returns the second string expression.
The Boolean expression in this case is "" & [picname]="". This compares the contents of the picname field to an empty string, even if the picname field contains a Null value. If this is True, the IIf function returns the first string expression, which is empty. Otherwise, it returns an <img> tag formulated as shown. The portion in blue will change depending on the value of the picname field.
<img src="../picture.aspx?size=75&url=pix/zeppelin.gif">Again referring to the graphic, note the expression pictag: in front of IIf. This gives the calculated field a name. By querying the adpix query rather than the ads table, the mbr-ads.aspx page gains access to the calculated pictag field as if it were an actual field in the database.
To view the mbr-ads.aspx page in detail, open it from the ch13/reg folder you installed from the companion CD.
Note
If you want to try tuning the mbr-ads.aspx page, be sure to use the version of the classified.mdb database in the ch13/db folder you installed from the companion CD. Copies of this database from earlier chapters don’t include the adpix query.
As you might have noticed, the ad-new.aspx, ad-pic.aspx, and mbr-ads.aspx pages in the ch13 folder you installed from the companion CD have convenience links among them. These are just ordinary hyperlinks you can add at your leisure.
This chapter explained how to accept and process files that Web visitors transmit as part of a Web form submission. It then provided instructions for constructing a fairly realistic Web page that does this.
The next chapter will introduce the concept of Web services, which readily distribute information and processing around a network. It will also include procedures for constructing a simple Web service and an equally simple Web service client.