
7
Adding Authentication to Our App
We’ve made great progress so far, developing our to-do app and hosting it on the web. However, making our application available on the internet introduces a new problem: how do we keep our data safe? Anybody who knows the URL of our app can access it and can see all our to-dos. We need to add some kind of authentication to our app so that only authorized users can access it. In addition, wouldn’t it be nice if we could share our to-do app with our friends and family so they could also create their lists and keep track of their to-dos?
To achieve these outcomes, we need to add an authentication layer to our app. Authentication will ensure that only authorized users can see specific to-do items. In other words, before allowing users to create or edit to-do items, we will ask the users to authenticate themselves. If they are new to the website, they will be asked to register. If they are already registered, they will be able to use their credentials (username and password) to log in. In addition, we will also make sure that each to-do item is associated with a specific user. This way, only the user who created the to-do item will be able to see it.
Here are the topics we are going to discuss in this chapter:
- Adding and configuring the GenieAuthentication plugin
- Restricting access to the data
- Updating our tests
Technical requirements
The source code for this chapter can be found at https://github.com/PacktPublishing/Web-Development-with-Julia-and-Genie/tree/main/Chapter7.
To get all the correct versions of all the packages used in this app, go to the project root folder and open up a Julia REPL. Then enter the following commands:
julia> ] # enter the package manager
pkg> instantiate
pkg> update
Then, do the same in the test/ folder.
Adding and configuring the GenieAuthentication plugin
The easiest way to add authentication to a Genie app is to use the GenieAuthentication plugin. Let’s add it and follow the installation instructions (https://github.com/GenieFramework/GenieAuthentication.jl) to set up our app for authentication.
In a terminal, start the Genie REPL for the TodoMVC app. Go to the application folder and run bin/repl if you are on Linux or macOS, or bin epl.bat if you are on Windows. Then, in the REPL, type ] to enter the Pkg mode and add the GenieAuthentication plugin:
pkg> add GenieAuthentication
Once the plugin is installed, we need to configure it:
julia> using GenieAuthentication
julia> GenieAuthentication.install(@__DIR__)
By running the install function, the plugin has added all the necessary integrations into our app (views, controller, model, migrations, and so on). You can see all the operations performed by the install function by looking at the output in the REPL.
Configuring the GenieAuthentication plugin
Now that the plugin is installed, let’s configure it to our needs. First, we said that we want to allow users to register, so let’s enable this functionality. Registration is disabled by default as a security precaution, to make sure that we don’t accidentally allow unwanted registrations on our app. To enable user registration, we need to edit the newly created genie_authentication.jl file in the plugins/ folder (this was one of the files created by the install function). Open the file and uncomment the two routes at the bottom of the file:
# UNCOMMENT TO ENABLE REGISTRATION ROUTES
route("/register", AuthenticationController.show_register, named = :show_register)
route("/register", AuthenticationController.register, method = POST, named = :register)
What are the plugins?
In case you are wondering about the plugins/ folder, it’s worth mentioning that this is a special Genie folder. The files placed inside this folder behave very similarly to the initializer files hosted in the config/initializers/ folder. The plugins/ folder is designed to be used by Genie plugins to add their integration and initialization logic, and the only difference compared to regular initializers is that the files in the plugins/ folder are loaded after the initializers so they can get access to all the features of the Genie app (for example, the database connection, logging, and so on).
Setting up the database
The GenieAuthentication plugin stores the user information in the application’s database. For this reason, we’ll need to create a new table to store the user information. The plugin has created a migration file for us in the migrations/ folder. Let’s run the migration to create the users table. Go back to the Genie app REPL and run the following:
julia> using SearchLight
julia> SearchLight.Migration.status()
This shows us the status of the migrations:
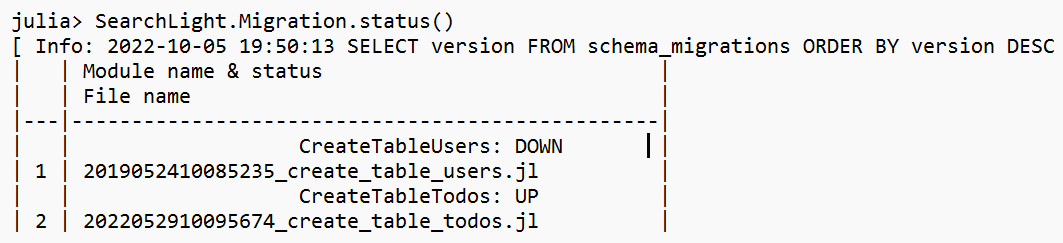
Figure 7.1 – Showing the migration status
We can see that we have one migration, create_table_users, that has not been run yet. Let’s run it:
julia> SearchLight.Migration.allup()
The Migration.allup function will run the migrations that have not been run yet. Alternatively, we can run a specific migration by passing its name to the Migration.up function; for example, in our case, it is the following: SearchLight.Migration.up("CreateTableUsers").
Running the migration will create a new table in the database called users. The table only includes a minimum set of columns that are required by the GenieAuthentication plugin: id, username, password, name, and email. If you want to customize this structure, you can edit the migration before running it or create additional migrations.
Restricting access to the app
It’s time to give our authentication feature a try. Let’s go ahead and restrict access to the list of to-do items. To do this, edit the app/resources/todos/TodosController.jl file as follows:
- At the top of the file, under the last using statement, add the following:
using GenieAuthentication
using TodoMVC.AuthenticationController
using TodoMVC
- Change the index function by adding the authenticated!() function call. This effectively restricts access to the body of the function to only authenticated users. The updated index function should look like this:
function index()
authenticated!()
html(:todos, :index; todos = todos(),
count_todos()..., ViewHelper.active)
end
That’s all we need to do for now in terms of code. However, before testing our app we need to reload it to give Genie the opportunity to load the plugin. Exit the Genie REPL and start it again (follow the instructions from the Pausing Development section in Chapter 4), then start the server with julia> up() and open the application in the browser (http://localhost:8000).
You should see the following login screen now:
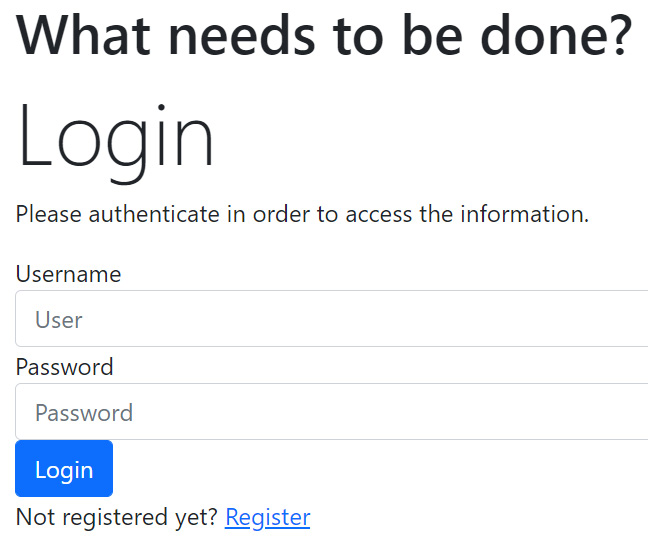
Figure 7.2 – The login screen
Registering a new user
This time, as you can see in the preceding screenshot, we will not be able to see the list of to-dos. Instead, we will be redirected to the login page because we are not authenticated. Let’s enable the registration functionality and create a new user. We enabled the registration routes earlier by uncommenting the routes. We’ll need to do the same for the registration link on the login page. Open the app/resources/authentication/views/login.jl file and uncomment the section at the bottom of the file by deleting the first and last lines (the ones that say Uncomment to enable registration):
<!-- Uncomment to enable registration
<div class="bs-callout bs-callout-primary">
  <p>
    Not registered yet? <a
      href="$(linkto(:register))">Register</a>
  </p>
</div>
Uncomment to enable registration -->
After you delete the two lines and reload the page, at the bottom, under the login form, you should see a link to the registration. Clicking on the Register link will take us to the registration page, displaying a form that allows us to create a new account. Let’s fill it up with some data and create a new user. Upon successful registration, we will get a message saying Registration successful. Let’s improve on this by redirecting the user to their to-do list instead. Edit the app/resources/authentication/AuthenticationController.jl file and change the register function. Look for the line that says Redirect successful and replace it with redirect("/?success=Registration successful").
Let’s try out the new flow by navigating back to the registration page http://localhost:8000/register and creating a new user. This time, after the successful registration, the user will be automatically logged in and will be taken to the to-do list page, with the app displaying a success message, notifying them that the registration was successful.
If you want, you can also try an invalid registration – for example, by reusing the same username or by leaving some of the fields empty. You will see that the plugin will automatically guard against such issues, blocking the invalid registration and displaying a default error message indicating the problematic field. As a useful exercise, you can further improve the registration experience by customizing the error message.
Note: as we haven’t added a logout button yet, you can log out by navigating to http://localhost:8000/logout.
Restricting access to the data
Our app is now protected by authentication, but we still need to make sure that the user can only see their own to-do items. To do this, we need to modify our app so that for each to-do item, we also store the user ID that created the to-do, effectively associating each to-do item with a user. Once we have that, we’ll need to further modify our code to only retrieve the to-do items that belong to the currently logged-in user.
Adding the user ID to the to-do items
In order to associate each to-do item with a user, we need to add a new column to the todos table. This means we’ll need to create a new migration. Let’s do that by running the following command in the Genie REPL:
julia> using SearchLight
julia> SearchLight.Migration.new("add column user_id to todos")
This will create a new migration, AddColumnUserIdToTodos – let’s edit it to put in our logic. In the db/migrations/ folder, open the file that ends in add_column_user_id_to_todos.jl and make it look like this:
module AddColumnUserIdToTodos
import SearchLight.Migrations: add_columns, remove_columns, add_index, remove_index
function up()
  add_columns(:todos, [
    :user_id => :int
  ])
  add_index(:todos, :user_id)
end
function down()
  remove_index(:todos, :user_id)
  remove_columns(:todos, [
    :user_id
  ])
end
end
The migration syntax should be familiar to you by now. We are adding a new column called user_id to the todos table and a new index on that column (this is a good practice to improve the performance of queries given that we will filter the to-dos by the data in this column). The down function will undo the changes made by the up function, by first removing the index and then dropping the column. Let’s run our migration:
julia> SearchLight.Migration.up()
Modifying the Todo model
Now that we have the new column in the database, we need to modify the Todo model to include it. Open the app/resources/todos/Todos.jl file and change the model definition to look like this:
@kwdef mutable struct Todo <: AbstractModel
  id::DbId = DbId()
  todo::String = ""
  completed::Bool = false
  user_id::DbId = DbId()
end
We have added a new field called user_id of the DbId type, which will be used to reference the ID of the user that created the to-do.
Important
Julia requires a restart when definitions of structs are changed. Exit the Genie REPL and start it again, otherwise, the application will not work correctly from this point on.
Now that we have added the column to store the user ID of the owner of the to-do item, let’s update our existing to-do items to set their user_id to the ID of our user. This is the ID of the user that we just created during the registration process. If you want to check what users are in the database, run the following in the Genie app REPL:
julia> using TodoMVC.Users
julia> all(User)
You will get a list of all users in the database. In my case, it looks like this:
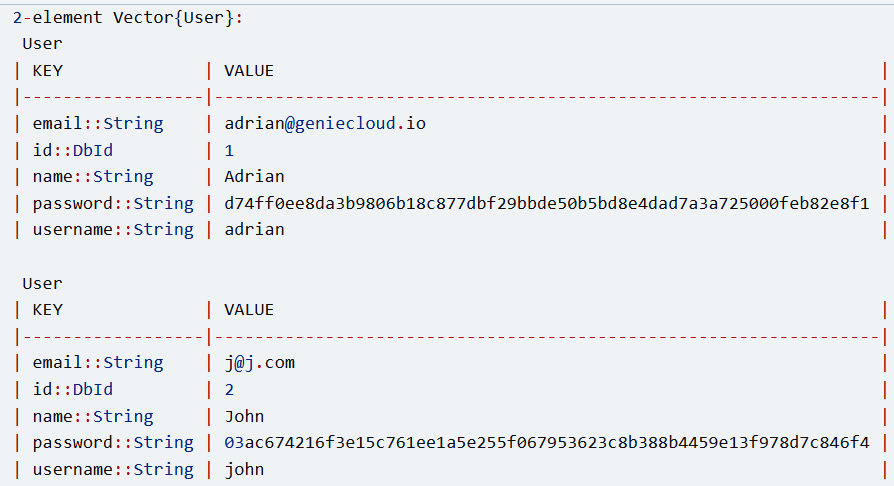
Figure 7.3 – List of users
Note
If you haven’t created a user for yourself yet, do that now by navigating to http://localhost:8000/register and registering.
First, let’s see a list of all to-dos in the database at this moment:
julia> using TodoMVC.Todos
julia> all(Todo)
Let’s check the ID of our user – that is, the user that will be associated with the to-do items we previously created. In my case, the ID is 1. Now, let’s update the existing to-do items to set their user_id to 1 (or whatever ID has the user you want to use). Run the following in the Genie app REPL:
julia >  using SearchLight
julia> for t in all(Todo)
          t.user_id = 1
          save!(t)
       end
Now, all our existing to-dos are associated with the ID of the user. Two more things left: first, filter the to-dos by the user ID of the authenticated user when retrieving them, and second, make sure that the user ID is set when creating a new to-do item.
Getting information about the authenticated user
So far so good. Adding a user_id manually was not hard. But how do we get the user_id of the authenticated user? As it turns out, this information is readily available through the same GenieAuthentication plugin. If you check the plugins/genie_authentication.jl file, you will see that it exports only two names: current_user() and current_user_id(). The first one returns the User instance corresponding to the currently authenticated user, and the second one returns just the ID of that user (as an Int). If a user is not authenticated, both functions return nothing. We’ll use the current_user_id() function to filter the to-dos by the user ID of the authenticated user. And as these functions are exported by the plugin, they are included directly and exposed by our application’s main module, TodoMVC. So, we need to make sure that we add using TodoMVC to the top of app/resources/todos/TodosController.jl, as well as inside the API.V1 submodule.
Filtering the to-dos by user ID
Let’s proceed by updating our application logic to filter the to-dos by the user ID of the authenticated user. Open the app/resources/todos/TodosController.jl file and make the following changes:
- In the count_todos function, add a new filter, user_id = current_user_id(), to the count function to only count the to-dos that belong to the authenticated user:
function count_todos()
notdonetodos = count(Todo, completed = false,
user_id = current_user_id())
donetodos = count(Todo, completed = true,
user_id = current_user_id())
(
notdonetodos = notdonetodos,
donetodos = donetodos,
alltodos = notdonetodos + donetodos
)
end
- In the todos function, add the same filter to all the find calls:
function todos()
todos = if params(:filter, "") == "done"
find(Todo, completed = true,
user_id = current_user_id())
elseif params(:filter, "") == "notdone"
find(Todo, completed = false,
user_id = current_user_id())
else
find(Todo; limit = params(:limit,
SearchLight.SQLLimit_ALL) |> SQLLimit,
offset = (parse(Int, params(:page
, "1"))-1) * parse(Int,
params(:limit, "0")),
user_id = current_user_id())
end
end
- Then, apply the same logic to the toggle, update, and delete functions:
function toggle()
todo = findone(Todo, id = params(:id),
user_id = current_user_id())
if todo === nothing
return Router.error(NOT_FOUND, "Todo item with id
$(params(:id))", MIME"text/html")
end
todo.completed = ! todo.completed
save(todo) && json(todo)
end
function update()
todo = findone(Todo, id = params(:id),
user_id = current_user_id())
if todo === nothing
return Router.error(NOT_FOUND, "Todo item with id
$(params(:id))", MIME"text/html")
end
todo.todo = replace(jsonpayload("todo"), "<br>"=>"")save(todo) && json(todo)
end
function delete()
todo = findone(Todo, id = params(:id),
user_id = current_user_id())
if todo === nothing
return Router.error(NOT_FOUND, "Todo item with id
$(params(:id))", MIME"text/html")
end
SearchLight.delete(todo)
json(Dict(:id => (:value => params(:id))))
end
- Next, update our API module by modifying the relevant functions in the TodosController.jl file within the API.V1 module, by adding the same user_id filter, as follows:
function item()
todo = findone(Todo, id = params(:id),
user_id = current_user_id())
if todo === nothing
return JSONException(status = NOT_FOUND,
message = "Todo not found") |> json
end
todo |> json
end
function update()
payload = try
check_payload()
catch ex
return json(ex)
end
todo = findone(Todo, id = params(:id),
user_id = current_user_id())
if todo === nothing
return JSONException(status = NOT_FOUND,
message = "Todo not found") |> json
end
todo.todo = get(payload, "todo", todo.todo)
todo.completed = get(payload, "completed",
todo.completed)
persist(todo)
end
function delete()
todo = findone(Todo, id = params(:id),
user_id = current_user_id())
if todo === nothing
return JSONException(status = NOT_FOUND,
message = "Todo not found") |> json
end
try
SearchLight.delete(todo) |> json
catch ex
JSONException(status = INTERNAL_ERROR,
message = string(ex)) |> json
end
end
- We also need to bring the authentication features into the scope of the API.V1 submodule by adding the following using statements at the top of the API.V1 module:
using GenieAuthentication
using TodoMVC.AuthenticationController
using TodoMVC
Setting the user ID when creating a new to-do item
Now that we can retrieve the to-dos by the user ID of the authenticated user, we need to make sure that the user ID is set when creating a new to-do item. In the same file, app/resources/todos/TodosController.jl, update the create function to set the user_id:
function create()
  todo = Todo(todo = params(:todo),
              user_id = current_user_id())
  validator = validate(todo)
  if haserrors(validator)
    return
      redirect("/?error=$(errors_to_string(validator))")
  end
  if save(todo)
    redirect("/?success=Todo created")
  else
    redirect("/?error=Could not save
             todo&todo=$(params(:todo))")
  end
end
Then, in the API.V1 module, in the same controller file, update the create function to set the user_id:
function create()
  payload = try
    check_payload()
  catch ex
    return json(ex)
  end
  todo = Todo(todo = get(payload, "todo", ""),
         completed = get(payload, "completed", false),
         user_id = current_user_id())
  persist(todo)
end
Enhancing the validation rules
One last thing: remember that the current_user_id() function returns nothing if the user is not authenticated. This is a valid value for the user_id field, allowing us to create to-do items without being authenticated. This is not what we want, so we need to add a validation rule to the Todo model to make sure that the user_id is not nothing when creating a new to-do item.
We need to create a new validation rule in the app/resources/todos/TodosValidator.jl file. We will call it dbid_is_not_nothing. Add the following code inside the module, at the bottom, right under the is_unique function body:
function dbid_is_not_nothing(field::Symbol, m::T)::ValidationResult where {T<:AbstractModel}
  isa(getfield(m, field), SearchLight.DbId) &&
      isa(getfield(m, field).value, Nothing) && return
      ValidationResult(invalid, :DbId_is_not_nothing,
      "should not be nothing")
  ValidationResult(valid)
end
The rule will retrieve the indicated field from the model and determine whether it’s of the SearchLight.DbId type, and make sure that its value property is not nothing. If it is, it will return an invalid validation result, producing an exception – otherwise, it will return a valid result.
To enable the validation rule, in the app/resources/todos/Todos.jl file, update the model validator logic by replacing it with the following code:
SearchLight.Validation.validator(::Type{Todo}) = ModelValidator([
  ValidationRule(:todo, TodosValidator.not_empty)
  ValidationRule(:user_id,
                  TodosValidator.dbid_is_not_nothing)
])
We have added a new validation rule, dbid_is_not_nothing, which will ensure that the user_id cannot be left unset upon saving a to-do item.
Securing all the public-facing pages
Now that we’ve made sure that authentication works as expected by creating a new user and logging in, and by extending the application to support multiple users, we need to make sure that all the public-facing pages are secured as well. We have already secured the TodosController.index function by calling the authenticated! function, but there are other pages that are not yet secured. We need to make sure that we protect pages accessible over both GET and POST – even if a page is not directly linked to from our app, a malicious user can see what other URLs our app exposes and can try to access them directly to expose and corrupt our data.
As such, besides the TodosController.index function, we need to secure the following functions in the TodosController, by adding the authenticated! function call at the top of each function, exactly like we did for the index function. For instance, for the TodosController.create function, the updated code will look like this:
function create()
  authenticated!()      # <----- we have added this line,
                        # the rest is unchanged
  todo = Todo(todo = params(:todo),
              user_id = current_user_id())
  # rest of the function is unchanged
end
Apply the same logic to the following functions: TodosController.toggle, TodosController.delete, and TodosController.update.
Securing the API
This should take care of the application’s public-facing pages. However, we also need to make sure that the API is secured. Remember that a chain is as strong as its weakest link, and if we don’t secure the API, we are leaving a door open for malicious users.
We can just go ahead and apply the same logic as we did for the public-facing pages by adding the authenticated! function call to all our public-facing API functions. This would work, but it’s not ideal. The problem is that by default, the authenticated! function is optimized to support integration with web pages. What this means is that it will redirect the user to the login page if they are not authenticated. This is not what we want for the API, as we want to return a JSON response instead (a redirect response is not valid JSON).
Exactly for this use case, GenieAuthentication allows us to specify a custom response to be returned when the user is not authenticated. All we need to do is to create a new JSON response and send it to the unauthenticated users. Add the following code to the TodosController.API.V1 module, inside the TodosController.jl file, for example, right after the using statements:
using Genie.Exceptions
const NOT_AUTHORISED_ERROR = ExceptionalResponse(401, ["Content-Type" => "application/json"], "Not authorised")
With this code, we have created a new ExceptionalResponse object, which is a type of error response. We will use it to return a 401 unauthorized response to unauthenticated users, by passing it to the authenticated! function. For instance, to secure the TodosController.API.V1.list function, we will update the function body to look like this:
function list()
  authenticated!(NOT_AUTHORISED_ERROR)
  TodosController.todos() |> json
end
That’s all there is to it! When attempting to access our API endpoint, unauthenticated users will now receive a 401 response, with a JSON body containing the message Not authorised.
Repeat the same logic for all the publicly accessible API functions, by adding the authenticated!(NOT_AUTHORISED_ERROR) function call at the top of each of the following functions:
- TodosController.API.V1.item
- TodosController.API.V1.persist
- TodosController.API.V1.create
- TodosController.API.V1.update
- TodosController.API.V1.delete
Updating our tests
Excellent, our application is now protected against unauthorized access. However, we need to make sure that our tests are updated as well. If we run our test suite now, we will see that all the tests are failing because they are also unable to access authentication-protected pages and API endpoints. So, we need to allow our tests to authenticate as well.
Enabling basic authentication
How can we authenticate our tests – and non-human users in general? We want to allow automation and scripts, like our tests, to access specific user data without having to go through the login process. There are a few methods for authenticating non-human users, and one of the most common and simplest is to use the so-called basic authentication. This is a standard HTTP authentication method, which allows us to restrict access to our server using the HTTP Basic schema.
To put it very simply, the Basic schema allows us to send a username and password in the HTTP request header. The header has a standard format: the key is Authorization, and the value is Basic <base64 encoded username:password>. That is, under the Authorization key, we send the Basic schema, followed by a space, followed by the base64 encoded username and password, separated by a colon. (You can read more about the HTTP Basic schema at https://developer.mozilla.org/en-US/docs/Web/HTTP/Authentication.)
In order to enable basic authentication, we need to integrate the dedicated GenieAuthentication features into our app. Add the following at the bottom of the genie_authentication.jl file:
# basic auth
basicauth(req, res, params) = begin
  if GenieAuthentication.isbasicauthrequest(params)
    try
      user = findone(Users.User, username =
             params[:username], password =
             Users.hash_password(params[:password]))
      user === nothing && return req, res, params
      login(user, authenticate(user.id,
        GenieAuthentication.GenieSession.session(params)))
    catch _
    end
  end
  req, res, params
end
basicauth in Genie.Router.pre_match_hooks || push!(Genie.Router.pre_match_hooks, basicauth)
Genie hooks
The code snippet in the preceding subsection uses a Genie hook to enable basic authentication. Hooks are a powerful feature of Genie that is common to many frameworks. They allow us to run custom code at specific points in the request life cycle. That is, we can register functions that will be automatically invoked by Genie when certain events occur. In this case, we register pre_match_hook with the Genie router. Pre-match hooks are functions that are invoked before Genie matches the request to a route. This hook is triggered very early in the request-response life cycle, and it allows us to modify the request and response objects, as well as the request parameters. Router hooks functions are expected to accept three arguments: the request, the response, and the request parameters. The function is expected to return the same three arguments, optionally modifying them.
In our code, we have registered the basicauth function as a pre-match hook. The function checks whether the request is a basic authentication request by looking for the Authorization header. If the request is a basic authentication request, the function attempts to find a user with the given username and password. If a user is found, the function logs the user in and returns a modified request, response, and parameters. If no user is found, the function returns the request, response, and parameters without modifying them.
Setting up the authentication flow
Let’s configure the Basic authentication header for our tests. In the test/runtests.jl file, add the following code, right above the @testset block at the bottom of the file:
using Base64
const DEFAULT_HEADERS = Dict("Authorization" => "Basic $(base64encode("testuser:testpass"))")
As mentioned, we need to encode the username and password, and we are using the base64encode function from the Base64 module. Base64 is a binary-to-text encoding scheme that transforms binary data in an ASCII string format using a radix -64 representation (for more info, see https://en.wikipedia.org/wiki/Base64).
Then, we simply declare a new constant, DEFAULT_HEADERS, which is a dictionary containing the Authorization header’s key and value. We’re declaring them here as we’ll be using them throughout all of our tests.
Remember to also add Base64 as a dependency to our tests project. To do this, start a Julia session in the test/ folder, and run the following command:
julia> ] # enter the package manager
pkg> activate .
(test) pkg> add Base64
Creating the default test user
For the username and password, we’re using testuser and testpass. However, there’s a problem: we don’t have a user with this username and password. In addition, remember that the test database is set up before each test run, and is reset after each test suite to ensure that no preexisting state affects the test, so we need to create the test user dynamically before each test run. Given that we already use the migrations to create the database tables, we can use the migrations to create the test user as well. Let’s add a new migration. In the Julia/Genie app REPL in the root folder, run the following command:
julia> using SearchLight
julia> SearchLight.Migration.new("create default user")
This will create a new migration file in the migrations folder. Open the file and add the following code:
module CreateDefaultUser
using Genie
using SearchLight
using ..Main.TodoMVC.Users
function up()
  Genie.Configuration.istest() || return
  Users.User( username  = "testuser",
              password  = "testpass" |>
              Users.hash_password,
              name      = "Test user",
              email     = "[email protected]") |> save!
end
function down()
  Genie.Configuration.istest() || return
  findone(Users.User, username = "testuser") |> delete
end
end
In the up function, we create a new user with the username and password we want to use for our tests. We then save the user to the database. In the down function, we delete the user from the database. Notice that, since we only want to run these functions when we are in test mode, we check for the current environment using the Genie.Configuration.istest() function. This function returns true if the current environment is test, and false otherwise. If we’re not in test mode, we simply return from the functions without running the actual migration code.
This migration, however, introduces an interesting problem. It needs to have access to application logic, like our User model. This means that it can only be run after the application is fully loaded. However, remember that in our app, we run the migrations in the searchlight.jl initializer. Initializers are run before the app resources are loaded, including the models. As such, this migration will crash our app upon startup. To address this, again, we will resort to Genie hooks. We need to replace the following snippet in the searchlight.jl initializer:
try
  SearchLight.Migration.init()
catch
end
SearchLight.Migration.allup()
We need to replace that with the following:
push!(Genie.Loader.post_load_hooks, () -> begin
  try
    SearchLight.Migration.init()
  catch
  end
  SearchLight.Migration.allup(context = @__MODULE__)
end)
Here, instead of directly running the migrations, we wrap the logic into an anonymous function and register it as a Loader post-load hook. This hook is invoked by Genie after the app resources are loaded, and it allows us to run code that depends on said resources. We simply delegate the migration logic to the hook function to be executed by Genie at exactly the right time.
Finally, notice that we also pass a context value to the Migration.allup function, allowing us to inject the dependencies used by the migration.
Wrapping up the tests
Now that we have configured the Basic authentication for our app and API, and we have created the test user, we can finally update our tests. Updating the tests needs to cover the following areas:
- Set up and tear down the test database before and after each test suite, passing in the context value to inject the app’s dependencies
- Add the Authorization header to all the requests, so that the requests are authenticated
- Alter all the creation/persistence code for to-do items to make sure that the user_id value is set to the ID of the test user
Let’s proceed. Starting with the test/todos_test.jl file, modify the existing @testset "Todo is correctly initialized" and @testset "Todo is valid" blocks:
 @testset "Todo is correctly initialized" begin
    @test t.todo == ""
    @test t.completed == false
    @test t.user_id.value == nothing # <-------------------
                                     # add this line
  end
@testset "Todo is valid" begin
    t.todo = "Buy milk"
    t.user_id = 1  # <------------------- add this line
    v = validate(t)
    # rest of the code the same
  end
As for the test/todos_API_test.jl, test/todos_db_test.jl, and test/todos_integration_test.jl files, we’ll refer to the code in the application repository (see the link in the Technical requirements section at the start of this chapter).
As before, run the tests at the command line with the following:
$ julia --project runtests.jl
You’ll see an output like this:

Figure 7.4 – Results of the test run
Summary
Access to our app and data needs to be secure. In the Genie framework, this security is provided by the GenieAuthentication plugin.
In this chapter, we learned how to configure this plugin and set up the database accordingly. Then, we coded functionality for registering a user, so that we could restrict access to the app itself. The next step was restricting access to the app’s data itself. Finally, we updated our tests to prove that everything still works.
In the next chapter, we’ll finally add the eagerly awaited dashboard functionality to our ToDo app!