
3
Applying Julia in Various Use Cases on the Web
In this chapter, we will discuss the higher-level packages and frameworks that exist in Julia to support web app development. Some of these include the Julia website (https://julialang.org/) built with Franklin, a static website generator; the Dash framework for creating dashboard apps (see the app gallery at https://dash.gallery/Portal/); and the Genie MVC web framework at https://www.genieframework.com/index.html#app-gallery. Additionally, the JuliaGizmos collection (https://github.com/JuliaGizmos) represents strong examples of cutting-edge development.
This chapter will give you an overview of what has been achieved in Julia using various web technologies, such as building static websites, microservices apps, dashboards, and web frameworks. By the end of the chapter, you’ll have a better idea of which frameworks to use and gain a head start in applying these packages to your own projects.
In this chapter, we will cover the following topics:
- Using Franklin to build static websites in Julia
- Using Julia with JavaScript (JS)
- Building microservices with Julia
- Building dashboards with Julia
- Compiling Julia in WASM
- Using cloud services with Julia
- Choosing the right Julia framework for a project
Technical requirements
The source code for this chapter can be found at https://github.com/PacktPublishing/Web-Development-with-Julia-and-Genie/tree/main/Chapter3.
Using Franklin to build static websites in Julia
The Franklin package (see https://franklinjl.org/) provides a very nice framework for generating static websites. It is especially suitable for all kinds of technical blogging. It can render LaTeX and KaTeX math expressions and embed Julia code with live evaluation. The package is easy to use, light, and well documented. To get started with using Franklin, perform the following steps:
- Go into REPL pkg mode with ] and type in add Franklin.
- Then, in normal REPL mode, type in using Franklin.
- When generating a new website, first, you have to choose the template on which your website will be based. Navigate to https://tlienart.github.io/FranklinTemplates.jl/ and choose one. All of the themes are written in CommonMark and can be adapted according to your needs. The generation phase converts the Markdown into HTML.
Next, open the REPL with julia –project and issue the newsite command along with a name for your website and a chosen template (for example, the vela theme):
julia> newsite("JuliaWebDev", template="vela")The preceding code will produce the following output:
 Website folder generated at "JuliaWebDev" (now the current directory).
→ Use serve() from Franklin to see the website in your browser.
The newly generated website folder contains the HTML, JS, and CSS assets you need for this template. Additionally, the folder includes a Project.toml file containing all your project’s dependencies, along with a number of .md files (such as index.md, menu1.md, and more), which you can modify to better suit your needs (I’ve modified some contents of index.md to better suit this book’s subject).
- Now, let’s see our newly created website by issuing the serve() command:
julia> serve()
- You will see the following output displayed:
Activating project at `D:Julia_DocsBookJulia-Web-Development-with-GenieChapter3JuliaWebDev`
→ Initial full pass...
→ Starting the server...
LiveServer listening on http://localhost:8000/ ...(use CTRL+C to shut down)
Generating the preceding output takes around 10 seconds, but this much time is also needed to fully generate the site at __site. Don’t change anything in the __site folder because it will be overwritten by your next modification!
Your folder structure now looks like the following:

Figure 3.1 – The Franklin folder structure
- The serve() command also automatically starts a browser on port 8000 to view the landing page (which is derived from index.md) of your new website:

Figure 3.2 – The starting page of a Franklin website
The preceding screenshot shows a structured base page, with a collapsible menu on the left-hand side.
- Open your editor in index.md or the other asset pages alongside the website in your browser. Any change you make will be immediately visible – how neat is that!
You can also make any subfolder pages such as pages/page1.md to further complete your website.
- Stop the web server with CTRL + C.
If you want to continue working on your website after having closed the REPL earlier, open up a terminal session in the website’s root folder (which is JuliaWebDev in our case). Then, open the REPL and type in the following:
using Franklin
serve()
Franklin comes with some handy tools:
verify_links(): This checks whether all your hyperlinks are still working.
optimize() : This minifies all HTML/CSS and preloads the built-in JS libraries.
publish(): This deploys your website to a remote repo that is synced with your local website.
To test them, open the REPL in the folder with julia –project, and then issue a using Franklin command.
However, in many cases, you need more than just a static website. Don’t worry, though, as Julia has you covered. Let us find out how by exploring how Julia can interact with JS.
Using Julia with JavaScript
In certain use cases, you might want to use JS for client-side web programming together with Julia. The client JS code could even be generated by Julia using part or a combination of the JSExpr, Blink, and WebIO packages, as we’ll see in the following sections.
JSExpr
The JSExpr.jl package (https://github.com/JuliaGizmos/JSExpr.jl) translates Julia syntactically into JS. As usual, you can get it in the REPL package mode through add JSExpr, and then a using JSExpr command in the normal REPL.
JSExpr works by providing two dedicated macros: @js and js"".
@js transpiles a Julia expression into JS. It does this by making a JSString, which contains the JS code as a string. The following is an example of converting a Julia cube function into its JS equivalent:
@js function cube(arg)
return arg * arg * arg
end
The return value is as follows:
JSString("function cube(arg){return (arg*arg*arg)}")In the following example, we see how @js also interpolates values and then translates an anonymous function into a JS function:
var1 = 108
callback = @js n -> n + $var1
The preceding code returns the following output:
JSString("(function (n){return (n+108)})")The js"" macro can also perform interpolation of Julia values into the string, for example, take a look at the following:
message = "hi"
fun1 = js"
function () {
              alert($message) // you can interpolate Julia
                              // variables!
}
         "
The preceding code returns the following JSString:
JSString("function () {
    alert("hi") // you can interpolate Julia variables!
}
")
The preceding JSString can be evaluated in JS.
As you can see, both macros generate JSStrings that can then be sent over a network socket to be interpreted in a browser. The Julia code to be converted already contains JS functions such as console.log(), alert(), or document.querySelector().
JSExpr can be used to run the same data validation logic on the client and server sides. JSExpr, in itself, is fairly limited because it only offers execution of very simple Julia functions, as defined with the @js macro, or the execution of JS strings.
JSExpr does not provide interactivity between Julia and JS. If you need that, check out the WebIO package in the next section. JSEXpr, combined with WebIO to manage communication and execution, enables quite a lot of use cases.
Blink
Blink is Julia’s wrapper for Electron, which is a framework to write desktop apps using web technologies (see https://www.electronjs.org/).
The source repo for Blink is located at https://github.com/JuliaGizmos/Blink.jl.
As usual, get it in the REPL package mode through add Blink, and then type using Blink in the normal REPL. If Electron is not installed on your machine, you can do so with julia> Blink.AtomShell.install().
Blink displays HTML content on local web pages and makes Julia communicate with these pages through web sockets. Combining the strengths of Electron and Julia, Blink is effectively a toolkit for building web applications on the desktop.
Let’s play a little bit with Blink.
In the REPL, do a using Blink command, and then type in w = Window(). This starts up Electron and opens up a new desktop window with the Julia icon and name as its title. Now you can add content to the window as follows:
body!(w, "Hello from Blink!")
The preceding code will generate the following window:

Figure 3.3 – The generated Blink window
To show external web pages, use the loadurl(w, url) function, loadurl(w, "https://google.com").
Use the load! function to execute standalone HTML, CSS, or JS files. The next section contains some more advanced examples because Blink and WebIO are very intertwined.
WebIO
WebIO (see the repo at https://github.com/JuliaGizmos/WebIO.jl) functions as a bridge between Julia and the web because it provides useful high-level tools for communication between Julia and the browser. It displays and can interact with web content such as the Jupyter Notebook, Blink (see the preceding section), and Mux (see the Mux subsection under the Choosing the right Julia framework for a project section).
If you installed JSExpr earlier in this section, you should already have WebIO. If not, get it in the REPL package mode through add WebIO, and then type using WebIO in the normal REPL.
Now you can start building up an HTML page with the dom function:
body!(w, dom"p"("Hello from WebIO and Blink!"))(On macOS and Ubuntu, you might also need to have Interact installed; see the next section.)
Using the @js and js "" macros from JSExpr allows you to execute JS, as we can see in the following code:
body!(w, dom"button"(
    "Greet",
     events=Dict(
        "click" => js"function() { alert('Hello, World!'); }",
    ),
))
The preceding code displays an HTML button with the text of Greet and wires in a JS click event. The event generates an alert pop-up window, as shown in the following screenshot:
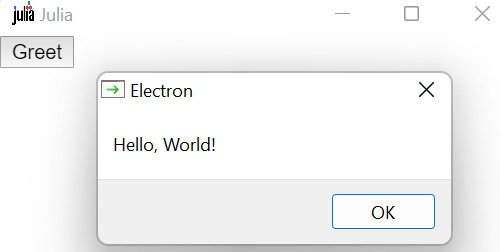
Figure 3.4 – Alert popup in the Blink window
WebIO is quite rich in terms of features; discussing all of its functionality in this chapter is impossible, so consult the docs at https://juliagizmos.github.io/WebIO.jl/latest/ and the Mux section.
Integration with NodeJS
Maxime Mouchet has developed an example framework for the use case when you want to deploy a Julia algorithm(s) in a Node.js environment. Why would you do this? Here is why:
- Julia is focused on developing performant algorithms
- Node.js is commonly used for writing web services in JS
The solution is based on the following steps:
- Make a Julia system image, which includes the algorithm’s compiled code, by using PackageCompiler.jl.
- Build a Node.js native extension in C/C++ in order to make the Node.js runtime and Julia work together. This will serve as a bridge between the Node.js app, which is written in JS, and the Julia code.
For more details, see the repo at https://github.com/maxmouchet/julia-node-extension-demo and the video of the talk given on this subject at JuliaCon 2020 ( https://www.youtube.com/watch?v=bk3DNy18c0Y).
Another approach to integrating Node.js and Julia can be seen at https://github.com/waTeim/node-julia.
In Chapter 2, Using Julia Standard Web Packages, under the Working with JSON data using a REST web server section, we saw how to write a simple microservice architecture using only the HTTP package. In the next section, we will discuss some interesting microservices projects that build upon these concepts.
Building microservices with Julia
Microservices are a well-established web technology used to deliver specific functionality over the web. They enable, among other benefits, easier deployment, management, and scaling. Julia is a good fit for creating an efficient environment for microservice development, as we will demonstrate in the different projects discussed in this section. A typical use case would be an analytics application that processes data coming from different sources over the internet. Such a microservice could further perform analysis, store results in a database, and show these results to end users through an on-demand microservice application.
In the Integration with Node.js section, we saw an example of how to integrate Julia into existing JS environments. This integration makes it possible to write microservices with Julia.
Another complete application, written by Jacob Quinn, uses a typical model-view-controller (MVC) architecture for microservices, which is not Julia-specific. It was presented as a workshop during JuliaCon 2020 (see https://www.youtube.com/watch?v=uLhXgt_gKJc&t=207s), with the source code stored at https://github.com/quinnj/MusicAlbums.jl/. As the project.toml file shows, the app only uses the HTTP and JSON3 packages to implement the network functionality. All Julia files reside in one src folder. MusicAlbums.jl is the main code file, and the app starts with the following run() function:
server = @async MusicAlbums.run(DBFILE, AUTHFILE)
The app contains an authentication module in Auth.jl and a loginUser function in Client.jl. The data is contained in the SqLite database, albums.sqlite. The model is defined in Model.jl, which contains the mutable Album and User structs that are used for authentication.
The Resource.jl module contains the createAlbum, getAlbum, updateAlbum, deleteAlbum, and pickAlbumToListen microservice functions. Their route handling is defined here with the HTTP.@register macro. The Service.jl module details the microservices functions, which uses the Mapper module to translate to SQL.
Download the project’s code and follow along with the workshop video (https://www.youtube.com/watch?v=uLhXgt_gKJc&t=207s) to see how the app can be built in 9 steps.
Another talk given at JuliaCon 2021 (https://live.juliacon.org/talk/SHHKEM) shows you how to develop an SDK for the easier development of microservices and how it can be applied in a corporate environment.
In Part 2 of this book, we will see how Genie makes writing microservices with Julia really easy. A key area of interest in using Julia for web apps comprises interactive data dashboards. Next, we will explore how to build these dashboards using Dash.
Building dashboards with Julia
Data scientists want to build rich, analytic, elegant, and exploratory portals to their data. In Part 2, we’ll explore how to build a dashboard with the Genie framework (see Chapter 7, Creating an Interactive Data Dashboard). However, in this chapter, we’ll concentrate on the Dash for Julia project, which was first published in October 2020.
Dash consists of two components that communicate via a JSON interface:
- The client side (frontend), written in JS, that is executed in the browser and contains the bulk of the code, control, and complexity. This makes Dash apps cross-platform and mobile-ready. The frontend mainly uses Plotly.js and the React ecosystem. It enables the direct binding of modern UI elements such as drop-down lists, sliders, and graphs to analytical Julia code on one or more web pages.
- The server side (backend), written in Julia, leverages the HTTP.jl package (there are also backends for Python, R, and F#).
The main advantage of using Dash is that the data scientist only needs to write Julia code in their project.
To see an example of visualizing COVID-19 data in U.S. states, navigate to https://covid-county-dash.herokuapp.com/ (the source code can be found at https://github.com/mbauman/CovidCountyDash.jl) or visit the app gallery at https://dash.gallery/Portal/.
As usual, install the Dash package via add Dash in the REPL package mode.
Let’s build a simple example. We’ll plot gender against some flavor preferences in a bar graph. The following is the code you need (see Chapter3using_dash.jl):
using Dash
app = dash()                             # 1
app.layout = html_div() do               # 2
    html_h1("Hello from Dash!"),
    html_div("Dash: A web application framework for your    	             data."),
    dcc_graph(
        id = "example-graph-1",
        figure = (
            data = [
                (x = ["Chocolate", "Strawberry",
                "Vanilla"], y = [21, 19, 33],
                 type = "bar", name = "Male"),
                (x = ["Chocolate", "Strawberry",
                 "Vanilla"], y = [38, 18, 12],
                 type = "bar", name = "Female"),
            ],
            layout = (title = "Flavor Preferences by
                      Gender", barmode="group")
        )
    )
end
run_server(app, "0.0.0.0", debug=true)   # 3
The preceding code works as follows:
- Line 1 starts up the Dash framework and returns an application object
- Its layout field is described, on line 2, as a tree of components, such as html_div, html_h1, and dcc_graph
- Line 3 starts up a web server, by default, on port 8050
Dash is declarative: each component is described entirely by keyword attributes. You can run the code in the REPL, but running it in a terminal is far more enjoyable because it enables hot reloading.
Start your app in the terminal with the following:
D:Chapter3>julia using_dash.jl
[ Info: Listening on: 0.0.0.0:8050
Then, simply make any change in the code and save it, and the browser refreshes automatically!
The following is the output when you start a browser with the http://127.0.0.1:8050/ URL:

Figure 3.5 – A Dash graph
Of course, Dash has many more possibilities; to find out more, consult the docs for this project at https://dash.plotly.com/julia.
Now that we have seen that Julia has a very viable dashboard builder with Dash, let’s see what has happened with Julia in the emerging WebAssembly field.
Compiling Julia in WASM
WebAssembly (WASM) is a new, upcoming technology. It defines a binary code format to be executed in a stack virtual machine at near-native code execution speeds. WASM works in browsers, where it is hosted in the JS environment to replace computation-intensive JS code in applications such as games. However, WASM can also be deployed in standalone runtime environments. More than 40 programming languages use (or are trying to use) WASM as a compilation target, and Julia is no exception. Generating WASM from Julia opens up many opportunities to embed Julia apps in web interfaces. Julia has an advantage here: it generates machine code through LLVM, and LLVM supports WASM, so there seems to be a straightforward path from Julia to WASM.
A lot of work has been done in this area by Tim Short (see https://github.com/tshort/ExportWebAssembly.jl); his project provides a working prototype. Another experimental compiler, called Charlotte, was built by Mike Innes (see https://github.com/MikeInnes/Charlotte.jl). Here is an online playground where you can try out conversions of Julia into WASM and JS: http://julia2js.gotfork.net/charlotte.
As a trivial example, type in the following add function in the playground (notice that you have to indicate the types on the left-hand side):
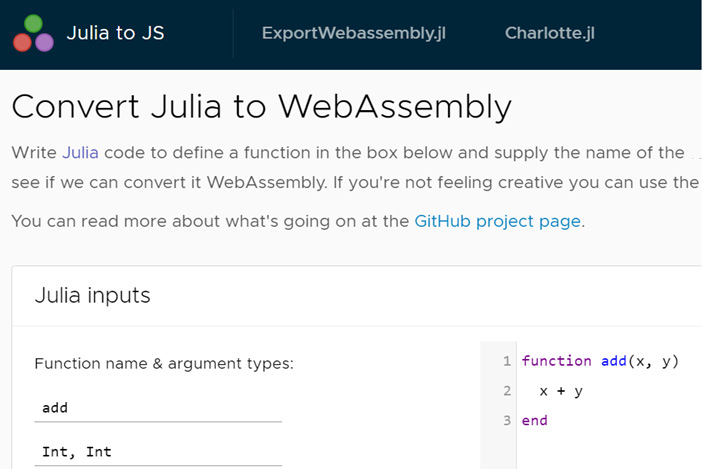
Figure 3.6 – Input for the WebAssembly conversion
Then, push the Convert to WebAssembly! button and you get the generated WebAssembly in text (.wat) and binary (.wasm) format:
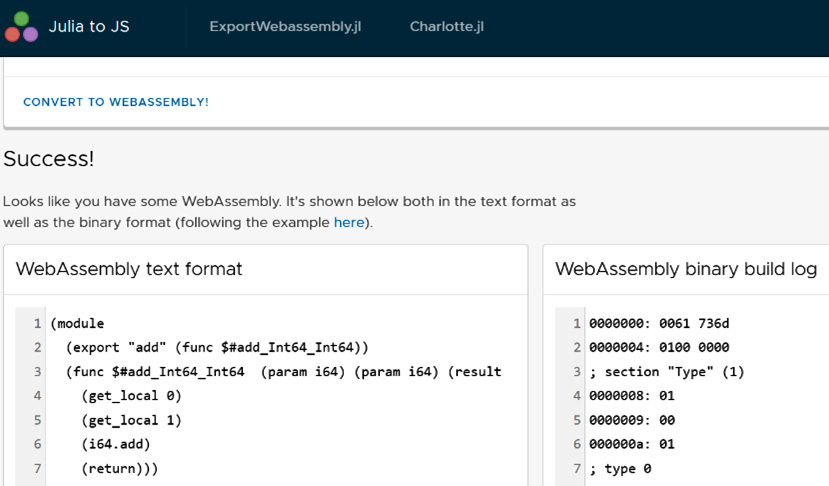
Figure 3.7 – Output of the WebAssembly conversion
The two most recent exploratory projects building on Short’s and Innes’ work are the following:
- A proof-of-concept WASM port of the complete Julia runtime by Keno Fischer (https://github.com/Keno/julia-wasm). The WASM port is demonstrated by running the Julia REPL in the browser as WASM code. Additionally, it contains a setup of instructions for building Julia to WASM by yourself.
- The WebAssembly.jl package by Mike Innes (https://github.com/MikeInnes/WebAssembly.jl) contains tools for working with the WASM format in Julia.
To summarize, although a lot of groundwork has been done, at the time of writing this book, there isn’t a production-ready tool in the Julia ecosystem to support WASM fully. Probably such a solution has to wait until the Julia compiler can support minimal binary executables (that is, one executable of minimal size containing the app and the Julia runtime), and also until WASM has better support for garbage collection (GC) because Julia needs GC.
Next, we will take a look at how we can use cloud services for and from Julia.
Using cloud services with Julia
As a beginning web developer, you’ll start with the local development of a web or microservices application, and then progress to deploy the app to virtualized cloud environments. This section will tell you what cloud computing possibilities exist for Julia.
Deployment to cloud platforms
From the start, Julia was meant to be a language for distributed and cloud computing. Julia Computing, which is the company behind Julia, offers its own cloud computing solution named JuliaHub (https://juliahub.com/lp/) for academic and enterprise users. If you’re looking for an alternative to the former free JuliaBox site, consult https://github.com/xiaodaigh/awesome-data-science-notebook-engines.
All of the major commercial cloud providers support deploying Julia apps. The JuliaCloud website (https://github.com/JuliaCloud/) contains most of the packages needed in this space.
The following is a list of the major ones:
- Amazon Web Services (AWS): AWS (https://aws.amazon.com/) is probably one of the biggest and best-known providers of cloud services and still offers the AWS Free Tier option where you can try it out. Follow the tutorial at https://aws.amazon.com/getting-started/guides/deploy-webapp-apprunner/ to get started.
AWS.jl (https://github.com/JuliaCloud/AWS.jl) is Julia’s interface package for AWS, supporting low-level and high-level APIs. The package has two backends, which serve as HTTP clients to reach the AWS REST API. You can consult the complete docs at https://juliacloud.github.io/AWS.jl/stable/. For a usage example, see using_AWS.jl.
- Google Cloud Platform (GCP): The GCP services (https://cloud.google.com/) are a good alternative to AWS. Their storage API can be interfaced with the GoogleCloud.jl package. You need to have a Google account to access the web-based management console at https://console.cloud.google.com/ and create a GCP project. See the tutorial in the docs at https://juliacloud.github.io/GoogleCloud.jl/latest/ for an introduction to the Google Cloud Service API.
- Microsoft Azure: The Microsoft cloud platform (https://azure.microsoft.com) is covered by the Azure.jl package (see the repo at https://github.com/JuliaComputing/Azure.jl). Moreover, Azure provides data science virtual machines with Julia and Jupyter preinstalled (https://azure.microsoft.com/en-us/services/virtual-machines/data-science-virtual-machines/). Julia microservices apps have successfully been deployed to Azure Service Fabric.
- Digital Ocean platform: For this platform, there is an interface package called JuDO.jl (https://github.com/aliddell/JuDO.jl).
Deployment to container platforms
Cloud services in Julia can be deployed through the Docker or Kubernetes container platforms.
Docker works great for deploying an application inside a server environment. Docker Hub maintains a wide variety of Julia images (https://hub.docker.com/_/julia). You can start from such an image, add the apps and files you need, and then deploy the modified image. DockerSandbox.jl (https://juliacontainerization.github.io/DockerSandbox.jl/dev/) lets you run Julia Cmd objects inside a Docker container. There is also a Docker.jl package, which is a Julia interface for the Docker Remote API.
Kubernetes is another alternative. It is an open source orchestration system for the deployment and management of containerized applications. The Kuber.jl package (https://github.com/JuliaComputing/Kuber.jl) is a Kubernetes client, which makes it easy to access Kubernetes clusters from Julia. Dash apps can also be deployed to Kubernetes clusters.
Now that we have explored the possibilities for deploying a Julia app in the cloud, let’s discover which Julia web frameworks exist to develop web apps from start to finish.
Choosing the right Julia framework for a project
While it is, in principle, possible to code a web application without using a framework, you don’t want to reinvent the wheel(s). Using a framework will save you enormous amounts of time and effort by providing reusable and scalable code for a basic web infrastructure. This way, as a developer, you can concentrate on higher-level application logic.
In this section, we’ll review the existing Julia web frameworks and discuss their use cases including their pros and cons. We’ll leave out Dash and Franklin, which are production-ready, and were discussed in previous sections. We can also make a distinction between the following:
- Using Julia for static websites
- A full stack framework, which provides all aspects from the data layer to deployment
- A micro framework, which only provides the routing part
If you’re looking for a simple CGI or FastCGI server, take a look at the Jaylle repo at https://github.com/Jaylle.
Genie
Genie is the best-known framework for general web development in the Julia ecosystem. It’s a full-stack MVC framework and offers an elegant workflow for building web apps. It has a low-code UI layer called Stipple and an object-relational mapper (ORM) layer called Searchlight. We’ll examine it in much more detail in the coming chapters, starting from Chapter 4, Building an MVC App Using Genie.
Bukdu
Bukdu is a full-stack framework that is influenced by the MVC Phoenix framework (which is the most popular Elixir web framework) as its model. The source repo can be found at https://github.com/wookay/Bukdu.jl. There is a Heroku demo at https://sevenstars.herokuapp.com/.
Here is some code so that you can get an initial impression (see Chapter3using_bukdu1.jl):
# add Bukdu     # in pkg mode
using Bukdu
struct WelcomeController <: ApplicationController    # 1
  conn::Conn
end
struct RestController <: ApplicationController
  conn::Conn
end
function index(c::WelcomeController)                 # 2
  render(JSON, "Hello World from Bukdu!")
end
function init(c::RestController)
  render(JSON, (:init, c.params.region, c.params.site_id,
    c.params.channel_id))
end
routes() do
  get("/", WelcomeController, index)                        #3A
  get("/init/region/:region/site/:site_id/channel/:channel_  	  id/", RestController, init, :site_id => Int, :channel_ 	  id=>Int)             # 3B
end
Bukdu.start(8080)                                    # 4
# Bukdu Listening on 127.0.0.1:8080
# Task (runnable) @0x00000000735447d0
# INFO: GET     WelcomeController   index           200 /
In the preceding code, you can observe the following:
- The Bukdu web server is started on line 4.
- A GET request for the root route is handled on line 3A; it specifies a controller (as defined on line 1) and a function (or index, as defined on line 2) that must be executed. Then, a render function is called that outputs a JSON string.
Visit http://127.0.0.1:8080 to see the JSON text, Hello World from Bukdu!, rendered in your web browser. Additionally, you can test it in a terminal by invoking curl: curl http://localhost:8080/.
- Line 3B shows more complex route handling where some parameter values, such as :site_id, are taken from the route and displayed in the init function. Here, the following curl command is given: curl localhost:8080/init/region/west/site/1/channel/2/.
The output is returned as follows:
["init","west",1,2]
In the preceding output, you can see that the :region symbol gets the "west" value, :site_id became 1, and :channel_id became 2.
Bukdu might be a good choice if you love the Phoenix framework. On the other hand, it doesn’t seem to be very actively maintained.
Interact
Interact is built upon WebIO, and with it, you can make little GUI apps with web technologies. These apps can be run in a browser, in an Electron window (with Blink), in a Jupyter notebook, or they can work together with Mux (see the next section). The package contains UI widgets such as textboxes, checkboxes, buttons, and sliders.
Here is some sample code to display an Electron window showing a drop-down list:
# add Interact   # pkg mode
using Interact, Blink
ddn = dropdown(["Getting groceries",
                "Visiting my therapist",
                "Getting a haircut",
                "Paying the energy bill",
                "Blog about workspace management"])
w = Window()
ui = dom"div"(ddn)
body!(w, ui)
Interact is documented at https://juliagizmos.github.io/Interact.jl/latest/ and in its GitHub repo at https://github.com/JuliaGizmos/Interact.jl.
Mux
Mux is a micro web framework, particularly useful for apps that deliver endpoint services. Its repo is situated at https://github.com/JuliaWeb/Mux.jl. Mux works nicely together with WebIO and Interact. Here is the example from the preceding section where a widget generated by Interact is served by the Mux web server:
using Interact, Mux
ddn = dropdown(["Getting groceries",
                "Visiting my therapist",
                "Getting a haircut",
                "Paying the energy bill",
                "Blog about workspace management"])
ui = dom"div"(ddn)
WebIO.webio_serve(page("/", req -> ui), 8080)   # 1
In the preceding code, you can observe the following:
- Line 1 starts a web server listening on port 8080, which will return the defined ui in a root request
- The following is the output in a browser:

Figure 3.8 – Mux in action
The @app macro lets you define a web server with three routes in just a few lines (see use_mux2.jl):
using Mux
@app test = (                                       # 1
  Mux.defaults,
  page(respond("<h1>Hello World from Mux!</h1>")),
  page("/about", respond("<h1>About Mux</h1>")),    # 2
  page("/user/:user", req -> "<h1>Hello,
       $(req[:params][:user])!</h1>"),
  Mux.notfound())
serve(test)                                        # 3
In the preceding code, line 1 starts the macro body, and line 3 starts the web server.
Try out the last route by entering http://localhost:8000/user/John in your browser to see the Hello John! message.
Mux is designed in a smart way that enables you to write simple APIs in a couple of lines. The important concept of Mux is middleware: a way to take a request and modify it. An app is just an endpoint function that takes a request and returns a response. You can chain any number of middleware steps with the mux function, as follows:
mux(auth, catch_errors, app)
Here, auth and catch_errors are middleware functions.
If you want to see some inspiring scripts combining WebIO and Mux, look at https://github.com/jlgw/julia-scripts. I hope this package gets the attention it deserves to further complete its functionality.
Merly
Merly is a microframework for web development, capable of route declaration and request handling. Its main design purpose is to make development easy, but at the same time, it has been optimized for execution speed. It supports all HTTP methods, including CORS handling and returning configured headers, working with static files, and parsing the page body’s content.
The following is a simple example demonstrating Merly’s usage:
# add Merly    # pkg mode
using Merly
@page "/" HTTP.Response(200,"Hello World from Merly!")                # 1
@page "/hello/:user" HTTP.Response(200,string("<b>Hello ",request.params["user"],"!</b>")) # 2
@route POST "/post" HTTP.Response(200,"I did something!")                       # 3
start(host = "127.0.0.1", port = 8086, verbose = true)   # 4
In the preceding code, you can observe the following:
- The @page macro used on line 1 is probably the simplest route-handling mechanism among all Julia frameworks.
- Line 2 takes a parameter user in the /hello path and displays it in the response.
- The @route macro on line 3 lets you specify the HTTP verb to use. Use start() to begin executing the web server (see line 4).
Start Merly up on a terminal with the following command:
julia using_merly.jl
Request handling can also be performed with dedicated functions such as Get, Post, Put, and Connect.
Merly has its own website at https://merly.vercel.app/ and is fully documented at https://neomatrixcode.gitbook.io/merly/. Additionally, the website features different examples of deployment to cloud providers (such as Heroku, Docker, Docker Compose, Google Cloud, and Digital Ocean).
Dance
The Dance framework aims to make it easier for the data scientist to present data on the web. To that end, the framework has special methods for converting bidirectionally Julia Dicts and DataFrames into JSON and JS strings. This enables using existing JS frameworks as a frontend to display data.
Dance has a project generator method called start_project (ToDo). This creates a ToDo folder with a startup script, dance.jl, and a project-specific script in srcTodo.jl. Routes are handled via the routes.jl script and can be described through regex patterns, for example, route(r"/post/dict/(?<value>d{3})", post_2). Additionally, Dance can serve static files.
After having specified server_host and server_port in Configuration.jl as localhost and 8080, respectively, start up the web server using the following command:
julia dance.jl
Then, opening up a browser with the localhost:8080 URL shows the "Hello World" text.
The integration of Webpack and a NodeJS environment inside a Dance.jl project is made easy through the DanceWebpack plugin.
More info about the possibilities of using Dance can be found in the repo at https://github.com/DanceJL/Dance.jl.
Summary
In this chapter, we delved into what the Julia community has built over the past 5 years in the way of tools to build web-based applications.
From now on, whenever you need to build a static website, Franklin will be available to you as a valuable choice. If you need to build a cross-platform Electron-based GUI app, you can combine WebIO, Blink, and Interact to accomplish this. If your next project is to build a web dashboard, look no further than Dash for Julia.
Also, we discussed the architecture of microservices, the current state of WASM in the Julia ecosystem, and which cloud platforms are readily available for Julia.
Finally, you got an overview of all mature web frameworks in Julia. You should have a better idea of which to apply when, and you have also gained a head start for working with any of them.
This concludes our overall survey of Julia and other web technologies. In the remaining part of the book, you’ll be guided, step by step, on how to build up different sorts of web apps using the Genie web framework.