
Chapter 7. Debugging and Tools
Previous chapters have gone into depth on building out solutions for using WebSocket in your applications. While in the process of integrating any technology into a new or existing project, perhaps the most vital tool is learning how to debug when things don’t go as originally planned.
In this chapter you’ll explore several areas of the WebSocket lifecycle and review tools that can aid in your journey across the WebSocket landscape. Let’s take one of the previous examples for a spin, and take a look at what’s being passed around and how you can use the tools to see what’s going on under the hood.
A typical WebSocket lifecycle consists of three main areas: the opening handshake, sending and receiving frames, and the closing handshake. Each can present its own challenges. Outlining all of them here would be impossible, but I’ll show some methods of investigating should challenges arise while debugging.
The Handshake
The expected data the server receives from a valid client must include several HTTP headers like Host, Connection, Upgrade, Sec-WebSocket-Key, Sec-WebSocket-Version, and others that are optional to WebSocket. Proxies and security tools on some corporate networks might modify headers before they are transmitted to the server and could likely cause the handshake to fail. For testing purposes you can use OWASP ZAP. ZAP was designed to assist penetration testers with finding vulnerabilities in web applications, and you can use it to intercept the handshake by using its break functionality and remove some of the important headers before the server sees them.
Throughout this chapter you’ll use the identity code example from Chapter 3. The full example for server and client are reproduced in the following sections.
The Server
Here is the complete code for the server portion of the identity chat application:
varWebSocket=require('ws');varWebSocketServer=WebSocket.Server,wss=newWebSocketServer({port:8181});varuuid=require('node-uuid');varclients=[];functionwsSend(type,client_uuid,nickname,message){for(vari=0;i<clients.length;i++){varclientSocket=clients[i].ws;if(clientSocket.readyState===WebSocket.OPEN){clientSocket.send(JSON.stringify({"type":type,"id":client_uuid,"nickname":nickname,"message":message}));}}}varclientIndex=1;wss.on('error',function(e){console.log("error time");});wss.on('connection',function(ws){varclient_uuid=uuid.v4();varnickname="AnonymousUser"+clientIndex;clientIndex+=1;clients.push({"id":client_uuid,"ws":ws,"nickname":nickname});console.log('client [%s] connected',client_uuid);varconnect_message=nickname+" has connected";wsSend("notification",client_uuid,nickname,connect_message);ws.on('message',function(message){if(message.indexOf('/nick')===0){varnickname_array=message.split(' ');if(nickname_array.length>=2){varold_nickname=nickname;nickname=nickname_array[1];varnickname_message="Client "+old_nickname+" changed to "+nickname;wsSend("nick_update",client_uuid,nickname,nickname_message);}}else{wsSend("message",client_uuid,nickname,message);}});ws.on('error',function(e){console.log("error happens");});varcloseSocket=function(customMessage){for(vari=0;i<clients.length;i++){if(clients[i].id==client_uuid){vardisconnect_message;if(customMessage){disconnect_message=customMessage;}else{disconnect_message=nickname+" has disconnected";}wsSend("notification",client_uuid,nickname,disconnect_message);clients.splice(i,1);}}}ws.on('close',function(){console.log("closing socket");closeSocket();});process.on('SIGINT',function(){console.log("Closing things");closeSocket('Server has disconnected');process.exit();});});
The Client
Here is the complete code for the client portion of the identity chat application:
<!DOCTYPE html><htmllang="en"><head><title>Bi-directional WebSocket Chat Demo</title><metacharset="utf-8"><metahttp-equiv="X-UA-Compatible"content="IE=edge"><metaname="viewport"content="width=device-width, initial-scale=1"><linkrel="stylesheet"href="http://bit.ly/cdn-bootstrap-css"><linkrel="stylesheet"href="http://bit.ly/cdn-bootstrap-theme"><scriptsrc="http://bit.ly/cdn-bootstrap-jq"></script><script>varws=newWebSocket("ws://localhost:8181");varnickname="";ws.onopen=function(e){console.log('Connection to server opened');}functionappendLog(type,nickname,message){varmessages=document.getElementById('messages');varmessageElem=document.createElement("li");varpreface_label;if(type==='notification'){preface_label="<span class="label label-info">*</span>";}elseif(type==='nick_update'){preface_label="<span class="label label-warning">*</span>";}else{preface_label="<span class="label label-success">"+nickname+"</span>";}varmessage_text="<h2>"+preface_label+" "+message+"</h2>";messageElem.innerHTML=message_text;messages.appendChild(messageElem);}ws.onmessage=function(e){vardata=JSON.parse(e.data);nickname=data.nickname;appendLog(data.type,data.nickname,data.message);console.log("ID: [%s] = %s",data.id,data.message);}ws.onclose=function(e){appendLog("Connection closed");console.log("Connection closed");}ws.onerror=function(e){appendLog("Error");console.log("Connection error");}functionsendMessage(){varmessageField=document.getElementById('message');if(ws.readyState===WebSocket.OPEN){ws.send(messageField.value);}messageField.value='';messageField.focus();}functiondisconnect(){ws.close();}</script></head><bodylang="en"><divclass="vertical-center"><divclass="container"><ulid="messages"class="list-unstyled"></ul><hr/><formrole="form"id="chat_form"onsubmit="sendMessage(); return false;"><divclass="form-group"><inputclass="form-control"type="text"id="message"name="message"placeholder="Type text to echo in here"value=""autofocus/></div><buttontype="button"id="send"class="btn btn-primary"onclick="sendMessage();">Send Message</button></form></div></div><scriptsrc="http://bit.ly/cdn-bootstrap-minjs"></script></body></html>
Download and Configure ZAP
The best way to follow along with the “bad proxies” test is to download ZAP and run it for your specific platform. ZAP can act as a proxy while you browse around your application, so you’ll need to modify the Network settings for your browser. With so many possible iterations, it’s best to just link off to ZAP’s documentation, which talks about a host of browsers and how to configure the proxy. The proxy by default runs on localhost port 8080 and can be changed by getting to the Options at Tools → Options → Local proxy.
In the ZAP client, select “Toggle break on all requests” so you can approve each request before it gets sent out. It is here that you’ll modify your handshake and remove some vital and required headers. When visiting the local client by opening the client.html file, it will attempt to make several HTTP connections. Some of these will be for external dependencies on bootstrap for the UI, and there will be one going to http://localhost:8181 asking for an upgrading connection for WebSocket. There will be Next buttons in the header of the UI allowing you to step through each request. When you get to the WebSocket request, stop and let’s make some changes.
Here is a request similar to what you should see in ZAP:
GET http://localhost:8181/ HTTP/1.1 Host: localhost:8181 Connection: Upgrade Pragma: no-cache Cache-Control: no-cache Upgrade: websocket Origin: null Sec-WebSocket-Version: 13 User-Agent: Mozilla/5.0(Macintosh;... Accept-Encoding: sdch Accept-Language: en-US,en;q=0.8,de;q=0.6 Sec-WebSocket-Key:BRUZ6wGtxKWln5gToX4MSg==Sec-WebSocket-Extensions: permessage-deflate;client_max_window_bits
In the text area, remove all of the WebSocket-specific headers as a bad proxy or IDS might do:
GET http://localhost:8181/ HTTP/1.1 Host: localhost:8181 Connection: Upgrade Pragma: no-cache Cache-Control: no-cache Origin: null User-Agent: Mozilla/5.0(Macintosh;Intel Mac OS X 10_10_3)AppleWebKit/537.36... Accept-Encoding: sdch Accept-Language: en-US,en;q=0.8,de;q=0.6
After allowing the request to continue without the proper headers, you will see in the response from ZAP an HTTP 426 error code. This HTTP code indicates that an upgrade is required and was not provided. This can be a common occurrence when interacting with bad proxies, which we’ll discuss resolving in the section “WebSocket Secure to the Rescue”.
Figure 7-1 shows the WebSocket handshake from within the OWASP application.
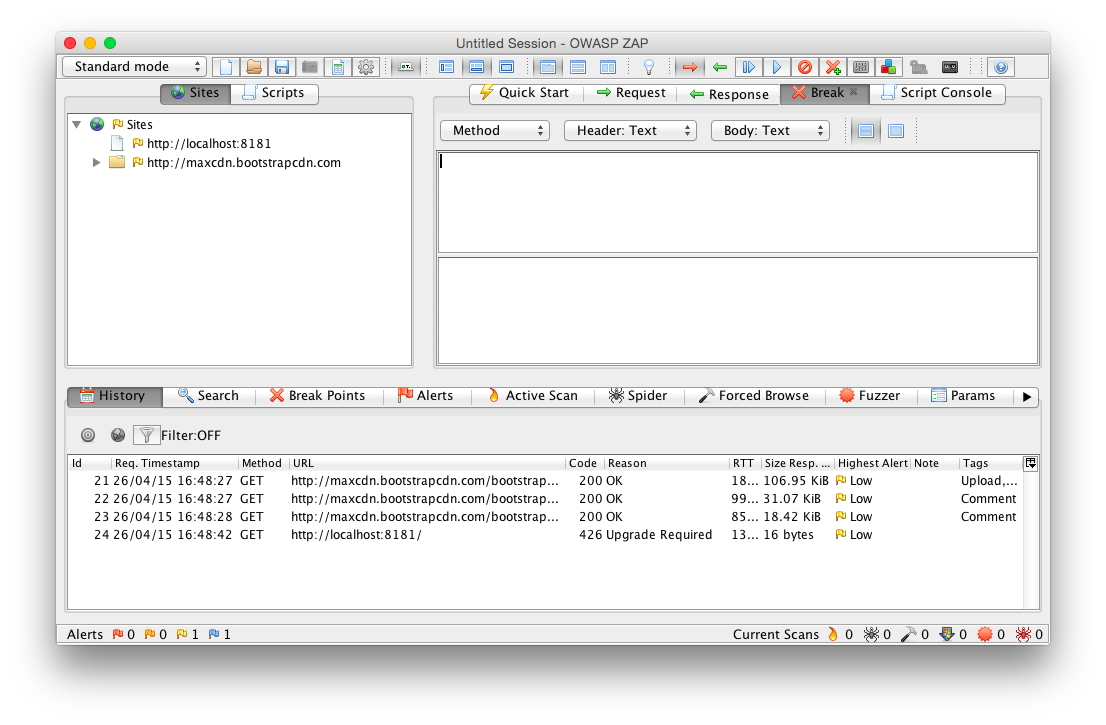
Figure 7-1. OWASP Zed attack proxy breaking WebSocket handshake
Let’s look at the Chrome Developer Tools; they should tell us a similar story. You may have to refresh the request and step through again with ZAP after navigating to the Network tab in Chrome’s Developer Tools section. You may need to click the Filter button and then specify WebSockets. After resubmitting, you should also see the HTTP 426 response code being passed back to the browser.
Figure 7-2 shows the result of missing some headers in the Chrome Developer Tools.
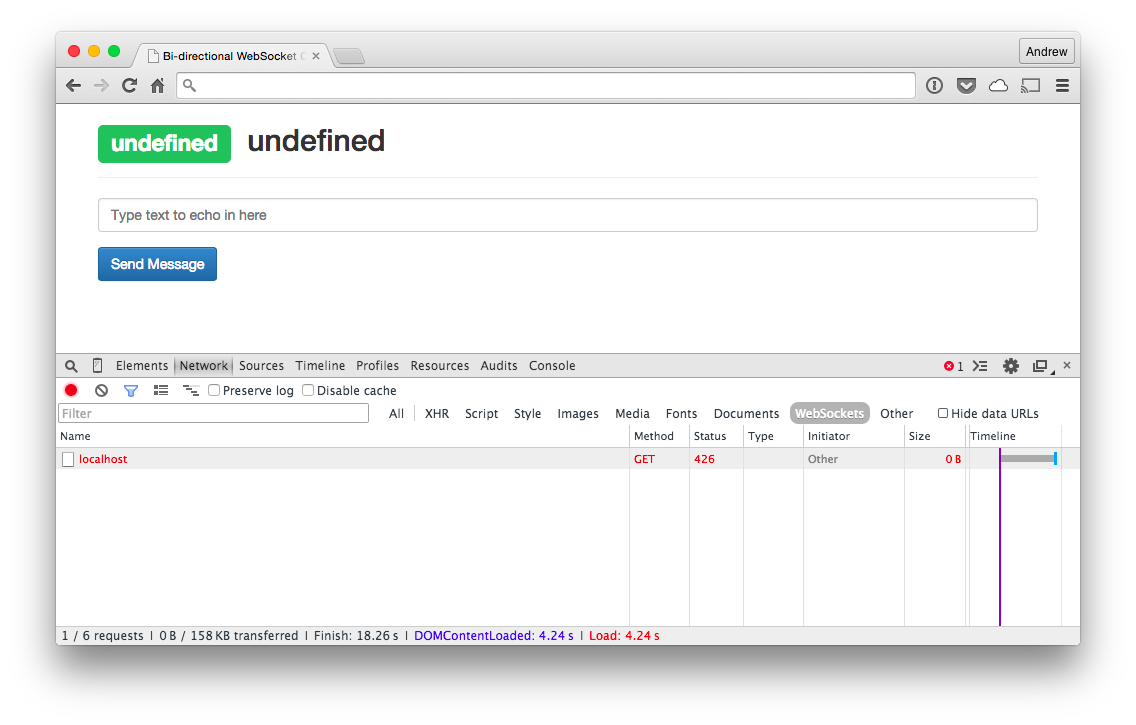
Figure 7-2. Handshake under Chrome Developer Tools
What would happen if you didn’t remove all headers, just something that may be important, like the Sec-WebSocket-Version? When the request comes in, remove the header you will see for Sec-WebSocket-Version:
GET http://localhost:8181/ HTTP/1.1 Host: localhost:8181 Connection: Upgrade Pragma: no-cache Cache-Control: no-cache Upgrade: websocket Origin: null User-Agent: Mozilla/5.0(Macintosh;Intel Mac OS X 10_10_3)AppleWebKit/537.36... Accept-Encoding: sdch Accept-Language: en-US,en;q=0.8,de;q=0.6 Sec-WebSocket-Key:BRUZ6wGtxKWln5gToX4MSg==Sec-WebSocket-Extensions: permessage-deflate;client_max_window_bits
After submitting this request back to the server, what will likely come back is an HTTP 400 Bad Request. You’re missing some vital information (Sec-WebSocket-Version), and it’s not going to let you continue. How can you ensure that there is a better chance that your messages are going to get received and sent properly?
WebSocket Secure to the Rescue
Thanks to a few neat tools, you’re able to see what’s going on with your connection and why things are looking a bit wonky. How do you get around things like proxies or IDS tools mucking with your precious headers? WebSocket Secure is the answer. As we discussed in Chapter 6, the best way to ensure that your communication will reach its intended destination is to always use wss://. If you need help configuring it, refer to Chapter 6 for instructions. In general, using the secure WebSocket channel can alleviate the issues outlined in the previous section.
Validating the Handshake
Most libraries and all browsers with WebSocket RFC 6455 support will implement the simple handshake process without fail. As we will discuss in Chapter 8, the Sec-WebSocket-Key is a random nonce that is base64 encoded and sent in the initial handshake from the client. In order to validate that your server is sending back the correct value to the client, you could take the example code in Chapter 8 and write a simple script that accepts a Sec-WebSocket-Key and spits out a proper response:
varcrypto=require('crypto');varSPEC_GUID="258EAFA5-E914-47DA-95CA-C5AB0DC85B11";varwebSocketAccept=function(secWebsocketKey){varsha1=crypto.createHash("sha1");sha1.update(secWebsocketKey+SPEC_GUID,"ascii");returnsha1.digest("base64");}if(process.argv.length<=2){console.log("You must provide a Sec-WebSocket-Key as the only parameter");process.exit(1);}varwebSocketKey=process.argv[2];webSocketAccept=webSocketAccept(webSocketKey);console.log("Sec-WebSocket-Accept:",webSocketAccept);
If you are seeing other values when using Wireshark or Chrome Developer Tools (values that would obviously be rejected by the client), run this script against the key first, and then see about fixing whatever may be in error with your server. It could indicate something along the path of communication is inserting itself in the communication and the protocol is doing the right thing by rejecting it.
Inspecting Frames
You will, on more than one occasion, be tasked with figuring out why a client is receiving unexpected data coming back from your server. The first reaction to this may be to add some debug logging to your app and ask the client to make another attempt. If your code is in production, however, this would be ill-advised because it could affect other users and might affect performance or availability. Another option is to use a network sniffer to watch the communication from the server to the affected client. Let’s use our existing chat example to see what is coming across the wire.
Masked Payloads
The best way to see each frame coming across the wire is to use our trusty tool Wireshark. That’s right, kids, Wireshark isn’t just for sniffing network connections in a café! The versatile network tool runs well on every platform and allows you to filter and inspect the handshake along with each individual frame sent over the wire. As of version 1.9 it runs without needing the X11 dependency as well, which is definitely a bonus.
Getting started with Wireshark is fairly straightforward. After successfully downloading and installing the tool for your specific platform, you’ll be greeted with the main screen, which lists all network interfaces that Wireshark is ready to listen on.
Figure 7-3 shows the initial screen for the Wireshark tool.
Double-click the interface that you will be browsing for these tests, and Wireshark will dutifully start showing you captured packets on the next screen (see Figure 7-4). It shows each captured packet in a table with sortable columns and a filter bar at the top for ease in viewing exactly what you’re after in the huge stream of data flowing back and forth.
You can choose to follow a TCP, UDP, or SSL stream to see the bidirectional communication being sent along the wire. You’ll take a look at the handshake in Figure 7-5 and you’ll see a request to the server from the client with the payload after the HTTP header.
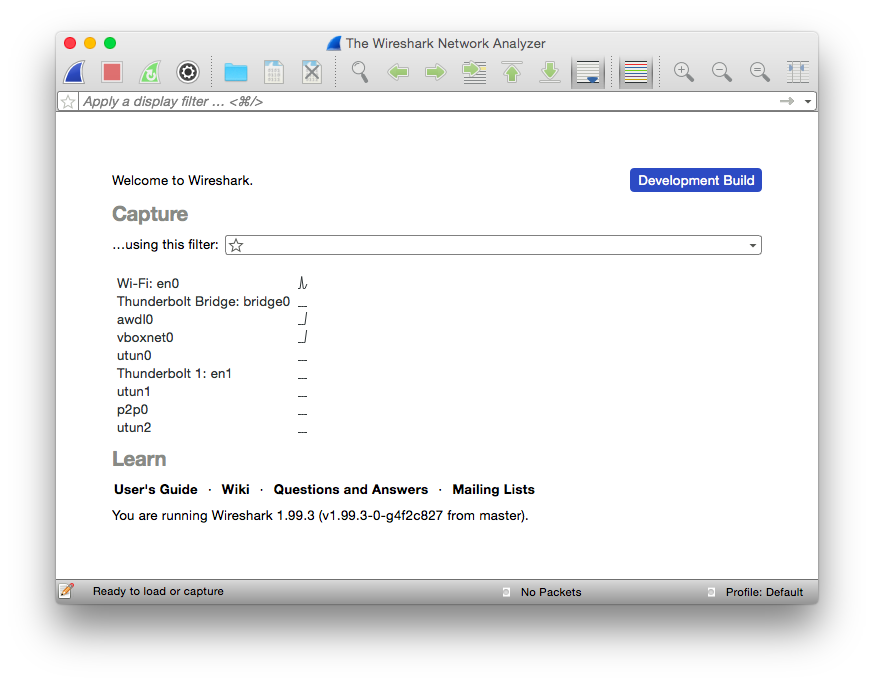
Figure 7-3. Wireshark main screen
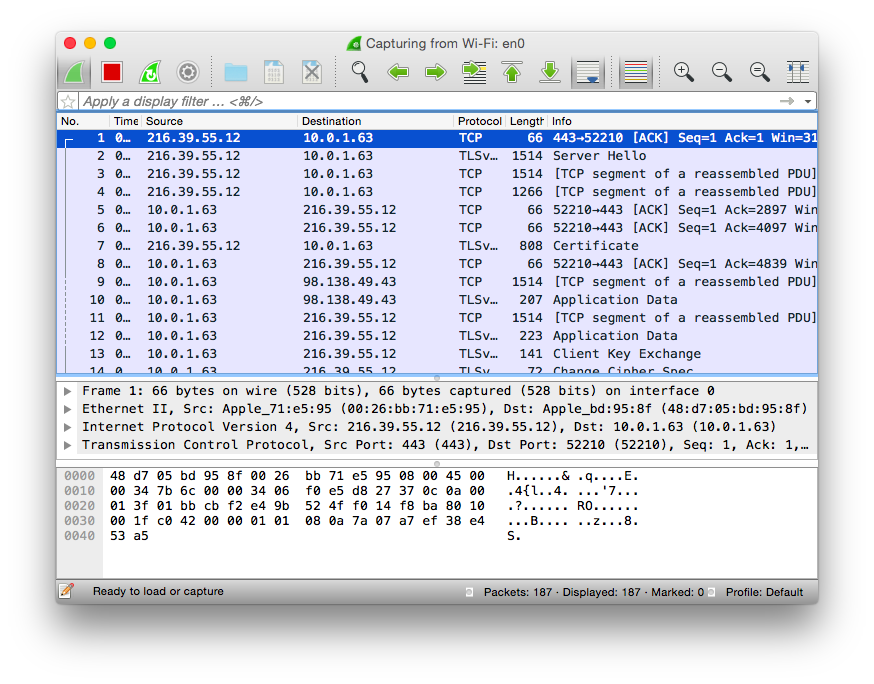
Figure 7-4. Wireshark capture screen
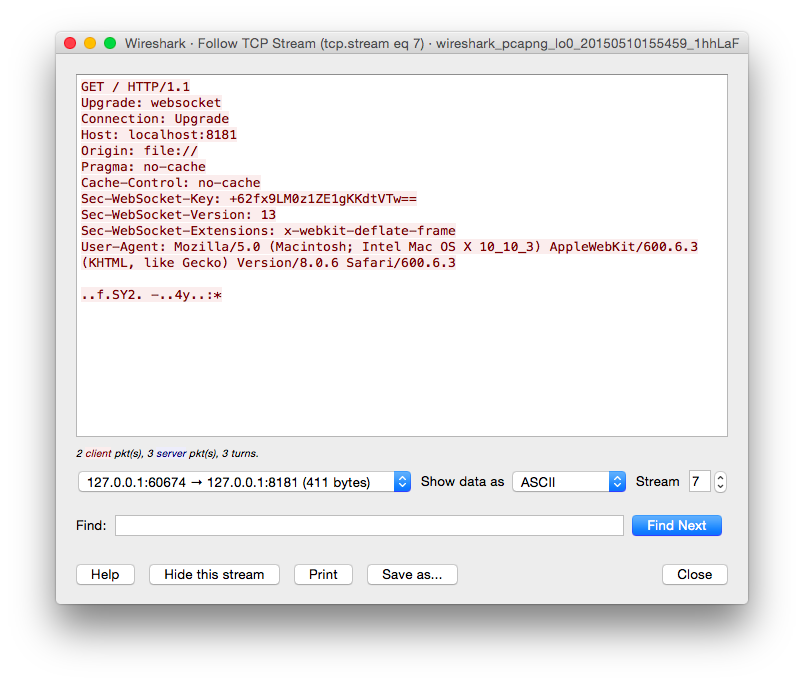
Figure 7-5. Wireshark frame client to server
We briefly discussed frame masking in Chapter 6, and if you’re looking at the payload thinking it doesn’t look like the JSON that you were expecting, you are correct. To be considered valid, all clients must mask the payload with the 32-bit masking key passed within the frame before sending any message to a server. You may be saying to yourself, “This sucks; how am I supposed to effectively debug what is going on with this client with these antiquated views into my data?” Have no fear, the latest versions of Wireshark support automatic unmasking of WebSocket requests to the server.
Figure 7-6 shows the masking key captured with Wireshark.
Here’s how to view it in Wireshark:
-
Find a frame to select that has [MASK] in the Info column.
-
Ensure that Packet Details is turned on and viewable.
-
Expand the bottommost section labeled “WebSocket.”
-
Expand the last section labeled “Unmask Payload” and behold your payload without masking.
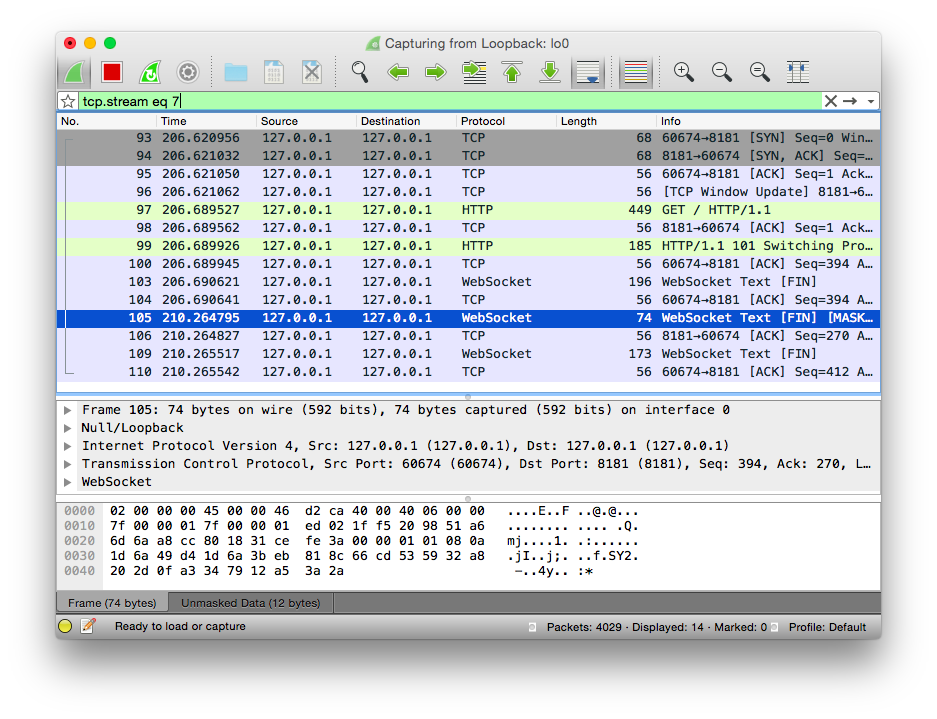
Figure 7-6. WebSocket masked frame shown in Wireshark
Figure 7-7 shows an example of the Wireshark UI and a sample unmasked payload along with the masked just above it should you need it. This is incredibly powerful for debugging the interactions with multiple clients and your server code.
Now you can see what the unmasked payload looks like for a specific message passed from client to server without resorting to debugging to stderr/stdout or otherwise hampering performance or availability in your application. When looking at options, Chrome Developer Tools is also a worthy companion for our efforts, though it does require that you are the client and can replicate the errors from your environment. One of the reasons I have found Wireshark to be so powerful in this regard is the ability to watch the stream without modifying or interrupting other clients in the process.

Figure 7-7. WebSocket unmasked payload shown in Wireshark
Although viewing specific unmasked payloads is interesting, other times it is most appropriate to see the entire thread of conversation for a specific client. For this, Wireshark is indispensable as well. While still capturing your WebSocket communication, you can right-click or Command-click any of the WebSocket or the initial HTTP handshake in the communication, and choose Follow → Follow TCP Stream. At the moment of capture, it will show you the entire conversation for that specific client.
Figure 7-8 shows the contextual menu necessary for following the TCP stream.
As you look through the conversation being shown in the Follow TCP Stream window, browsing back to the main capture screen you should notice that the capture appears filtered. Whenever you follow a stream, it will pick that stream and filter out anything else so you can focus in. The next section covers how to debug and watch for close frames by using Wireshark.
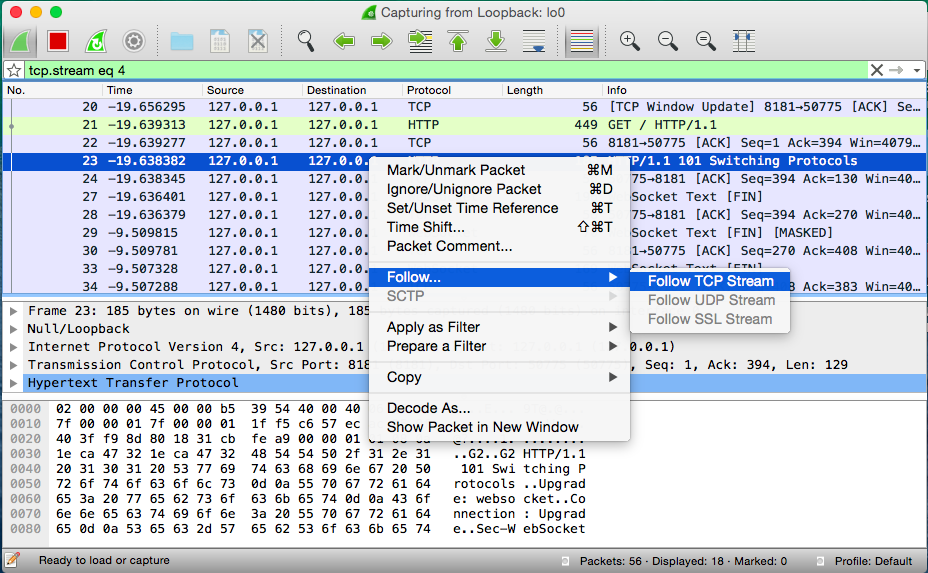
Figure 7-8. Wireshark follow TCP stream
Closing Connection
The final thing you will ever see in a WebSocket conversation is the closing frame. Say that you add a button to your UI, allowing the client to send a close frame to the server like so:
<buttontype="button"onclick="disconnect();">Disconnect</button>
You could then use some of the things you learned about watching frames in Wireshark. Befitting our task would be to see the masked frame being sent by the client and looking at the very small message with the empty payload for a close request. If you view the frame and open the WebSocket section from within Wireshark, you should see something similar to the following:
WebSocket1.......=Fin:True.000....=Reserved:0x00....1000=Opcode:ConnectionClose(8)1.......=Mask:True.0000000=Payloadlength:0Masking-Key:4021df19
The registered status codes for a close for RFC-specific reasons are defined in Chapter 8. The preceding header indicates that a normal close occurred, and no message was passed. If you would like to pass your own status code in the close and/or a message, you can do so using the JavaScript API as we discussed in Chapter 2 with the following:
ws.close(1000,'Ended normally');
The payload would be identical to how messages are received normally including being masked, and sent along with the headers in the frame. The opcode would adorn the code passed in the JavaScript call, the mask would be set, and the masking key would be used to mask the message being sent to the client. That is the final communication you’ll receive with a WebSocket conversation, and you’ve learned how to watch it all, and modify things as needed to test different scenarios.
Summary
This chapter covered the opening handshake, the frames, and the closing handshake and presented tools that enable you to watch the interaction between client and server. Following is a recap of some of the problems you can identify using these tools.
If you receive a code other than an HTTP 200 during the opening handshake:
-
A bad proxy or IDS is likely involved and removing headers. The code could indicate that you didn’t use WebSocket Secure, which is preferred over using the regular non-TLS connection.
-
The code could also indicate that something went wrong with the
Sec-WebSocket-Keyor theSec-WebSocket-Acceptthat was sent in response. You can watch for the request and response by using either OWASP, Chrome Developer Tools, or Wireshark and run the values against the script you wrote in “Validating the Handshake”.
If a client is complaining of errors but you have no visibility due to masking:
-
Use Wireshark and follow the instructions that detail how to see the server responses and requests made by the client so you can fully understand where things are going wrong.
And finally, if a close is occurring:
-
Use any of the listed tools to look at what is being sent by the client, or responded to from the server, see the code and/or message, and handle accordingly.
We were able to identify some potential pitfalls along the way, and how they could be identified using tools so they won’t end up in a days-long search during the debugging process. The tools should serve as worthy companions during the development process and during debugging when the app makes its way into production and you need a better view into what is going on.
You may notice that the debugging-via-browser method focused exclusively on Chrome Developer Tools. Safari offers no discernible way to debug WebSocket frames. Firefox will show you the opening handshake and all headers associated with the connection, but no inspection of the frame is available. According to Mozilla bug 885508, it is still open and looks like no implementation is available in the otherwise wonderful developer tools. You have plenty of tools at your disposal, though; Chrome along with Wireshark and OWASP ZAP can give you the introspection you need to find out what’s going on when things go south.
The final chapter presents a deeper look at the WebSocket protocol itself.