
Artists on some of the world’s most popular webcomics began life with talent that was not apparent. In the print or newspaper comics world, this might have meant these webcomics would never have had a chance. Online, though, these webcomics artists kept at it. They hammered away at their craft until it got better. The progression is visible in real time through the archives. Simply practicing on a regular schedule over and over was enough to improve.
You can go that route if you feel your skills are not up to par and you feel your fans will stick with you as your art evolves. If your rendering isn’t where you’d like it to be, you still need to ensure your art is clean. Don’t hamstring yourself.
Here’s the process that many webcomics artists use, from the blank page to the scanned, finished art. Also, check the sidebar for several important tips from the artist on this book, Sam Romero.
You may elect to begin by sketching out several quick thumbnails, or small, sketchy panels on a separate piece of paper. These thumbnails suggest camera angles and character placements and may be invaluable when actually drawing the webcomic.
If you’re strictly an artist and are not writing the webcomic, it’d be wise to refer to The Comic Script section of Chapter 8, “The Writing.” When working with a writer early in your creative relationship, it’s a good idea to spend some time discussing the early scripts. Make sure the scripts make sense and make sure the writer is scripting to your comfort level. For example, the writer may not be putting in enough detail or [may be] including too much extraneous information. Or the writer may not be introducing objects important to the story early enough.
This communication is important and is preferable to just deviating from the script without talking it over. As the artist, you may have better ideas about layout and camera angles. Bring them up in an e-mail, and, odds are, the writer will be OK with the changes. Later on in your partnership, the writer may become more comfortable with you making the necessary changes where you see fit. Similarly, you may find the script design altering to suit your style. This synergy almost invariably produces better webcomics.
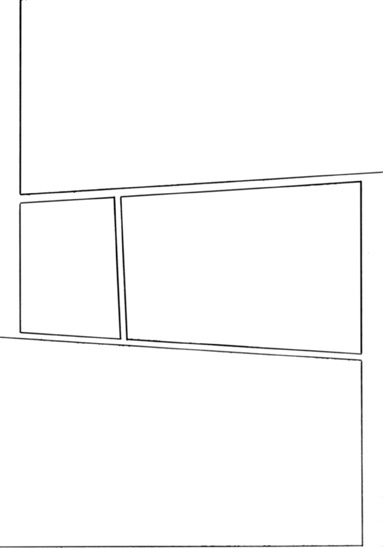
Your webcomic installment may have the same number of panels every time, or the panel count may vary according to the script or the needs of the story. Determine the size and quantity of panels in your installment and ink them using a pen or marker and straight edge on paper or using the shape tools in Photoshop or the panel creation tool in Manga Studio, if on the computer. Figure 9.1 is an example of a page with the panels drawn in.
Now it’s time to start drawing. Some artists do a low-level drawing across the entire installment first. Some complete an entire single panel at a time. Some work from the background in, and some work from the faces out. There’s no one right method, but there may be a better method for you than what you’re doing. Try different approaches and see what really helps you get the art finished.
Some artists will actually sketch in where they want the speech balloons to go, though your letterer, if you have one, may want to handle balloon placement. Either way, remember to leave room for dialogue and captions.
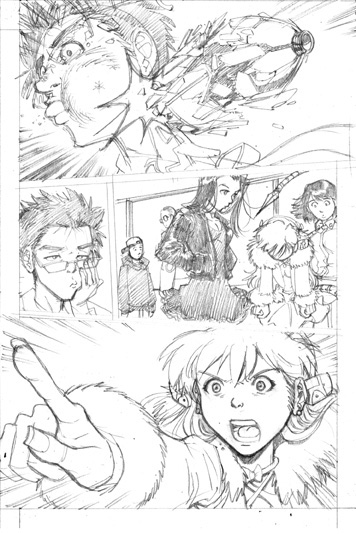
Sam Romero’s Edge the Devilhunter starts to take shape in the pencil stage (Figure 9.2).
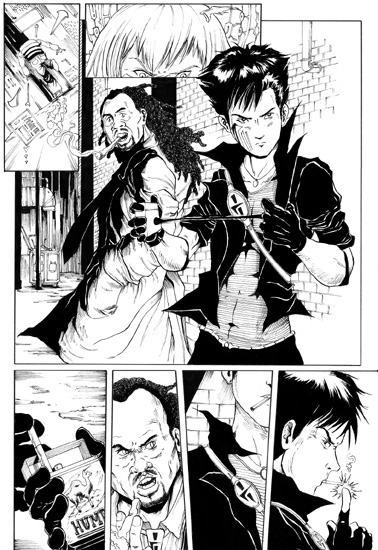
Using a pen, brush, or marker of your choice, ink in the pencils, apply black to areas that need it, and give elements line weight and definition. Then erase the pencils with a good professional eraser, not the one on the back of the pencil. Edge the Devilhunter now has form and definition (Figure 9.3).
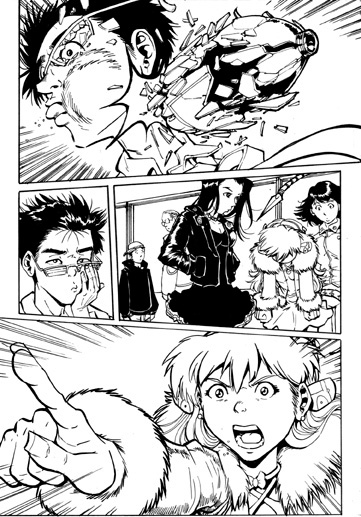
Figure 9.3. Romero inks the drawing. Among his tools are a Windsor-Newton Series 7 no. 2 brush for thick lines and a g-pen with a Tachikawa pen holder for the remaining linework.
Many creators scan in the work at this step and then finish the art on the computer. Some prefer to use the computer just for lettering, and some do the entire thing old school—no computer aspect at all until it’s done.
Many artists scan in the work at this step, but you may elect to scan earlier or later. Either way, you’ll need to invest in a scanner large enough for the paper you’re working on. If you’re drawing on 8.5 × 11, any scanner will do; otherwise, you’ll need an 11 × 17 scanner, which you can find online for a few hundred bucks.
Black and white, unfinished art should be scanned in at 300 to 400 dpi, and either black-and-white or grayscale. Black-and-white scans are for clean, well-inked pieces with little shading. Grayscale scans are for the heavily shaded work, or if you want to scan pencils in. If you’ve somehow colored your work on paper, then scan in color.
After importing the scanned file into your favorite graphics software, it’s important to then adjust the levels. In Photoshop, you’ll want to go to Adjust > Levels. Select the darkest part of your drawing with the black dropper and the lightest part of your drawing with the white dropper. Also, adjust the brightness and contrast as desired.
If you scanned in as grayscale, try changing the mode to a black-and-white drawing, and see how it looks. After that, turn it back to grayscale. If you plan to color it, select the RGB or CMYK color space at this time. See the “Coloring Webcomics Effectively” sidebar for more tips on which color space you should be choosing.
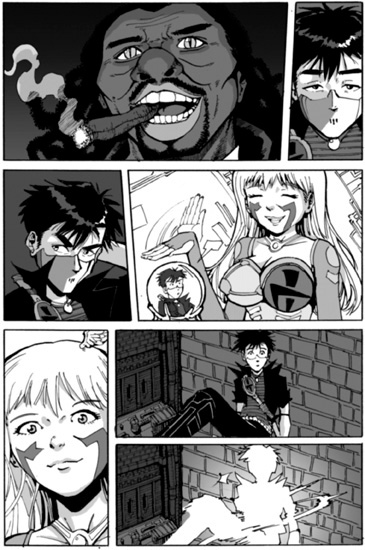
After the art is scanned in, the work is then sometimes toned or colored. Black-and-white webcomics can be finished by the inking step if enough shading is applied. Manga and many Western-style webcomics are not shaded in the inking step; instead, a series of tones or shades are applied. These tones give the work a three-dimensional quality. The best program for applying tones is Manga Studio, in either Debut or EX flavor. The full EX version has more tones to choose from. However, artist Sam Romero used Photoshop, which works nearly as well (Figure 9.4).

You may choose to color the work instead. Photoshop is the weapon of choice here. If you color your webcomic periodically, or want to, remember that coloring is an entirely different art than penciling and inking. Study books on color theory. Color on one or more layers in Photoshop separate from the line art. Make sure you save the black-and-white version as a separate file.
Finally, speech balloons, lettering, sound effects, and captions are applied (Figure 9.5). See the following sidebar for a guest article from professional letterer Johnny Lowe and learn how pro lettering can make all the difference.

Electronic Lettering
Guest-written by Johnny Lowe
Since we’re talking about comics on the computer, it’s only natural we talk about lettering on the computer as well. Most letterers swear by Adobe Illustrator, though there’s also CorelDraw, Inkscape, and Manga Studio; some even use Photoshop. It depends on what you’re familiar with—and of course, your budget.
Fonts
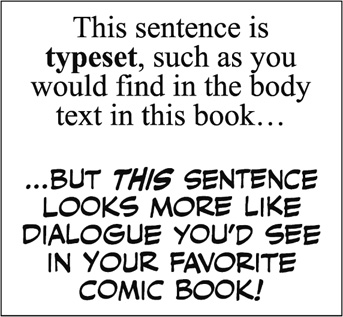
What about fonts? Well, you want to utilize fonts specifically designed for comics—fonts with a “hand-lettered” look. Yes, most comics today are lettered on the computer, but they don’t look “typeset,” like the text in this paragraph (Figure 9.6). These fonts are designed for comic books and generally are all caps (though many cool upper/lowercase fonts are available), and many include alternate characters.
For instance, say you want to type the word “commander” (Figure 9.7). As you type out the letters of the word, type the first “m.” Then, while simultaneously pressing the Shift key, type the second “m.” Look close and you’ll see the second “m” is just slightly different from the first. It’s subtle, but it contributes to the hand-lettered look.

Comicbookfonts.com (Comicraft) and Blambot.com are two excellent sites for comics fonts. Many Blambot fonts are free, but Comicraft frequently features special offers on its selections. And both sites include numerous how-to tips on most any lettering question that might turn up.
One last thing—despite the fact the name of the font includes the word “Comic,” never, ever even consider Comic Sans for lettering your comic book—or even someone else’s comic. Because if you do—bad, very bad things will happen to you and your dog.
The Basics
No matter what software you choose for lettering, there are certain basics. First, decide what font is most appropriate for your comic— sometimes different styles are used for different characters (remember Walt Kelly’s comic strip Pogo?). Don’t go crazy with every character speaking with a different “look,” however. As with most things—moderation.
Decide on the size and leading (vertical space between lines) for your fonts. While a font at 6.25 pt. size and 7.5 pt. leading works for print, you might want to up the size a few points for best viewing on the computer screen—try several examples at different sizes/leading and see what works best for the font you’ve chosen.
Dialogue requires text, word balloons, and their corresponding tails, so you’ll make a text box, type in the dialogue, center it, and then “stack” it so the text is roughly a diamond shape (with the middle lines wider than the top and bottom). But don’t have too much text in a single balloon; break it up into two or perhaps three balloons. This can also be done for pacing, to give the speech a pause, or “beat,” between sentences.
Once you’ve typed the dialogue for the balloon, go back and utilize alternate characters as mentioned above on every other instance of a specific letter—again, for the hand-lettered feel. One thing to remember with the uppercase “I” (which you’ll get generally by typing Shift and “I” together, but it depends on the font)—use the version with the “crossbars” (the horizontal bars at the top and bottom of the letter) only with the word “I” or a contraction such as “I’ll” or “I’ve.” All other instances will be the plain old “I” that more or less looks like a lowercase “L.” Of course you don’t have to do this, but it’s a style thing most letterers abide by.
Create your balloons, make tails to join them to that point close to the mouth of the person speaking, and then you’re getting somewhere. If your artist is on the ball, he will have placed the characters in the panel so that the first person speaking is on the left, the second person speaking to the right, etc. Sometimes, however, they do not do this (or leave a decent amount of space for the lettering), and you will have to juggle things to fit—while at the same time not covering pertinent areas of the art.
If you use sound effects (SFX) in your comic, again, the choice of font is important. If you have an explosion of some sort, you want a big, bad, bold font (e.g., Biff Bam Boom or BadaboomBB) that will communicate the sound and feel of the blast—and not something like Times Bold, which only shows you really didn’t put much thought into it.
The Results
The best lettering is lettering that doesn’t get noticed; that is, the fonts complement the story, the balloons don’t cover up important parts of the art (don’t put word balloons over girls!), and balloon placement always furthers the readability of the story. Whether it’s on paper or online, lettering is an important part of a comic—there is an art to it, after all.
When doing art, whether scanning it in or doing it entirely on computer, save the raw file as you go in the graphics program’s native format: in other words, PSD for Photoshop and MSD for Manga Studio. Then, when you’re completely done with the webcomics installment, you need to save in two formats. First, save in TIF at 400 dpi and the original page dimensions. This file is important for T-shirts, the collected book edition, and other ancillary products.
Then, save under a different filename as a 100 dpi JPG. This is going to be suitable for the Web, so the page dimensions depend on what size you want on the screen. Letterbox or 4:3 format is 640 × 480. A standard comic book page, horizontally visible on most computers but requiring a bit of scrolling downward to read it all, is 1500 × 2200. A comic strip format all depends on how large your panels are. An infinite canvas webcomic can be just about any size you want it to be.
Experiment with different dimensions under different filenames (making sure Constrain Proportions is checked) and figure out what’s going to look good for your readers. Once you decide on dimensions, stick with it unless your webcomic changes format.
When preparing digital files for print collections, there’s an important concept to keep in mind, and no, it’s not painful. The bleed is the extra art around the border of a comic that is lost when the printing machines make the book. During the page-cutting process, you’ll lose a certain amount of art around the edges. There are two solutions to the bleed issue.
The first is to continue to draw all the way to the edge of the paper, but make sure that no important details appear on the edges and no speech balloons or captions would be cut off. This is called full bleed art. The other solution is to inset the artwork in the center of the page and put a thick border around it, .125 inches from the edge. The cutting will all happen outside of this border, so you don’t lose any art. This is called bordered art.
Single-panel or strip-format webcomics are almost always bordered; manga and Western-style full-page art is sometimes full-bleed, sometimes not. It all depends on the style of the particular webcomic.
Translating an infinite canvas webcomic (one that can travel in any direction on the computer screen and can have any size panels) is a challenge. Print, obviously, is not infinite, so some compromises may have to be made. You may need to fit multiple installments on a single page. You may elect to print your book in a different size, such as horizontally (as many newspaper comics are reprinted). You may have to chop up a single installment across multiple book pages. Or you may conclude that print is just not the best venue for your eclectic work, and you will have to live without.
Other than the art in the webcomic itself, there are several other elements on your webcomic site where your art skills will come in handy.
You’ve done character sketches, attempts at a specific pose, or even an entire installment that just didn’t get the effect you were looking for. Don’t let these art extras go to waste—put them on the site, for the fans! Many webcomics collectives have specific sections on your webcomic’s page for sketches and other extras. By allowing your readers a glimpse into the creative process, you let them feel like active participants. Also, giving readers this kind of insight just may be the last step toward another webcomics creator being born!
Many webcomics collectives offer a section to show off your characters. These character sections can include original pinups or head shots of the cast members and a short description of their personalities. Feel free to adapt the character bible the writer put together when creating your webcomic (see Chapter 8, in the section “The Character Bible”). Consider including links to key webcomics that showcase these characters.
When writing the descriptions, just be sure to leave out any spoilery information revealed in the character bible but not yet revealed in the webcomic itself. It never hurts to consult with the writer about what you can and can’t say. Even better, let the writer write the thing, and you can make it look nice for the site. If you’re a one-man army, then you’ll have to talk things over with yourself. Just be sure nobody’s around.
As you get into the habit of drawing your webcomic regularly, you’ll find your art evolving and changing, sometimes consciously, sometimes unconsciously. Don’t worry about fighting these changes, and don’t worry about forcing yourself to emulate your old style. This is you getting better, faster, and more sure of yourself. Whether the current installments match the archives is irrelevant. The evolution of your art will ultimately make the webcomic better. Besides, you’ll know you’ve really arrived when fans start complaining that “your old stuff was better.”
Here’s how Sam Romero’s art evolved from the very beginning of Edge the Devilhunter’s run on Graphic Smash (Figure 9.8) to the original short story for this book (Figure 9.9).
As we said in Chapter 8, people come to webcomics for the art. Though art skill isn’t as important to a webcomic’s success as a print comic, it is important to be clean and consistent in whatever presentation you choose. Practice and repetition are important for developing skills and taking your art where you want to be. Ultimately, expressing yourself through webcomics art will fulfill you in a way that art for a corporation can’t possibly—because it’s your art and you own it.