Chapter 2. Editing for the First Time
Anyone can edit Wikipedia—including you. That’s right. There’s no fee, and you don’t have to register. You don’t even have to have an email account (but if you’re reading this book, you probably do). All Wikipedia articles are collaborative efforts, and you can jump right in and add your own knowledge with just a few clicks and some typing.
This chapter explains what you see when you look at an article in Wikipedia’s editing window and how to practice, preview, and save your edits. You’ll also learn a few more basic editing skills—how to create a link from one article to another, and how to edit a section of an article rather than the whole article. Once you’ve got these skills under your belt, you’re ready for the first step in for-real Wikipedia editing: identifying an article in need of an edit.
Tip
You can dive right in and start editing without setting up a Wikipedia account (that is, getting a user name). However, there are advantages to having a user name—increased privacy and the ability to create new articles and a personal user page, to name two.
The Wikipedia Way of Editing
Experienced Wikipedia editors understand one thing above all else: Wikipedia is a collaboration. There’s no need to be intimidated, because you’ve got the support of an entire community of researchers, fact-checkers, and proofreaders. Keeping the following points in mind will get you into the right mindset for effective editing:
You don’t need to know everything about Wikipedia to edit an article. Wikipedia has literally hundreds of pages of policy, guidelines, and how-to information on topics such as capitalization, categorization, citations, copyrights, disclaimers, foreign language characters, headings, indentation, links, lists, neutrality, pronunciation, quotations, tags, and templates, to name just a few. If you don’t get something exactly right, don’t worry—no one else gets everything right every time, either.
You don’t need to know everything about your subject to edit an article. If you add something that’s constructive and 90-percent right, that’s far better than not doing an edit at all. As in sports, you don’t need to hit a home run or score a goal on every play to be a valuable contributor. If you don’t get something exactly right, someone else is likely to come along and help by fixing or finishing it.
You can contribute without editing at all. If you see a problem in an article, but you don’t (yet) know how to fix it, or you do know how to fix it, but you can’t edit the article (some articles are fully protected, typically for short periods of time), you can still help by posting a constructive comment on the article’s talk (discussion) page. If you don’t want to or can’t edit an article directly, you can still help to improve it.
Practicing in the Sandbox
Even if you’ve done a lot of writing and editing with various types of software in the past, you’ll need some practice with Wikipedia’s tools. Fortunately, Wikipedia has a page called the sandbox, where editors can practice without worrying about damaging anything. In this chapter, you’ll do your work in the sandbox, rather than editing actual articles.
Remember as you go through the book (or whenever you’re editing), if you encounter a feature that you don’t fully understand, you can always go to the sandbox and do some testing there. You won’t break anything, and you can experiment as much as you want until you figure out exactly how things work. You can even practice duplicating the actual edits that are shown throughout this book.
From any page in Wikipedia, you can get to the sandbox in one of two ways:
In the “search” box on the left side of the screen, type WP:SAND, and press Return. Make sure to type it with all capital letters and no space after the colon.
Tip
WP:SAND is a shortcut, and you’ll see others like it throughout the book. If you feel you need to burn a few more calories, type in the search box the full name of the page you want to go to, in this case Wikipedia:Sandbox. Also note that Shift+Alt+F [Shift-Control-F on a Mac] will take you directly to the search box.
Click the “edit this page” tab at the top of any page to go directly into edit mode. You’ll see, toward the bottom of the screen (scroll down if necessary), “Your changes will be visible immediately.” Immediately below, it says “For testing, please use the sandbox instead.” The word “sandbox” is a bolded link—just click it.
Both ways get you to the sandbox quickly. Just use whichever method you find easier to remember. Figure 2-1 shows the sandbox before editing starts.

Starting, Previewing, and Saving Your Edit
Editing in Wikipedia is much like using a very basic text editor, with a few word-processing tools thrown in. You type text into the edit box (less commonly written editbox), and then click buttons to preview and finally save your work.
Adding Text
You edit Wikipedia articles in a big, white text box in the middle of the window. To get to that box, you must go into edit mode.
In the search box on the left side of the screen, type WP:SAND, and press Return to go to the sandbox.
You’ll do all your work in this chapter in the sandbox, so you won’t actually change any Wikipedia articles.
From the sandbox page (Figure 2-1), click the “edit this page” tab.
You’re now in edit mode, complete with the edit box shown in Figure 2-2.

Note
If the bottom of Figure 2-2 looks intimidating, don’t worry: There are only about two dozen items that editors actually use, except in exceedingly rare circumstances.

Delete everything but the first three lines, which are instructions.
The edit box contents should look like Figure 2-3. In this box, you’ll type some text that includes bold and italic formatting, and section headings.
Note
If someone else has deleted part or all of the top three instructional lines in Figure 2-3, don’t worry—the steps on these pages will work just fine without them. But you may want to add them back to help others using the sandbox.
If you compare Figure 2-1 to Figure 2-3, you may be puzzled about a couple things: What is the purpose of the curly brackets (the first line in the edit box in Figure 2-3), and why is the text in Figure 2-1 (“Welcome to the Wikipedia Sandbox! This page allows you to carry out experiments”) not the same as the underlying text in Figure 2-3?
The answer to both questions is essentially the same: The curly brackets indicate a template, and the purpose of templates, generally, is to add standard text to a page. Because templates are so important—you’ll find them everywhere at Wikipedia—there’s a separate section on them later in this chapter (see Understanding and Using Templates).
Type the text shown in Figure 2-4 (except the first three lines at the top, which should already be there) into the edit box.
For this example, you don’t have to type all the text if you don’t want to. You can even type some text of your own invention, as long as it includes each of the following:
Section headings. Type two equal signs at the beginning and two more at the end of a line of text. (If you create at least four headings, Wikipedia automatically creates a table of contents, as you’ll see in a moment.)
Boldface. Type three apostrophes (''') before and after the text you want to bold.
Italic. Type two apostrophes ('') before and after the text you want to italicize.

Note
Never put a blank space at the beginning of a line unless you want that line of text to stand out (which you never want in an article). With a blank space at the beginning, Wikipedia displays a line of text in a box with a light blue background. If it’s a long line of text, the text goes off the screen to the right, requiring the reader to scroll to see it all.
Previewing
One of the most important things after doing an edit is to preview it—to see how it’s going to look. For edits involving formatting, previewing is absolutely essential. But even if you’ve added only plain text, you should still preview it because you want to get in the habit previewing every time.
Experienced editors often skip previewing when making small, routine edits. Usually that’s okay, but sometimes, to their embarrassment, after seeing what the page looks like after being saved, they realize they need to do another edit to fix their own mistakes. So, until you’ve become an experienced editor, preview your work every time.
Before you click the “Show preview” button, however, you should do one more thing—provide a summary of the edit you just made. You should do this now, rather than later, because previewing will also show you what the edit summary will look like. Think of the edit summary as a way for you to explain your edit to other editors. The explanation can be very brief (“typo,” “revert vandalism”) or it can be lengthy (up to 200 characters). Keep it as short as you can, and make it as long as you need to.
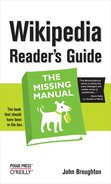
In the “Edit summary” box (Figure 2-5), type a few words to describe the purpose of your edit.
In other words, follow the instructions in fine print: “Briefly describe the changes you have made.” For example, in this case you might type Test edit – first time using the Sandbox. (See the box below for information about edit summaries.)
Once you’ve added an edit summary, it’s time to check your work.
Click the “Show preview” button just below the edit window (the button is shown in Figure 2-5) to see what the Wikipedia page will look like after you save your edit.
A Wikipedia preview screen has three parts. The very top of the screen (Figure 2-6) shows a warning that you’re not looking at a saved version of the page. The middle and bottom of the screen (Figure 2-7) show both what the page will look like after you save it (if you don’t change it further) and the edit box and related tools.
Figure 2-6. At the very top of the preview screen there’s always a warning, in red, that you’re looking at a preview, not something that has been saved.Figure 2-7. The middle and part of the bottom half of the preview screen, showing how the edit from Figure 2-4 looks after saving the page. Wikipedia automatically adds a table of contents for articles that have four or more section headings. At bottom is the now-familiar edit box, so you can make corrections or improvements to your article.


Saving
Click the “Save page” button (see Figure 2-5 for the location of this button, if you need to). At this point, one of three things happens:
Most of the time, the page changes, incorporating your edit. That is, the page looks like what it did when you looked at it in preview mode, except now there is no preview warning on top. Your edit is complete; you’re done.
You might see a cached version of the page. You’ll see a version of the page that looks like it did before you edited the page. In this case, you should refresh the page in your Web browser; typing Ctrl-R (⌘-R on the Mac) does the trick in most browsers. Once you see your edit has taken affect, you’re done. (In the rare case where refreshing the page doesn’t work, you need to tell your computer to remove old copies of everything. See the page Wikipedia:Purge; shortcut WP:PURGE.)
The worst case scenario is that Wikipedia refuses to make the change because someone else changed the page while you were editing it. Figure 2-8 shows what the page will look like in case of an edit conflict.
Wiki Markup: From Edit Box to Screen
Earlier in this chapter, you learned how to create section headers, and to format text as bold or italic (see Figure 2-4). Such formatting is called wiki markup. As you continue through this book, you’ll learn about every type of markup you’re likely to encounter. As a new editor, though, you need to learn three things right away: to recognize the types of markup, how templates are used, and how to create links between articles.
Types of Markup
Besides headings, bold, and italic text, you’ll encounter the following types of markup as you edit articles:
{{pagename}} or {{pagename | info1 | info2 }} or {{pagename | this= info 1 | that= info2}}.The double curly brackets indicate a template. An example of a template appeared in Figure 2-3 and was discussed immediately thereafter. Templates are discussed in more detail later in this chapter (Understanding and Using Templates).
[[Article name]] or [[Article name| other name]]. Double square brackets create internal links (wikilinks), which are hyperlinks between pages in Wikipedia.
[http:url] or [http:url some text]. Single square brackets around a URL create external links. This formatting is discussed in Wikipedia: The Missing Manual.
<ref> text possibly with a URL </ref> and <references />. These are footnote tags—the text between the tags is the footnote itself—plus the instruction to Wikipedia as to where to display the footnotes. Footnotes are also described in detail in Wikipedia: The Missing Manual.
<blockquote> text </blockquote> and <math> numbers and symbols</math>. In articles, you’ll find a few other types of paired tags besides the <ref> tags for footnotes; blockquote and math tags are among the more common. Tags normally come in pairs, and the ending tag must have a slash character (“/”) as its second character if it is to work properly.
<!-- Your comment text goes here -->. This markup turns the text inside into an invisible comment; an example appears in Figure 2-3. “Invisible” means that the text doesn’t display in normal viewing mode; you can see it only in edit mode.
{| bunch of stuff with lots of vertical lines |}. This formatting creates a table. You can learn more about creating tables in Chapter 14 of Wikipedia: The Missing Manual.
One or more rows starting with an “*” or a “#”. These characters create lists within an article (the “#” numbers the list, while the “*” just puts a bullet at the beginning of a line).
[[Category:Name]]. This markup looks like a wikilink, and it is, in a way, but it puts a category link at the bottom of a page.
How to Create Internal Links
Linking one article to another is very easy—with good reason. Links to other articles can add a lot of value to an article because readers can follow the links whenever they come across a word they don’t know a lot about. Good places to add internal links include the lead sections of articles and at the beginning of new sections within articles. A reader should always be able to get to important, related articles via a link.
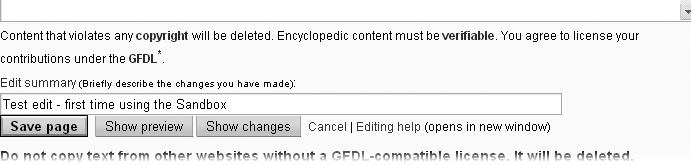
In the edit box, just place paired square brackets around the name of the article you want to link to, for example: [[Winston Churchill]]. Figure 2-9 shows the sandbox again, in preview mode with some internal links sprinkled in.
Another kind of internal link—a piped link—is extremely useful for situations where naming varies by country. For example, you’ve typed the following sentence in your article: “San Francisco has an extensive public transportation system,” and you want to link the words “public transportation” to the relevant article. Trouble is, there’s no article in Wikipedia named “public transportation.” There is, however, an article named “public transport,” which was probably written by someone who speaks British English. You don’t care what it’s called, you just want your readers to be able to go to that article. Here’s how to create the link while having the article read “public transportation”: San Francisco has an extensive [[public transport|public transportation]] system.
Understanding and Using Templates
As mentioned on 3, if you go into edit mode and see some text surrounded by two curly brackets, like this: {{pagename}}, you’re looking at a template. A template tells the software to get text and formatting instructions from another place and insert that formatted text into the article when the article is displayed.
Here’s a common example: If you see the {{fact}} template in the edit box when you’re editing an article, it’s telling the software to go to the page [[Template:Fact]], get the text there (including formatting), and insert that text into the article when the article is displayed for readers. The {{fact}} template, displays the following text: [citation needed].
Templates are widespread for a number of reasons:
Consistency. Every cleanup template looks the same, each type of infobox looks the same, and so on. Editors don’t have to constantly figure out how to present a particular type of information in an article.
Time savings. You don’t have to type out standard information, and you don’t have to know how to format information in standard ways (such as superscript or message boxes). You just have to find out the name of the template and put it in double curly brackets. The software does the rest.
Automatic updating. If the Wikipedia community decides to change a template, changing just one page—the template page itself—automatically changes what’s displayed on every other page that uses the template. (High-use templates are protected from being changed by normal editors, to prevent easily-done extensive vandalism.)
Categorization. Templates can include text that puts a page into a category. Then you and other editors can go to the category page to find, for example, all articles that have been categorized as needing copyediting.
For more details on using templates, see Wikipedia: The Missing Manual.
Editing Article Sections
Inexperienced editors often work on entire articles in edit mode even though they’re making changes only to one section of that article. Not only does this make it more difficult for other editors to understand what an editor did, but it also significantly increases the chances of an edit conflict. So, an important rule of editing is: Don’t edit an entire page if you’re changing only one section of the page.
Editing One Section
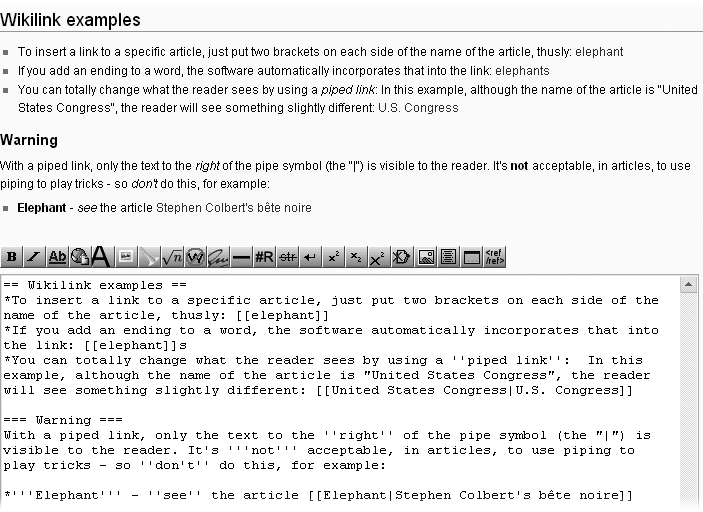
You’ll know an article has sections if you see a table of contents near the top of the article. Even if there is no table of contents, if you see headings within an article, then the article has sections that can be edited. Figure 2-10 shows an article with no table of contents but with three headings that indicate sections that can be edited.

If you click one of the three “edit” links in Figure 2-10, then the edit box shows only the text in the section, not the text of the entire article. That makes it easier to edit (less text in the edit box), and it significantly lessens the likelihood of an edit conflict, because if another editor is editing a different section, your two edits can’t collide.
Tip
Sometimes editing an entire article at once is necessary—for example, if you’re moving sections around, or moving text from one section to another. But often when you plan to edit two or three sections of an article, you can efficiently do these as separate edits of individual sections, rather than editing the entire article. If nothing else, it makes previewing much easier (but the preview shows only part of the article, not the entire article).
Editing the Lead Section
From the previous section, you know the importance of editing only a section rather than an entire article, whenever possible. But you may have noticed that in Figure 2-10 there was no [edit] link for the first sentence in the article, what Wikipedia calls the lead section. So, it appears that if you want to edit that section, you have to click the “edit this page” tab, just as if you wanted to edit the entire article.
In fact, it is possible to edit only the lead section of an article, though most editors don’t know how. There are actually three different options:
The manual way is to click the [edit] link for a section below the lead section, then go to the URL at the top of the screen and change the number at the end of the URL to “0”. (The lead section of an article is always numbered section “0”.) Press Enter, and you’re then editing the lead section.
The most complicated way is to add JavaScript code to your personal JavaScript page, to give you either a special tab (the “0” tab) or an “edit” link. You can find these scripts in the “Navigating to Edit page” section of the page Wikipedia:WikiProject User scripts/Scripts (shortcut: WP:JS). (Note: To do so, you must be a registered editor.)
The easiest way is to click the “my preferences” link on the upper right of the page (which you won’t see unless you have a registered account and are logged in), go to the “Gadgets” tab. Select “Add an [edit] link for the introduction section of a page”, and then click the Save button. Thereafter, whenever you’re editing an article, you’ll see something similar to Figure 2-11.
Figure 2-11. After you’ve selected the option to add an edit link for the lead section on the Gadgets tab of the “My preferences” page, you see a new edit link to the right of the title of every article. Clicking that link will open the top section of the article for editing. (If you don’t see such a link, make sure you bypassed your browser’s cache as described at the bottom of the Gadgets tab.)
Editing for Real
Now that you’ve read about the basics of editing, and (hopefully) followed the step-by-step instructions for doing a sandbox edit, you’re almost ready to start editing actual articles. Before you do so, you need to understand a bit more about the rules of Wikipedia. Then you’ll be prepared to find some articles that you can improve.
Wordsmithing Versus Adding Information
Taken to an extreme, there are basically two kinds of edits (other than removing vandalism, spam, and other problematic material):
You can change the wording and/or formatting of an article, leaving the information in the article more or less intact.
You can add new information.
It’s worthwhile to do a bit of research about correct documenting of sources in Wikipedia articles before you start adding new information, but if you want to jump right into wordsmithing, read on.
A Few Words about Content
Wikipedia has three core policies for content. Two of them, no original research and verifiability, can be overlooked for the moment (though you can read about them in detail in Wikipedia: The Missing Manual). The third, neutral point of view, is worth mentioning now, because wordsmithing is often about a point of view.
Consider, for a moment, the goal of the people doing public relations or in a marketing department: to write about organizations, products and services, and leaders in a way that casts them in the best possible light. Or consider the wording of a press release by a political party, which tries to make the opposition look as bad as possible. In both of these situations, the writers have what Wikipedians call an extreme point of view (POV). By contrast, Wikipedia’s policies require editors to follow these principles:
Present significant viewpoints in proportion to the (published) prominence of each. Fringe theories, for example, deserve much less space (word count) in an article than mainstream/conventional theories.
Represent fairly any differing views about a topic. Fairly means presenting the best case for each view, while avoiding extreme rhetoric from either side.
Write without bias. The best way to do this is to write about facts, not about opinions. For example, instead of saying “X murdered Y,” which is an opinion (was it self defense?), write “X was convicted of murdering Y,” a documentable fact.
Wikipedia has much, much more detail that you can read about this policy (type the shortcut WP:NPOV in the search box on the left of the screen). Many (probably most, maybe even all) editors at Wikipedia have very strong opinions about one thing or another—cultural values, religion, politics, science, whatever. Good editors avoid problems by either focusing on making articles as factual as possible or working on articles where their potential biases aren’t triggered. So if you’re absolutely, positively sure you’re right about a topic where many, and possibly most, other editors at Wikipedia wouldn’t agree with you, it’s a good idea to work on the other two million (or so) articles in Wikipedia that aren’t about that topic. (Keep in mind that there are lots of places on the Web—blogs, personal pages, wikis other than Wikipedia, and more—where proactive opinions are welcome.)
Selecting a Random Page
Ready to edit? If so, you’ll want to find articles that you can improve with copyediting. One way is to click the “Random article” link on the left side of the screen (see Figure 2-12).
When you click this link, there’s a good chance you’ll get a very short article (a stub), or a list, or a page that starts “XYZ may refer to ...” followed by a list of related topics (a disambiguation page), or a very specialized article. You can edit these, of course, but you may want to try again. When you get an article that you’re not interested in editing, just click the “Random article” link again. (Do this twenty or so times, and you get a reasonable sense of the variety in the almost two million articles in Wikipedia.)
Working on a Known Problem
An alternative to using the “Random article” link is to go to articles that other editors have identified as problematic. Several good places to find such articles are:
When you see the name of an article that seems interesting, just click the article name to go to it and start editing as described earlier in this chapter.