
CHAPTER 4
![]()
Reaching Beyond the App
The world is highly connected. Most likely, the apps you build will need to be connected as well. They might need to connect to an Internet source for data, or they might need to connect to other apps or services on the machine where they are running. This chapter introduces you to concepts involved in extending Metro style apps and connecting with other apps.
This chapter covers:
- Capabilities
- Implementing the Location capability
- Declarations (contracts)
- Implementing the Share declaration (as a source)
- Implementing the Share Target declaration
Capabilities
All Metro style apps are sandboxed. They are isolated from one another and cannot directly access content on the machine where they are running. This provides a secure experience for the user.
However, consumers also expect certain apps to gain access to certain resources on their machine. For example, an app for editing photos would be expected to access the photos on the user’s machine. An app that plays videos should be capable of accessing the video library.
This is where capability declarations apply. When an app is built that needs to access external resources, those needs must be declared. When an app is installed that has been configured with declarations, the user will be notified what capabilities the app is requesting. This notification is presented prior to installation, giving the user the option to cancel the process if the user prefers not to allow the specific app access to the requested resources.
![]() Note When an app is submitted to the Windows Store, any capability declarations will be checked against the purpose of that app. If the declarations do not appear appropriate for the type of app, it could be rejected.
Note When an app is submitted to the Windows Store, any capability declarations will be checked against the purpose of that app. If the declarations do not appear appropriate for the type of app, it could be rejected.
The capability declarations are predefined by the Windows Runtime. They are configured using the Manifest Designer in Visual Studio. This designer is accessed by opening the Package.appxmanifest file in the app project. Figure 4-1 shows how this appears in Visual Studio 11 Beta.

Figure 4-1. Manifest Designer in Visual Studio 11
The capability declarations are managed on the Capabilities tab in the Manifest Designer. This allows for easy manipulation of what is essentially an XML file. Developers simply check the boxes for the appropriate resources their app needs to access.
![]() Note Capability declarations are only needed if the app desires to access resources without the user’s explicit permission. If a control such as a FilePicker is used to access a picture or video, then that declaration is not necessary. When the user is involved in the process, they are essentially giving permission by choosing the file themselves. Declarations allow apps to programmatically access resources without prompting the user for permission.
Note Capability declarations are only needed if the app desires to access resources without the user’s explicit permission. If a control such as a FilePicker is used to access a picture or video, then that declaration is not necessary. When the user is involved in the process, they are essentially giving permission by choosing the file themselves. Declarations allow apps to programmatically access resources without prompting the user for permission.
The Available Capability Options
WinRT provides access to many types of resources via the following capabilities:
Documents Library: Provides the ability to add, change, or delete files in the Documents Library on the local PC. The types of files the app can access must be declared. This does not grant access to the Document Libraries on other HomeGroup PCs.
Enterprise Authentication: Provides the ability to connect to enterprise resources that require domain credentials.
Internet (Client & Server): Provides inbound and outbound access to the Internet and public networks. The Internet (Client) capability is not needed when this declaration is present.
Internet (Client): Provides outbound access to the Internet and public networks.
Location: Provides access to the current location information available on the PC. This includes cell triangulations, WiFi through IP address, and GPS sensors or devices.
Microphone: Provides access to the microphone’s audio feed on the PC.
Music Library: Provides the ability to add, change, or delete files in the user’s local Music Library and those on HomeGroup PCs.
Pictures Library: Provides the ability to add, change, or delete files in the user’s local Pictures Library and those on HomeGroup PCs.
Private Networks (Client & Server): Provides inbound and outbound access to the home and work networks.
Proximity: Provides the ability to connect to devices in close proximity to the PC using near-field communication. This includes Bluetooth, WiFi, and the Internet.
Removable Storage: Provides the ability to add, change, or delete files on any removable storage devices connected to the PC. The types of files the app can access must be declared. This does not grant access to removable storage devices on HomeGroup PCs.
Shared User Certificates: Provides the ability to access software and hardware certificates, including smart card certificates.
Text Messaging: Provides access to the SMS functionality on the PC. This includes onboard cellular chips that can be present in tablets, or connected cell phones and data devices in laptops.
Videos Library: Provides the ability to add, change, or delete files in the user’s local Videos Library and those on HomeGroup PCs.
Webcam: Provides access to the webcam’s video feed on the PC.
![]() Note The Documents Library and Removable Storage capabilities require File Type Associations declarations to filter which types of files to grant access. These declarations will be discussed in more detail later in this chapter.
Note The Documents Library and Removable Storage capabilities require File Type Associations declarations to filter which types of files to grant access. These declarations will be discussed in more detail later in this chapter.
Implement the Location Capability
Visual Studio provides a straightforward process for configuring an app’s capabilities. This removes the difficulty of implementation, leaving the developer to concentrate on the app’s design and the proper use of the resources available. In this section, you will build a simple app that uses location information via the Location capability.
Create the Solution
You will begin with a Visual C# Blank Application template and add a simple UI to display the current location of the PC using the WiFi connection.
1. Start Visual Studio 11 and select the Blank Application template in the Visual C# Windows Metro style section. Name the solution WinRT_Location and select the appropriate location on your PC. When your screen appears similar to Figure 4-2, click OK.

Figure 4-2. Creating the WinRT_Location project
2. Open the Package.appxmanifest file. This will bring up the Manifest Designer. Click the Capabilities tab and select the Location option, as shown in Figure 4-3.
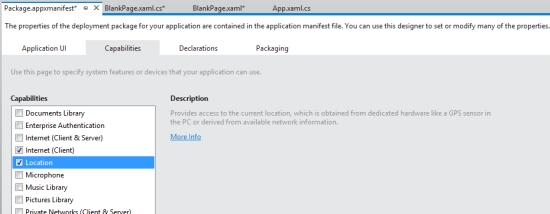
Figure 4-3. Selecting the Location capability
3. Open BlankPage.xaml. Replace the empty grid with the following code:
<Grid Background="Silver">
<Grid.RowDefinitions>
<RowDefinition Height="80" />
<RowDefinition Height="300" />
<RowDefinition Height="100"/>
<RowDefinition />
</Grid.RowDefinitions>
<TextBlock Grid.Row="0" FontSize="36" TextAlignment="Center"
Margin="20">Find My Location</TextBlock>
<Border Grid.Row="1" BorderBrush="Black" BorderThickness="2">
<TextBlock x:Name="lblLocation" Grid.Row="1" FontSize="24"
TextAlignment="Center" Width="800" Margin="20"></TextBlock>
</Border>
<Button x:Name="btnFindLocation" Grid.Row="2"
Content="Where Am I" HorizontalAlignment="Center"
Click="btnFindLocation_Click_1"></Button>
</Grid>
This XAML code describes a simple grid of a title, a TextBlock control for display, and a Button control. When the button is clicked, the app will display the current location information in the TextBlock control. A Border control is used to indicate the location of the empty TextBlock before the user clicks
the button.
4. Open BlankPage.xaml.cs. Add the following namespace to gain access to the WinRT components involved in geolocation:
5. Add the following method to handle the button click event:
async private void btnFindLocation_Click_1(object sender,
RoutedEventArgs e)
{
var locator = new Geolocator();
locator.DesiredAccuracy = PositionAccuracy.Default;
var position = await locator.GetGeopositionAsync();
this.LoadPosition(position);
}
WinRT has made getting the current location extremely simple and straightforward. The Geolocator.GetGeopositionAsync() method uses the existing location resources and returns the current geolocation information as a Geoposition object.
Just prior to calling the GetGeopositionAsync() method, the DesiredAccuracy property is set. There are two values for this property, Default and High. The Default setting is optimized for power and performance. The High setting will produce more accurate results, but it will also use more battery power and connection bandwidth. The High setting should be reserved to only those situations where accuracy is absolutely necessary, or power and performance are not a factor.
6. Add the following method to display the information found in the returned Geoposition object:
private void LoadPosition(Geoposition position)
{
string locationText = "";
locationText = "You have been located!" + Environment.NewLine;
locationText += Environment.NewLine;
locationText += "Your coordinates are " +
position.Coordinate.Longitude + " longitude and " +
position.Coordinate.Latitude + " latitude " + Environment.NewLine;
locationText += Environment.NewLine;
if (string.IsNullOrWhiteSpace(position.CivicAddress.City))
{
locationText += "Your local address information is not
available at this time" + Environment.NewLine;
locationText += Environment.NewLine;
}
else
{
locationText += "You may recognize this location as " +
position.CivicAddress.City + ", " + position.CivicAddress.State + " " + position.CivicAddress.PostalCode + Environment.NewLine;
locationText += Environment.NewLine;
}
locationText += "It is currently " +
position.CivicAddress.Timestamp.DateTime.ToString() + " at your location";
lblLocation.Text = locationText;
}
This text builds a string for display from the information found in the Geoposition object returned by the Windows Runtime. The longitude and latitude information is available in the Coordinate property. Local information, such as City, State, Postal Code, and the local time stored in a property named TimeStamp, is available through the CivicAddress property.
Now the app is ready to test.
1. Press F5 to run the app. Click the button and your screen should appear similar to Figure 4-4.

Figure 4-4. Permission request for location information
Perhaps you were not expecting to get a prompt for permission since the app included the capability declaration. Location is one of the items that Windows protects with an extra layer of certainty by prompting the user the first time the resource is accessed by the app. Once the user has made their choice, the app will not prompt again.
![]() Note While WinRT components essentially access the Windows Core directly, there is a layer of security within this process. The broker service ensures that Metro style apps only access the resources for which they have permission.
Note While WinRT components essentially access the Windows Core directly, there is a layer of security within this process. The broker service ensures that Metro style apps only access the resources for which they have permission.
2. Click Allow to provide permission to the location information. Your screen should now appear similar to Figure 4-5.

Figure 4-5. WinRT_Location running successfully
![]() Note Depending on your hardware configuration, you may experience different results. The project for this book was run on a laptop, and the location information was obtained through the WiFi connection. The CivicAddress property was not fully populated.
Note Depending on your hardware configuration, you may experience different results. The project for this book was run on a laptop, and the location information was obtained through the WiFi connection. The CivicAddress property was not fully populated.
The same approach would be used to implement the capabilities in an app. The option must be checked within the Package.appxmanifest file before the app is granted access.
Declarations (Contracts)
When WinRT was described at the 2011 Build conference, the word “contract” was used to describe how Windows Runtime components gained exposure to other components on the system. This is a good conceptual word.
However, in the Visual Studio 11 Manifest Designer, these contracts are called declarations. They will also be referred to as declarations for the remainder of this chapter.
Declaration Options
The Windows Runtime provides many declaration options. These options are found in the Package.appxmanifest file under the Declarations tab, as shown in Figure 4-6.
This list contains the following options:
Account Picture Provider: Provides the context for an app to allow a user to change their account picture.
AutoPlay Content: Provides the context for configuring an app to launch when specific content types are detected.
AutoPlay Device: Provides the context for configuring an app to launch when specific devices are detected.
Background Tasks: Provides the context to run tasks while an app is suspended.
Cached File Updater: Provides the context for an app to update specific files to ensure they are tracked and maintained.
Camera Settings: Provides the context to expose camera options to the user.
Certificates: Provides the context to install digital certificates for authentication, typically over SSL.
Contact Picker: Provides the context to gain access to contact data.

Figure 4-6. WinRT declaration options
File Open Picker: Provides the context for apps to find and open files from other apps.
File Save Picker: Provides the context for saving files on the system.
File Type Associations: Provides the context to gain access to certain file types. If a file type is not declared, the app will not be allowed access without explicit permission from the user.
Game Explorer: Provides the context to register with Windows as a game.
Print Task Settings: Provides the context for a custom user interface for accessing print devices.
Protocol: Provides the context to use existing protocols as well as create custom ones.
Search: Provides the context for searching within the app or searching within other apps. This declaration will provide access for searching by other apps as well.
Implement the Share Declaration
Sharing is an important feature for an app. Many users expect information to be shareable within many apps. Even simple games are expected to share scoring information and such.
In this section, you will build a simple app that shares text information. This app will serve as the source in the sharing activity.
Create the Solution
In this section you will build a Visual C# Metro style app using the Blank Application template and add a simple UI to write some text. You will then add the ability to respond to the Share Charm as well as provide button to initial the sharing experience.
![]() Note Windows 8 provides a new UI feature called Charms. They appear on the right side of the Start screen and are universally available. Users can access them from within any app. The Charms available are Search, Share, Start, Devices and Settings.
Note Windows 8 provides a new UI feature called Charms. They appear on the right side of the Start screen and are universally available. Users can access them from within any app. The Charms available are Search, Share, Start, Devices and Settings.
1. Open Visual Studio 11 and select the Blank Application template in the Visual C# Metro style section. Name the project WinRT_Sharing and choose the appropriate location on your PC. When your screen looks similar to Figure 4-7, click OK.

Figure 4-7. Creating the WinRT_Sharing project
2. Open BlankPage.xaml and replace the empty grid with the following code:
<Grid Background="Silver">
<Grid.RowDefinitions>
<RowDefinition Height="30" />
<RowDefinition Height="220" />
<RowDefinition Height="50" />
<RowDefinition />
</Grid.RowDefinitions>
<TextBlock Grid.Row="0" FontSize="18" TextAlignment="Center"
VerticalAlignment="Center">Text to Share</TextBlock>
<TextBox x:Name="txtPostText" Grid.Row="1" Height="150" Width="500"
TextWrapping="Wrap" Margin="10"></TextBox>
<Button x:Name="btnPost" Grid.Row="2" Content="Share"
HorizontalAlignment="Center" Click="btnPost_Click_1"></Button>
<StackPanel Grid.Row="3">
<Button x:Name="btnFindContact" Content="Pick a contact"
HorizontalAlignment="Center" Margin="20" Click="btnFindContact_Click_1"></Button>
<TextBlock x:Name="lblContact"
HorizontalAlignment="Center"></TextBlock>
</StackPanel>
</Grid>
This markup code adds a title, a TextBox control for typing, and a Button control. The designer in Visual Studio should appear similar to Figure 4-8.

Figure 4-8. WinRT_Sharing UI in the designer
3. Open BlankPage.xaml.cs. Add the following namespace to gain access to the sharing functionality in WinRT:
4. Add the following code to handle the event when data is requested from this app:
DataTransferManager.GetForCurrentView().DataRequested +=
BlankPage_DataRequested;
5. Add the following method to handle the data request event:
void BlankPage_DataRequested(DataTransferManager sender,
DataRequestedEventArgs args)
{
args.Request.Data.Properties.Title = "Test Post";
args.Request.Data.Properties.Description = "Testing sharing from Windows 8";
args.Request.Data.SetText(txtPostText.Text);
}
The BlankPage_DataRequested() method is called when Windows 8 requests data from the app through the sharing process. The Sharing Charm is accessible to the users while the app is running; users can request to share information at almost any time.
This method declares the Title and Description properties for display and then calls the SetText() property. This ensures that only text is being shared from this app. Only apps that are configured to receive text will appear in the Share UI.
6. Add the following method to handle the button click:
private void btnPost_Click_1(object sender, RoutedEventArgs e)
{
DataTransferManager.ShowShareUI();
}
The code within this method displays the Share UI. The user can then initiate the sharing experience directly from within the app rather than from the Charms UI.
Run the Sharing App
Now the app is ready to test.
1. Press F5 to run the app. Enter some text into the TextBox control. Your screen should appear similar to Figure 4-9.

Figure 4-9. WinRT_Sharing running successfully
2. Either access the Charms and click the Share Charm, or click the Share button within the app to initiate sharing. Your screen should appear similar to Figure 4-10.

Figure 4-10. Sharing from WinRT_Sharing
![]() Note The list of apps in the Share UI may appear different on your machine, depending on what apps are installed. At the time of writing this app, only the Mail app was configured to receive text through the Share UI.
Note The list of apps in the Share UI may appear different on your machine, depending on what apps are installed. At the time of writing this app, only the Mail app was configured to receive text through the Share UI.
3. Choose the Mail app. This will bring up the specific UI presented by the Mail app for receiving text. That UI appears as shown in Figure 4-11.
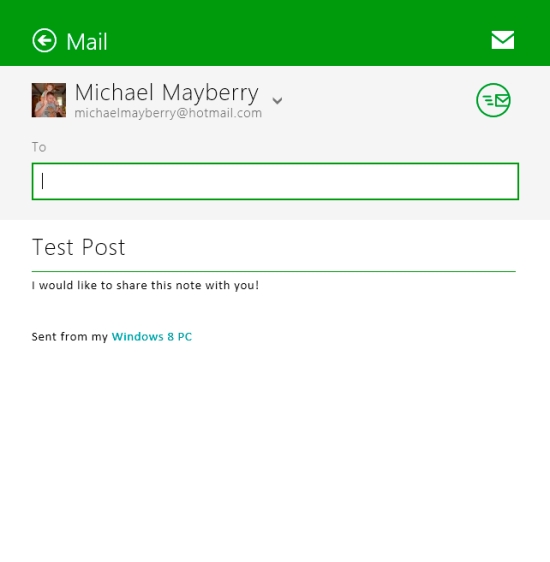
Figure 4-11. Sharing text through the Mail app Share UI
You should notice that a specific declaration was not necessary to allow this app to engage in sharing. The app did implement the concept of the sharing contract, but to push information, the Windows system does not require declarations to exist.
This is not the case when accepting information through sharing, as will be demonstrated in the next section.
Implement the Share Target Declaration
In this section you will build a Visual C# app to accept a photo through the Share UI. You will configure the UI to present for accepting the photo.
Create the Solution
You will first build a project using the Blank Application template for Visual C# Metro style apps. You will then design the UI to present when accepting shared information and configure the app to respond when photo information is being shared.
1. Open Visual Studio 11 and create a new project using the Visual C# Windows Metro style Blank Application template. Name the project WinRT_ShareTarget and choose the appropriate location on your PC. When your screen appears similar to Figure 4-12, click OK.

Figure 4-12. Creating the WinRT_ShareTarget project
2. Right-click the solution and click Add New Item. Choose a BlankPage and name it ShareTarget.xaml.
3. Open ShareTarget.xaml and replace the empty grid with the following code:
<Grid Background="{StaticResource ApplicationPageBackgroundBrush}">
<Grid.RowDefinitions>
<RowDefinition Height="75" />
<RowDefinition />
<RowDefinition />
</Grid.RowDefinitions>
<StackPanel Background="silver" Grid.Row="0">
<TextBlock FontSize="36">WinRT Sharing</TextBlock>
</StackPanel>
<StackPanel Orientation="Vertical" Grid.Row="1">
<Image x:Name="imgShare" Width="400"></Image>
<TextBlock x:Name="lblMessage"></TextBlock>
</StackPanel>
<Button x:Name="btnShare" Content="Share" Grid.Row="2"
HorizontalAlignment="Center" Click="btnShare_Click_1"></Button>
</Grid>
This markup code creates a simple UI with a title, an area to display an image, and a button. This will serve as the UI presented when this app is selected to share a photo. That is done in a slim window on the right of the screen, so the page width needs to change.
4. Add the following attribute to the Page element in ShareTarget.xaml:
Width="600"
The designer in Visual Studio should look similar to Figure 4-13.

Figure 4-13. ShareTarget.xaml in the Visual Studio designer
5. Open Package.appxmanifest. Click the Declarations tab.
6. In the Available Declarations drop-down list, select Share Target. Click the Add button.
7. Under the Data Formats section on the right side of the screen, click the Add New button and enter Bitmap as the data format.
Your screen should appear as shown in Figure 4-14.

Figure 4-14. WinRT_ShareTarget declarations
These changes ensure that the app is configured to respond to the sharing event when the type of data being shared is a Bitmap.
When a sharing event occurs, Windows presents a list of apps that have declared they accept the type of data being shared. Another event is triggered when the user selects an app.
8. Open App.xaml.cs. Add the following method to handle the event when the app is selected as the Share Target:
protected override void OnShareTargetActivated(
ShareTargetActivatedEventArgs args)
{
var shareTarget = new ShareTarget();
shareTarget.Activate(args);
Window.Current.Content = shareTarget;
Window.Current.Activate();
}
This code instantiates the ShareTarget page and calls the Activate() method, passing in the ShareTargetActivatedEventArgs. This essentially allows the page to set up using the information about the share request, including the data being shared.
Once the Activate() method completes, the ShareTarget page is displayed to the user to complete the share experience.
Now the ShareTarget page must be coded to handle this request.
9. Open ShareTarget.xaml.cs. Add the following namespaces:
using Windows.ApplicationModel.Activation;
using Windows.UI.Xaml.Media.Imaging;
using Windows.ApplicationModel.DataTransfer.ShareTarget;
using Windows.ApplicationModel.DataTransfer;
using Windows.Storage.Streams;
using Windows.Storage;
10. Add the following code to implement the Activate() method:
public void Activate(ShareTargetActivatedEventArgs args)
{
if (args.Kind != ActivationKind.ShareTarget) return;
this.LoadShareTextAsync(args);
_shareOperation = args.ShareOperation;
}
This method checks the arguments passed in to ensure that only ShareTarget events are handled. Then a private method is called to process the parameters, and the ShareOperation object is stored into a private member for use later.
11. Add the following code to implement the LoadShareTextAsync() method:
async private void LoadShareTextAsync(
ShareTargetActivatedEventArgs args)
{
if (args.ShareOperation.Data.Contains(
StandardDataFormats.Bitmap))
{
var imageStreamRef = await
args.ShareOperation.Data.GetBitmapAsync();
var imageStream = await imageStreamRef.OpenReadAsync();
BitmapImage bitmap = new BitmapImage();
bitmap.SetSource(imageStream);
imgShare.Source = bitmap;
lblMessage.Text = "image loaded";
}
else if (args.ShareOperation.Data.Contains(
StandardDataFormats.StorageItems))
{
var files = await
args.ShareOperation.Data.GetStorageItemsAsync();
var file = (StorageFile)files[0];
BitmapImage bitmap = new BitmapImage();
bitmap.SetSource(await file.OpenAsync(
Windows.Storage.FileAccessMode.Read)
);
imgShare.Source = bitmap;
}
}
First, notice the async keyword is used in the method declaration. Since at least one asynchronous method will be called within this method, the async keyword is required.
This method handles two scenarios: one when the shared information is in the Bitmap format, and the other when the shared information is in the StorageItems format. This app is designed to accept photos. This type of data may be shared as either one of these formats.
If the data is of type Bitmap, the GetBitmapAsyc() method is used. This returns a reference to a stream. The OpenReadAsync() method is called to return the actual stream. From there, a BitmapImage may be created and set as the source of the Image control on the page.
If the data is of type StoredImages, the GetStorageItemsAsync() method is called to get a list of files that are being shared. This app is written to only accept one image, so only the first file of this list is referenced. Again, a BitmapImage is created and used to set the source of the Image control.
![]() Note Along with the async keyword used in the method declaration, the await keyword is also used within this method. As discussed in previous chapters, the await keyword is the simple syntax for handling asynchronous method calls in C#.
Note Along with the async keyword used in the method declaration, the await keyword is also used within this method. As discussed in previous chapters, the await keyword is the simple syntax for handling asynchronous method calls in C#.
12. Add the following method to handle the button click event:
private void btnShare_Click_1(object sender, RoutedEventArgs e)
{
_shareOperation.ReportCompleted();
_shareOperation = null;
}
This app simply reports back to the initiating app that the share operation is complete. In a typical app, this event would handle the data and store it or present it within the app. This demonstration simply walks through the share experience itself.
![]() Note Buildinga full app to accept and handle the data being shared is beyond the scope of this chapter. How that is handled depends on the purpose of the app itself. The data could simply be displayed onto a separate page, or the file could be stored somewhere on the system. It could possibly be passed along to an online service. The options for handling the shared data are endless.
Note Buildinga full app to accept and handle the data being shared is beyond the scope of this chapter. How that is handled depends on the purpose of the app itself. The data could simply be displayed onto a separate page, or the file could be stored somewhere on the system. It could possibly be passed along to an online service. The options for handling the shared data are endless.
Run the Share Target App
This app is written to respond to the sharing events. Typically, an entire UI would be written and this sharing page would only provide a minor role. As it is, there is no real UI for this app. Rather than running the app for testing, you will need to deploy the app and initiate a sharing experience for this app to respond.
1. Right-click the solution and click Deploy, as shown in Figure 4-15.
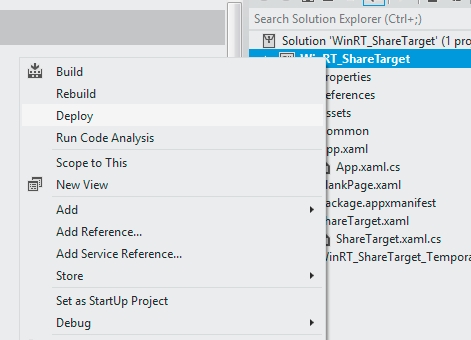
Figure 4-15. Deploying the WinRT_ShareTarget app
2. Navigate to the Windows 8 Start screen and select the Photo app.
3. Browse the available photos and select one. Figure 4-16 shows a selected photo in the Photo app.

Figure 4-16. Selected photo in the Photo app
![]() Note On a laptop, photos are selected by right-clicking them. For hardware with a touch interface, the experience will be different.
Note On a laptop, photos are selected by right-clicking them. For hardware with a touch interface, the experience will be different.
4. Access the Windows 8 Charms. Figure 4-17 shows the Windows 8 Charms.
5. Click the Share Charm. This will display the apps available to accept a photo through sharing. Notice that WinRT_ShareTarget is listed among the available apps. You should see something similar to Figure 4-18.
6. Click the WinRT_ShareTarget app in the Share list. This should present the UI, as shown in Figure 4-19.
7. Click the Share button. The share experience should end and you should be taken back to the Photo app.
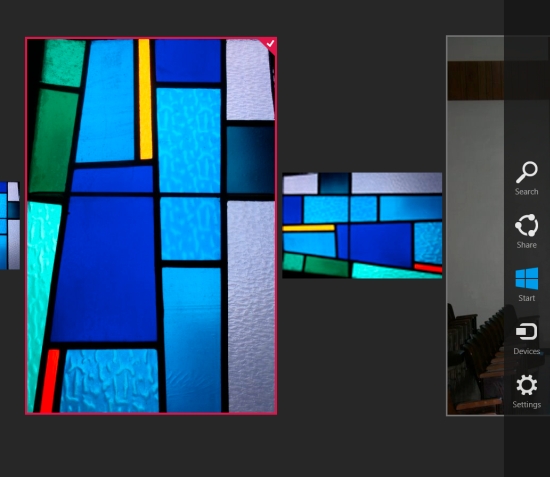
Figure 4-17. The Windows 8 Charms

Figure 4-18. WinRT_ShareTarget listed as a target app for sharing photos

Figure 4-19. Share UI from WinRT_ShareTarget
Summary
Building sandboxed apps is important for a secure and controlled experience for users. However, those same users desire connectivity, and they expect it from their apps. The Windows Runtime provides the infrastructure to develop safe and secure interconnected apps. You have been introduced to the concepts that make this happen:
- Capabilities
- Declarations
You have implemented these concepts into working apps. You used the Location capability to find the geolocation of the device running your app.
You have implemented the sharing contract, both as a source and by using the Share Target declaration. You have seen how apps can respond to system events and handle shared information.
This book has introduced you to the Windows Runtime in Windows 8. The fundamentals demonstrated within this book provide the foundation for app building in the Windows 8 ecosystem.
Take these sample projects and extend their functionality. Space was limited in this book, so only a few examples were included.
The Appendix includes references to resources for further investigation and exposure to the Windows Runtime. Some resources expound on topics within this book. Some address topics this book could not cover.
I hope you have found this book helpful. WinRT is a new and exciting opportunity for developers. This book has attempted to answer some of the questions you may have about WinRT and, through the knowledge presented, enhance your ability to build Windows 8 apps.