1. Setting Up Windows
In This Chapter
![]() Choosing between an upgrade and a custom installation
Choosing between an upgrade and a custom installation
![]() Making the right choices on the setup screens
Making the right choices on the setup screens
![]() Signing in and out, locking and restarting Windows, using sleep and hibernation, and shutting down
Signing in and out, locking and restarting Windows, using sleep and hibernation, and shutting down
This chapter shows you how to set up Windows 10 on your computer. You learn how to choose between an upgrade and a custom installation, if applicable; how to make the right choices for your needs on the setup screens; and how to perform essential moves such as signing in and out, locking Windows, and shutting down or restarting your computer.
Starting the Installation
You can start installing Windows 10 in several ways:
![]() Click the Get Windows 10 icon in the notification area of the taskbar. This icon appears only if your computer contains a version of Windows from which you can upgrade to Windows 10.
Click the Get Windows 10 icon in the notification area of the taskbar. This icon appears only if your computer contains a version of Windows from which you can upgrade to Windows 10.
![]() Run the DVD from your current version of Windows. If your computer has a DVD drive and a working version of Windows, insert the Windows 10 DVD. When the Windows 10 Setup screen appears, check the I Accept the License Terms box and click the Accept button to start the upgrade.
Run the DVD from your current version of Windows. If your computer has a DVD drive and a working version of Windows, insert the Windows 10 DVD. When the Windows 10 Setup screen appears, check the I Accept the License Terms box and click the Accept button to start the upgrade.
![]() Boot from the DVD. If your computer has an optical drive, you can insert the DVD in the drive and boot from the DVD. How you boot from the optical drive depends on your computer, so you may have to consult the manual or the manufacturer’s website. This approach is useful if your computer doesn’t have Windows installed, or if Windows is installed but not working, but you can also use it even if Windows is installed and working fine.
Boot from the DVD. If your computer has an optical drive, you can insert the DVD in the drive and boot from the DVD. How you boot from the optical drive depends on your computer, so you may have to consult the manual or the manufacturer’s website. This approach is useful if your computer doesn’t have Windows installed, or if Windows is installed but not working, but you can also use it even if Windows is installed and working fine.
![]() Boot from a USB drive. You can buy Windows 10 on a USB drive for convenience. Or you can use a tool such as Rufus (free from http://rufus.akeo.ie) to create a bootable USB drive from either a Windows DVD or a Windows ISO disc image that you download from Microsoft.
Boot from a USB drive. You can buy Windows 10 on a USB drive for convenience. Or you can use a tool such as Rufus (free from http://rufus.akeo.ie) to create a bootable USB drive from either a Windows DVD or a Windows ISO disc image that you download from Microsoft.
Choosing Between an Upgrade and a Custom Installation
If you’re installing Windows 10 on a computer that already has Windows 7 or Windows 8.1 installed, you can choose between upgrading the existing version of Windows and performing a custom installation of Windows 10. This is a massive decision, so you’ll want to get it right. You make this choice by clicking either the Upgrade option or the Custom option on the Which Type of Installation Do You Want? screen of Windows Setup (see Figure 1.1).

FIGURE 1.1 On the Which Type of Installation Do You Want? screen of Windows Setup, click Upgrade or Custom, as needed.
![]() Note
Note
As you know, Windows 10 runs on both devices with regular screens, on which you click with a mouse or trackpad, and devices with touchscreens, which you tap (or thump, if you’re my son). This book uses “click” instead of “click or tap,” for concision, for clicks with the left button or regular taps on the screen, and it uses “right-click or long-press” for clicking with the right button on a mouse or performing a long press on the touchscreen.
Normally, you’ll want to upgrade the existing version of Windows. Upgrading keeps all your apps and your files in place, and after the upgrade finishes, you can carry on using your computer much as before, only with the benefit of Windows 10’s new features.
But if your computer’s software is at all messed up, or if you want to take the new version of Windows as an opportunity to get rid of apps you no longer need and slim down your files, perform a custom installation instead. You’ll then need to install the apps you want to use, and copy across the files that you want to have on the computer.
![]() Caution
Caution
Before performing a custom installation, back up any files you care about to an external drive, an online storage site, or both.
If you’re installing Windows from scratch on a newly built computer or on a new hard drive, the custom installation is your only choice. But—as of this writing, anyway—the installer doesn’t check that an upgrade is possible, so the Upgrade button appears to be available.
Choosing the Drive and Partition for a Custom Installation
If you go for a custom install, the Where Do You Want to Install Windows? screen (see Figure 1.2) appears next, enabling you to choose the drive (if your computer has multiple drives) and partition on which to install Windows. From this screen, you can delete existing partitions, extend existing partitions, create new partitions, and format partitions to remove the data they contain.

FIGURE 1.2 On the Where Do You Want to Install Windows? screen, select the drive and partition on which to install the OS.
A partition is a logical section of a drive. You can use partitions to separate different operating systems from each other. For example, if your computer has Windows 8 installed on it, you can install Windows 10 on a separate partition without upgrading Windows 8, so you can boot the computer into either operating system. You might want to do this when evaluating Windows 10.
![]() Caution
Caution
Be very careful when working with partitions. It’s all too easy to wipe out a partition that contains valuable data. Use the Total Size column and the Free Space column to verify that you’re working with the correct drive and partition.
What you do on this screen depends on your computer’s configuration. Here’s an example starting with the blank drive on the computer shown in the screens:
1. Click the drive in the list box. In this case, it’s the only item there.
2. Click the New button. The Size box and the Apply button and Cancel button appear (see Figure 1.3).

FIGURE 1.3 Enter the size for the new partition in the Size box and then click Apply.
3. Enter the size in the Size box, either by typing or by clicking the spin arrows.
4. Click Apply. The Windows Setup dialog box opens (see Figure 1.4), warning you that Windows might create additional partitions for system files.
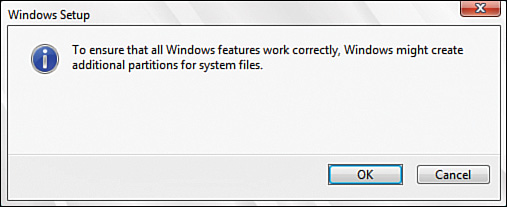
FIGURE 1.4 The Windows Setup dialog box warns you that Windows may create extra partitions. Click OK.
5. Click OK. Windows Setup creates the partition you requested and, if needed, creates a System Reserved partition (see Figure 1.5).
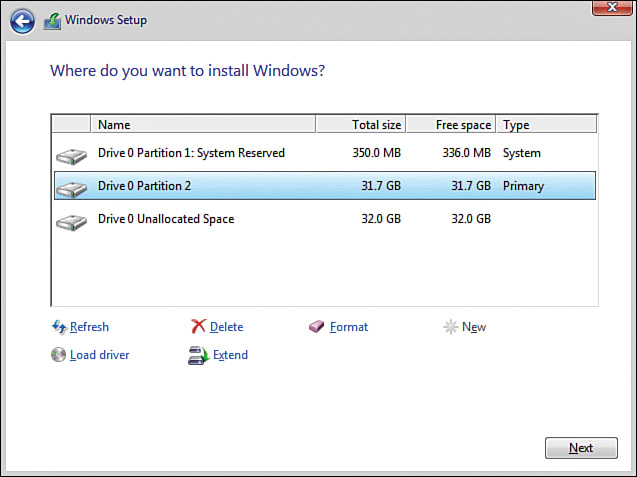
FIGURE 1.5 Windows Setup creates your partition and any system partition needed, leaving the rest of the drive as unallocated space.
After you’ve created the partition on which you want to install Windows, select the partition, and then click Next.
Making the Right Choices on the Setup Screens
Next, Windows Setup copies the files it needs from your install medium, and then installs them. The Installing Windows screen appears (see Figure 1.6), showing you the progress of the installation. Windows then restarts a couple of times before needing your involvement again.
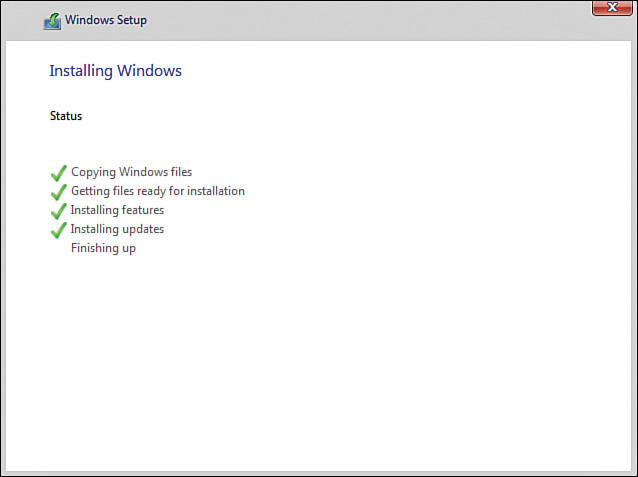
FIGURE 1.6 The Installing Windows screen appears while Windows Setup copies files and installs them.
Choosing Between Using Default Settings and Configuring Windows Manually
The next big choice is on the Get Going Fast screen (see Figure 1.7). This screen lets you choose between configuring Windows quickly using the default settings and configuring Windows manually with custom settings. To encourage you to use the express settings, this screen has a nice big Use Express Settings button and a small Customize Settings link.
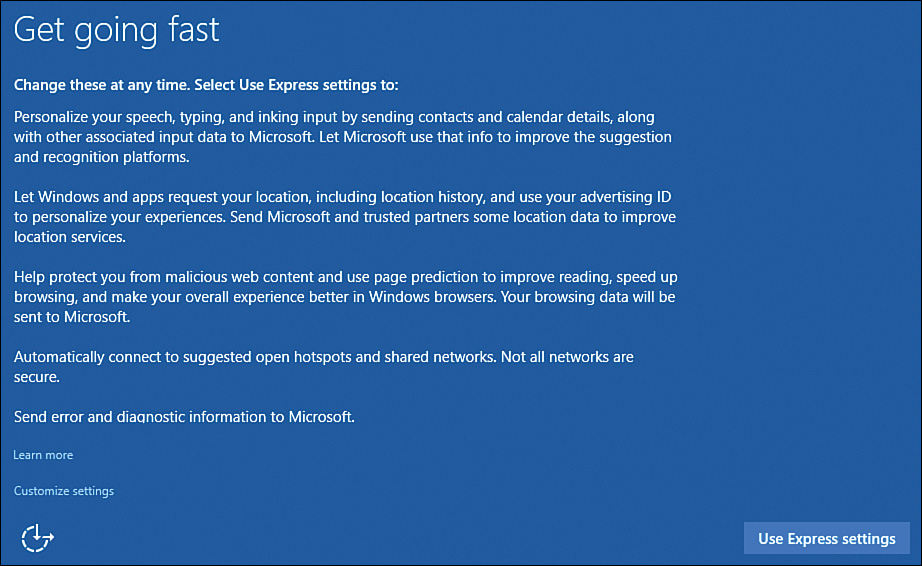
FIGURE 1.7 On the Get Going Fast screen, you’ll probably be tempted to click Use Express Settings. But it’s usually better to click Customize Settings.
You can change any of the express settings afterward if you want—but it’s all too easy to forget to do so. To retain as much control of your computer as you likely want, it’s best to customize the settings.
On the Settings screen, click the Use Express Settings button if you want to set up Windows with the default settings. These work pretty well, but you may need to change them afterward.
![]() Caution
Caution
It’s easy to choose the Use Express Settings option, but this gives Microsoft a huge amount of information that you may not want to cede. It’s much better to click the Customize Settings link and slog through the individual options so that you can control how much information you’re giving up.
If you prefer to have full control over Windows right from the start, click the Customize Settings link. The first Customize Settings screen appears (see Figure 1.8).
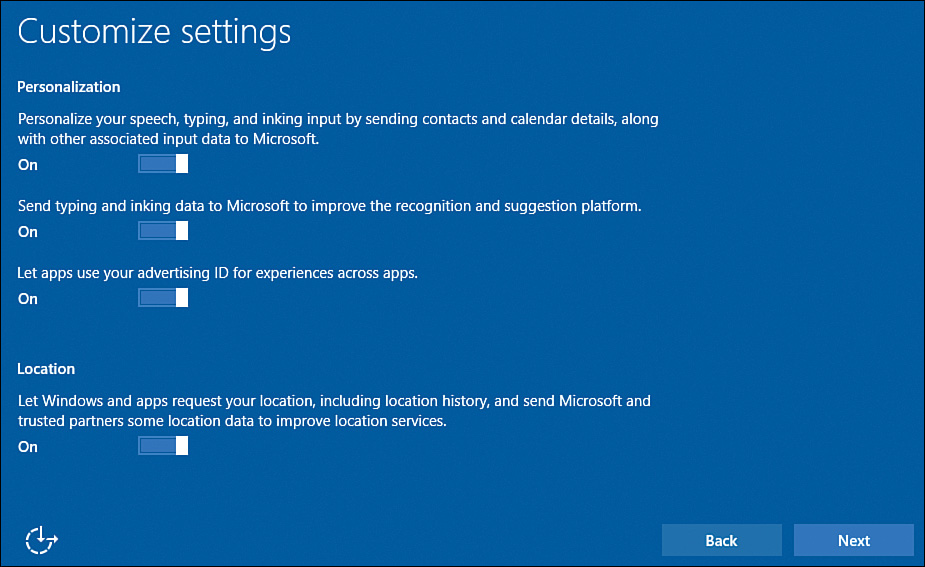
FIGURE 1.8 Choose Personalization and Location settings on the first Customize Settings screen.
![]() Note
Note
Three things before we start customizing settings. First, you can change any of these settings later, and I’ll show you how to do so later in the book. Second, most of the settings have awkwardly long names, because Microsoft is trying to make clear what they do. Third, all the switches are set to On by default.
Choosing Personalization and Location Settings
In the Personalization section of the first Customize Settings screen, you can modify the following three settings.
![]() Personalize Your Speech, Typing, and Inking Input by Sending Contacts and Calendar Details, Along with Other Associated Input Data to Microsoft. Set this switch to On if you want to share your contacts, your calendar events, and other data with Microsoft to enable Windows to better recognize your speech input, typing input, and inking input. Sharing this data helps you get more accurate input results, especially for tricky items such as spoken contact names—but be sure you’re comfortable sharing it.
Personalize Your Speech, Typing, and Inking Input by Sending Contacts and Calendar Details, Along with Other Associated Input Data to Microsoft. Set this switch to On if you want to share your contacts, your calendar events, and other data with Microsoft to enable Windows to better recognize your speech input, typing input, and inking input. Sharing this data helps you get more accurate input results, especially for tricky items such as spoken contact names—but be sure you’re comfortable sharing it.
![]() Send Typing and Inking Data to Microsoft to Improve the Recognition and Suggestion Platform. Set this switch to On if you want to share your typing and inking data anonymously with Microsoft so that it can improve recognition and suggestions. Doing this benefits Windows users over the long term.
Send Typing and Inking Data to Microsoft to Improve the Recognition and Suggestion Platform. Set this switch to On if you want to share your typing and inking data anonymously with Microsoft so that it can improve recognition and suggestions. Doing this benefits Windows users over the long term.
![]() Let Apps Use Your Advertising ID for Experiences Across Apps. Your advertising ID or “advertising identifier” is a unique identifier for your Windows user account. Set this switch to On if you want apps to be able to get your advertising ID so that they can serve up targeted ads. If not, set this switch to Off.
Let Apps Use Your Advertising ID for Experiences Across Apps. Your advertising ID or “advertising identifier” is a unique identifier for your Windows user account. Set this switch to On if you want apps to be able to get your advertising ID so that they can serve up targeted ads. If not, set this switch to Off.
![]() Tip
Tip
You can enable or disable the advertising ID as needed after setup. Open the Settings app, click Privacy, and then set the Let Apps Use Your Advertising ID for Experiences Across Apps switch to On or Off, as needed. Setting this switch to Off resets your advertising ID, wiping out the information currently held.
In the Location section, you can modify one setting:
![]() Let Windows and Apps Request Your Location, Including Location History, and Send Microsoft and Trusted Partners Some Location Data to Improve Location Services. This is a wide-ranging setting. Set this switch to On if you want to allow Windows and apps to request your location and your location history. The main benefit of this is being able to get location-specific information automatically—for example, to get directions from wherever you’ve gotten lost to where you’re supposed to be—without having to enter your location manually. But to get this information, you must allow both Windows and apps to access not only your current location but also your location history, which can be sensitive information. The other aspect, sending location data to help improve location services, is less controversial, and ideally you’d be able to enable it without enabling location access for Windows and apps.
Let Windows and Apps Request Your Location, Including Location History, and Send Microsoft and Trusted Partners Some Location Data to Improve Location Services. This is a wide-ranging setting. Set this switch to On if you want to allow Windows and apps to request your location and your location history. The main benefit of this is being able to get location-specific information automatically—for example, to get directions from wherever you’ve gotten lost to where you’re supposed to be—without having to enter your location manually. But to get this information, you must allow both Windows and apps to access not only your current location but also your location history, which can be sensitive information. The other aspect, sending location data to help improve location services, is less controversial, and ideally you’d be able to enable it without enabling location access for Windows and apps.
![]() Tip
Tip
Allowing location access tends to be much more helpful for a laptop or tablet than for a desktop that spends all its life in one location. If you’re prepared to provide your location manually on occasion, I suggest setting the Let Windows and Apps Request Your Location switch to Off.
Click the Next button when you’re ready to move on. The second Customize Settings screen appears, offering Browser and Protection settings and Connectivity and Error Reporting settings.
Choosing Browser, Protection, Connectivity, and Error Reporting Settings
In the Browser and Protection section of the second Customize Settings screen, you can modify these two settings:
![]() Use SmartScreen Online Services to Help Protect Against Malicious Content and Downloads in Sites Loaded by Windows Browsers and Store Apps. Set this switch to On if you want to use the SmartScreen feature to protect against malevolent software. This is almost always a good idea.
Use SmartScreen Online Services to Help Protect Against Malicious Content and Downloads in Sites Loaded by Windows Browsers and Store Apps. Set this switch to On if you want to use the SmartScreen feature to protect against malevolent software. This is almost always a good idea.
![]() Use Page Prediction to Improve Reading, Speed Up Browsing, and Make Your Overall Experience Better in Windows Browsers. Your Browsing Data Will Be Sent to Microsoft. Set this switch to On if you want to use Page Prediction in your browser. Page Prediction analyzes each web page you load and tries to work out which links on that page you might click; to speed up your browsing, Page Prediction preloads the pages it thinks you might want. (Preloading means that the browser downloads the pages but doesn’t display them—it just caches the data.) So when you click the link for a preloaded page, the page appears more quickly, because the data is already on your computer.
Use Page Prediction to Improve Reading, Speed Up Browsing, and Make Your Overall Experience Better in Windows Browsers. Your Browsing Data Will Be Sent to Microsoft. Set this switch to On if you want to use Page Prediction in your browser. Page Prediction analyzes each web page you load and tries to work out which links on that page you might click; to speed up your browsing, Page Prediction preloads the pages it thinks you might want. (Preloading means that the browser downloads the pages but doesn’t display them—it just caches the data.) So when you click the link for a preloaded page, the page appears more quickly, because the data is already on your computer.
![]() Caution
Caution
If your computer uses a cellular connection for web browsing, you’ll probably want to turn off Page Prediction, because it can greatly increase your data usage.
Page Prediction can cause your web browser to connect to web pages that you might not want to load yourself. Your browser’s cache may contain data, such as images, that you didn’t download yourself. The preloaded pages don’t appear in your browsing history unless you choose to go to them, but to anyone (such as a government agency) who can get your browsing data from your ISP, it may appear that you visited the pages.
In the Connectivity and Error Reporting section, you can modify these two settings:
![]() Automatically Connect to Suggested Open Hotspots. Not All Networks Are Secure. Set this switch to On if you want Windows to connect automatically to open wireless networks on Microsoft’s approved list. (“Open” means the networks aren’t secured with passwords or other security measures.) These are networks that Microsoft believes to be safe, but it is possible that some networks may have been compromised. You might want to set this switch to Off and manage your Wi-Fi connections manually.
Automatically Connect to Suggested Open Hotspots. Not All Networks Are Secure. Set this switch to On if you want Windows to connect automatically to open wireless networks on Microsoft’s approved list. (“Open” means the networks aren’t secured with passwords or other security measures.) These are networks that Microsoft believes to be safe, but it is possible that some networks may have been compromised. You might want to set this switch to Off and manage your Wi-Fi connections manually.
![]() Note
Note
The two Automatically Connect settings use a service called Wi-Fi Sense that Microsoft developed to help mobile devices running Windows online without racking up huge cellular bills. You must have Location Services turned on for Wi-Fi Sense to work.
![]() Automatically Connect to Networks Shared by Your Contacts. Set this switch to On if you want Windows to connect automatically to networks that your contacts share. These networks aren’t open—they’re secured networks that your friends choose to share. Windows shares the passwords securely so that you can use the networks but not learn the passwords.
Automatically Connect to Networks Shared by Your Contacts. Set this switch to On if you want Windows to connect automatically to networks that your contacts share. These networks aren’t open—they’re secured networks that your friends choose to share. Windows shares the passwords securely so that you can use the networks but not learn the passwords.
Again, click the Next button when you’ve made your choices. The Just a Moment screen appears while the installer implements your choices, and then the Who Owns This PC? screen appears. Continue with the next section.
Working on the Who Owns This PC? Screen
On the Who Owns This PC? screen (see Figure 1.9), you make an important decision by clicking either My Organization or I Own It and then clicking the Next button.

FIGURE 1.9 On the Who Owns This PC? screen, click My Organization or I Own It, as appropriate.
The Who Owns This PC? screen does not appear for Windows 10 Home Edition, which cannot connect to domain-based networks.
When you click My Organization and then click the Next button, the installer walks you through the process of setting up Windows to connect to a domain-based Windows network. This is the kind of network that Windows-based companies and organizations of any size typically have.
When you click I Own It and then click the Next button, the installer leads you through setting up Windows for individual use, not connecting to a domain-based network. This is the type of setup you’ll normally want for home use.
Working on the Make It Yours Screen
The Make It Yours screen encourages you to sign in to Windows using a Microsoft account. Normally you’ll want to do this so that you can sync your apps and data across the Internet.
![]() Note
Note
A Microsoft account is an online account that enables you to sign in to Windows and Microsoft products and services using the same login information.
If you have a Microsoft account, enter your email address and password and then click the Sign In button.
If you don’t have an account, click the Create One! link and follow the prompts to create an account.
If you have a Microsoft account but you’ve forgotten the password, click the Forgot My Password link and follow the prompts to get a new temporary password that enables you to reset your password.
![]() Note
Note
The alternative to signing in with a Microsoft account is to use a local account—an account that exists only on your computer. To use a local account, click the Skip This Step link on the Make It Yours screen and go to the section “Working on the Create an Account for This PC Screen,” later in this chapter.
When you click the Sign In button, the installer displays the Please Wait screen and then the Just a Moment screen while it configures Windows. If Windows gets stuck at the Just a Moment screen, restart your computer. Normally, after booting it will reach the Who Owns This PC? screen, so you have only a couple of choices to make before you’re back where you were.
Setting a PIN and Meeting Cortana
Next, the Set Up a PIN screen appears, prompting you to set a PIN that you can use instead of a password for signing in. If you want to set up a PIN, click the Set a PIN button to display the Set Up a PIN dialog box, type the PIN in the New PIN box and the Confirm PIN box, and click the OK button.
After this, the Meet Cortana screen appears (see Figure 1.10), explaining the Cortana personal assistant and what information Microsoft collects in order to make Cortana work effectively. Click the Next button if you want to use Cortana; if not, click the small Not Now button in the lower-left corner of the screen.

FIGURE 1.10 On the Meet Cortana screen, read the information that Microsoft will collect about you. Click the Continue button if you want to use Cortana, or click the Not Now button if you want to disable Cortana for now.
From here, skip ahead to the section “Working in the Networks Pane.”
Working on the Create an Account for This PC Screen
If you don’t sign in to a Microsoft account on the Make It Yours screen, Windows displays the Create an Account for This PC Screen (see Figure 1.11), on which you create a local account for yourself. Follow these steps:
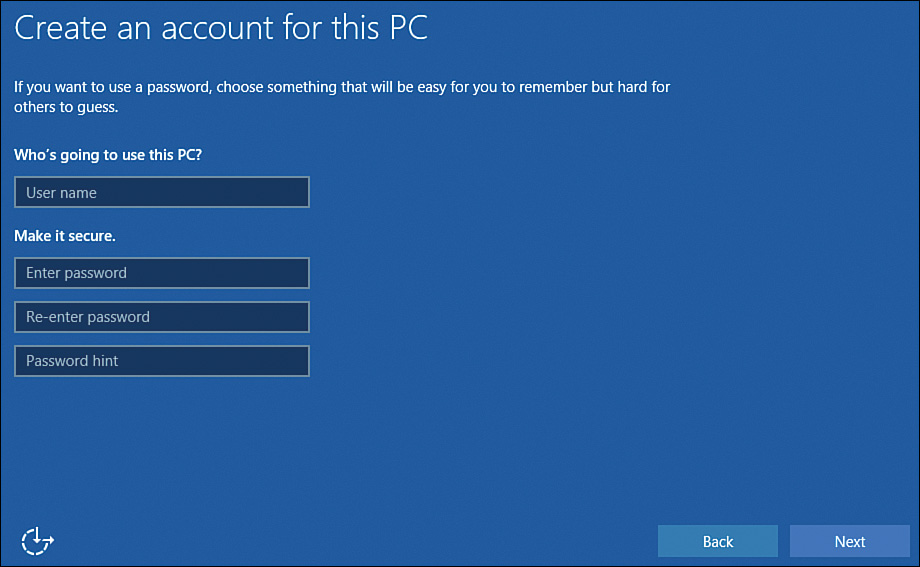
FIGURE 1.11 On the Create an Account for This PC screen, enter the user name you want and a strong password to protect your account. You can also enter a password hint.
1. Type the user name you want in the User Name box.
2. Type a strong password (see the tip) in the Enter Password box and the Re-enter Password box.
To create a strong password, include upper- and lowercase letters, numbers, and symbols (such as $, %, or &) in the password. Make the password at least 8 characters long. More than 12 characters gives you far greater protection because it is much harder to crack. Avoid any real word in any language.
![]() Note
Note
The Create an Account for This PC screen encourages you to set a password for the account—but it doesn’t make you set a password. However, to protect your account and your personal information, it’s vital that you do set a password and that you make it a strong password.
3. Type a password hint in the Password Hint box. See the sidebar “What Sort of Password Hint Should You Create?” for advice.
Click Next when you are ready to proceed. The installer then installs your apps, displaying messages along the way. Your desktop then appears, and the Networks pane opens. Continue with the next section.
Working in the Networks Pane
In the Networks pane (see Figure 1.12), you can click Yes or No to choose whether to let your computer find PCs, devices, and content on the network.
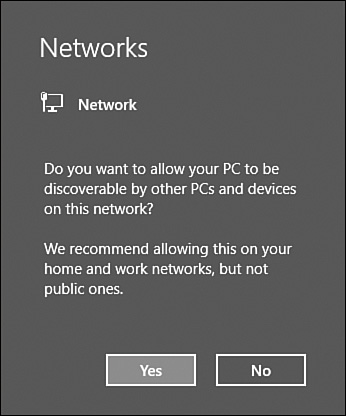
FIGURE 1.12 In the Networks pane, choose whether to turn on Network Discovery for the network.
Clicking Yes in the Networks pane turns on a feature called Network Discovery that enables your computer to connect automatically to printers, TVs, and other devices on the network. Normally, it’s a good idea to turn on Network Discovery for home networks and for work networks, because it makes connecting to other devices easier. You can control Network Discovery separately for each network to which your computer connects.
![]() Caution
Caution
If you connect your computer to a public network, such as a Wi-Fi hotspot in a coffee shop, you must make sure that Network Discovery is off for that network. Otherwise, your computer is exposed to all the other computers and devices on that network, which compromises your security.
You can easily turn Network Discovery on or off later if necessary. You can also fine-tune your Network Discovery settings, allowing some types of connections but preventing others. See Chapter 3, “Connecting to Networks and the Internet,” for details.
Signing In and Out of Windows
To use Windows, you sign in using your Microsoft account or your local account. On the login screen, click the appropriate account, type your password in the Password box, and then press Enter or click the arrow button.
To sign out, click Start, click your account name in the upper-left corner of the Start menu, and then click Sign Out on the drop-down menu (see Figure 1.13).
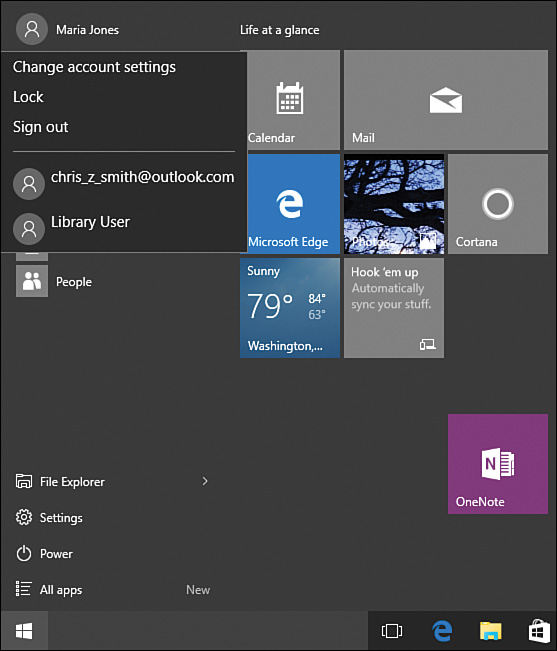
FIGURE 1.13 You can sign out by opening the Start menu, clicking your account name, and then clicking Sign Out.
Locking Windows
When you want to stop using your computer but leave your apps running so that you can resume your work or play immediately when you return, lock Windows instead of signing out. To lock Windows, click Start, click your account name at the upper-left corner of the Start menu, and then click Lock.
When you return to your computer, announce your presence by pressing a key, moving the mouse, or tapping the touchscreen. Then type your password or PIN at the prompt to unlock Windows. (If you set up Windows without a password, Windows unlocks without you—or anyone else—having to provide any authentication.)
Restarting Windows
Windows is designed to keep running for days or weeks on end, but you will need to restart it now and then. Restarting Windows can frequently resolve minor software problems that have occurred, so you may find it helpful to restart Windows every few days. Choose any of these methods to restart Windows:
![]() Click Start, click Power, and then click Restart.
Click Start, click Power, and then click Restart.
![]() Right-click or long-press Start, click Shut Down or Sign Out, and then click Restart.
Right-click or long-press Start, click Shut Down or Sign Out, and then click Restart.
![]() On the login screen, click Shut Down (the power icon) and then click Restart on the drop-down menu.
On the login screen, click Shut Down (the power icon) and then click Restart on the drop-down menu.
Putting Your Computer to Sleep or into Hibernation
When you’re not using your computer, you can put it to sleep to save power. To do so, perform one of these moves:
![]() Click Start, click Power, and then click Sleep.
Click Start, click Power, and then click Sleep.
![]() Right-click or long-press Start, click Shut Down or Sign Out, and then click Sleep.
Right-click or long-press Start, click Shut Down or Sign Out, and then click Sleep.
![]() On the login screen, click Shut Down (the power icon) and then click Sleep on the drop-down menu.
On the login screen, click Shut Down (the power icon) and then click Sleep on the drop-down menu.
If your computer has a dedicated Sleep button, you can press the button to put your computer to sleep. You may also be able to put a laptop to sleep by closing the lid.
You can wake the computer more or less instantly from sleep by pressing a key on the keyboard, clicking your pointing device, or tapping the touchscreen.
![]() Tip
Tip
You may also be able to wake your computer from sleep or hibernation by pressing the power button. If the computer is a laptop, opening the lid normally wakes it.
The alternative to sleep is hibernation, which is a deeper form of sleep designed for knocking out the computer for longer periods. You can make your computer hibernate in these ways:
![]() Click Start, click Power, and then click Hibernate.
Click Start, click Power, and then click Hibernate.
![]() Right-click or long-press Start, click Shut Down or Sign Out, and then click Hibernate.
Right-click or long-press Start, click Shut Down or Sign Out, and then click Hibernate.
![]() On the login screen, click Shut Down (the power icon) and then click Hibernate on the drop-down menu.
On the login screen, click Shut Down (the power icon) and then click Hibernate on the drop-down menu.
To wake the computer from hibernation, press a key on the keyboard, click the mouse or other pointing device, or tap the touchscreen.
Configuring and Using Cortana
Windows 10 includes the search assistant called Cortana, which enables you to search either using your voice or by typing terms into the Search box on the taskbar and Start menu.
As you saw earlier in this chapter, you can choose during setup whether to enable or disable Cortana. Windows enables Cortana by default, so if you accepted the default settings, or if someone else set up Windows for you, chances are that Cortana is enabled.
You can enable or disable Cortana as needed after setup. You can also configure Cortana to make it work your way.
Configuring Cortana
If you haven’t yet configured Cortana, do so by following these steps:
1. Click the Search box on the taskbar to display the Cortana panel.
2. In the Great! Now What Would You Like Me to Call You? pane (shown on the left in Figure 1.14), type the name or nickname you want Cortana to use, and then click the Next button. Cortana then prompts you for permission to use your location.
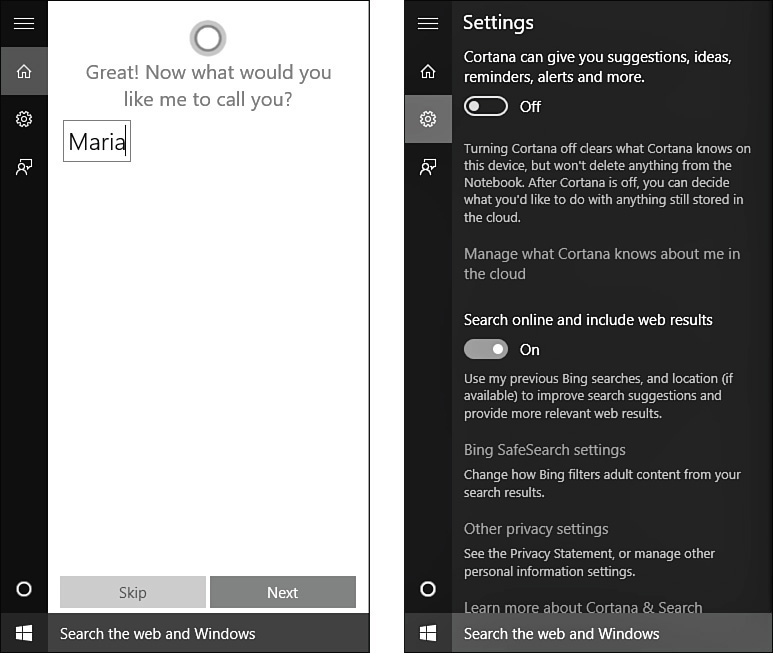
FIGURE 1.14 First, tell Cortana what to call you (left). Then, in the Settings pane, choose which Cortana features you want to use when searching.
3. Click the Settings button at the bottom of the pane to display the Settings pane (see the right screen in Figure 1.14).
![]() Note
Note
You can display the Settings pane at any time subsequently by clicking the Settings icon (the gear icon) in the left column of the Cortana panel.
4. Set the Cortana Can Give You Suggestions, Ideas, Reminders, Alerts and More switch to On or Off, as needed.
Like other search assistants, Cortana becomes more useful the more it knows about you. If you enable Cortana’s features for giving you suggestions, ideas, reminders, and alerts, Cortana needs to know about your schedule and your actions. So when configuring Cortana, you must balance your desire for convenience against the amount of information you’re willing to give to Microsoft (and maybe Microsoft’s business partners).
5. Set the Search Online and Include Web Results switch to On or Off, as needed. By setting this switch to Off, you can restrict Cortana to searching only on your computer, which is sometimes useful. But if you want to be able to search both your computer and the Web, make sure this switch is set to On.
When you set the Search Online and Include Web Results switch to On, Cortana uses your previous searches on the Bing search engine, plus your location if it is available, to try to deliver more useful search results. These can be helpful and can save you time—but again, make sure you’re happy with the information you’re giving Microsoft in exchange.
![]() Note
Note
You can click the Bing SafeSearch Settings link in the Settings pane for Cortana to display the Search settings for your account on the Bing search engine. Here, you can choose a SafeSearch setting to specify whether you want to filter out adult text, images, and videos; specify your location (your city and ZIP code) and your region (such as your country); choose whether to see search suggestions as you type; and choose whether to play videos and panoramas automatically.
6. When you finish choosing settings for Cortana, click outside the pane if you want to close it. If you want to search, click the Search box and type your search terms.
Searching with Cortana
After configuring Cortana, you can use Cortana to search at any time. Simply click in the Search box and start typing your search terms. Cortana displays suggestions as you type (see Figure 1.15). You can browse the different categories of results all together, or click either the My Stuff button to display only search results on your computer or the Web button to display search results on the Web. Click the result you want to view.
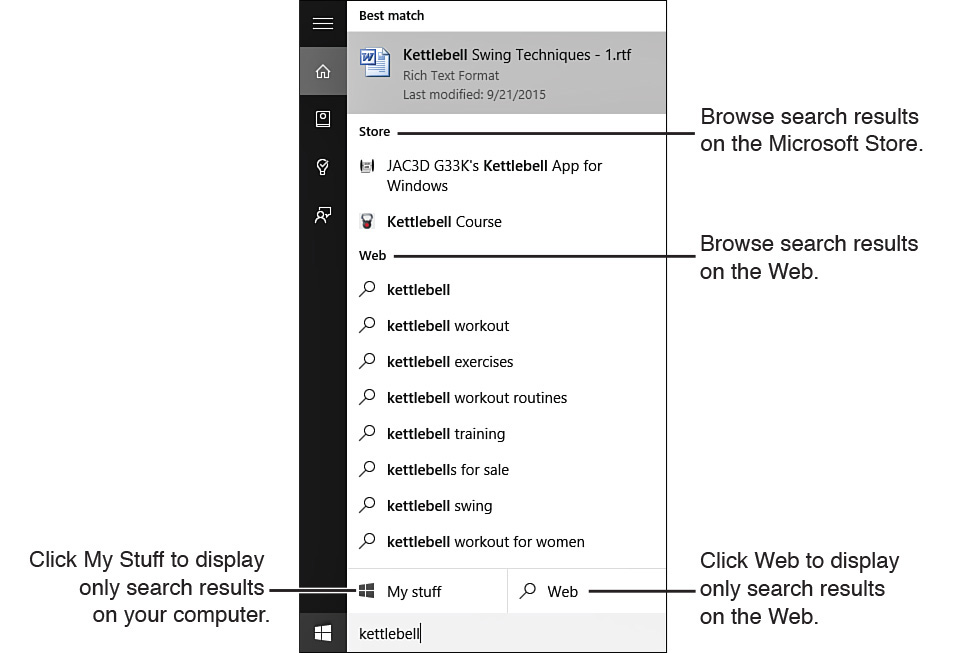
FIGURE 1.15 Cortana delivers search results on your computer, on the Microsoft Store, and on the Web.
Shutting Down Your Computer
When you don’t need to use your computer for a while, you can shut it down completely. You can shut down in any of these ways:
![]() Click Start, click Power, and then click Shut Down.
Click Start, click Power, and then click Shut Down.
![]() Right-click or long-press Start, click Shut Down or Sign Out, and then click Shut Down.
Right-click or long-press Start, click Shut Down or Sign Out, and then click Shut Down.
![]() On the login screen, click Shut Down (the power icon) and then click Shut Down on the drop-down menu.
On the login screen, click Shut Down (the power icon) and then click Shut Down on the drop-down menu.
When you need to restart your computer, press the power button.