9. Installing, Running, and Managing Apps
In This Chapter
![]() Getting apps from the Windows Store and other sources
Getting apps from the Windows Store and other sources
![]() Managing your apps and removing unwanted apps
Managing your apps and removing unwanted apps
![]() Choosing your default apps for opening files
Choosing your default apps for opening files
To get almost anything done in Windows, you must use an app. Windows comes with enough apps to cover basic needs, from editing text files and viewing photos to playing music, but you will probably want to add other apps to create and manipulate the files with which you work and play.
This chapter covers how to install apps, manage them, and remove apps you don’t need. You also learn how to choose your default apps for opening files.
Getting the Apps You Need
Windows comes with various apps built in, and whoever sold or provided your computer may have added others. But most likely you will need to add apps, from either the Windows Store or other sources, such as the apps you already have on disc or as distribution files.
Getting Apps from the Store
Windows 10 comes set to use the Windows Store as its primary source of apps. The Windows Store is a Microsoft service that offers both free apps and “paid apps”—apps for which you must pay—along with games, music, and multimedia files.
![]() Note
Note
Getting apps from the Store has a couple of benefits. First, although it’s not yet comprehensive, the Store is a good place to find a wide selection of apps, because Microsoft is encouraging developers to sell their apps through the Store. Second, the apps in the Store are checked for quality and are guaranteed not to contain malicious code.
![]() Note
Note
You can install apps you get from the Windows Store on multiple devices. As of this writing, you can install an app on up to 10 devices.
Launching the Store App and Browsing the Apps
To see which apps are available in the Store, launch the Store app from the taskbar or from the Start menu. The Start menu usually contains a tile for the Store app, but if you don’t find one, you can launch the app from the All Apps list.
At first, the Store window usually displays the Store home screen, which includes some apps, some games, and other content. Click Apps on the toolbar to display the Apps screen, which lets you focus on apps (see Figure 9.1).

FIGURE 9.1 Click Apps on the toolbar in the Store window to browse or search apps on the Windows Store.
From here, you can locate apps in any of these ways:
![]() Browse by lists. The Apps screen contains various lists, such as Apps We Picked for You, Top Free Apps, Top Paid Apps, and Best-Rated Apps. You can click the Show All link on any of these lists to display the whole list.
Browse by lists. The Apps screen contains various lists, such as Apps We Picked for You, Top Free Apps, Top Paid Apps, and Best-Rated Apps. You can click the Show All link on any of these lists to display the whole list.
![]() Browse by App Top Charts, App Categories, or Featured Apps. Click App Top Charts, App Categories, or Featured Apps near the top of the screen.
Browse by App Top Charts, App Categories, or Featured Apps. Click App Top Charts, App Categories, or Featured Apps near the top of the screen.
![]() Search for apps. Click in the Search box in the upper-right corner of the screen and type your search terms.
Search for apps. Click in the Search box in the upper-right corner of the screen and type your search terms.
After you’ve found an app you want to learn more about, click it to display its screen (see Figure 9.2). You can then read the app’s description; if necessary, click the More link near the end of the description to expand the description. Beyond the description, you can look at screenshots of the app, view ratings and read reviews, and see a full list of the app’s features.
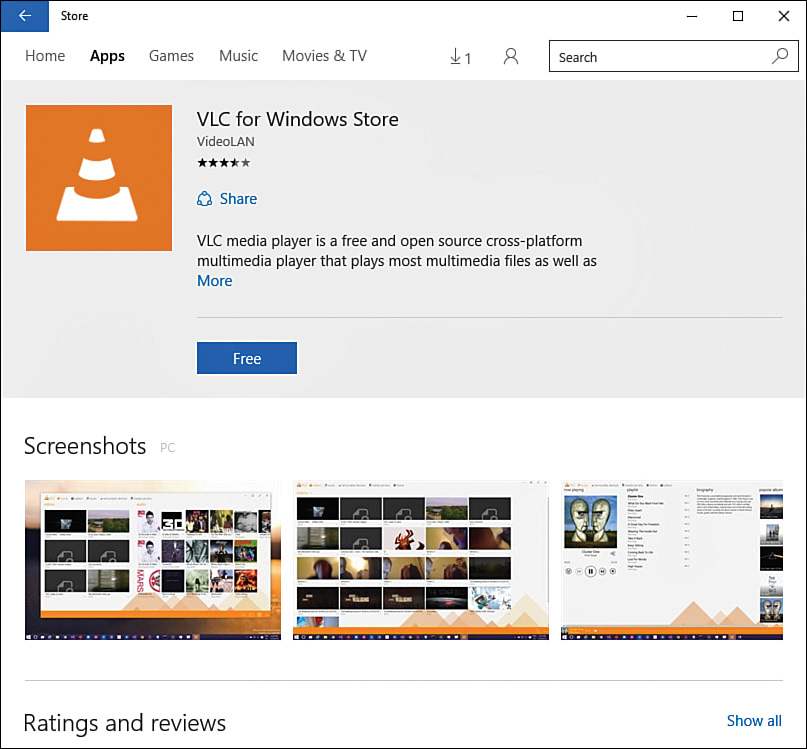
FIGURE 9.2 On the app’s screen in the Store app, read the description, browse the screenshots, and dig into the ratings and reviews to learn more about the app.
Installing an App from the Store
If you decide to get the app, click the Free button or the price button. If it’s a free app, the Store app starts downloading it. If it’s a paid app, the Store app may prompt you to enter your PIN or password. The Store app then displays the Buy App dialog box, in which you choose your means of payment.
![]() Note
Note
You can pay for apps either by using a means of payment you’ve set up in your Microsoft account, such as the credit card that suffers for your Xbox habit, or by redeeming a code. To redeem a code, click the Account icon on the toolbar and then click Redeem a Code on the drop-down menu. The Store app causes your default browser, such as Microsoft Edge, to display the Redeem Your Code or Gift Card screen in your Microsoft account. You can then enter the number of the code or gift card and click Redeem to redeem it.
The Store app then downloads the app, showing a progress readout with a Pause button (the standard Pause icon, two vertical lines) and a Stop button (the × button).
![]() Tip
Tip
While the Store app is downloading the app, you can click the Pause button to pause the download. You might need to do this if the app is large and the download is taking more time than you have. You can then restart the download by clicking the Restart button (the clockwise curling arrow) that replaces the Pause button.
When the download finishes, the Store app installs the app. You can then open the app in either of these ways:
![]() Click the Open button on the app’s page in the Store app. This is handy if you still have the app’s page displayed.
Click the Open button on the app’s page in the Store app. This is handy if you still have the app’s page displayed.
![]() Click the app’s icon on the Start menu. The app appears on the Recently Added list. If you’ve removed the Recently Added list from the Start menu, click All Apps and then navigate to the app’s icon.
Click the app’s icon on the Start menu. The app appears on the Recently Added list. If you’ve removed the Recently Added list from the Start menu, click All Apps and then navigate to the app’s icon.
When the app opens, you can perform any setup needed. For example, many apps have configurable options you can set, whereas other apps require you to set up an online account for accessing or storing data.
Using the My Library Feature
The My Library screen in the Store app gives you quick access to the apps, games, music, and other items you’ve acquired or purchased from the Windows Store. To access the My Library feature, click the Account icon on the toolbar and then click My Library.
The download arrows on the right side of the buttons on the My Library screen (see Figure 9.3) indicate the apps you haven’t yet installed on this computer. You can click the download arrow to start downloading the app, or click elsewhere on the button to display the app’s screen, where you can refresh your memory of the app and decide whether to install it.
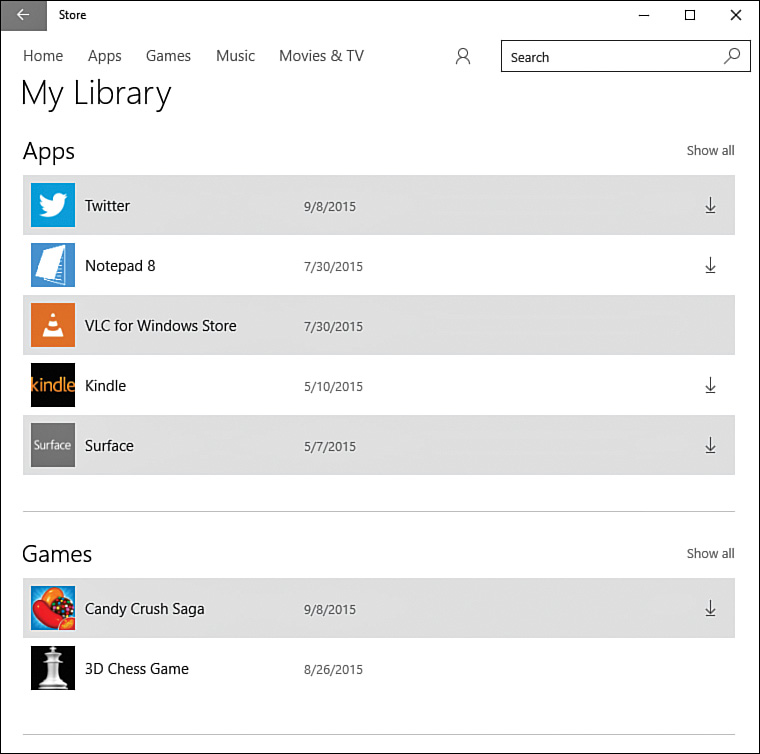
FIGURE 9.3 On the My Library screen in the Store app, click the download arrow on the right of an app’s button to start installing that app.
Keeping Your Windows Store Apps Updated
To get the best performance out of your apps, and to minimize security problems, it’s a good idea to install updates to the apps soon after they become available. The Store app checks for updates periodically, but you can also check for updates manually whenever you want.
![]() Note
Note
The Store app may be set to install updates automatically.
![]() Caution
Caution
App updates sometimes cause problems on some computers, so unless an app has a problem already that you urgently need to solve, it’s usually a good idea to wait a few days after an app update becomes available and let other people try it first. If all seems well, you can update the app; if there’s an explosion of complaints, you’ll likely want to wait until the app’s developer fixes the problem before you update the app on your computer.
To see which updates are available, click the Downloads icon to the left of the Account icon on the toolbar in the Store app. This icon appears when the Store app has identified an available update or download. If the Downloads icon doesn’t appear, click the Account icon to open the drop-down menu, and then click Downloads. Either way, the Downloads and Installs screen appears, and you can click the Check for Updates button to force the Store app to check for new updates.
After you can see what’s available, you can click an item on the Downloads and Installs screen to download and install it.
Choosing Settings for the Store App
You can configure three settings to control how the Store app behaves. To reach the settings, click the Account icon on the toolbar in the Store app and then click Settings on the drop-down menu. You can then set these settings:
![]() Update Apps Automatically. Set this switch to On to allow the Store app to download and install updates automatically. Set this switch to Off if you want to handle updates manually—for example, to protect yourself against the occasional poorly programmed update.
Update Apps Automatically. Set this switch to On to allow the Store app to download and install updates automatically. Set this switch to Off if you want to handle updates manually—for example, to protect yourself against the occasional poorly programmed update.
![]() Show Products on Tile. Set this switch to On if you want the Store tile on the Start menu to show products.
Show Products on Tile. Set this switch to On if you want the Store tile on the Start menu to show products.
![]() Only Update the Tile When I’m on Wi-Fi. If you set the Show Products on Tile switch to On, set this switch to On to allow the Store app to update the information on the tile only when your computer is using a Wi-Fi connection rather than a cellular connection.
Only Update the Tile When I’m on Wi-Fi. If you set the Show Products on Tile switch to On, set this switch to On to allow the Store app to update the information on the tile only when your computer is using a Wi-Fi connection rather than a cellular connection.
Stay on the Settings screen for the next section.
Removing a Device from Your Windows Store Account
As mentioned earlier, you can install apps you download from the Windows Store on multiple devices—10 devices as of this writing.
If you run into your device limit, you can remove a device from your Windows Store account. Removing the device prevents any apps you’ve installed on it from the Windows Store from working anymore.
In the Account section of the Settings screen, click Manage Your Devices to display the Devices with Apps and Games You Downloaded from the Store screen (see Figure 9.4) in your Microsoft account in your default browser, such as Microsoft Edge.
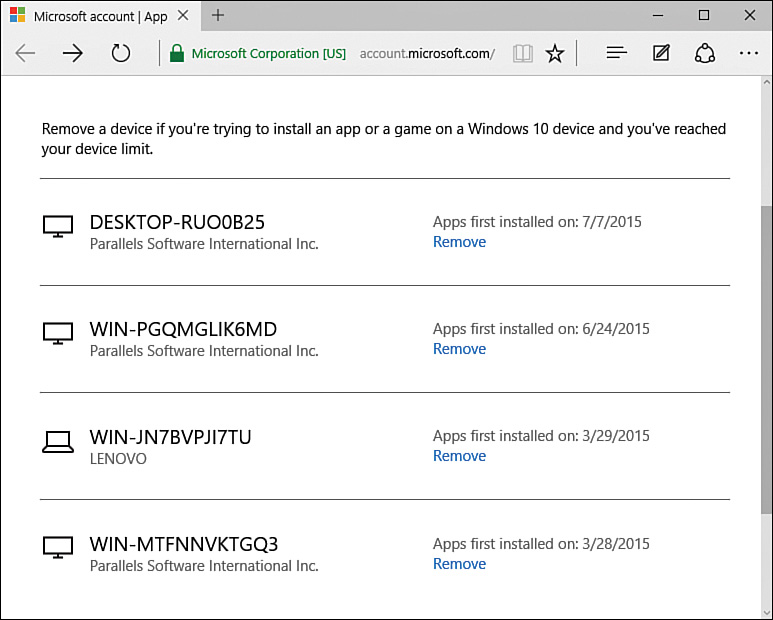
FIGURE 9.4 In your Microsoft account, click the Remove button for the device you want to remove from your Windows Store account.
The browser displays the Remove screen for the device, such as the Remove Your Laptop screen shown in Figure 9.5. Check the I’m Ready to Remove This Device check box, and then click the Remove button.
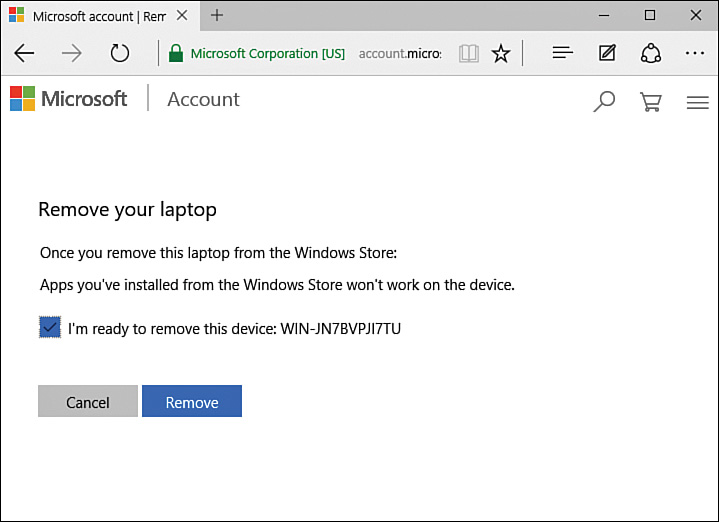
FIGURE 9.5 On the Remove screen, check the I’m Ready to Remove This Device check box, and then click the Remove button.
Now that you’ve removed this device, you can add another device to your Windows Store account by logging in to Windows on the device.
Getting and Installing Apps from Other Sources
Although Microsoft has set up Windows to use the Windows Store as its primary source of apps, you can freely install apps from other sources as well. For example, you can buy apps from online stores or brick-and-mortar stores and then install them, either from physical discs or from distribution files. And you can install any apps that you already have on discs or in files.
Starting an Installation from an Optical Disc
To install an app from an optical disc, such as a CD or DVD, insert the disc in an optical drive connected to your computer.
Windows usually assesses the contents of the disc and displays a pop-up balloon above the notification area prompting you to tap to choose what happens with the drive. Tap the balloon to display the Choose What to Do with This Disc dialog box (see Figure 9.6).

FIGURE 9.6 In the Choose What to Do with This Disc dialog box, click the Run button to run the installer or click Open Folder to View Files if you want to examine the disc’s contents.
If you want to go ahead and run the installer, click the Run item, which usually shows an app name such as SETUP.EXE or INSTALL.EXE. Otherwise, click the Open Folder to View Files item to open a File Explorer window showing the disc’s contents so that you can decide whether to install the app.
Starting an Installation from a Distribution File
If you have downloaded an app from a source other than the Windows Store, you’ll have a distribution file containing the app. The distribution file will normally be either an executable file or a zip file:
![]() Executable file. Double-click the file to start the installation.
Executable file. Double-click the file to start the installation.
![]() Zip file. Double-click the file to display its contents in a File Explorer window, and then choose Extract, Extract All to launch the Extract Compressed (Zipped) Folders wizard (see Figure 9.7). If you want to use a different destination folder than that shown in the Files Will Be Extracted to This Folder box, click the Browse button and choose the folder. Check the Show Extracted Files When Complete check box, and then click the Extract button. In the File Explorer window that opens, double-click the executable file, such as
Zip file. Double-click the file to display its contents in a File Explorer window, and then choose Extract, Extract All to launch the Extract Compressed (Zipped) Folders wizard (see Figure 9.7). If you want to use a different destination folder than that shown in the Files Will Be Extracted to This Folder box, click the Browse button and choose the folder. Check the Show Extracted Files When Complete check box, and then click the Extract button. In the File Explorer window that opens, double-click the executable file, such as SETUP.EXE, to launch the installation.

FIGURE 9.7 On the Select a Destination and Extract Files screen of the Extract Compressed (Zipped) Folders Wizard, choose the destination folder and click the Extract button.
Depending on the app you’re installing, Windows may display a User Account Control dialog box (see Figure 9.8) to confirm that you want to install the app (as opposed to malevolent software having launched the installation). Verify the program name and the publisher, and then click the Yes button to proceed.
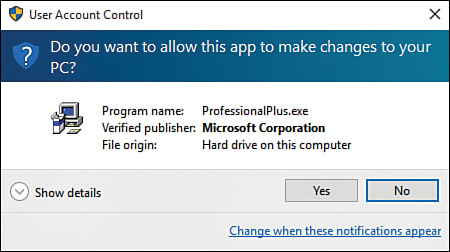
FIGURE 9.8 If Windows displays the User Account Control dialog box, make sure the program name and publisher are correct before clicking the Yes button.
Choosing Settings for the App You’re Installing
After launch, the installer usually prompts you to accept the end-user license agreement for the app. After you have done this, the app may prompt you to enter your product key or other identifying information.
After you’ve negotiated the formalities, the installer may display settings you can configure for the app, as in the example shown in Figure 9.9. Choose settings to suit your needs, and then click the Install button or other button to complete the installation.
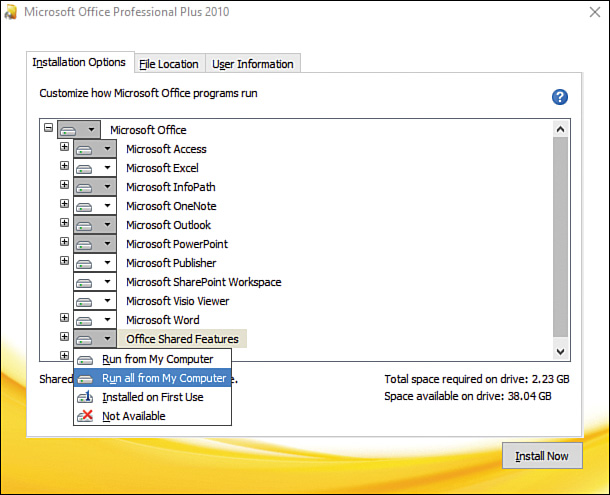
FIGURE 9.9 If the installer displays an options screen, choose the settings that will suit you best.
![]() Caution
Caution
Many installers automatically create a shortcut on the desktop for the app. Unless you like having your desktop full of app shortcuts and find them a more convenient way to launch apps than the Start menu or the taskbar, uncheck the check box for creating a shortcut during installation.
After the installation finishes, you can launch the app from the Start menu.
Making Older Apps Run with Compatibility Mode
Any new apps you buy should be optimized for Windows 10, and any recent apps for Windows 7, Windows 8, or Windows 8.1. But apps designed for older versions of Windows may not work unless you choose suitable settings in Compatibility mode.
![]() Note
Note
You can use Compatibility mode to install an app if the installer crashes when run normally.
If you know that the app requires Compatibility mode, you can set it to run with Compatibility mode from the start. But more likely you’ll try running the app normally, see a crash message such as that shown in Figure 9.10, and then apply Compatibility mode to get the app working.

FIGURE 9.10 If an app crashes when you run it normally, try applying Compatibility mode.
![]() Note
Note
Windows may prompt you to use Compatibility mode for an app. If not, try Compatibility mode yourself anyway. Search online using the app’s name and “Compatibility mode” to find recommended settings.
Here’s how to choose settings in Compatibility mode:
1. Open a File Explorer window to the folder that contains the app file. The easiest way to do this is to click Start, right-click or long-press the app in the Recently Added list or the Apps list, and then click Open File Location on the shortcut menu.
2. In the File Explorer window, right-click or long-press the app file to display the shortcut menu.
3. Click Properties to display the Properties dialog box.
4. Click the Compatibility tab to display its controls. Figure 9.11 shows the Compatibility tab of the Properties dialog box with settings chosen.
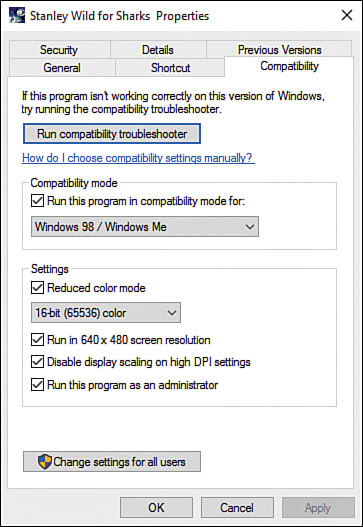
FIGURE 9.11 You can configure Compatibility mode for an app on the Compatibility tab of the Properties dialog box for the app’s file.
5. In the Compatibility Mode box, check the Run This Program in Compatibility Mode For check box, and then choose the appropriate version of Windows in the drop-down menu.
![]() Tip
Tip
To determine which version of Windows to use for Compatibility mode, look at the app’s packaging (if you still have it) or on the Web. If the app is designed for several versions of Windows, try using the latest version for Compatibility mode. For example, if an app is designed for Windows 98, Windows Me, and Windows XP, try choosing Windows XP in the Compatibility Mode drop-down menu.
![]() Note
Note
Checking the Run This Program in Compatibility Mode For check box and choosing the right operating system version in the drop-down menu may be all you need to do to get the app running. For other apps, you may need to choose settings in the Settings box. You can click Apply at any point to apply the settings you’ve chosen so far without closing the Properties dialog box. You can then try starting the app. If it works correctly, you’re all set; if it doesn’t, go back to the Properties dialog box and try other settings.
6. If necessary, go to the Settings box and check the Reduced Color Mode check box. Then open the drop-down menu and select the color mode: 8-Bit (256) Color, or 16-Bit (65536) Color.
7. Also if necessary, check the Run in 640 × 480 Screen Resolution check box. You may need this for some older games designed to run on obsolete hardware.
8. Also if necessary, check the Disable Display Scaling on High DPI Settings check box. Normally, you’d want to check this check box if the app uses a large-scale font that appears distorted in Windows 10.
9. Also if necessary, check the Run This Program as an Administrator check box.
![]() Caution
Caution
Check the Run This Program as an Administrator check box only if you’ve found a specific and convincing recommendation to do so. This setting may be needed for apps designed for Windows 95, Windows 98, or Windows Me, which used a different programming model than apps designed for Windows NT and the versions of Windows based on it (Windows 2000, Windows XP, Windows Vista, Windows 7, Windows 8 and 8.1, and Windows 10).
Running a program as an administrator enables it to take a wider range of actions on your computer than running the program normally does. It may enable the app to destabilize Windows or to access files you wouldn’t want it to access.
![]() Note
Note
You can click the Change Settings for All Users button to apply the compatibility settings for all users. If the app won’t run normally, and you have the administrator permissions required to make this change, doing so is normally a good idea.
10. When you finish making changes in the Properties dialog box, click OK to close it.
Managing the Apps You’re Running
You already know the essential moves for managing apps—how to launch an app, how to switch from one app to another, how to resize and position app windows, and how to close an app. In this section, we’ll examine how to use the Windows Task Manager tool to deal with apps that stop responding and to identify apps that are either hogging resources or otherwise causing performance problems on your computer.
Closing an App That Stops Responding
If an app stops responding to input from the keyboard, mouse, or touchscreen, you will need to close the app. Usually, you can do this by using Task Manager.
Opening Task Manager
Open Task Manager in one of these ways:
![]() Open Task Manager using the mouse or touchscreen. Right-click or long-press Start, and then click Task Manager on the shortcut menu.
Open Task Manager using the mouse or touchscreen. Right-click or long-press Start, and then click Task Manager on the shortcut menu.
![]() Tip
Tip
You can also right-click or long-press open space on the taskbar (if you can find any) or right-click or long-press in the notification area and then click Task Manager on the shortcut menu.
![]() Open Task Manager using the keyboard. Press Ctrl+Alt+Delete to display the screen that contains the Lock, Switch User, Sign Out, and Task Manager commands. Press the down arrow key to select Task Manager, and then press Enter. (Alternatively, click Task Manager.)
Open Task Manager using the keyboard. Press Ctrl+Alt+Delete to display the screen that contains the Lock, Switch User, Sign Out, and Task Manager commands. Press the down arrow key to select Task Manager, and then press Enter. (Alternatively, click Task Manager.)
Closing an App with Task Manager
Task Manager usually opens in its Fewer Details mode, which shows only the list of running apps (see Figure 9.12). If you know which app is causing problems, you can close it by clicking it in the list of apps and then clicking End Task. Windows doesn’t confirm closing the app.

FIGURE 9.12 In its Fewer Details mode, Task Manager shows only the list of running apps. You can close an app by clicking it and then clicking End Task.
Going Further with Other Actions in Task Manager
For more actions to take with the app, right-click or long-press its entry in the list. The shortcut menu (see Figure 9.13) offers the following commands:
![]() Switch To. Click this command to make the app active.
Switch To. Click this command to make the app active.
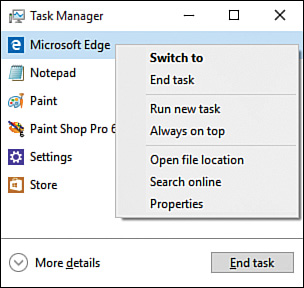
FIGURE 9.13 The shortcut menu for an app in Task Manager enables you to switch to a running app, close the app, or find out information about the app.
If you lose an app and can’t locate its window in the Windows interface, open Task Manager. You can then double-click the app (or right-click or long-press it and click Switch To on the shortcut menu) to make the app active.
![]() End Task. Click this command to close the app.
End Task. Click this command to close the app.
![]() Run New Task. Click this command to open the Create New Task dialog box (see Figure 9.14), which you can use to open an app. Type the app’s name in the Open box; or click the drop-down arrow and choose a recent app you’ve run this way; or click Browse, navigate to and select the app in the Browse dialog box that opens, and then click the Open button. You can check the Create This Task with Administrative Privileges check box if you need to run the task as an administrator rather than as a standard user. Click the OK button to run the app.
Run New Task. Click this command to open the Create New Task dialog box (see Figure 9.14), which you can use to open an app. Type the app’s name in the Open box; or click the drop-down arrow and choose a recent app you’ve run this way; or click Browse, navigate to and select the app in the Browse dialog box that opens, and then click the Open button. You can check the Create This Task with Administrative Privileges check box if you need to run the task as an administrator rather than as a standard user. Click the OK button to run the app.
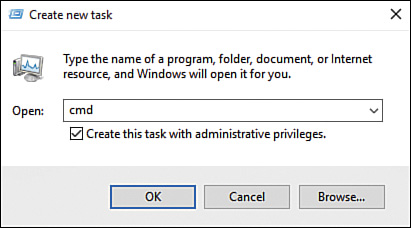
FIGURE 9.14 Use the Create New Task dialog box to open an app from Task Manager.
![]() Tip
Tip
Opening an app via the Create New Task dialog box can be helpful when the Windows interface isn’t responding correctly but you can access Task Manager. For example, you might open a command-prompt window so that you can give commands.
![]() Always on Top. Click this command to keep the Task Manager window on top of all the other windows. Keeping Task Manager on top can be useful when you’re troubleshooting problems.
Always on Top. Click this command to keep the Task Manager window on top of all the other windows. Keeping Task Manager on top can be useful when you’re troubleshooting problems.
![]() Open File Location. Click this command to open a File Explorer window showing the folder that contains the app or system process you’ve selected.
Open File Location. Click this command to open a File Explorer window showing the folder that contains the app or system process you’ve selected.
![]() Search Online. Click this command to search online for the name of the app or system process you’ve selected. You might want to search to find out what a particular app or process does.
Search Online. Click this command to search online for the name of the app or system process you’ve selected. You might want to search to find out what a particular app or process does.
![]() Properties. Click this command to display the Properties dialog box for the app or system process you’ve selected. The Properties dialog box enables you to view detailed information about the app or process. The Previous Versions tab contains details of any previous version of the app and gives you a way to restore a version if necessary.
Properties. Click this command to display the Properties dialog box for the app or system process you’ve selected. The Properties dialog box enables you to view detailed information about the app or process. The Previous Versions tab contains details of any previous version of the app and gives you a way to restore a version if necessary.
![]() Tip
Tip
Most of the information in the Properties dialog box isn’t usually directly useful for troubleshooting—but you may need to find out the file version of the app if it keeps crashing or otherwise causing grief. To find this out, look at the File version readout on the Details tab of the Properties dialog box.
Examining Apps and Processes in Task Manager
If you want to see the details of the apps you’re running, and see information about the background processes that Windows is running on your behalf, click More Details in the lower-left corner of the Task Manager window to switch Task Manager to More Details view. This view has seven tabs, as you can see in Figure 9.15, which shows the Processes tab, the tab that appears first:

FIGURE 9.15 Use the Processes tab in More Details view in Task Manager to see detailed information on the apps you’re running and the background processes Windows is running.
![]() Processes. This tab shows the apps you’re running (in the Apps list) and the background processes that Windows is running (in the Background Processes list). You can right-click or long-press a column heading to choose which columns of information you want to display.
Processes. This tab shows the apps you’re running (in the Apps list) and the background processes that Windows is running (in the Background Processes list). You can right-click or long-press a column heading to choose which columns of information you want to display.
![]() Tip
Tip
To sort the processes, click the column heading by which you want to sort. You can reverse the sort order by clicking the column heading again. For example, if you want to see which apps are using the most processor cycles, click the CPU column heading. Task Manager normally gives you a descending sort for this column, but if you get an ascending sort, click the column heading again to switch to a descending sort.
![]() Performance. This tab enables you to get an overview of your computer’s performance. We’ll look at the Performance tab in the section “Identifying Performance Problems in Task Manager,” later in this chapter.
Performance. This tab enables you to get an overview of your computer’s performance. We’ll look at the Performance tab in the section “Identifying Performance Problems in Task Manager,” later in this chapter.
![]() App History. This tab lets you see the demands that your apps have been putting on your computer. We’ll look at the App History tab in the section “Identifying Resource Hogs in Task Manager,” later in this chapter.
App History. This tab lets you see the demands that your apps have been putting on your computer. We’ll look at the App History tab in the section “Identifying Resource Hogs in Task Manager,” later in this chapter.
![]() Startup. This tab allows you to see which apps and tools your computer is set to launch at startup, together with their approximate startup impact (High, Medium, or Low).
Startup. This tab allows you to see which apps and tools your computer is set to launch at startup, together with their approximate startup impact (High, Medium, or Low).
![]() Note
Note
See the section “Reducing the Number of Startup Items” in Chapter 8 for coverage of the Startup tab.
![]() Users. This tab enables you to see which users are logged in to the computer, which apps they’re running and which processes Windows is running for them, and what impact they’re having on the system. See the section “Seeing Which Other Users Are Logged In and Which Apps They’re Running,” later in this chapter, for details.
Users. This tab enables you to see which users are logged in to the computer, which apps they’re running and which processes Windows is running for them, and what impact they’re having on the system. See the section “Seeing Which Other Users Are Logged In and Which Apps They’re Running,” later in this chapter, for details.
![]() Details. This tab lists the apps and processes running on the computer. See the section “Viewing the Details of the Apps and Services Running,” later in this chapter, for more information.
Details. This tab lists the apps and processes running on the computer. See the section “Viewing the Details of the Apps and Services Running,” later in this chapter, for more information.
![]() Services. This tab lists the services on the computer and shows their current status, such as Running or Stopped. See the section “Viewing the Current Status of Services,” later in this chapter, for details.
Services. This tab lists the services on the computer and shows their current status, such as Running or Stopped. See the section “Viewing the Current Status of Services,” later in this chapter, for details.
![]() Tip
Tip
In More Details view, you can choose Options, Always on Top to keep Task Manager on top of other windows.
Identifying Performance Problems in Task Manager
You can use the Performance tab of the More Details view in Task Manager to identify performance problems your computer is suffering. For example, you can see whether the CPU is running at full throttle, whether all the memory is in use, and how hard the disks and the network connection are working.
Click the Performance tab to display its contents (see Figure 9.16), go to the left pane, and then click the component for which you want to view performance information. For example, click CPU to see a graph of the CPU’s performance.
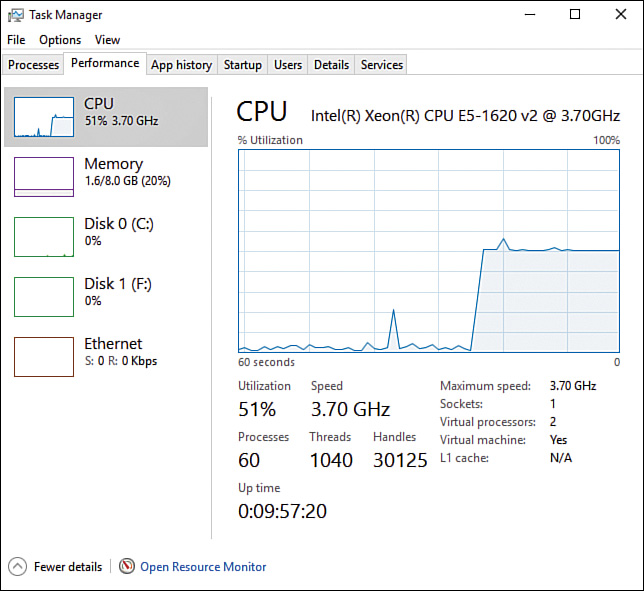
FIGURE 9.16 On the Performance tab in Task Manager, click the component in the left column whose performance you want to view in the right pane.
Identifying Resource Hogs in Task Manager
The More Details view in Task Manager also enables you to identify resource hogs. Click the App History tab to display its contents (see Figure 9.17), and then click the column heading of the column by which you want to sort. For example, click the CPU Time column heading to see which apps have used the most processor time.
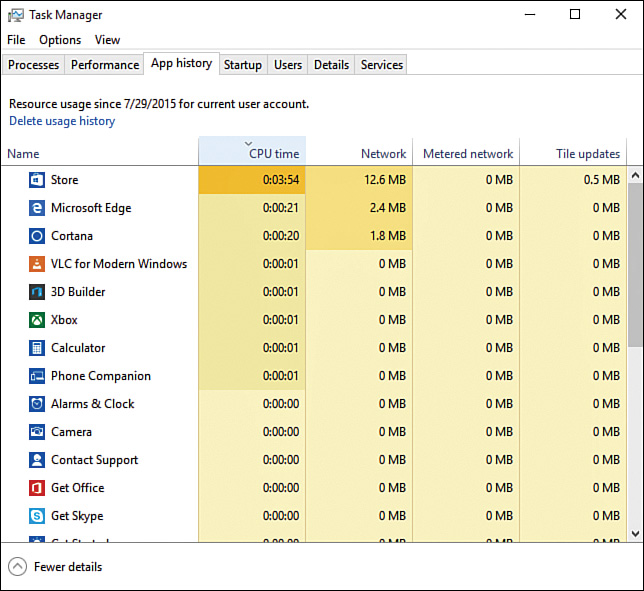
FIGURE 9.17 Use the App History tab of Task Manager to see which apps have been using the most CPU time, network bandwidth, or Internet data transfer.
![]() Tip
Tip
You can right-click or long-press a column heading on the App History tab to change the columns displayed. For example, you may want to display the Downloads column or the Uploads column to see which apps have been transferring the most data across your computer’s Internet connection.
Seeing Which Other Users Are Logged in and Which Apps They’re Running
The Users tab of the More Details view in Task Manager enables you to see which users are logged in to the computer. Double-click a user’s entry in the list to display the full list of apps and services the user is running (see Figure 9.18). If necessary, you can right-click or long-press an app or a service and click End Task on the shortcut menu to end it.

FIGURE 9.18 On the Users tab, you can see not only which users are logged in to your computer but also which processes they are running.
![]() Tip
Tip
You can disconnect another user’s session by right-clicking or long-pressing the user’s name on the Users tab and then clicking Disconnect in the shortcut menu. You must be an administrator to disconnect another user like this—and you should remember that the user may lose unsaved data when you disconnect him.
Viewing the Details of the Apps and Services Running
The Details tab of the More Details view in Task Manager (see Figure 9.19) enables you to see the status of each app or service running on the computer. You can right-click or long-press an item to display the shortcut menu, which includes the following commands:
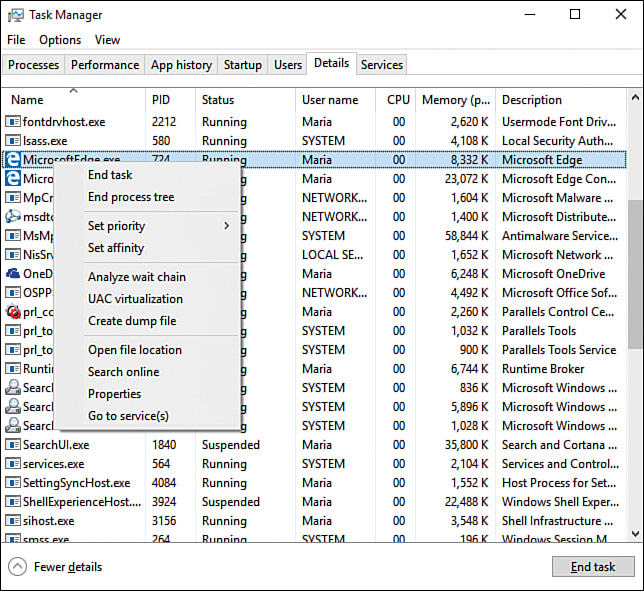
FIGURE 9.19 On the Details tab in Task Manager, you can view the status of each app or service. You can also end a task or a process tree if necessary.
![]() End Task. Click this item to end the current task.
End Task. Click this item to end the current task.
![]() End Process Tree. Click this item to end the selected process and any other processes it has created, either directly or indirectly.
End Process Tree. Click this item to end the selected process and any other processes it has created, either directly or indirectly.
![]() Set Priority. Click this item to display the Set Priority submenu, on which you can click the priority to assign to the process: Realtime, High, Above Normal, Normal, Below Normal, or Low.
Set Priority. Click this item to display the Set Priority submenu, on which you can click the priority to assign to the process: Realtime, High, Above Normal, Normal, Below Normal, or Low.
![]() Caution
Caution
Use the End Task command and End Process Tree command on the Details tab in Task Manager only when absolutely necessary. You should also avoid using the Set Priority command, because Windows automatically assigns suitable priority levels to all system processes.
![]() Go to Service(s). Click this item to display the corresponding service on the Services tab in Task Manager.
Go to Service(s). Click this item to display the corresponding service on the Services tab in Task Manager.
Viewing the Current Status of Services
The Services tab of the More Details view in Task Manager (see Figure 9.20) enables you to see the current status of all the services on your computer. From the Services tab, you can take the following actions:
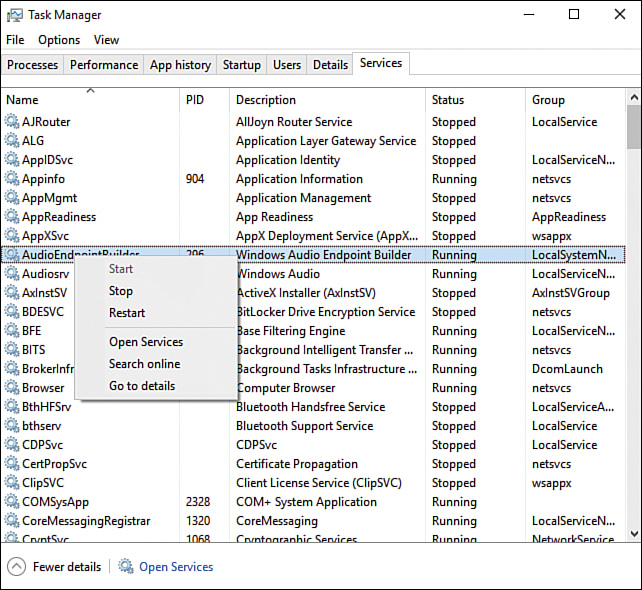
FIGURE 9.20 Use the Services tab in Task Manager to examine the status of a service, stop it, or restart it.
![]() Start, stop, or restart a service. Right-click or long-press the service, and then click the Start command, the Stop command, or the Restart command on the shortcut menu.
Start, stop, or restart a service. Right-click or long-press the service, and then click the Start command, the Stop command, or the Restart command on the shortcut menu.
![]() Go to the details for a running service. Right-click or long-press the service, and then click Go to Details to display the service’s entry on the Details pane in Task Manager.
Go to the details for a running service. Right-click or long-press the service, and then click Go to Details to display the service’s entry on the Details pane in Task Manager.
![]() Open the Services console. Either click Open Services at the bottom of the window or right-click or long-press a service and then click Open Services on the shortcut menu.
Open the Services console. Either click Open Services at the bottom of the window or right-click or long-press a service and then click Open Services on the shortcut menu.
![]() Look up a service online. Right-click or long-press the service and then click Search Online on the shortcut menu. You might want to look up a service online to find out what it does and establish whether you can safely stop it.
Look up a service online. Right-click or long-press the service and then click Search Online on the shortcut menu. You might want to look up a service online to find out what it does and establish whether you can safely stop it.
Removing Unwanted Apps
If your computer contains any apps that you neither need nor want, take a few minutes to get rid of them. Windows enables you to remove apps easily using the Apps & Features screen in the Settings app.
Here’s how to remove an app:
1. Choose Start, Settings to open the Settings window.
2. Click System to display the System screen.
3. Click Apps & Features in the left pane to display the Apps & Features pane (see Figure 9.21).
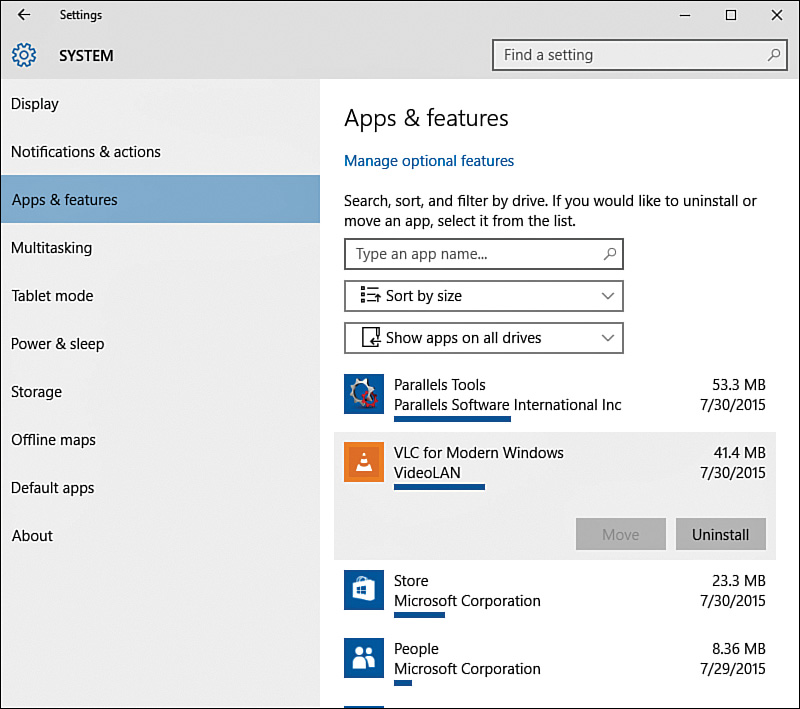
FIGURE 9.21 In the Apps & Features pane on the System screen in the Settings app, click the app you want to remove, and then click Uninstall.
4. Optionally, click the Sort drop-down menu, and then click the means of sorting you want to use: Sort by Size, Sort by Name, or Sort by Install Date.
5. Optionally, click the Show Apps drop-down menu, and then click Show Apps on All Drives, This PC, or a particular drive, as needed.
6. Either scroll to locate the app, or click in the Type an App Name box and start typing the app’s name to locate it quickly.
7. Click the app to select it. The Move button and the Uninstall button appear. Some apps display a Modify button instead of a Move button.
8. Click Uninstall. Windows displays a confirmation message box.
9. Click Uninstall in the message box as well. Windows then removes the app.
Setting the Default Apps You Need
To make sure that files open in the apps you want to use, you can set default apps. A default app is the app that opens automatically when you open a particular type of file—for example, by double-clicking the file in a File Explorer window.
Opening the Default Apps Pane in the Settings App
To set your default apps, first display the Default Apps pane in the Settings app like this:
1. Choose Start, Settings to open the Settings window.
2. Click System to display the System screen.
3. Click Default Apps in the left column to display the Default Apps pane (see Figure 9.22).

FIGURE 9.22 You can set default apps by clicking the buttons in the Choose Default Apps area in the Default Apps pane in the Settings app.
Choosing Your Default Apps
Now look at the Choose Default Apps list and see which you need to change. If any of the items shows the Choose a Default message, click the + button to display the Choose an App pop-up menu. This menu contains a button for any app on your computer that can perform this role and the Look for an App in the Store button, which you can click to launch the Store app and search for a suitable app.
Similarly, you can click one of the current default apps to see which alternatives are available on your system or in the Store.
Choosing Default Apps by File Types or by Protocols
The Settings app also enables you to choose default apps by file types or by protocols. As an example of the former, you could set a text editor or a word processing app as the default app for the .txt (Text Document) file type. As an example of the latter, you could set your favorite browser as the default app for the HTTP (URL:HyperText Transfer Protocol) protocol.
To choose default apps by file types, click Choose Default Apps by File Type toward the bottom of the Default Apps pane. On the Choose Default Apps by File Type screen that appears, scroll down to the file type for which you want to set the default app. You can then click the existing app or the Choose a Default button to display the Choose an App pop-up menu, and then click the app you want to use for that file type.
To choose default apps by protocols, click Choose Default Apps by Protocol toward the bottom of the Default Apps pane. On the Choose Default Apps by Protocol screen, navigate to the protocol for which you want to set the default app. You can then click the existing app or the Choose a Default button to display the Choose an App pop-up menu, and then click the app you want to use for that protocol.
Choosing Default Apps by Apps
Windows also enables you to choose default apps by selecting an app and then choosing the file types and protocols for which you want it to be the default. To do this, open the Set Default Programs screen in Control Panel in one of these ways:
![]() From the Settings app. Choose Set Defaults by App at the bottom of the Default Apps pane in the Settings app.
From the Settings app. Choose Set Defaults by App at the bottom of the Default Apps pane in the Settings app.
![]() From the Start menu. Right-click or long-press Start, click Control Panel, click Programs, and then click Set Your Default Programs.
From the Start menu. Right-click or long-press Start, click Control Panel, click Programs, and then click Set Your Default Programs.
On the Set Default Programs screen (see Figure 9.23), click the app in the Programs list on the left. You can then click Set This Program as Default to set the app as the default app for all the file types and protocols it can handle, or click Choose Defaults for This Program to choose just those file types and protocols you want.
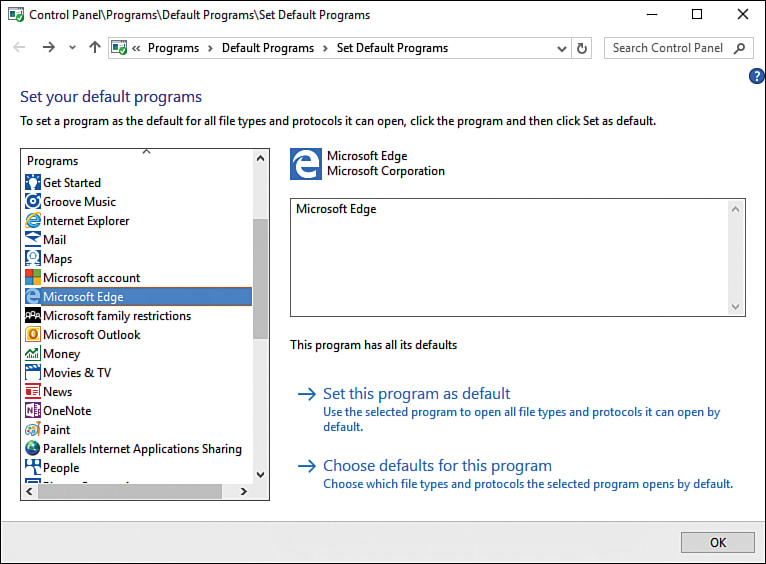
FIGURE 9.23 On the Set Default Programs screen in Control Panel, select the app you want to affect. You can then click Set This Program as Default to use the program for all its file types and protocols or click Choose Defaults for This Program to choose individual file types and protocols.
If you click Choose Defaults for This Program, Control Panel displays the Set Program Associations screen (see Figure 9.24). Check the appropriate check boxes in the Extensions list and in the Protocols list, and then click the Save button to save the changes.

FIGURE 9.24 On the Set Program Associations screen in Control Panel, check the boxes for the file extensions and protocols for which you want this app to be the default app, and then click the Save button.
Opening a File in a Non-Default App and Changing the Default App
Default apps are handy, but you’ll likely sometimes want to open a file in a different app than the default app. To do so, follow these steps:
1. Open a File Explorer window to the folder that contains the file you want to open. (If the file is on the desktop, you can work directly there—no need to open a File Explorer window.)
2. Right-click or long-press the file to display the shortcut menu.
3. Click Open With to display the Open With submenu (see Figure 9.25).
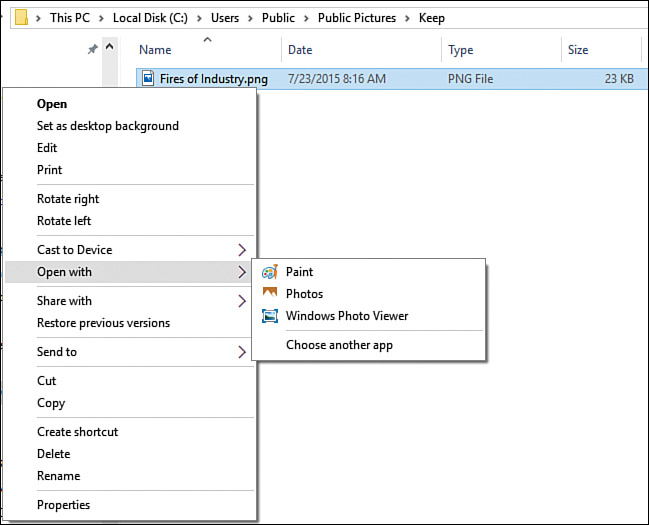
FIGURE 9.25 Use the Open With submenu on the shortcut menu to open a file in an app other than the default app.
4. If the app you want to use appears on the Open With submenu, click it.
If the Open With submenu doesn’t show the app you want to use, click Choose Another App to display the How Do You Want to Open This File? dialog box (see Figure 9.26). From here, you can take three actions:

FIGURE 9.26 In the How Do You Want to Open This File? dialog box, choose the app you want to use. You can check the Always Use This App to Open Files check box to change the default app.
![]() Click Look for an App in the Store. Click this button and then click OK to launch the Store app and search for apps that can handle the file extension of the file you clicked.
Click Look for an App in the Store. Click this button and then click OK to launch the Store app and search for apps that can handle the file extension of the file you clicked.
![]() Click More Apps to display other possible apps. Click this button to display any more apps that Windows thinks can handle this file type but that Windows isn’t displaying on the Open With submenu. If one of the apps is the one you want, click it and then click OK to open the file in it.
Click More Apps to display other possible apps. Click this button to display any more apps that Windows thinks can handle this file type but that Windows isn’t displaying on the Open With submenu. If one of the apps is the one you want, click it and then click OK to open the file in it.
![]() Caution
Caution
If you open the file in one of the apps listed under More Apps, Windows adds that app to the Open With submenu. This is fine if you’ve chosen the right app, but it can be a problem if you’ve picked the wrong app.
Some of the apps on the More Apps list may be wild guesses. For example, on the computer shown in these screens, Windows suggests Notepad and WordPad as apps that can open a PNG image file. Both Notepad and WordPad can open a PNG file—but each opens it as if it were text, displaying a lengthy document of gibberish characters.
If you choose the wrong app, you can remove it as explained in the nearby sidebar “Remove an App from the Open With Submenu.”
![]() Change the default app. If you want to change the default app for the file type, click the app in the list, check the Always Use This App to Open Files check box, and then click OK.
Change the default app. If you want to change the default app for the file type, click the app in the list, check the Always Use This App to Open Files check box, and then click OK.
![]() Note
Note
Changing the default app as explained here removes the corresponding default app in the Default Apps pane in the Settings app. For example, if you use this technique to change the default app for PNG files from the Photos app to the Paint app, Windows removes Photos from the Photo Viewer setting on the Default Apps list. But Windows doesn’t make Paint the default app for Photo Viewer.