
CHAPTER 10
Working with Files
This chapter shows you how to work with the files on your computer. These easy and efficient methods take you through all the basic file tasks, including how to select and preview files, how to change the file view, and how to copy, move, and rename files. This chapter also shows you how to create new files and delete files, as well as how to restore accidentally deleted files. This chapter also covers adding files to your online OneDrive and how to extract files from a compressed folder.

Select a File
Before you can use File Explorer to do any work with one or more files, you first have to select the files so that Windows knows which ones you want to work with. For example, before you can move files to a new location, you must first select the files you want to move. You can select just a single file, two or more files, a group of files, or all the files in a folder. Although you learn specifically about selecting files in this section, the technique for selecting folders is the same.
Select a File

Select a Single File
![]() Click File Explorer (
Click File Explorer (![]() ).
).
![]() Open the folder containing the file.
Open the folder containing the file.
![]() Click the file.
Click the file.

Select Multiple Files
![]() Open the folder containing the files.
Open the folder containing the files.
![]() Click the first file you want to select.
Click the first file you want to select.
![]() Press and hold
Press and hold ![]() and click each of the other files you want to select.
and click each of the other files you want to select.

Select a Group of Files
![]() Open the folder containing the files.
Open the folder containing the files.
![]() Position the mouse pointer (
Position the mouse pointer (![]() ) slightly above and slightly to the left of the first file in the group.
) slightly above and slightly to the left of the first file in the group.
![]() Click and drag the mouse pointer (
Click and drag the mouse pointer (![]() ) down and to the right until all the files in the group are selected.
) down and to the right until all the files in the group are selected.
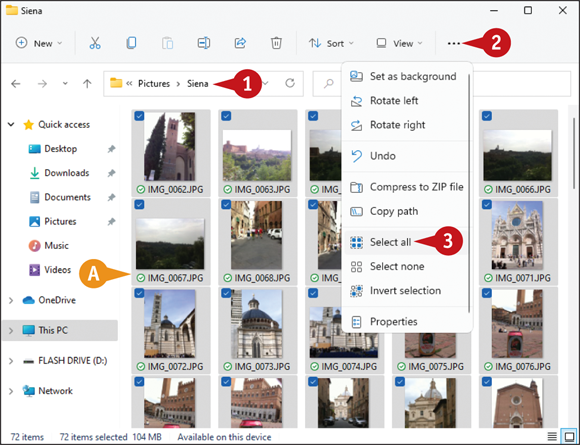
Select All Files
![]() Open the folder containing the files.
Open the folder containing the files.
![]() Click See more (
Click See more (![]() ).
).
![]() Click Select all.
Click Select all.
Note: A quick way to select all the files in a folder is to press ![]() +
+![]() .
.
![]() File Explorer selects all the files in the folder.
File Explorer selects all the files in the folder.
Change the File View
You can configure how Windows displays the files in a folder by changing the file view. This enables you to see larger or smaller icons or the details of each file.
You can choose a view such as Small Icons to see more files in the folder window. A view such as Large Icons or Extra Large Icons enables you to view images as thumbnail versions of each picture. If you want to see more information about the files, choose either the Tiles view or the Details view.
Change the File View

![]() In File Explorer, open the folder containing the files you want to view.
In File Explorer, open the folder containing the files you want to view.
![]() Click View.
Click View.

Windows displays the Layout gallery.
![]() Click the view you want.
Click the view you want.
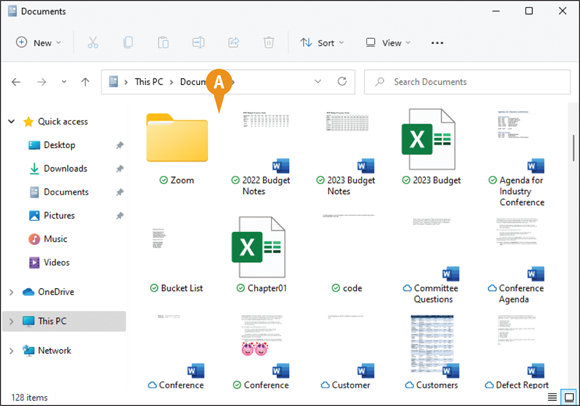
![]() File Explorer changes the file view (this example shows Tiles view).
File Explorer changes the file view (this example shows Tiles view).
![]() File Explorer displays a dot (
File Explorer displays a dot (![]() ) beside the currently selected view.
) beside the currently selected view.
Preview a File
Windows enables you to view the contents of some files without opening them. This makes it easier to select the file you want to work with because it means you do not have to run an application to see the file’s contents. Previewing the file is faster and uses fewer system resources. Windows previews only certain types of files, such as text documents, rich text documents, web pages, images, and videos.
Preview a File
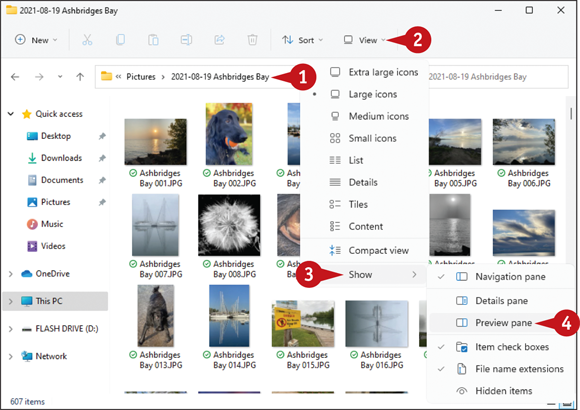
![]() In File Explorer, open the folder containing the file you want to preview.
In File Explorer, open the folder containing the file you want to preview.
![]() Click View.
Click View.
![]() Click Show.
Click Show.
![]() Click Preview pane.
Click Preview pane.
Note: You can also press ![]() +
+![]() to open the Preview pane.
to open the Preview pane.

![]() The Preview pane appears.
The Preview pane appears.
![]() Click a file.
Click a file.
![]() The file’s contents appear in the Preview pane.
The file’s contents appear in the Preview pane.
![]() You can click and drag the left border of the Preview pane to change its size.
You can click and drag the left border of the Preview pane to change its size.
Note: When you are finished with the Preview pane, you can click View, click Show, and then click Preview pane (or press ![]() +
+![]() ) to close it.
) to close it.
Copy a File
You can use Windows to make an exact copy of a file. This is useful if you want to back up an important file by making an extra copy on a flash drive, memory card, or other removable disc. Similarly, you might require a copy of a file if you want to send the copy on a disc to another person. This section shows you how to copy a single file, but the steps also work if you select multiple files. You can also use these steps to copy a folder.
Copy a File

![]() In File Explorer, open the folder containing the file you want to copy.
In File Explorer, open the folder containing the file you want to copy.
![]() Select the file.
Select the file.
![]() Click Copy (
Click Copy (![]() ).
).
Note: A quick way to run the Copy command is to press ![]() +
+![]() .
.
Windows places a copy of the file in a special memory location called the Clipboard.

![]() Open the location you want to use to store the copy.
Open the location you want to use to store the copy.
![]() Click Paste (
Click Paste (![]() ).
).
Note: A quick way to run the Paste command is to press ![]() +
+![]() .
.
![]() Windows inserts a copy of the file in the location.
Windows inserts a copy of the file in the location.
Move a File
When you need to store a file in a new location, the easiest way is to move the file from its current folder to another folder on your computer. When you save a file for the first time, you specify a folder on your PC’s hard drive. This original location is not permanent; you can move the file to another location on the hard drive. This section shows you how to move a single file, but the steps also work if you select multiple files or move a folder.
Move a File
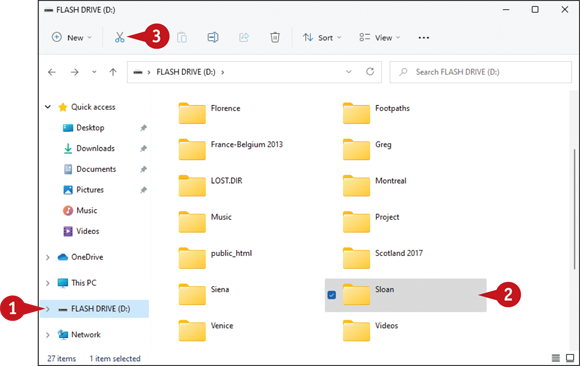
![]() In File Explorer, open the folder containing the item you want to move.
In File Explorer, open the folder containing the item you want to move.
![]() Select the item.
Select the item.
![]() Click Cut (
Click Cut (![]() ).
).
Note: A quick way to run the Cut command is to press ![]() +
+![]() .
.
Windows places the item in the Clipboard.

![]() Open the folder to which you want to move the item.
Open the folder to which you want to move the item.
![]() Click Paste (
Click Paste (![]() ).
).
Note: A quick way to run the Paste command is to press ![]() +
+![]() .
.
![]() Windows moves the item to the new location.
Windows moves the item to the new location.
Rename a File
You can change the name of a file, which is useful if the current name of the file does not accurately describe the file’s contents. By giving your document a descriptive name, you make it easier to find the file later.
Make sure that you rename only those documents that you have created or that someone else has given to you. Do not rename any of the Windows system files or any files associated with your programs, or your computer may behave erratically, or even crash.
Rename a File

![]() In File Explorer, open the folder that contains the file you want to rename.
In File Explorer, open the folder that contains the file you want to rename.
![]() Click the file.
Click the file.
Note: In addition to renaming files, you can also rename any folders that you have created.
![]() Click Rename (
Click Rename (![]() ).
).
Note: You can also run the Rename command by pressing ![]() .
.
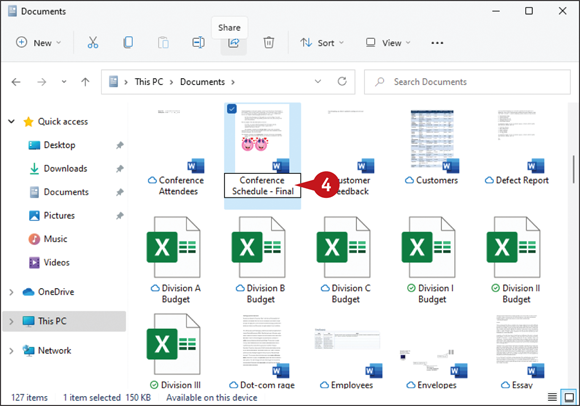
A text box appears around the filename.
![]() Type the new name you want to use for the file.
Type the new name you want to use for the file.
Note: If you decide that you do not want to rename the file after all, press ![]() to cancel the operation.
to cancel the operation.
Note: The name you type can be up to 255 characters long, but it cannot include the following characters: < > , ? : " *.
![]() Press
Press ![]() .
.
The new name appears under the file’s icon.
Create a New File
You can quickly create a new file directly within a file folder. This method is faster, and often more convenient, than running a program’s New command. In Windows, you can create several different file types, such as a Bitmap Image (a drawing), Rich Text Document (a WordPad file), Text Document (a Notepad file), and Compressed (Zipped) Folder (which combines multiple files in a single file, as described in the section “Extract Files from a Compressed Folder” later in this chapter). You can also create a new folder.
Create a New File

![]() In File Explorer, open the folder in which you want to create the file.
In File Explorer, open the folder in which you want to create the file.
![]() Click New.
Click New.
![]() Click the type of file you want to create.
Click the type of file you want to create.
![]() If you click Folder, Windows creates a new subfolder.
If you click Folder, Windows creates a new subfolder.
Note: The New menu on your system may contain more items than you see here because some programs install their own file types.
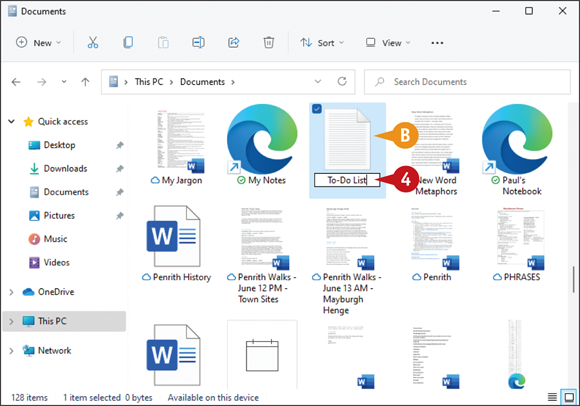
![]() An icon for the new file appears in the folder.
An icon for the new file appears in the folder.
![]() Type the name you want to use for the new file.
Type the name you want to use for the new file.
![]() Press
Press ![]() .
.
The new name appears under the file’s icon.
Delete a File
When you have a file that you no longer need, instead of leaving the file to clutter your hard drive, you can delete it. Make sure that you delete only those documents that you have created or that someone else has given to you. Do not delete any of the Windows system files or any files associated with your programs, or your computer may behave erratically or crash.
Delete a File
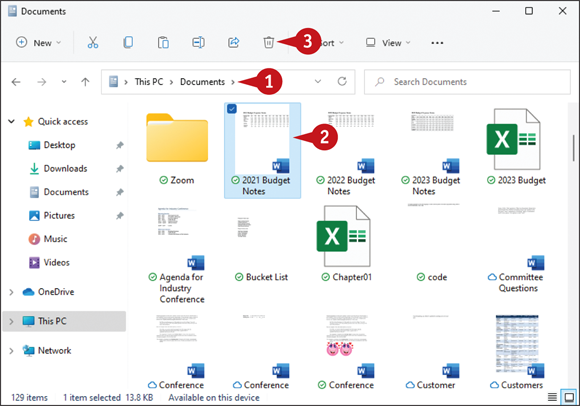
![]() In File Explorer, open the folder that contains the file you want to delete.
In File Explorer, open the folder that contains the file you want to delete.
![]() Click the file you want to delete.
Click the file you want to delete.
Note: If you need to remove more than one file, select all the files you want to delete.
Note: See the section “Select a File,” earlier in this chapter, to select multiple files.
![]() Click Delete (
Click Delete (![]() ).
).
Note: Another way to select the Delete command is to press ![]() .
.
![]() Windows removes the file from the folder.
Windows removes the file from the folder.
Note: Another way to delete a file is to click and drag it to the desktop Recycle Bin icon (![]() ).
).
Restore a Deleted File
If you delete a file in error, Windows enables you to restore the file by placing it back in the folder from which you deleted it. You can restore a deleted file because Windows stores each deleted file in a special folder called the Recycle Bin, where the file stays for a few days or a few weeks, depending on how often you empty the bin or how full the folder becomes.
Restore a Deleted File

![]() Double-click the desktop Recycle Bin icon (
Double-click the desktop Recycle Bin icon (![]() ).
).
Note: If you have a Touch PC, open File Explorer, tap the first ![]() in the address bar, and then tap Recycle Bin.
in the address bar, and then tap Recycle Bin.
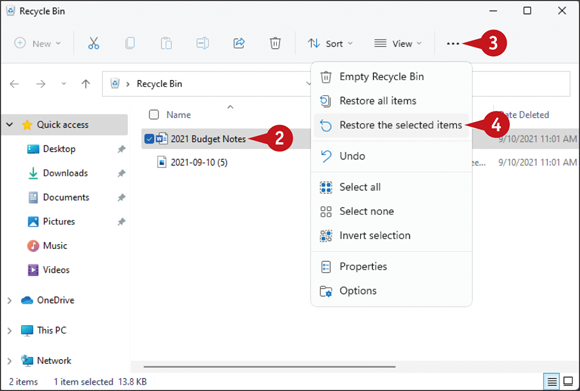
The Recycle Bin folder appears.
![]() Click the file you want to restore.
Click the file you want to restore.
![]() Click See more (
Click See more (![]() ).
).
![]() Click Restore the selected items.
Click Restore the selected items.
The file disappears from the Recycle Bin and reappears in its original folder.
Add a File to Your OneDrive
If you are using Windows under a Microsoft account, then as part of that account you get a free online storage area called OneDrive. You can use the special OneDrive folder on your PC to move or copy any of your files to your OneDrive. This is useful if you are going to be away from your computer but still require access to a file. Because OneDrive is accessible anywhere you have web access, you can view and work with your file without using your computer. Note that your Desktop, Documents, and Pictures folders are automatically backed up to OneDrive.
Add a File to Your OneDrive
Move a File to Your OneDrive
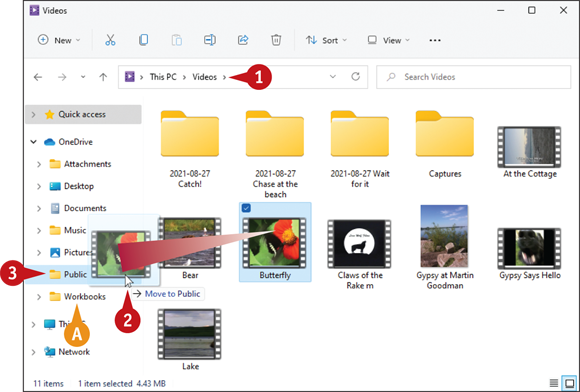
![]() In File Explorer, open the folder that contains the file you want to move.
In File Explorer, open the folder that contains the file you want to move.
![]() Click and drag the file to the OneDrive folder.
Click and drag the file to the OneDrive folder.
![]() As you drag, if you hover the file over OneDrive, File Explorer expands OneDrive to let you see your other OneDrive folders.
As you drag, if you hover the file over OneDrive, File Explorer expands OneDrive to let you see your other OneDrive folders.
![]() Drop the file on the OneDrive folder you want to use.
Drop the file on the OneDrive folder you want to use.
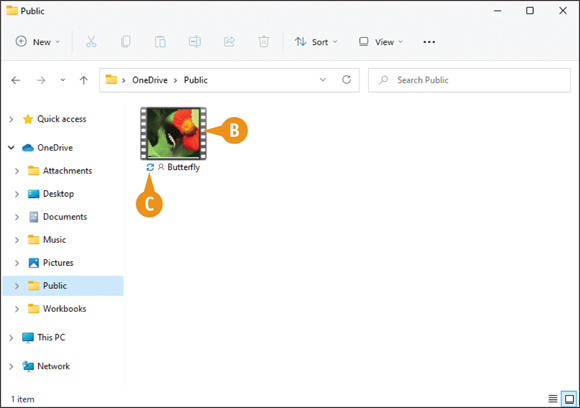
![]() File Explorer moves the file to the OneDrive folder.
File Explorer moves the file to the OneDrive folder.
![]() While the Syncing icon (
While the Syncing icon (![]() ) appears beside the filename, it means OneDrive is uploading the file. When the upload is complete, you see the Synced icon (
) appears beside the filename, it means OneDrive is uploading the file. When the upload is complete, you see the Synced icon (![]() ) instead.
) instead.
Note: If you see the Online icon (![]() ) beside a filename, it means the file is available only on your OneDrive, not on your PC.
) beside a filename, it means the file is available only on your OneDrive, not on your PC.

Copy a File to Your OneDrive
![]() In File Explorer, open the folder that contains the file you want to copy.
In File Explorer, open the folder that contains the file you want to copy.
![]() Press and hold
Press and hold ![]() and then click and drag the file to the OneDrive folder.
and then click and drag the file to the OneDrive folder.
![]() If needed, you can hover the file over OneDrive to see your other OneDrive folders.
If needed, you can hover the file over OneDrive to see your other OneDrive folders.
![]() Drop the file on the OneDrive folder you want to use.
Drop the file on the OneDrive folder you want to use.

![]() File Explorer copies the file to the OneDrive folder.
File Explorer copies the file to the OneDrive folder.
Extract Files from a Compressed Folder
If someone sends you a file via email or if you download a file from the Internet, the file often arrives in a compressed form, which means the file actually contains one or more files that have been compressed to save space. To use the files on your computer, you need to extract them from the compressed file.
Because a compressed file can contain one or more files, it acts like a kind of folder. Therefore, Windows calls such files compressed folders, zipped folders, or Zip archives. You can view these files or extract them from the folder.
Extract Files from a Compressed Folder

View Compressed Folder Files
![]() In File Explorer, open the folder containing the compressed folder.
In File Explorer, open the folder containing the compressed folder.
![]() The compressed folder appears as a folder icon with a zipper.
The compressed folder appears as a folder icon with a zipper.
![]() Double-click the compressed folder.
Double-click the compressed folder.

![]() File Explorer displays the contents of the compressed folder.
File Explorer displays the contents of the compressed folder.
Note: File Explorer is only displaying the contents of a compressed folder; it has not extracted the files. To extract the files, follow the steps in the next subsection.

Extract Compressed Folder Files
![]() In File Explorer, open the folder containing the compressed folder.
In File Explorer, open the folder containing the compressed folder.
![]() Click the compressed folder.
Click the compressed folder.
![]() Click Extract all.
Click Extract all.

The Select a Destination and Extract Files dialog box of the Extract Wizard appears.
![]() Type the location of the folder into which you want to extract the files.
Type the location of the folder into which you want to extract the files.
![]() You can also click Browse and choose the folder.
You can also click Browse and choose the folder.
![]() If you want to open the folder into which you extracted the files, click Show extracted files when complete (
If you want to open the folder into which you extracted the files, click Show extracted files when complete (![]() changes to
changes to ![]() ).
).
![]() Click Extract.
Click Extract.
Windows extracts the files.
