
CHAPTER 12
Making Windows More Accessible
If you have visual, hearing, or mobility challenges, you might find the default Windows setup to be frustrating, inefficient, or close to unusable. Fortunately, Windows offers a variety of tools and settings that are designed to make your computer more accessible. As you learn in this chapter, if you have visual issues, you can increase the text size, magnify areas of the screen, have screen text read to you, use a high-contrast color scheme, and apply a color filter. If you have mobility issues, you can make the keyboard easier to use, and you can control Windows using voice commands.

Change to a High-Contrast Theme
Flash the Screen During Audio Notifications
Increase the Text Size
You can make most text you see on your computer screen bigger by adjusting the text size to a larger value. If you have a visual impairment — or if your eyesight is not what it used to be — the relatively small size of most of the text displayed by the Windows interface and by your apps can make it difficult to use your computer. To remedy this problem, Windows offers a setting that enables you to increase the size of most text you see on the screen, including the text in menus, title bars, and icons.
Increase the Text Size

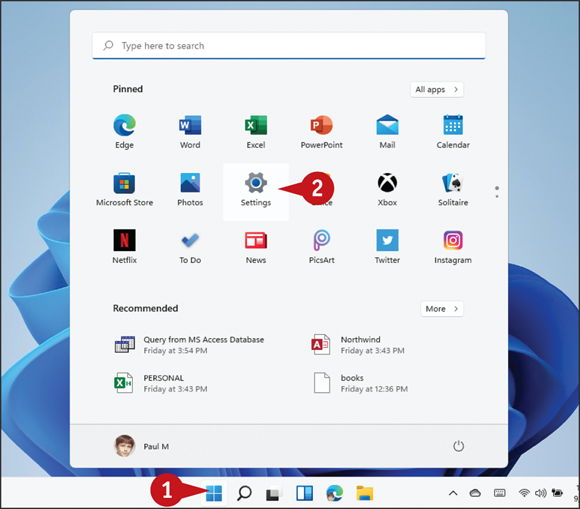
![]() Click Start (
Click Start (![]() ).
).
![]() Click Settings.
Click Settings.

Windows opens the Settings app.
![]() Click Accessibility.
Click Accessibility.

The Accessibility screen appears.
![]() Click Text size.
Click Text size.

The Text Size screen appears.
![]() Click and drag the Text size slider (
Click and drag the Text size slider (![]() ) to set the text size you prefer.
) to set the text size you prefer.
![]() This tooltip shows you the new magnification percentage.
This tooltip shows you the new magnification percentage.
![]() This sample text shows you the new text size.
This sample text shows you the new text size.
![]() Click Apply.
Click Apply.
Windows applies your new text size.
Magnify Screen Areas
You can use the Magnifier tool to zoom in on difficult-to-see areas of the screen. As you use Windows and your apps, you might find that although you can make out most of the items on the screen, the occasional icon, image, or text is too small to see clearly. You can increase the overall text size, as described in the previous section, “Increase the Text Size,” but that does not help you see nontext screen areas. A better solution is to use the Magnifier tool to temporarily zoom in on problematic portions of the screen.
Magnify Screen Areas

![]() Click Start (
Click Start (![]() ).
).
![]() Click Settings.
Click Settings.

Windows opens the Settings app.
![]() Click Accessibility.
Click Accessibility.

The Accessibility screen appears.
![]() Click Magnifier.
Click Magnifier.

The Magnifier screen appears.
![]() Click the Magnifier switch to On (
Click the Magnifier switch to On (![]() changes to
changes to ![]() ).
).
Windows displays the Magnifier window and zooms in on the screen.
Note: You can also activate Magnifier by pressing ![]() +
+ ![]() .
.
![]() Set Magnifier’s zoom level by clicking the Increase (
Set Magnifier’s zoom level by clicking the Increase (![]() ) or Decrease (
) or Decrease (![]() ) buttons as needed.
) buttons as needed.
Note: When you no longer need to use Magnifier, either click the Magnifier switch to Off (![]() changes to
changes to ![]() ) or press
) or press ![]() +
+ ![]() .
.
Have Screen Text Read to You
You can activate the Narrator accessibility feature to have screen text read to you. Narrator is an example of a screen reader, an accessibility tool for the visually impaired. If you cannot read the text on your PC screen or if you use a PC that does not have a screen, Narrator describes what is on each screen and reads aloud any text that appears on the screen.
Have Screen Text Read to You

![]() Click Start (
Click Start (![]() ).
).
![]() Click Settings.
Click Settings.

Windows opens the Settings app.
![]() Click Accessibility.
Click Accessibility.
The Accessibility screen appears.
![]() Click Narrator.
Click Narrator.

The Narrator screen appears.
![]() Click the Narrator switch to On (
Click the Narrator switch to On (![]() changes to
changes to ![]() ).
).
Windows starts Narrator and displays the Narrator Home window.
Note: You can also start (and stop) Narrator by pressing ![]() +
+ ![]() +
+ ![]() .
.
![]() If you do not want to see Narrator Home each time you start Narrator, you can click Show Narrator Home when Narrator starts (
If you do not want to see Narrator Home each time you start Narrator, you can click Show Narrator Home when Narrator starts (![]() changes to
changes to ![]() ).
).
![]() In the Narrator Home window, click Minimize (not shown).
In the Narrator Home window, click Minimize (not shown).

![]() Click the Voice
Click the Voice ![]() to select a Narrator voice.
to select a Narrator voice.
![]() Click and drag the Speed slider (
Click and drag the Speed slider (![]() ) to set a speaking rate.
) to set a speaking rate.
![]() Click and drag the Pitch slider (
Click and drag the Pitch slider (![]() ) to set a voice pitch.
) to set a voice pitch.
![]() Click and drag the Volume slider (
Click and drag the Volume slider (![]() ) to set a speaking volume.
) to set a speaking volume.
Windows puts your Narrator settings into effect.
Change to a High-Contrast Theme
You can make Windows and your apps easier to use by switching to a high-contrast theme. Contrast is a measure of the relative distinctness of two colors. Low-contrast colors are very similar and difficult to distinguish, while high-contrast colors are very different and easy to distinguish. In practice, if the colors of the text and background are low-contrast, the text is hard to read, particularly for people with poor eyesight. The solution is to switch to a high-contrast theme, which uses a color scheme where the text and background are readily distinguished, which makes the text much easier to read.
Change to a High-Contrast Theme

![]() Click Start (
Click Start (![]() ).
).
![]() Click Settings.
Click Settings.

Windows opens the Settings app.
![]() Click Accessibility.
Click Accessibility.
The Accessibility screen appears.
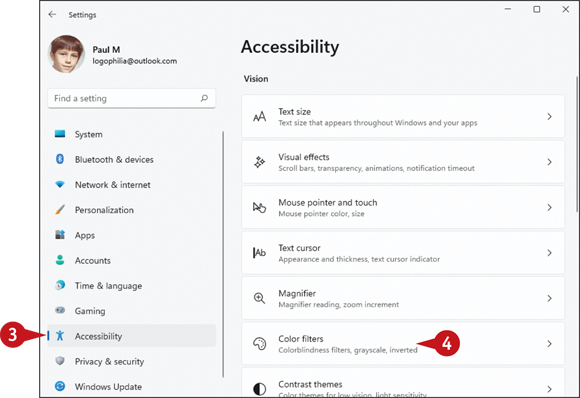
![]() Click Contrast themes.
Click Contrast themes.

The Contrast Themes screen appears.
![]() Click the Contrast themes
Click the Contrast themes ![]() and then click the theme you want to use.
and then click the theme you want to use.
![]() These thumbnails provide a preview of each theme’s color scheme.
These thumbnails provide a preview of each theme’s color scheme.
![]() Click Apply.
Click Apply.

Windows applies the high-contrast theme.
Apply a Color Filter
You can make screen buttons, images, text, and other elements easier to see by applying a color filter. If you suffer from red-green color blindness — either deuteranopia, where the eyes cannot process green light, or protanopia, where the eyes cannot process red light — or from blue-yellow color blindness (also called tritanopia), you can apply a color filter that makes these colors easier to distinguish. If you have trouble seeing all colors, you can apply a color filter that turns each color into its grayscale equivalent, which makes them easier to distinguish.
Apply a Color Filter

![]() Click Start (
Click Start (![]() ).
).
![]() Click Settings.
Click Settings.
Windows opens the Settings app.
![]() Click Accessibility.
Click Accessibility.
The Accessibility screen appears.
![]() Click Color Filters.
Click Color Filters.

The Color Filters screen appears.
![]() Click the Color filters switch to On (
Click the Color filters switch to On (![]() changes to
changes to ![]() ).
).
![]() Click the type of filter you want to apply (
Click the type of filter you want to apply (![]() changes to
changes to ![]() ).
).

![]() Windows previews the color filter.
Windows previews the color filter.
![]() Repeat step 6 until you find the color filter that works for you.
Repeat step 6 until you find the color filter that works for you.
Windows applies the color filter to all screen elements.
Flash the Screen During Audio Notifications
You can help ensure that you do not miss alerts and other notifications by configuring Windows to flash the screen whenever it displays a notification that includes an audio component. All Windows notifications appear with a sound effect to catch your attention, while some Windows alerts are audio-only. If you have an impairment that prevents you from hearing the audio portion of these notifications, you might miss them. To help prevent this, Windows offers an accessibility feature that flashes the screen — that is, temporarily displays a high-contrast version of the screen colors — whenever an audio notification occurs.
Flash the Screen During Audio Notifications

![]() Click Start (
Click Start (![]() ).
).
![]() Click Settings.
Click Settings.

Windows opens the Settings app.
![]() Click Accessibility.
Click Accessibility.
The Accessibility screen appears.
![]() Click Audio.
Click Audio.

The Audio screen appears.
![]() Click the Flash my screen during audio notifications
Click the Flash my screen during audio notifications ![]() .
.
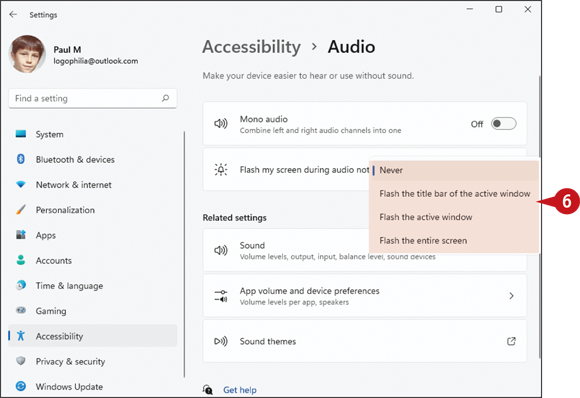
![]() Click the screen element that you want Windows to flash.
Click the screen element that you want Windows to flash.
Windows now flashes your chosen screen element whenever an audio notification appears.
Make the Keyboard More Accessible
If you have mobility or dexterity issues, you can make your computer keyboard easier to use by activating features designed to enhance keyboard accessibility. The Sticky keys feature enables you to press multiple-key shortcuts — such as ![]() +
+ ![]() and
and ![]() +
+ ![]() — one key at a time. The Filter keys feature configures Windows to ignore extra keystrokes caused by inadvertently holding down or repeatedly pressing a key. Finally, the Toggle keys feature tells Windows to play a sound when you press any one of the following keys: Caps Lock, Num Lock, or Scroll Lock.
— one key at a time. The Filter keys feature configures Windows to ignore extra keystrokes caused by inadvertently holding down or repeatedly pressing a key. Finally, the Toggle keys feature tells Windows to play a sound when you press any one of the following keys: Caps Lock, Num Lock, or Scroll Lock.
Make the Keyboard More Accessible
![]() Click Start (
Click Start (![]() ).
).
![]() Click Settings.
Click Settings.

Windows opens the Settings app.
![]() Click Accessibility.
Click Accessibility.

The Accessibility screen appears.
![]() Click Keyboard.
Click Keyboard.

The Keyboard screen appears.
![]() Click the Sticky keys switch to On (
Click the Sticky keys switch to On (![]() changes to
changes to ![]() ).
).
![]() You can click Sticky keys to customize this feature.
You can click Sticky keys to customize this feature.
![]() Click the Filter keys switch to On (
Click the Filter keys switch to On (![]() changes to
changes to ![]() ).
).
![]() You can click Filter keys to customize this feature.
You can click Filter keys to customize this feature.
![]() Click the Toggle keys switch to On (
Click the Toggle keys switch to On (![]() changes to
changes to ![]() ).
).
Windows puts the new settings into effect immediately.
Control Windows Via Voice
If you have mobility or dexterity issues that make it difficult to use a mouse and keyboard, the Speech Recognition feature enables you to control Windows via voice commands. With Speech Recognition activated, you can speak commands into a microphone and Windows will execute those commands.
To use Speech Recognition, you need to connect a microphone to your PC. For best results, use a headset microphone rather than a microphone that sits on your desk. Also, it is best to use Speech Recognition in a relatively quiet room and to speak your commands as clearly as you can.
Control Windows Via Voice

![]() Click Start (
Click Start (![]() ).
).
![]() Click Settings.
Click Settings.
Windows opens the Settings app.
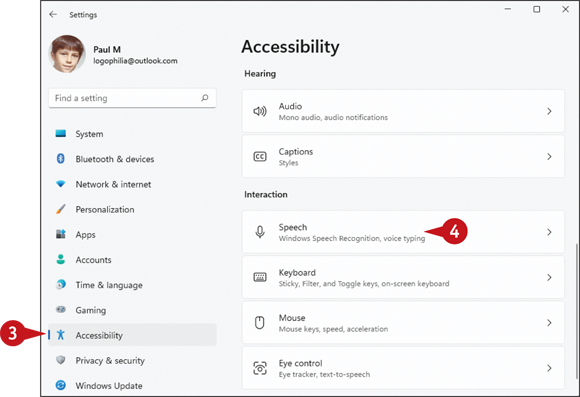
![]() Click Accessibility.
Click Accessibility.
The Accessibility screen appears.
![]() Click Speech.
Click Speech.

The Speech screen appears.
![]() Click the Windows Speech Recognition switch to On (
Click the Windows Speech Recognition switch to On (![]() changes to
changes to ![]() ).
).

The Set Up Speech Recognition dialog box appears.
![]() Click Next.
Click Next.
![]() Follow the instructions on the dialog boxes that appear to set up your microphone and Speech Recognition.
Follow the instructions on the dialog boxes that appear to set up your microphone and Speech Recognition.
Note: When Windows asks you to choose an activation mode, you can click Use voice activation mode (![]() changes to
changes to ![]() ) so that you can start and stop Speech Recognition using voice commands.
) so that you can start and stop Speech Recognition using voice commands.
When complete all the dialog boxes, you can start controlling Windows via voice.