Chapter 5
One Desktop from Any Device
IN THIS CHAPTER
![]() Expanding your knowledge to better understand how your cloud PC works
Expanding your knowledge to better understand how your cloud PC works
![]() Exploring how to open the Windows 365 Remote Desktop client application
Exploring how to open the Windows 365 Remote Desktop client application
![]() Using your web browser to connect to your cloud PC
Using your web browser to connect to your cloud PC
![]() Taking a look at the differences between using a web browser and the client
Taking a look at the differences between using a web browser and the client
The metaverse is the new name for all things virtual. Facebook went as far as to change their name to Meta in order to show how serious they are about the virtual world. The concept of the metaverse is not new. What is new, though, is how connected everything has become and the ubiquity of high-speed and high-quality Internet connections. By moving your PC into the cloud, you don’t have to worry about a physical computer anymore. The physical computer you sit in front of, have in your pocket, or rest on your lap is just an interface into your cloud PC. In this way, you can think of your cloud PC as your computer in the metaverse. We expect that in the future you will access your cloud PC from your smart glasses, or maybe even a brain implant that provides an interface between your brain and the metaverse. It sounds outrageous, but Elon Musk is working on it with his company called Neuralink. For now though, you are stuck using regular old computers, laptops, tablets, and smartphones. That is to say, even though your cloud PC is available to nearly any device, you still need a physical device to access it. The good news is that just about any device will do. You literally have one desktop (cloud PC) and you can access it from any device with a web browser.
In this chapter, we walk through the concept of a cloud PC to understand fully what it is and how it works. We talk about how to access your cloud PC from a web browser, and then we discuss some of the differences between using the Windows 365 Remote Desktop client, which we covered installing in Chapter 4, and using your web browser. We take a look at using your smartphone to access your cloud PC, and finally, we take a peek at how you can configure your cloud PC.
Performing a Reality Check on Your New Cloud PC
You interact with your cloud PC from your phone or tablet. Everything you do within the window happens on your cloud PC, not your iPhone or iPad. To test this out, open a Notepad document, type hello, and then close the Windows 365 Remote Desktop application. Now go to another computer or device and connect again to your cloud PC. You will see your Notepad document just as you left it. Everything you do on your cloud PC happens in the cloud. This is the primary benefit of Windows 365 in our opinion.
Access the apps you have on your cloud PC from anywhere using just about any device.
Opening Your Cloud PC from a Web Browser
In Chapter 3, you learned how to install the Windows 365 Remote Desktop client on computers, phones, and tablets. You will get the most out of using the client as we explore further later in the chapter. However, with that said, you can connect to, and work with, your cloud PC from just about any device running a web browser. The general process is the same for any device since everything happens using your web browser.
Let’s take a look at how to get to our cloud PC using your favorite web browser.
Here’s how:
-
Open your favorite web browser and go to
https://windows365.microsoft.com.The Windows 365 main page appears.
-
Sign in using your Microsoft 365 credentials to see your cloud PCs.
If you are following along, we created our Microsoft 365 credentials in Chapter 2. Our username is
[email protected]. -
In the PC that you want to work on, click the Open in Browser button at the bottom of the information card, as shown in Figure 5-1.
A new tab opens and you are asked if you want to allow your cloud PC to use the printer, microphone, and clipboard of your local computer, as shown in Figure 5-2. The Advanced Settings drop-down includes options to select an alternative keyboard layout.
-
Click the Connect button and then sign into your cloud PC.
Your sign-in to your cloud PC is the same as the sign-in to Microsoft 365. So we use the same credentials that we used in step 2 above. Another advantage of using the Windows 365 Remote Desktop client is that you don’t have to sign in all the time. After you get things set up, you can access your cloud PC by just clicking on an icon to connect and get started working with your cloud PC. We cover getting the client installed in Chapter 3.
 We experienced errors sometimes when it had been a while since we connected to our cloud PC. We suspect it took a little time for our cloud PC to wake up from its dreams of electric sheep. If you experience an error, then try again after a minute or two. If you keep getting an error, then open a support ticket with Microsoft. You can open a support ticket in your Microsoft 365 administration center at
 https://admin.microsoft.com. - The page loads, and you are presented with the desktop of your cloud PC, as shown in Figure 5-3.
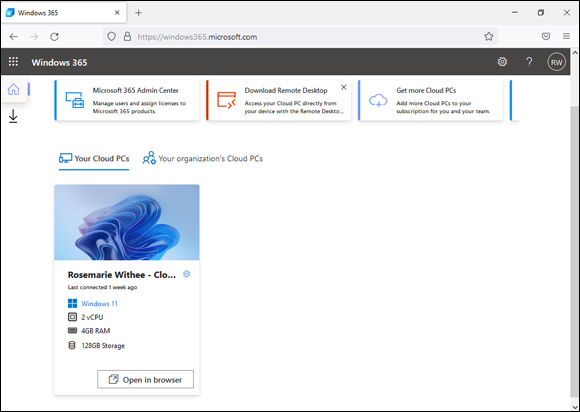
FIGURE 5-1: Opening a cloud PC using a web browser.

FIGURE 5-2: Allowing the cloud PC to use the printer, microphone, and clipboard of the physical computer.
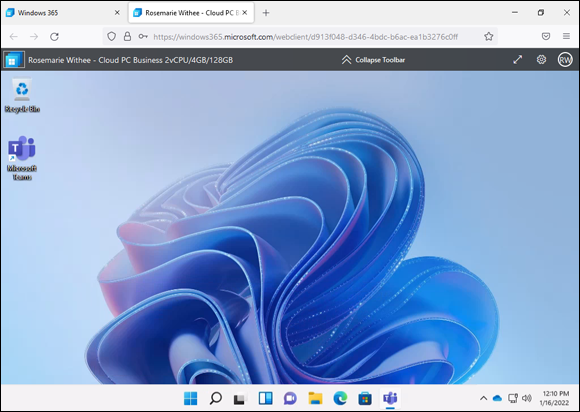
FIGURE 5-3: The desktop of your cloud PC running in the Firefox web browser.
Making your cloud PC feel like it is running locally
It can take a while to get used to looking at your PC desktop in your web browser. We find it helpful to maximize the screen so that your cloud PC desktop takes up the full screen of your physical computer. To maximize the screen, click the diagonal line with an arrow at each end. You can see it in the upper-right of Figure 5-3. To get back out of full-screen view, click the icon that shows two lines with arrows pointing towards each other. You can also press the Esc key on your keyboard.
When you make the window full-screen, you can have the feeling you are working on your Windows computer regardless of what operating system your physical computer is running. If, for example, you purchased your physical computer from System76 and it is running the Linux operating system, when you connect to your cloud PC using a web browser and maximize the window then it feels just like you are working on your Windows computer.
Benefits of using your web browser
You can use just about any computer to sign in and use your cloud PC. For example, you might be a globe-trotting nomad working from a remote beach somewhere. As you are working on a deadline, a rogue wave splashes your computer and renders it dead. To make the deadline, you’ll have to run down to the local Internet café, sign in using the web browser, and complete your work there. (Okay, maybe our imagination got away from us there, but we would like to think that working from a beach somewhere is definitely within the realm of possibility!) In any case, just remember that most any physical computer will do when you need to get work done on your cloud PC.
Be careful signing into anything from a public computer. Although you could technically do this through the web browser at an Internet café, you should be aware that security issues are rife around the world these days. The simplest thing a bad actor might do is install a key logger on the computer, which allows them to review the log at a later time to see your username and password. We always recommend multiple factors of authentication, such as using a code sent to your phone. And if you sign in from an untrusted computer, be sure to change your password as soon as possible. You do use a password manager, right?
Another benefit to using your web browser is that you don’t need to go through the process of installing the Windows 365 Remote Desktop client application (which we covered in Chapter 3). When using your web browser you just navigate to the Windows 365 dashboard and open up your cloud PC.
Installing the Windows 365 Remote Desktop client can take some time but it is worth the effort on computers that you use on a regular basis. We cover some of the benefits of using the client, as opposed to your web browser, later in the chapter.
Opening the Windows 365 Remote Desktop Client
After you install it, the Windows 365 Remote Desktop client is just another application on your computer, phone, or tablet. Its name is one area of confusion: Remote Desktop. This can be particularly confusing because Microsoft also has an application called Remote Desktop Connection. It is important that you use the correct Remote Desktop app: the Remote Desktop client application from Windows 365 that you learned how to install in Chapter 3. Figure 5-4 shows the two applications in Windows 10 when searching for the word remote. The top application was installed from Windows 365, and the second application down was already part of Windows 10.
When you have the Windows 365 Remote Desktop client installed, you can open it just like any other application on your computer. The process is different depending on whether you’re running Windows or Mac or whether your phone or tablet is running iOS or Android. In any case, once you have installed the Windows 365 Remote Desktop client you will find it under the name Remote Desktop.
Top open the client in Windows 10 or Windows 11, follow these steps:
-
Click open the Start menu and then type Remote Desktop in the search field.
Windows filters your applications and shows you everything that contains the word remote.
-
In the list of available applications, click the one that says Remote Desktop and that includes an icon that looks like two ‘L’ letters facing away from each other, as shown in Figure 5-4.
The Windows 365 Remote Desktop client opens and you will see all of the available cloud PCs that are available.
- Double-click the cloud PC icon that you want to open and then sign in.

FIGURE 5-4: The Windows 365 Remote Desktop client and the Remote Desktop Connection app in Windows 10.
To open the client in MacOS, follow these steps:
-
Open Spotlight and type Remote Desktop in the search field.
Spotlight narrows down the list and shows you the Remote Desktop application.
-
Click the one that says Remote Desktop and that includes an icon that looks like two ‘L’ letters facing away from each other, as shown in Figure 5-5.
The Windows 365 Remote Desktop client opens, and you will see all of the available cloud PCs that are available.
- Double-click the cloud PC icon that you want to open and then sign in.

FIGURE 5-5: The Windows 365 Remote Desktop client and the Microsoft Remote Desktop app in MacOS.
 Be aware that you should install the Remote Desktop client from the Windows 365 administration center as outlined in Chapter 3. If you have already installed Remote Desktop (separate from the Windows 365 administration download page) then you won’t see your cloud PC as an available connection. If you already have Microsoft Remote Desktop installed as an older version you can update the app in the App Store to add the cloud features.
Web Browser vs. the Windows 365 Remote Desktop Client
On the surface, you can use either your web browser or the Windows 365 Remote Desktop client and either should work just fine. In our experience, we have found that the client works better than using the web browser. For example, when we were using Teams on our cloud PC, we were unable to get the video to work in the web browser. When we switched to the Windows 365 Remote Desktop application to connect to our cloud PC, however, the video worked fine.
Other applications, of course, also come in both client and web-browser flavors, and you may find you strongly prefer one of these over the other. For example, consider the Office applications such as Word, Excel, and PowerPoint. These are available both as a client that you install and as a resource accessible from a web browser. When we work with Word, we prefer the actual client and dislike opening files in the web browser. Why? We are hard-pressed to list specifics. It’s just how we feel. The same is true with Windows 365. We have some experience, like we mentioned with video in Teams, but on the whole preferring the client is just a feeling. The client seems to have a tighter integration than the web browser. This makes intuitive sense because there are many different web browsers and they all implement the various standards differently. So you might have a perfect experience using Microsoft’s Edge web browser with your cloud PC and then have a different experience using Firefox or Safari.
The Remote Desktop client, as opposed to a web browser, is specifically designed from the ground up to be a connection to a remote computer. The Remote Desktop client is specialized, so it makes sense that it would provide a better experience for working remotely with another computer.
We recommend using the Windows 365 Remote Desktop client whenever possible as opposed to a web browser. We have had a much more consistent experience using the client.
Theoretically, it shouldn’t matter which web browser you are using or whether you are using the Remote Desktop client. However, in reality, the Remote Desktop client offers a consistently better experience, and we recommend it whenever possible.
Using Your Phone in a Pinch (pun intended)
In Chapter 3, you learned how to install the Windows 365 Remote Desktop client on iPhone, iPad, and Android devices. Working with a full-fledged version of Windows in the cloud using a device designed for fingering and tapping, however, can be a challenge. We mostly use this method in a pinch when we need to do something critical on our work PC and are away from any regular computer. We always have our phones with us, and this has saved us from a pinch multiple times.
The primary way you work with a Windows computer is using a mouse. It can be tricky to move a pointer around using your finger on a small phone screen or even a larger tablet screen. The Remote Desktop application lets you choose between two different ways of moving the mouse pointer on your cloud computer.
The first method lets you swipe the screen to move the pointer and then tap to click. Microsoft calls this Mouse Pointer mode. The mouse pointer on your cloud PC doesn’t follow your finger directly. Instead, it moves in more general terms: swipe towards the left anywhere on your phone and the mouse pointer will move over towards the left of wherever it was currently positioned. This mechanism is hard to describe but feels natural after you start working with your desktop on your phone or tablet.
The best comparison we can come up with is the pinch gesture on your phone. You can zoom in and zoom out by pinching your fingers together or expending your fingers apart. It doesn’t matter exactly where you pinch the screen, the main thing is the gesture of pinching the screen. The same is true with this method of moving the mouse pointer. Say the mouse pointer on your cloud PC is on the right side of the screen, and touching your finger to the screen and moving it to the left causes the mouse pointer on your cloud PC to move to the left as well. The pointer won’t move exactly where you touched the screen, but it moves in the same direction. This can be beneficial for moving the mouse pointer to a particular spot without needing to touch your screen on the exact spot you are targeting.
The second method lets you tie the mouse directly to wherever you touch on the screen. Microsoft calls this method Direct Touch mode. So, touching your finger to the screen causes the mouse pointer to move right at that exact spot. If you then move your finger to the left or right, then the mouse pointer will follow exactly where your finger is touching the screen.
Even though it doesn’t sound intuitive, we actually prefer the first method, Mouse Pointer mode, where the mouse on your cloud PC can be moved by dragging your finger on your screen instead of appearing exactly wherever you touch the screen. This lets us move our finger around but still see exactly what the mouse on the cloud PC is doing.
To left-click on your cloud PC desktop while using your phone or tablet, you tap the screen. To right-click, you tap and hold.
You can switch back and forth between these methods by going back to your Remote Desktop application. To break out of full-screen view, tap the icon that shows two arrows pointing towards each other, as shown in Figure 5-6. Then, tap the icon that looks like a mouse to use Mouse Pointer mode or the icon that looks like a finger to use Direct Touch mode, as shown in Figure 5-7.

FIGURE 5-6: Viewing your Windows 365 cloud PC from an iPhone.

FIGURE 5-7: Switching the mouse pointer mode in Remote Desktop on an iPhone.
Peeking under the Covers of Your Cloud PC
Earlier in this chapter, you used your web browser to sign into your main Windows 365 page at https://windows365.microsoft.com. From this page you can see all of your cloud PCs and perform tasks on them. The main card for each cloud PC provides some basic information such as the Windows version, CPUs, RAM, and file storage.
Chapter 2 provides information to help understand CPU, RAM, and file storage.
You access the Settings menu on your cloud PC by clicking the gear icon, as shown in Figure 5-8. From this menu you can restart your virtual computer, reset it back to a default setting, or rename it to something that means something to you. You can also start a troubleshooting process if you cannot access your cloud PC for some reason. And finally, you can view the system information about your cloud PC as shown in Figure 5-9.
We cover administration of Windows 365 cloud PCs in Chapter 18.

FIGURE 5-8: The Settings menu for your cloud PC on the Windows 365 page.
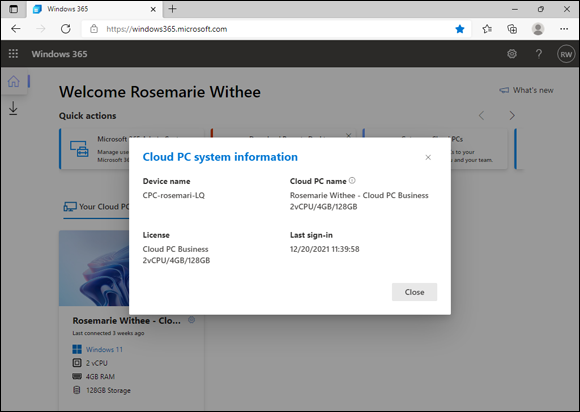
FIGURE 5-9: Viewing the system information for your cloud PC.
Windows Hybrid: Keeping a Foot in Each World
In the future, using a physical computer may become a thing of the past. We remember how our grandparents were baffled by the Internet. During their lifetime, the world changed dramatically from using horses and traveling slowly to using cars and jet planes. Then the Internet came along, and it was at a level of understanding that was beyond their time. We expect we will be there in the future with the metaverse. People will plug into the metaverse, and the world will change in ways we can’t comprehend. Until that time arrives, though, we are happy using our physical computers, phones, and tablets as an interface to our cloud PC in the metaverse.
We try to keep up with the latest buzzwords, and the metaverse is all the rage. The metaverse is just another word for describing the virtual world of online games, or virtual reality, or augmented reality. We like to think of the metaverse as the new term for online worlds. Remember that game The Sims in which you create an avatar that can walk around and talk to other avatars (people)? The virtual world of The Sims was released over two decades ago! And the virtual world is the same thing we call the metaverse. A fantastic new name, metaverse, for a very old and well-understood idea. It wouldn’t be a great buzzword any other way.
It seems a bit greedy for Microsoft to charge for the Windows operating system on both your physical computer and your virtual computer. We can understand the cost of the virtual computer because behind the scenes there are real computers in a real-world data center somewhere, and someone needs to continually maintain them. The operating system also requires work to build and maintain, so we understand the need to charge money for it. But it would be nice if Microsoft would give a bit of a bonus for people that choose to use the Windows operating system on both their physical computer and their virtual cloud PC. The good news is that Microsoft agrees with us, and they provide a discount on your cloud PC when you use Windows for your physical PC. The discount is called the hybrid discount, and you obtain it when you sign up for your cloud PC. We walk through the process and point out the place where you get the discount in Chapter 3.
Another benefit to using Windows on both your physical and cloud PCs, though this one is arguable, is that getting familiar with a single operating system makes it easier to move between your physical computer and your virtual cloud computer. You get used to how things work, and the same knowledge transfers between both. Personally, we love our operating systems and we use Linux, Mac, and Windows all at the same time on many different computers. If you aren’t happy to be techy nerds like us, it can save you a lot of time and effort to just learn one operating system, though.