Chapter 12
Customizing Windows 8
Windows 8 comes with a number of features that enable you to personalize your computer. Not only can you change the appearance of Windows 8 to suit your taste, but you can also change the way Windows 8 works to make it easier to use and more efficient.

Pin an App to the Start Screen
Change the Start Screen Background
Change the Lock Screen Background
Synchronize Settings between PCs
Configure the Start Screen
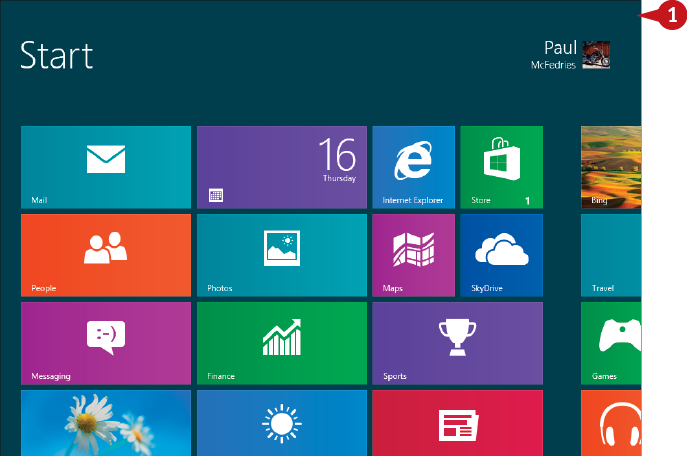
You can personalize how the Start screen looks and operates to suit your style and the way you work. For example, you can rearrange the Start screen tiles so that the apps you use most often appear together on the screen.
You can also make your Start screen more useful or more efficient by resizing some of the Windows 8 app screen tiles. The Start screen supports two sizes of Windows 8 app tiles: small and large. They are both the same height, but the larger size is twice as wide as the smaller.
Configure the Start Screen
Move a Tile
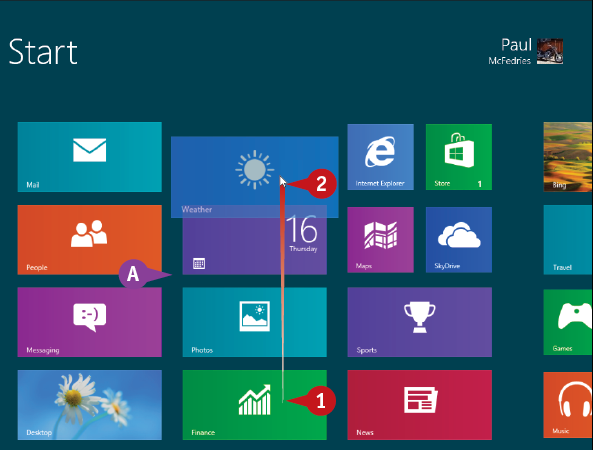
![]() On the Start screen, click the tile of the app you want to move.
On the Start screen, click the tile of the app you want to move.
A Windows 8 reduces the tile sizes slightly and adds extra space between the tiles.
![]() Drag the tile to the position you prefer.
Drag the tile to the position you prefer.

![]() Release the tile.
Release the tile.
B Windows 8 moves the tile to the new position.
Change a Tile Size

![]() Right-click the Start screen tile you want to resize.
Right-click the Start screen tile you want to resize.
C Windows 8 displays the application bar.
![]() Click Smaller.
Click Smaller.
Note: If the tile is small and you prefer to enlarge it, click Larger, instead.

D Windows 8 resizes the tile.
Simplify It
Can I combine similar apps into a single group of tiles?
Yes. To create a group, drag the first app tile all the way to left edge of the screen until you see a vertical bar, and then release the mouse button to create the new group. To add other tiles to the group, drag and drop the tiles within the group.
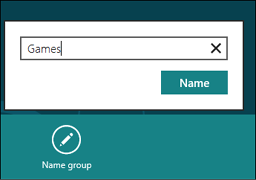
Can I name an app group?
Yes. To name a group, press ![]() +
+![]() (dash) to zoom out of the Start screen. Right-click any tile in the group, click Name group, type the group name, and then click Name. Press
(dash) to zoom out of the Start screen. Right-click any tile in the group, click Name group, type the group name, and then click Name. Press ![]() +
+![]() to zoom back in to the Start screen.
to zoom back in to the Start screen.
Pin an App to the Start Screen
You can customize the Start screen to give yourself quick access to the programs that you use most often.
If you have an app that does not appear on the Start menu, you usually open the app by right-clicking the Start screen and then clicking All Apps. For those apps you use most often, you can avoid this extra work by pinning their icons permanently to the main Start screen.
All pinned apps appear to the right of the main Start screen tiles. This means that once you have pinned an app to your Start screen, you can launch that app by scrolling right and then clicking the app.
Pin an App to the Start Screen
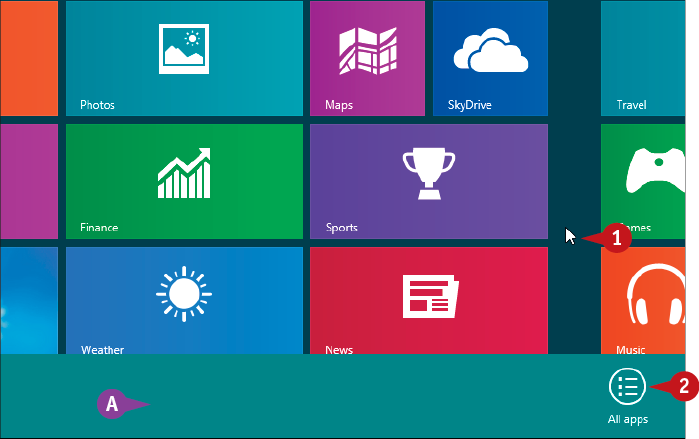
![]() Right-click an empty section of the Start screen.
Right-click an empty section of the Start screen.
A The application bar appears.
![]() Click All apps.
Click All apps.
The Apps screen appears.
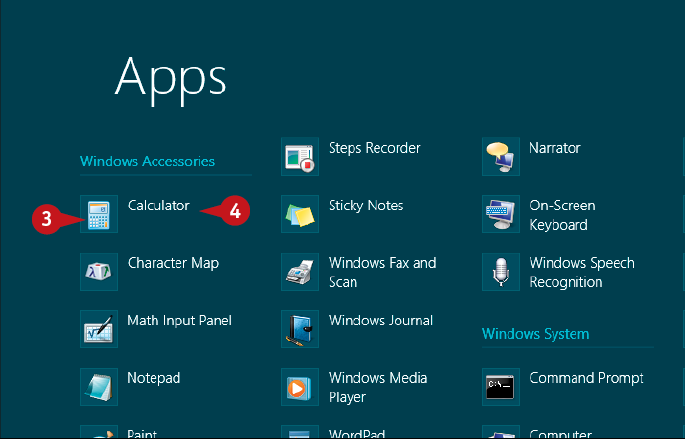
![]() Locate the app you want to pin.
Locate the app you want to pin.
![]() Right-click the app.
Right-click the app.

B The application bar appears.
![]() Click Pin to Start.
Click Pin to Start.
![]() Press
Press ![]() .
.
Windows 8 returns you to the Start screen.
![]() Scroll to the right.
Scroll to the right.
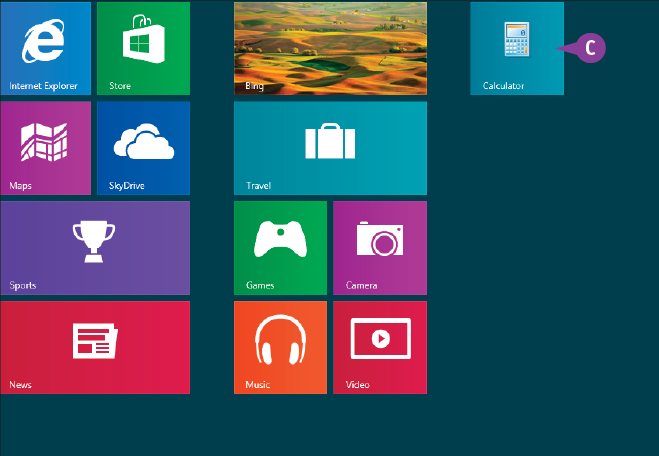
C A tile for the pinned app appears on the Start screen.
Simplify It
Can I remove an app from the Start screen?

Yes, you can remove any app tile from the Start screen, even the default apps that come with Windows 8. To remove an app from the Start screen, right-click the app’s tile and then click Unpin from Start.
What happens if the app I want to pin does not appear in the Apps screen?
Switch to the Start screen and begin typing the name of the app. Windows 8 switches to the Apps search screen and begins displaying a list of apps with names that match your text. Keep typing until you see the app, right-click the app, and click Pin to Start.
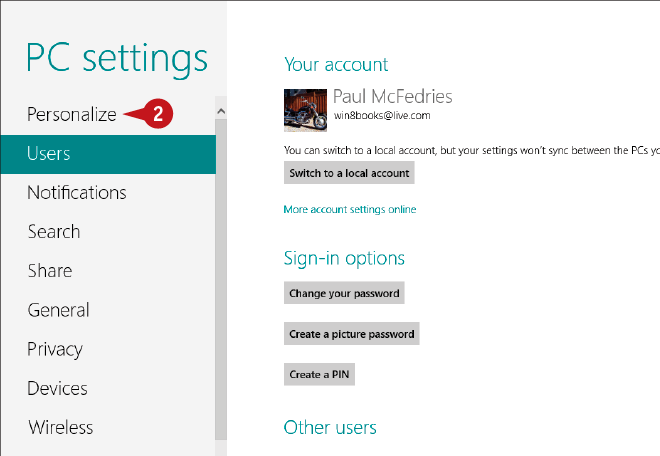
Open the PC Settings App
You can configure and customize many aspects of your Windows 8 system using the PC Settings app.
PC Settings is the Windows 8 app that you use for customizing and tweaking your PC. Many of the tasks that follow in this chapter, including changing the Start and Lock screen backgrounds and adding an app to the Lock screen, are performed using the PC Settings app. PC Settings also offers a wealth of other options that you can use to customize your PC.
Open the PC Settings App
![]() Move the mouse
Move the mouse ![]() to the top right corner of the screen.
to the top right corner of the screen.
The Charms menu appears.

![]() Click Settings.
Click Settings.
The Settings pane appears.

![]() Click Change PC settings.
Click Change PC settings.
The PC Settings app appears.

A Use the tabs on the left side of the screen to navigate the PC Settings app.
Simplify It
Is there a faster way to open the PC Settings app?
Probably the fastest way is to press ![]() +
+![]() and then press
and then press ![]() . If you are using a tablet, swipe in from the right edge of the screen to display the Charms menu, tap Settings, and then tap Change PC Settings.
. If you are using a tablet, swipe in from the right edge of the screen to display the Charms menu, tap Settings, and then tap Change PC Settings.
If I know which tab of the PC Settings app I want to use, is there a quick way to display it?

Press ![]() +
+![]() to open the Settings search pane, and then begin typing the name of the tab or setting you want. For example, if you want to go directly to the Users tab, type users and then click Users in the search results.
to open the Settings search pane, and then begin typing the name of the tab or setting you want. For example, if you want to go directly to the Users tab, type users and then click Users in the search results.
Change the Start Screen Background
To give Windows 8 a different look, you can change the default Start screen background.
The Start screen background is the area that appears “behind” the tiles. It consists of an abstract pattern formatted with a green color scheme. If you find yourself using the Start screen frequently, the default background might become tiresome. If so, you can liven things up a bit by changing both the background pattern and the background color.
Change the Start Screen Background
![]() Open the PC Settings app.
Open the PC Settings app.
Note: See the previous section, “Open the PC Settings App.”

![]() Click Personalize.
Click Personalize.
![]() Click Start screen.
Click Start screen.

![]() Click the background image you want to use.
Click the background image you want to use.
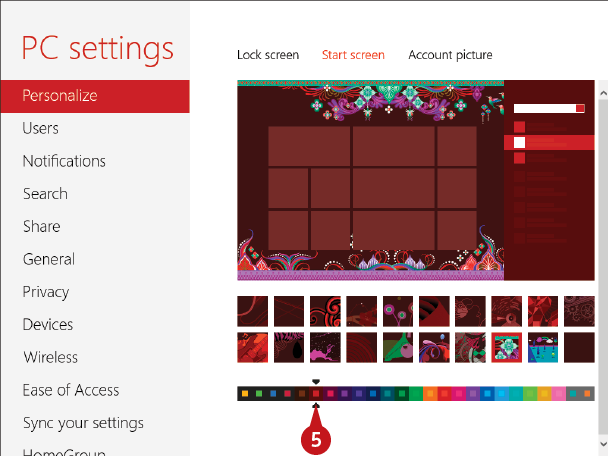
![]() Click the background color you want to use.
Click the background color you want to use.
My eyesight is not what it used to be. Is there a way to make the Start screen more readable?
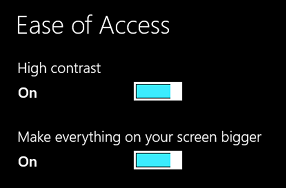
Windows tends to use fairly subtle colors and fairly small text, so the screen can be hard to read if your eyesight is poor. The solution is to switch to High Contrast mode, which uses white text on a black background. You can also increase the size of the screen elements.
To set this up, open the PC Settings app, click the Ease of Access tab, click the High contrast switch to On, and click the Make everything on your screen bigger switch to On. Note, too, that you can also switch between the regular screen mode and High Contrast mode by pressing Shift+Alt+Print Screen. (Make sure you use the left Shift and left Alt keys for this.) When Windows asks you to confirm, click Yes.
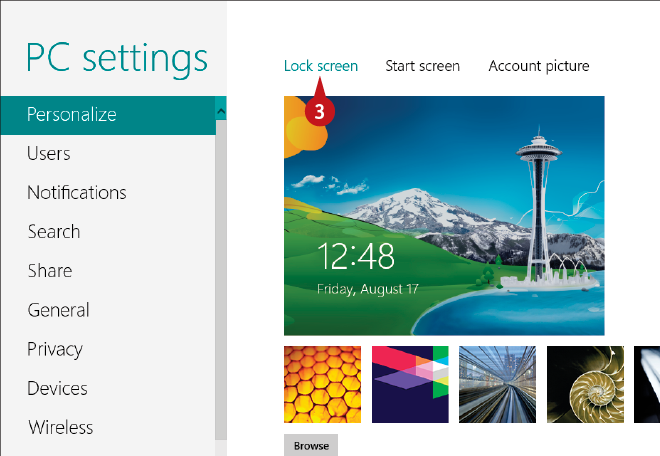
Change the Lock Screen Background
If you frequently lock your computer, you can change the Lock screen background to something more interesting.
As discussed in Chapter 11, locking your computer is a useful safety feature because it prevents unauthorized users from accessing your files and your network. If you find yourself looking at the Lock screen frequently, you might prefer to see something other than the default image. Windows 8 comes with several system pictures that you can use, or you can use one of your own pictures.
Change the Lock Screen Background
![]() Open the PC Settings app.
Open the PC Settings app.
Note: See “Open the PC Settings App,” earlier in this chapter.

![]() Click Personalize.
Click Personalize.
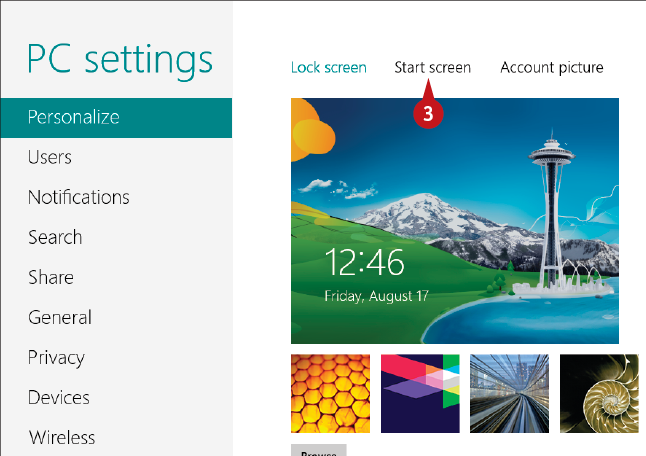
![]() Click Lock screen.
Click Lock screen.
A You can choose a system picture.
![]() To use one of your own pictures, click Browse.
To use one of your own pictures, click Browse.
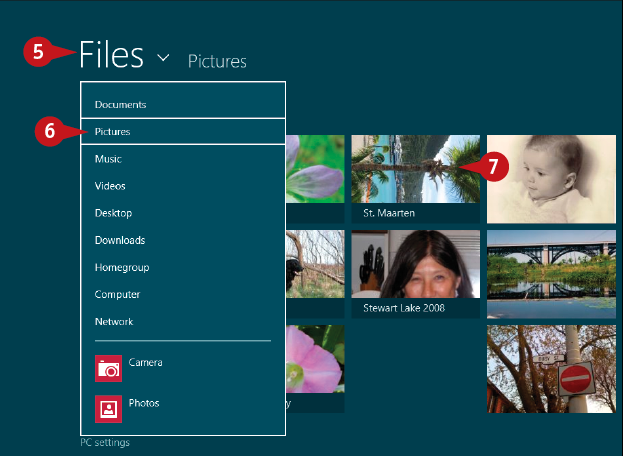
![]() Click Files.
Click Files.
![]() Click the folder that contains the picture you want to use.
Click the folder that contains the picture you want to use.
![]() If the picture resides in a subfolder, click that subfolder to open it.
If the picture resides in a subfolder, click that subfolder to open it.

![]() Click the picture you want to use.
Click the picture you want to use.
![]() Click Choose picture.
Click Choose picture.
The image appears the next time you lock your computer.
Simplify It
Can I change the desktop background?
Yes, by following these steps:
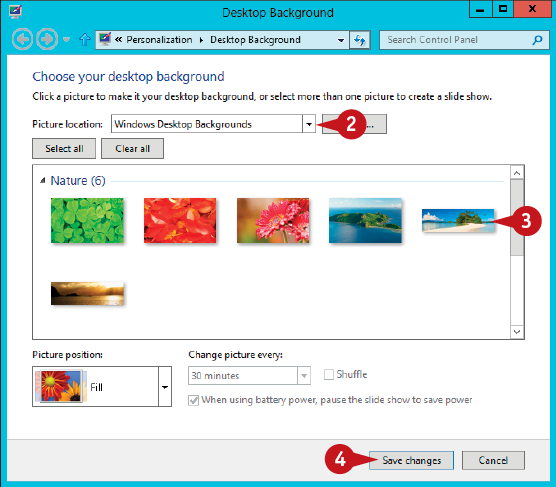
![]() Press
Press ![]() +
+![]() , type desktop, and then click Change desktop background.
, type desktop, and then click Change desktop background.
The Desktop Background window appears.
![]() Click the Picture location
Click the Picture location ![]() and then click the background gallery you want to use.
and then click the background gallery you want to use.
![]() Click the image or color you want to use.
Click the image or color you want to use.
The picture or color you selected appears on the desktop.
![]() Click Save changes.
Click Save changes.
Add an App to the Lock Screen
If you frequently lock your PC, you can make the resulting Lock screen more useful by adding one or more apps.
When you lock your PC, Windows 8 displays icons for apps that have had recent notifications. For example, the Mail app shows the number of unread messages, and the Messages app shows the number of new text messages. The Lock screen also shows any new notifications that appear for these apps.
If you lock your computer frequently, you can make the Lock screen even more useful by adding icons for other apps that support notifications.
Add an App to the Lock Screen
![]() Open the PC Settings app.
Open the PC Settings app.
Note: See “Open the PC Settings App,” earlier in this chapter.
![]() Click Personalize.
Click Personalize.
![]() Click Lock screen.
Click Lock screen.
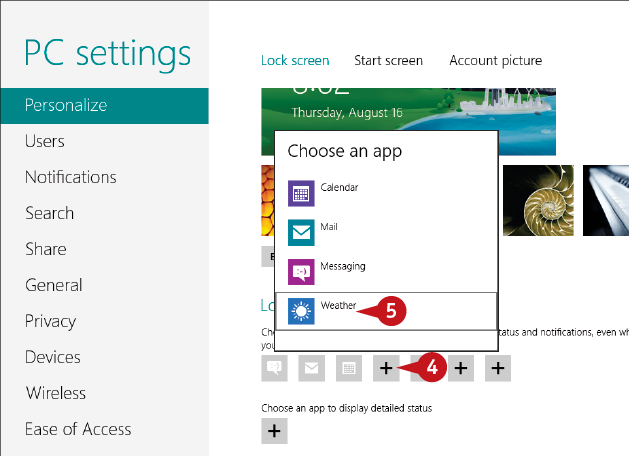
![]() Click Add (
Click Add (![]() ).
).
Windows 8 opens the Choose an App window.
![]() Click the app you want to add to the Lock screen.
Click the app you want to add to the Lock screen.

![]() To add an app to display detailed status, click Add (
To add an app to display detailed status, click Add (![]() ).
).
![]() Click the app.
Click the app.
Windows 8 puts the new settings into effect and the apps appear on the Lock screen the next time you use it.
What is the difference between quick status and detailed status?
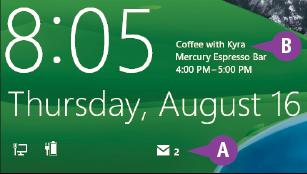
Quick status means that the Lock screen shows only a small icon for an app, and that icon displays the number of recent or unread items, such as the number of unread e-mail messages in the Mail app (A). Detailed status means that the Lock screen shows more information from the app. For example, if you have an upcoming event in the Calendar app, the Lock screen shows the details of that event, including the event title, location, and time (B).
Synchronize Settings between PCs
You can make Windows 8 easier to use, more consistent, and more efficient by synchronizing your settings, customizations, and data between multiple devices.
If besides your Windows 8 desktop computer you also have a Windows 8 notebook, a Windows 8 tablet, and a Windows 8 phone, using the same Microsoft account on each means you can synchronize data between them. You can sync customizations (such as backgrounds and themes), system settings (such as languages and regional settings), Internet Explorer data (such as favorites and history), app settings, and more. This gives you a consistent interface across your devices, and consistent data so you can be more productive.
Synchronize Settings between PCs
![]() Open the PC Settings app.
Open the PC Settings app.
Note: See “Open the PC Settings App,” earlier in this chapter.

![]() Click Sync your settings.
Click Sync your settings.
Windows 8 displays the Sync Your Settings screen.

![]() Click Sync settings on this PC to On.
Click Sync settings on this PC to On.
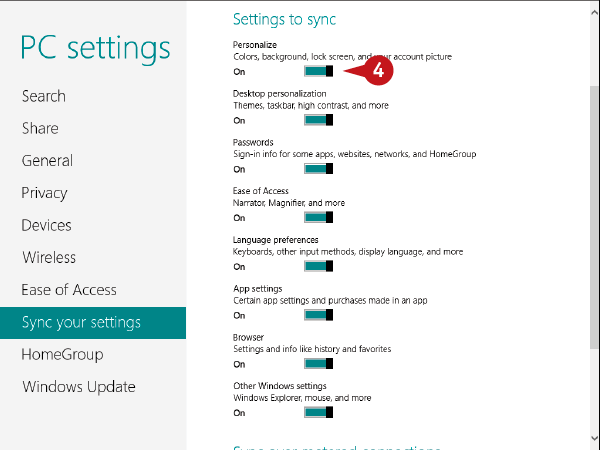
![]() Under Settings to Sync, click the switch to Off beside each type of setting that you do not want to include in the sync.
Under Settings to Sync, click the switch to Off beside each type of setting that you do not want to include in the sync.
Can I prevent syncing during those times when I am using a metered Internet connection that allows me only so much data?

By default, Windows 8 does not sync with other PCs when you are using a metered Internet connection. However, you have to tell Windows 8 when you are using a metered connection. Press ![]() +
+![]() , click the Network icon (
, click the Network icon (![]() ), right-click your Internet connection, and then click Set as metered connection.
), right-click your Internet connection, and then click Set as metered connection.
If I am using a metered Internet connection, is there a way to sync between PCs anyway?
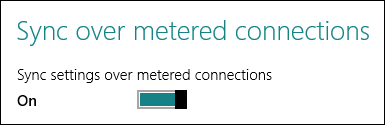
Yes, you can configure Windows 8 to sync over a metered Internet connection. Follow steps 1 and 2 to display the Sync Your Settings screen, scroll to the bottom of the screen, and then click the Sync settings on metered connections switch to On.
Access an App’s Features
You can gain access to all of a Windows 8 app’s commands and settings by displaying its application bar.
By design, Windows 8 apps appear simple and uncomplicated. They take up the entire screen, and when you first launch them you usually only see a fairly basic interface. However, almost all Windows 8 apps include a number of features — commands, settings, views, and so on — that you cannot see at first. To access these features, you must display the application bar (sometimes called the app bar), a strip that appears along the bottom (or sometimes the top) of the screen. You can then click the feature you want to use.
Access an App’s Features
Display the Application Bar
![]() Open the Windows 8 app you want to work with.
Open the Windows 8 app you want to work with.
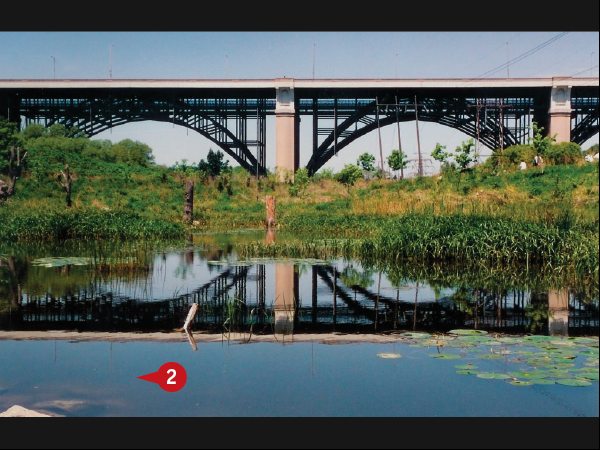
![]() Right-click the screen.
Right-click the screen.
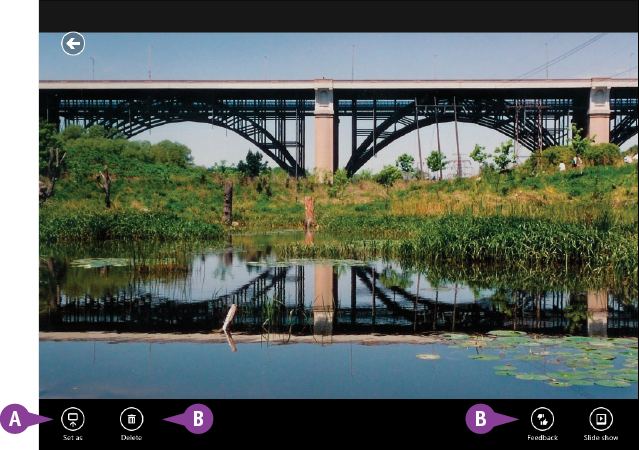
A The application bar appears.
B The icons inside the application bar represent the app’s features.
Note: In some apps, the application bar appears at the top of the screen, whereas in other apps you see two application bars, one on the bottom and one on the top of the screen.
Hide the Application Bar
Note: If you click an application bar feature, the app automatically hides the application bar. You only need to hide the application bar by hand if you decide not to select a feature.
![]() Click an empty section of the app screen outside the application bar.
Click an empty section of the app screen outside the application bar.

C The app hides the application bar.
Simplify It
Is there a faster way to display and hide the application bar?
If your hands are already on the keyboard, then probably the fastest way to access the application bar is to press ![]() +
+![]() . To hide the application, press
. To hide the application, press ![]() +
+![]() again.
again.
How do I display and hide the application bar on my Windows 8 tablet?
To access the application bar on a tablet, either swipe up from the bottom edge of the screen, or swipe down from the top edge of the screen. To hide the application bar on a tablet, tap an empty section of the screen outside the application bar.
Pin an App to the Taskbar
If you spend more time using the desktop than the Start screen, you can place your favorite apps a mouse click away by pinning them to the taskbar.
Pinning an app to the Start screen was covered earlier in this chapter, but that is helpful only if you use the Start screen regularly. If you use the desktop more often and you have an app that you use frequently, you might prefer to have that app just a single click away. You can achieve this by pinning that app to the taskbar.
You can pin an app to the taskbar either from the Start screen or from the desktop.
Pin an App to the Taskbar
Pin an App Using the Start Screen

![]() On the Start screen, type the name of the app you want to pin.
On the Start screen, type the name of the app you want to pin.
![]() In the Apps screen search results, right-click the app you want to pin.
In the Apps screen search results, right-click the app you want to pin.
![]() Click Pin to taskbar.
Click Pin to taskbar.
![]() Press
Press ![]() +
+![]() .
.
The desktop appears.
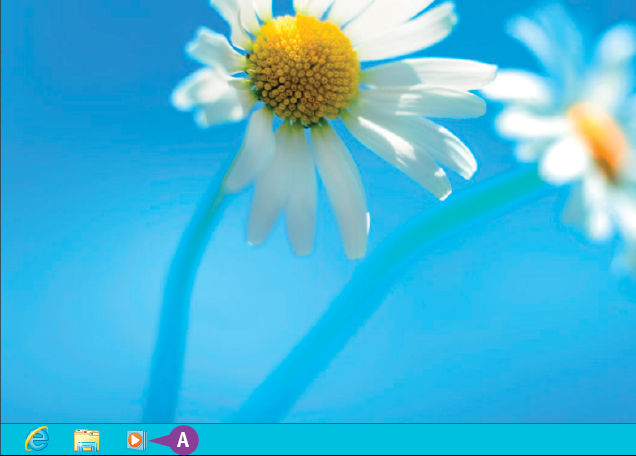
A An icon for the app now appears in the taskbar.
Pin a Running App

![]() Launch the app you want to pin.
Launch the app you want to pin.
![]() Right-click the running app’s taskbar icon.
Right-click the running app’s taskbar icon.
![]() Click Pin this program to taskbar.
Click Pin this program to taskbar.
![]() Click the Close button (
Click the Close button (![]() ).
).

B An icon for the app remains on the taskbar.