
C H A P T E R 6
VM Role and Windows Azure Connect
As two of the latest additions to the Windows Azure platform, it's hard to think of any more widely anticipated features than VM role and Windows Azure Connect. However, they may also be the most misunderstood. In this chapter, I will help you understand why these features were released, what their purpose is, and the scenarios to which they do and do not apply.
![]() Note As of the time of writing, both of these technologies are technically still in beta. Thus, they are not supported for production use. For announcements regarding production availability for his and other Azure feature, go to
Note As of the time of writing, both of these technologies are technically still in beta. Thus, they are not supported for production use. For announcements regarding production availability for his and other Azure feature, go to http://blogs.msdn.com/windowsazure.
The VM role is complementary to the Web and Worker roles. It provides the ability to deploy a Windows Server 2008 R2 Hyper-V-enabled virtual machine to your hosted service. Essentially, you will now have the ability to run your own images in the Azure environment.
Windows Azure Connect provides IPSec protected connections between on-premise machines and cloud role instances. This provides a higher level of integration than previously offered by the AppFabric Service Bus.
VM Role
The first thing to note about the VM role in its current form is that it is not considered infrastructure as a service. In other words, it's not intended to be used in the same way as Amazon Web Services EC2 or other IaaS providers such as Rackspace. This makes sense when you consider the Azure Fabric—the Fabric Controller can bring down any role instance at any time, for many good reasons. In addition, the nodes sit behind a round-robin load balancer. This is what makes Azure strong as a PaaS provider. However, this also means that in order to maintain the Azure SLA, you will need at least two instances of your role deployed. This has several architectural impacts, including the following:
- State management. Because there are two instances running behind a round-robin load balancer, you will need to store runtime state information outside the VM. Windows Azure Caching is a good candidate for this.
- File management: Files will also need to be maintained outside the VM. Because the load balancers route requests in a round-robin fashion, the file systems on each compute instance will quickly become dissimilar and fragmented unless files are stored centrally. If the files are read-only files, then Windows Azure Drives are a great solution. Otherwise, consider using Azure blob storage.
So, what this means today is that VM role is not well suited to running stateful server applications. Obviously, you wouldn't want to install Active Directory to a VM role, but applications like SQL Server and Oracle are also not good candidates at this point.
VM Role Benefits/Tradeoffs
Using VM role provides you the ability to have more control over your image. You can set it up exactly the way you want, install any software necessary, and configure services that you might need. In addition, you still get the benefits of Azure-provided load balancing, failover, and redundancy.
However, once you use the VM role, you are responsible for maintaining the image yourself. This means you have to perform upgrades to the operating system, and patches. If you have an application update, you will need to build and test the new images, rather than simply deploying an application package to the Azure Service Management portal. This also complicates your development cycles. Before, your application developers could test their work by simply deploying their package to the compute emulator. Now there's an extra layer of complexity brought into the development cycle.
Scenarios
There are several scenarios in which VM role makes perfect sense. One would be an application that requires many other products to be installed to run correctly. While you could use Startup Tasks to install this required software, the install will take time. This time increases the amount of time required to spin up the Azure role instances. This has several impacts, most notably that whenever one of your VMs are taken down by the fabric controller, it will take longer for that VM to be restored, resulting in longer periods of diminished capacity.
If you were to pre-install all of this software on a VHD image, then you won't have to wait for the installers to run—the software will be already installed.
![]() Note You might assume that by handling OS upgrades and patches yourself in VM role, that the application would gain significantly more uptime, as the fabric controller would not need to install these updates. This is only partially true, in that the guest OS would not need to be updated. However, the instance can still be taken down for a variety of reasons, including hardware failure, Host OS updates, or even to gain hardware efficiencies in the data center.
Note You might assume that by handling OS upgrades and patches yourself in VM role, that the application would gain significantly more uptime, as the fabric controller would not need to install these updates. This is only partially true, in that the guest OS would not need to be updated. However, the instance can still be taken down for a variety of reasons, including hardware failure, Host OS updates, or even to gain hardware efficiencies in the data center.
There is another scenario worth mentioning related to installing software. If your application requires third-party software, and the provider didn't write its installer to run in silent or unattended mode, then you need to use the VM role. You can install the software manually on your image, then deploy your image to the cloud.
There are other scenarios, such as complications involving SysWow64 and 32-bit Dlls, but the takeaway from this section is to carefully consider the use of the VM role. It isn't intended to support IaaS, and you should take this into consideration, especially when migrating an existing application to the cloud. Some applications, such as single-server, on-premises applications are not good candidates for the cloud without significant changes, whether you use VM role or Web/Worker roles. VM role is not always a shortcut to getting to the cloud.
At a high level, there are the following three steps to deploying a VM to Windows Azure:
- Create a base image in Hyper-V.
- Apply
sysprep.exe. - Upload to Windows Azure.
I discuss these in the following sections.
Creating the Virtual Machine
The first step is to build your base VM image. You'll need a Windows 2008 R2 Server with Hyper-V enabled, and either a disk or .iso image for a Windows Server 2008 R2 (along with a valid license key, of course). You will also want to either install the Windows Azure SDK 1.4 to this server, or copy the following file to your server hard drive:
C:Program FilesWindows Azure SDKv1.4isowavmroleic.iso
This assumes you are running SDK version 1.4 and have installed to the default directory. If you installed to another directory, or are using another version, adjust the path accordingly.
![]() Note The steps to setting up Hyper-V and creating a base virtual machine image are beyond the scope of this book. I will be focusing on any steps that are specific to building and deploying to Windows Azure. The Windows Azure Platform Training Kit has an excellent lab that will take you step by step through this process.
Note The steps to setting up Hyper-V and creating a base virtual machine image are beyond the scope of this book. I will be focusing on any steps that are specific to building and deploying to Windows Azure. The Windows Azure Platform Training Kit has an excellent lab that will take you step by step through this process.
Using Hyper-V Manager, build your base image. The key step in this process that is different is to pay attention to how much memory you assign to the image. It's important that this space is within the disk space allocated for the size of the Azure VM you plan to deploy. For example, the Medium size VM has a 500GB disk size limit. You obviously wouldn't want to allocate 750 GB to your image in this case, unless you are planning on deploying to a Large VM, which would increase the cost of the application.
After installing the OS, add the roles you need for the server (such as IIS), and features such as .NET Framework, Remote Administration, and enabling Remote Desktop access if you want to be able to remote into your instance. You'll also want to install all other server application components necessary to run your application, such as third-party tools, services, and the code required to run your application.
Windows Azure VM Role Integration Components
The Windows Azure VM Role Integration components are required to be installed on the image. These are components that start each time the operating system starts, and they perform tasks that enable the VM to run in the Azure environment. Essentially, the components provide several functions – preparing the VM for deployment, installing runtime APIs that provide coordination between the VM and the Azure Fabric, installing certificates, and creating local storage resources.
System Preparation
Included with the Integration Components is a System Preparation Tool (sysprep.exe). This tool runs the VM you have created through a specialized setup when the instance is initialized. In order to automate this, a file (C:unattend.xml) is installed in the root directory of the VM role instance. This file provides the Windows configuration settings for this specialization phase, and includes the following:
- System locale to en-US
- Time zone to UTC (which must not be changed)
- Turning off Windows Update
- Setting the Administrator password
Provide Coordination Between Your Image and the Windows Azure Fabric
Several service runtime APIs are also installed. These allow the VM to communicate with the Azure environment. This is what enables code from the Microsoft.WindowsAzure.ServiceRuntime namespace to perform actions such as retrieving the IP addresses of all other role instances, getting the instance ID, and getting service configuration information. It also enables the VM to communicate its instance state through the load balancer. This is critical to ensuring the fabric controller can determine when a VM is unhealthy and needs to be recycled.
![]() Note Code that uses the service runtime API needs to be running under an administrator or
Note Code that uses the service runtime API needs to be running under an administrator or LocalSystem account.
Install Certificates
Remember that certificates are specified in the service definition file and uploaded through the Azure portal? Well, this means that they somehow need to get installed on the VM. The Windows Azure Integration Components handle this for you. All certificates are installed to the LocalMachine store location.
If you're thinking that it's easier to install the server certificate directly on the server image, think again. The sysprep tool, in the process of generalizing your image, destroys private key information.
![]() Note For more information on using management certificates with a VM role, go to
Note For more information on using management certificates with a VM role, go to http://msdn.microsoft.com/en-us/library/gg697586.aspx.
Create Local Storage Resources
In your service definition, you have the ability to define local storage on the VM. Because this is in the service definition and not on the VM, the Integration Components must read the service model through the service runtime API, and then allocate the local storage resources as necessary.
Installing the Integration Components
In order to install the components, you will need the wavmroleic.iso file, which can be found in the Windows Azure SDK as described previously, or copied to you server hard drive (see Figure 6-1). Here are the steps:
- While connected to your VM on your server, choose Media DVD Drive Insert Disk.
- Browse to the
.isofile, select it, and click Open. - This will mount the ISO as a DVD drive, which will bring up the AutoPlay dialog. Double-click
WaIntegrationComponents-x64.msito begin the installation.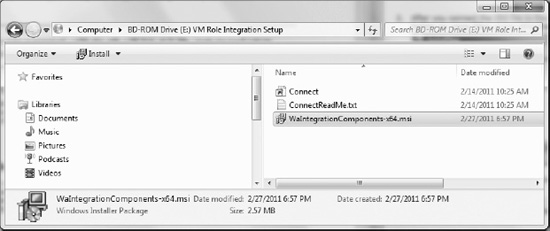
Figure 6-1. Windows Azure integration components install file
- Run the install wizard. You will need to provide the Administrator password. This is used when the operating system starts, after the image is prepared and deployed to Windows Azure.
- When the install is complete, you will be asked to restart the system.
![]() Note It's probably a good idea to create a password-reset disk, in case you ever lose the Administrator password.
Note It's probably a good idea to create a password-reset disk, in case you ever lose the Administrator password.
System Preparation Tool
Once the VM is restarted, log in and run the System Preparation Tool, which is located at %windir%system32sysprepsysprep.exe. Set the options as shown in Figure 6-2.
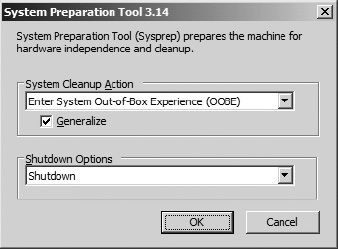
Figure 6-2. System Preparation Tool settings
The sysprep tool will prepare the image by cleaning up specifics such as user and machine settings and log files, private key information, and hardware-dependent information.
Upload Image to Windows Azure
Finally, we are ready to upload the image to Windows Azure! In order to upload to the Windows Azure environment, we will use the csupload.exe command-line tool that is provided as part of the Windows Azure SDK. Once the image is uploaded, we will create the Visual Studio project that contains the service definition
From the start menu, navigate to Windows Azure SDK 1.4 and open the Azure SDK Command Prompt as an Administrator. Here, we will execute csupload.exe, telling it to execute a PowerShell cmdlet that will upload the vhd file:
csupload Add-VMImage -Connection "SubscriptionId=<YOUR-SUBSCRIPTION-ID>;

CertificateThumbprint=<YOUR-CERTIFICATE-THUMBPRINT>" -Description "<YOUR DESCIPTION>"

-LiteralPath "<PATH-TO-VHD-FILE>" -Name <NAME.VHD> -Location <HOSTED-SERVICE-LOCATION>
The subscription ID is your Azure subscription ID. This can be obtained from the Management Portal. The certificate thumbprint is the thumbprint from the management certificate you generated and uploaded to the management portal. Add your own description, the path to your VHD, and the name of the VHD, and then the name of the Windows Azure datacenter where the VHD will be hosted. As of the time of writing, available options are “East Asia,” “North Central US,” “North Europe,” “South Central US,” “Southeast Asia,” “West Europe.”
Once execution starts, the Windows Azure VHD Verification Tool will run. This tool will mount the VHD and verify it, then compress it into an even smaller copy, with a .preped extension. It will then begin uploading the image, which can take a long time, due to the typically large file size and connection speed.
Viewing Image in Management Portal
To verify that the image was uploaded successfully, Open your Management Portal, click Hosted Services, Storage Accounts & CDN, and the click the VM Images folder on the left, as shown in Figure 6-3. You should see a list of your subscriptions, along with any VMs you have uploaded.

Figure 6-3. VM image in Management Portal
Creating the Hosted Service and Service Definition
Congratulations! You have successfully uploaded a VHD to Windows Azure! But wait… we're not done yet. We need a hosted service in which to deploy the image, which means we need to create a deployment package and configure it to reference the image we just uploaded. Here are the steps:
- Open Visual Studio and create a new Windows Azure Project, but in this case do not add any roles. Just click OK when the Add Roles dialog appears.
- Once the solution is created, right-click the Roles folder in Solution Explorer, and choose Add New Virtual Machine Role.
 Note If the New Virtual Machine Role option is not available, you may need to change a registry setting (remember, this is still technically in beta). This link can help:
 http://social.msdn.microsoft.com/Forums/en-US/windowsazuretroubleshooting/thread/84c61a84-89c1-4fef-8d7b-e6419e8c4339. - Double-click the role you just created in Solution Explorer to begin configuring the Hosted Service model. Visual Studio will need access to your Azure subscription, to retrieve the list of VMs that have been uploaded and are available.
- Select the credentials that you have uploaded to the portal. In the Virtual Hard Disk tab, choose the credentials you used when uploading the VM, and then you will be provided with a drop down listing the VHDs you have uploaded.
- Choose the appropriate VHD for this hosted service (see Figure 6-4).
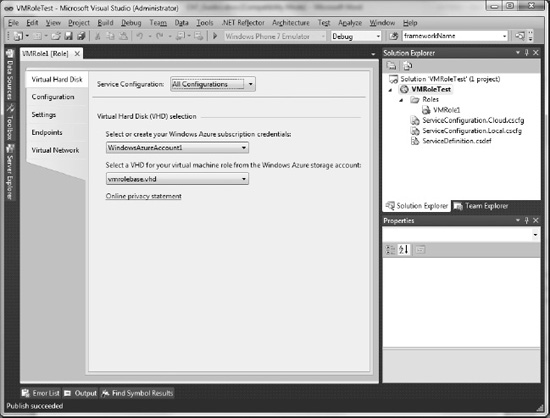
Figure 6-4. Selecting a VHD in Visual Studio
Note If you have not yet uploaded management certificates to the portal, go to http://msdn.microsoft.com/en-us/wazplatformtrainingcourse_vmrolelab_topic6for additional information. - Next, we need to configure endpoints. Go to the Endpoints tab and add the endpoints required for your application, such as HTTP and HTTPS, plus any TCP ports you need opened (see Figure 6-5). Keep in mind there is a 5-port limit, and that Remote Access will also consume one of your ports.
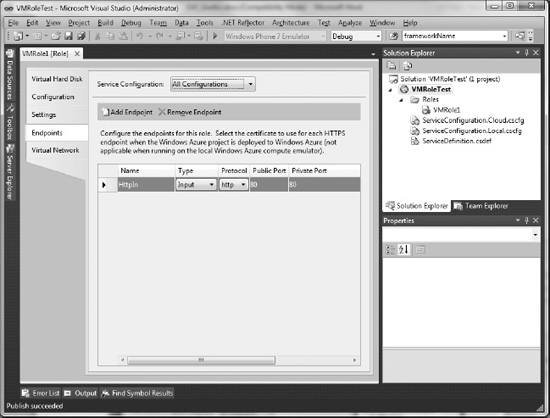
Figure 6-5. Configuring endpoints in Service Definition
Once we have completed these tasks, the final steps are to package the role and (if desired) enable remote access so we can view the instance remotely once deployed.
Packaging and Enabling Remote Access
Packaging our VM role for deployment is not different than doing the same for a Web or Worker role. Right-click the Cloud Service project and select Publish. To enable remote access, click the Configure Remote Desktop Connections link, and enter your credentials, and the Remote Access password, which is either the Administrator password, or another identity you created in the VM for remote access.
Deploying the Hosted Service
To deploy the hosted service, we simply go back to the management portal and deploy our package exactly the same as a Web or Worker role. Navigate to Hosted Services, create or select the hosted service in which to deploy, and deploy your project.
Once these steps are complete, you should have your VM role application running on Windows Azure!
Next, we will take a look at Windows Azure Connect—a handy tool, for instance, if you need to connect your VM to a server running on premises.
Windows Azure Connect
While the Azure product team doesn't refer to Windows Azure Connect as a VPN, I can't really come up with a more accurate comparison. Windows Azure Connect provides an IPsec protected connection between disconnected machines. This could be on-premise machines, or Web/Worker/VM role instances in separate hosted services. As you might expect, the possibilities for hybrid applications becomes mind-boggling, as shown in Figure 6-6.
In the next few sections, we will look at how Windows Azure Connect is different from the Windows Azure AppFabric Service Bus, as well as how to provision and activate Windows Azure Connect endpoints, creating a solution that networks could instances to on-premises machines.
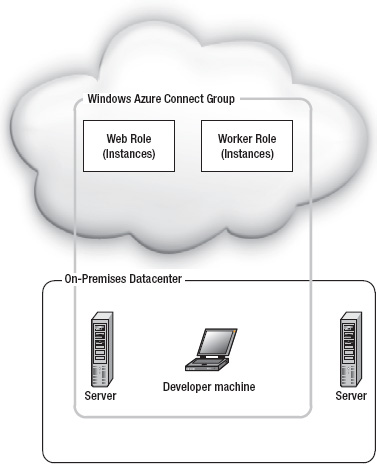
Figure 6-6. Windows Azure Connect group
Windows Azure Connect vs. Service Bus
Connect enables hybrid scenarios and Service Bus enables hybrid scenarios. So how are they different, and when is it appropriate to use one over the other? I like to think of Service Bus as an application-level integration utility, while Connect is a machine-level integration utility.
With Service Bus, you need to build proxies on each side of the firewall, and the applications use a relay service to communicate. If your scenario is one application talking to another application, this is highly appropriate.
With Connect, you have access to the entire machine as if it were in your datacenter. This means you can operate in a more familiar way, such as integrating System Center Operations Manager for monitoring, connecting to a database on-premises, or accessing functionality of legacy systems that could not be ported to the cloud.
Connect brings tremendous power and flexibility. However, keep the following in mind:
- Network latency. Keeping your database on-premises and using Connect is very tempting, especially in regulatory compliance scenarios. However, the distance between your datacenter and the Azure datacenter matters. Performance may suffer. However, if the benefits outweigh the performance cost, then go with Connect.
- Bandwidth costs. Even though the servers are interacting as if they are in the same datacenter, they are not. Even though pricing has not yet been announced for Connect, keep in mind that you are charged for all bandwidth coming out of the datacenter. No matter what, you would always want to make sure you are using bandwidth as efficiently as possible.
![]() Note For a real-world example that implemented Connect as a replacement for Service Bus, go to
Note For a real-world example that implemented Connect as a replacement for Service Bus, go to www.microsoft.com/windowsazure/learn/real-world-guidance/field-notes/integratingonpremises-using-connect/.
Provisioning Windows Azure Connect
The first step in provisioning Windows Azure Connect is to ensure you have access to the CTP. To do so, follow these steps:
- In the Windows Azure Management Portal, click the Home tab, then the Beta Programs folder in the left-hand navigation.
- There you will be given the option to request CTP access. Note that this process will change once Connect is in production, you will not need to request access.
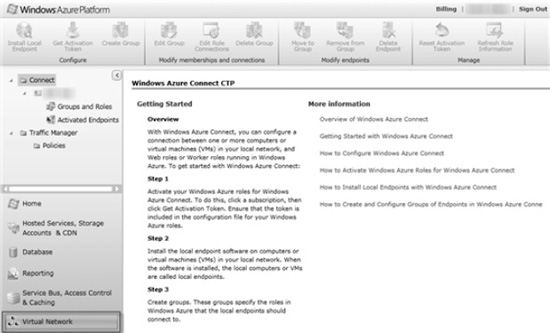
- Once access has been granted, you will be able to access Connect functionality through the Virtual Network tab, as shown in Figure 6-7.
- Next, you will need to enable Windows Azure Connect for your subscription. In the left-hand navigation pane, click on your subscription name.
- A dialog box will pop up asking if you want to enable Windows Azure Connect for your subscription. Click Yes.
Once your subscription is enabled, you will need to create endpoints, and create a group containing your roles and on-premises machines.
Activated Endpoints, Groups, and Roles
Endpoints you wish to have available to Connect must be registered with Windows Azure. Once registered, you will have the ability to add these endpoints into groups that will be able to interact with each other as if they were in the same datacenter.
The Management Portal shows two folders in the navigation: Activated Endpoints and Groups and Roles. Activated Endpoints lists the endpoints that you have activated for this subscription. Groups and Roles will provide a tree view showing the groups you have created, and what endpoints exist in each group.
The end result we want is to have a group of endpoints connected, so first we need to activate those endpoints for our subscription. The process is different depending on whether you are activating an endpoint for a local machine, or an Azure role.
Installing and Activating an Azure Endpoint on a Local Machine
In order for local machines to be integrated with Windows Azure Connect, you will need to install the endpoint software on the machine itself.
The following steps are the easiest way to do this:
- Go to the Virtual network tab on the Management Portal and click on your subscription in the left-hand navigation.
- Then click Install Local Endpoint in the upper left-hand corner. You'll be presented with a dialog that contains a link (see Figure 6-8).
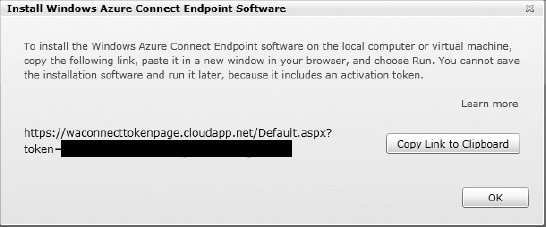
Figure 6-8. Local endpoint installation link
- Click the button to copy the link to your clipboard.
- If you are on the machine for which you want to install the endpoint, then open your browser and paste this link into your browser. If you plan to install to another machine, then you will need to paste this link to a text file.
- Copy the text file to the other machine, and then copy/paste the link into the browser on that machine. This will download and install the endpoint software on your machine.
Note The local endpoint software is currently only compatible with Windows operating systems.
- Once installed, note that there really isn't much for UI elements to determine that the endpoint is running. The only UI element is in your system tray (see Figure 6-9).
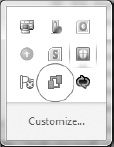
- If you click the tray icon, you will be presented with options to open Windows Azure Connect, Refresh Policy, or Diagnostics. Opening Windows Azure Connect brings up the dialog shown in Figure 6-10.
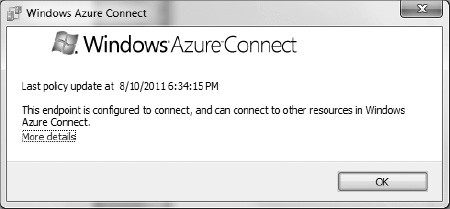
Figure 6-10. Windows Aure Connect endpoint software UI
If you're having connectivity issues, the diagnostics dialog might be useful in detecting issues (see Figure 6-11).
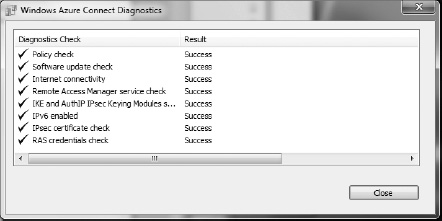
Figure 6-11. Windows Azure Connect Diagnostics dialog
Protocols and Ports
Note that Azure connectivity is based on IPv6 and HTTPS. This means that on the machine hosting the local endpoint software, TCP port 443 outbound must be opened, and firewall excpetions must be created for Internet Control Message Protocol version 6 (ICMPv6) communication. This is critical to establishing an IPv6 link. The endpoint software configures these for you, but you should be aware of these protocol/port/firewall requirements in case you run into issues. Additionally, you will need to configure other firewall exceptions as required by your applications.
Concerning your Windows Azure role instances, the endpoints/firewall rules are configured for you by Windows Azure. If you need a specific port opened for an application running on your instnace, then you will need to configure that in the service definition, but otherwise, you won't need to make any specific changes for Windows Azure Connect.
Enabling Windows Azure Connect for a Role
In order to activate Windows Acure Connect for a role, you must get an activation token from the Management Portal, and copy that token into the service configuration for your role. This token tells Windows Azure to add this role to the collection of activated endpoints that can be added to an Azure group (see Figure 6-12).
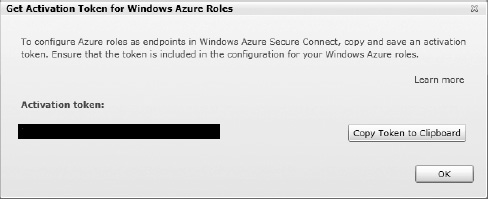
Figure 6-12. Getting an activation token from the Management Portal
Connect must be enabled in the ServiceDefinition for your deployment. In order to enable Connect, open the role properties by double-clicking, go to the Virtual Network tab, select the Activate Windows Azure Connect checkbox, and paste the token you received from the portal (see Figure 6-13).

Figure 6-13. Activating Windows Azure Connect for a role
It's really that simple. Behind the scenes, your ServiceDefinion.csdef and ServiceConfiguration.cscfg files are modified.
<Import moduleName="Connect" />
The code in Listing 6-1 is added to the service configuration, and define the settings for the Connect environment:
Listing 6-1. ServiceConfiguration.cscfg modifications
<Setting name="Microsoft.WindowsAzure.Plugins.Connect.ActivationToken" value="<TOKEN>" />

<Setting name="Microsoft.WindowsAzure.Plugins.Connect.Refresh" value="" />

<Setting name="Microsoft.WindowsAzure.Plugins.Connect.Diagnostics" value="" />

<Setting name="Microsoft.WindowsAzure.Plugins.Connect.WaitForConnectivity" value="" />

<Setting name="Microsoft.WindowsAzure.Plugins.Connect.EnableDomainJoin" value="" />

<Setting name="Microsoft.WindowsAzure.Plugins.Connect.DomainFQDN" value="" />

<Setting name="Microsoft.WindowsAzure.Plugins.Connect.DomainControllerFQDN" value="" />

<Setting name="Microsoft.WindowsAzure.Plugins.Connect.DomainAccountName" value="" />

<Setting name="Microsoft.WindowsAzure.Plugins.Connect.DomainPassword" value="" />

<Setting name="Microsoft.WindowsAzure.Plugins.Connect.DomainOU" value="" />

<Setting name="Microsoft.WindowsAzure.Plugins.Connect.DNSServers" value="" />

<Setting name="Microsoft.WindowsAzure.Plugins.Connect.Administrators" value="" />

<Setting name="Microsoft.WindowsAzure.Plugins.Connect.DomainSiteName" value="" />

<Setting name="Microsoft.WindowsAzure.Plugins.Connect.Upgrade" value="" />
Once you deploy your solution, your endpoints will be activated. You can view these endpoints by clicking the Activated Endpoints folder in the Management Portal.
Creating Connect Groups
Creating groups is very simple once you have activated all the required endpoints. Go to the Management Portal, click the Virtual network tab, select your subscription, and click the Groups and Roles folder. Click Create Group. Provide a name for your group, and add your local endpoints. Note the checkbox for “Allow connections between endpoints in group.” This allows you to control whether the local endpoints can communicate with each other. Keep in mind that the local endpoints may not be in the same datacenter, so you need to decide whether you want to enable them to communicate directly with each other.
Next you add your Azure roles for which you have activated endpoints, or other endpoint groups you have already created. Click Create, and your group will be enabled and capable of communicating directly (see Figure 6-14)!
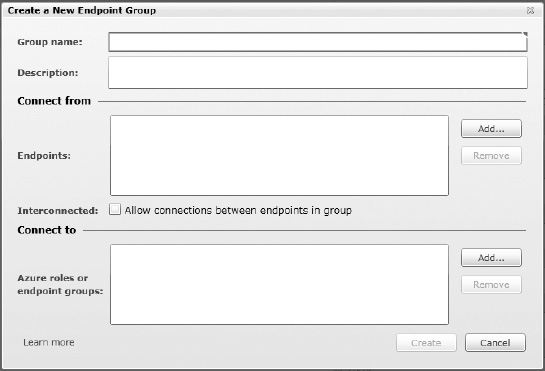
Figure 6-14. Creating a Windows Azure Connect endpoint group
![]() Note If you un-deploy a role and re-deploy (which may happen often during development), the role will be dropped from the group and you will need to go back to the Management Portal and add t to the group again. Roles can be easily added or removed using the Edit Group button (see Figure 6-15).
Note If you un-deploy a role and re-deploy (which may happen often during development), the role will be dropped from the group and you will need to go back to the Management Portal and add t to the group again. Roles can be easily added or removed using the Edit Group button (see Figure 6-15).
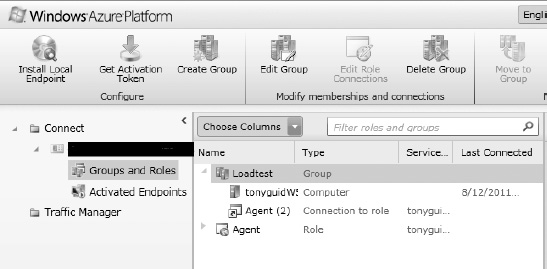
Figure 6-15. Group named Loadtest, with a computer and a role (two instances)
Summary
In this chapter you learned how to create a VM role, as well as the scenarios in which VM role can be useful, and other scenarios where it may not be an appropriate solution. We covered Windows Azure Connect and creating Azure Connect groups to enable machine-level connectivity between environments.
Bibliography
MSDN: How to Install the Windows Azure Integration Components. http://msdn.microsoft.com/en-us/library/gg465409.aspx
MSDN: Troubleshooting Windows Azure Connect. http://msdn.microsoft.com/en-us/library/gg433016.aspx
MSDN: Overview of Firewall Settings Related to Windows Azure Connect. http://msdn.microsoft.com/en-us/library/gg433061.aspx