Once you’ve got your XP MCE system set up and integrated into your home environment, it’s time to dig below the surface and uncover some of the little gems of functionality that will really improve your MCE experience.
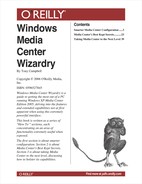
The electronic program guide (EPG), known in MCE simply as “Guide,” is an on-screen, interactive listing of all television and radio programs available for viewing over the coming days and weeks. An example of what the Guide looks like is shown in Figure 12.
This Guide presentation is, in fact, a very powerful user interface. Not only is it used to display the next ten days worth of scheduled programs, but it is also the primary route to most of the added value that MCE provides.
Tip
If you are using a wide-screen television set, you will see an additional 30 minutes of information than you would if you were using a standard aspect ratio set.
Getting more information about any particular scheduled program is easy. If you navigate to the program listing in question using the MCE remoter control so that the program name is highlighted, you will see additional information displayed at the bottom of the screen. If you press the OK button on the highlighted program name, you are selecting that channel if the program is currently playing. If you press the More Info button when you are highlighting a program, you can view further information on that show, such as the information shown in Figure 13.

You can record programs listed in the Guide in a number or ways:
You can record the program directly from the Guide interface by locating the program you are interested in, highlighting it, and pressing the Record button on your MCE remote control.
You can search through the Guide using the Search feature (covered in more detail later), and then set MCE to record the show based on the search results.
Create a manual, scheduled recording in the same way you’d schedule a recording on a VCR or DVD recorder. This is particularly useful if the Guide information is unavailable (for whatever reason) and you know the time and station you want recorded. Press the More Info button on your remote control from the My TV main menu to record shows manually.
There is a feature in the Guide that allows you to filter the contents displayed on the screen based on a number of categories. A list of the items that attest to the criteria you filter upon is displayed on the screen. For example, if you filter on Film, you will only see movie content, as identified by a metadata search on each Guide entry.
To filter the Guide, press the More Info button on your MCE remote control when viewing the standard Guide, then select Filter Guide from the context menu; see Figure 14.

You will be presented with a new menu bar at the bottom of the screen, beneath the current program listings, where you can select the filter you would like applied to the Guide. This menu is shown in Figure 15.

Filters are not as powerful as program searches, but they give you a much simpler interface that cuts down on the amount of information you need to process in order to find the right program, all with a single click.
Simple and advanced searching of the Guide is covered in detail later, but for now, the following category filters are available using the single click filter menu:
All on now
Displays all programs available to watch on all channels at this point in time.
Film
Displays all movies (based on information in the metadata for the program).
Childrens
Allows you to display only categorized children’s programs from Guide data.
Sports
Displays all sporting events being screened over the course of the 14-day guide listing. Be careful with this filter, however, as many sporting events overrun their allocated timeslot or are rescheduled. The Guide cannot cope with these extraordinary circumstances and programs might be missed or, even worse, the ending might be clipped. Always set minute manual recording schedules for sporting events and build in a big enough tolerance to suit any eventuality—for example, add an extra three hours of recording onto the Super Bowl.
News
This one is self-explanatory. Again, the information is derived from the Guide and is only as up to date as the most recent download. Breaking news items will not appear.
Special
Displays programs that are not in a set category.
Imagine this scenario: after deciding you need a break from the rat race, you book a month-long break during which you will be traveling the world. However, there’s a problem. You don’t want to miss any of the reruns of “Friends,” which could be screened at virtually any time of the day or night, every single day of the week.
MCE has the solution: you can ask your system to record an entire series, and using the information contained in the broadcast, it can determine whether it has already recorded that program before from another channel or not. In this way, when you decide to record a series, it will record all instances of that television show, from all channels contained in the Guide, without filling up your hard disk with duplicate shows.
To set MCE to record a program series, locate an episode of the series in the main Guide interface and click the More Info button on your MCE remote control. On this context menu, select the Program Info button to reveal detailed information and options for that program. On the left-hand side of the screen, you will see the menu, shown in Figure 16.

Highlight Record Series on the menu on the left-hand side and press OK on your MCE remote control.
The information shown for a particular series recording is related to that series, including the channel the program will record from, the time it will record, and the episode titles in order of date.
Figure 17 shows the details for an entire series. It displays a list containing the time and date for each recording, which you can scroll through using the arrow keys on your MCE remote control. You can also view more-detailed information about each episode.

If you select Series Settings, you get to view more details about each episode—information obtained from the relevant Guide entry.
To cancel a series recording, select Cancel Series from the menu, and then confirm your wish to remove the scheduled recordings; see Figure 18.

The advanced record screen under Advanced Record for any scheduled recording allows you to change the settings for that particular episode or, indeed, for the entire series if applicable. You can add recording tolerances to the schedule in case of program overrun, and have the option to allow MCE to automatically free up disk space based on a set of predefined rules.
Searching through the content provided by the Guide service is extremely useful. Microsoft has increased the usability of the search feature to now only allow you to search, but you can also intelligently use the results for setting recording schedules. This is one of the most powerful features provided for television viewing, and it’s important that you understand fully how to get the most from it.
You can search the Guide in a number of ways, as shown in Figure 19.

Following are the methods you can use to search the Guide:
Categories
A set of predefined genres that allow you to select your favorite program type from the list and display a set of results for that selection. There are a total of nine different category genres from which to select.
Title
Allows you to search for the title (or partial title) of the program you are looking for.
Keyword
Allows you to search for a program even if you cannot find a category that suits what you are looking for and don’t know the name of the program you want to watch or record. For example, if you want to search through the Horror genre but no such category exists, try a keyword search for “horror.”
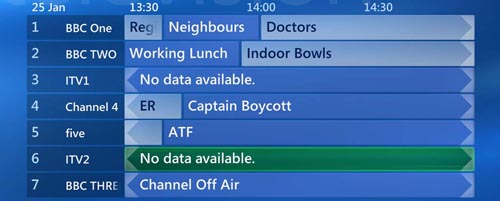
Keyword searching is by far the most powerful search feature in MCE. You can search the entire Guide using a specific keyword, such as an actor’s or character’s name, and then MCE will search all of the program metadata within the Guide and return a list of shows containing that keyword.
As you type the keyword into the interface, you will see the list of shows on the right-hand side of the screen gradually decrease in length as the search term becomes more specific; see Figure 20.
You can create keyword lists that are then saved on your MCE system, allowing you to repeat a search at a later date. There are five keyword categories you can save keywords under: actor name, director name, movie title, program title and generic keyword.
You can use the output from the search, shown on the right-hand side of the screen, to perform the usual set of Guide functions.
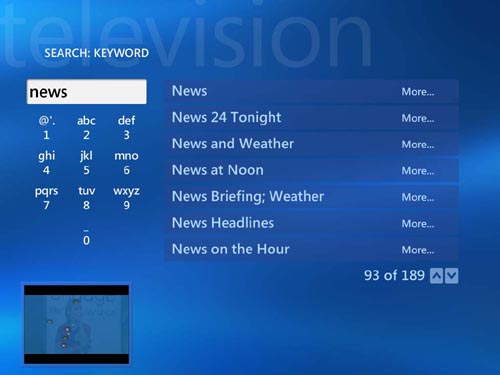
Without going to the trouble of installing additional software or specialized hardware, MCE is capable of playing most of the common audio and visual media file types you would encounter on the Internet—files such as WMA, ASF, WMV, AVI, MPEG, and MPG. This is accomplished through the tight integration of the MCE software and the underlying operating system component, Windows Media Player.
To see a compete list of all file types supported inherently by MCE, look in Windows Media Player (see Figure 21).
In addition to the file types supported by Windows Media Player by default, many proprietary file types exist for a whole variety of reasons. Some content manufacturers have created content encoding and decoding software as a security mechanism to protect their content from piracy. In other cases, companies outside Microsoft’s preferred supplier list (companies that have chosen not to embrace the Microsoft world) have opted to not include their software for free and charge a premium, usually for a better service. A good example of a recognized and well-respected file format that does not form an integrated service in Microsoft’s offering is that of DIVX. Files encoded using the DIVX format can be played only if you install the appropriate software plug-in that supports that format. A plug-in of this nature is commonly called a codec (a concatenation of coding and decoding) and is easily obtained from the supplier of the content (in the case of DIVX, for example; see http://www.divx.com) or from related Internet sites, such as http://www.moviecodec.com.
Warning
Make sure that any files you download from the Internet are checked for both viruses and spyware before you try installing them.
If you download a file that cannot be played using your MCE system, check the file extension to see if it matches any of the codecs you have access to. If you cannot find a codec suitable for playing the file, try posing the question to the experts on the forums at http://www.moviecodec.com or http://www.thegreenbutton.com.
Note
The Green Button (see Figure 22) is a web site dedicated to the support and development of everything related to Microsoft Windows XP Media Center Edition. It’s free to join and it’s highly recommended that all MCE enthusiasts take a look. You can access The Green Button by going directly to the web site from your browser (http://www.thegreenbutton.com) or, if you prefer, by going from the MCE Help interface that’s available through the Communities page.

Unwanted codecs should be deleted from your system when you no longer require them by using the Add/Remove Programs menu option from the Windows Control Panel (click Start→Settings→Control Panel).
Displaying digital pictures on your MCE system is a great benefit. It provides easy picture management and a way to display slideshows, which makes it the perfect compliment to your digital camera. Also, the My Pictures menu item offers a feature that is less used yet extremely useful.
When you are viewing a picture on the screen, press the More Info button on the MCE remote control. This takes you to the Picture Details menu (see Figure 23).

From the Picture Details page, you can manipulate the digital photograph in some of the ways most commonly used in other touch-up programs. There are a total of seven menu options from which to select, but this section will concentrate on explaining only two: Rotate and Touch Up.
If you select Rotate from the Picture Details menu, you will rotate the digital photograph on its central axis 90 degrees clockwise from a vertical position. This is particularly useful if you have taken a portrait image on your digital camera, since portraits appear on their side when first viewed in MCE.
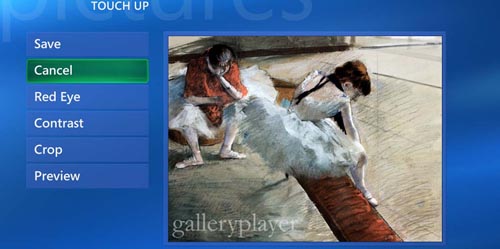
If you want to adjust the contrast, color, and brightness of a digital image in order to gain professional results and fine-grained control, you should use a professional package such as Adobe PhotoShop. The free product that comes with Windows XP, Microsoft Picture Manager, is also quite good (although nowhere near as useful as PhotoShop) and is accessible on most Windows XP configurations by clicking Start→All Programs→Accessories. So, you realize that there are professional ways of modifying digital images using some comprehensive tools outside the remit of what MCE provides. However, if you want to let MCE have a go at fixing any contrast, color, brightness, and red eye problems in your images, select the Touch Up option from the Picture Details menu to reveal the options available; see Figure 24.
There are a whole range of portable Media Center devices available on the market that allow the transfer of multimedia content between your MCE device and the small handheld version. Figure 25 shows Creative Labs’ Zen portable Media Center, designed to synchronize with MCE and transfer content and playlists seamlessly between the two.

Although these devices have not yet proved very popular due to their high cost and lack of flexibility, there is a concerted market effort to increase their capabilities, and it won’t be long before the next-generation portable device takes MCE by storm.
Warning
Check before buying a portable Media Center, as most don’t support the installation of additional codecs; this would keep you from playing content other than the default content supported by standard MCE.
To synchronize content from your MCE system to a portable device, navigate to the More Programs menu option from the top-level MCE menu, and then select “Sync to Device.” If the portable device is not connected or there is a problem of some sort, you will see the error message shown in Figure 26.

Most portable Media Center PCs can only support a single synchronization at a time. If you have already synchronized your portable Media Center with another PC, the warning message shown in Figure 27 will be displayed. You can either overwrite the existing synchronization, removing the data on the portable device and replacing it with new stuff from MCE, or cancel the operation.

There are lots of options available for defining what’s synchronized with the portable device, most of which are related to playlists and content popularity. Take a look at Figure 28 to see some of the things that can be synchronized. The thing to remember is that the lists exist as a way of automating how you transfer the best content for your own needs to the portable device.

Move the order of the content transfer up and down the list by clicking on the up and down arrows, then select an item by clicking X.
Click the Add More menu item on the left-hand side of the screen to browse your MCE device for content to be transferred. You can choose from music, pictures, video content, and recorded television shows. The main limitation is disk space on the portable Media Center device. JP: So can you take this thing with you? I really don’t know what a portable media center is.
Although you can listen to FM Radio through the main menu Radio feature (as long as you have an FM tuner card installed in your system), by default, MCE has no preset Internet radio stations configured for access through this interface. As a result, you have to configure MCE to present a shortcut for Internet channels you want to listen to. You can select a service, such as Live365.com, using the Online Spotlight feature. There are many more services available on the Internet for digital radio, however, not many of these have as yet been introduced as MCE Online Spotlight services. However, Online Spotlight services are updated regularly and you should periodically check to see what’s available. If you want to find channels that don’t appear on Live365, you can search on Google for “Online Radio”.
Note
You will be required to register with Live365.com before you can receive its full list of services. Registration is free for the basic service.
To start adding channels to Radio, click Online Spotlight in the MCE main menu, and then select Live365.com.
Figure 29 shows how an Internet radio station appears in Live365.com. To add the radio channel as a shortcut in the Radio menu, click the “Add to My Radio +” button or press the More Info button on your MCE remote control.

When you add the Live365.com channel to your MCE Radio menu as a shortcut, a new button, the Internet button, appears in the Radio menu (see Figure 30).

Internet radio stations are subsequently shown with an icon denoting the station’s name and logo on the right-hand side of the screen. To play an Internet radio channel, simply click OK on the MCE remote control when the radio station icon is highlighted.