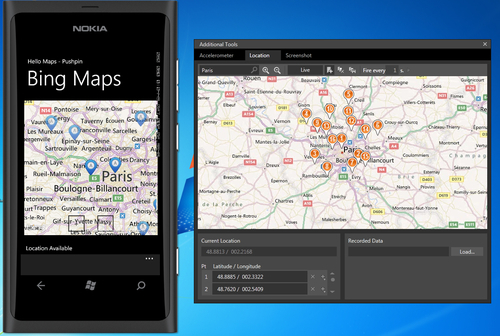
We created our own maps application and added a pushpin. Great! But does it look great? To be honest — no, the black pushpin icon is not fancy. In fact the pushpins in the Location simulator are better! (We hope Microsoft guys are reading this line.) We can, however, use the following code to add some content to the pushpin, but it still does not give us the "wow" look:
myPin.Content = newLoc.Position.Location.Latitude.ToString() +
", " +newLoc.Position.Location.Longitude.ToString();
Thankfully the Windows Phone Bing Maps Silverlight Control provides the ability to use our own icons for the pushpin. There are two ways to use custom map pushpins:
- Using an image as the pushpin
- Using your own pushpin style (in XAML)
Note
The guys at http://365psd.com/ have some excellent and free map pushpin icons. You can find a few at http://365psd.com/?s=map. We use the one from Dennis Covent: http://365psd.com/day/2-302/ as the custom icon for our pushpin.
Let us use the icon mentioned previously as an image for our pushpins:
- Open the
HelloMaps-Pushpinexample and navigate to theMainPage.xaml.csfile. - Declare an object of type
MapLayerin the global namespace.MapLayer myMapLayer;
- In the
MainPage()constructor initialize themyMapLayerobject and add it to the map as:myMapLayer = new MapLayer(); myMap.Children.Add(myMapLayer);
- In your
locationManager_getPositionfunction add the following lines of code and comment out the rest:void locationManager_getPosition(object sender, GeoPositionChangedEventArgs<GeoCoordinate> newLoc) { // Custom PushPin Image pushpinImage = new Image(); pushpinImage.Source = new System.Windows.Media.Imaging.BitmapImage (newUri("myPushPin.png", UriKind.Relative)); pushpinImage.Opacity = 0.7; pushpinImage.Stretch = System.Windows.Media.Stretch.None; PositionOrigin position = PositionOrigin.Center; myMapLayer.AddChild(pushpinImage, new GeoCoordinate(newLoc.Position.Location.Latitude, newLoc.Position.Location.Longitude), position); // End of Custom PushPin myMap.SetView(new GeoCoordinate (newLoc.Position.Location.Latitude, newLoc.Position.Location.Longitude), zoomLevel); } - Do not forget to add the
myPushPin.pngimage to your project. - Note the highlighted code in step 4. It adds
pushpinImagetothemyMapLayerobject at the location detected, and adds our pushpin icon in at the center of the view. - Run the application now to see the custom pushpin icons in action as shown in the following screenshot:

We saw how to use the image as a layer instead of a pushpin. Some developers would not want to work with a pushpin in this way. The Image and Pushpin classes are quite different in their own sense, each having their own properties, methods, constructors, and events. So using a layer is not always equal to a pushpin implementation. So using a layer is not always equal to a pushpin implementation.
In such cases we define a new XAML style in App.xaml, the main class that calls MainPage.xaml within the<Application.Resources></Application.Resources> tags:
- Open your project
HelloMaps-Pushpin. Navigate to theApp.xamlfile and add the following style markup within the<Application.Resources></Application.Resources>tags:<Style TargetType="m:Pushpin" x:Key="myPushpinStyle"> <Setter Property="Template"> <Setter.Value> <ControlTemplate TargetType="m:Pushpin"> <Grid x:Name="ContentGrid"> <Image Source="myPushPin.png" Stretch="None"/> </Grid> </ControlTemplate> </Setter.Value> </Setter> </Style>
- Now in your
MainPage.xaml.csfile uncomment the default pushpin code that we commented earlier.// Standard Pushpin myPin.Content = newLoc.Position.Location.Latitude.ToString() + ", " +newLoc.Position.Location.Longitude.ToString(); myPin.Style = (Style)(Application.Current.Resources["myPushpinStyle"]); myPin.Location = newGeoCoordinate (newLoc.Position.Location.Latitude, newLoc.Position.Location.Longitude); myMap.Children.Add(myPin); // End of Standard Pushpin - With the addition of the code highlighted in the previous step, here we are using the style we defined in
App.xamland assigning it to our pushpin object. - Running the app will result in an almost similar icon display as shown earlier, the only difference being the
Opacityparameter set previously, which we haven't put in our style.
