
In this chapter, we delve into a Windows Store app’s process model. Specifically, we’ll look at the various ways that an app gets activated as well as how it uses threads and windows. We’ll also talk about how to best architect your app so that it uses memory efficiently as it navigates the user from page to page. We’ll conclude with a discussion of process lifetime management (PLM) and how Microsoft Windows manages your app’s lifetime to further conserve memory, reduce CPU usage, and simplify the end-user experience.
Understanding this topic is critical to building Windows Store apps. If you are familiar with the Windows desktop app process model, you know that it is relatively easy to understand because you can usually get away with using just one thread, a main window, and then lots of child windows. However, the Windows Store app process model is substantially different and more complex because it uses several threads, each having at most one window, and child controls are simply drawn on a window. And this is just the tip of the iceberg in terms of complexity. The additional complexity is the result of two main factors:
Windows Store apps are single instance. Windows allows only one instance of a Windows Store app to run at a time on the system. This conserves memory because multi-instance apps would each have their own memory. Because most apps have a single window, switching between apps is simpler for end users. Instead of seeing many windows they can switch to, users now see fewer windows. However, this makes your app more complex because you must now write the code to manage multiple documents or tabs yourself.
Windows Store app activations. Windows Store apps can be activated for myriad reasons. All activations re-activate the already-running app and some activations cause other threads and windows to be created that your code has to manage.
In this section, we talk about app activation. Specifically, we’ll discuss how Windows creates a process for your app and allows your app to initialize itself, and then we’ll look at how your app can start doing work on behalf of the user.
An app can be activated for several reasons. The most obvious is when the user taps your app’s tile from the Start screen. This kind of activation is called a launch activation, and all Windows Store apps must support launch activation; there is no way for a Windows Store app to opt out of it. But your Windows Store app can also be activated by the user tapping one of your app’s secondary tiles on the Start screen or if the user selects a toast notification that your app displays. (See Chapter 8 for more information.) Activating your app due to a secondary tile or toast notification is also known as a launch activation. In addition to supporting launch activations, your app can optionally support other activations. For example, you can allow your app to be activated by the user opening a file in File Explorer, attaching a device (like a camera) to the PC, attempting to share content from another app with your app, and so on. There is a WinRT-enumerated type called Windows.ApplicationModel.Activation.ActivationKind that indicates all the ways an app can be activated. Table 3-1 shows the values offered by this enumeration and briefly describes each. Some of these activations are discussed in other chapters in this book, and some are very rarely used, so we will not discuss them at all.
Table 3-1. ActivationKind values, their descriptions, and their view type.
ActivationKind value | Activates your app when | View activation |
|---|---|---|
Launch | User taps app’s primary tile, a secondary tile, or a toast notification. | Main |
Search | User uses the Search charm to search within your app while it’s in the foreground. | Main |
File | Another app launches a file whose file type is supported by your app. | Main |
Protocol | Another app launches a URI whose scheme is supported by your app. | Main |
Device | User attaches a device to the PC that is supported by your app (AutoPlay). | Main |
Contact | User wants your app to post, message, call, video call, or map a contact. | Main |
LockScreenCall | User taps a toast that answers a call when the user has locked her PC. | Main |
AppointmentsProvider | Another app wants your app to show a time frame. | Main |
Another app wants your app to add, replace, or remove an appointment. | Hosted | |
ShareTarget | User wants to share content from another app with your app. | Hosted |
FileOpenPicker | Another app allows the user to open a file from a location your app has access to. | Hosted |
FileSavePicker | Another app allows the user to save a file to a location your app has access to. | Hosted |
CachedFileUpdater | Another app uses a file your app has cached. | Hosted |
ContactPicker | Another app allows the user to access a contact maintained by your app. | Hosted |
PrintTaskSettings | Your app is an app associated with a printer and exposes its settings. | Hosted |
CameraSettings | Your app is an app associated with a camera and exposes its settings. | Hosted |
Note
The terms app declaration, app extension, app activation, and contract all relate to the exact same thing. That is, in your package, you must declare an app extension, allowing the system to activate your app. We say that your app implements a contract when it responds to an activation. The MSDN webpage that explains contracts and extensions, http://msdn.microsoft.com/en-us/library/windows/apps/hh464906.aspx, is very inaccurate.
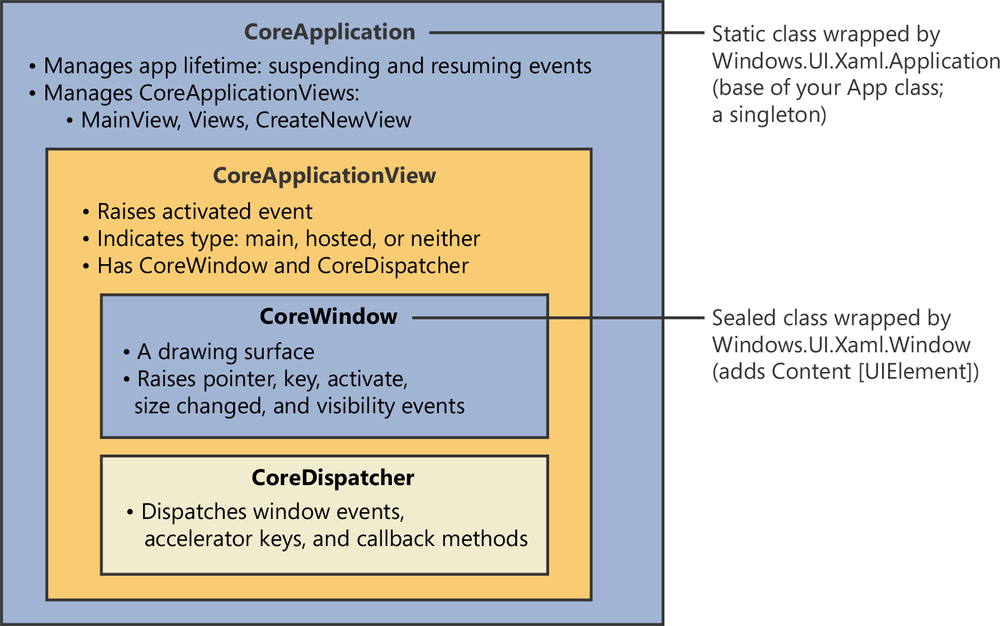
Figure 3-1 shows the relationship between various WinRT types that make up a running app, and Figure 3-2 shows a flowchart explaining how these various WinRT objects get created at runtime during app activation. You’ll want to periodically refer to these two figures as we continue the discussion.
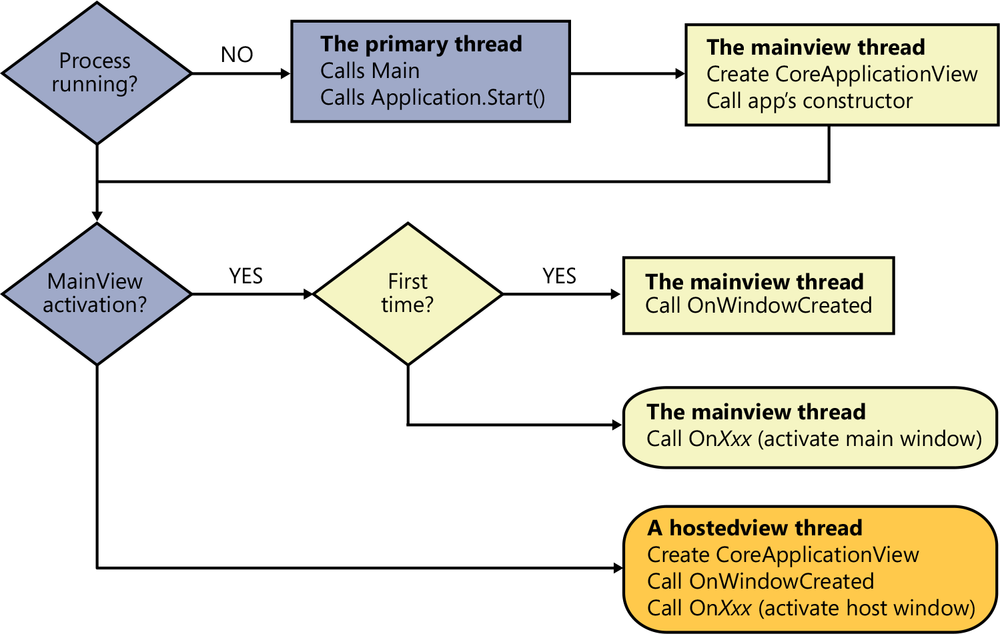
When Windows needs to activate an app, it first displays a splash screen so that the user gets immediate feedback indicating that the app is starting. Windows gets the splash screen image and background color from the app’s manifest; this allows Windows to display the splash screen while the app is initializing. At the same time, Windows creates a process and loads the app’s code into it. After this, Windows creates the process’ primary thread and invokes a Main method. When you build a Windows Store app, a Main method is created for you automatically in an App.g.i.cs file. The Main method looks like this:[19]
#if !DISABLE_XAML_GENERATED_MAIN
   public static class Program {
      static void Main(String[] args) {
         Windows.UI.Xaml.Application.Start((p) => new App());
      }
   }
#endif
As you can see, this method doesn’t do very much. When the process’ primary thread calls Main, it internally calls Windows.UI.Xaml.Application’s static Start method, which creates another thread called the main view thread. This thread then creates a Windows.ApplicationModel.Core.CoreApplicationView object that is your app’s main drawing surface. The CoreApplicationView object is associated with the main view thread and can be manipulated only by code executed by the main view thread. The main view thread then invokes the callback method passed as a parameter to Application’s Start method, which constructs an instance of your app’s App class. The Application base class’ constructor stores a reference to your App object in a private static field, ensuring that it never gets garbage collected for the entire lifetime of the process. You can always get a reference to your app’s singleton App object by calling Application’s static Current property.
Important
This App object is a singleton object that lives throughout the entire lifetime of the process. Because this object is never destroyed, any other objects directly or indirectly referred to by any static or instance fields will prevent those other objects from being garbage collected. Be careful about this because this can be a source of memory leaks.
After the App object singleton is created, the primary thread checks the ActivationKind value to see why the app is being activated. All the activations fall into one of two categories: main view activations or hosted view activations. (See the last column in Table 3-1.) Main view activations are what most developers are familiar with. A main view activation causes your app’s main window to become the foreground window and allows the user to interact with your app.
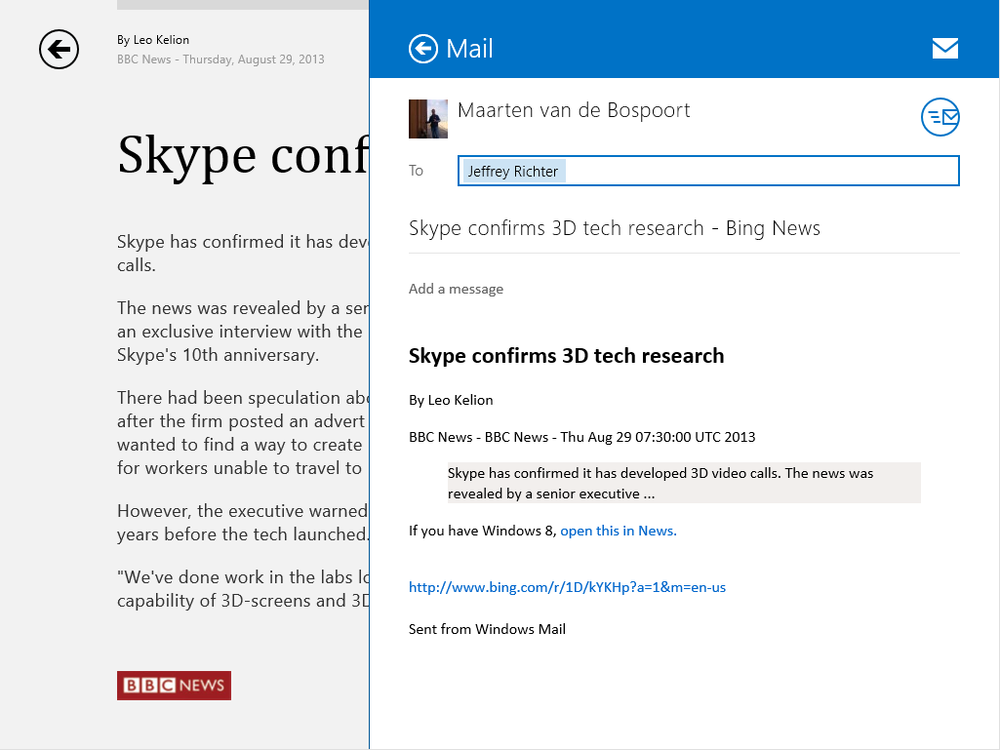
Hosted view activations are not as familiar to many people. In this case, an app wants to complete some operation leveraging some functionality provided by another app. The app the user is interacting with asks Windows to create a new window and then Windows activates the other app. This second app will create a small window that gets hosted inside Windows’ big window. This is why the activation is called a hosted view activation: the app is being activated to have its window hosted for use by another app. An example of a hosted view activation is when the user wants to share a webpage with a friend via the Mail app. Figure 3-3 shows the Bing News app as the main app the user is interacting with. If the user taps the Share charm and selects the Mail app, Windows creates a narrow, full-height window on the edge of the user’s screen. The header is displayed by Windows at the top of the window it created. The header contains the back arrow, app name (Mail), and logo. Underneath the header is a hosted view window created and managed by the Mail app itself.
Your App class is derived from the Windows.UI.Xaml.Application class, which defines some virtual methods as shown here:
public class Application {
   // Override to know when the main view thread's or
   // a hosted view thread's window has been created
   protected virtual void OnWindowCreated(WindowCreatedEventArgs args);
   // Override any of these main view activations:
   protected virtual void OnLaunched(LaunchActivatedEventArgs args);
   protected virtual void OnSearchActivated(SearchActivatedEventArgs args);
   protected virtual void OnFileActivated(FileActivatedEventArgs args);
   // Override any of these hosted view activations:
   protected virtual void OnShareTargetActivated(ShareTargetActivatedEventArgs args);
   protected virtual void OnFileOpenPickerActivated(FileOpenPickerActivatedEventArgs args);
   protected virtual void OnFileSavePickerActivated(FileSavePickerActivatedEventArgs args);
   protected virtual void OnCachedFileUpdaterActivated(
      CachedFileUpdaterActivatedEventArgs args);
   // Override this for less-frequently used main view (Protocol, Device,
   // AppointmentsProvider, Contact, LockScreenCall) and hosted view (ContactPicker,
   // PrintTaskSettings, CameraSettings) activations:
   protected virtual void OnActivated(IActivatedEventArgs args);
}
As soon as a main view or hosted view window is created, the thread creating the window calls the virtual OnWindowCreated method. If you override this method, the WindowsCreatedEventArgs object passed to it contains a reference to the thread’s newly created window. In this method, you can register callback methods with any of the events (Activated, SizeChanged, VisibilityChanged, or Closed) it offers. After OnWindowCreated returns, one and only one of the other virtual methods is called, depending on why your app is being activated. The OnActivated method is called for the less-commonly used activation kinds.
Inside one of these virtual methods, you perform any initialization required for the specific kind of activation, create the desired user-interface element tree, set Window’s Content property to the root of your user-interface element tree, and then activate the view’s CoreApplicationView object, thereby bringing your app’s window to the foreground so that the user can interact with it.
If your app is being activated due to a hosted view activation, your app’s primary thread will create a hosted view thread. This thread then creates its own CoreApplicationView object that is your app’s drawing surface while hosted. When the hosted view is no longer required by the hosting app, your host CoreApplicationView window and the hosted view thread are destroyed. Every time your app is activated with a hosted view activation, a new hosted view thread and CoreApplicationView window are created. In fact, multiple apps could host your app simultaneously. For example, several apps can host an app implementing the FileOpenPicker contract simultaneously. If this happens, your app’s process will have one hosted view thread and CoreApplicationView window for each app that is currently hosting your app. On the other hand, your app’s process will never have more than one main view thread and main CoreApplicationView window.
While your app is running, it could be activated with more main view activations. This typically happens if the user taps one of your app’s secondary tiles or a toast notification. In this case, the app comes to the foreground but the act of tapping a tile or toast notification might direct the app to show something special when brought to the foreground. When an already-running app is activated with a new main view activation, the process’ primary thread will not create the main view thread and its CoreApplicationView because these have already been created. Because the window has already been created, the virtual OnWindowCreated method will not be called, but the proper virtual method indicating why the main view is being re-activated will be called. This virtual method should respond accordingly by deciding what UI to show and then activating the main view window so that the user can interact with it.
Important
Avoid registering event handlers inside a main view activation’s virtual method because these methods can be called multiple times and you do not want to register multiple callbacks with a single event over the lifetime of your process. It can be OK to register callback methods with events inside the OnWindowCreated method because this method is called only once per thread/window.
Note that your app might not be running at all, and then a user can activate your app for a hosted view. This causes your app’s primary thread to be created, and then a hosted view thread and its window are created. But your app’s main view thread and window are not created at this time. If the user now activates your app with a main view activation, Windows will now create your app’s main view thread and window, call the OnWindowCreated method, and then call the virtual method indicating why your app is being activated with a main view activation.
The previous section discussed how your app activates and initializes itself. In this section, we discuss some core WinRT classes you should be aware of and how you can use them now that your app is up and running. As you read this discussion, you might want to periodically refer back to Figure 3-10, which shows the relationship between these classes.
WinRT offers a Windows.ApplicationModel.Core.CoreApplication class that looks like this:
public static class CoreApplication {
   // Returns the CoreApplicationView associated with the calling thread
   public static CoreApplicationView GetCurrentView();
   // Returns all CoreApplicationViews existing within the process
   public static IReadOnlyList<CoreApplicationView> Views { get; }
   // Returns the main view thread's CoreApplicationView
   public static CoreApplicationView MainView { get; }
   // These events are discussed later in this chapter
   public static event EventHandler<Object> Resuming;
   public static event EventHandler<SuspendingEventArgs> Suspending;
   // These events are for debugging only
   public static event EventHandler<Object> Exiting;
   public static event EventHandler<UnhandledErrorDetectedEventArgs> UnhandledErrorDetected;
   // This method allows you to create multiple main view windows
   public static CoreApplicationView CreateNewView();
   // Some members not shown here...
}
As you can see, this class is a static class. This means that you cannot create instances of this class. So this static class manages your app as a whole. However, static classes don’t lend themselves to nice object-oriented programming features like inheritance and virtual methods. So, for XAML developers, WinRT also offers the Windows.UI.Xaml.Application class that we discussed earlier; this is the class that has all the virtual methods in it, making it easier for you to implement your activation code. In effect, the Application singleton object we discussed wraps the static CoreApplication class. Now let me show you some of the other members of this Application class:
public class Application  {
   // Static members:
   public static void Start(ApplicationInitializationCallback callback);
   public static Application Current { get; }
   // The same Resuming & Suspending events offered by the CoreApplication class
   public event EventHandler<object> Resuming;
   public event SuspendingEventHandler Suspending;
   // XAML-specific properties and events:
   public DebugSettings DebugSettings { get; }
   public ApplicationTheme RequestedTheme { get; set; }
   public ResourceDictionary Resources { get; set; }
   public event UnhandledExceptionEventHandler UnhandledException;
   // The virtual methods shown earlier and some other members are not shown here...
}
Your App class derives from this Application class, inheriting all the instance members, and allows you to override the virtual methods.
Let’s go back to the CoreApplication class. This class has many members that return CoreApplicationView objects. Here is what the CoreApplicationView class looks like:
public sealed class CoreApplicationView {
   public CoreDispatcher Dispatcher { get; }
   public CoreWindow     CoreWindow { get; }
   public Boolean        IsMain     { get; }
   public Boolean        IsHosted   { get; }
   public event TypedEventHandler<CoreApplicationView, IActivatedEventArgs> Activated;
}
As you can see, a CoreApplicationView object refers to a CoreDispatcher (the message pump that dispatches window messages) and a CoreWindow (the actual drawing surface), and it has an additional field indicating whether the CoreWindow is the app’s main window or one of the app’s hosted windows. There is also an Activated event that is raised when the window is being activated; the IActivatedEventArgs interface includes a Kind property, which returns one of the ActivationKind enumeration values (as shown in Table 3-1). Other members of this interface are described later in this chapter’s Process lifetime management section.
A CoreWindow object is a drawing surface, and it has associated with it the standard things you’d expect with a window. It has state (fields) indicating the bounding rectangle, whether input is enabled, which cursor to display, and whether the window is visible or not. It also offers events such as Activated, Closed, SizeChanged, VisibilityChanged, as well as keyboard and pointer (mouse, touch, and stylus) input events. And there are methods such as Activate, Close, Get(Async)KeyState, Set/ReleasePointerCapture, and a static GetForCurrentThread method.
For XAML developers, there is a sealed Windows.UI.Xaml.Window class that puts a thin wrapper around a CoreWindow object:
public sealed class Window  {
   public static Window Current { get; }    // Returns calling thread's Window
   public CoreWindow CoreWindow { get; }
   public CoreDispatcher Dispatcher { get; } // Same as CoreApplicationView.Dispatcher
   // The Content property is how XAML integrates with the window's drawing surface:
   public UIElement Content { get; set; }
   // This class exposes some of the same properties (Bounds, Visible)
   // This class exposes some of the same events (Activated, Closed,
   // SizeChanged, VisibilityChanged)
   // This class exposes some of the same methods (Activate, Close)
}
The final WinRT class to discuss here is the Windows.UI.Core.CoreDispatcher class, which looks like this:
public sealed class CoreDispatcher {
   // Returns true if the calling thread is the same thread
   // that this CoreDispatcher object is associated with
   public Boolean HasThreadAccess { get; }
   // Call this to have the CoreDispatcher's thread execute the agileCallback
   // with a priority of Idle, Low, Normal, or High
   public IAsyncAction RunAsync(
      CoreDispatcherPriority priority, DispatchedHandler agileCallback);
   // Call this to get/set the priority of the code that dispatcher is currently executing
   public CoreDispatcherPriority CurrentPriority { get; set; }
   // Other members not shown...
}
Many .NET developers are already familiar with this CoreDispatcher class because it behaves quite similarly to the Dispatcher class found in Windows Presentation Foundation (WPF) and Silverlight. Because each CoreApplicationView has only one thread that manages it, its CoreDispatcher object lets you execute a method on that same thread, allowing the method to update that view’s user interface. This is useful when some arbitrary thread calls one of your methods and you then need to update the user interface. I will talk more about the CoreDispatcher and show how to use it in other chapters.
A Windows Store app’s main view can create additional views to show additional content. These views can be shown side by side on the same monitor and resized to the user’s liking or shown on different monitors. For example, the Windows Mail app allows you to open new views, enabling you to refer to one mail message while composing another simultaneously. Apps can create new view threads and views by calling CoreApplication’s static CreateNewView method. This method creates a new thread along with its own CoreDispatcher and CoreWindow, ultimately returning a CoreApplicationView. For this CoreApplicationView object, the IsMain and IsHosted properties both return false. Of course, when you create a new view, your App’s OnWindowCreated virtual method is called via the new thread. Then you can create the UI for this new view using code like this:
private async Task CreateNewViewWindow() {
   // Have Windows create a new thread, CoreDispatcher, CoreWindow, and CoreApplicationView
   CoreApplicationView cav = CoreApplication.CreateNewView();
   CoreWindow newAppViewWindow = null; // This will hold the new view's window
   // Have the new thread initialize the new view's content
   await cav.Dispatcher.RunAsync(CoreDispatcherPriority.Normal, () => {
      // Give the new thread's window back to the creating thread
      newAppViewWindow = Window.Current.CoreWindow;
      // Create the desired UI element tree and make it the content of the new window
      Window.Current.Content = new MyPage();
      Window.Current.Activate();
   });
   // After the new thread initializes its view, the creating thread makes it appear
   Int32 newAppViewId = ApplicationView.GetApplicationViewIdForWindow(newAppViewWindow);
   await ApplicationViewSwitcher.TryShowAsStandaloneAsync(newAppViewId,
      ViewSizePreference.UseLess);
   // The SDK documentation for Windows.UI.ViewManagement.ApplicationViewSwitcher explains
   // its other methods, allowing you to control switching between your app's views.
}
The previous code leverages the Windows.UI.ViewManagement.ApplicationView class. This class offers many dynamic properties related to a view. In other words, these properties’ values change frequently. The class looks like this:
public sealed class ApplicationView {
   // Gets the view for the calling thread
   public static ApplicationView GetForCurrentView();
   // Gets the unique window ID corresponding to a specific CoreWindow
   public static Int32 GetApplicationViewIdForWindow(ICoreWindow window);
   // Gets a unique ID identifying this view. NOTE: This ID is passed to
   // an XxxActivatedEventArgs' CurrentlyShownApplicationViewId property
   public Int32 Id { get; }
   // Gets/sets the view's title (shown in task switchers) & if PrtScn can capture its content
   public String  Title { get; set; }
   public Boolean IsScreenCaptureEnabled { get; set; }
   // Read-only properties related to view's position & size
   public ApplicationViewOrientation Orientation { get; }  // Landscape or Portrait
   public Boolean AdjacentToLeftDisplayEdge { get; }
   public Boolean AdjacentToRightDisplayEdge { get; }
   public Boolean IsFullScreen { get; }
   public Boolean IsOnLockScreen { get; }
   // Raised when the view is removed from task switcher (if user closes the view)
   public event TypedEventHandler<ApplicationView, ApplicationViewConsolidatedEventArgs>
      Consolidated;
   // Indicates if app terminates when all views close (Default=false)
   public static Boolean TerminateAppOnFinalViewClose { get; set; }
}Most XAML apps show the user a view with an initial page and then allow the user to navigate to other pages within the view. This is similar to a website paradigm where users start at a website’s home page and then click on links to delve into specific sections of the website. Users are also quite familiar with navigating back to pages they’ve seen before and, occasionally, after navigating back, users navigate forward to a page they were just looking at. Windows Store apps typically offer this same user experience. Of course, some Windows Store apps might just show a single page and, in this case, navigation doesn’t come into play at all.
In this section, I talk about the XAML support for page navigation and how to manage memory for this efficiently. Microsoft provides a WinRT class called Windows.UI.Xaml.Controls.Frame. An instance of this class manages a collection of UI pages allowing the user to navigate backward and forward through them. The class derives from ContentControl, which ultimately derives from UIElement, allowing you to assign a Frame object to Window’s Content property to place XAML content on a drawing surface. The Frame class looks like this:
public class Frame : ContentControl, INavigate {
   // Clears the stack from the next Page type to the end
   // and appends a new Page type to the stack
   public Boolean Navigate(Type sourcePageType, Object parameter);
   public Boolean CanGoBack { get; }    // True if positioned after the 1st Page type
   public void    GoBack();             // Navigates to the previous page type
   public Boolean CanGoForward { get; } // True if a Page type exists after the current position
   public void    GoForward();          // Navigates to the next Page type
   // These members return the stack's content and size
   public IList<PageStackEntry> BackStack { get; }
   public Int23 BackStackDepth { get; }
   // Member to serialize/deserialize the stack's types/parameters to/from a string
   public String GetNavigationState();
   public void   SetNavigationState(String navigationState);
   // Some members not shown
}
Frame objects hold a collection of Windows.UI.Xaml.Controls.Page-derived types. Notice that they hold Page-derived types, not Page-derived objects. To have the Frame object navigate to a new Page-derived object, you call the Navigate method, passing in a reference to a System.Type object that identifies the page you want to navigate to. Internally, the Navigate method constructs an instance of the Page-derived type and makes this object be the content of the Frame object, allowing the user to interact with the page’s user interface. Your Page-derived types must derive from Windows.UI.Xaml.Controls.Page, which looks like this:
public class Page : UserControl {
   // Returns the Frame that "owns" this page
   public Frame Frame { get; }
   // Invoked when the Page is loaded and becomes the current content of a parent Frame
   protected virtual void OnNavigatedTo(NavigationEventArgs e);
   // Invoked after the Page is no longer the current content of its parent Frame
   protected virtual void OnNavigatedFrom(NavigationEventArgs e);
   // Gets or sets the navigation mode that indicates whether this Page is cached,
   // and the period of time that the cache entry should persist.
   public NavigationCacheMode NavigationCacheMode { get; set; }
   // Other members not shown
}
After the Frame object constructs an instance of your Page-derived type, it calls the virtual OnNavigatedTo method. Your class should override this method and have it perform any initialization for the page. When you call Frame’s Navigate method, you get to pass an object reference as a parameter. Your Page-derived object can get the value of this parameter type by querying NavigationEventArgs’s read-only Parameter property. This gives you a way to pass some data from the code when navigating to a new page. For reasons that will be described later, in the Process lifetime management section, the value you pass should be serializable.
Page objects can be very expensive in terms of memory consumption because pages tend to have many controls and some of these controls are collection controls, which might manage many items. When the user navigates to a new Page, keeping all the previous Pages with all their child objects in memory can be quite inefficient. This is why the Frame object maintains Page types, not instances of Page objects. When the user navigates to another Page, the Frame removes all references to the previous page object, which allows the page object and all its child objects to be garbage collected, freeing up what can potentially be a lot of memory. Then, if the user navigates back to a previous page, the Frame constructs a new Page object and calls its OnNavigatedTo method so that the new Page object can initialize itself, reallocating whatever memory it needs.[20]
This is all fine and good but what if your Page needs to record some state in between being garbage collected and re-initialized? For example, the user might have entered some text in a TextBox control or scrolled to and selected a specific item in a ListView or GridView control. When the Page gets garbage collected, all of this state is destroyed by the garbage collector. So, when the user navigates away from a Page, in the OnNavigatedFrom method, you need to preserve the minimal amount of state necessary in order to restore the Page back to where it was before the user navigated away from it. And this state must be preserved in a place where it will not get garbage collected.
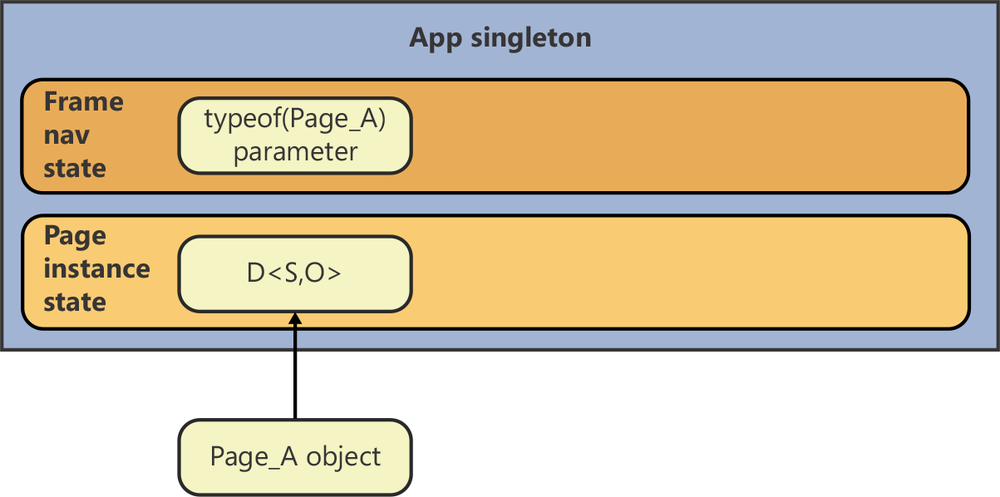
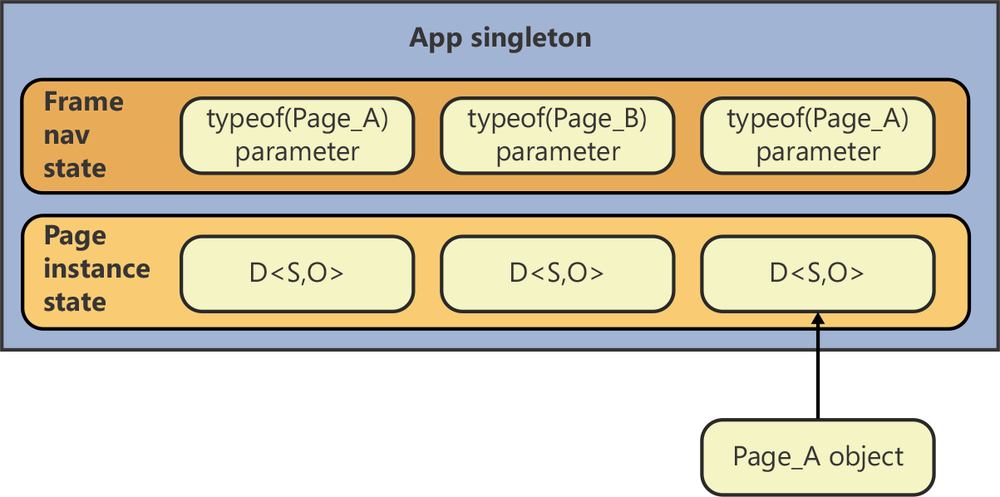
The recommended practice is to have your App singleton object maintain a collection of dictionaries; something like a List<Dictionary<String, Object>>. You have one dictionary for each page managed by the Frame, and each dictionary contains a set of key/value pairs; use one key/value pair for each piece of page state you need to persist. Now, because your App singleton object stays alive for the lifetime of your process, it keeps the collection alive and the collection keeps all the dictionaries alive.
When navigating to a new page, you add a new dictionary to the list. When navigating to a previous page, look up its dictionary in the list using Frame’s BackStackDepth property. Figure 3-4 shows what objects you should have in memory after the app navigates to Page_A. The Frame object has a single Page_A type in its collection along with its navigation parameter, and our list of dictionaries has just one dictionary in it. Notice that the Page_A object can reference the dictionary, but you must make sure that nothing in the App singleton object refers to any page object because this prevents the page object from being garbage collected. Also, avoid registering any of the page’s instance methods with external events because this also prevents the page object from ever being garbage collected. Or, if you do register any instance methods with events, make sure you unregister them in the OnNavigatedFrom method.
Now, if the user navigates to Page_B, the Frame constructs a Page_B object, makes it the current contents of the Frame, and calls its OnNavigatedTo method. In the OnNavigatedTo method, we add another dictionary to the list, and this is where the page instance persists its state. Figure 3-5 shows what objects you should have in memory after the user navigates from Page_A to Page_B.

Figure 3-5. The Page_A object can be garbage collected, and the new Page_B object persists its state in the second dictionary in the list.
From here, the user might navigate from Page_B back to Page_A. Doing so would cause the Page_B object to be garbage collected, and a new Page_A object would be created, which would refer to the first dictionary in the list. Or, from Page_B, the user might navigate to a new Page_A object whose content is populated based on the navigation parameter passed to OnNavigatedTo and extracted via NavigationEventArgs’s Parameter property. Figure 3-6 shows what objects you should have in memory after the user navigates forward from Page_B to a new Page_A.
Now, if the user navigates backward from the new Page_A to Page_B, the Frame object removes its reference to the Page_A object, allowing it to be garbage collected. But the dictionary maintains that instance of Page_A’s state so that it can restore its state should the user later navigate forward again from Page_B to a new Page_A object. Similarly, the user can navigate back and forth throughout all the page types in Frame’s collection. Navigating to a page constructs a new page, restoring its state from the dictionary. By the way, if the user is currently at the first Page_A and then, from this page, the app decides to navigate to Page_C, then the dictionaries beyond the current page must be removed from the list (allowing them to be garbage collected) because the user is navigating down a whole different branch of the app’s user interface now.
With this model in place, memory is used very efficiently by your app. There is another benefit we get when using this model, which is described later in the Process lifetime management section of this chapter. By the way, some of the Visual Studio templates for creating Windows Store apps spit out source code for a SuspensionManager class that manages page instance state. This class is not a WinRT class, and it is not part of Windows; the source code for the class is injected into your Visual Studio project when you create it.
Personally, I do not use the SuspensionManager class in my own projects. Instead, I created my own FramePageStateManager class that, in my opinion, is better. It has a cleaner interface and also leverages some helper classes that put a type-safety wrapper around each dictionary, giving you support for IntelliSense, compile-time type safety, and data binding. These additional features greatly simplify the effort of coding your app and managing its state. The code to manage it all is part of the Process Model app that is available with the downloadable code that accompanies this book; see http://Wintellect.com/Resource-WinRT-Via-CSharp.
Back when the Windows operating system (OS) was first created (in the early 1980s), there were no computers that ran on battery power. Instead, all computers were plugged into an AC power source, which effectively meant that there was an infinite amount of power to draw on. Because power was in infinite supply, Windows allowed apps to run all the time. Even when the user was not interacting with the app, the app was allowed to consume power-consuming resources such as CPU time, disk I/O, and network I/O.
But today, users want mobile computer systems that do run on battery power and they want the battery to last as long as possible between charges. For Windows to meet user demands, Windows Store apps are allowed to consume system resources (and power) only when the user is interacting with the app; when the user switches away from a Windows Store app, the OS suspends all threads in the process, preventing the app from executing any more of its code, and this prevents consumption of power.
In addition, the original version of Windows was designed for keyboard and mouse input only. But nowadays, users demand systems that use more intuitive and natural touch-based input. When using a mouse as an input device, users are more likely to tolerate a lag. For example, when paging down in a document, the user can click the mouse on a scroll bar and then, after releasing the mouse button, the document scrolls. The user clicks and then the document scrolls. But, with touch input, the document needs to scroll as the user swipes his finger. With touch, users won’t tolerate a lag between swiping and the document scrolling. When apps are allowed to run and consume resources when the user is not interacting with them, these apps can take resources away from the app the user is interacting with, negatively affecting the performance and introducing lag for the user. This is another reason why Windows Store apps have all their threads suspended when the user is not interacting with them.
Furthermore, Windows puts a lot of time restrictions on Windows Store apps. If your app does not meet a time restriction, the OS terminates your app, bringing the user back to the Start screen where he can relaunch your app or run another app that performs more satisfactorily.
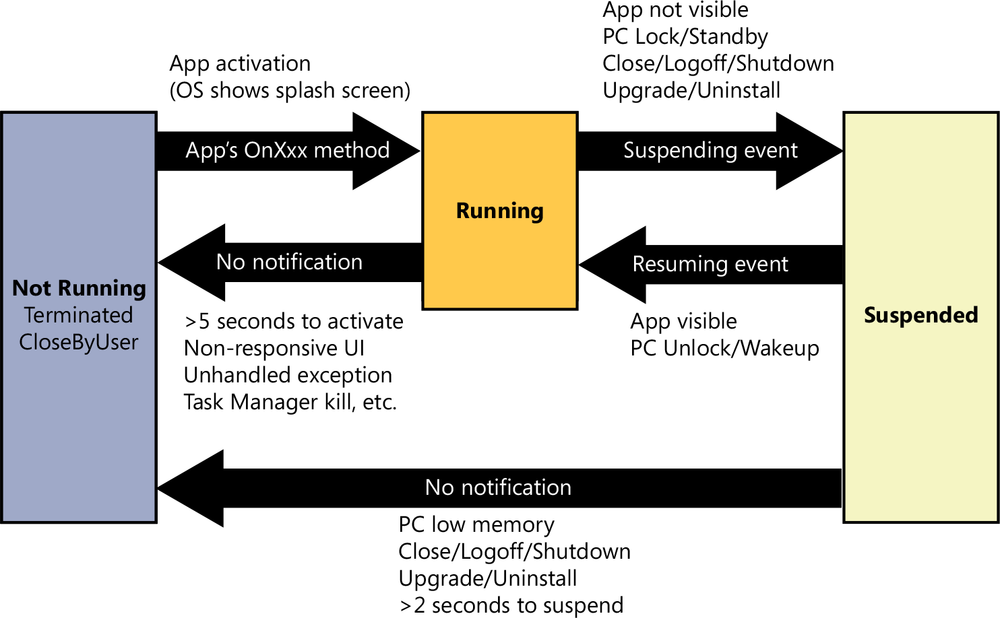
Figure 3-7 shows the lifetime of a Windows Store app. When your app is activated, Windows immediately shows your app’s splash screen (as specified in your app’s manifest file). This gives the user immediate feedback that your app is initializing. While the splash screen is visible, Windows invokes your app’s Main method and runs through all the activation steps as described at the beginning of this chapter. One of the last things your app does after initializing is activate its window (drawing surface) by calling Windows.UI.Xaml.Window’s Activate method. If your app does not call this method within 15 seconds, the OS terminates your app and returns the user to the Start screen.[21] While the OS gives your app 15 seconds to activate its window, your app must actually activate its window within 5 seconds in order to pass Windows Store certification. So you really should design your app to complete its initialization and activate its window within 5 seconds, not 15 seconds.
If your app needs more than 5 seconds to initialize, you can implement an extended splash screen as shown in the Process Model app available with the downloadable code that accompanies this book. This means that your app is activating a window that looks similar to the splash screen during its initialization. But, because you activated a window, the OS believes that your app is alive and well and it will not terminate your app now. Because you are in control of this window, you can show the user a progress ring or use other UI affordances to indicate to the user that your app requires more time to initialize. For an example of an app that shows an extended splash screen, see the Skype app that comes with Windows.
If your app displays content such as news articles, your app can bring up an empty wireframe or grid that gets populated as data flows in from the network. In this scenario, your app does not require an extended splash screen; the user can start interacting with it immediately.
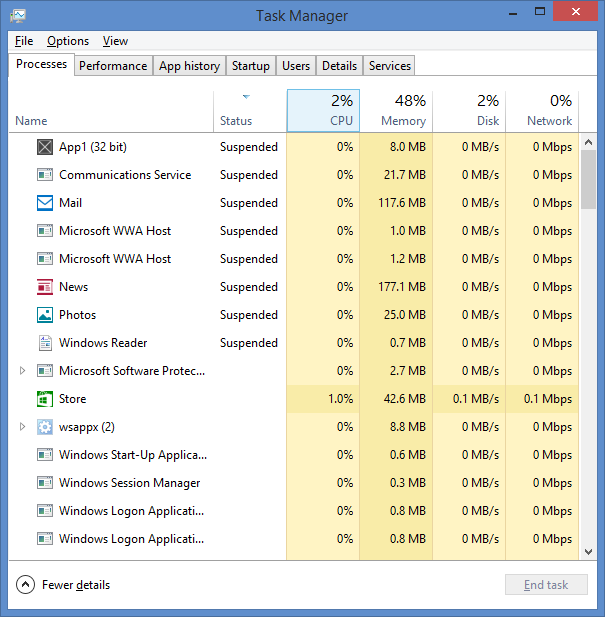
When the user switches away from your app, the OS suspends all the threads in your process. You can see this for yourself in Task Manager (shown in Figure 3-8). First, in Task Manager, select the View menu’s Status Values option and make sure that Show Suspended Status is selected. Then launch multiple Windows Store apps. After a few seconds, Task Manager shows a status of Suspended for any apps whose threads are suspended. For suspended apps, you’ll also notice that their CPU, Disk, and Network consumption all go to 0. Of course, memory is not impacted because these apps are still resident in memory.
When the user switches back to a suspended app, the system simply resumes the app’s threads and allows the app to interact with the user again. This is great, but what if your app shows real-time data like temperature, stock prices, or sports scores? Your app could have been suspended for weeks or maybe months. In this case, you wouldn’t want your app to simply resume and show the user stale data. So WinRT’s Application base class offers a Resuming event (which really just wraps CoreApplication’s Resuming event). When an app is resumed, this event is raised and your app can refresh its data to show the user current information. To know how long your app was suspended, query the time in the Suspending event and subtract this value from the time obtained in the Resuming event; there might be no need to refresh data if only a small amount of time passed. There is no time restriction placed on your Resuming event’s callback method. Many apps do not show real-time data, so many apps have no need to register with the Resuming event.
Important
If Windows suspends your app and subsequently activates it with a hosted view activation (such as Share), Windows does not resume all the threads in your app; the main view thread remains suspended. This can lead to blocking threads if you attempt to perform any kind of cross-thread communication.
In this chapter, we’ve talked a lot about how to efficiently manage memory used by your app. This is critically important because many mobile PCs do not have the amount of memory that desktop computers traditionally have. But, even if all Windows Store apps manage their memory as described in this chapter, there is still a chance that the user could start many Windows Store apps and the system will still run out of memory. At this point, a user has to close some currently running app in order to run some new app. But which apps should the user close? A good choice is the one using the most amount of memory, but how does the user know which app this is? There is no good answer to this question, and even if there was, it puts a big burden on the user to figure this stuff out and to manage it.
So, for Windows Store apps, Microsoft has taken this problem away from the user and has instead solved the problem in the OS itself—although you, as a software developer, must also contribute effort to solving the problem. When available memory is running low, Windows automatically terminates a Windows Store app that the user is not currently interacting with. Of course, the user is not aware that this has happened because the user is not interacting with the app. The system remembers that the app was running and allows the user to switch back to the app via the Windows Store apps task list (Windows key+Tab). When the user switches back to the app, the OS automatically relaunches the app so that the user can interact with the app again.
Of course, an app uses its memory to maintain state on behalf of the user. And, when the OS terminates an app, the memory is freed up and therefore the state is discarded. This is where you, as a developer, come in. Before your app is terminated, it must save its state to disk and, when your app is relaunched, it must restore its state. If your app does this correctly, it gives the illusion to the user that your app was never terminated and remained in memory the whole time (although your app’s splash screen is shown while your app re-initializes). The result is that users do not have to manage an app’s lifetime; instead, the OS works with your app to manage it, resulting in a better end-user experience. Again, this is especially useful with mobile PCs, which have limited amounts of memory.
Earlier, we talked about the Resuming event and how it is raised when the OS resumes your app’s threads. Well, the WinRT Application base class also offers a Suspending event (which really just wraps CoreApplication’s Suspending event). Just before an app’s threads are suspended, this event is raised so that your app can persist its state out to a file on the user’s disk.[22] Windows gives your app 5 seconds to complete its suspension; if you take longer than this, Windows just terminates your app. Although Windows gives you 5 seconds, your suspension must actually complete within 2 seconds to be certified for the Window Store.[23] If you follow the model described in the XAML page navigation section of this chapter, you are in great shape because all you have to do in your suspension code is create a file on disk and serialize the list of dictionaries into it. You’ll also need to call your Frame object’s GetNavigationState method, which returns a String that has encoded in it the collection of pages the user built up while navigating through your app; serialize this string out to the file as well.[24]
While your app is suspended, the OS might terminate it to free up memory for other apps. If the OS chooses to terminate your app, your app is given no additional notification; it is simply killed. The reason is obvious: if the system allowed your app to execute code before termination, your app could allocate more memory, making the situation worse. The main point to take away from this is that your app must save its state when it receives the Suspending event because your app will not be given a chance to execute more code if the OS decides to terminate it.
Even if the OS terminates your app, it gives the illusion to the user that your app is still running and allows the user to switch back to your terminated app. Figure 3-9 shows the system’s task list and Task Manager after the App1 app has been terminated. Notice that the task list shows the App1 app, allowing the user to switch to it.[25] However, Task Manager does not show any entry for the App1 app at all because it is no longer resident in memory.
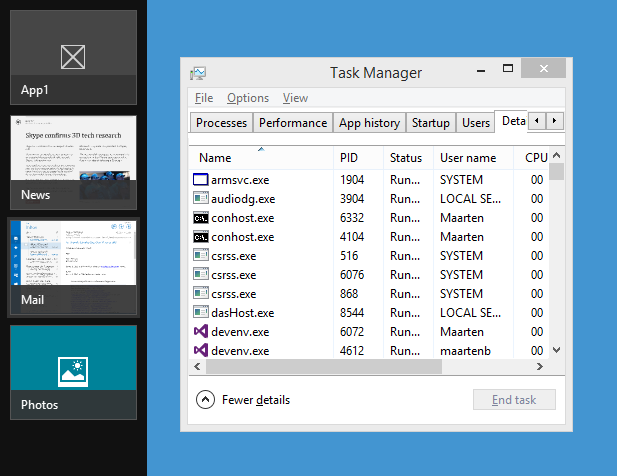
Figure 3-9. The Windows task list showing running, suspended, and terminated apps while Task Manager shows only running and suspended apps.
When the user switches back to a terminated app, the OS performs a main view activation of the app (showing its splash screen). The app must now initialize itself and restore its state back to what it was before the app was terminated.[26] The fact that the app got terminated should be transparent to the user. This is an important point. As far as the user is concerned, your app never stopped running: whether it is running, suspended, or even terminated, your app is available to the user.
When your app is activated, your app’s Main method runs, the main view thread is created, your App’s constructor executes, and then Application’s virtual OnWindowCreated method is called, followed by one of the other virtual OnXxx methods (depending on why your app is being re-activated). If your app is being activated with a hosted view activation, there is no need to restore your app’s state to what it was when it was suspended. But, when your app starts due to a main view activation, you’ll need to find out if your app is being re-activated because the OS terminated it.
All the virtual OnXxx methods are passed a parameter whose type implements the IActivatedEventArgs interface. This interface has a PreviousExecutionState property that returns an AppliationExecutionState value. This type is an enumerated type, and if the PreviousExecutionState property returns ApplicationExecutionState.Terminated, your app knows that it’s being relaunched because the OS terminated it. At this point, your code should open the file on the user’s disk where you previously serialized the app’s state, deserialize the list of dictionaries, and then grab the String with the encoded frame pages in it and pass it to your Frame object’s SetNavigationState method. When you call SetNavigationState, it resets the state of the Frame object back to what it was when your app was suspended so that the user will be looking at the exact same thing she was looking at when the app got suspended.[27] To the user, it looks like your app never terminated.
Note that memory pressure is not the only reason your app can terminate. The user can close your app by typing Alt+F4, dragging your app’s window from the top of the screen to the bottom and holding for a few seconds, or right-clicking your app in the task list and selecting Close. In addition, the OS closes all apps when the user logs off or shuts down the machine. In all the scenarios just given, the OS does raise the Window’s VisibilityChanged event, followed by the App’s Suspending event, giving your app a chance to save its state. However, in the future, when your app is launched, you should not restore your app’s state because the user has explicitly taken action to close your app as opposed to the OS implicitly terminating your app. If you check the PreviousExecutionState property, you’ll see that in all these scenarios, it returns ApplicationExecutionState.ClosedByUser.
Users can also forcibly kill an app using the Task Manager and, of course, an app can kill itself by throwing an unhandled exception. In addition, Windows will automatically kill an app if it’s running when the user uninstalls it or if the system updates the app to a newer version. In all these scenarios, when the app relaunches in the future, it should just initialize itself and not restore any previous state because state might have gotten corrupted, which is what might have caused the unhandled exception in the first place. If you check the PreviousExecutionState property, you’ll see that in these scenarios, it returns ApplicationExecutionState.NotRunning.
Note
Windows Store apps are not supposed to close themselves or offer any kind of UI that allows the user to close the app. If your app violates this rule, it will not pass Windows Store certification. The CoreApplication class offers an Exit method and an Exiting event. These members are for use in debug scenarios during app development only, such as memory-leak detection, unit testing, and so on. When you submit your app to the Windows Store for certification, your app must not use these members. To discourage the use of these members, the Windows.UI.Xaml.Application does not wrap these members; therefore, they are not easily available to your App class.
I know that all the information presented in this chapter can be difficult to take in, memorize, and turn into correctly implemented code. So, to simplify things, I’ve created an AppAid class that encapsulates a lot of this knowledge and makes building new Windows Store apps easier. Here is what this class looks like:
namespace Wintellect.WinRT.AppAids {
   public enum ViewType { None, Main, Hosted, Auxiliary }
   public enum LaunchReason { PrimaryTile, SecondaryTile, Toast, Proximity }
   public static class AppAid {
      private static ApplicationInitializationCallback m_appInitCallback;
      private static Func<Frame, IActivatedEventArgs, Task<Boolean>>
         s_deserializeFramePageStateAsync;
      /// <summary>Call this method from Main instead of calling Application.Start</summary>
      /// <param name="callback">The callback that constructs the App singleton object.</param>
      /// <param name="deserializeFramePageStateAsync">A callback that restores the user's
      /// session state. Called during 1st main view activation if the app was previously
      /// terminated.</param>
      public static void Start(ApplicationInitializationCallback callback,
         Func<Frame, IActivatedEventArgs, Task<Boolean>> deserializeFramePageStateAsync = null) {
         // Invoked via process' primary thread each time the process initializes
         s_deserializeFramePageStateAsync = deserializeFramePageStateAsync;
         m_appInitCallback = callback;
         Application.Start(AppInitialization);
      }
      private static void AppInitialization(ApplicationInitializationCallbackParams p) {
         // Invoked via main view thread
         // But the main view's CoreWindow & CoreDispatcher do NOT exist yet;
         // they are created by Application.Start after this method returns
         m_appInitCallback(p);  // Creates a singleton App object that never gets GC'd
         // because the base class (Application) holds a reference to it
         m_appInitCallback = null;   // Allow delegate to be GC'd
      }
      /// <summary>Call this method from inside App's OnWindowCreated method to determine
      /// what kind of window is being created.</summary>
      /// <returns> The view type (main or hosted) for this kind of activation.</returns>
      public static ViewType OnWindowCreated(this WindowCreatedEventArgs args) {
         // Invoked once via main view thread and once for each hosted view/auxiliary thread
         // NOTE: You can't tell what kind of activation (Share, Protocol, etc.) is occurring.
         return ViewType;
      }
      /// <summary>This method returns the kind of view for a given activation kind</summary>
      /// <param name="args">Indicates what kind of activation is occurring.</param>
      /// <returns>The view type (main or hosted) for this kind of activation.</returns>
      public static ViewType GetViewType(this IActivatedEventArgs args) {
         switch (args.Kind) {
            case ActivationKind.AppointmentsProvider:
               String verb = ((IAppointmentsProviderActivatedEventArgs)args).Verb;
               if (verb == AppointmentsProviderLaunchActionVerbs.AddAppointment)
                  return ViewType.Hosted;
               if (verb == AppointmentsProviderLaunchActionVerbs.ReplaceAppointment)
                  return ViewType.Hosted;
               if (verb == AppointmentsProviderLaunchActionVerbs.RemoveAppointment)
                  return ViewType.Hosted;
               if (verb == AppointmentsProviderLaunchActionVerbs.ShowTimeFrame)
                  return ViewType.Main;
               break;
            case ActivationKind.Contact:
               verb = ((IContactsProviderActivatedEventArgs)args).Verb;
               if (verb == ContactLaunchActionVerbs.Call) return ViewType.Main;
               if (verb == ContactLaunchActionVerbs.Map) return ViewType.Main;
               if (verb == ContactLaunchActionVerbs.Message) return ViewType.Main;
               if (verb == ContactLaunchActionVerbs.Post) return ViewType.Main;
               if (verb == ContactLaunchActionVerbs.VideoCall) return ViewType.Main;
               break;
            case ActivationKind.Launch:
            case ActivationKind.Search:
            case ActivationKind.File:
            case ActivationKind.Protocol:
            case ActivationKind.Device:
            case ActivationKind.LockScreenCall:
               return ViewType.Main;
            case ActivationKind.ShareTarget:
            case ActivationKind.FileOpenPicker:
            case ActivationKind.FileSavePicker:
            case ActivationKind.CachedFileUpdater:
            case ActivationKind.ContactPicker:
            case ActivationKind.PrintTaskSettings:
            case ActivationKind.CameraSettings:
               return ViewType.Hosted;
         }
         throw new ArgumentException("Unrecognized activation kind");
      }
      public static ViewType ViewType {
         get {
            try {
               CoreApplicationView cav = CoreApplication.GetCurrentView();
               return cav.IsMain ? ViewType.Main :
                  (cav.IsHosted ? ViewType.Hosted : ViewType.Auxiliary);
            }
            catch { return ViewType.None; }
         }
      }
      /// <summary>Whenever you override one of App's virtual activation methods
      /// (eg: OnLaunched, OnFileActivated, OnShareTargetActivated), call this method.
      /// If called for the 1st Main view activation, sets Window's Frame,
      /// restores user session state (if app was previously terminated), and activates window.
      /// If called for a Hosted view activation, sets Window's Frame & activates window.
      /// </summary>
      /// <param name="args">The reason for app activation</param>
      /// <returns>True if previous state was restored; false if starting fresh.</returns>
      public static async Task<Boolean> ActivateViewAsync(this IActivatedEventArgs args) {
         Window currentWindow = Window.Current;
         Boolean previousStateRestored = false; // Assume previous state is not being restored
         if (args.GetViewType() == ViewType.Main) {
            if (currentWindow.Content == null) {
               currentWindow.Content = new Frame();
            }
            // The UI is set; this is the 1st main view activation or a secondary activation
            // If not 1st activation,
            // PreviousExecutionState == ApplicationExecutionState.Running
            if (args.PreviousExecutionState == ApplicationExecutionState.Terminated
                && s_deserializeFramePageStateAsync != null) {
               // Restore user session state because app relaunched after OS termination
               previousStateRestored =
                  await s_deserializeFramePageStateAsync(CurrentFrame, args);
               s_deserializeFramePageStateAsync = null;   // Allow delegate to be GC'd
            }
         } else {
            currentWindow.Content = new Frame();
         }
         currentWindow.Activate();  // Activate the MainView window
         return previousStateRestored;
      }
      /// <summary>Returns the Frame in the calling thread's window.</summary>
      public static Frame CurrentFrame { get { return (Frame)Window.Current.Content; } }
      private const String ProximityLaunchArg = "Windows.Networking.Proximity:StreamSocket";
      public static LaunchReason GetLaunchReason(this LaunchActivatedEventArgs args) {
         if (args.Arguments == ProximityLaunchArg) return LaunchReason.Proximity;
         if (args.TileId == Windows.ApplicationModel.Core.CoreApplication.Id) {
            return (args.Arguments == String.Empty)
               ? LaunchReason.PrimaryTile : LaunchReason.Toast;
         }
         return LaunchReason.SecondaryTile;
      }
   }
}
The code that accompanies this book has a souped-up version of the AppAid class. The souped-up version supports extended splash screens and thread logging, and it has some navigation helpers. Here is some code for a sample App class that uses my AppAid class. The code calls some additional methods that I provide in the code that accompanies this book to simplify saving and restoring user session state in case of app termination. The most important part of the following code is the comments.
// Our singleton App class; store all app-wide data in this class object
public sealed partial class App : Application {
   // Invoked because DISABLE_XAML_GENERATED_MAIN is defined:
   public static void Main(String[] args) {
      // Invoked via process' primary thread each time the process initializes
      AppAid.Start(AppInitialization,
         (f, a) => f.DeserializePageStateAsync(c_FramePageStateFileName, a));
   }
   private static void AppInitialization(ApplicationInitializationCallbackParams p) {
      // Invoked via main view thread
      // But the main view's CoreWindow & CoreDispatcher do NOT exist yet;
      // they are created by Application.Start after this method returns
      // Create a singleton App object. It never gets GC'd because the base class (Application)
      // holds a reference to it obtainable via Application.Current
      var app = new App();
   }
   private App() {
      // Invoked via main view thread; CoreWindow & CoreDispatcher do NOT exist yet
      this.InitializeComponent();
      this.Resuming += OnResuming;     // Raised when main view thread resumes from suspend
      this.Suspending += OnSuspending; // Raised when main view thread is being suspended
      // TODO: Add any additional app initialization
   }
   private void OnResuming(Object sender, Object e) {
      // Invoked via main view thread when it resumes from suspend
      // TODO: Update any stale state in the UI (news, weather, scores, etc.)
   }
   private void OnSuspending(Object sender, SuspendingEventArgs e) {
      // Invoked via main view thread when app is being suspended or closed by user
      // Windows gives 5 seconds for app to suspend or OS kills the app
      // Windows Store certification requires suspend to complete in 2 seconds
      // TODO: Save session state in case app is terminated
      // (see ApplicationData.Current.LocalFolder)
      // NOTE: I perform this operation synchronously instead of using a deferral
      this.GetCurrentFrame().SerializePageStateAsync(c_FramePageStateFileName)
         .GetAwaiter().GetResult();
   }
   protected override void OnWindowCreated(WindowCreatedEventArgs args) {
      // Invoked once via the main view thread and once for each hosted view thread
      // NOTE: In here, you do not know the activation kind (Launch, Share, Protocol, etc.)
      switch (args.OnWindowCreated()) {
         case ViewType.Main:
            // TODO: Put code here you want to execute for the main view thread/window
            break;
         case ViewType.Hosted:
            // TODO: Put code here you want to execute for a hosted view thread/window
            break;
         case ViewType.Auxiliary:
            // TODO: Put code here you want to execute for an auxiliary view thread/window
            break;
      }
      // Optional: register handlers with these events
      Window w = args.Window; // Refers to the view's window (drawing surface)
      w.Activated += Window_Activated;
      w.VisibilityChanged += Window_VisibilityChanged;
   }
   private void Window_Activated(Object sender, WindowActivatedEventArgs e) {
      // Invoked via view thread each time its window changes activation state
      CoreWindowActivationState activateState = e.WindowActivationState;
   }
   private void Window_VisibilityChanged(Object sender, VisibilityChangedEventArgs e) {
      // Invoked via view thread each time its window changes visibility
      // A window becomes not-visible whenever the app is suspending or closing
      if (e.Visible) return;
   }
   protected override async void OnLaunched(LaunchActivatedEventArgs args) {
      Boolean previousStateRestored = await args.ActivateViewAsync();
      switch (args.GetLaunchReason()) {
         case LaunchReason.PrimaryTile:
            if (previousStateRestored) {
               // Previous state restored back to what it was
               // before app was terminated; nothing else to do
            } else {
               // Previous state not restored; navigate to app's first page
               // TODO: Navigate to desired page
            }
            break;
         case LaunchReason.SecondaryTile:
            // TODO: Navigate to desired page
            break;
         case LaunchReason.Toast:
            // TODO: Navigate to desired page
            break;
         case LaunchReason.Proximity:
            // TODO: Navigate to desired page
            break;
      }
   }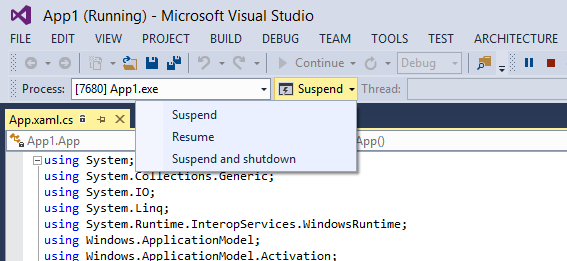
}When debugging, Windows will not suspend or terminate a Windows Store app because this would lead to a poor debugging experience. This makes it impossible for you to debug and step through your app’s Resuming and Suspending event handlers. So, to allow you to debug these event handlers, Visual Studio offers a way to force suspending, resuming, and terminating your app. While your app is running, go to Visual Studio’s Debug Location toolbar and select the operation you want to force, as shown in Figure 3-10. You might also want to use the PLMDebug tool, which you can download with the Debugging Tools for Windows. This tool allows you to turn off PLM for your app so that you can attach a debugger and debug the app without the OS suspending it.
[19] If you want to implement your own Main method and not use the XAML-generated one, you can do so by adding the DISABLE_XAML_GENERATED_MAIN conditional compilation symbol to your project’s build settings.
[20] If you are less concerned about memory conservation, you can override this default behavior and have the Frame object keep your page objects in memory by setting your Page object’s NavigationCacheMode property. See the SDK documentation for details.
[21] Actually, Windows terminates your app only if the user navigates away from its splash screen. If the user leaves the splash screen in the foreground, the app is not terminated.
[22] When an app goes to the background, Windows waits a few seconds before raising the Suspending event. This gives the user a few seconds to switch back to the app in case the user switched away from it by accident.
[23] If you need more time than 2 seconds to complete your suspension, you could look at Window’s VisibilityChanged event. This event is raised whenever a window becomes visible or invisible. A window always becomes invisible first before the app is suspending and its Suspending event is raised.
[24] GetNavigationState internally calls the page’s OnNavigateFrom method so that it can store any state in its dictionary before GetNavigationState returns its encoded String. The format of the string is undocumented; do not write code that parses or interprets the string in any way.
[25] The task list shows the contents of the app’s view if the app is still running and shows the default logo for the app if Windows terminated it.
[26] This does not always make senses for every app. For some apps, if they are suspended for a long time, the user might not remember or care about what she was last doing with the app. In this case, your app can just initialize itself and not restore any previous user state. You might take this approach for a newsreader app where the article might be stale or a weather app where the data is stale.
[27] SetNavigationState internally calls the page’s OnNavigatedTo method so that the page can load state from its dictionary back into its UI.