
Today, almost all apps transfer data over a network to other PCs and servers. In this chapter, I present the WinRT APIs available for you to use in your Windows Store apps.[47] However, before you roll up your sleeves and start coding against these APIs, you should see if there is some simpler system-provided functionality you can leverage.
For example, Windows can automatically sync a package’s settings and files across a user’s PCs. (See Chapter 4.) Or your app might want to post some data to a social networking site or share some data through a messaging app. Instead of writing code that works with a specific service, you could use the Windows Share charm. (See Chapter 10.) For updating tiles or badges, or for displaying a toast notification, your own service could use the Windows Push Notification Service (WNS) to send an update to your app. (See Chapter 8.) You can also send a raw WNS notifications to execute code in response to an input message coming in over the network. (See Chapter 9.)
Your app can also rely on one of the file pickers to let the user open files from network-accessible locations. (See Chapter 5, “Storage files and folders.”) And, for those apps that process Atom Publishing Protocol, ATOM, and RSS feeds, you can use the APIs in the Windows.Web.AtomPub and Windows.Web.Syndication namespaces.
It’s recommend that, when possible, you use the highest networking abstraction you can because this simplifies your code. But, if your app needs more traditional networking (HTTP, TCP, WebSockets, and UDP), WinRT does have APIs for you, and using these APIs is the focus of this chapter.
Windows supports different kinds of networks, such as LAN, Wi-Fi, and mobile (GSM, 3G/4G, and so on). Each of these networks has its own characteristics (such as bandwidth) that might affect your app’s responsiveness. Additionally, these networks might have different costs associated with their usage. LAN and Wi-Fi at home or work are usually considered unlimited. Connections in hotel rooms or hotspots might be capped, and mobile networks could have additional restrictions such as roaming costs. When connecting to a network, Windows prioritizes a user’s available networks. It prefers lower cost and better performance networks such as LAN and Wi-Fi to mobile networks. Additionally, when connecting to a Wi-Fi network, the system prefers the most recently-connected-to and available access point.
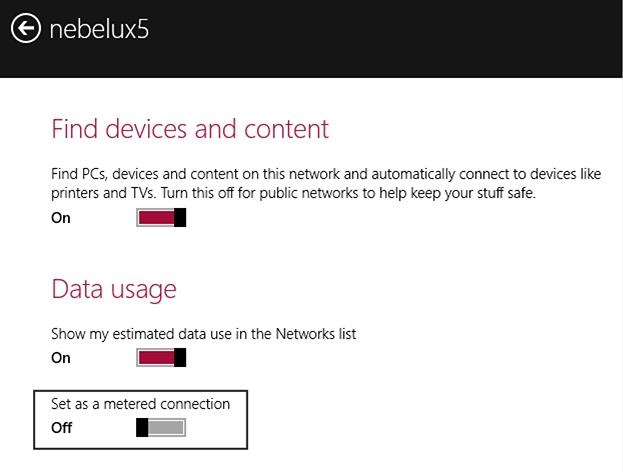
The Windows Runtime provides APIs so that you can get information about the network’s speed and cost, allowing your app to make informed decisions about whether and how to use the connection. However, the system does not always have all the necessary information to decide if a connection should be metered (for example, when it is being used in hotel rooms). Therefore, Windows allows users to change a connection to Set As A Metered Connection as shown in Figure 7-1 by going to PC Settings > Network > Connections > network name. Changing a connection like this is also useful for developers so that they can test how their app behaves with different connection types. Additionally, the simulator allows you to modify these network settings.
Windows surfaces this information to your app, as you’ll see in this chapter’s Network connection profile information section. The system itself also changes its behavior when on a metered network. For example, open PC Settings and look at SkyDrive > Files, SkyDrive > Sync Settings, and PC & Devices > Devices. All of these provide a Metered Connections section, allowing a user to control network costs.
Users can use Task Manager’s App History tab (shown in Figure 7-2) to see how much bandwidth individual apps have consumed. Task Manager shows Network usage, Metered Network usage, and also Tile Updates. If a user gets a large bill at the end of a month, he can easily find out which app or apps are using the most bandwidth. The user can then alter how he works with that app or uninstall it entirely.

When Visual Studio creates a Windows Store app, it sets one capability in the app’s manifest file: Internet (Client). With this, Microsoft is assuming that all Windows Store apps will make outgoing connections over the Internet. However, if your app performs all its networking using other features (like roaming settings, sharing, or WNS), your app does not need this capability and you should turn it off.
Important
Packages that enable any network capability must have a privacy policy when they are submitted to the Windows Store for certification. The reason is because each network request includes the user’s IP address, and this is considered personal information. The privacy policy must be part of the package’s description and must also be available via the app’s settings as displayed in the Windows Settings charm. The setting can open a webpage displaying the privacy policy. The privacy policy simply states what you intend do to with the user’s personal information. Of course, the policy can say that you discard any personal information; you just have to make it clear to users what you intend to do with their information.
In fact, I have written a few Windows Store apps that specifically do not have any network capabilities turned on because I want users to rest assured that my app does nothing with any personal data they enter into it. Without these capabilities, there is no way for an app to transmit a user’s personal data. Table 7-1 shows the various capabilities related to networking:
Table 7-1. Manifest capabilities related to networking.
Capability | Description |
|---|---|
Internet (Client) | Allows outbound access to the Internet and networks in public places. |
Internet (Client & Server) | Allows outbound and inbound access to/from the Internet and networks in public places. This capability is a superset of Internet (Client). |
Private Networks (Client & Server) | Allows outbound and inbound access to/from an intranet network authenticated by a domain controller or a network the user has designated as a home or work network. |
Enterprise Authentication | Allows the app to access resources that require domain credentials. Only Windows Store apps submitted by companies (not individuals) can pass certification when using this capability. |
Proximity | Allows the app to communicate with other PCs via Near Field Communication (NFC) |
If you’ve ever written a Setup.exe or other installer file, such as MSI, for an application that needed access to the network, you probably had to write some code or a script to open up the firewall for your application (and, of course, close the firewall when your app is uninstalled). As you learned in Chapter 2 Windows Store apps are always installed by the system; there is no separate installer app. When Windows installs a Windows Store package, the system looks at the manifest file, sees the capabilities, and automatically opens up the firewall for the package’s app. You can verify this by going to the firewall settings and looking for your package. (See Figure 7-3.)
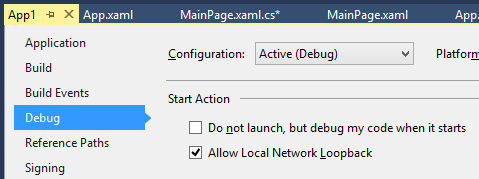
As explained in Chapter 1 Windows Store apps are isolated from one another. That is, they cannot communicate with each other, any desktop app, or even a service running on the same PC. However, when debugging client/server communications, it is convenient to run the client and server applications on the same PC. To help developers and testers, Visual Studio exposes a Debug setting called “Allow Local Network Loopback.” (See Figure 7-4.) This setting is for development purposes only, and you won’t find this anywhere in the manifest file.
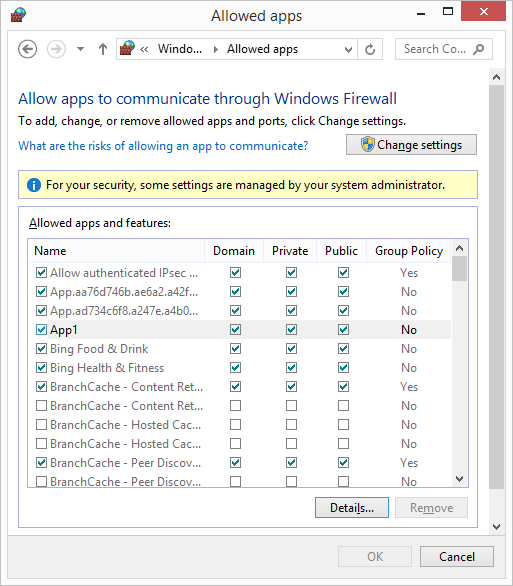
Figure 7-3. Windows automatically configures a package’s firewall settings based on the package’s manifest capabilities.
Internally, toggling this check box from selected to not selected executes a command-line tool called CheckNetIsolation.exe. This tool can add and remove packages to the loopback exempt list. (For more information, see http://http://msdn.microsoft.com/en-us/library/windows/apps/hh780593.aspx.)
Important
Many developers debug their client/server app on their machine successfully because Visual Studio, by default, selects the Allow Local Network Loopback option. But then, when the app and server are deployed for testing on another machine, the communication fails. On the test machine, you must run CheckNetIsolation.exe to enable loopback or, better yet, set up the client and server on different machines because this tests the apps in a more true-to-life environment.
You can also run the CheckNetIsolation.exe tool (as an Administrator) to see what networking capabilities your app actually used when running. Here is an example:
C:>CheckNetIsolation.exe debug -n=JeffreyRichter.AzureSASGenerator_ape9s8gs6w87m
Network Isolation Debug Session started.
Reproduce your scenario, then press Ctrl-C when done.
      Collecting Logs.....
Summary Report
Network Capabilities Status
----------------------------------------------------------------------
    InternetClient                Not Used and Insecure
    InternetClientServer          Not Used and Insecure
    PrivateNetworkClientServer    Missing, maybe intended
CheckNetIsolation.exe is monitoring the firewall, and if it finds that your app is trying to reach an address the firewall has blocked, it flags it. As you can see from the preceding example, it has noticed that the app was trying to reach an address on the intranet and flagged the capability as missing.
Important
A Windows Store app is always allowed to establish itself as both a server and client, and Windows does allow the app to communicate with itself. This allows you to have a clean architecture where the client code can connect to the server code as if the client were connecting via the network. In addition, if your Windows Store app is just talking to itself, you do not need to add the Internet (Client & Server) capability to your package’s manifest.
Network connections are tenuous, especially Wi-Fi and mobile connections. This means you must code your app to be resilient against dynamic network changes, bandwidth changes, and cost changes. Your app learns about the current state of the network by calling the NetworkInformation class’ static GetInternetConnectionProfile method:
ConnectionProfile cp = NetworkInformation.GetInternetConnectionProfile();
This method returns a ConnectionProfile that has a lot of information packed into it:
public sealed class ConnectionProfile {
   // Enum indicating access: None, LocalAccess, ConstrainedInternetAccess, InternetAccess
   public NetworkConnectivityLevel GetNetworkConnectivityLevel();
   // Returns network adapter info including bandwidth speeds:
   public NetworkAdapter NetworkAdapter { get; }
   // Returns the cost associated with accessing this network:
   public ConnectionCost GetConnectionCost();
   // Returns info about the connection's data plan
   public DataPlanStatus GetDataPlanStatus();
   // Less useful members not shown here...
}
The GetNetworkConnectivityLevel method returns an enumerated type indicating what the app can access: nothing, local intranet resources, constrained Internet resources,[48] or Internet resources. The NetworkAdapter property tells you what network interface card (NIC), Wi-Fi card, or mobile broadband radio the current connection is using, its bandwidth characteristics, and so on. Other members reveal the connection’s authentication and encryption—for example, Wired Equivalent Privacy (WEP) or Wi-Fi Protected Access (WPA) in the case of wireless networks—the name of the network (such as the SSID for wireless), and more.
The GetConnectionCost method returns a ConnectionCost object indicating the costs associated with a network connection:
public sealed class ConnectionCost {
   // Enum: Unknown, Unrestricted (LAN & Wi-Fi),
   //       Fixed (free to a limit), Variable (has a cost per byte)
   public NetworkCostType NetworkCostType { get; }
   public Boolean ApproachingDataLimit { get; } // Applies when NetworkCostType is Fixed
   public Boolean OverDataLimit        { get; } // Applies when NetworkCostType is Fixed
   public Boolean Roaming              { get; }
}
NetworkCostType has four different values: Unknown, Unrestricted, Fixed, and Variable. Unknown is a transient network state that quickly changes to one of the other three categories. LAN and Wi-Fi connections will almost always fall in the Unrestricted category. Typically, these connection types have either no cap or one that is very high. Mobile broadband networks typically indicate Fixed or Variable. Fixed indicates that the bandwidth is free up to a certain amount (for example, 5 GB per month) and then additional costs kick in. The ApproachingDataLimit and OverDataLimit properties apply to this Fixed network cost type. ApproachingDataLimit returns true once the connection has reached a threshold close to the data usage allowance.[49] Variable indicates that the bandwidth has a cost per byte associated with it. The Roaming property indicates that the network access is expensive because the user is roaming away from her usual network.
The GetDataPlanStatus method returns a DataPlanStatus object containing information (populated by the network provider) about the user’s data plan:
public sealed class DataPlanStatus {
   // Your app uses this when on a metered network:
   public UInt32? MaxTransferSizeInMegabytes { get; }
   // Indicates speed of connection (most apps ignore these):
   public UInt64? InboundBitsPerSecond { get; }
   public UInt64? OutboundBitsPerSecond { get; }
   // Billing cycle information (most apps ignore these):
   public DateTimeOffset? NextBillingCycle { get; }
   public UInt32? DataLimitInMegabytes { get; }
   public DataPlanUsage DataPlanUsage { get; }
}For your app to pass Windows Store certification,[50] it must have code that leverages the connection profile just discussed. The goal here is to prevent users from getting unexpected carrier fees by using an app that internally performs networking operations. When on a nonmetered network, your app can use network bandwidth to its heart’s content. But, when on a metered network, your app should dynamically adjust its bandwidth usage based on network connectivity. For example, Windows itself does not download normal system updates when connected via a metered network. However, it does download critical security updates when on a metered network.
Specifically, when on a metered network, your app should
Stream audio no more than 64 Kbps
Stream video no more than 256 Kbps
Not perform any single transfer larger than the number of bytes returned from
DataPlanStatus' MaxTransferSizeInMegabytesproperty without requesting user permission.[51]Not transfer any data when the connection is over its data limit or when the PC is roaming because this can be quite expensive for the user. If a transfer is in progress when a connection goes over its data limit or is roaming, the policy allows an app to transfer up to 1 MB of additional data before stopping.
The Windows Store cannot easily verify that your app adheres to these policies. However, if users of your app complain about your app’s network consumption because it is not adhering to these policies, your app will be removed from the Windows Store.
That being said, your app can offer the user a setting that allows your app to violate these restrictions, but the important thing here is the user must be in control. Here is an example of an extension method you can use in your app before initiating a transfer operation. This method returns the maximum size of the transfer in megabytes allowed given the current network connection and the user’s preference:
public static UInt64 GetMaxTransferSizeInMegabytes(this ConnectionProfile cp,
   Boolean userOptIn = false,
   NetworkConnectivityLevel requiredLevel = NetworkConnectivityLevel.InternetAccess) {
   // If no physical connection or less than required, transfer 0 bytes
   if ((cp == null) || (cp.GetNetworkConnectivityLevel() < requiredLevel)) return 0;
   // If the user opts in to full network usage, there is no limit
   if (userOptIn) return UInt64.MaxValue;
   ConnectionCost cc = cp.GetConnectionCost();
   // If expensive, don't transfer anything (your app can really use 1MB more)
   if (cc.Roaming || cc.OverDataLimit) return 0;
   // No limit if not metered
   Boolean isMetered = cc.NetworkCostType == NetworkCostType.Fixed
      || cc.NetworkCostType == NetworkCostType.Variable;
   if (!isMetered) return UInt64.MaxValue;
   // Return MaxTransferSizeinMegabytes (if exist) or no limit
   return cp.GetDataPlanStatus().MaxTransferSizeInMegabytes ?? UInt64.MaxValue;
}
When your app is about to transfer data, it should call this method to see how large a transfer it can do to keep your users happy with your app’s network consumption and also to pass Windows Store certification.
In addition to costs, there are other issues worth keeping in mind when building a networking app—for example, power conservation. Apps should use as little bandwidth as possible to decrease power consumption. Also, it is best to avoid frequent periodic requests because this prevents the network hardware from entering an idle state. Instead, batch requests together and perform them all simultaneously less frequently. Also, consider caching data offline to avoid unnecessary network requests and also to give your users a good experience with your app when a network is unavailable.
Your app can receive a notification whenever network connectivity changes by having it register a callback method with the NetworkInformation class’ static NetworkStatusChanged event. Apps typically use this to re-establish connections whenever network connectivity is restored. Unfortunately, there is no way to easily find out what exactly changed. Also, this event is raised whenever any connection changes. For example, if your system has both wired and Wi-Fi connections, the event is raised when either of these changes. This means your app might have to walk through all the connections (by calling NetworkInformation’s static GetConnectionProfiles method) to see if the one it is currently using has changed; some changed events might not affect your app at all.
Situations might arise where the system or even your app is using multiple connections simultaneously. For example, if your app opened a socket to connect with a server over a mobile broadband connection, your app will continue to use that connection even if other better networks become available later. For these scenarios, you can certainly use the NetworkStatusChanged event to find out if a better connection has become available and re-establish the connection within your app’s code. Finally, if your app is suspended when a network status change occurs, the system will raise the event once when your app resumes.
Although the NetworkStatusChanged event does not indicate what has changed, you can get more information if you create a background task triggered by a SystemTrigger with a SystemTriggerType of NetworkStateChange. Then, whenever this task executes, its IBackgroundTaskInstance’s TriggerDetails property will refer to a NetworkStateChangeEventDetails object that exposes what has changed:
public sealed class NetworkStateChangeEventDetails {
   public Boolean HasNewConnectionCost { get; }
   public Boolean HasNewDomainConnectivityLevel { get; }
   public Boolean HasNewHostNameList { get; }
   public Boolean HasNewInternetConnectionProfile { get; }
   public Boolean HasNewNetworkConnectivityLevel { get; }
   public Boolean HasNewWwanRegistrationState { get; }
}Many Windows Store apps transfer files (documents, pictures, audio, and video) over the network. Typically, users use an app to initiate a transfer and then the user works with other apps while the transfer takes place. However, as discussed in Chapter 3 Windows Store apps are suspended while not in the foreground, and therefore, the file transfer stops. This is clearly not an ideal user experience.
Fortunately, Windows provides a background transfer feature allowing an app to initiate a transfer, and then the system continues the transfer while the app is running or suspended (but not if the app is terminated). The WinRT background transfer APIs are simple to use and have the following capabilities:
Support small and large transfers (although they are most commonly used for large transfers)
Automatically take connection profile and cost into account so that you don’t have to worry about this
Can resume downloads and restart uploads even if network connectivity issues arise during the transfer
Support HTTP(S) with custom headers (typically used for authentication) and FTP (download only) protocols
Support progress reporting, pause/resume (downloads only), and cancel operations
Support normal and high-priority transfer operations
Support transfer groups, allowing you to perform a set of transfers serially or in parallel
Can update a tile or display a toast notification when a transfer or transfer group completes or fails
Allow your app to read the data while downloading; your app does not have to wait for the download to complete
Performing a background transfer starts with two classes in the Windows.Networking.BackgroundTransfer namespace: BackgroundDownloader and BackgroundUploader. Because it is more common for apps to download data, I’ll focus the discussion on downloading. However, because these two classes are practically identical, the discussion applies to uploading as well. Where appropriate, I will point out differences. The BackgroundDownloader class looks like this:
public sealed class BackgroundDownloader : IBackgroundTransferBase {
   public BackgroundDownloader();
   // These members set properties/headers you want applied to 1 or more download operations
   public BackgroundTransferCostPolicy CostPolicy {get; set; }
   public String Method { get; set; }                   // HTTP method: "GET", "POST", "PUT"
   public BackgroundTransferGroup TransferGroup { get; set; }
   public PasswordCredential ProxyCredential  { get; set; }        // For HTTP requests
   public PasswordCredential ServerCredential { get; set; }
   public void SetRequestHeader(String headerName, String headerValue); // For HTTP requests
   public TileNotification SuccessTileNotification { get; set; }   // Used if ALL succeed
   public TileNotification FailureTileNotification { get; set; }   // Used if ANY fail
   public ToastNotification SuccessToastNotification { get; set; } // Used if ALL succeed
   public ToastNotification FailureToastNotification { get; set; } // Used if ANY fail
   // This method creates a download operation using the specified properties & headers
   public DownloadOperation CreateDownload(Uri uri, IStorageFile resultFile);
   // This method asks the user if the downloads can proceed if the PC is on battery power
   public static IAsyncOperation<UnconstrainedTransferRequestResult>
      RequestUnconstrainedDownloadsAsync(IEnumerable<DownloadOperation> operations);
   // These static methods (discussed later) resume transferring when
   // a terminated process relaunches
   public static IAsyncOperation<IReadOnlyList<DownloadOperation>> GetCurrentDownloadsAsync();
   public static IAsyncOperation<IReadOnlyList<DownloadOperation>>
      GetCurrentDownloadsForTransferGroupAsync(BackgroundTransferGroup group);
}
After you construct a BackgroundDownloader object, you set any desired properties and optionally add any request headers. Let’s discuss a few of these properties.
The CostPolicy property controls the cost of the transfer. Here are the possible values and what each means:
Default. The transfer occurs on unrestricted networks or on metered networks if not roaming or over the data limit. Note that a download operation won’t even start if the file size is known and would take the connection over its data limit.
UnrestrictedOnly. The transfer occurs on unrestricted networks if not roaming.
Always. The transfer occurs regardless of network costs. Your app should specify this value only if the user opts into this behavior. To do this, you could call
BackgroundDownloader’sRequestUnconstrainedDownloadsAsyncmethod.
The Method property is for HTTP(S) requests; it defaults to an empty string, which means GET for a download operation and POST for an upload operation. The TransferGroup property allows you to assign a bunch of operations to a group (identified by a string [typically a GUID]) and whether you want the operations to transfer sequentially or in parallel (the default). The operations that are part of this group can be obtained when calling the static GetCurrentDownloadsForTransferGroupAsync method (discussed later). Transfer groups allow an app to use a third-party component to initiate several transfers using a group name string that is unknown to the app. Because the app doesn’t know the group name string, it can’t discover and manipulate the component’s transfers. The ProxyCredential and ServerCredential properties allow you to specify any username/passwords required.
After you initialize a BackgroundDownloader object, you use it to create one or more transfers. You create a transfer by calling its CreateDownload method. A download operation downloads data from the specified Uri to the specified IStorageFile. For an FTP download, the URI must include credentials and must look something like this:
ftp://username:[email protected]/FolderName/FileName.ext
If you want to process the data as it downloads without persisting it into your own file, pass null for the resultFile parameter and then call DownloadOperation’s GetResultStreamAt method, which returns an IInputStream you can use to read the data as it is downloading. Note that a background download operation always stores the downloaded data to a system-created temporary file; the GetResultStreamAt method really returns an IInputStream to this temporary file.[52] Downloading to a temporary file allows your app to be suspended while the download continues and then process the data when your app resumes. I show an example using this technique in the Populating a stream on demand section of Chapter 6.
You create a background upload operation by calling BackgroundUploader’s CreateUpload method:
public UploadOperation CreateUpload(Uri uri, IStorageFile sourceFile);
The upload operation uploads data from the specified IStorageFile to the specified Uri. If you want to upload from memory instead of using a file, you cannot pass null for the sourceFile parameter because that throws a NullReferenceException. Instead, call BackgroundUploader’s CreateUploadFromStream method:
public IAsyncOperation<UploadOperation> CreateUploadFromStreamAsync(
   Uri uri, IInputStream sourceStream);
The BackgroundUploader class also offers a CreateUploadAsync method that allows you to upload data as a MIME multipart message.
The DownloadOperation and UploadOperation objects are practically identical. Here’s what these classes look like:
public sealed class XxxOperation : IBackgroundTransferOperation {
   // Members initialized when you called CreateDownload or CreateUpload:
   public BackgroundTransferCostPolicy CostPolicy { get; set; }
   public BackgroundTransferGroup TransferGroup { get; }
   public String Method           { get; }
   public Uri RequestedUri        { get; }
   public IStorageFile ResultFile { get; }  // Called "SourceFile" for UploadOperation
   public Guid Guid               { get; }  // Uniquely identifies this transfer operation
   public BackgroundTransferPriority Priority { get; set; } // Default or High
   // Members to control the transfer; cancel via IAsyncOperationWithProgress' Cancel method
   public IAsyncOperationWithProgress<XxxOperation, XxxOperation> StartAsync();
   public IAsyncOperationWithProgress<XxxOperation, XxxOperation> AttachAsync();
   public BackgroundXxxProgress Progress { get; }
   public void Pause();                    // Offered by DownloadOperation only
   public void Resume();                   // Offered by DownloadOperation only
   public ResponseInformation GetResponseInformation();
   public IInputStream GetResultStreamAt(UInt64 position);
}
Once you have one of these objects, you can alter some of its properties (if desired) and then tell Windows to start transferring the data by calling the StartAsync method. This method returns an IAsyncOperationWithProcess object, which you can use to register for periodic progress notifications and transfer completion. You can also use it to cancel the operation. When you get a progress notification, you can query XxxOperation’s Progress property to get detailed progress information:
public struct BackgroundXxxProgress {
   public Boolean HasRestarted;
   public Boolean HasResponseChanged;
   // Idle, Running, Paused[ByApplication|CostedNetwork|NoNetwork], Completed, Canceled, Error
   public BackgroundTransferStatus Status;
   public UInt64 BytesReceived;
   public UInt64 TotalBytesToReceive;
   public UInt64 BytesSent;        // Offered by BackgroundUploadProgress only
   public UInt64 TotalBytesToSend; // Offered by BackgroundUploadProgress only
}
So now, let me show you an example that downloads a file:
void StartDownload(Uri uri, IStorageFile file, CancellationToken ct) {
   BackgroundDownloader bd = new BackgroundDownloader();
   DownloadOperation dop = bd.CreateDownload(uri, file);
   var p = new Progress<DownloadOperation>(DownloadProgress);
   // NOTE: It is common NOT to use await here as you DO want the
   // next line of code to execute before the transfer completes.
   // Instead, when transfer completes, TransferDone is called.
   dop.StartAsync().AsTask(ct, p).ContinueWith(TransferDone);
}
 void DownloadProgress(DownloadOperation dop) {
   // Windows calls this method approximately once every 500 milliseconds
   // NOTE: This method is called by the GUI thread
   // TODO: Update UI with dop.Progress properties...
}
async void TransferDone(Task<DownloadOperation> task) {
   // NOTE: This method could be called by any thread; to update UI use a CoreDispatcher
   DownloadOperation dop = null;
   try {
      dop = await task;   // Get DownloadOperation; throws if transfer canceled/failed
      // TODO: Update UI/show toast...
   }
   catch (Exception ex) {
      if (ex is OperationCanceledException) {
         // TODO: Code to handle cancellation...
      } else {
         // Converts HResult to HTTP response code
         WebErrorStatus webErrorStatus = BackgroundTransferError.GetStatus(ex.HResult);
      }
   }
}
The preceding code initiates a transfer, which Windows performs while your app is running or suspended. If progress or completion notifications come in, your app receives them if it is running. If your app is suspended, Windows remembers the most recent events only and raises them when your app resumes. But what if your app is terminated? In this case, Windows stops the transfer operation. Then, when the user switches back to your app, Windows automatically relaunches your app. But, at this point, any callback methods you’ve registered for progress reporting and completion have been destroyed. Furthermore, Windows doesn’t automatically detect that your app relaunched, so it will not resume your app’s transfers.
So, when your app relaunches, it must call the BackgroundDownloader.GetCurrentDownloadsAsync and BackgroundUploader.GetCurrentUploadsAsync methods. These methods return a collection of XxxOperation objects—one object for each transfer your app initiated by calling StartAsync. Just calling these methods is enough to have Windows resume the transfers; you do not actually have to iterate through the returned collections. Note that uploads using the HTTP PUT method restart, while uploads using the HTTP POST method do not.
If you want, you can iterate through these collections and register any progress, cancellation, and completion notifications you’d like:
// NOTE: This code assumes one CancellationToken for all transfer operations.
// It also assumes one progress and completion callback for all downloads & for all uploads
// You must modify this code if you desire different behavior
private async void AttachToBackgroundTransfers(CancellationToken ct, String group,
   Progress<DownloadOperation>     downloadProgress,
   Action<Task<DownloadOperation>> downloadComplete,
   Progress<UploadOperation>       uploadProgress,
   Action<Task<UploadOperation>>   uploadComplete) {
   foreach (DownloadOperation dop in
      await BackgroundDownloader.GetCurrentDownloadsAsync(group)) {
      var noWarning = dop.AttachAsync().AsTask(ct, downloadProgress)
         .ContinueWith(downloadComplete);
   }
   foreach (UploadOperation uop in
      await BackgroundUploader.GetCurrentUploadsAsync(group)) {
      var noWarning = uop.AttachAsync().AsTask(ct, uploadProgress)
         .ContinueWith(uploadComplete);
   }
}
When you start a transfer operation, the system remembers it. If your app closes or terminates, it must reattach to the previously started transfer operations or they will remain dormant in the system, wasting resources. Your app has to complete or cancel each operation to release its resources. Don’t forget about this when debugging your app. When you stop a debugging session, the system still remembers any initiated operations. If you debug and stop a lot, your app can accumulate a lot of transfer operations. The easy way to destroy all of the operations is to go to your app’s properties in Visual Studio and, on the Debug pane, select the “Uninstall and then re-install my package. All information about the application state is deleted.” option and then start your app again.
Because your app can be suspended, background transfers execute in a separate process. You can see this in Task Manager. Figure 7-5 shows the App1 app suspended, but there is also an App1 Download/Upload Host process that is not suspended. If you tap and hold this process and choose Go To Detail, Task Manager takes you to the Details tab, selecting a process called BackgroundTransferHost.exe. (This process ships with Windows itself.)
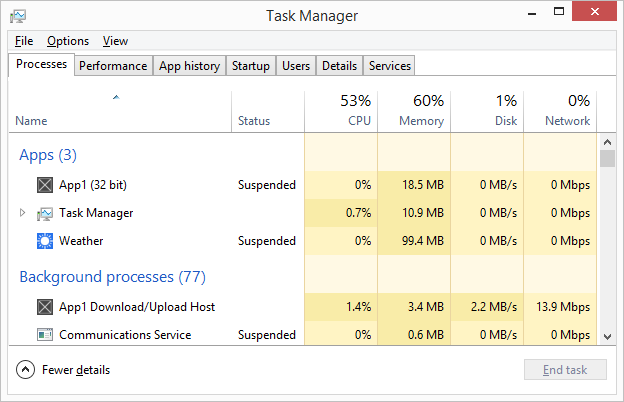
Each app using WinRT’s background transfer API gets its own instance of the BackgroundTransferHost.exe process, and each instance runs in the package’s app container. If your app uses the background transfer API, you must turn on the Internet (Client) capability in your package’s manifest so that the host process gets this capability too.
As always, you can use the Windows Event Viewer (EventVwr.exe) to see system logs related to background transfer. Here’s where to look for the log entries: Applications And Service Logs > Microsoft > Windows > Runtime-Networking-BackgroundTransfer.[53]
Probably the most common form of network communication is client-side HTTP(S) communication. To accomplish this with WinRT, you use the Windows.Web.Http.HttpClient class, which looks like this:[54]
public sealed class HttpClient : IDisposable, IStringable {
   public HttpClient();                   // Construct using HttpBaseProtocolFilter
   public HttpClient(IHttpFilter filter); // Construct with a specific IHttpFilter
   // Use this property to set request headers sent with each request.
   public HttpRequestHeaderCollection DefaultRequestHeaders { get; }
   // This method sends a request. The operation is considered complete
   // after reading response headers or the entire response.
   public IAsyncOperationWithProgress<HttpResponseMessage, HttpProgress>
      SendRequestAsync(HttpRequestMessage request);
   public IAsyncOperationWithProgress<HttpResponseMessage, HttpProgress>
      SendRequestAsync(HttpRequestMessage request, HttpCompletionOption completionOption);
   // These methods simplify calling SendRequestAsync for common operations:
   public IAsyncOperationWithProgress<HttpResponseMessage, HttpProgress>
      PostAsync(Uri uri, IHttpContent content);
   public IAsyncOperationWithProgress<HttpResponseMessage, HttpProgress>
      PutAsync(Uri uri, IHttpContent content);
   public IAsyncOperationWithProgress<HttpResponseMessage, HttpProgress> DeleteAsync(Uri uri);
   public IAsyncOperationWithProgress<HttpResponseMessage, HttpProgress> GetAsync(Uri uri);
   public IAsyncOperationWithProgress<HttpResponseMessage, HttpProgress>
      GetAsync(Uri uri, HttpCompletionOption completionOption);
   // These methods simplify calling GetAsync for common HTTP GET operations:
   public IAsyncOperationWithProgress<String, HttpProgress> GetStringAsync(Uri uri);
   public IAsyncOperationWithProgress<IBuffer, HttpProgress> GetBufferAsync(Uri uri);
   public IAsyncOperationWithProgress<IInputStream, HttpProgress> GetInputStreamAsync(Uri uri);
   public String ToString(); // Returns filter and default header information
   public void Dispose();    // Releases unmanaged resources associated with the HttpClient
}
Once you’ve constructed an HttpClient object, you can easily download a string like this:
using (HttpClient client = new HttpClient()) {
   String html = await client.GetStringAsync(new Uri("http://WintellectNOW.com/"));
}
This is very simple, but sometimes you need to have more control over the communication. All of the simple XxxAsync methods are really just wrappers around HttpClient’s more capable SendRequestAsync method. To have more control over the request, you must construct an HttpRequestMessage object that looks like this (some members not shown):
public sealed class HttpRequestMessage : IDisposable, IStringable {
   // Set the HTTP method (GET, POST, PUT, DELETE, etc.) and server URI
   public HttpRequestMessage(HttpMethod method, Uri uri);
   // Set this request's headers (HttpClient's DefaultRequestHeaders are merged with these)
   public HttpRequestHeaderCollection Headers { get; }
   // Set any content to send to the server (not used for some methods, like GET)
   public IHttpContent Content { get; set; }
   // Optional: When using HTTPS, examine information about the server's certificate
   public HttpTransportInformation TransportInformation { get; }
   public void Dispose();    // Releases HttpRequestMessage's unmanaged resources
}
Here is an example of how to make an HTTPS POST request to the http://httpbin.org service:
using (HttpClient client = new HttpClient()) {
   HttpRequestMessage request =
      new HttpRequestMessage(HttpMethod.Post, new Uri("https://httpbin.org/post")) {
      Content = new HttpStringContent("Some test data", UnicodeEncoding.Utf8, "text/plain")
   };
   HttpResponseMessage response = await client.SendRequestAsync(request);
   String json = await response.Content.ReadAsStringAsync();
}
When I look at the returned JSON string, I get this:
{
  "headers": {
    "Content-Length": "14",
    "Content-Type": "text/plain; charset=UTF-8",
    "Accept-Encoding": "gzip, deflate",
    "Cache-Control": "no-cache",
    "Connection": "close",
    "Host": "httpbin.org"
  },
  "args": {},
  "data": "Some test data",
  "files": {},
  "url": "http://httpbin.org/post",
  "json": null,
  "form": {},
  "origin": "50.135.158.248"
}
In the preceding code, I set the content by constructing an HttpStringContent object, passing in an encoding and mime type. This class is just one of many that implement the IHttpContent interface:
public interface IHttpContent : IDisposable {
   HttpContentHeaderCollection Headers { get; }  // Use this to set/get content headers
   Boolean TryComputeLength(out UInt64 length);  // Gets content length in bytes
   // Sends content to an output stream
   IAsyncOperationWithProgress<UInt64, UInt64> WriteToStreamAsync(IOutputStream outputStream);
   // Serializes content into memory
   IAsyncOperationWithProgress<UInt64, UInt64> BufferAllAsync();
   // Read response content as an IInputStream, IBuffer, or a String
   IAsyncOperationWithProgress<IInputStream, UInt64> ReadAsInputStreamAsync();
   IAsyncOperationWithProgress<IBuffer, UInt64> ReadAsBufferAsync();
   IAsyncOperationWithProgress<String, UInt64> ReadAsStringAsync();
}
All the classes that implement this interface convert rich content into a stream whose data can be sent over the network. Here are all the WinRT classes that implement this interface:
HttpStringContent
HttpBufferContent
HttpStreamContent
HttpFormUrlEncodedContent
HttpMultipartContent
HttpMultipartFormDataContent
The SendRequestAsync method returns an HttpResponseMessage:
public sealed class HttpResponseMessage : IDisposable, IStringable {
   // Members that return request's response status
   public HttpStatusCode StatusCode { get; set; }        // Gets response status code
   public Boolean IsSuccessStatusCode { get; }           // True for codes between 200-299
   public HttpResponseMessage EnsureSuccessStatusCode(); // Throws if !IsSuccessStatusCode
   public String ReasonPhrase { get; set; }              // Gets status reason (eg: "OK")
   public HttpResponseMessageSource Source { get; set; } // Network or Cache
   public HttpResponseHeaderCollection Headers { get; }  // Returns this response's headers
   public IHttpContent Content { get; set; }             // Returns content sent from server
   public void Dispose();    // Releases HttpResponseMessage's unmanaged resources
   // Some members not shown here...
}
Again the Content property returns an object whose type implements the IHttpContent interface. You would then call IHttpContent’s ReadAsInputStreamAsync, ReadAsBufferAsync, or ReadAsStringAsync method to read the data returned from the server. At this point, I have covered the core features of the HttpClient class. However, it offers some additional features that make it very powerful and flexible. I’ll cover these next.
WinRT defines a Windows.Web.Http.Filters.HttpBaseProtocolFilter class. When you construct an HttpClient object using its default constructor, the object uses an instance of the HttpBaseProtocolFilter class internally. It is the HttpBaseProtocolFilter object that establishes the TCP socket connection with the server, sends the bytes to it, and receives the response bytes back. In addition, this filter manages caching, cookies, credentials, and a slew of other communication parameters. The class looks like this:
public sealed class HttpBaseProtocolFilter : IHttpFilter, IDisposable {
   public HttpBaseProtocolFilter();
   // Gets an object allowing you to set cache read and write behavior
   public HttpCacheControl CacheControl { get; }
   // Returns the cookie manager allowing you to get and set cookies
   public HttpCookieManager CookieManager { get; }
   // Allows you to set the maximum connections from filter to an HTTP server
   public UInt32 MaxConnectionsPerServer { get; set; }
   // Can filter follow a redirect response (default = true)
   public Boolean AllowAutoRedirect { get; set; }
   // Can filter automatically decompress response data (default = true)
   public Boolean AutomaticDecompression { get; set; }
   // Ignorable SSL errors
   public IList<ChainValidationResult> IgnorableServerCertificateErrors { get; }
   // Can filter use a proxy to send request
   public Boolean UseProxy { get; set; }
   // Sets HTTP proxy credentials
   public PasswordCredential ProxyCredential { get; set; }
   // Sets client certificate to send to server (if requested)
   public Certificate ClientCertificate { get; set; }
   // Sets HTTP server credentials
   public PasswordCredential ServerCredential { get; set; }
   // Can filter prompt for user credentials at server's request (default = true)
   public Boolean AllowUI { get; set; }
   // Sends HTTP request over the wire (SendRequestAsync is IHttpFilter's only member)
   public IAsyncOperationWithProgress<HttpResponseMessage, HttpProgress>
      SendRequestAsync(HttpRequestMessage request);
   // Releases unmanaged resources associated with the HttpBaseProtocolFilter
   public void Dispose();
}
Each package has a per-user cache that can hold downloaded HTTP content.[55] This prevents one package’s downloaded content from being visible to another package’s app, and it also prevents content downloaded by one user from being visible to another user who happens to be using the same package. Using HttpBaseProtocolFilter’s CacheControl property, your app can control how HTTP responses are cached on the user’s local machine and use this to alter your app’s performance.
Before making an HTTP request, you can set CacheControl’s ReadBehavior to Default (as described in RFC 2616), MostRecent (if the server has more recent data, get it; otherwise, use cached data),[56] or OnlyFromCache (get data from cache [useful when a PC is offline or at app startup time to show what’s cached quickly]). You can also set CacheControl’s WriteBehavior to control how the read data gets put into the user’s local cache. The possible values are Default (save the response in the local cache) and NoCache (do not save the response in the local cache [useful when streaming media]). When your app gets a response back, HttpResponseMessage’s Source property indicates whether the response came from the server or from the user’s local cache.
Here is an example that reads the most recent data from the server (or cache if it exists there); if read from the server, the data is not cached locally:
using (HttpBaseProtocolFilter filter = new HttpBaseProtocolFilter())
using (HttpClient client = new HttpClient(filter)) {
   // Try to get most recent data from server (or cache)
   filter.CacheControl.ReadBehavior = HttpCacheReadBehavior.MostRecent;
   // If we get it from server, don't store it in cache
   filter.CacheControl.WriteBehavior = HttpCacheWriteBehavior.NoCache;
   HttpRequestMessage request =
      new HttpRequestMessage(HttpMethod.Get, new Uri("http://Wintellect.com/"));
   HttpResponseMessage response = await client.SendRequestAsync(request);
   switch (response.Source) {
      case HttpResponseMessageSource.Cache:     // Data came from cache
         break;
      case HttpResponseMessageSource.Network:   // Data came from server
         break;
   }
}
To improve application performance, WinRT offers a simple Windows.Networking.BackgroundTransfer.ContentPrefetcher class:
public static class ContentPrefetcher {
   // Set of URIs to content the system periodically downloads and caches for your app
   // Use this when URIs don't change between runs of the app (Ex: a URI to weather in a city)
   public static IList<Uri> ContentUris { get; }
   // A URI to an XML file the system periodically downloads. The XML file contains prioritized
   // URIs to other content the system will also download and cache. Use this when URIs to
   // content do change between runs of the app.
   // Example: a URI to an XML file with URIs to the latest news stories
   public static Uri IndirectContentUri { get; set; }
   // NOTE: The system can prefetch data for up to 40 URIs. ContentUris takes precedence
   // over URIs in the XML file referred to by IndirectContentUri
}
After populating the ContentPrefetcher with some URIs, the system uses heuristics to determine when to periodically download the content on your app’s behalf. The goal is that, when your app runs, the data it needs has already been downloaded and stored in the package’s cache so that the app can simply make an HTTP request, get the data from the cache, and show the user relevant data without incurring a network performance hit. The exact heuristics are not documented and are subject to change, but they take into account power and network conditions as well as how often the app actually consumed the prefetched data and how often the app is used. The ContentPrefetcher is best for data an app shows at startup time, frequently used data, and data whose usefulness is long-lived.
In addition to a cache, each package also has a per-user set of cookies.[57] Using HttpBaseProtocolFilter’s CookieManager property, your app can examine cookies returned from HTTP servers. It can also create cookies to send to a server. The following code demonstrates how to examine the cookies returned in an HTTP response from a server:
using (HttpBaseProtocolFilter filter = new HttpBaseProtocolFilter())
using (HttpClient client = new HttpClient(filter)) {
   HttpRequestMessage request =
      new HttpRequestMessage(HttpMethod.Get, new Uri("http://Bing.com/"));
   HttpResponseMessage response = await client.SendRequestAsync(request);
   // See the returned cookies (HttpCookieManager also has SetCookie and DeleteCookie methods)
   foreach (HttpCookie cookie in filter.CookieManager.GetCookies(request.RequestUri)) {
      String cookieInfo = String.Format(
         "Domain={0}, Expires={1}, HttpOnly={2}, Name={3}, Path={4}, Secure={5}, Value={6}",
         cookie.Domain, cookie.Expires, cookie.HttpOnly, cookie.Name, cookie.Path,
         cookie.Secure, cookie.Value);
   }
}
The last thing I want to say about filters is that you can chain them together. That is, you can create your own classes that implement the IHttpFilter interface with its SendRequestAsync method. Then you can create instances of your class and pass them into HttpClient’s constructor. Your filter class’ constructor should accept another filter object in order to maintain the chain of filters. Here is an example of a filter that calculates how much time it takes for the server to respond to each request:
internal sealed class RequestDurationFilter : IHttpFilter {
   private readonly IHttpFilter m_nextFilter;
   public RequestDurationFilter(IHttpFilter nextFilter) {
      if (nextFilter == null) throw new ArgumentNullException("nextFilter");
      m_nextFilter = nextFilter;
   }
   public void Dispose() { m_nextFilter.Dispose(); }
   public TimeSpan RequestDuration { get; private set; }
   public IAsyncOperationWithProgress<HttpResponseMessage, HttpProgress>
      SendRequestAsync(HttpRequestMessage request) {
      return AsyncInfo.Run<HttpResponseMessage, HttpProgress>(
         async (cancellationToken, progress) => {
            RequestDuration = TimeSpan.Zero;
            Stopwatch time = Stopwatch.StartNew(); // Get the current time
            HttpResponseMessage response =
               await m_nextFilter.SendRequestAsync(request).AsTask(cancellationToken, progress);
            RequestDuration = time.Elapsed;        // Set the request's duration
            cancellationToken.ThrowIfCancellationRequested();
            return response;
         });
   }
}
Using this filter is extremely simple:
using (RequestDurationFilter filter = new RequestDurationFilter(new HttpBaseProtocolFilter()))
using (HttpClient client = new HttpClient(filter)) {
   HttpRequestMessage request = new HttpRequestMessage(HttpMethod.Get,
                                   new Uri("http://WintellectNOW.com/"));
   HttpResponseMessage response = await client.SendRequestAsync(request);
   String s = String.Format("Request took {0}ms", filter.RequestDuration.TotalMilliseconds);
}
Custom filters open up all kinds of possibilities. You could create a filter that
Automatically retries sending a request when a server responds with an HTTP 503 (service unavailable)
Checks if the user’s PC is on a metered network, and produces an error instead of attempting the network access
Automatically authenticates against the server it wants to communicate with
Takes advantage of your own custom cache implementation
Injects simulated network failures to help test the resiliency of your app’s code
Really, you’re only limited by your imagination. Microsoft has already implemented some of these filters for you. You can download the source code for them from the MSDN website. For sample filters showing retry and metered networks, see http://code.msdn.microsoft.com/windowsapps/HttpClient-sample-55700664. For a sample showing authentication, see http://code.msdn.microsoft.com/windowsapps/Web-Authentication-d0485122 and look at its AuthFilters folder.
Windows provides sockets that allow apps to communicate using special protocols like SMTP, MAPI, Telnet, and so on. Table 7-2 shows the different kinds of sockets you can use in your Windows Store app.
Once a connection is established, all sockets offer objects implementing the IInputStream and IOutputStream interfaces as discussed in Chapter 6. By implementing these interfaces, you transfer data through sockets the same way you transfer data to files and you get to leverage all the helper classes, such as DataReader, DataWriter, DataProtectionProvider, Compressor, and so on.
When performing I/O operations, your app can be suspended. In general, this is not a problem and your app should not abort connections before being suspended and re-establish connections when resumed. When an app initiates any I/O operation, that operation is sent to a Windows device driver and the driver performs the actual operation. The driver is capable of accessing the app’s data buffers even when the app’s threads are suspended, so the I/O operation continues. Of course, if the app is terminated, the app’s buffers are destroyed and the device driver cancels any of the app’s outstanding I/O operations. Connections will have to be re-established when the app is relaunched.
Before showing examples working with sockets, I need to explain how your app identifies a remote system to WinRT. WinRT offers a Windows.Networking.HostName class that abstracts the name or address of a remote system:
public sealed class HostName : IStringable {
   // Constructor
   public HostName(String hostName);           // e.g. "server", "192.168.1.125", etc.
   // Read-only information about the host name:
   public HostNameType Type { get; }           // DomainName, Ipv4, Ipv6, Bluetooth
   public String RawName { get; }              // Same value passed to constructor
   public String DisplayName { get; }          // String that can be shown to a user
   public String CanonicalName { get; }        // String that can be used by the app's code
   public IPInformation IPInformation { get; } // NetworkAdapter info for an Ipv4/Ipv6 address
   // Methods to compare canonical hostnames with one another:
   public Boolean IsEqual(HostName hostName);
   public static Int32 Compare(String value1, String value2);
}
You can construct a HostName object, passing in an IPv4 or IPv6 literal, an actual host name (“Wintellect.com”), or a Bluetooth address. The constructor then sets the Type property to indicate what kind of string you passed in, determines the DisplayName version of the host name (which you can show to a user), and also determines the CanonicalName version (which you can use programmatically within your code).
The HostName class also offers IsEqual and Compare methods, which compare the canonical versions of two host names. Here is an example demonstrating how to compare host names:
// The top-level domain for the Russian Federation is "xn--p1ai" (in ASCII) and "pφ" (in
// Cyrillic). For more information, see http://en.wikipedia.org/wiki/.%D1%80%D1%84
String kremlinAscii = "πpe3ИДeHT.xn--p1ai";
HostName kremlin = new HostName(kremlinAscii);
String display = kremlin.DisplayName;      // "πpe3ИДeHT.pφ"
String canonical = kremlin.CanonicalName;  // "πpe3ИДeHT.pφ"
// Compares canonical names:
Boolean same = kremlin.IsEqual(new HostName("πpe3ИДeHT.pφ")); // true
Int32 order = HostName.Compare(kremlinAscii, "πpe3ИДeHT.pφ"); // 0
// Compare IPv6 addresses
HostName hostname = new HostName("0::1");
same = hostname.IsEqual(new HostName("0:0::1"));              // true
// Compare host names
hostname = new HostName("WINTELLECT.COM");
same = hostname.IsEqual(new HostName("Wintellect.com"));      // true
In addition to needing a HostName, your app also needs the name of a service that it wants to communicate with on the remote system. The service name is represented by a string. You can use a numeric literal for a port number (like “80” for HTTP) or a service name. Service names are similar to DNS names. DNS names are strings passed to a DNS server that then returns the IP address. Likewise, service names can be passed to a DNS server whose SRV records return a port number.[58] Instead of querying DNS servers, Windows can map a host name to an IP address by looking up the host name in the %WinDir%System32DriversEtcHosts text file. Similarly, Windows can map a service name to a port number by looking up the service name in the %WinDir%System32DriversEtcServices text file.
The combination of a host name and a service name results in an endpoint. When your app’s local socket connects to a remote socket, you have a pair of endpoints. WinRT defines an EndpointPair class that encapsulates connection information:
public sealed class EndpointPair {
   public EndpointPair(
      HostName localHostName,  String localServiceName,
      HostName remoteHostName, String remoteServiceName);
   public HostName LocalHostName     { get; set; }
   public String   LocalServiceName  { get; set; }
   public HostName RemoteHostName    { get; set; }
   public String   RemoteServiceName { get; set; }
}
As you’ll see, some WinRT APIs accept an EndpointPair argument.
To accomplish client-side TCP communication with WinRT, you use the StreamSocket class, which looks like this:
public sealed class StreamSocket : IDisposable {
   public StreamSocket();
   // OPTIONAL: Modify connection (keep alive, outbound buffer size, QoS)
   // before calling ConnectAsync
   public StreamSocketControl Control { get; }
   // Returns connection read-only information (bandwidth, host/service names, timings)
   public StreamSocketInformation Information { get; }
   // Connect to a service on a remote machine (other overloads not shown here)
   public IAsyncAction ConnectAsync(HostName remoteHostName, String remoteServiceName,
      SocketProtectionLevel protectionLevel);
   // After calling ConnectAsync, the app uses these to read & write data
   public IInputStream  InputStream  { get; }
   public IOutputStream OutputStream { get; }
   // Upgrade a connected socket to use SSL
   public IAsyncAction UpgradeToSslAsync(
      SocketProtectionLevel protectionLevel, HostName validationHostName);
   public void Dispose();  // Close the socket
}
Here is an example that uses a StreamSocket to establish a connection with a server sending it a 32-bit integer length header followed by a set of bytes. The server sums the bytes and returns a 32-bit integer:
private async Task TcpClientAsync() {
   using (StreamSocket socket = new StreamSocket())
   using (DataWriter dw = new DataWriter(socket.OutputStream))
   using (DataReader dr = new DataReader(socket.InputStream)) {
      // Connect to the remote server:
      await socket.ConnectAsync(new HostName("localhost"), "8080");
      // Send message header (UInt32) and message bytes to server:
      Byte[] messageData = new Byte[] { 1, 2 };
      dw.WriteUInt32((UInt32)messageData.Length);
      dw.WriteBytes(messageData);
      await dw.StoreAsync();
      // Read UInt32 response from server:
      await dr.LoadAsync(sizeof(Int32));
      Int32 sum = dr.ReadInt32();
   }
}
When calling IInputStream’s ReadAsync method or when using a DataReader (which calls ReadAsync internally), think about the InputStreamOptions bit flags. Here is what the flags mean:
None (0). The
ReadAsyncorLoadAsyncoperation will not complete until the number of bytes requested has come in over the socket.Noneis useful when you’re expecting a specific number of bytes.Partial (1). The
ReadAsyncorLoadAsyncoperation completes when one or more bytes is available; all the bytes you requested might not be available yet.Partialis useful when you’re expecting a stream of data and your app must parse it to know exactly how many additional bytes your app expects. I show an example using this technique in theStreamWebSocketClientAsyncmethod later in this chapter.ReadAhead (2). The
ReadAsyncorLoadAsyncoperation might complete with more bytes than actually requested.ReadAheadis useful to reduce latency and improve performance.
When any member of a StreamSocket, StreamSocketListener, or DatagramSocket fails, an Exception object is thrown. The Exception object’s HResult property indicates the reason for failure. You can easily convert the HResult value to a more meaningful value by passing it to the Windows.Networking.Sockets.SocketError class’ static GetStatus method. This returns a value from the SocketErrorStatus enumeration.
Although it’s not nearly as common as client-side-initiated communication, your Windows Store app can listen for TCP connections coming into it. This is useful for peer-to-peer scenarios where your app wants to let multiple users collaborate with each user on his or her own PC. A game might use this to allow two users to play against each other. Setting your app as a TCP listener requires the use of the StreamSocketListener class, which looks like this:
public sealed class StreamSocketListener : IDisposable {
   public StreamSocketListener();
   // OPTIONAL: Modify connection (QoS) before calling BindXxxAsync
   public StreamSocketListenerControl Control { get; }
   // Returns read-only information about the connection (local port)
   public StreamSocketListenerInformation Information { get; }
   // This event is raised whenever a client connects to this socket listener
   public event TypedEventHandler<StreamSocketListener,
      StreamSocketListenerConnectionReceivedEventArgs> ConnectionReceived;
   // Start listening on local IP addresses of all NICs
   // If localServiceName is "", system picks port
   public IAsyncAction BindServiceNameAsync(String localServiceName);
   // Start listening on the hostname/IP address and service name specified.
   // If localHostName is 'null', local IP is used; if localServiceName is "", OS picks port.
   public IAsyncAction BindEndpointAsync(HostName localHostName, String localServiceName);
   public void Dispose();    // Close the socket
}
When another machine connects to this StreamSocketListener, the ConnectionReceived event is raised. Any registered callback method receives a reference to the StreamSocketListener and, more importantly, a reference to a StreamSocketListenerConnectionReceivedEventArgs object, which looks like this:
public sealed class StreamSocketListenerConnectionReceivedEventArgs {
   // Returns a StreamSocket created by the client connection
   // Use its IInputStream and IOutputStream to talk to the client
   public StreamSocket Socket { get; }
}
Here is an example that uses a StreamSocketListener to process requests when clients connect. Each client sends the service a set of bytes. The service sums the bytes together and returns the sum back to the client:
// NOTE: Don't let the returned StreamSocketListener be garbage collected
//       until you no longer want to accept connections
private async Task<StreamSocketListener> StartTcpServiceAsync(String localServiceName) {
   var tcpService = new StreamSocketListener();
   // You must register handlers before calling BindXxxAsync
   tcpService.ConnectionReceived += OnConnectionReceived;
   await tcpService.BindServiceNameAsync(localServiceName); // Listen on desired port
   return tcpService;
}
private async void OnClientConnectionReceivedAsync(StreamSocketListener listener,
   StreamSocketListenerConnectionReceivedEventArgs e) {
   using (StreamSocket client = e.Socket)
   using (DataReader dr = new DataReader(e.Socket.InputStream))
   using (DataWriter dw = new DataWriter(e.Socket.OutputStream)) {
      // Read request header from client:
      await dr.LoadAsync(sizeof(Int32));
      UInt32 messageLength = dr.ReadUInt32();
      // Read request data from client:
      await dr.LoadAsync(messageLength);
      Byte[] bytes = new Byte[messageLength];
      dr.ReadBytes(bytes);
      Int32 sum = bytes.Sum(number => number);  // Calculate response
      // Send response to client:
      dw.WriteInt32(sum);
      await dw.StoreAsync();  // Required to send the response back to the client
   }
}Many organizations configure their firewalls to disallow traditional socket communication to better secure their resources. However, many organizations do allow their firewalls to flow HTTP and HTTPS traffic over ports 80 and 443, respectively. This allows standard Internet access to the World Wide Web. But HTTP(S) traffic has its own shortcomings. For example, it is a request/response protocol that has a lot of overheard associated with it, making it less efficient than using the TCP protocol that HTTP(S) is built upon.
To address the HTTP(S) protocol’s strengths and weaknesses, the WebSocket protocol was created. (See http://www.w3.org/TR/websockets/.) The WebSocket protocol allows asynchronous, bidirectional, high-performance communication through firewalls using ports 80 and 443. It works by having a client initiate an HTTP(S) communication with a server. And then, once communication is established, the client and server continue using the same TCP socket. This establishes the connection successfully through the firewall (and proxy servers) and then allows for high-performance, bidirectional communication thereafter.[59] The bidirectional aspect allows a server to send data to the client when it wants to; there’s no need for clients to periodically poll the server, use long-polling, or establish the client as a server, too, so that it can accept requests.[60]
Of course, the client and the server must both support the WebSocket protocol, and today, not many servers support this protocol. A WebSocket client connects to a server by specifying a URL with a “ws://” or “wss://” schema. The former imitates the conversation using HTTP and transfers data in the clear over the network, while the latter initiates the conversation using HTTPS and encrypts the data as it goes over the network. In most cases, you’ll want to use a secure WebSocket connection because this sets up a secure end-to-end tunnel that intermediate proxy servers allow, dramatically increasing the chance your connection succeeds.
WinRT offers two classes that allow a Windows Store app to initiate the client-side communication to a WebSocket server: StreamWebSocket and MessageWebSocket.[61] I’ll talk about the StreamWebSocket class in this section and the MessageWebSocket class in the next section. The StreamWebSocket class is very similar to the StreamSocket class; here is what it looks like:
public sealed class StreamWebSocket : IWebSocket, IDisposable {
   public StreamWebSocket();
   // OPTIONAL: Modify connection (output buffer size, NoDelay, credentials)
   //           before calling ConnectAsync
   public StreamWebSocketControl Control { get; }
   // Returns connection read-only information (local address, protocol, bandwidth stats)
   public StreamWebSocketInformation Information { get; }
   // This event is raised when the server closes the connection
   public event TypedEventHandler<IWebSocket, WebSocketClosedEventArgs> Closed;
   // Adds an HTTP request header sent when ConnectAsync is called
   public void SetRequestHeader(String headerName, String headerValue);
   // Connect to a remote machine ("ws://" or "wss://")
   public IAsyncAction ConnectAsync(Uri uri);
   // After calling ConnectAsync, the app uses these to read & write data
   public IInputStream  InputStream  { get; }
   public IOutputStream OutputStream { get; }
   // Closes the socket, indicating a reason and optional UTF-8 string with additional info
   public void Close(UInt16 code, String reason);
   public void Dispose();  // Close the socket
}
The WebSocket protocol defines a closing handshake. If the server closes the connection, the Closed event is raised. If you want to close the connection, just call the Dispose method or the Close method that takes a status code and reason.[62] For troubleshooting issues related to WebSockets, see the system event logs under the following: Applications And Services Logs > Microsoft > Windows > Websocket-Protocol-Component.
And here is code demonstrating how to use the StreamWebSocket class to send data to the publicly accessible WebSocket Echo service (which you can learn more about at http://www.websocket.org/echo.html):
private async Task StreamWebSocketClientAsync() {
   using (StreamWebSocket ws = new StreamWebSocket()) {
      // Connect to the remote service (use "wss" for secure WebSocket [TLS])
      await ws.ConnectAsync(new Uri("wss://echo.websocket.org/"));
      // Write a UInt32 (string length) & a UTF-8 string to the service:
      using (DataWriter dw = new DataWriter(ws.OutputStream)) {
         String s = "Jeffrey";
         dw.WriteUInt32(dw.MeasureString(s));
         dw.WriteString(s);
         await dw.StoreAsync();
      }
      // The WebSocket Echo service just returns back whatever you send it.
      // Read a UInt32 (string length) & a UTF-8 string response from the service:
      using (DataReader dr = new DataReader(ws.InputStream)
         { InputStreamOptions = InputStreamOptions.Partial }) {
         while (dr.UnconsumedBufferLength < sizeof(UInt32)) {
            await dr.LoadAsync(1024);
         }
         UInt32 stringLen = dr.ReadUInt32();
         while (dr.UnconsumedBufferLength < stringLen) {
            await dr.LoadAsync(1024);
         }
         String s = dr.ReadString(stringLen);
      }
   }
}Sometimes, it can be difficult to work with streaming protocols (as required by StreamSocket, StreamSocketListener, and StreamWebSocket). Instead, it’s frequently useful to send messages back and forth. To simplify these scenarios, WinRT offers a MessageWebSocket class that sends and receives data as messages consisting of UTF-8 text or binary data. The MessageWebSocket class looks like this:
public sealed class MessageWebSocket : IWebSocket, IDisposable {
   public MessageWebSocket();
   // OPTIONAL: Modify connection (max msg size, msg type (binary/UTF8), output buffer size,
   //          credentials) before calling ConnectAsync
   public MessageWebSocketControl Control { get; }
   // Returns connection read-only information (local address, protocol, bandwidth stats)
   public MessageWebSocketInformation Information { get; }
   // This event is raised when a message is received
   public event TypedEventHandler<MessageWebSocket,  MessageWebSocketMessageReceivedEventArgs>
      MessageReceived;
   // This event is raised when the server closes the connection
   public event TypedEventHandler<IWebSocket, WebSocketClosedEventArgs> Closed;
   // Adds an HTTP request header sent when ConnectAsync is called
   public void SetRequestHeader(string headerName, string headerValue);
   // Connect to a remote machine ("ws://" or "wss://")
   public IAsyncAction ConnectAsync(Uri uri);
   // After calling ConnectAsync, the app uses this to write a message
   public IOutputStream OutputStream { get; }
   // Closes the socket, indicating a reason and optional UTF-8 string with additional info
   public void Close(UInt16 code, String reason);
   public void Dispose();  // Close the socket
}
Here is a rewrite of the StreamWebSocketClientAsync method shown at the end of the previous section. This new version uses the MessageWebSocket class, greatly simplifying the code that processes the server’s response:
private async void MessageWebSocketClientAsync() {
   using (MessageWebSocket socket = new MessageWebSocket()) {
      // You must register handlers before calling ConnectAsync
      socket.MessageReceived += OnWebSocketMessageReceived;
      await socket.ConnectAsync(new Uri("wss://echo.websocket.org/"));
      using (DataWriter dw = new DataWriter(socket.OutputStream)) {
         dw.WriteString("Jeffrey");
         await dw.StoreAsync();  // Send a "message" to the service
      }
   }
}
private void OnWebSocketMessageReceived(MessageWebSocket sender,
   MessageWebSocketMessageReceivedEventArgs args) {
   // The service responded with a "message"; read all of it as a string
   using (DataReader dr = args.GetDataReader()) {
      String s = dr.ReadString(dr.UnconsumedBufferLength);
   }
}For peer-to-peer communication using the UDP protocol, WinRT offers the DatagramSocket class. The DatagramSocket class allows you to
Send messages to another machine (act as a client).
Receive messages from another machine (act as a server).
Broadcast messages to multiple machines (multicast). This will be discussed in the next section.
The class itself looks like this:
public sealed class DatagramSocket : IDisposable {
   public DatagramSocket();
   // OPTIONAL: Modify connection (outbound unicast hop limit, QoS, don't fragment, inbound
   //           buffer size) before calling BindXxxAsync, ConnectAsync, or GetOutputStreamAsync
   public DatagramSocketControl Control { get; }
   // Returns connection read-only information (local & remote hostname/port)
   public DatagramSocketInformation Information { get; }
   // This event is raised whenever this socket receives a message
   public event TypedEventHandler<DatagramSocket, DatagramSocketMessageReceivedEventArgs>
      MessageReceived;
   // Call these methods to listen for incoming data (OS picks port if localServicename is "0").
   public IAsyncAction BindServiceNameAsync(String localServiceName);
   public IAsyncAction BindEndpointAsync(HostName localHostName, String localServiceName);
   // After calling BindXxxAsync, a listener can call this to listen for multicast data packets.
   public void JoinMulticastGroup(HostName host);
   // Call this method to send data to a single remote machine
   public IAsyncAction ConnectAsync(HostName remoteHostName, String remoteServiceName);
   public IAsyncAction ConnectAsync(EndpointPair endpointPair);
   // After calling ConnectAsync, the app uses this to send data to the remote machine
   public IOutputStream OutputStream { get; }
   // Call this method (instead of ConnectAsync) to make a single request to a remote machine
   public IAsyncOperation<IOutputStream>
      GetOutputStreamAsync(HostName remoteHostName, String remoteServiceName);
   public IAsyncOperation<IOutputStream> GetOutputStreamAsync(EndpointPair endpointPair);
   public void Dispose();  // Close the socket
   // Static methods returning all endpoints based on remote hostname/service name.
   // You can connect to one of the returned endpoints
   public static IAsyncOperation< IReadOnlyList<EndpointPair>> GetEndpointPairsAsync(
      HostName remoteHostName, String remoteServiceName);
   public static IAsyncOperation< IReadOnlyList<EndpointPair>> GetEndpointPairsAsync(
      HostName remoteHostName, String remoteServiceName, HostNameSortOptions sortOptions);
}
Here is an example that uses a DatagramSocket to establish a listening server. The server accepts a set of bytes, sums them together, and returns the sum back to the client:
// NOTE: Don't let the returned DatagramSocket be garbage collected
//       until you no longer want to accept messages
private async Task<DatagramSocket> StartDatagramServiceAsync(String localServiceName) {
   var datagramService = new DatagramSocket();
   // You must register handlers before calling BindXxxAsync
   datagramService.MessageReceived += OnDatagramServiceMessageReceived;
   await datagramService.BindServiceNameAsync(localServiceName); // Listen on desired port
   return datagramService;
}
private async void OnDatagramServiceMessageReceived(DatagramSocket sender,
   DatagramSocketMessageReceivedEventArgs e) {
   // NOTE: This method could be called by any thread; to update UI use a CoreDispatcher
   // Read request from client:
   DataReader dr = e.GetDataReader();
   Byte[] bytes = new Byte[dr.UnconsumedBufferLength];
   dr.ReadBytes(bytes);
   // Process client's request:
   Int32 sum = bytes.Sum(number => number);
   // Send response to client:
   IOutputStream outputStream =
      await sender.GetOutputStreamAsync(e.RemoteAddress, e.RemotePort);
   using (var dw = new DataWriter(outputStream)) {
      dw.WriteInt32(sum);
      await dw.StoreAsync();
   }
}
Here is the client-side code that demonstrates how to make multiple requests to the same server:
private async Task DatagramClientAsync() {
   HostName localhost = new HostName("localhost");
   // This pattern makes multiple requests to a single server:
   using (var socket = new DatagramSocket()) {
      // You must register handlers before calling ConnectAsync
      socket.MessageReceived += OnDatagramClientMessageReceived;
      // ConnectAsync implicitly binds to a port so the server can respond
      await socket.ConnectAsync(localhost, c_datagramServiceName);
      // Send the 1st request:
      await socket.OutputStream.WriteAsync(new Byte[] { 1, 2 }.AsBuffer());
      // Send the 2nd request:
      await socket.OutputStream.WriteAsync(new Byte[] { 2, 3 }.AsBuffer());
   }
}
private void OnDatagramClientMessageReceived(
   DatagramSocket sender, DatagramSocketMessageReceivedEventArgs e) {
   // NOTE: This method could be called by any thread; to update UI use a CoreDispatcher
   using (DataReader dr = e.GetDataReader()) {
      Int32 sum = dr.ReadInt32();
   }
}
You can use a different pattern to perform client requests to multiple servers. The following code demonstrates this pattern:
private async Task DatagramClientAsync() {
   HostName host1 = new HostName("server1.com");
   HostName host2 = new HostName("server2.com");
   // This pattern makes multiple requests to different servers:
   using (var socket = new DatagramSocket()) {
      // Register handler before calling GetOutputStreamAsync
      socket.MessageReceived += OnDatagramClientMessageReceived;
      // Send 1st request (GetOutputStreamAsync implicitly binds to a port
      // so the server can respond):
      IOutputStream output = await socket.GetOutputStreamAsync(host1, c_datagramServiceName);
      await output.WriteAsync(new Byte[] { 1, 2 }.AsBuffer());
      // Send  2nd request (GetOutputStreamAsync implicitly binds to a port
      // so the server can respond):
      output = await socket.GetOutputStreamAsync(host2, c_datagramServiceName);
      await output.WriteAsync(new Byte[] { 2, 3 }.AsBuffer());
   }
}
There is a crucial difference between ConnectAsync and GetOutputStreamAsync. When you use ConnectAsync, the local socket will accept response data only from the remote host/service name passed to ConnectAsync. You can verify this by creating a new DatagramSocket on the server and then use it to send a response. If you do this, you see that the client does not get the response. On the other hand, GetOutputStreamAsync accepts response data from any other host/service name.
ConnectAsync and GetOutputStreamAsync both have overloads that take an EndpointPair as a parameter. Because the definition of an EndpointPair is the two endpoints between a local and remote host, you can imagine there are multiple EndpointPairs from one machine to another. The static GetOutputStreamAsync method returns the endpoints. On my PC, I get three EndpointPair objects: one pair over IPv6 (Ethernet), and two pairs over IPv4 (Ethernet and Wi-Fi). By default, the system sorts these endpoint pairs in order of quickest connection. But this means that Windows might connect quickly to an unreliable connection. In your app, you can get the list sorted with the most-reliable connection first by calling GetEndpointPairsAsync and passing in the HostNameSortOptions.OptimizeForLongConnections flag.
With DatagramSocket, you can also send and receive UDP multicast packets. Multicast allows one machine to broadcast a data packet to a number of other machines simultaneously. The sender sends the packet once, and the network infrastructure (like routers) replicates the data as it gets forwarded to the receivers. Multicast is typically used to stream audio and video to a large number of clients.
You set up a PC as a multicast listener the exact same way you set up a DatagramSocket listener. But then you must join the socket to a multicast group by specifying a multicast IP address (which you can learn more about at http://en.wikipedia.org/wiki/Multicast_address):
// NOTE: Don't let the returned DatagramSocket be garbage collected
//       until you no longer want to accept messages
private async Task<DatagramSocket> StartMulticastListenerAsync(String localServiceName) {
   DatagramSocket multicastListener = new DatagramSocket();
   // You must register handlers before calling BindXxxAsync
   multicastListener.MessageReceived += OnMulticastListenerMessageReceived;
   await multicastListener.BindServiceNameAsync(localServiceName); // Listen on desired port
   // IPv4 multicast IP addresses: 224.0.0.0 to 239.255.255.255
   HostName hostname = new HostName("224.168.100.2"); // Pick a multicast IP address
   multicastListener.JoinMulticastGroup(hostname);    // Join socket to the multicast IP address
   return multicastListener;
}
When the socket receives a message, you process it as you normally would in the OnMulticastListenerMessageReceived event handler. In the handler, you can examine the DatagramSocketMessageReceivedEventArgs object’s RemoteAddress and RemotePort properties to determine which remote machine sent the data packet.
You can check how the multicast address is bound to the network cards with netsh interface ipv4 show joins. The output will be similar to what’s shown next. Note how 224.168.100.2 is bound to all network interfaces.
C:>netsh interface ipv4 show joins
Interface 1: Loopback Pseudo-Interface 1
Scope       References  Last  Address
----------  ----------  ----  ---------------------------------
0                    1  Yes   224.168.100.2
0                    4  Yes   239.255.255.250
Interface 13: Wi-Fi
Scope       References  Last  Address
----------  ----------  ----  ---------------------------------
0                    0  No    224.0.0.1
0                    1  Yes   224.0.0.252
0                    1  No    224.168.100.2
0                    4  No    239.255.255.250
Interface 12: Ethernet
Scope       References  Last  Address
----------  ----------  ----  ---------------------------------
0                    0  No    224.0.0.1
0                    1  No    224.0.0.252
0                    1  Yes   224.0.0.253
0                    1  No    224.168.100.2
0                    4  No    239.255.255.250
Interface 18: Bluetooth Network Connection
Scope       References  Last  Address
----------  ----------  ----  ---------------------------------
0                    0  Yes   224.0.0.1
0                    1  Yes   224.168.100.2
Sending data to a multicast group is identical to how you normally send data using a DatagramSocket; you just need to use the multicast IP address and service name (port).
Frequently, when sending data over a network, you want to encrypt it so that other people cannot intercept the data you’re sending. There are many ways to encrypt data as it traverses a network, but the most common way is using certificates. There are two ways a client app can encrypt data it wants to send to a server. The first way is by using a URI scheme. When using the BackgroundDownloader, BackgroundUploader, or HttpClient class, simply use “https://” instead of “http://”. When using the MessageWebSocket or DatagramWebSocket class, use “wss://” instead of “ws://”.
When using StreamSocket, you can specify a SocketProtectionLevel enumeration when calling ConnectAsync, or you can make a call to UpgradeToSslAsync once you establish a connection. The StreamSocketListener class does not have a mechanism of setting up Secure Sockets Layer (SSL) on the server side. Thus, your Windows Store app can participate only in an SSL connection to a server that exposes SSL, not to another Windows Store app.
You should also know that securing network traffic from a Windows Store app to your own web service is pretty easy. Here are the steps:
Create a certificate (it can be self-signed), and install it in the certificate store on your web server.
Export the certificate’s public key into a .cer file.
In Visual Studio, open your Windows Store app’s package manifest and go to the Declarations tab.
Under Available Declarations, select Certificates and click Add.
In the Trust Flags section, select Exclusive Trust if you want your Windows Store app to use only your certificate, ignoring any other certificates installed on the user’s PC. If your app will communicate securely with multiple servers, do not select Exclusive Trust.
In the Store Name field, enter the name of the certificate store (such as Root) where you want the public key stored. Each package has its own private certificate store. In the Content field, navigate to the .cer file you exported in step 2.
Executing the preceding steps embeds the public key of your certificate in your package file and allows it to be used when communicating via SSL.
[47] Note that many of the WinRT APIs described in this chapter are also usable by Windows desktop apps.
[48] Constrained access is an indication that the user needs to provide credentials to get full Internet access (such as when connecting via a web portal from a hotel room). This is also known as captive portal.
[49] The ApproachingDataLimit value is defined by the network provider.
[50] See section 4.5 of Microsoft’s “Windows 8 app certification requirements” document (http://msdn.microsoft.com/en-us/library/windows/apps/hh694083.aspx).
[51] This limitation complies with mobile operator requirements. It helps prevent devices from clogging mobile networks. An app can make multiple transfers smaller than MaxTransferSizeInMegabytes, but this is not in keeping with the spirit of the Windows Store policy.
[52] The temporary files is created in the %UserProfile%AppDataLocalPackagesPackageFamilyNameACBackgroundTransferApi directory.
[53] Show Analytic And Debug Logs has to be enabled from the Event Viewer View menu. This log is disabled by default.
[54] WinRT’s Windows.Web.Http.HttpClient class is the latest and greatest class from Microsoft that allows developers to perform HTTP(S) requests. You should use this class instead of using the .NET Framework’s System.Net.Http.HttpClient class.
[55] The cache is stored under %LocalAppData%PackagesPackageFamilyNameACINetCache. The INetCache directory is hidden, so you won’t normally see it when using File Explorer or a CMD prompt.
[56] This option causes the HttpBaseProtocolFilter to add an If-Modified-Since header to the request. If the server returns a 200 (OK) or 304 (Not modified) status code, the cache version is returned, thus conserving bandwidth and improving performance.
[57] Cookies are stored under %LocalAppData%PackagesPackageFamilyNameACINetCookies. The INetCookies directory is hidden, so you won’t normally see it when using File Explorer or a CMD prompt.
[58] For more information about DNS SRV records, see http://tools.ietf.org/html/rfc2782. For a list of well-known service-to-port mappings, see http://www.iana.org/assignments/service-names-port-numbers/service-names-port-numbers.xml.
[59] Beware that some proxy servers and routers do not support the WebSocket protocol properly, thus preventing its use in some environments.
[60] Internally, the WebSocket protocol specification defines Ping and Pong frames that are used for keep-alive, heartbeats, network status probing, latency instrumentation, and so forth. So, for some situations where real-time response is not necessary, polling might still be preferred because it doesn’t keep the connection open, thereby freeing up resources.
[61] WinRT does not offer any class that allows an app to be a WebSocket server. However, Windows itself does support this, and the .NET Framework offers a System.Net.WebSockets namespace containing classes usable by desktop apps.
[62] You can and should think of the Dispose and Close methods as being overloads of each other. Remember the WinRT type system has an IClosable interface with a Close method, but the CLR projects this interface as IDisposable with its Dispose method.