Microsoft Internet Information Services (IIS) 6.0 (the version of IIS that is native to Windows Server 2003) marks a radical change in philosophy, design, and configuration from previous versions. Unlike Windows 2000 IIS, IIS 6.0 does not install by default. If IIS services are required, they must be selected during server installation or added at a later time. This is the first version of IIS that, when installed, becomes a static web server. The administrator must select, install, and configure the additional features to use them. In addition, IIS has a substantially different architecture, including the following:
An XML metabase (the configuration database for IIS)
Support for automatic metabase versioning and history
Improved performance because of kernel mode caching
Worker process isolation mode installed as the default
Tip
A worker process is user-level code that is used to process requests. Worker process isolation mode refers to how the code is isolated from other user-level code running on the server.
Before installing IIS, you must determine the reason for its installation. This may be the need for a static web site, a web-based application, or even an IIS-based service such as the need for Simple Mail Transfer Protocol (SMTP) services for Active Directory replication. The configuration of IIS depends on knowledge of its use. Once that has been decided, IIS administration requires knowledge of the following:
IIS installation (including the configuration of web servers and sites)
Key IIS services (such as mail services)
The running IIS applications
Warning
A special version of Windows Server 2003, the Web Server Edition, is a single function, economical, dedicated server. It supports 2 GB of RAM and 10 inbound server message block (SMB) connections for content publishing. Use of the server for non-web serving applications is prohibited. Unlike other versions of Windows Server 2003, the Web Server Edition cannot be a domain controller or support other Windows Server 2003 functions. Most of the information on IIS 6.0 in this chapter is applicable to the Web Server Edition, but other information about Windows Server 2003 in this chapter and throughout the book may not be. Before selecting the Web Server Edition for a specific application or purpose, review that purpose with an authorized dealer for the product.
This chapter provides information on these basic IIS administrative duties. It does not provide detailed information on the administration of Network News Transport Protocol (NNTP) , SMTP, or POP3 services, nor information on the many IIS extensions and alternative components. Chapter 13 provides some information on using WebDAV for the transport of files encrypted with the Encrypting File System (EFS) and using IIS’s SMTP service for SMTP-based Active Directory replication.
Before installing IIS, you must prepare Windows Server 2003. The steps to take are dictated by your intended use of IIS. For example, if IIS will support Internet-facing web sites, it will need a higher level of security hardening and a location in the network infrastructure where it can be protected from external attacks and isolated from the internal network. It should also be installed as a dedicated web server. When IIS is used as an intranet web server, security is still important, but may be less dramatically applied.
In all cases, only the necessary server and IIS components should be enabled. Prior to installation, determine what components are required based on how the server will be used. If the uses of IIS cannot be clearly defined, then IIS should not be installed. The following instructions assume that the IIS server will be a dedicated web server. The following sections provide basic administration instructions, including how to customize the basic server for web sites and their application. In the following sections, you will learn how to install and prepare Windows Server 2003, as well as how to install IIS.
The foundation on which IIS will rest is very important. The major steps required are:
Determine the proper location and network support for the server. Provide a secure network infrastructure. Plan to locate the web server behind such perimeter protection as firewalls, malware gateways, and application filters. The server should not be installed in this location. The web server should not be built and tested here.
Prepare the physical server. Ensure that it has appropriate processor(s), memory, networking hardware, and drives for its intended use. Best practices indicate that a dedicated disk volume should be provided for web site content. This can not only be more secure (because of the potential for compromise of the system volume), but it will be easier to back up content.
Install Windows Server 2003 as a stand-alone server with no connections to a production network or to the Internet. Use only the Windows NT File System (NTFS) filesystem. Do not install networking components inappropriate for its intended use. For example, do not install DHCP server services. They are not necessary for IIS. Install only essential server services and options.
If current service packs and security patches are not slipstreamed into the installation, update the server so that it is current with all packs and patches.
Set permissions on the root of the disk volume intended for web content. Grant the local Administrators group Full Control privileges and remove all other groups.
Disable services that are not required by a dedicated web server. Windows Server 2003 services that may be disabled on a dedicated web server are listed in the section "Hardening of dedicated web server services" later in this chapter.
Configure server auditing to monitor logons and policy changes. Turn on object auditing so that web server file access can be monitored.
Apply security hardening steps for the server. Hardening means to follow known best practices for securing the server. Consult security references, including security pages at http://www.microsoft.com/technet/security for specifics. Information on security for IIS is embedded within the administration instructions in this chapter.
Test the server’s network operation on an isolated test network.
If the server will be a member of a Windows domain, add it to the domain after all tests and configuration. If the web application is dependent on domain membership, the web application should be tested on a test network in which IIS is installed in a test domain prior to being hosted on a live web server.
Prior to installing IIS, document the server configuration. Modify the documentation after installing IIS and after installing web server applications. Two purposes are served here. First, if the server must be duplicated, solid information on its requirements and a working configuration is available. Second, if the server must be replaced or restored, the files are available and the process will be much easier.
Windows Server 2003 installs many services by default. The startup status of these services can be disabled, manual (can be started by an administrator or by a process) or automatic (enabled and running at computer boot). For performance and security reasons, no service should be running if it is not required to support the web server function. The fewer services that are running, the more computer resources there will be available for the web server. The fewer services that are running, the fewer opportunities there will be for malfunction or for vulnerability to attack. Before installing IIS, review the status of server services and disable those services that are not required for the server or for the operation of IIS. You should also document the status of installed services so that the status can be maintained.
The following server services are disabled by default and should remain disabled on the web server:
Alerter
Clipbook
Human Interface Device Access
IMAPI CD-Burning COM Service
Internet Connection Firewall(ICF)/Internet Connection Sharing (ICS)
Intersite Messaging
Kerberos Key Distribution Center
License Logging Service
Messenger
Network DDE
Network DDE DSDM
Routing and Remote Access
Themes
Terminal Services Session Directory
Web Client
Windows Audio
Windows Image Acquisition (WIA)
Warning
After disabling services , test the function of the server both before and after installing IIS. The instructions here are generic; your specific purpose and server requirements should also be considered.
In addition to these services, Microsoft recommends disabling many other services on a dedicated web server. Table 12-1 lists and describes these services.
Table 12-1. Microsoft recommended modifications to server service startup
Service | Function | Change |
|---|---|---|
Application Management | Provides software installation services for applications deployed using Control Panel → Add or Remove Programs. | After web server setup and configuration, disable this service to prevent unauthorized installation of software. Disabling this service will not prevent installation of software that does not require the use of Add or Remove Programs. |
Automatic Updates | Downloads and installs Windows updates such as security patches. | If manual updates will be performed, disable this service. |
Background Intelligent Transfer Service | Manages background file transfer and queues. Used by Automatic updates. | If automatic updates are disabled, disable this service as well. |
Distributed File System | Manages logical volumes distributed across a LAN or WAN. | Disable. |
Distributed Link Tracking Client | Maintains links between NTFS filesystem files and other servers in a domain. | Disable. |
Distributed Link Tracking Server | Tracks information about files moved between NTFS volumes throughout a domain. | Disable. |
Error Reporting Service | Collects, stores, and reports application crashes to Microsoft. | Disable. |
Fax Service | Provides the capability to send and receive faxes. | Disable. |
Indexing Service | Indexes content and file properties to enable rapid access. | Disable unless web server applications leverage the use of this service for searching site content. |
NetMeeting Remote Desktop Sharing | Allows remote administration through NetMeeting. | Disable. |
Print Spooler | Manages local and network print queues and controls all print jobs. | Disable unless printing from the web server is required. |
Remote Access Auto Connection Manager | Detects unsuccessful attempts to connect to a remote network or computer and attempts to try alternative configurations if available. | Disable unless dial-up or VPN connections are initiated from the web server. |
Remote Access Connection Manager | Manages VPN and dial-up connections from web server to Internet or other networks. | Disable unless dial-up or VPN connections are initiated from the web server. |
Remote Desktop Help Sessions Manager | Manages and controls remote assistance. | Disable. (Use Terminal Services for administration.) |
Remote Procedure Call (RPC) Locater | This is required by RPC clients using the RpcNs* family of application programming interfaces (APIs) to use local RPC servers and to manage the RPC name service database. (This is called the RpcNs* family because all RPC name service APIs begin the “RpcNs.”) | Disable if no applications use the RpcNs* APIs. |
Special Administration Console Helper | Enables remote administration via Emergency Management Services | Disable if Emergency Management Services will not be required for the web server. |
Removable storage | Manages and catalogs removable media and automated removable media devices (such as tape auto loaders). | Disable if all removable media devices are directly connected to web server. Required to access some tape devices. |
Telephony | Provides Telephony API (TAPI) support for client programs that control telephony devices. | Disable if applications do not require TAPI. |
Telnet | Enables the use of a telnet connection. Enables command-line applications on the web server through this connection. | Disable. |
Terminal services | Allows multiple remote users to connect and run desktops and applications. | Disable unless used for remote administration. |
Upload Manages | Manages file transfers between clients and servers on the network. Can supply help to users in locating required drivers. | Disable. |
Volume Shadow Copy | Manages volume shadow copies. These can be used for backup. | If volume shadow copies will not be used on the web server, disable this service. (Volume shadow copies are snapshots of the filesystem and may be used in the backup and restore process.) |
WinHTTP Web Proxy Auto-Discovery Service | Implements the Web Proxy AutoDiscovery (WPAD) protocol and enables an HTTP client to discover a proxy configuration. | Disable. |
Wireless Configuration | Enables configuration for IEEE 802.11 adapters. | Disable. |
WMI Performance adapter | Provides performance library information from Windows Management Instrumentation (WMI) providers to clients. | Disable. |
In addition, the following services may be candidates to be disabled. Review their purposes closely before disabling because they may be used in your organization and, therefore, it may not be wise to disable them.
- File Replication Service
Used to automatically copy and maintain files simultaneously on multiple servers.
- Help and Support
Runs the Help and Support Center on the web server
- Portable Media Serial Number Service
Retrieves the serial number of a portable media player connected to the server.
- Remote Registry Service
Remote users use this service to remotely modify the registry. By default, only Administrators and Backup Operators group members have the required permissions to do so. If remote administration is not required, disable this service.
- Smart Card
Provides management and control access to a smart card used in a smart card reader attached to the web server. If smart cards are not used, disable the service.
- Uninterruptible Power Supply
Manages an uninterruptible power supply (UPS) connected to the web server via a serial port. Disable if this type of UPS system connection is not used.
To disable a service, begin by opening Start → Administrative Tools → Services. Scroll to and double-click the service to open its Properties page. Use the “Startup type” drop-down list to select Disabled. If the service is started, click Stop. Click OK.
Now that you have installed and prepared Windows 2003, you can begin the process of installing IIS .
Before starting the installation process, review the default installation options and determine if this installation requires additional services and options. Services and options can be added during or after installation. Optional items include services, administration tools, and subcomponents. Table 12-2 lists and describes the IIS services that may be installed.
Table 12-2. IIS 6.0 services
Service | Description | Installed/ enabled by default? |
|---|---|---|
FTP | These services provide file-transfer services through the file transfer protocol (FTP) and the ability to manage the service. | No |
IIS Admin | This service provides administrative services through the IIS Management console. | Yes |
Indexing | You can use this service to create catalogs of file information that can then be searched. Once installed and started, the administrator uses the built in Microsoft Management Console (MMC) snap-in for the Indexing service or the Indexing service node in Computer management to administer the service. The service works in the background to extract information from files and build catalogs. Space for catalogs may be from 15 to 40% of the size of the original files and, therefore, care must be taken to ensure adequate disk space is available. Catalogs are associated with web sites, NNTP sites, or external file directories. Use the Indexing service for web sites built to leverage the use of this service. Developer information is located at http://whidbey.msdn.microsoft.com/library/default.asp?url=/library/en-us/indexsrv/html/indexingservicestartpage_6td1.asp. | No |
NNTP | This service supports the management of NNTP virtual servers for the purpose of supporting NNTP news groups and services. Links to articles on NNTP administration is located at http://www.microsoft.com/resources/documentation/WindowsServ/2003/standard/ proddocs/en-us/Default.asp?url=/resources/documentation/WindowsServ/2003/standard/ proddocs/en-us/nntp_administration.asp. | No |
SMTP | Many web site applications require the ability to send and receive email. Both SMTP (for sending) and POP3 (for receiving) services are available for IIS 6.0. Both are installed as virtual servers and configurable via IIS Manager. By default, SMTP is configured to send and receive locally generated messages and to restrict the sending of messages generated by remote users, as well as restrict those generated by named users on the local computer. Mail relay through the SMTP server is also disabled by default. | No |
POP3 | POP3 is available as separate service from IIS and is configurable from its own MMC snap-in. | No |
World Wide Web Publishing Service | This provides services for administering the web server and for transferring files using HTTP. | Yes |
Installation of IIS is hidden beneath the more generic Application Server, which is a collection of components. If the Application Server is selected for installation and no changes are made during the process, the following subcomponents of the Application Server are installed:
- Application Server Console
The MMC snap-in is used for administration of Web Application Server components.
- Network COM+ Access
Web servers can host COM+ components for distributed applications.
- Internet Information Services
Basic web and FTP services are installed, but FTP is not enabled by default.
The following subcomponents of IIS are enabled:
- Common Files
These are files required by IIS for it to run.
- Internet Information Services Manager
This is an administrative interface for IIS. It can be disabled if the web server will not be administered locally.
- SMTP Service
This supports the transfer of electronic mail. It can be disabled if email is not managed or required by the web server.
- World Wide Web Service
This supports static and (if configured) dynamic content. Only the World Wide Web Service subcomponent of this service is enabled by default. (Other subcomponents are Active Server Pages, BITS, Internet Data Connector, Remote Administration via HTML, Remote Desktop Web Connection, Service Side includes, and WebDAV.)
To install IIS, begin by opening the Control Panel → Add or Remove Programs → Add/Remove Widows Components. Select the Application Server, as shown in Figure 12-1.
Click the Details button and continue to expand components and select those required for a specific installation. Only install essential components. Components can be installed later if necessary. Click OK until returned to the Windows Components page of the wizard. Click Next. If prompted, provide the installation CD-ROM. Click Finish when installation is complete.
After installation, inspect changes to the server. Note, for example, that the World Wide Web Service is installed and started, as are other services if you selected them during the installation. Note the creation in the filesystem of a webroot folder and Administrative

scripts folder underneath the inetpub folder. This is the default location for the default web site, as well as any other default virtual servers. If installed, an ftproot and mailroot exist as well. The Administrative Scripts folder contains two files: adsutil.vbs (which uses VBScript with Active Directory Service Interfaces, or ADSI, to manipulate the metabase) and synciwam.vbs (used to synchronize the identity of the IWAM account, the identity for out-of-process applications). These are useful learning administrative tools, but the scripts should be removed from the web server. Furthermore, they are unsupported scripts. Supported scripts are installed in the %systemroot%system32 folder. A list of supported scripts can be viewed at http://www.microsoft.com/resources/documentation/IIS/6/all/techref/en-us/iisRG_TAS_37.mspx.
To inspect changes to the server, click Start → Administrative Tools, and open the Internet Information Server (IIS) Manager console. Expand and select the Default Web Site. Note the location of a default .htm file, as shown in Figure 12-2.
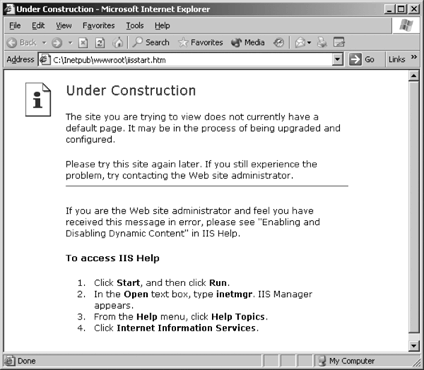
Browse to the file location C:inetpubwwwroot and double-click on the iisstart.htm file to open in Internet Explorer. This file is shown in Figure 12-3 and is the page seen by any user who is able to access the default web site at this time. It is simply a placeholder page that tells everyone that the site is “Under construction” This allows you to test connectivity to the web site. The default web site is mapped to the default AD domain. To use other domains, create new web sites. Creating new web sites is described in the section "Creating a Web Site" later in this chapter.

Configuring web servers and web sites includes preparing disk locations and filesystem permissions, creating virtual web servers and web sites, and then configuring them. The applications that will run on these sites and servers dictate how they are set up. To administer IIS, you should be able to perform a number of tasks. Creating a web site is just the first step. You must be able to configure it in order to secure it and to enable it to provide specific services. In addition, services other than web services are available, and you should be familiar with them. The following are the minimal operations you should know:
- Creating a web site
A default web site is created when IIS is installed. However, you may want to create your own unique web site to fulfill some specific purpose, or you may want to have multiple web sites on the IIS server.
- Managing IIS permissions
IIS permission settings determine how data and code on the IIS server can be used. These permissions are different than server filesystem permissions or user rights. They include the capability to run scripts and programs and to read and/or write files.
- Configuring user authentication
Much web access is done anonymously. However, web applications may require authentication when sensitive operations or access to sensitive data is enabled. There are a number of options here and authentication must be carefully configured to match requirements and maintain security.
- Configuring web site properties
In addition to permissions and authentication, a web site’s properties include its IP address; restricting access from designated computers, domains and networks; NTFS permissions; and components, services, and extensions.
- Reviewing web server security
Knowledge of web server configuration by itself is not enough. You must know which options provide better security and how to maximize security for each web server use.
- Editing the metabase
IIS configuration information is stored in a special file, the metabase. It is important to know how to configure IIS using this file, because it may be easier to configure certain items using the metabase rather than the GUI, and some items can only be configured this way.
- Using IIS backup and recovery
Configuration and operations of a web server is not complete without a regular backup program that is periodically tested. Performing backups is a simple task and can make the process of restoring a damaged or inoperable web server much easier.
- Configuring SSL
E-commerce site communications (as well as that of web sites that provide access to sensitive data) must be protected. The use of SSL is one way to do so. It must, however be correctly implemented or it offers no protection at all.
- Configuring FTP
While the file transfer protocol (FTP) is not used as frequently to upload and download files across the WAN, its services are available with IIS. You should learn how to securely implement FTP services.
Each web site must have a home directory , which is the central location of published web pages (including a home page or index file to serve as a portal to other pages). The home directory includes subfolders that contain application code or content. The home directory is mapped to domain name of web site or name of the web server. Web sites can also store web content in a virtual directory. Web site content can be located in folders underneath the home directory, or in folders elsewhere. When folders outside of the home directory path are used, they are called virtual directories.
Tip
Creating a home directory on a disk volume other than the system volume reduces the risk that a compromised web site can be used to compromise the entire server.
To create a web site, begin by creating a folder in the NTFS filesystem on a disk volume other than the system volume. Open the Internet Information Services (IIS) Manager. Right-click the Web sites folder, select New, and then “Create a web site.” Enter a description for the site and click Next. Select the IP address and port number to be used for the site, and then click Next. (Each web site hosted on a single server must have either a unique IP address, a unique port or a unique host header. Host headers let you identify multiple domains on a single web server.) Enter or browse to the file folder location that will be used for the web site and click Next. If anonymous access to the site will not be allowed, clear the “Allow anonymous access” checkbox. Click Next. Modify the default “Web permissions” for the site. Table 12-3 explains the permissions shown in Figure 12-4. Click Next, followed by Finish.
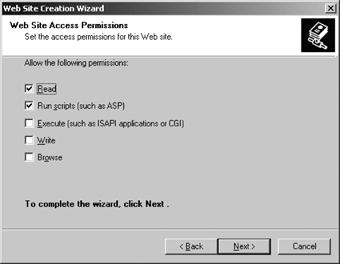
Table 12-3. IIS permissions set through the Wizard
Permissions | Description |
|---|---|
Read | Read the data. |
Run scripts (such as ASP) | Run scripts. |
Execute (such as ISAPI applications or CGI) | Run applications. |
Write | Write data to the web server. |
Browse | View directories and files. |
Tip
An excellent article on host headers and how to use them can be found at http://www.windowsitpro.com/Article/ ArticleID/7176/7176.html?Ad=1. An interesting use of host headers for security is at http://www.microsoft.com/ technet/technetmag/issues/2005/01/hackerbasher/default.aspx.
A virtual directory is a folder that is not a subfolder of the home directory, but is configured so that it can be addressed using a folder name. The virtual directory can be a physical directory on the web server, or in a Uniform Naming Convention (UNC) addressable location. Figure 12-5 provides an example of a virtual directory. In the figure, the home directory of the peaceweaver.com web site is the file folder peaceweaver on drive F of the server. Another folder on the same server, the p-catalog folder, represents a virtual directory. When created, it was given an alias of products. Its content can be accessed using the http://peaceweaver.com/products address. You should use an alias (or assigned name) for the virtual directory because it hides the directory name and because it may make it easier to use. Ease of use might mean an alias that better fits the content, or an alias that is shorter than the directory name. In this case, virtual folders containing other catalogs for other web sites can be created and might use an abbreviated first-letter hyphenated catalog name. In addition to the http://peaceweaver.com/products address, another alias and its server address might be http://somewebsitename.com/products. You can use the same alias name for multiple virtual directories if they are located on different web sites. In this case, the alias for each can be products, since the complete address for each will include a different web site.
To create a virtual directory, you should first create the folder in the NTFS filesystem on a disk volume other than the system volume. This improves security and performance.
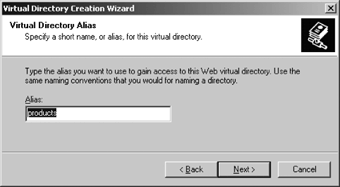
To create a virtual directory using IIS Manager, begin by opening the IIS Manager console. Expand the Web sites folder and expand the web site to which a virtual folder will be added. Right-click the web site or folder. Select New, then click Virtual Directory, and then click Next. Enter a name for the virtual directory in the Alias box, as shown in Figure 12-6, and then click Next.

Enter (or Browse to) the path of the physical directory to be used and then click Next. Select the checkboxes for the access permission to assign for users and then click Next followed by Finish. (The permissions mentioned here and in the next paragraph are the web permissions explained in the next section, "Managing IIS Permissions.”)
To create a virtual directory using Windows Explorer, begin by opening Windows Explorer. Right-click the folder to be used by the virtual directory and click Properties. Click the Web Sharing tab. Click “Share this folder.” In the Edit Alias box, enter the name for the virtual directory. Select the checkboxes under Access Permissions for the types of access to grant. Click OK twice.
Permissions should be set both at the file level, using NTFS and at the web server level using IIS web permissions. Don’t confuse web permissions with NTFS file permissions. One controls access through web connections, and the other provides control through filesystem access. Both permission sets do impact web access, but only file permissions affect local access. If NTFS permissions and IIS permissions conflict, the more restrictive permission applies. To set web permissions for a web site, right-click on the web site in Internet Information Services Manager and select Properties. Then select the Home Directory tab. The Home Directory tab also provides information on data location and application configuration, things that are not related to setting web permissions. To set permissions directly in the filesystem for a virtual directory, use the Web Sharing tab in Explorer, as described in the previous section. Figure 12-7 displays the Home Directory property page for a web site. Table 12-4 lists and describes IIS permissions. Note that during web site creation, it is possible to configure the web site to allow scripts to run. The “Scripts only” permission must be selected from the “Execute permissions” drop-down list in order to provide the appropriate permissions.

Table 12-4. IIS 6.0 permissions
Permission | Description |
|---|---|
Script Source Access | Users can access source files. Combined with the read permission, users can read files. Combined with the write permission, users can modify source files. |
Read | View content and properties of directories and files. Required for static content. Can be removed for scripted content such as ASP content. |
Write | Users can change content and properties of directories and files. |
Directory browsing | Users can view file lists. |
Log visits | A log entry for each visit is created. |
Index this resource | The indexing services will be used to index the content. |
Execute permissions | The three choices are None (no scripts or executables can run), Scripts only (only scripts can run), or Scripts and Executable (both can run). |
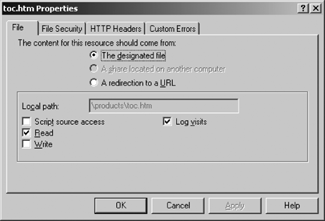
Web permissions can also be set on virtual directories and on files in the same manner. If file properties are examined in IIS, the File tab is used (Figure 12-8) instead of the Home Directory tab shown in Figure 12-7. The File tab is located on the properties pages for each file. To configure these permissions, right-click the file in the details pane of the Internet Information Server Manager and select Properties. Since you are configuring permissions for a file and not a web site, the directory browsing permission is not present. Script or program execution and indexing a web site are also possible directory level permissions.
There are several possible user authentication methods that are configurable for web sites and applications. These methods should be selected and configured based on the requirements of the applications that are supported. Authentication methods can be anonymous or require the use of individual user accounts. They can also require that user credentials be encrypted and thus protected from possible capture and reuse by unauthorized persons or software. Authentication choices may also be dependent upon the web browser used by the clients. To select and configure the right authentication method for a web site and application, all of these things must be considered. Table 12-5 lists and describes authentication methods that do provide some protection for user credentials.
Table 12-5. Authentication methods
Authentication method | Protection for credentials in transit | Requires as client | Protection for credentials stored on the server | Additional exceptions |
|---|---|---|---|---|
Digest | Encrypts | Microsoft Internet Explorer 5.0 or later. | User passwords stored unencrypted in password store. Associated Application Pool identity must be LocalSystem. | Requires Active Directory on Windows 2000 or later. (No local accounts can be used.) |
Advanced Digest | Encrypts | Microsoft Internet Explorer 5.0 or later. | No. | Requires Active Directory on Windows Server 2003. (No local accounts can be used.) |
Integrated Windows | Encrypts | Microsoft Internet Explorer 2.0 or later; requires Microsoft clients. | No. | No. |
Client Certificates | Entire session including credentials exchange can be encrypted | Client must support use of certificates. | No. | Requires public key infrastructure (PKI). Client certificates can be mapped to Active Directory accounts (Windows 2000 or later). |
Microsoft .NET Passport | Encrypts | Microsoft Internet Explorer 4.0 or later. Netscape Navigator 4.0 or later. | No. | If account mapping is used, requires Active Directory. The .NET Passport authentication service must be licensed by the organization. |
Tip
An application pool is a structure that consists of URLs serviced by a common worker process(s). In IIS 6.0, each application pool is isolated from every other application pool.
In addition to these authentication methods, another authentication method that requires the use of user credentials is the Basic authentication method. Requiring Secure Socket Layer (SSL) connection can protect this method, which otherwise passes user credentials in the clear. When SSL is used, the entire session is encrypted including the credentials exchange. Using the combination of Basic authentication and SSL is often the best solution since it does not require a specific client, does not require Active Directory, and only requires that the server have an appropriate certificate and associated private key. Unlike client certificates, it is practical to implement SSL without a PKI as only one certificate is required.
To configure authentication, obtain any certificates and perform any server-side configuration for the authentication types that will be selected in IIS. Open the IIS Manager console. Right-click the site, directory or file to configure authentication for, and then click Properties. Click the Directory Security tab (click the File Security tab if you are configuring a file). Click Edit in the “Authentication and access control” section. To enable or disable anonymous authentication, click to select or deselect the “Enable anonymous access” checkbox. If anonymous authentication is enabled, enter or browse to the valid user account for anonymous access. To configure other authentication choices, click the checkbox in the “Authenticated access” box, as shown in Figure 12-9.
Web site configuration consists of adjusting a number of properties by using the IIS Manager, directly editing the metabase, or using scripts. While scripting may be a more efficient way to manage multiple web sites, using the IIS Manager is more efficient and less prone to error when managing a single site or when only occasional administration is required. The IIS Manager is opened from Start → Administrative Tools → Internet Information Server. The following administrative tasks are common ones that you should be familiar with:
Configuring the IP address used for the server
Configuring access by computer IP address, domain name, or subnet range for web sites, applications, or files
Setting Multipurpose Internet Mail Extensions (MIME)
Configuring NTFS permissions
Configuring logging

Adding IIS components and services
Enabling and configuring extensions
To configure the IP address used for the server, open the IIS Manager console. Expand the local computer and right-click the web site to configure, and then select Properties. To configure the IP address assigned to a web site, click the Web Site tab and use the IP Address drop-down list box to select the IP address. Click OK.
To configure access by computer IP address, domain name, or subnet range for web sites, applications, or files, begin by opening the IIS Manager console. To configure IP address and domain name restrictions, click the Directory Security or File Security tab. Click the IP address and domain name section Edit button to display choices shown in Figure 12-10.
Select “Granted access” to explicitly deny an IP address subnet or domain access by using the “Except the following:” box. Select “Denied access” to explicitly grant an IP address subnet or domain access by using the “Except the following:” box.
To add a single computer as an exception, click Add and then click “Single computer.” Click “DNS lookup” to search for computers or domains by name rather than by IP address. Enter the DNS name for the computer. To add a subnet of computers to the exception list, use the “Group of computers” selection instead of the “Single computer” selection, and then add the Network ID and “Subnet mask” box
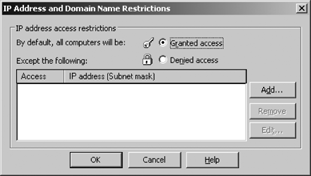
to specify a subnet. To grant or deny access to a domain, use the “Domain name” box. Note that if exceptions are managed by IP address, changing the IP address of a computer will mean that the exception no longer applies.
Setting MIME is important because IIS will only recognize those file types that you’ve defined. Remove those MIME types not used to avoid possible exploits coded using them. Add new types as necessary to accommodate application requirements. MIME types can also be edited to create a better description or to correct the extension.
To change MIME types, begin by opening the IIS Manager console. Right-click on the local computer and select Properties. Click the “MIME types” button to display the current list, as shown in Figure 12-11.

To add a MIME type, click New and then enter a file extension and description. Then click OK. To remove a MIME type, select a MIME type from the “Registered MIME types (file extensions)” list and then click Remove. Click OK three times to exit.
NTFS permissions can be configured on the filesystem and directly on the web site or file. To configure NTFS permissions from IIS Manager, begin by opening the IIS Manager console. Right-click the web site or file, and then click Permissions. Use the object picker to add usernames or groups. Select the username or group and click the appropriate permission. To remove permissions, select the username or group and reconfigure.
Logging at the web site level is enabled by default. To configure logging, begin by opening the IIS Manager console. Expand the local computer ikon, then expand the Web Sites or FTP Sites directory, and then right-click on the web or FTP site to enable logging. Click Properties. To enable logging for a virtual directory, right-click the virtual directory and click Properties. Click the “Enable logging” checkbox. Select a log file format. Table 12-6 defines the log file formats.
Table 12-6. Log file formats
File format | Description |
|---|---|
W3C Extended log file format | Text-based, and customizable for a single site (the default). |
National Center for Supercomputing Application (NCSA) Common log file format | Text-based and fixed format for a single site. |
IIS log file format | Text-based, and fixed format for a single site. |
ODBC logging | Fixed format for a single site. Data can be stored in an ODBC-compliant database (such as SQL Server). |
Centralized binary logging | Binary-based, unformatted data. Not customizable. Data can be collected in a central location and can combine data from multiple web sites. A special parser is required to read the logs. |
| Fixed format for |
UTF-8 Format | To read text-based (W3C extended, IIS, and NCSA Common) log files in languages other than English, enable UTF-8. (UTF-8 is configured by checking the “Encode Web logs in UTF-8” checkbox in the local computer properties.) |
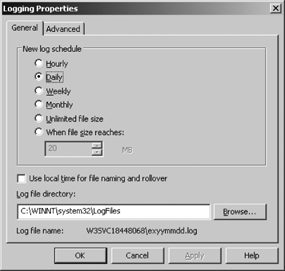
Logs are stored by default at the %systemroot%system32logfiles folder. Click the Properties button to configure a different log location, or schedule the frequency of log creation, as shown in Figure 12-12.
Use the Advanced tab shown in Figure 12-13 to modify the information that is collected in the log (if the format is W3C).
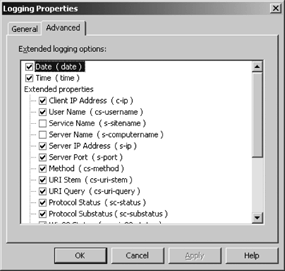
Click OK twice.
When changing the log file location, configure NTFS security to match that of the default. The default file security is Administrators and SYSTEM Full Control. No user access is configured (nor is it required).
If new uses for the web server require additional IIS components, services, and extensions , they can be easily installed and configured. To add IIS components and services, select Control Panel → Add or Remote Programs → Add/Remove Windows Components. Click Application Server and then click Details. Click Internet Information Services (IIS) and then click Details. Enable or disable the IIS component and service by selecting the checkbox or clearing it to remove the component or service.
To enable extensions, open the IIS Manager console. Expand the local computer and click Web Service Extensions, as shown in Figure 12-14.
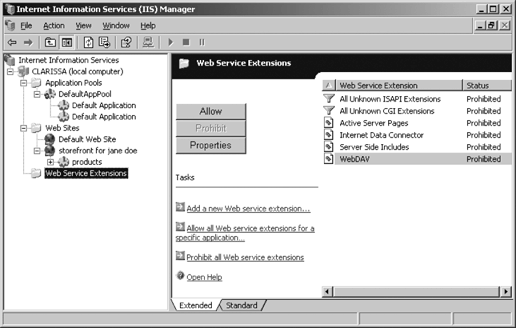
In the Details pane on the right of the screen, select a web service extension to disable or enable it. Click Allow to enable the extensions, or click Prohibit to disable the extension.
If an HTTP request handler (a programmed module created to respond to HTTP requests such as requests for URLs or URL extensions within an application) is not in the list of web service extensions, you must register it by adding the HTTP request handler to the list of web service extensions. To do so, open the IIS Manager console and select the desired web service extensions. In the details pane on the right of the screen, click “Add a new web service extension” and then click Add. Enter or browse to the extension’s path. If desired, click the “Set extension status to Allowed” checkbox. Click OK.
To allow an application to call a web service extension, open the IIS Manager console. Expand the local computer and click Web Service Extensions. In the details pane on the right of the screen, click “Allow all web service extensions for a specific application.” Select the name of the application from the Application list box.
To prohibit all web service extensions, open the IIS Manager console. Expand the local computer and click Web Service Extensions. Click “Prohibit all Web service extensions” and click Yes.
You should review web server security prior to placing a web server in production. Periodic review of a production web server should also be done. The security review should include the location for the web server, the server and web server security hardening, and the security policy (written rules) and posture (actual practice) of the organization. Security hardening for IIS should include the following:
Enable only essential MIME types. Attacks often leverage a vulnerability related to a specific file type. If that file type does not need to be stored on the web server, disable it.
Create root level directories for each web site and create subfolders for each application.
Install web site applications in folders and set NTFS permissions for appropriate access.
Set IIS web site permissions.
Set IP address and domain name restrictions to explicitly grant or deny access to web sites where this makes sense (for example, granting only those internal domains or subnets allowed access to intranet sites). Restrictions can be set for an entire web site or per application.
Configure web sites and application for isolation. Isolation is configured by assigning separate resources, anonymous accounts, and permissions to web sites, and by assigning applications to application pools. Configuring isolation can prevent a poorly behaving application from having an affect on other web sites and applications, and can make it more difficult for security incidents affecting one application or web site from spreading to others.
Configure appropriate user authentication and secure user credentials during transport.
Configure SSL to encrypt confidential data transported between web server and clients, and between web server and SQL servers (if a SQL Server database is part of a web application).
Use IPSec or VPN for remote administration.
Ensure that the server, web server, and applications are kept up-to-date and patched.
Enable file access auditing for web site content.
Configure IIS logging and logs.
When the IIS Manager console is used to configure IIS, changes are written to the IIS metabase, an XML file that represents IIS configuration. In addition to IIS Manager-based changes, some configuration steps are only done by directly editing the metabase file. An IIS administrator should become familiar with the metabase file and comfortable enough to work with it as necessary. However, caution should be used, since improper changes to the file can make the web server, a web site, or an application inoperable.
Tip
An excellent text for learning metabase properties and usage is the Working with the Metabase chapter of the IIS 6.0 Technical Reference, which is online at http://www.microsoft.com/resources/documentation/IIS/6/all/techref/en-us/iisRG_MET_29.mspx.
In addition to the metabase file,
metabase.xml, predefined information properties
for the metabase are described in the metabase schema
file, MBSSchema.xml. Both files are
located at %systemroot%system32inetserv and
can be edited by using a text editor. If necessary, the metabase can
be edited while IIS is running by enabling the edit-while-running
feature described next. After the edit is complete, and the file is
saved, the properties will be replaced in the in-memory metabase. IIS
maintains a history of changes made to the metabase file and saved to
disk. Metabase history files are saved using the HistoryMajorVersionNumber property of the
metabase file. Files are saved in the
systemrootsystem32inetsrvhistory
folder.
To enable the edit-while-running option, begin by opening the IIS Manager console. Right-click the local computer and select Properties, as shown in Figure 12-15.
Select Enable Direct Metabase Edit checkbox. Click OK.
The metabase can be backed up by using the IIS Manager or the command-line script issback.vbs, which is located in the %systemroot%System32 directory. Two types of backup can be created: a portable backup that can be restored to another server, and a nonportable backup that can only be restored to the same server. The type of backup created depends on whether a password or the machine keys are used to encrypt secure metabase properties.
To create a backup, begin by opening the IIS Manager console. Right-click the local computer and select All Tasks, then select Backup/Restore Configuration. Click Create Backup. Enter a name for the backup file. To make the backup portable, select

the “Encrypt backup using password” checkbox and enter a password in both the Password box and the “Confirm password” box. Click OK and then click Close. A copy of the metabase is created in the %systemroot%System32inetsrvMetaBack folder.
To restore the backup, begin by opening the IIS Manager console. Right-click the local computer and select All Tasks, then select Backup/Restore. Click the version of the Automatic Backup file to use in the restore and click Restore. If prompted for a password, enter the password used when creating the backup.
Although backing up the metabase is important, a complete backup of the web server should also be performed regularly. A complete backup includes the backup of all the web sites, applications, and data stored on the web server. It also includes a backup of the System State and of the boot and system volumes, as well as the metabase. In addition to a regular backup, a complete web server backup should be performed before migration, before allowing client access to a newly created web site or application, or before changing configuration settings on an existing web server. Backup files can be saved to hard disk, or other removable or nonremovable media. ntbackup.exe and third-party backup programs can be used.
To back up using ntbackup.exe, click Start → All Programs → Accessories → System Tools → Backup. Click Advanced Mode. Click the Backup tab. Select the System State checkbox on the left side of the screen, as shown in Figure 12-16, then select the boot and system volume.
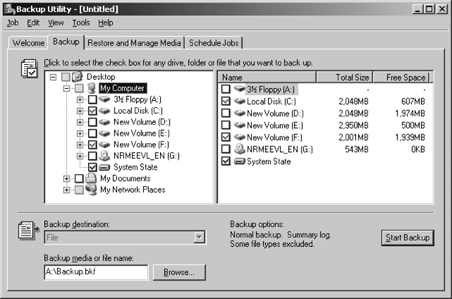
Select web server data, including the backup destination type and media or filename. Select the file or tape location in the “Backup destination” drop-down box. Enter a file path or select the tape to use, respectively, in the “Backup media or file name” text box. Click Tools and then click Options and complete options such as backup type and log file type. Then click OK. Use the Advanced button to set such advanced backup options as data verification or hardware compression. Then click OK. When you have selected all the appropriate options, click Start Backup.
To restore using ntbackup.exe, click Start → All Programs → Accessories → System Tools → Backup. Click the Advanced Mode. Click Restore and Manage Media and then expand the media item that contains the backup. Select the System State box for that file. Select other data to restore. Click “Original location” if backups should be placed in the same folder or folders as they were when backed up. Or, click “Alternate location” and designate a folder. The folder structure of the backup will be preserved. Click the Tools menu and then click Options. Click the Restore tab and then select either “Do not replace the file on my computer to retain files remaining on the disk” (these files may be more recent versions) or “Replace the file on disk only if the file on disk is older,” or check “Always replace the file on my computer.” Click OK. Click Start Restore. Use the Advanced button for other options such as restoring security settings.
SSL is a method that can provide clients with a way to authenticate the server they are connected to. Authenticating the server means to verify that it is who it says it is; SSL provides encryption of the communications between client and server. Web sites can be configured to accept or require SSL connections. To do so requires a server certificate. The use of client certificates is optional, but can provide additional security since the clients are then able to authenticate to the server. In most cases, however, SSL is configured to require a server certificate only.
The certificate can be either purchased from a public Certification Authority (CA) or produced by a Microsoft or third-party CA operated by your organization. When a browser client is used for an SSL connection to a web site, the server presents its certificate and the browser client performs a number of tests, including checking its certificate store to determine if a trusted CA issued the certificate. A trusted CA is a CA for which a copy of its server certificate is stored in the browsers Trusted store. The public key stored in the certificate can be used to validate the signature of the issued server certificate signed by the associated CA private key. If the certificate is not available, the client cannot validate the certificate. The client then provides a warning to the user.
Because the certificate provided by the public CA can be validated by most (if not all) browser clients, it is better to obtain an SSL certificate from a public CA for e-commerce and for other sites that expect connections from the public. Privately produced SSL certificates may better serve private, or intranet sites. To facilitate their use, clients will need a copy of the CA certificate to be able to validate the server certificate.
To configure IIS 6.0 to use SSL, you generally must do the following:
Request a certificate from a CA
Install the certificate
Configure the web site to require SSL
Back up or restore a certificate
To request a SSL certificate, begin by opening the IIS Manager console. Right-click on the web site the that certificate will be used in and select Properties. Select the Directory Security page and then click the Server Certificate button in the Secure Communications section and then click Next. Click Create a New Certificate (as shown in Figure 12-17) and then click Next.
Click “Prepare the request now,” but send it later, as shown in Figure 12-18. Then click Next.
Enter a name for the certificate. Change the key strength, if required, by entering the information on this page and then click Next. Key strength (or length) is important because, in general, the longer the key, the more secure the communication. However, longer keys can mean slower communications, and more expense if certificates


are purchased. Enter the organization name and department name (“Organizational unit”), as shown in Figure 12-19. Click Next.
Enter the common name and then click Next. This should be the fully qualified domain name (FQDN) for the web server domain if the server will be on the Internet, but can be the server NetBIOS name if the web server will be on the intranet. Enter city, state, and country information, and then click Next. Browse to a location to save the certificate file and click OK. The file is saved as a text file and given a .cer extension.
The certificate request must be submitted to a CA to receive a certificate. When using a public CA, follow the instructions provided by the CA. If you are using a non-Microsoft CA, follow the CA instructions. If you are using a Microsoft CA, copy the certificate text file produced in the previous steps to the CA, and use these instructions.
At the CA, browse to the CA’s web site (for example, http://localhost/crtsrv). Click Request a Certificate. Click Advanced Certificate Request. Click “Submit a certificate

request using a base 64 Encoded CMC or PKCS # 10 file or submit a renewal request using a base 64 Encoded PCKS #7 file.” Click Browse to look for a file to insert and browse to the location of the saved certificate request file created earlier in this section. Use the certificate template drop-down list to select Web Server and then click Submit to submit the request.
If the certificate request must be approved, a warning will appear, indicating that an administrator with appropriate permissions on the CA must approve the request. The certificate must be downloaded after approval. If the CA is configured to automatically approve the request, the certificate will be issued.
Select “Download certificate” and browse to a location to store the certificate file.
After the certificate file is obtained, you must return it to the web server for installation. Open the IIS Manager console. Right-click on “Web site” and select Properties. Select the Directory Security page and click Server Certificate. Click “Process the pending request and install the certificate,” as shown in Figure 12-20, and then click Next.
Browse to the certificate file. Specify the SSL port to use or accept the default of 443 and then click Next followed by Finish.
Once the certificate is installed, it can be used to create an HTTPS connection to the web server. However, HTTP connections will still be allowed unless the web server is configured to require an SSL connection. To require an SSL connection return to the

Directory Security property page (as explained previously), click Edit, and select Require Secure Channel (SSL).
SSL certificates should be backed up. This makes them available for a restore when the web server must be moved to another server. The backing up of certificates is referred to as exporting them. Likewise, they can be restored to a server via an import operation.
To back up the SSL certificate, begin by opening an empty MMC console. Select the File menu and then click Add/Remove Snapins. Click Add and then select the Certificates snap-in. When prompted, select Local Computer and then click OK to return to the MMC console. You should use the File → Save As menu function and save the console for later use. In the console, expand the stores and then select the Personal store. In the detail pane on the right side of the screen, right-click the certificate to export and click All Tasks and then click Export. Click “Export private key.” Click Next. Do not select “Delete the private key if export is successful.” Enter the filename. Click Finish.
When a certificate is purchased, or requested via a local CA, the certificate is often delivered via the network and installed directly to the certificate store via the IIS Manager. This also assigns the certificate for use in SSL. Alternatively, a certificate file can be used to install a certificate on the web server. If the certificate is damaged, or if it is accidentally deleted from the server, it can be replaced in the certificate store by using the import function as we’ll discuss next.
To add a certificate to the certificate store, open the certificates snap-in in an MMC console. Right-click on the Personal store and select All Tasks and then select Import. Click Next. Enter the name of the file or browse to it. Enter the password for the file. Click Next. The certificate will be installed. Click OK if a pop-up window confirms this. Close the console.
FTP is not installed by default. To install an FTP server, use the Control Panel → Add/Remove Programs → Add/Remove Windows Components applet. The FTP service is an Application Server component. To configure the server, you must provide a root level file folder and subfolders for FTP content. If user isolation will be used, you must create a subfolder entitled LocalUser, a subfolder called LocalUserPublic, and subfolders under LocalUser for every user who will have the right to store and/or use files on the FTP server. The user subfolders should be of the form <FTProot><LocalUser><UserName> if local users will be accessing the server, and <FTProot><DomainName><UserName> if Active Directory user accounts will be used.
In our discussion on configuring FTP, we will look at the following tasks:
Create FTP sites and select a user isolation mode (if required)
Configure FTP authentication
To create an FTP site, begin by opening the IIS Manager console. Right-click on the local computer and select New, then “Create an FTP site.” Enter a name for the site and then click Next. Select an IP address and port number to be used, and then click Next. Every FTP site on the same server must have a unique IP address or port. Select FTP isolation mode required and then click Next. In Figure 12-21, the user isolation mode is selected. The default is no isolation. Table 12-7 describes the FTP user isolation modes.

Table 12-7. User isolation modes
Isolation mode | Description |
|---|---|
Do not isolate users | Users may gain access to the home directory of other users. |
Isolate users | Each user has his or her own directory. To the users, it looks like the FTP root. |
Isolate users using Active Directory | The FTP service is integrated with Active Directory to retrieve home directory information for users. The Active Directory user object is extended with properties to hold the FTP root (the FTP share) and FTP directory (the relative path to the user’s home directory. A script (%systemroot%system32iisftp.vbs) can be used to get and set the properties. |
Configure access permissions, as shown in Figure 12-22, and then click Next. Click Finish.

You must configure authentication for FTP separately from authentication for HTTP. FTP authentication is either anonymous FTP or basic FTP. Anonymous FTP authentication requires no user credentials, while basic FTP authentication requires a username and password. Unfortunately, basic FTP authentication sends credentials in plain text.
To configure FTP authentication, open the IIS Manager console and select “FTP sites.” In the detail pane on the right side of the screen as shown in Figure 12-23, right-click the FTP site, directory, virtual directory, or file to configure. Then select Properties.
Click the Security Accounts tab. To allow anonymous connections, select the “Allow anonymous connections” checkbox as shown in Figure 12-24. Enter the username and password for the anonymous logon username.
To enable basic FTP Authentication, clear the “Allow anonymous connections” checkbox. Click OK.


Setting up an FTP site concludes the discussion on basic administration tasks for IIS . You should now feel comfortable creating web sites, configuring authentication and permissions, as well as configuring SSL and creating virtual directories. There are other operations that you may be required to perform. One of the lesser known is configuring IIS mail services . While this process can be quite complex, you should know a little bit about the IIS mail services that are available.
Using and configuring mail services (SMTP, POP3, NNTP) is a complex task and is beyond the scope of this book. However, basic SMTP services may be required for many web-based applications and can be used by other Windows operations such as SMTP-based Active Directory replication (as described in Chapter 13). Some introductory information is, therefore, included here.
When SMTP is added to IIS, a filesystem location for the mailroot must be specified. The mailroot is the parent directory for all subfolders required by the email system. Each SMTP virtual server can have a different mailroot. Table 12-8 lists and describes the subfolders under mailroot.
Table 12-8. mailroot folders
Folder name | Description | Monitor |
|---|---|---|
Badmail | This stores undeliverable messages that cannot be returned to sender. | Monitor the Badmail folder and use the error messages associated with bad mail to help diagnose the problem. |
Drop | This stores all incoming messages addressed to recipients located on the server. If POP3 is configured, the message bypasses the Drop folder and is placed in the appropriate mailbox store. | Read messages here and forward as necessary, or delete. |
Mailbox | This stores mailboxes for POP3 users. Each domain is configured as a separate folder. Email messages are stored in mailbox folders as flat files. | N/A |
Pickup | Any mail placed here is picked up by the SMTP service and transferred to the Queue folder. An application or an administrator can place mail in this folder. | Messages should pass through this folder quickly. If they remain here, something is wrong. They may be corrupt, or there may be a problem with the SMTP service. If no mail is being processed, check the permission settings on the folder to ensure that the SMTP service can read its contents. |
Queue | This holds messages ready for processing and delivery. | Monitor this folder to ensure that mail is flowing. Problems may be related to network connections. |
Route | This is used when a route domain for an SMTP virtual server is configured. | Monitor to ensure that mail is flowing. |
SortTemp | This is a temporary sorting area for messages. | Temp files are placed here and cleared when messages are sorted for delivery. |
Mail messages are processed by SMTP if they are either received by the SMTP service, or placed in the Pickup folder. Messages are then placed in the Queue folder to await processing. If POP3 is not configured and the mail is for a local recipient (that is, a recipient with an email domain serviced locally by SMTP), the message is moved to the Drop folder. If POP 3 is configured, the message is moved to the appropriate mailbox store. If a message is for a remote recipient (that is, a recipient with an email domain that is not serviced locally), messages are sorted by domain so that SMTP can deliver the message to the recipients as a group. After sorting, the mail is queued for delivery. If messages cannot be delivered, they are marked as nondeliverable, a nondelivery report is generated, and an attempt is made to deliver this to the original message sender.
With this brief background, we can now look at three important tasks:
Configuring email services
Using a mail gateway with the SMTP virtual server
Monitoring SMTP
The SMTP service is not installed by default, but can be installed by using the Add Windows Components program. The SMTP service is an Application Server component. However, the POP3 service must be installed from the E-mail Services section of Windows Components. When SMTP is installed, a default SMTP virtual server is created. The default virtual server is set to monitor the default domain. To set additional virtual SMTP servers to monitor additional domains create a new virtual SMTP server:
If a new IP address will be used by the SMTP service, configure the IP address before creating the virtual server. Create a folder to hold SMTP folders and files. When the new SMTP virtual server is created, the folders identified in Table 12-8 will be created.
Open the IIS Manager console. Right-click the computer and select SMTP Virtual Server. Enter a name for the web site. Use the IP drop-down list to select an available IP address. Choose All Unasssigned to allow SMTP to respond on all unassigned IP addresses configured on the server. Each SMTP server must have a unique IP address or port. Click Next. Enter the path to the directory to be used for the mail root. Specify the default domain for the virtual server. Click Finish.
To stop, start, and pause SMTP, begin by opening the IIS Manager console. Select the local computer. Right-click the virtual server and click Stop to stop the server, or Pause to pause it. To restart a paused server, click Pause again. To start a stopped server, click Start.
Tip
When SMTP is stopped, all SMTP virtual servers are stopped. When SMTP is paused, no new connections can be made, but existing connections are not dropped.
To stop and start POP3, select Start → All Programs → Administrative Tools. Click POP3. Right-click the computer icon and select Connect. On the resulting shortcuts menu, choose All Tasks and then choose to stop, start, or pause the service.
To configure an SMTP virtual server, begin by opening the IIS Manager console. Right-click on the SMTP virtual server and select Properties. To change the IP address used, use the “IP address” drop-down list. To change the port, click the Advanced button. Select the IP address to configure and click Edit. Enter a new port number and click OK. The Advanced tab can be used to add multiple IP addresses and multiple ports on which the SMTP server can listen.
By default, the SMTP service is configured not to relay mail. This is important, since it prevents the SMTP server from being used to distribute spam. Unfortunately, it also prevents the SMTP service from forwarding mail to a mail gateway. You can configure the SMTP service to relay mail to and from a specific mail server used as a mail gateway. To do so, create a remote domain that represents the mail gateway, and configure the remote domain and the local SMTP virtual server to relay mail.
Begin by opening the IIS Manager console. Expand the virtual SMTP server entry and select Domain to see the default domain, as shown in Figure 12-25.

Right-click a domain and click New. Then select Domain. Select Remote as the domain type and then click Next. Enter the domain address space (that is, the DNS domain name of the remote domain). Click Finish.
In the IIS Manager console, select the SMTP virtual server Domain node and right-click the remote domain entry. Select Properties. On the General page, set the properties for routing and securing message delivery. Click “Allow incoming mail to be relayed to this domain,” as shown in Figure 12-26. Click OK.
Monitoring SMTP entails more than checking to see that the service is running. Logging should be configured, logs reviewed, and the mail folder should be monitored, as described in Table 12-6. User sessions can also be monitored and disconnected if necessary.
A user session starts when a user connects to a virtual server. User sessions are tracked separately and can be manually disconnected. To do so, begin by opening the IIS Manager console. Double-click the virtual SMTP server. Select the “Current sessions” node for the server. In the detail pane on the right of the screen, right-click the session and select Terminate. To disconnect all users, right-click in the detail pane and select “Terminate all.”

To monitor SMTP activity, you should enable and configure logging. To do so, begin by opening the IIS Manager console. Right-click the virtual SMTP server and select Properties. To enable logging, check the “Enable logging” box. To change the logging file format, use the “Active log format” box.
This brief introduction to mail services in IIS is not meant to make you an SMTP expert, but rather to give you a glimpse into what’s available should you want to provide such services for IIS applications. The main purpose of IIS is, of course, as a basis for web applications. Web applications should be written by those who understand not just web server administration, but how to translate application requirements into production quality applications that fulfill them. Application authors are responsible for detailing which IIS services and extensions are required. As an administrator, you should understand how to install and run IIS applications as described next.
The methods used to deploy and run IIS-based applications will vary depending on the application. Some applications will include provisioning scripts or installation packages that install and configure virtual directories and enable components as necessary. Others will require a substantial amount of preparation and configuration.
Windows Server 2003 server and IIS may also need to be configured to accommodate the applications that will run on them. For example, if an asp.net application does not have an installation script, the following steps must be taken:
If necessary, install and/or enable Windows Server 2003 services and components.
If necessary, install, enable and/or configure IIS services, components, and attributes (such as the IIS process isolation mode).
Create the web site and virtual directories for each asp.net application.
If necessary, create and configure an application pool.
Assign the application to an application pool.
Copy the asp.net application content to the web server.
If session state should be retained, configure IIS to use the asp.net application session state method.
If out-of-process session state is retained, enable common storage for the asp.net session state. Out-of-process session state data can be managed by the asp.net state service or by the SQL server.
If necessary, configure encryption and validation keys used to protect session state data. Session state data is only accessible from the web server that created the data. To accommodate the use of multiple web servers as used in a web farm, all web servers in the farm must be configured to use the same encryption and validation keys in order to share session state data. Keys are stored in the <machine key> section of the metabase.
Configure asp.net to use session state.
If necessary, configure impersonation, (the ability for an application to use the identity of a user.)
Secure the asp.net session state connection string.
Ensure security and availability of the application.
Verify that the asp.net application was deployed successfully by examining the System log on the web server. IIS 6.0 creates events in the System log if a web site fails to start.
Back up the web server.
Enable client access to the asp.net application. This includes creating DNS entries for the asp.net application and placing the server on the network.
Monitor client traffic to see that clients are accessing the application.
Establish a monitoring period (perhaps a few hours a day) to check response times.
Now that you understand the general process involved with installing and running IIS applications, let’s take a look at some key areas that deserve special attention:
Session state data is per-user and per-application data that can be retrieved across multiple requests. The data is typically cached by the application and is the total of the data generated by the user during one connection to the server. Session state data is independent of other sessions and does not survive the user session. Session state is also not part of the HTTP protocol, but rather is an abstraction layer built by the server-side environment (such as our asp.net example). The data is stored in components called providers. The example asp.net application can use three different providers: InProc (or in-process storage, which means the data is kept by the worker process assigned to the application; a worker process is user-level code that is used to process requests), StateServer (an out-of-process store that is kept by a separate worker process), and SQLServer (an out-of-process store in a SQL server table). If an in-process provider is used, and the application is recycled, all session state data is lost. If an out-of-process provider is used and the application is recycled, the session state data is maintained.
Many web servers host multiple web sites and applications. For example, an Internet Service Provider (ISP) may host hundreds of web sites and applications for hundreds of organizations. Some web sites will require a dedicated server, but many will be hosted together with others on the same server. Organizations may also host several of their own unique web sites and want to make use of a single server. When multiple sites and applications are hosted on a single server, you should provide some isolation to ensure availability, improve performance, and enhance security. Isolation is the process by which web sites and applications are kept separated and prevented from having an impact on each other. This can be accomplished in a number of ways, including providing them their own disk or subdirectories, their own worker processes, and their own security context.
When applications or web sites are hosted on separate disks, it is harder for failure or compromise on the part of one of them to impact the other. If an application fails, uses up available disk space, or the disk itself fails, web sites and applications running on other disks are less likely to be impacted (and may not be impacted at all). If an application is compromised, it will be harder for others on separate disks to be compromised because it is harder to gain access to different disks. Permission settings can also be modified to prevent access and are less likely to be incorrectly set when different disks are involved. If unique subdirectories off the root are assigned instead, there is less protection, but still more protection than if not. Restricting root drive access to the local Administrators group will also make this operation more secure.
When applications are assigned to unique application pools they can be assigned unique worker processes. Because the worker processes are unique to the application pool, a poorly behaving application (or one that fails) has no impact on those assigned to other application pools and processes. As has already been described, a number of application pool configurations can also improve performance and availability. (We’ll examine this approach later in this chapter.)
The security context of a web application
is the identity under which the application operates. This can be
either the identity of the user who is accessing the web site (or
its application), or the application pool identity that is used by
the web site (and its applications). If anonymous access is allowed,
then the security context may be the IUSR_
name_of_server account or other account
assigned to the web site for anonymous access. (Anonymous
access of web sites and applications is done by a web
site user who has no authenticated credentials. The anonymous
account assigned to the web site still authenticates, and must be
provided permissions to access resources on the server.) If basic
(or Windows Integrated) authentication is configured, then the
security context can be any user who has a valid account and is
authorized to use the application and its resources. When the
application pool identity is used, by default, this is the built-in
Network Service account.
When multiple applications and web sites are hosted on one server, using the application pool identity to run the application can provide isolation of the applications regardless of the individual user accessing the server. However, since all application pools default to the Network Service account, if this account is compromised, then there is a potential for compromise of all applications, and/or the data they have access to. This can be prevented if a unique service account is created and assigned for each application pool.
Impersonation is the ability of a worker process to run under security credentials other than its base identity. A worker processes base identity is established by the application pool identity (which is the account assigned to the application pool, such as the default Network Service account).
Ordinarily, the worker process runs under this identity. However when a client request is processed, the authenticated users token (that is, a token associated with the identity of the client) is used for the duration of the request. Impersonation, therefore, determines the access a web application user has to resources on the server. The authenticated users token may be the anonymous account assigned to the web site (if anonymous access is allowed), or that of a specific Windows user account (if some other form of authentication is configured). Before a client request is served, the user’s token is verified against the access control list (ACL) assigned to the resources the request is attempting to use.
Tip
Impersonation is disabled for asp.net applications by default. All resource access is verified against the process token of the application worker process, regardless of what authentication methods are configured or used. If an asp.net application requires the use of impersonation, this must be configured.
IIS 6.0 can run in two different application isolation modes : the IIS 5.0 isolation mode and the IIS 6.0 worker process isolation mode. Running applications in isolation mode provides better security and availability because application code can be separated from the web server code and from other applications. IIS 6.0 worker process isolation mode is superior to IIS 5.0 isolation mode because it runs all application code in an isolated environment without a performance penalty. IIS 5.0 isolation mode is available for backward compatibility with those applications that depend on its behavior.
All new installations of IIS 6.0 will default to worker process isolation mode, while all upgrades of IIS 5.0 to IIS 6.0 will default to IIS 5.0 isolation mode. To change from one mode to another, open the IIS Manager console. Right-click on the Web Sites node and select Properties. Select the Service tab. Change the checkbox of the “Run WWW service in IIS 5.0 isolation mode,” as shown in Figure 12-27. (Enabling this box with a check runs IIS 50; clearing the box runs worker process isolation mode.) Click OK.

Worker process isolation mode supports multiple application pools, each of which can have a different configuration. Worker process application mode provides the following improvements to performance, availability, and security:
- Processor affinity
Support for processor affinity (that is, when a process will always attempt to use the same processor). For worker processes it means that worker processes can take advantage of processor caching to improve performance. Instructions for setting processor affinity are in the article Assigning Processor Affinity, at http://www.microsoft.com/resources/documentation/IIS/6/all/techref/en-us/IISRG_WAS_35.mspx.
- Automatic shutdown of idle worker process and reclamation of unused resources
Configures application pools to shut down idle processes. The processes will restart when requested. When idle processes are shut down, the resources they were using can be freed for use by other processes, thus making operation more efficient and improving the performance of heavily used processes. When a web site supports multiple applications or a web server supports multiple sites, this arrangement can mean improvements in scalability, or a reduction in the need for as many servers, or even the need for larger servers.
- Web garden
A web garden is an application pool with multiple worker processes available to service client connections. When multiple worker processes are used, more clients can be served with greater speed and efficiency.
- Fault-tolerant request processing
Assigning multiple worker processes to an application pool also means that, should one worker process fail, others are available to do the work.
- Reduced restarts
Fewer restarts are required because many common operation tasks do not need the server or the web service to be restarted. Upgrading web sites and debugging web applications in one application pool probably will not make any impact on the availability of application or sites.
- Health monitoring
Configure an application pool to monitor its health, including the health of worker processes servicing the application pool. IIS can determine when processes fail (or have the potential to fail) and automatically start a new process. Application requests can be queued until the new process is ready. Administrators can be notified of failures by configuring this tab. Old processes can be orphaned or separated from the pool for debugging, rather then simply ended.
- Rapid-fail protection
If a web site enters into a cycle of failure and restart, it can consume system resources and cause availability problems for other sites and applications. Rapid-fail protection stops an application pool when too many of the worker processes assigned to an application pool are found unhealthy during a specific period of time.
- Scheduled automatic restart
Applications with memory leaks, bad coding, or other problems must be rewritten. Meanwhile, keep them operational by scheduling automatic restarts.
When multiple applications and/or web sites will be hosted on a single server, the applications and web sites should be assigned to application pools and the applications pools should be configured. To do so requires thought as to the best assignment. It is not always the best choice to simply assign every application to its own application pool. Doing so may increase administration efforts and provide a diminishing return on performance and availability.
For best results, follow these steps:
Make a list of the web sites and applications that will be hosted on the server.
Group them by organization, if multiple organizations will be assigned to the server or business unit, or if all web sites and applications are the product of a single organization.
Split these groups by their need for the same user rights and resource access. These groups become candidates for unique application pools.
Remove from these groups any known problem applications (such as those that are poorly written, or those that have memory leaks). The problem applications may need their own application pool.
Isolate new applications temporarily into their own application pool until their behavior is known.
Create as many application pools as determined by Steps 3, 4, and 5.
Create a unique service account to be used for each application pool. This account is assigned as the application pool identity.
Add these accounts to the IIS_WPG group. This group has user rights and resource access required by most web sites and applications.
Assign additional rights and resource access to each new service account as appropriate. (Each application and web site may require access to specific resources. Do not assign these rights and accesses to all service accounts, but rather only to the one that will be used by the web site and application.)
Assign each service account to its specific application pool.
Assign web sites and applications to application pools.
To create an application pool, begin by opening the IIS Manager console. Right-click “Application pools,” select New, and then select Application Pool. Enter a name for the new application pool, as shown in Figure 12-28 and then click OK.
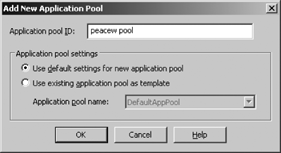
To assign a service account (that is, configure the identity) for an application pool, first expand the local computer in the Internet Information Services Manager and expand Application Pools. Right-click the application pool to configure and click Properties. Click the Identity tab, as shown in Figure 12-29. Click either Predefined (use a standard service account such as Network Service, Local Service, or Local System) or Configurable (use an account created).
Use the drop-down list box to select a Predefined account or use the “User name” and Password boxes in the Configurable section to enter the username and password of the account. Click OK.
To assign web sites and applications to an application pool, begin by opening the IIS Manager console. Right-click “Web site” and select Properties. Select the Home

Directory tab. In the “Application pool” field, use the drop-down list to select the application pool, as shown in Figure 12-30.

There are many settings that can be used to detect Application Pool health, to keep applications running efficiently, and to improve performance.
IIS 6.0 supports application availability by detecting problems with worker processes and taking action based on the problem detected. The basic detection method is a ping, and the action taken is based on the worker process response. If the worker process doesn’t respond, it is considered unavailable. The worker process may respond to the ping by requesting a recycle. Adjust the ping response time property (that is, the interval between pings to the worker process) to accommodate the specifics of applications and servers on the organization’s network. The ping response time should not be set too short, as normally busy worker processes will take some time to respond; and a too short ping response time may cause a shutdown of a healthy worker process.
Worker process pinging is enabled by default. To manage worker process pinging, open the IIS manager console, right-click on the application pool, and select Properties. Click the Health tab. To modify worker process pinging, select the “Enable pinging” checkbox, as shown in Figure 12-31.

Enter the number of seconds before the worker process should be pinged. To configure rapid-fail protection, select “Enable rapid-fail protection” checkbox. Rapid fail protection disables the application pool if a selected number of failures occur within a selected number of minutes. This prevents a damaged application from continuing to needlessly consume resources. Enter the maximum number of failures allowed. Enter the “Time Period (in minutes)” during which the number of failures is counted. In the “Startup time limit” box, enter the time in seconds in which the Worker process must start up. In the “Shutdown time limit” field, enter the time (in seconds) to elapse before shutting down a failing worker process. Click OK.
Misbehaving worker processes can be stopped and restarted. This process is often called process recycling, but is sometimes referred to as application recycling. Process recycling can be configured based on the following properties:
- Elapsed time
Specify the number of minutes after which the worker process should be recycled. If applications have problems running for long time periods, determine the maximum amount of time they can run and set the elapsed time for less than that time.
- Number of requests
Specify the number of HTTP requests that can be processed before the worker process should be recycled. If applications are failing after a given number of HTTP requests, set the number for less than that number.
- Scheduled times
Specify the time within a 24-hour period when a worker process should be recycled. This should be a frequency that prevents an application from failing.
- Virtual memory
Specify the amount of virtual memory the worker process can use before it must be recycled. When applications reserve memory multiple times, the memory heap becomes fragmented and there is a steady rise in the amount of virtual memory used. Start with less than 70 percent of available virtual memory, monitor the worker processes memory usage, and adjust this figure.
- Used memory
Specify the amount of memory used by the W3wp.exe process before the worker process should be recycled. If an application has memory leaks, the amount of memory used will continue to increase. Set to less than 60 percent of available memory.
- On demand
Specify that worker process recycling occurs via the use of the MMC console or a script that requests recycling of an application pool.
To immediately recycle the worker processes assigned to an application pool, expand the local computer node from the IIS Manager console and right-click the application pool. Then click Recycle. To configure a worker process to be recycled after a set elapsed time, right-click the application pool in the IIS Manager console and then click Properties. Select the Recycling tab, as shown in Figure 12-32.
Select the “Recycle worker processes (in minutes)” checkbox. Enter the number of minutes to elapse before the worker process is recycled. To configure the worker process to be recycled after a number of processing requests, select “Recycle worker process (number of requests)” and enter the number of requests to be processed before worker process recycling. To configure the worker process to be recycled at scheduled
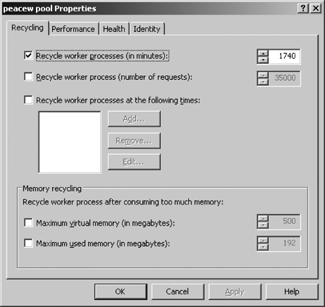
times, select the “Recycle worker process at the following times” checkbox. Click Add to add a time to the list, Remove to delete a time, or Edit to change a time. To configure a worker process to be recycled after consuming a set amount of memory, select the “Maximum virtual memory (in megabytes)” checkbox. Enter the maximum amount of virtual memory allowed before the worker process is recycled. Memory consumption can also be limited by clicking the “Maximum used memory (in megabytes)” and entering the maximum amount of memory to be used before the process is recycled. Click OK to apply the changes.
Many of the application pool configurations will improve web server and application performance since they limit memory use, constrain or stop misbehaving applications and so on. Other performance settings are also available.
To configure application pool performance, begin by opening the IIS Manager console. Expand the local computer and right-click the application pool. Select the Performance tab, as shown in Figure 12-33.
In the Idle Timeout areas, select “Shutdown worker process after being idle for (time in minutes)” checkbox. Enter the number of minutes before the worker process will be recycled. To configure a request queue limit, select “Limit the kernel request queue (number of requests)” checkbox. Enter the maximum number of requests to allow in the request queue limit field. To configure CPU monitoring, select the “Enable CPU monitoring” checkbox. Enter the percent maximum CPU threshold in the “Maximum CPU use (percentage)” checkbox. Enter the number of minutes before the CPU usage numbers are refreshed in the “Refresh CPU usage numbers (in minutes)” field. Use the “Action performed when CPU usage exceeds maximum CPU use” drop-down box to select an action to take. To configure a web garden
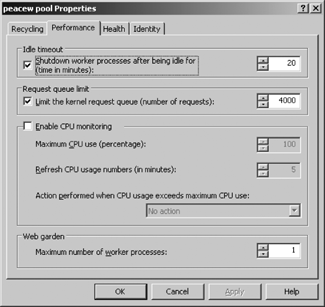
(that is, assign multiple worker processes), use the “Web garden maximum number of worker processes” text box and enter the number of worker processes to assign to the application pool. When you have finished configuring the performance, click OK.
IIS can be used as a simple static web server or a rich application server. The number of services and components that must be installed and configured will depend on the applications that it will host and the requirements that they have. IIS was designed to provide the web server administrator with flexible configuration capabilities and the ability to monitor server health and respond automatically to many conditions.
This chapter concludes the discussions of specific Windows Server 2003 networking services and how to administer them. However, there are several security components and properties of Windows Server 2003 on which these components rely. If you understand these security administration basics about Windows, it will go a long way toward empowering you to do the best administratively, no matter which network service you must administer. Chapter 13, therefore, describes basic Windows security philosophies, such as “the administrator is all powerful” and how permissions and rights are used. It also provides critical information on administrative delegation, certificate services, and EFS.