
Up to this point, I have discussed the various standards in wireless networks, in particular the IEEE 802.11 specifications. All the theoretical discussions are not very exciting unless you get your hands dirty and try to set up a wireless network yourself. In the following sections, I show you how to connect to a wireless network using three different wireless cards and adapters.
Although I demonstrate each example using different hardware from Cisco, D-Link, and Linksys, wireless hardware vendors use the same or similar chipsets in their equipment. So, the installation and configuration procedures will be somewhat similar across different vendors and different product lines from the same vendor. You should still consult the documentation that comes with your hardware before installing anything.
Most wireless cards in the market today use the following chipsets:
Some newer 802.11g wireless products (such as those from Linksys) use the Broadcom chipset.
Table 2-4 shows a list of common wireless cards available in the market (all are PC cards unless stated otherwise).
Table 2-4. List of wireless cards and the chipsets used
|
Card |
Chipset |
|---|---|
|
3Com AirConnect 3CRWE737A |
Spectrum24 |
|
3Com AirConnect 3CRWE777A (PCI) |
PRISM-II |
|
Actiontec HWC01170 |
PRISM-2.5 |
|
Actiontec HWC01150 |
Atmel |
|
Addtron AWP-100 |
PRISM-II |
|
Agere Orinoco (Lucent) |
Hermes |
|
Apple Airport |
Hermes |
|
Buffalo AirStation |
PRISM-II |
|
Buffalo AirStation (CF) |
PRISM-II |
|
Cabletron RoamAbout |
Hermes |
|
Compaq Agency NC5004 |
PRISM-II |
|
Contec FLEXLAN/FX-DS110-PCC |
PRISM-II |
|
Corega PCC-11 |
PRISM-II |
|
Corega PCCA-11 |
PRISM-II |
|
Corega PCCB-11 |
PRISM-II |
|
Corega CGWLPCIA11 (PCI) |
PRISM-II |
|
D-Link DWL-520 (PCI) |
PRISM-2.5 |
|
D-Link DWL-650 |
PRISM-2.5 |
|
D-Link DWL-650+ |
TI Chipset |
|
D-Link DWL-660 |
TI Chipset |
|
ELSA XI300 |
PRISM-II |
|
ELSA XI325 |
PRISM-2.5 |
|
ELSA XI325H |
PRISM-2.5 |
|
ELSA XI800 (CF) |
PRISM-II |
|
EMTAC A2424i |
PRISM-II |
|
Ericsson Wireless LAN CARD C11 |
Spectrum24 |
|
Gemtek WL-311 |
PRISM-2.5 |
|
Hawking Technology WE110P |
PRISM-2.5 |
|
I-O DATA WN-B11/PCM |
PRISM-II |
|
Intel PRO/Wireless 2011 |
Spectrum24 |
|
Intersil PRISM-II |
PRISM-II |
|
Intersil Mini (PCI) |
PRISM-2.5 |
|
Linksys Instant Wireless WPC11 |
PRISM-II |
|
Linksys Instant Wireless WPC11 2.5 |
PRISM-2.5 |
|
Linksys Instant Wireless WPC11 3.0 |
PRISM-2.5 |
|
Lucent WaveLAN |
Hermes |
|
Nanospeed ROOT-RZ2000 |
PRISM-II |
|
NDC/Sohoware NCP130 (PCI) |
PRISM-II |
|
NEC CMZ-RT-WP |
PRISM-II |
|
Netgear MA401 |
PRISM-II |
|
Netgear MA401RA |
PRISM-2.5 |
|
Nokia C020 Wireless LAN |
PRISM-I |
|
Nokia C110/C111 Wireless LAN |
PRISM-II |
|
NTT-ME 11Mbps Wireless LAN |
PRISM-II |
|
Proxim Harmony |
PRISM-II |
|
Proxim RangeLAN-DS |
PRISM-II |
|
Samsung MagicLAN SWL-2000N |
PRISM-II |
|
Symbol Spectrum24 |
Spectrum24 |
|
SMC 2632 EZ Connect |
PRISM-II |
|
TDK LAK-CD011WL |
PRISM-II |
|
US Robotics 2410 |
PRISM-II |
|
US Robotics 2445 |
PRISM-II |
I’ll start by showing you how to connect to a wireless network. I will illustrate using two wireless cards — the Cisco Aironet 350 and the D-Link DWL-650+, and one USB wireless adapter. I’ll take a look at the Cisco Aironet 350 first.
The Cisco Aironet 350 wireless card (see Figure 2-5) is an 802.11b card. This is my preferred card as it is truly plug-and-play — plug this into your PCMCIA slot and Windows XP will connect to the network in seconds! Windows XP includes a driver for this card so there is no need for you to manually install the drivers.

For this section, you need the following:
A Windows XP notebook computer with a vacant PCMCIA slot
An existing wireless network (see Chapter 5 for information on setting up a wireless network)
The Cisco Aironet 350 wireless card
Take the following steps:
Insert the Cisco Aironet 350 into your computer’s PCMCIA slot.
Windows XP will automatically detect the card and install the necessary drivers for it.
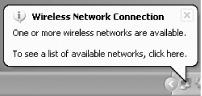
Windows XP will then automatically discover any available wireless networks. The Wireless Network Connection icon can be found in the system tray. This is shown in Figure 2-6.
Click on the Wireless Network Connection icon in the tray to view all the available wireless networks. Figure 2-7 shows the two available networks with the SSIDs: MyOffice and default.
MyOffice has WEP enabled. When you select it, you have to enter a network key. default does not have WEP enabled, so when you select it, you have to turn on the “Allow me to connect to the selected wireless network, even though it is not secure” option (see Figure 2-8).
You can click on the Advanced button to add your own preferred wireless network (see Figure 2-9). This is useful when you use your computer in different places such as home and the office. In the Wireless Networks tab (see Figure 2-9), there are two sections: Available networks and Preferred networks. Available networks list the SSIDs of the all wireless networks in range. Preferred networks show all the SSIDs of wireless networks in range plus the networks that you used in the past. If your wireless network does not broadcast its SSID, you need to add it manually using the Add button.


Tip
To connect to a different wireless network, you can right-click on the Wireless Network Connection icon in the tray and select View Available Wireless Networks (see Figure 2-10).

The Cisco Aironet 350 comes with the Aironet Client Utility (ACU), as shown in Figure 2-11. Strictly speaking, you do not need this for the 350 to work, since Windows XP supports the card natively. You can also download the ACU from http://www.cisco.com/pcgi-bin/tablebuild.pl/aironet_utilities_windows.

The ACU comes with an interesting Link Status function that displays the signal strength graphically (see Figure 2-12). This is useful when you need to know where to position yourself so that you get the maximum signal strength for best throughput (see Section 3.2.1).

The D-Link AirPlus DWL-650+ (see Figure 2-13) is an 802.11b wireless card. When used with another AirPlus product (such as the D-Link AirPlus DI-714P+ wireless router), the maximum raw transfer rate of 22 Mbps can be achieved. For this section, you need the following:

A Windows XP notebook computer with a vacant PCMCIA slot
An existing wireless network
The D-Link AirPlus DWL-650+ wireless card
You should download and install the latest driver and utility from D-Link’s web site at http://www.dlink.com/.
To install the DWL-650+, take the following steps:
Insert the DWL-650+ into the PCMCIA slot on your computer.
Windows XP will detect the presence of the card and search for a suitable driver.
If prompted for a driver, direct Windows XP to the drivers that you downloaded.
After the installation, the AirPlus utility icon should appear in the Tray, as shown in Figure 2-14 (the icon in the middle).
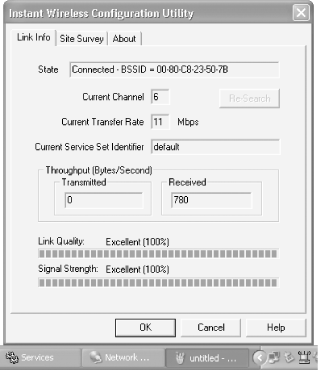
Double-click on the icon and the D-Link AirPlus utility window (see Figure 2-15) will appear.

The AirPlus utility contains five main pages:
- Link Info
Displays information about the current connection. Displays the link quality, signal strength, and data rate graphically.
- Configuration
- Encryption
Specifies whether encryption is used for the wireless network. Also allows you to enter the key(s) used.
- SiteSurvey
Displays the available wireless network as well as allows you to manually add networks (see Figure 2-16).
- About
Displays copyright information and the firmware and utility version numbers.

Tip
Third-party tools like NetStumbler can also assist in doing a wireless site survey. Chapter 3 and Chapter 9 discuss NetStumbler in more detail.
Figure 2-16 shows the result of a site survey. Two wireless networks are detected. When a wireless network with WEP enabled is selected, you are prompted to enter a key, as shown in Figure 2-17.

The USB wireless adapter that I use in this section is the Linksys WUSB11 wireless adapter (see Figure 2-2, earlier in this chapter). The benefit of using a USB wireless adapter is that you can use it on your desktop PC as well as on a notebook. It is a useful alternative when you need to share an adapter among multiple computers.
To use the WUSB11, simply connect it to your USB port on your computer and Windows XP will prompt you for the drivers. You should use the drivers provided by Linksys or download them from Linksys’s web site at http://www.linksys.com/.
Linksys provides the WUSB11 with a configuration utility. (See Figure 2-18: the utility is represented by a little green icon on the lower right corner. When the network is not present, the icon turns red.)
Using this configuration utility, you can perform a site survey and view the current link quality and signal strength.