
General Packet Radio Service (GPRS) is a data service that supplements other data services such as Circuit Switched Data (CSD, used for data and fax calls on GSM networks) and Short Message Service (SMS). The design of GPRS was informed by the fact that wireless data communications are bursty in nature. That is, the data is not sent in one long stream, but rather in short bursts. Traditional use of CSD such as the Wireless Application Protocol (WAP) for data transfer requires establishing connections between two communicating parties, which occupies bandwidth even when not transmitting data. With GPRS, data is sent as packets as and when required. This feature allows devices to stay connected all the time, and eliminates the need to establish a connection and stay connected within the entire duration. This allows service providers to bill customers based on the data transferred and not the connection time.
In this section, I take a closer look at how GPRS works, as well as some of the devices that you can use on the road.
GPRS is a packet-switched service built on the existing Global System for Mobile (GSM) communication voice network. GSM was primarily designed for voice services.
A GSM channel contains eight timeslots (a portion of time allocated to transmit data), with each timeslot dedicated to each circuit-switched call. Traditionally, when using Circuit Switched Data (CSD) — which is explained in more detail in What Is CSD/HSCSD? later in this chapter — you can only use a maximum of one timeslot. With GPRS, timeslots can be assigned dynamically, and you can use more than one single timeslot. This results in increased throughput, which was was previously not possible with CSD. Also, because timeslots are only allocated when required, more users can be supported at any one time.
GSM networks have more worldwide coverage than any other cellular technologies, such as CDMA and PDC (Personal Digital Cellular) used in Japan. In Asia and Europe, the frequencies used for GSM are 900 and 1800 MHz. In North America, it is 1900 MHz. Phones that support these three frequencies are known as tri-band phones. Examples of tri-band phones are the Sony Ericsson T68i and the Nokia 6610.
GPRS uses multiple timeslots for sending data. In theory, GPRS can use up to eight timeslots, but physical constraints (such as the number of users currently on the network as well as the coverage quality) have placed the number to a maximum of five, with one or two timeslots reserved for upstream communications (leaving three or four for downloads).
There are altogether four encoding schemes used in a GPRS network. Table 8-2 shows these and their data rate per timeslot as well as their maximum data speed for eight timeslots. The encoding scheme to be used is determined by the service provider and depends on factors such as the quality of the channel (the radio link between the GPRS device and the base station). CS-1 has the highest reliability (but the lowest data rate) and CS-4 has the least reliability (but the highest data rate).
Table 8-2. Coding schemes used in GPRS
|
Channel coding scheme |
Data rate per timeslot |
Maximum data speed with eight timeslots |
|---|---|---|
|
CS-1 |
9.05 Kbps |
72.4 Kbps |
|
CS-2 |
13.4 Kbps |
107.2 Kbps |
|
CS-3 |
15.6 Kbps |
124.8 Kbps |
|
CS-4 |
21.4 Kbps |
171.2 Kbps |
Each GPRS device also belongs to a particular class. A class determines the number of timeslots used for downloading and uploading. The manufacturer of the GPRS device determines the class of a device.
Table 8-3 shows the 29 classes for GPRS devices. Each class has a designated number of timeslots used for downloading and uploading. The maximum slots column lists the maximum number of timeslots that a device can use simultaneously for downloads and uploads.
Table 8-3. GPRS device classes
|
Class |
Download |
Upload |
Maximum slots |
|---|---|---|---|
|
1 |
1 |
1 |
2 |
|
2 |
2 |
1 |
3 |
|
3 |
2 |
2 |
3 |
|
4 |
3 |
1 |
4 |
|
5 |
2 |
2 |
4 |
|
6 |
3 |
2 |
4 |
|
7 |
3 |
3 |
5 |
|
8 |
4 |
1 |
5 |
|
9 |
3 |
2 |
5 |
|
10 |
4 |
2 |
5 |
|
11 |
4 |
3 |
5 |
|
12 |
4 |
4 |
5 |
|
13 |
3 |
3 |
unlimited |
|
14 |
4 |
4 |
unlimited |
|
15 |
5 |
5 |
unlimited |
|
16 |
6 |
6 |
unlimited |
|
17 |
7 |
7 |
unlimited |
|
18 |
8 |
8 |
unlimited |
|
19 |
6 |
2 |
unlimited |
|
20 |
6 |
3 |
unlimited |
|
21 |
6 |
4 |
unlimited |
|
22 |
6 |
4 |
unlimited |
|
23 |
6 |
6 |
unlimited |
|
24 |
8 |
2 |
unlimited |
|
25 |
8 |
3 |
unlimited |
|
26 |
8 |
4 |
unlimited |
|
27 |
8 |
4 |
unlimited |
|
28 |
8 |
6 |
unlimited |
|
29 |
8 |
8 |
unlimited |
To put these numbers into perspective, let’s take an example and illustrate how all these numbers determine the throughput of a GPRS device.
The Nokia D211 GPRS PC card is a Class 6 device (I talk more about this card in the next section). This means that it has 3 timeslots allocated for downloads (sometimes referred as 3+2, for 3 timeslots for downloads and 2 timeslots for uploads). If I use the Nokia D211 in Singapore and myISP supports the CS-2 coding scheme, then the maximum downstream speedof the D211 is (13.4 Kbps x 3), giving a maximum download speed of 40.2 Kbps.
Tip
In practice, the theoretical data rate of 40.2 Kbps is not achievable due to real-world conditions such as signal interference and protocol overhead.
GPRS devices fall into three categories:
- Class A
Class A devices can connect to GSM and GPRS services simultaneously, and both can work at the same time. This is the ideal communication device.
- Class B
Class B devices can connect to either GSM or GPRS services (or both at the same time). But only one can work at a time. An example of Class B device is a GPRS-enabled mobile phone such as the Ericsson T68i. You may be using the GPRS service and suddenly a voice call comes in. You can use either the voice service or the GPRS service, but not the two simultaneously. Most mobile phones today are Class B devices.
- Class C
Class C devices can connect to GSM or GPRS services (but not both at the same time). The user must manually switch between the two services. An example of Class C device is the Nokia D211 GPRS card. You need to manually switch between GSM and GPRS services.
GPRS devices are commonly called " GPRS terminals.” These come in different shapes and sizes, but can be grouped into the following categories:
GPRS phones
GPRS modems
GPRS modules
A constantly updated list of GPRS terminals can be found at http://www.gsmworld.com/technology/gprs/terminals.shtml.
Many new mobile phones support GPRS for data access. Two such phones are the Sony Ericsson T68i and the Nokia 6610 (see Figure 8-1).

Figure 8-1. The Sony Ericsson T68i and the Nokia 6610 (shown with the kind permission of Sony Ericsson; copyright Sony Ericsson 2003)
Using a GPRS-enabled phone, you can access WAP applications on your mobile phone. You can also connect your Windows XP computer to your mobile phone (through Bluetooth or infrared) and use it as a GPRS modem. You can then access the Internet.
For dedicated data access, you can use a GPRS modem. This is usually a PC card that allows you to make data calls. To use a GPRS modem, you need to insert your Subscriber Identity Module (SIM) card into your phone or PCMCIA card; it also requires a subscription to the data service provided by your ISP. The Sierra Wireless Aircard® 750 (see Figure 8-3) is a GPRS modem card that supports GPRS data access in addition to GSM voice calls and SMS messages.


GPRS modules are commonly used by vertical application developers such as value-added service providers and equipment manufacturers.
The Sony Ericsson GM47/GM48 (see Figure 8-4) is a radio device that can be incorporated into other devices such as a vending machine, an alarm monitoring system, etc. It allows systems developers to build GPRS (and GSM) functionality into their systems.
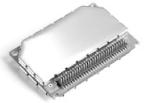
Figure 8-4. The Sony Ericsson GM47/GM48 GSM module (shown with the kind permission of Sony Ericsson; copyright Sony Ericsson 2003)
The Sony Ericsson GM29 (see Figure 8-5) uses the GM47/GM48 hardware module. The GM29 is marketed as a GSM/GPRS modem. It is a Class B (4+1) device with an RS232 connection.

The Nokia D211 (see Figure 8-6) and D311 are multimode radio cards (PCMCIA cards) that support GPRS, CSD (Circuit Switched Data), HSCSD (High Speed Circuit Switched Data; D211 only), and 802.11b networks. It is slightly longer than a conventional wireless card and combines the best of both worlds: allowing you to access a wireless network as well as connect to the Internet through GPRS when a wireless network is not available. The beauty of the D211 is that all these functionalities are integrated in one card, which makes it ideal for road warriors. The only downside is that you cannot make voice calls using the D211; otherwise, the card would be perfect.

Tip
Both T-Mobile and AT&T Wireless offer the Sierra Wireless AirCard 750; although it does not support Wi-Fi, it is voice capable.
Installing the Nokia D211 is a straightforward procedure:
Install the provided software using the installation CD.
Insert the card into a PCMCIA slot on your notebook.
Windows XP will search for the appropriate drivers using wizards. Select the option “Install the software automatically,” and then select “Continue Anyway” to continue with the installation.
When the software is installed, you should be able to see the icon of the Nokia software located in the Tray (see Figure 8-7).
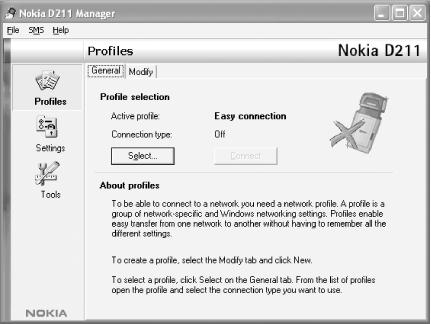
Double-click on the icon in the Tray to invoke the Nokia D211 Manager (see Figure 8-8).
The Nokia D211 Manager contains three main functions: Profiles, Settings, and Tools. The Profiles function allows you to configure the various settings for Wi-Fi, GSM and GPRS access. The Settings function allows you to fine-tune the various settings for GSM, WLAN, and Security. The Tools function contains a diagnostics utility as well as log information, etc.
The Nokia D211 and D311 support 802.11b wireless network access. Let’s configure the card for wireless access now. Here are the steps:
Ensure that you have selected the Profiles function from the Nokia D211 Manager.
Click on the Modify tab.
Click on New....
Give your profile a name, e.g., Home Network (see Figure 8-9). Also check the connection type(s) to be used for this profile. In other words, you can use this profile to connect to a WLAN connection, GSM connection, or GPRS connection (for our example here, let’s just turn on the WLAN connection checkbox). Click Next.

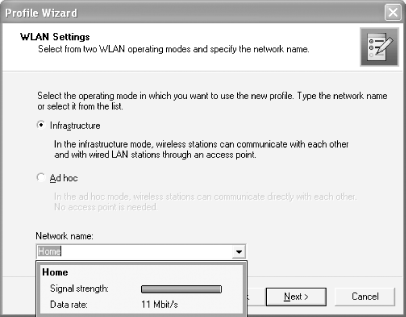
You will be prompted to select the wireless mode (Infrastructure or ad-hoc). The SSID(s) of the available wireless networks will also be displayed (see Figure 8-10). Select the SSID of the wireless network to which you want to connect. Click Next.
On the next screen, you have the option to specify your IP address manually. We will use the IP address allocated by the wireless network. Click Next.
The main screen of the Nokia D211 Manager will be displayed again (see Figure 8-8). Click Select... to choose the profile to use. Select the WLAN connection type under the Home Network item (see Figure 8-11).
You should now be able to connect to the wireless network. Information about the connection, such as the connection quality and data flow, is displayed (see Figure 8-12).


Let’s now configure the Nokia D211 for GPRS access. For this, you need to insert your SIM card into the D211 before you can connect to the GPRS network. If you purchased the D211 or D311 along with a wireless plan from a cellular provider, the SIM card may have been installed for you. Otherwise, you will have to use a SIM card from another phone.
In the D211 Manager, click on Profiles, then click the Modify tab.
Select the profile to which you want to add GPRS access.
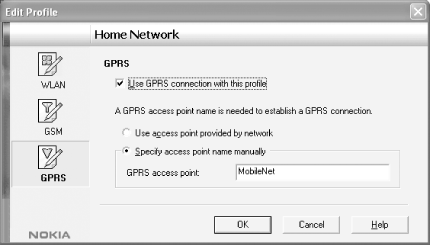
Click on GPRS (see Figure 8-13). Turn on the “Use GPRS connection with this profile” and “Specify access point name manually” options. Enter the GPRS access point name provided by your ISP.
Click OK and return to the main screen by clicking on the General tab.
Click Select... and choose the GPRS item (see Figure 8-14).
Click the Activate button (see Figure 8-15).
A Dial-up Connection window appears (see Figure 8-16). Enter your username and password (provided by your ISP).
When authenticated, you should now see the operational information (see Figure 8-17).


One interesting feature of the Nokia D211 is the ability to send and receive SMS (Short Message Service) messages. In the Nokia D211 Manager window (see Figure 8-18), click SMS → Inbox (or any other items within the SMS menu to launch the Nokia Short Messaging window).
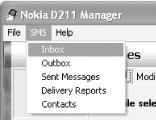
This window contains five main tabs: Inbox, Outbox, Sent messages, Delivery reports and Contacts (see Figure 8-19). To send a message, simply click the Send message icon and type your text.
