
Chapter 5
Onsite Radio Profiling
Once we have gathered as much information as possible offsite, it is time to go onsite and perform additional reconnaissance. Remember, of course, that the techniques described here are for profiling a target for which you have explicit authorization. Hearing the chirp of a police radio while performing a penetration assessment is rarely, if ever, positive.
The goal of onsite profiling is to discover the frequencies used by the target organization, and to validate the frequency information obtained during offsite profiling. We are looking for the frequencies used by the guard radios, facilities radios used by janitors and maintenance staff, wireless headsets if in scope, and any other radio traffic that may emanate from the target organization. This profiling does not require a special trip; it should be included in the normal onsite profiling that is part of any physical penetration test.
Initial Onsite Reconnaissance
With any reconnaissance, it is essential to have an idea of what to look for. There are several things that you should keep an eye out for on any onsite reconnaissance mission. Be sure to determine the number of guards if possible. This may require some inference, as for every guard that is visible from the perimeter, there are likely several more in other locations. Once the frequencies used by the guard radios are discovered monitoring the guards’ radio traffic is another way to verify the number of guards onsite. Most online map services offer aerial views which are a great starting point when you need a sketch of the target site. A sketch of the target facility will be helpful to mark locations of guards, antennas, cameras, and any other useful information. Pay attention to any antenna seen on the property or attached to the building. Note the type of antenna and size to try to determine the frequency range it operates on. Also look for cameras, and see if they appear to be wireless, most wireless cameras have an antenna on them or are attached to a transmitter box with an antenna coming out of it.
Tip
Different online mapping sites often have different sources for their aerial photography. Thus, when generating a map of a site, it is often beneficial to check the aerial photography from multiple online mapping services such as Google Maps and Bing Maps. For example, Bing Maps aerial view and bird eye views often contain images from different sources, which can allow you to view the site at different times of year, or from different angles.
Time is of the Essence
Start a Frequency Counter the Minute You Arrive Onsite
Time is usually of the essence during the onsite profiling phase, as the longer you are onsite, the more likely you are to be discovered. The more tasks that you can run concurrently the more efficient your reconnaissance will be. We recommend setting up the Scout frequency counter (Figure 5.1) (described in detail in this chapter) upon or prior to arrival, and letting it run while you are performing visual reconnaissance. The longer the Scout is able to run, the more information it will gather.
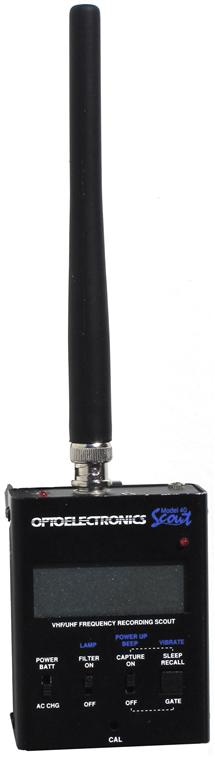
Figure 5.1 Optoelectronic Scout, Reprinted with Permission from Meagan Call
The Guard Force
If there are security guards, it is essential to learn as much about them as possible while profiling. This can easily mean the difference between a successful and an unsuccessful penetration test. Security Guard uniforms hold a great deal of information. Contracted guards will often wear the uniform of the contracting company, and knowing the name of the guard company allows you to use the techniques in the offsite profiling chapter to search for the frequencies they use. It is also common that there will be a mix of contracted guards and guards employed by the target organization. This is common in both the government and private sectors, and it is likely that in this situation the contracted and employee guards will be dressed differently. The contracted guards will generally wear standard guard uniforms, and the employee guards will often wear ties and blazers or suits. The employee guards are usually in locations where they interact with other employees, such as at the reception desk or assigned to executive protection while the contract guards will generally be found patrolling the perimeter or guarding remote locations. If contract guards are present, it can take a week or more of observation to determine their shift rotation. Also note if the guards are the same each day. While it is uncommon, as a company is usually assigned a specific set of contract guards, if there is high turnover with the contractors it will likely make it easier to impersonate a guard and gain access. Discovering guard names, whether from nametags, badges, or desk placards can also prove valuable. Remember, the more you know about the target environment, the better the chance of a successful penetration assessment.
Using a Frequency Counter
A portable frequency counter (Figure 5.2) is one of the most valuable pieces of equipment for onsite profiling. They work by counting the number of beats, or oscillations in the airwaves of a set period of time, giving the frequency of those oscillations and thus the transmission frequency. An important caveat is that if there are multiple transmission frequencies in the vicinity, the frequency counter will give false data as it will likely combine the oscillations and give an inaccurate frequency count. Frequency counters work best at counting a single signal in a low noise environment, as they need a signal that is high enough over the noise floor that the counter can separate that signal from the background noise and only count that waveform. The frequency counter will display the closest “near field” signal, which must be approximately 10–15 times as strong as other signals in the area, and the closer the frequency counter is physically to the signal, the better the chance that the frequency counter will be effective. It is becoming more and more difficult to find a place where there is single signal in a low noise area, as today’s world is an extremely RF-rich environment. With the proliferation of wireless phones and the wireless network towers, it can be a challenge for the frequency counter to lock onto a signal. This is especially difficult when in a signal rich urban area or when there are multiple transmitters in a single tower. Additionally, commercial radio, pager, television, and emergency dispatch towers can cause havoc for the frequency counter. This makes sense, as radio, television, and emergency dispatch towers must have the power to broadcast over a geographically large area, while the two-way radio transmitters used by many organizations must only blanket a comparatively small area. The law of inverse squares means that the closer you are to a signal, the stronger the signal will be. It should, of course, be obvious that a handheld frequency counter will generally allow you to get fairly close to the signal source. This is especially true when you have access to the interior of the facility that is being targeted.
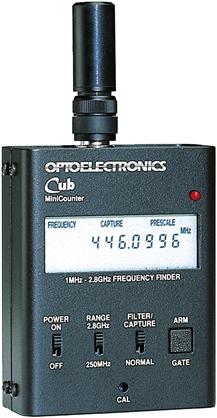
Figure 5.2 Optoelectronics Cub Portable Frequency Counter, Reprinted with Permission from Optoelectronics, Inc.
Tip
WiNRADiO, Optoelectronics, and others make filters to remove common strong frequency ranges such as the commercial FM broadcast band and page broadcast bands. These can be put inline between the antenna and a frequency counter to filter out these strong signals. The WiNRADiO WR-UBF-1800 filters can be configured to block broadcast AM as well as broadcast FM signals. The Optoelectronics N100 FM Notch Filter (Figure 5.3) blocks the FM broadcast band and is designed to fit inline between the antenna and the frequency counter and requires not additional cables. This makes the N100 ideal for mobile and handheld operations. Unfortunately for the penetration tester, TV stations cover such a wide range of frequencies they do not offer a filter to remove those strong signals. However, a tunable notch filter (a filter used to eliminate limited ranges of frequencies based around a central frequency) can also be used to prevent a single strong frequency from interfering with a frequency counter.

Figure 5.3 Optoelectronics N100 FM Notch Filter, Reprinted with Permission from Optoelectronics, Inc.
Tip
Sweeping for bugs? A common trick used when sweeping for bugs is to take a footprint of the frequencies that are present in an a room or area about 100 ft from the area to be swept for bugs, and then take a footprint of the frequencies in the area to be swept for bugs. Anything that is actually transmitting in the area you are sweeping, even if transmitting at very low power, will appear much stronger due to the law of inverse squares.
For penetration testers we recommend an Optoelectronic Scout frequency counter (Figure 5.4). The Scout has many advantages over a normal frequency counter, and the extra features are very useful for a penetration tester. The Scout can hold multiple frequencies as well as multiple hits per frequency, and the frequencies can be downloaded to a computer for easy analysis. This can be a huge time-saver, as reading frequencies from a frequency counter screen and entering them into a computer can be a real headache. The Scout also offers reaction tuning, which means that it can automatically tune a compatible scanner to a frequency seen by the Scout. While this has limited usefulness, we have found that in some situations it can be helpful and save time. For example, if once onsite there is not enough time for proper profiling, and reaction tuning may allow you to quickly monitor signals in the area. While this is no substitute for proper profiling, it is a good hack if needed. Additionally, if the budget allows it, an extra scanner doing reaction tuning during an assessment can be a great way to catch frequencies missing during the onsite and offsite profiling.

Figure 5.4 Optoelectronics Analog Scout, Reprinted with Permission from Optoelectronics, Inc.
What is most useful as far as the Scout, however, is its small size and portability. The Scout can be kept in a backpack or worn on a belt under a coat, which is helpful in situations where discretion is necessary. Being seen removing and replacing a frequency counter from a backpack or coat pocket is suspicious and can draw unwanted attention during a penetration assessment.
The Optoelectronic Scout comes in both analog (Figure 5.4) and digital (Figure 5.5) versions. The digital version, as you may suspect, is designed to find the frequencies of a radio operating in a digital mode, which we have found to be of limited use during penetration assessments. Additionally, the digital mode tends to be finicky outside of a lab environment. The analog version, however, is a great piece of equipment and we highly recommend it.

Figure 5.5 Optoelectronics Digital Scout, Reprinted with Permission from Optoelectronics, Inc.
If you choose to get a frequency counter other than the Scout, be sure to get one with a hold function which will continue to display the frequency after the counter is out of range of the frequency. The hold function will save in its memory the first frequency the counter locks onto, which saves you from having to write down the frequency with pen and paper. Of course, there is a caveat that even with a hold feature, the benefit is limited as there is generally a good chance that there will be a lot of trial and error as the frequency counter will lock onto the first strong signal it detects in the area which may not be the signal you are ultimately looking for. This is another reason to use a Scout, as it will also capture unwanted signals, however it will hopefully also capture the signal that you are looking for. All models of the Scout also include reaction tuning. This means that if you connect the Scout to a compatible scanner (a list of compatible scanners is available on the optoelectronics web site), the scanner will tune to the frequencies that the Scout counted.
Tip
People tend to want to help, it is human nature. Combine this with the fact that most people love to talk about their jobs, and it can be simple to capture a frequency. There have been times when we simply started a conversation with a guard about their radio, expressed an interest in radio technology, and asked the guard to see their radio. From there, it is simply a matter of using a single memory frequency counter to grab the target signal.
If you are new to radio reconnaissance, and don’t want to make the investment in a new Scout, a used one may be a viable option. There are, however, issues with buying any used piece of equipment in general, and issues specific to buying a used Scout. It is almost certain that in a well-used Scout that the battery will be beyond its prime and likely close to the end of its useful life. If you are comfortable working with electronic devices, and soldering in particular, replacing the battery can be a fairly simple job. Hackers tend to be tinkerers at heart, so when replacing the battery, it may make sense to install a replacement battery that will hold its charge longer than the OEM battery. If doing this upgrade, make sure that the replacement battery is compatible with the Scout’s charging circuit.
Note
It should go without saying that since it requires soldering, replacing the battery on your own will void whatever warranty you may have received with your equipment. Additionally, you make any changes to your electronic equipment at your own risk; the authors cannot accept responsibility should any repair or replacement damage your device.
Another common issue with a used Scout is a blown front end, the initial receive circuitry just after the antenna, an essential part of the receive portion of any radio. This happens when the Scout has been exposed to an unusually strong signal. Optoelectronics offers repairs, however at the time of this writing the minimum repair fee is $100, which is about one third of the cost of a brand new Scout.
Certain models of scanners have frequency finding features. Band scope is one such feature, however it has limited usefulness in reconnaissance unless it has a fast scan rate. Additional information is available in Chapter 7. Frequency grabbing features on scanners can be useful, and on higher end equipment there is often an option to automatically store detected frequencies. Keep in mind that the frequency grabbing features on these scanners function similarly to other frequency counters, and have short-range capabilities and lock onto strong signals. Multiple manufactures use different trade names for this capability, and a few of them are described in the sidebar.
Note
Scanner manufacturers use several names to describe their frequency counting capabilities:
When using a signal counter, or the signal counting capabilities of a scanner, there are several tips that will make success more likely. Although it may seem counter intuitive, the signal strength does not always get stronger as you move toward the transmitting antennas. In fact, the base of the antenna tower is one of the worst places to measure a signal, as radio waves form a donut shape when leaving omni-directional antenna, with the antenna in the middle of the donut hole (Figure 5.6). This center of the donut hole is essentially leaving a “cone of silence” around the tower.
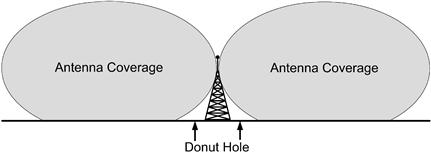
Figure 5.6 Donut Hole Created Close to Transmitter Towers
Visual Recon
As with other types of reconnaissance, a sharp eye is an essential tool in radio profiling. Being able to examine a radio used by the organization, whether from a distance or up close, can provide a wealth of information. Often, organizations will place stickers on the radios listing the channel assignments, for example channel one is security while channel 2 is maintenance. It is also common that these channel listings will be posted in guard stations or behind the reception desk, so be sure to look around.
Tip
There are many reasons to have a camera with a zoom lens with you during a penetration test, and taking pictures of equipment or frequency lists is one of them. If your frequency counter does not have a memory function you could also use the camera to take pictures of the frequencies displayed on your frequency counter for later review.
Identifying the model of radios in use by the target organization is invaluable. Many radios have the manufacturer name prominently displayed on the outer housing, and some will even have the model or series number. This is another place where having a camera can be helpful. A quick snapshot will allow you to take all the time you need to research and determine the radio make and model once you are offsite.
Tip
In the United States, the top five commercial grade two-way radio manufacturers are Motorola, Midland, Kenwood, Icom, and Vertex.
Once you have determined the type of radio in use by the target organization, there are a wealth of resources to enable you to gather a large amount of information. Internet search engines and web sites (Figure 5.7) are an obvious choice, however there are also people who will likely be willing to help you. Developing a positive relationship with local radio equipment dealers and Ham radio operators will provide experienced input. We may be biased, however we have found that people in the radio community tend to be friendly and generous with their time and knowledge. As you gain experience with radios, you will be able to quickly determine at least the manufacturer of a device with a quick glance.
Note
It should go without saying that we do not encourage nor condone forming relationships with people in the radio community solely to gather information.
Once you have determined the model, or models, of radio in use by the target organization, it is time to get back to research. Knowing the model of the equipment will let you learn what frequency ranges are supported by the radios, and if it has any special features such as encryption, trunking, or is digital.

Figure 5.7 Batlabs (www.batlabs.com) a Great Resource for Researching Motorola Radios, Although it is Not Updated as Often as it Used to Be
Antennas
A lot can be learned from the type of antennas on radio equipment. When looking at the radios used by the target organization, be sure to note the antennas length and type. Antennas types are described in greater detail in the Antenna section of Chapter 2, however it is good to know that as a general rule the shorter the antennas, the higher the frequency (such as 460 MHz) and the longer the antennas the lower the frequency (such as 150 MHz) used by the radio (Figure 5.8). The main exceptions to this rule are compact antennas which are designed to be small in size, and still operate on lower frequency ranges. These antennas may be ½ or ¼ (or even smaller) wave antennas.

Figure 5.8 Two Antennas Used for Different Frequencies, Reprinted with Permission from Meagan Call
Like everything else in this book, and penetration testing in general, the more experience you have the easier the identification of antennas and their probable frequency ranges will be. Having a properly tuned antenna is far more important when transmitting, in fact, transmitting with an improperly tuned antenna can damage the transmitter. This is another place where being able to take a picture of the target radio is helpful, as it will allow for you to research the antenna at your convenience. Manufacturer web sites and catalogs will often provide a description of the antenna, and in the best case, will provide the frequencies on which the antenna is designed to operate.
While onsite, also look to see if all the radios in use are the same model, or if there is a mix of types. If there is a mix, then it is unlikely that the target organization is using any special or advanced features such as encryption. The nature of radio equipment makes it such that it is difficult, and often impossible, to get advanced features to work between equipment from multiple manufacturers. In fact, it can be complicated to get features such as digital transmission and encryption to work reliably between different model equipment by the same manufacturer. Additionally, if there is a mix of equipment manufacturers, it is unlikely that trunking is being used.
Search Common Frequency Ranges
Searching common frequency ranges is labor intensive and time consuming, however if signal counting and the methods described in the {cross ref offsite profiling chapter, with page number} prove unsuccessful, this may be the only option. The concept is fairly simple, listen on commonly used frequencies and look for traffic from the target. The good news is that if you are able to view the radios in use, you can generally narrow down the number of possible frequencies and save significant time. The following describes the common frequencies in use.
Family Radio Service (FRS)
FRS was originally designed to provide a low cost option for families to use walkie-talkies. The idea of families using walkie-talkies may seem quaint now with the proliferation of wireless phones, however it was of course conceived prior to the cellular age. FRS is now commonly used by businesses to provide a cheap radio communication solution. Power is limited to a half watt (.5 W).
Family Radio Service Frequencies (Note: These are United States Frequencies)
| Channel | Frequency (All frequencies are in MHz) |
| 1 | 462.5625a |
| 2 | 462.5875a |
| 3 | 462.6125a |
| 4 | 462.6375a |
| 5 | 462.6625a |
| 6 | 462.6875a |
| 7 | 462.7125a |
| 8 | 467.5625 |
| 9 | 467.5875 |
| 10 | 467.6125 |
| 11 | 467.6375 |
| 12 | 467.6625 |
| 13 | 467.6875 |
| 14 | 467.7125 |
aShared with GMRS.
General Mobile Radio Service (GMRS)
GMRS is less common than FRS as it requires a license to use the service. The license is not challenging to obtain, as there is no required exam and at the time of this writing the cost is $85 and a single license can be used by an entire family. A main advantage is that GMRS allows the use of repeaters and more transmission power than FRS.
The names of the channels in GMRS often vary by manufacturer, however the frequency is what is important for our purposes so they can be programmed into a scanner to determine whether the target is broadcasting on them. As with other frequencies, if possible, program these frequencies into the scanner prior to going onsite. The 8 GMRS frequencies in the GMRS Frequencies table are in addition to the seven in the FRS table listed as being shared with GMRS.
GMRS Frequencies
| Common Channel | Frequency (MHz) | Note |
| 15 | 462.5500 | Simplex and repeater output |
| 16 | 462.5750 | Simplex and repeater output |
| 17 | 462.6000 | Simplex and repeater output |
| 18 | 462.6250 | Simplex and repeater output |
| 19 | 462.6500 | Simplex and repeater output |
| 20 | 462.6750 | Simplex and repeater output |
| 21 | 462.7000 | Simplex and repeater output |
| 22 | 462.7250 | Simplex and repeater output |
Generally, it is only necessary to monitor simplex or repeater input; if you are able to hear the input you will be able to hear the output. Conversely, if you are able to hear the input you may not be able to hear the output.
GMRS Repeater Inputs
467.550 MHz
467.575 MHz
467.600 MHz
467.625 MHz
467.650 MHz
467.675 MHz
467.700 MHz
467.725 MHz
Multi Use Radio Service (MURS)
MURS is an unlicensed radio service commonly used by businesses.
MURS Frequencies
| Channel | Frequency (MHz) |
| 1 | 151.820 |
| 2 | 151.880 |
| 3 | 151.940 |
| 4 (AKA Blue Dot) | 154.570 |
| 5 (AKA Green Dot) | 154.600 |
Dot Frequencies
Dot frequencies are common business band frequencies.
Note
Where did the term dot frequency originate? While no one can give a definitive answer, the often-repeated rumor in the radio community is that manufacturers placed round colored stickers on radio equipment to make it easier to purchase multiple devices that operate on the same frequency.
Dot Frequencies
| Color Dot | Frequency (MHz) |
| Red dot | 151.625 |
| Purple dot | 151.955 |
| Blue dot | 154.570 |
| Green dot | 154.600 |
| White dot | 462.575a |
| Black dot | 462.625a |
| Orange dot | 462.675a |
| Brown dot | 464.500 |
| Yellow dot | 464.550 |
| J dot | 467.7625 |
| K dot | 467.8125 |
| Silver star | 467.850 |
| Gold star | 467.875 |
| Red star | 467.900 |
| Blue star | 467.925 |
aAlso used in GMRS.
Common Ranges
Not every target will broadcast on a common frequency, however they will generally broadcast in a common range. Some scanner models will have search bands preprogrammed for businesses, police, fire, and other channels, which may be useful. If you are using a scanner which supports custom band scans, enter the common ranges prior to going onsite so you can quickly scan the common ranges. With any penetration test, the more work you can do offsite, the quicker the onsite portion, and the lower the likelihood of being detected. Manually searching ranges can be a very time-intensive process. You can often narrow down the ranges to be searched by using information gathered earlier in the onsite profiling such as the types of radios used and antennas on the radios. For example, if the radios used by the guard force only support frequencies between 450 MHz and 470 MHz that would be the range you would want to search first.
Common Cordless Phone and Headset Ranges
Cordless phone and headsets commonly operate on the ranges shown in the cordless phone and headset ranges chart. It is especially important to ensure that profiling these communication devices is within scope and legal. It is rare to find equipment operating in the 43.7–50 MHz range, however the authors have seen it in use in a datacenter cordless phone during a previous penetration assessment.
Cordless Phone and Headset Ranges
43.7–50 MHz
902–928 MHz
2400–2483.5 MHz (usually digital)
Scanner Tips
Prior to going onsite, it is helpful to enter the FRS, GMRS, MURS, Dot frequencies, and cordless phone and headset ranges into banks on your scanner to make it easier to scan the channels. If the scanner supports banks of multiple sizes, each service can be given its own bank. When a frequency range is common, we will often put them in the higher banks, and use the lower banks for frequencies specific to the target.
Finding Trunked Systems
Trunked systems present a unique set of challenges, however they are generally only used by Government entities (Local, State, and Federal), Utilities, educational institutions, and other large organizations and corporations. In larger cities, we will also likely encounter companies that lease a talk group on a trunk system run by a third party in the area. In the best case scenario, we discovered the trunking information during the offsite reconnaissance, as manually finding and mapping trunked systems can be extremely time consuming and very challenging. This, however, does not mean that it is not possible. Some trunked systems will only require you find the control frequency to be able to monitor traffic, while other systems will require you to map out all frequencies in the system. If you are using a scanner that supports Control Channel Only trunking and are targeting a compatible trunked system, you will only need to program the control channel into the scanner to monitor the trunked system. Unfortunately for the penetration tester, only select Motorola trunked systems support this.
Tip
It is worthwhile to try Control Channel Only (CCO) first. If this works, you have saved yourself a great deal of time and effort. If it doesn’t work, you have only lost a minute.
Regardless of the type of trunked system you are targeting, it will be necessary to come up with a talk group mapping so you can separate the different channels. The talk group mapping will allow you to determine which talk groups are used by, for example, the maintenance department and which are used by security. While time consuming, talk group mapping is not complicated, and depending on the chatter on the frequencies, it can be interesting.
Case Study: Onsite Profiling
Internal penetration test at a large insurance company located in a downtown of a large city.
The following story is, well, mostly true. Because we are professional security people, we cannot disclose details of our clients’ systems nor their names. All the events in this case study happened, however we drew from events from multiple penetration assessments to create this scenario.
Initially, our scope included only the internal network, we were looking at attack vectors coming from someone who had already gained physical access to the building, or a rogue employee. During a walkthrough of the building, we noticed that employees on the phone were using wireless headsets (Figure 5.9). People often assume wireless headsets have a very short range and can’t be monitored outside the building. We talked to the Client to see if we could expand the penetration test to include monitoring the headsets. The Client agreed to include the headsets, so we worked on changing the rules of engagement to include them. For this, we needed to engage our lawyer, the Client’s legal staff, and Human Resources, to make sure this was done in a way that did not violate any laws or internal company policies.
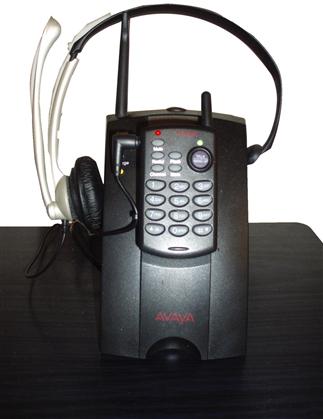
Figure 5.9 Wireless Headsets Observed Onsite
We started the penetration test by gathering information. Using Yaesu VX-5r (Figure 5.10) and Uniden Bearcat BCD396XT (Figure 5.11) scanners we search for signals in the frequency ranges commonly used by wireless headsets, reference the Common Cordless Phone and Headset Ranges section earlier in this chapter.
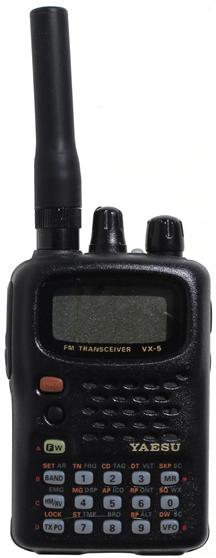
Figure 5.10 Yessu VX-5R Amateur Radio, Reprinted with Permission from Meagan Call

Figure 5.11 Bearcat BCD396XT Scanner, Reprinted with Permission from Meagan Call
Our scans detected a number of signals of interest in the 900 MHz range. After completing the initial survey to see what signals we could detect, we needed to verify which ones were inside the target building. This was an important step for legal liability, because we needed to ensure we did not monitor any headset, and therefore phone calls, from other business in the area.
To accomplish this, we switched to directional antennas, and, using them from several locations, determined which signals originated from inside the target building. Once we had identified which signals originated from within the Client site, we started monitoring these signals.
Note
Remember whenever you are going to be monitoring telephone calls it is critical to do it in a fashion that is legal and does not violate any wiretap laws. Wiretap laws are complicated and vary by state. For example, some states only require one party to consent to monitoring while other states require both parties (two party) consent. Be sure to engage your legal counsel to make sure this is done in a way that did not violate any laws.
This lead to our first critical discovery. It turned out that one of the groups that used wireless headsets was the helpdesk. The helpdesk group handles password resets. By monitoring their headsets, we could listen in on password reset conversations taking place. Once a password reset took place it was a race to login with the new password before the user did. If we won the race, we were in and had access to whatever that user account has permissions to.
Once we logged in, we did need to set a new password. Meanwhile, when the legitimate user tried to reset their password using the temporary password provided to them by the helpdesk, they would find that the temporary password given to them over the phone by the helpdesk didn’t work, and would need to call back to have it reset again. This could have clued someone in that something wasn’t right, but it’s human nature to assume a simpler, less sinister problem—such as the user heard the password incorrectly, or simply to blame the computer. It’s not uncommon for a password to need to be reset a couple of time even when things are working correctly. So this behavior didn’t raise any suspicions.
Once we logged in and got a valid Windows authentication token, it didn’t matter if the password was reset again. Windows authentication tokens are good for a number of hours. So we could use the login as a beach head to attack the rest of the network. Next we used local privilege escalation exploits to gain administrative access over the system. Once we had administrative access to the system we searched for the token of a domain administrator who had recently logged into the system and used them to gain control of the corporate domain.
If we could gain access to a list of user accounts, somehow, such as by sniffing network traffic, or finding a hard copy posted on a bulletin board or left on a desk, we could have targeted a specific user account by attempting a number of failed login until the account became locked, and needed to be reset by the helpdesk. Normally a locked account does not need to have the password reset, but if we continued sending bad authentication attempts so that the account keeps getting locked before the user can get in, eventually the user will request a password reset. So instead of waiting around and hoping to hear a reset request, we could trigger one.
By using a DTMF (Dual Tone Multi-Frequency) decoder to translate the audible tones the phone makes when pressing buttons into the corresponding number that it represents, we could decode users’ voicemail passwords when they logged in to check their voicemail over the headset.
Finally, the way these specific headsets in use at the Client worked, they broadcast at all times when powered on—not just while actively on a call. So the headset also acted as a room bug, transmitting surrounding conversations if the headset was left on, which people commonly did. The microphones could pick up conversations beyond just the wearer at times, and we could hear conversations taking place in a small office. We discovered this at another company, and used the “feature” to gain valuable information about an upcoming merger. At that company, the only people authorized to use the headsets were executives and their assistants. In essence, the company not only accidently bugged their most valuable target, they filtered out a great deal of much less interesting chatter for us.
Our Client was also interested in seeing how far away we could monitor the headsets. With the normal antenna, we could listen to the headsets from about 100 ft away, which at this site meant that we could eavesdrop from the parking lot and street around the building. Using antennas tuned for 900 MHz, (the Max Systems 8HH 900 MHz discone antenna, which sadly has been discontinued) we could easily monitor the headsets from two blocks (about 500 ft) away, showing how much performance can be increased by using a good antenna that matches the target frequency.
Tip
Although the Max System 8HH is no longer in production it can still be found on eBay. Additionally discone antennas is a fairly easy one to make at home. Searching online for “how to make a discone antenna” will turn up a number of tutorials explaining how to make and tune a discone antenna to a specific frequency.
Remediation and Lessons Learned
As a result of the RF survey, we recommended the Client to upgrade the wireless headsets to encrypted models, or if those were too expensive, replace them with digital headsets that would be more difficult to monitor. The Client determined that the expense was not warranted given the use of the wireless feature of the headsets was not critical to operations. Most of the headsets were replaced by a wired model, which adequately remediated the vulnerability at a much lower cost. Supervisors and other workers who needed the mobility of the wireless headsets were upgraded to digital models.
To prevent inadvertent exposure in the future, the Client also implemented a process to test and approve wireless devices before they can be purchased. Using this process they generated a list of approved wireless headsets which could be purchased.
Lessons:
![]() Know your equipment. Most organizations tend to focus on the desired features that a device provides them in order to do something useful. They don’t often think about the unintended things that the equipment also does—such as broadcast a signal that can be picked up with the right equipment from hundreds of feet away further than the intended use.
Know your equipment. Most organizations tend to focus on the desired features that a device provides them in order to do something useful. They don’t often think about the unintended things that the equipment also does—such as broadcast a signal that can be picked up with the right equipment from hundreds of feet away further than the intended use.
• Test your equipment. Most of those unintended things won’t be found on a feature list in a brochure. Test the security of any devices that communicate wirelessly before widespread adoption. Most organizations will think to test 802.11/WiFi devices, but don’t think about things like wireless headsets, cordless phones, two-way radios, remote controls, and RFID tags.
• Better security isn’t always more expensive. Sometimes a simple, cheap solution, such as switching to wired headsets, is better than an expensive technical solution.
• Be aware of what your organization is saying over the air. Avoid broadcasting critical information. If you must broadcast something sensitive on a routine basis, come up with a protocol for what to say, what not to say, and how to say what you need to (using pre-determined code words, for example) without inadvertently revealing unnecessary details.