
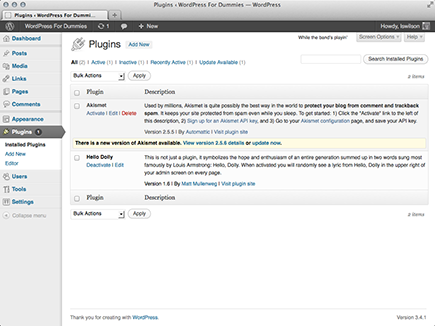
Figure 10-1: Manage your plugins with the Plugins page on the WordPress Dashboard.
Chapter 10
Making the Most of WordPress Plugins
In This Chapter
![]() Plugging in to plugins
Plugging in to plugins
![]() Finding, downloading, and unpacking plugin files
Finding, downloading, and unpacking plugin files
![]() Using the plugins that come with WordPress
Using the plugins that come with WordPress
![]() Uploading and installing plugins
Uploading and installing plugins
![]() Activating and managing plugins
Activating and managing plugins
![]() Exploring open source plugins
Exploring open source plugins
Half the fun of running a WordPress-powered blog is playing with the hundreds of plugins that you can install to extend your blog’s functions and options. WordPress plugins are like those really cool custom rims you put on your car: Although they don’t come with the car, they’re awesome accessories that make your car better than all the rest.
By itself, WordPress is a very powerful program for web publishing, but by customizing WordPress with plugins — add-on programs that give WordPress almost limitless ways to handle web content — you can make it even more powerful. You can choose any plugins you need to expand your online possibilities. Plugins can turn your WordPress installation into a full-featured gallery for posting images on the web, an online store to sell your products, a user forum, or a social networking site. WordPress plugins can be simple, adding (say) a few minor features to your blog, or they can be complex enough to change your entire WordPress site’s functionality.
In this chapter, you find out what plugins are, how to find and install them, and how they enhance your blog to make it unique. Using plugins can also greatly improve your readers’ experiences by providing them various tools to interact and participate — just the way you want them to!
In this chapter, I assume that you already have WordPress installed on your web server. Installing plugins pertains only to the WordPress.org software. If you’re skipping around in the book and haven’t yet installed WordPress on your web server, you can find instructions in Chapter 6.
 WordPress.com users can’t install or configure plugins on their hosted blogs. I don’t make the rules, so please don’t kill the messenger.
Finding Out What Plugins Are
A plugin is a small program that, when added to WordPress, interacts with the software to provide some extensibility to the software. Plugins aren’t part of the core software, nor are they software programs themselves. They typically don’t function as standalone software. They do require the host program (WordPress, in this case) to function.
Plugin developers are the people who write these gems and share them with the rest of us — usually for free. As is WordPress, most plugins are free to anyone who wants to further tailor and customize a site to meet specific needs.
Literally thousands of plugins are available for WordPress — certainly way too many for me to list in this chapter alone. I could, but then you’d need heavy machinery to lift this book off the shelf! So here are just a few examples of things that plugins let you add to your WordPress blog:
![]() E-mail notification: Your biggest fans can sign up to have an e-mail notification sent to them every time you update your blog.
E-mail notification: Your biggest fans can sign up to have an e-mail notification sent to them every time you update your blog.
![]() Submit your blog to social networking services: Allow your readers to submit your blog posts to some of the most popular social networking services such as Digg, Twitter, Facebook, and Reddit.
Submit your blog to social networking services: Allow your readers to submit your blog posts to some of the most popular social networking services such as Digg, Twitter, Facebook, and Reddit.
![]() Stats program: Keep track of where your traffic is coming from; which posts on your blog are the most popular; and how much traffic is coming through your blog on a daily, monthly, and yearly basis.
Stats program: Keep track of where your traffic is coming from; which posts on your blog are the most popular; and how much traffic is coming through your blog on a daily, monthly, and yearly basis.
Chapter 14 gives you a peek at some of the most popular plugins on the scene today. In the meantime, this chapter takes you through the process of finding plugins, installing them in your WordPress blog, and managing and troubleshooting them.
Exploring the Plugins page
Before you start installing plugins for your blog, it’s important for you to explore the Plugins page on your WordPress Dashboard and understand how to manage the plugins after you install them. Click the Installed Plugins link in the Plugins menu on your WordPress Dashboard to view the Plugins page shown in Figure 10-1.

The Plugins page is where you manage all the plugins you install in your WordPress blog. By default, the Plugins page displays a full listing of all the WordPress plugins you currently have installed. You can filter the listing of plugins using the three links shown directly below the Plugins page title:
![]() All: This is the default view for the Plugins page and shows a listing of all plugins currently installed on your WordPress website, whether they are active or not.
All: This is the default view for the Plugins page and shows a listing of all plugins currently installed on your WordPress website, whether they are active or not.
![]() Active: Clicking this link shows a list of the plugins that are currently activated and in use on your WordPress website.
Active: Clicking this link shows a list of the plugins that are currently activated and in use on your WordPress website.
![]() Inactive: Clicking this link changes the display and shows the list of plugins that are installed but not currently active. (Note: This link displays on the Plugins page only if you have inactive plugins.)
Inactive: Clicking this link changes the display and shows the list of plugins that are installed but not currently active. (Note: This link displays on the Plugins page only if you have inactive plugins.)
![]() Drop-Ins: A very select few plugins actually have files that change the behavior of WordPress so substantially that it lets you know about it, just in case there’s a question later. These plugins drop files into the
Drop-Ins: A very select few plugins actually have files that change the behavior of WordPress so substantially that it lets you know about it, just in case there’s a question later. These plugins drop files into the wp-content directory that modify the core settings of WordPress (mostly having to do with caching or other server-specific settings). These files don’t show up in the main plugin listing because they typically belong to other plugins. The Drop-Ins link appears only if you have drop-in plugins installed.
With a quick glance at the Plugins page, you can easily tell which plugins are active — and which aren’t — by the background color of each plugin listed. A gray background means that the plugin is not active. A white background means that the plugin is active. In Figure 10-1, the background of the Akismet plugin is gray and the background of the Hello Dolly plugin is white. Akismet isn’t active, but Hello Dolly is.
 You can mass manage your plugins on the Plugins page. You can deactivate all your plugins simultaneously by selecting the box to the left of each plugin name and then selecting Deactivate in the Bulk Actions drop-down menu at the top or bottom of the page (as shown in Figure 10-1). Then click the Apply button. Likewise, you can activate, upgrade, or delete the plugins listed by selecting Activate, Update, or Delete in the Bulk Actions drop-down menu. To quickly select all your plugins with one click, select the box to the left of the Plugin heading on the Plugins page.
The Plugins page displays plugins in two columns, which give details for each plugin:
![]() Plugin: This column lists the plugin name so that you can find it easily when browsing the Plugins page. Directly beneath the plugin name, you see a few links for easy plugin management:
Plugin: This column lists the plugin name so that you can find it easily when browsing the Plugins page. Directly beneath the plugin name, you see a few links for easy plugin management:
• Activate: This link appears below the title of only inactive plugins. Click the link to activate a plugin.
• Deactivate: This link appears below the title of only active plugins. Click the link to deactivate a plugin.
• Delete: This link appears below the title of only inactive plugins. Click the link to delete the plugin from your site. (See more about this topic in the “Uninstalling Plugins” section, later in this chapter.)
• Edit: This link appears below all listed plugins, whether they are active or not. Click the link to visit the Edit Plugins page. If you feel comfortable doing so, you can edit the individual plugin files.
![]() Description: This column lists a description for the plugin. Depending on the plugin, you may also see brief instructions on using the plugin. Directly below the description are the version number of the plugin, the plugin author’s name, and a link to the website where you can read more information about the plugin.
Description: This column lists a description for the plugin. Depending on the plugin, you may also see brief instructions on using the plugin. Directly below the description are the version number of the plugin, the plugin author’s name, and a link to the website where you can read more information about the plugin.
Discovering the one-click plugin update
For a lot of reasons, mainly security reasons and feature updates, always use the most up-to-date versions of the plugins in your blog. With everything you have to do every day, how can you possibly keep up with knowing whether the plugins you’re using have been updated?
You don’t have to. WordPress does it for you.
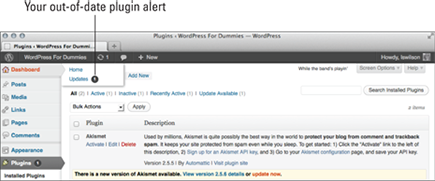
Figure 10-2 shows an out-of-date version (2.5.5) of Akismet installed. WordPress notifies you when a new update is available for a plugin in three different ways, as shown in Figure 10-2:
![]() Dashboard Updates link: The Updates link below the Dashboard menu displays a circle with a white number. The number indicates how many plugins have updates available. In Figure 10-2, you see that there is one plugin with an update available on my site. Click the Update link to see which plugins have updates available.
Dashboard Updates link: The Updates link below the Dashboard menu displays a circle with a white number. The number indicates how many plugins have updates available. In Figure 10-2, you see that there is one plugin with an update available on my site. Click the Update link to see which plugins have updates available.
![]() Plugins menu title: The Plugins menu title also displays a circle with a number. As with the Updates link, the number indicates how many plugins have updates available, as shown in Figure 10-2.
Plugins menu title: The Plugins menu title also displays a circle with a number. As with the Updates link, the number indicates how many plugins have updates available, as shown in Figure 10-2.
![]() Plugins page: Figure 10-2 shows the Plugins page. Below the Akismet plugin you see a message that says,
Plugins page: Figure 10-2 shows the Plugins page. Below the Akismet plugin you see a message that says, There is a new version of Akismet available. View version 2.5.6 details or update now.
Figure 10-2: WordPress tells you when a new plugin version is available.
WordPress gives you not only a message that a new version of the plugin is available, but also a link to a page where you can download the new version, or a link that you can click to update the plugin right there and then — WordPress’s one-click plugin update.
Click the Update Now link, and WordPress grabs the new files off the WordPress.org server, uploads them to your plugins directory, deletes the old plugin, and activates the new one. (If a plugin is deactivated at the time it’s updated, WordPress gives you the option to activate the plugin after your update process is completed.) Figure 10-3 shows the Update Plugin page that you see while the plugin is being upgraded.
WordPress notifies you of an out-of-date plugin and provides you with the one-click upgrade function only for plugins that are in the official WordPress Plugin Directory (http://wordpress.org/extend/plugins). If a plugin you are using is not listed in the directory, the notification and one-click upgrade function won’t be present for that plugin.
Another way that WordPress alerts you of out-of-date plugins is in the left navigation menu. When you have an out-of-date plugin, a number appears next to the Updates link on the Dashboard menu, indicating that you have a plugin, or plugins, that need to be upgraded. Figure 10-4 shows my Dashboard telling me that I have one plugin that needs to be upgraded. After you upgrade the plugin, the number disappears.
Figure 10-3: The Update Plugin page shows the status of your plugin update.

 Whatever you do, do not ignore the plugin update messages that WordPress gives you. Plugin developers usually release new versions because of security problems or vulnerabilities that require an upgrade. If you notice that an upgrade is available for a plugin you’re using, stop what you’re doing and upgrade it — it takes only a few seconds.
Figure 10-4: The bubble next to the Updates link alerts you of out-of-date plugins.
 For the automatic plugin upgrade to work, your plugin directory (
/wp- content/plugins) must be writable on your web server, which means that you should have set permissions of 755 or 777 (depending on your web server configuration). See Chapter 6 for information about changing file permissions on your web server, or contact your web-hosting provider for assistance.
Exploring the Plugins Included with WordPress
At this writing, WordPress packages two plugins with the installation files:
![]() Akismet: This plugin is essential.
Akismet: This plugin is essential.
![]() Hello Dolly: This plugin isn’t necessary to make your blog run smoothly, but it adds some extra fun.
Hello Dolly: This plugin isn’t necessary to make your blog run smoothly, but it adds some extra fun.
Incorporating Akismet
I touch on Akismet a few times throughout this book. It’s my humble opinion that Akismet is the mother of all plugins and that no WordPress blog is complete without a fully activated version.
Apparently WordPress agrees, because the plugin has been packaged in every WordPress software release since version 2.0. Akismet was created by the folks at Automattic — the same folks who bring you the Sidebar Widgets plugin. Akismet is the answer to comment and trackback spam. Matt Mullenweg of Automattic says that Akismet is a “collaborative effort to make comment and trackback spam a non-issue and restore innocence to blogging, so you never have to worry about spam again” (from the Akismet website at http://akismet.com).
To use the plugin, follow these steps:
1. On the Plugins page, click the Activate link under the Akismet plugin name.
A yellow box appears at the top of the page, saying: Akismet is almost ready. You must enter your Akismet API key for it to work (see Figure 10-5). An API key is a string of numbers and letters that function like a unique password given to you by WordPress.com; it’s the key that allows your WordPress.org application to communicate with your WordPress.com account.
2. Click the link in the yellow box to obtain your WordPress.com API key.
Clicking this link takes you to the Akismet Configuration page on your WordPress Dashboard, where you enter your API key in the Akismet API Key text field and then click the Update Options button to save your changes. You can stop here if you already have a key, but if you do not have an Akismet key, keep following the steps in this section.
Figure 10-5: After you activate Akismet, WordPress tells you that the plugin isn’t quite ready to use yet.

3. Click the Akismet.com link on the Akismet Configuration page.
This opens the Akismet website in your browser window at http://akismet.com/get.
4. Click the Get an Akismet API Key button.
This opens the signup page on the Akismet website, where you can choose from several different options for obtaining an Akismet key:
• Enterprise: $50/month for people who own multiple WordPress-powered websites and want to use Akismet on all of them.
• Pro: $5/month for people who own one small, nonpersonal (or business) WordPress-powered site.
• Personal: $0–$120/year for people who own one small, personal, WordPress-powered blog. You can choose to pay nothing ($0), or if you’d like to contribute a little cash toward the cause of combating spam, you can opt to spend up to $120 per year for your Akismet key subscription.
5. Select and pay for (if needed) your Akismet key.
After you’ve gone through the signup process, Akismet provides you with an API key. Copy that key by selecting it with your mouse pointer, right-clicking, and choosing Copy.
6. When you have your API key, go to the Akismet Configuration page by clicking the Akismet Configuration link in the Plugins menu on your WordPress Dashboard.
7. Enter the API key in the Akismet API Key text box (see Figure 10-6) and click the Update Options button to fully activate the Akismet plugin.
On the Akismet Configuration Page, after you’ve entered and saved your key, you also have two options that you can select to further manage your spam protection:
![]() Auto-delete Spam Submitted on Posts More Than a Month Old: Enable this option by selecting the check box next to it to tell Akismet to automatically delete spam comments on posts that are more than a month old.
Auto-delete Spam Submitted on Posts More Than a Month Old: Enable this option by selecting the check box next to it to tell Akismet to automatically delete spam comments on posts that are more than a month old.
![]() Show The Number of Comments You’ve Approved Beside Each Comment Author: Enable this option by selecting the check box next to it to tell Akismet to display the number of approved comments each comment author on your blog has.
Show The Number of Comments You’ve Approved Beside Each Comment Author: Enable this option by selecting the check box next to it to tell Akismet to display the number of approved comments each comment author on your blog has.
Figure 10-6: Akismet Configura-tion Page on the WordPress Dashboard.

Akismet catches spam and throws it into a queue, holding the spam for 15 days and then deleting it from your database. It’s probably worth your while to check the Akismet Spam page once a week to make sure that the plugin hasn’t captured any legitimate comments or trackbacks.
You can rescue those nonspam-captured comments and trackbacks by doing the following (after you’ve logged on to your WordPress Dashboard):
1. Click the Comments menu.
The Comments page appears, displaying a list of the most recent comments on your blog.
2. Click the Spam link.
The Comments page now displays all spam comments that the plugin caught.
3. Browse through the list of spam comments, looking for any legitimate comments or trackbacks.
4. If you locate one that’s legitimate, select the Approve link directly below the entry.
The comment is marked as legitimate. In other words, you don’t consider this comment to be spam. The comment is then approved and published on your blog.
Check your spam filter often. I just found four legitimate comments caught in my spam filter and was able to de-spam them, releasing them from the binds of Akismet and unleashing them upon the world. Check out Chapter 8 for more information on managing comments in WordPress.
The folks at Automattic did a fine thing with Akismet. Since the emergence of Akismet, I’ve barely had to think about comment or trackback spam, except for the few times a month I check my Akismet spam queue.
Saying Hello Dolly
Matt Mullenweg, co-founder of WordPress, developed the Hello Dolly plugin. Anyone who follows the development of WordPress knows that Matt is a huge jazz fan. How do we know this? Every single release of WordPress is named after some jazz great. One of the most recent releases of the software, for example, is named Ella — after jazz great Ella Fitzgerald; another release was named Coltrane after the late American jazz saxophonist and composer John Coltrane.
So, knowing this, it isn’t surprising that Mullenweg developed a plugin named Hello Dolly. Here’s the description of it that you see in the Plugins page on your Dashboard:
This is not just a plugin, it symbolizes the hope and enthusiasm of an entire generation summed up in two words sung most famously by Louis Armstrong: “Hello, Dolly.” When activated, you will randomly see a lyric from “Hello, Dolly” in the upper right of your admin screen on every page.
Is it necessary? No. Is it fun? Sure!
Activate the Hello Dolly plugin on the Plugins page on your WordPress Dashboard. When you’ve activated it, your WordPress blog greets you with a different lyric from the song “Hello, Dolly!” each time.
If you want to change the lyrics in this plugin, you can edit them by clicking the Edit link to the right of the Hello Dolly plugin on the Plugins page. The Plugin Editor opens and lets you edit the file in a text editor. Make sure that each line of the lyric has its own line in the plugin file. This plugin may not seem very useful to you and, in fact, it may not be useful to the majority of WordPress users, but the real purpose behind the plugin is to provide WordPress plugin developers with a simple example of how to write a plugin. This book does not cover topics on how to create your own plugin, but if you are interested in that, you may want to check out my other book, WordPress All-in-One For Dummies (John Wiley & Sons, Inc.), which does cover that topic in detail.
Using Plugins: Just the Basics
In this section, I show you how to install a plugin in your WordPress blog using the built-in plugins feature. The auto-installation of plugins from within your WordPress Dashboard works only for plugins that are included in the official WordPress Plugin Directory (http://wordpress.org/extend/plugins). You can manually install plugins on your WordPress blog, a process that I cover in the next section.
WordPress makes it super easy to find, install, and then activate plugins for use on your blog. Just follow these simple steps:
1. Click the Add New link in the Plugins menu.
The Install Plugins page opens, and you can browse the official WordPress Plugins Directory from your WordPress Dashboard.
2. Search for a plugin to install on your blog:
• Keyword: If you want to search for plugins that allow you to add additional features for comments on your site, select Term in the drop-down menu and then enter the word Comments in the Search text box on the Install Plugins page. Click the Search Plugins button, and a list of plugins returns that deal specifically with comments.
• Author or Tag: Select Author or Tag in the drop-down menu and then enter the author or tag name in the Search box; then click the Search Plugins button.
You can also search by tag by clicking any of the tag names that appear at the bottom of the Install Plugins page under the Popular heading.
I want to install a very popular plugin called Subscribe to Comments, by Mark Jaquith (see the next section in this chapter for a description of this plugin). To find it, enter the words Subscribe to Comments in the Search text box on the Install Plugins page. Then click Search Plugins.
Figure 10-7 shows the results page for the Subscribe to Comments search phrase, which is listed as the first plugin on the Search Results page.
Figure 10-7: Finding a plugin to install using the built-in Plugin Directory search.

3. Click the Details link below the plugin name.
A Description window opens, giving you information about the Subscribe to Comments plugin, including a description of the plugin, version number, author name, and an Install Now button.
4. Click the Install Now button.
You go to the Installing Plugins page within your WordPress Dashboard, where you find a confirmation message that the plugin has been downloaded, unpacked, and successfully installed.
5. Specify whether to activate the plugin or proceed to the Plugins page.
Two links are shown below the confirmation message:
• Activate Plugin: Click this link to activate the plugin you just installed on your blog.
• Return to Plugin Installer: Click this link to go to the Install Plugins page without activating the plugin.
The auto-installation of plugins from your WordPress Dashboard works on most web-hosting configurations. However, some web-hosting services don’t allow the kind of access that WordPress needs to complete the auto-installation. If you get any errors or find that you are unable to use the plugin auto-installation feature, get in touch with your web-hosting provider to find out whether it can assist you.
Installing Plugins Manually
In the following sections, I show you how to find, upload, and install the very popular Subscribe to Comments plugin, developed by Mark Jaquith. I’m using the Subscribe to Comments plugin as a real-world example to take you through the mechanics involved in downloading, unpacking, uploading, activating, and using a plugin in WordPress.
Subscribe to Comments gives your readers the opportunity to subscribe to individual comment threads on your site so that they receive a notification, via e-mail, when a new comment has been left on the comment thread (or blog post) that they have subscribed to. This plugin helps keep lively discussions active in your blog.
Installing the Subscribe to Comments plugin takes you through the process, but keep in mind that every plugin is different. Reading the description and installation instructions for each plugin you want to install is very important.
Finding and downloading the files
The first step in using plugins is locating the one you want to install. The absolute best place to find WordPress plugins is the official WordPress Plugins Directory found at http://wordpress.org/extend/plugins where, at the time of this writing, you will find over 21,000 plugins available for download.
To find Mark Jaquith’s Subscribe to Comments plugin, follow these steps:
1. Go to the official WordPress Plugin Directory, located at http://wordpress.org/extend/plugins.
2. In the search box at the top of the Plugin Directory home page, enter the keywords Subscribe to Comments and then click the Search Plugins button.
3. Locate the Subscribe to Comments plugin on the search results page (see Figure 10-8) and click the plugin name.
The Subscribe to Comments page opens in the WordPress Plugin Directory, where you find a description of the plugin as well as other information about the plugin (see Figure 10-9). For example, in Figure 10-9, take note of the important information on the right side of the page:
Figure 10-8: Use the search feature of the WordPress Plugin Directory page to find the plugin you need.
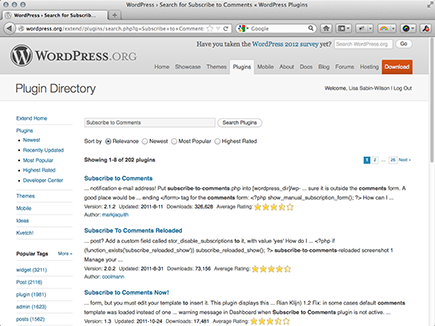
Figure 10-9: The download page for the Subscribe to Comments plugin.
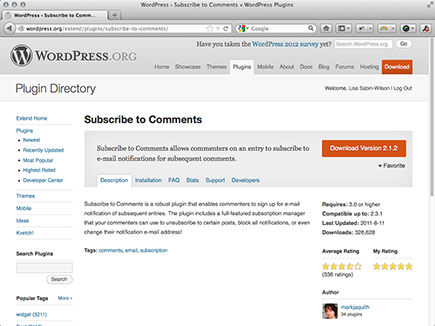
• Download Version: This is the download link that you click to download the plugin, and the number shown in this area is the most recent version number of the plugin.
• Requires: This tells you what version of WordPress you need to successfully use this plugin. For example, Figure 10-9 shows that the Subscribe to Comments plugin requires WordPress version 3.0 or higher; this means that this plugin doesn’t work with WordPress versions lower than 3.0. Helpful!
• Compatible Up To: This tells you what version of WordPress this plugin is compatible up to. For example, if this section tells you that the plugin is compatible up to version 2.3, this means that you usually can’t use the plugin with versions higher than 2.3. I say usually because the plugin developer may not update the information in this section — especially if the plugin files themselves haven’t changed. The best way to check is to download the plugin, install it, and see whether it works! (Figure 10-9 shows that Mark Jaquith’s Subscribe to Comments plugin is compatible up to WordPress version 2.3.1 — however, I can verify that it does work in all versions up to the most recent, 3.4.1.)
• Last Updated: This displays the date that the plugin was last updated by the author.
• Downloads: This number tells you how many times this plugin has been downloaded by other WordPress users.
• Ratings: With a rating system of 1-5 stars (1 being the lowest, 5 being the highest), you can see how other WordPress users have rated this plugin.
4. Click the Download button for the plugin version you want to download.
If you’re using Internet Explorer, click the Download button, and a dialog box opens, asking whether you want to open or save the file. Click Save to save the zip file to your hard drive, and remember where you saved it.
If you’re using Mozilla Firefox, click the Download button, and a dialog box opens, asking what Firefox should do with the file. Select the Save File radio button and then click OK to save it to your hard drive. Again, remember where you saved it.
For other browsers, follow the download instructions in the corresponding dialog box.
5. Locate the file on your hard drive and open it with your favorite decompression program.
If you’re unsure how to use your decompression program, refer to the documentation available with the program.
6. Unpack (decompress) the plugin files you downloaded for the Subscribe to Comments plugin.
Reading the instructions
Frequently, the plugin developer includes a readme file inside the zip file. Do what the title of the file says: Read it. Many times, it contains the exact documentation and instructions that you will find on the plugin developer’s page.
Make sure that you read the instructions carefully and follow them correctly. Ninety-nine percent of WordPress plugins have great documentation and instructions from the plugin developer. If you don’t follow the instructions correctly, the best scenario is that the plugin just doesn’t work on your blog. At worst, the plugin creates all sorts of ugly errors, requiring you to start the plugin installation over from step one.
You can open readme.txt files in any text-editor program, such as Notepad or WordPad on a PC, or TextEdit on a Mac.
In the case of Mark Jaquith’s Subscribe to Comments plugin, the readme.txt file contains instructions on how to upload and use the plugin, as well as some answers to frequently asked questions on troubleshooting the installation and use.
Every plugin is different in terms of where the plugin files are uploaded and what configurations and setup are necessary to make the plugin work on your site. Read the installation instructions very carefully and follow those instructions to the letter to install the plugin correctly on your site.
Uploading and Activating Plugins
Now you’re ready to upload the plugin files to your web server. In earlier versions of WordPress, you needed to upload the unpacked plugin files to your web server via FTP (see Chapter 6). Now, all you need to do is upload the zip file you just downloaded from the WordPress Plugin Directory. Be sure you are logged on to your WordPress Dashboard.
Although, unpacking the zip file you’ve downloaded is helpful because it can contain files that give you insight into the use of the plugin itself. Locate the plugin files you just unpacked on your hard drive. In the event that the plugin developer didn’t include a readme.txt file with instructions, check the plugin developer’s page for specific instructions on how to install the plugin in your WordPress blog. Specifically, the documentation in the readme.txt file and/or on the plugin’s website should address the following points:
![]() What directory on your web server you upload the plugin files to.
What directory on your web server you upload the plugin files to.
![]() What to do if you need to change permissions for any of the plugin files after you upload them to your web server. (See Chapter 6 if you need information on changing file permissions.)
What to do if you need to change permissions for any of the plugin files after you upload them to your web server. (See Chapter 6 if you need information on changing file permissions.)
![]() What to do if you need to set specific configurations in the plugin file to make it work.
What to do if you need to set specific configurations in the plugin file to make it work.
![]() What to do if you need to modify your theme template files to include the plugin’s functions in your blog.
What to do if you need to modify your theme template files to include the plugin’s functions in your blog.
Uploading a new plugin
To install the Subscribe to Comments plugin via the WordPress Dashboard, follow these easy steps:
1. Click the Add New link in the Plugins menu.
This opens the Install Plugins page on your Dashboard.
2. Click the Upload link at the top of the Install Plugins page.
The resulting page gives you an interface for uploading a plugin in zip format.
3. Click the Browse button.
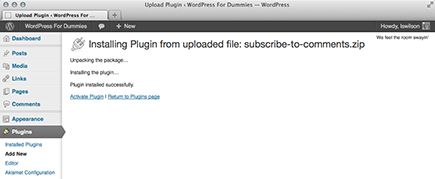
In the resulting File Upload dialog box, you can locate the zip file for the plugin you’d like to install. In this case, the file is subscribe-to- comments.zip (see Figure 10-10). Click the file to select it and then click the Open button to return to the Install Plugins page.
Figure 10-10: Uploading a plugin zip file via the Dashboard.

4. Click the Install Now button.
WordPress uploads the plugin’s zip file into the /wp-content/plugins/ folder on your web server, unpacks it, and installs it. Figure 10-11 shows the Installing Plugin page with messages for you during and after the (hopefully successful) installation.
Figure 10-11: Successful plugin upload via the Dashboard.
Activating the plugin
All plugins listed on the Plugins page are either Active or Inactive (except the Drop-In plugins, which are active by default). When you want to activate an inactive plugin, follow these easy steps (in this case, you are activating the Subscribe to Comments plugin that you installed in the previous section):
1. Click the Installed Plugins link on the Plugins menu.
The Plugins page opens, listing all the plugins installed in your WordPress blog.
2. Locate the Subscribe to Comments plugin.
If you have a lot of plugins installed on your WordPress website, you can narrow your search by clicking the Inactive link, which lists the currently inactive plugins.
3. Click the Activate link below the plugin name.
The Plugins page refreshes, and the Subscribe to Comments plugin now appears as an active plugin on the page.
If you’ve followed all these steps in your own blog, congratulations — you now have Subscribe to Comments installed. Great job!
Setting Plugin Options
Some, but not all, WordPress plugins provide an administration page where you can set options that are specific to that particular plugin. You may find the plugin administration page in any of these places:
![]() The Settings page (click the Settings menu)
The Settings page (click the Settings menu)
![]() The Tools menu (located in the navigation menu)
The Tools menu (located in the navigation menu)
![]() The Plugins menu (located in the navigation menu)
The Plugins menu (located in the navigation menu)
![]() A Dashboard menu (some plugins even create their own menus!)
A Dashboard menu (some plugins even create their own menus!)
![]() The Admin Toolbar (at the top of any Dashboard page)
The Admin Toolbar (at the top of any Dashboard page)
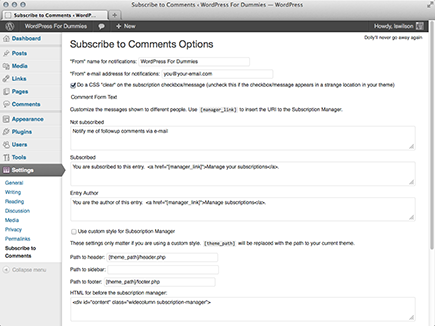
You can find the Subscribe to Comments Options page by clicking the Subscribe to Comments link in the Settings menu. The Subscribe to Comments Options page opens (see Figure 10-12).
Figure 10-12: The Subscribe to Comments Options administration page.
Uninstalling Plugins
After all this talk about installing and activating plugins, what happens if you install and activate a plugin and then at some point decide that it just isn’t what you want? Don’t worry — you aren’t stuck forever with a plugin that you don’t want. WordPress lets you be fickle and finicky in your plugin choices!
To uninstall a plugin from your WordPress blog
1. Click the Installed Plugins link on the Plugins menu.
The Plugins page opens.
2. Locate the plugin you want to uninstall.
3. Click the Deactivate link below the plugin title.
The Plugins page refreshes, and the plugin now appears as deactivated (or inactive).
4. Click the Delete link that now appears below the plugin title.
The Delete Plugin page opens, and a confirmation message displays asking you whether you’re sure you want to delete this plugin. (See Figure 10-13.)
5. Click the Yes, Delete These Files button.
The Plugins page refreshes, and the plugin you just deleted is gone from the lists of plugins, with a message displayed at the top confirming the deletion of the plugin.
Figure 10-13: Confirmation question on the Delete Plugin(s) page.

Bang! You’re done. That’s all it takes.
Don’t forget to remove any bits of code that you may have added to your theme templates for that particular plugin; otherwise, it may cause ugly error messages to appear in your blog.
Understanding the Open Source Environment
The WordPress software was built on an existing platform called b2. Matt Mullenweg, co-founder of WordPress, was using b2 as a blogging platform at the time the developer of that program abandoned it. What did this mean for its users? It meant no more development unless someone somewhere picked up the ball and continued with the platform. Enter Mullenweg and WordPress.
Getting premium plugins
Not all plugins were created equally. In 2010, the WordPress community saw the emergence of premium, or paid, plugins. These plugins are slightly different from the plugins you find in the official WordPress Plugin Directory, mainly because they have a nominal fee associated with them. Most of the premium plugins also provide great value and support. Here are two examples of premium plugin directories available today:
![]() Plugin Buddy (
Plugin Buddy (http://ewebscapes.com/pluginbuddy): Run by WordPress experts and veterans from the team at iThemes (http://ithemes.com), Plugin Buddy is a repository of quality premium plugins like BackupBuddy and Billboard.
![]() WPMU Premium Dev (
WPMU Premium Dev (http:// ewebscapes.com/wpmu-premium): Run by WordPress experts, Incsub, WPMU Premium Dev provide their members with hundreds of high-quality and useful plugins for WordPress, as well as themes and helpful support forums.
Apply this same concept to plugin development, and you’ll understand that plugins sometimes fall by the wayside and drop off the face of the earth. Unless someone takes over when the original developer loses interest, future development of that plugin ceases. It’s important to understand that most plugins are developed in an open source environment, which means a few things for you, the end user:
![]() The developers who created your favorite plugin aren’t obligated to continue development. If they find a new hobby or simply tire of the work, they can give it up completely. If no one picks up where they left off, you can kiss that plugin goodbye if it doesn’t work with the latest WordPress release.
The developers who created your favorite plugin aren’t obligated to continue development. If they find a new hobby or simply tire of the work, they can give it up completely. If no one picks up where they left off, you can kiss that plugin goodbye if it doesn’t work with the latest WordPress release.
![]() Developers of popular plugins don’t hold to a specific timetable. Generally, developers are extremely good about updating their plugins when new versions of WordPress are released, or when a security bug or flaw is discovered. Keep in mind, however, that no timetable exists for these developers to follow. Many of these folks have day jobs, classes, or families that can keep them from devoting as much time to the project as you want them to.
Developers of popular plugins don’t hold to a specific timetable. Generally, developers are extremely good about updating their plugins when new versions of WordPress are released, or when a security bug or flaw is discovered. Keep in mind, however, that no timetable exists for these developers to follow. Many of these folks have day jobs, classes, or families that can keep them from devoting as much time to the project as you want them to.
![]() In the world of plugin development, it’s easy come, easy go. Beware of the pitfalls of falling in love with any particular WordPress plugin. For example, don’t let your website become dependent on a plugin, and don’t be surprised if a plugin you love doesn’t exist tomorrow. You can use the plugin for as long as it continues to work for you, but when it stops working (such as with a new WordPress release or a security exploit that makes it unusable), you have a tough decision to make. You can
In the world of plugin development, it’s easy come, easy go. Beware of the pitfalls of falling in love with any particular WordPress plugin. For example, don’t let your website become dependent on a plugin, and don’t be surprised if a plugin you love doesn’t exist tomorrow. You can use the plugin for as long as it continues to work for you, but when it stops working (such as with a new WordPress release or a security exploit that makes it unusable), you have a tough decision to make. You can
• Stop using the plugin and try to find a suitable alternative.
• Hope that another developer takes over the project when the original developer discontinues his involvement.
• Try to find someone to provide a fix for you (in which case, you’ll more than likely have to pay that someone for her time).
I don’t want to make the world of WordPress plugins sound like gloom and doom, but I do think it’s very important for you to understand the dynamics in play. Consider this section to be food for thought.
..................Content has been hidden....................
You can't read the all page of ebook, please click here login for view all page.