
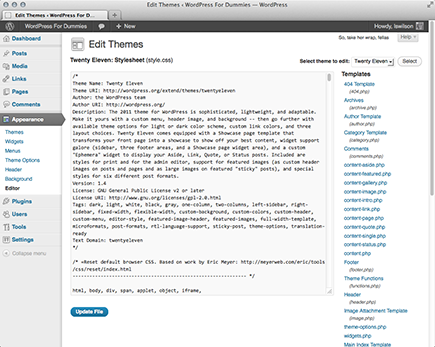
Figure 13-1: The WordPress default theme stylesheet (style.css).
Chapter 13
Tweaking WordPress Themes
In This Chapter
![]() Exploring basic CSS and defining CSS properties and values
Exploring basic CSS and defining CSS properties and values
![]() Setting a new background color, creating a header, and customizing navigation menus
Setting a new background color, creating a header, and customizing navigation menus
![]() Changing fonts
Changing fonts
![]() Knowing HTML essentials
Knowing HTML essentials
![]() Working with parent/child themes
Working with parent/child themes
Chapter 11 shows how you can use free WordPress themes in your blog. Many people are quite happy to use these themes without making any adjustments to them at all. I can’t tell you, however, how many times people have asked me whether they can customize a theme that they’ve found. The answer to their question is always, “Of course you can make changes on your own.”
The practice of changing a few elements of an existing WordPress theme is known as tweaking. Thousands of WordPress blog owners tweak their existing themes on a regular basis. This chapter provides information on some of the most common tweaks you can make to your theme, such as changing the header image, changing the color of the background or the text links, and changing font styles — and these changes are pretty easy to make, too! You’ll be tweaking your own theme in no time flat.
Using a theme exactly as a theme author released it is great. If a new version is released that fixes a browser compatibility issue or adds features offered by a new version of WordPress, a quick theme upgrade is very easy to do.
However, chances are good that you’ll want to tinker with the design, add new features, or modify the theme structure. If you modify the theme, you won’t be able to upgrade to a newly released version without modifying the theme again.
If only you could upgrade customized versions of themes with new features when they’re released. . . . Fortunately, child themes give you this best-of-both-worlds theme solution. This chapter explores what child themes are, how to create a parent theme that’s child-theme ready, and how to get the most out of using child themes.
 Before you go too wild with tweaking templates, make a backup of your theme so that you have the original files from which to easily restore it if necessary. You can back up your theme files by connecting to your web server via FTP (see Chapter 6) and downloading your theme folder to your computer. When you have the original theme files safe and secure on your hard drive, feel free to tweak away, comfortable in the knowledge that you have a backup.
Styling with CSS: The Basics
A Cascading Style Sheet (CSS) is a cascading sheet of style markup that controls the appearance of content on a website. Every single WordPress theme you use in your blog uses CSS. The CSS provides style and design flair to the template tags in your templates. (See Chapter 12 for information about WordPress template tags.) The CSS for your WordPress theme is pulled in through the Header template (header.php) and is named style.css.
On your Dashboard, click the Editor link on the Appearance menu and look at the Header template for the Twenty Eleven WordPress theme by clicking the Header link on the Edit Themes page. You find the following line of code, which pulls the CSS (style.css) into the page to provide the formatting of the elements of your blog:
<link rel=”stylesheet” type=”text/css” media=”all” href=”<?php bloginfo( ‘stylesheet_url’ ); ?>” />
 Don’t tweak the line of code that pulls in the
 style.css file; otherwise the CSS won’t work for your blog.
Chapter 12 covers the commonly used parameters for the bloginfo(); template tag used in WordPress themes.
CSS selectors
With CSS, you can provide style (such as size, color, and placement) to the display of elements on your blog (such as text links, header images, font size and colors, paragraph margins, and line spacing). CSS selectors contain names, properties, and values to define which HTML elements in the templates you will style with CSS. CSS selectors are used to declare (or select) which part of the markup the style applies to. Table 13-1 provides some examples of CSS selectors and their use.

Classes and IDs
You can find the stylesheet (style.css) for the default Twenty Eleven theme on the Edit Themes page on your Dashboard (see Figure 13-1). Everything in it may look foreign to you right now, but I want to bring your attention to two items you see when you scroll down that template:
![]()
#content: One type of CSS selector. The hash mark (#) indicates that it’s a CSS ID.
![]()
.singular: Another type of CSS selector. The period (.) indicates that it’s a CSS class.
IDs and classes define styling properties for different sections of your WordPress theme. Table 13-2 shows examples of IDs and classes from the header.php template in the Twenty Eleven WordPress theme. Armed with this information, you’ll know where to look in the stylesheet when you want to change the styling for a particular area of your theme.
Table 13-2 Connecting HTML with CSS Selectors
|
HTML |
CSS Selector |
Description |
|
In this case, the CSS selector name is |
|
Styles the elements for the |
|
|
|
Styles the elements for the |
|
|
|
Styles the elements for your |
|
|
|
Styles the elements for your |
|
|
|
Styles the elements for the |
If you find an element in the template code that says id (such as div id= or p id=), look for the hash symbol in the stylesheet. If you find an element in the template code that says class (such as div class= or p class=), look for the period in the stylesheet followed by the selector name.
CSS properties and values
CSS properties are assigned to the CSS selector name. You also need to provide values for the CSS properties to define the style elements for the particular CSS selector you’re working with.
In the default Twenty Eleven WordPress theme, for example, the first piece of markup in the Header template (header.php) is <div id=”page”>. This ID, with the name page, provides styling for the site page.
In the default Twenty Eleven WordPress theme stylesheet, the CSS defined for the page ID is as follows:
#page {
margin: 2em auto;
max-width: 1000px;
}
Every CSS property needs to be followed by a colon (:), and each CSS value needs to be followed by a semicolon (;).
The CSS selector is #page, which has two properties:
![]() The first CSS property is
The first CSS property is margin, which has the value of 0 auto;.
![]() The second CSS property is
The second CSS property is max-width, which has the value 1000px (absolute, fixed pixel width).
Table 13-3 provides some examples of commonly used CSS properties and values.
Table 13-3 Common CSS Properties and Values
|
CSS Property |
CSS Value |
Examples |
|
|
Defines the color of the background (such as red, black, or white) |
Markup: CSS: |
|
|
Defines a background image |
Markup: CSS: |
|
|
Defines the fonts used for the selector |
Markup: CSS: |
|
|
Defines the color of the text |
Markup: CSS: |
|
|
Defines the size of the font used for the text |
Markup: CSS: |
|
|
Defines the alignment of the text (left, center, right, or justified) |
Markup: CSS: |
* W3Schools has a good resource on the font-family property here: http://www.w3schools.com/cssref/pr_font_font-family.asp ** W3Schools has a good resource on the font-size property here: http://www.w3schools.com/cssref/pr_font_font-size.asp
Changing the Background Color
In Chapter 12, I discuss the Header template (header.php) in detail. In this section, I show you how to tweak the background color in the default Twenty Eleven theme. If you’re not using the default Twenty Eleven theme, you can also use the <body> tag in a Header template to change the background color of your website.
Creating a custom background
The Twenty Eleven WordPress theme is packaged with the option to change the background to a different color or use an image for your background. To use the nifty, built-in custom background feature to change the Twenty Eleven background for your blog, follow these steps:
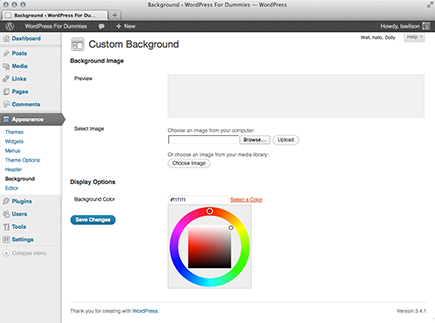
1. Click the Background link under the Appearance menu.
The Custom Background page loads on the Dashboard.
2. To change the background color, type the hexadecimal color code in the Color text box.
If you don’t know what hex color code you want to use, click the Select a Color link and click a color within the provided color wheel (see Figure 13-2). The color selected in Figure 13-2 is #f1f1f1, which is gray.
 A hexadecimal (or hex) code represents a certain color. Hex codes always start with a hash symbol (
#) and have six letters and/or numbers to represent a particular color; for example, the code #d5d6d7 represents the color gray in hexadecimal code. I talk more about hexadecimal values in the section “Changing the background using CSS,” later in this chapter.
3. To use an image file for the background, upload an image from your computer.
Click the Browse button under Choose an Image from Your Computer and select a file from your computer. Then click the Upload button.
4. Change the display options for your new background image.
• Position: Select Left, Center, or Right to set the screen position of the background image on your website.
• Repeat: Select No Repeat, Tile, Tile Horizontally, or Tile Vertically in the drop-down menu to set the image repeat behavior of the background image on your website.
• Attachment: Select Scroll to set the background image to scroll down the page, or select Fixed to set the background image in a static position (so that it doesn’t scroll down the page).
5. Save your changes.
Be sure to click the Save Changes button before navigating away from the Custom Background page. Otherwise your new settings won’t be saved.
Figure 13-2: The color wheel selector on the Custom Background page.
You can add support for the Custom Background feature to any theme with just a few lines of code. Just follow these steps:
1. Browse to the Edit Themes page and click the Theme Functions (functions.php) template.
The Theme Functions template opens in the text editor on the left side of the page.
2. Add the following line of code to the Theme Functions template somewhere after the line that says <?php:
add_custom_background();
This line of code tells WordPress that your theme has added the Custom Background feature.
3. Click the Update File button.
The Theme Functions template is saved, along with your changes. The Background link now displays below the Appearance menu.
4. View your website page to see your changes.
Changing the background using CSS
The <body> tag is simple HTML markup. Every theme has this tag, which defines the overall default content for each page of your website — the site’s body.
In the Twenty Eleven stylesheet (style.css), the background for the body is defined like this:
body {
background: #ffffff;
}
The background for the <body> tag uses a hexadecimal color code of #ffffff that gives the background a white color. You can use a color or an image (or both) to style the background of your website:
![]() Color: The W3Schools website has a great resource on hex codes at
Color: The W3Schools website has a great resource on hex codes at http://w3schools.com/HTML/html_colornames.asp.
![]() Image: You can easily use an image as a background for your site by uploading the image to the
Image: You can easily use an image as a background for your site by uploading the image to the images folder in your theme directory. That value looks like background: url(images/yourimage.jpg). (Note: The url portion of this code automatically pulls in the URL of your blog, so you don’t have to change the url part to your URL.)
You can also use a combination of colors and images in your backgrounds.
In the case of some basic colors, you don’t have to use the hex code. For colors such as white, black, red, blue, and silver, you can just use their names — background-color: white, for example.
If you want to change the background color of your theme, follow these steps:
1. On the WordPress Dashboard, click the Editor link on the Appearance menu.
The Edit Themes page opens.
2. From the Select Theme to Edit drop-down menu, choose the theme you want to change.
3. Click the Stylesheet template link.
The style.css template opens in the text editor on the left side of the Edit Themes page (refer to Figure 13-1).
4. Scroll down in the text editor until you find the CSS selector body.
If you’re tweaking the default theme, this section is what you’re looking for:
body {
background: #ffffff;
}
If you’re tweaking a different template, the CSS selector body will look similar.
5. Edit the background property’s values.
For example, in the default template, if you want to change the background color to black, you can use one of the following:
background: #000000;
or
background: black;
6. Click the Update File button in the bottom-left corner of the page.
Your changes are saved and applied to your theme.
7. Visit your site in your web browser.
The background color of your theme has changed.
Using Your Own Header Image
Most themes have a header image that appears at the top of the page. This image is generated by a graphic defined either in the CSS value for the property that represents the header area, or through the use of a feature in WordPress called a custom header. In the WordPress default Twenty Eleven theme, all the hard work’s been done for you. Including a custom header image on a blog that uses the Twenty Eleven theme is pretty darn easy.
To use existing header images, follow these steps:
1. Click the Header link in the Appearance menu on your Dashboard.
The Your Header Image page appears.
2. Choose from one of eight header images.
Scroll down to the bottom of the page and select one of the cool header images that WordPress provides for you by clicking the circle to the left of your chosen image.
3. Click the Save Changes button.
The header image you’ve chosen is now saved. When you view your website, you should see it displayed at the top.
To upload a new header image, follow these steps:
1. Click the Browse button under the Upload Image title. Select the image from your computer and then click Open.
2. Click Upload.
Your image uploads to your web server. The Crop Header Image page appears, where you can crop the image and adjust which portion of the header image you would like displayed (see Figure 13-3).
3. Click the Crop and Publish button.
The Header Image page appears, and your new header image is now displayed.
4. View your website.
Your new header image appears at the top of your website.
In themes that do not have the custom header image feature, you can easily define a background image for the header image using CSS.
Figure 13-3: Adjust the dotted lines to choose the area of the image to display.

For purposes of this example, the HTML markup for the header in the template is
<header id=”branding”></div>
In the CSS (style.css) file, you can use a background image by defining it in the CSS properties for #branding. Use this code:
#branding {
background: url(/images/header-image.jpg) no-repeat;
width: 1000px;
height: 228px;
}
The background value indicates an image called header-image.jpg. For it to display on your site, you need to create the image and upload it to your web server under /wp-content/theme-name/images/.
Creating Custom Navigation Menus
A navigation menu is a listing of links displayed on your site. These links can be to pages, posts, or categories within your site, or they can be links to other sites. Either way, you can define navigation menus on your site through the built-in Custom Menus feature in WordPress.
It’s to your advantage to provide at least one navigation menu on your site so that readers can see everything your site has to offer. Providing visitors with a link — or several — to click keeps the point-and-click spirit of the web.
Adding the Custom Menu feature to your theme
The Custom Menu feature is already built in to the default Twenty Eleven WordPress theme, so you don’t have to worry about preparing your theme for it. However, if you’re using a different theme, adding support for the Menu feature to your theme is easy:
1. Click the Editor link under the Appearance menu. Then click the Theme Functions (functions.php) template.
The Theme Functions template opens in the text editor on the left side of the Edit Themes page.
2. Type the following function on a new line in the Theme Functions template file somewhere underneath this line: <?php:
add_theme_support( ‘nav-menus’ );
3. Click the Update File button to save the changes to the template.
This template tag tells WordPress that your theme can use the Custom Menu feature, and a Menus link now appears under the Appearance menu on the Dashboard.
4. Open the Header template (header.php).
Click the Header link on the Edit Themes page to open the Header template in the text editor on the left side of the Edit Themes page.
5. Add the following template tag by typing it on a new line in the Header template (header.php):
<?php wp_nav_menu(); ?>
This template tag is needed so that the menu you build using the Custom Menu feature will display at the top of your website. Table 13-4 gives the details on the different parameters you can use with the wp_nav_menu(); template tag to further customize the display to suit your needs.
6. Save the changes you’ve made to the Header template.
Click the Update File button at the bottom of the page.


Building custom navigation menus
After you add the menu feature to your theme (or if you’re already using a theme that has the menu feature), building menus is super-easy — just follow these steps:
1. Click the Menus link in the Appearance menu on your Dashboard.
The Menus page opens on your WordPress Dashboard.
2. Type a name in the Menu Name box and click the Create Menu button.
The Menus page is reloaded with a message that tells you your new menu has been created.
3. Add links to your newly created menu.
WordPress gives you three ways to add links to the new menu you just created (the items in this list are shown in Figure 13-4):
• Custom Links: In the URL field, type the URL of the website that you want to add (http://www.google.com). Next, type the name of the link that you want displayed in your menu in the Label text field (Google). Then click the Add to Menu button.
• Pages: Click the View All link to display a list of all the page(s) you have published on your site. Select the box next to the page names you want to add to your menu. Then click the Add to Menu button.
• Categories: Click the View All link to display a list of all the categories you’ve created on your site. Select the box next to the category names you want to add to the menu. Then click the Add to Menu button.
4. Review your menu choices on the right side of the page.
When you add new menu items, the column on the right side of the Menus page populates with your menu choices.
5. Edit your menu choices, if needed.
Click the Edit link to the right of the menu link name () to edit the information of each individual link in your new menu.
6. Save your menu before leaving the Menus page.
Be sure to click the Save Menu button under Menu Settings on the right side at the top of the Menus page. A message appears, confirming that the new menu has been saved.
You can create as many menus as you need to for your website. Just follow the parameters for the menu template tag to make sure you’re pulling in the correct menu in the correct spot on your theme. Pay attention to either the menu ID or menu name in the template tag. Additionally, you find more options for your navigation menus by clicking the Screen Options tab at the top-right corner of your Dashboard. From there, you can add things like Posts and Custom Post Types to your menu options, as well as add descriptions for menu items.
Figure 13-4: The Build Custom Menus options on the Menus page on the Dashboard.

The HTML markup for the menu is generated as an unordered list, by default, and looks like this:
<ul id=”menu-main” class=”menu”>
<li id=”menu-item-1” class=”menu-item menu-item-type-custom menu-item-object-custom menu-item-1”><a href=”/”>Home</a></li>
<li id=”menu-item-2” class=”menu-item menu-item-type-post_type menu-item-object-page menu-item-2”><a href=”http://localhost/wpdemo/blog/”>Blog</a></li>
<li id=”menu-item-3” class=”menu-item menu-item-type-post_type menu-item-object-page menu-item-3”><a href=”http://localhost/wpdemo/about/”>About</a></li>
</ul>
Notice, in the HTML markup, that the first line defines CSS ID and class: <ul id=“menu-main” class=“menu”>.
The ID in that line reflects the name that you gave your menu. Because I gave my menu the name of “Main” when I created it on the Dashboard, the CSS ID is menu-main. If I had named it “Foo,” the ID would instead be menu-foo. This assignment of menu names in the CSS and HTML markup is why WordPress allows you to use CSS to create different styles and formats for your different menus.
When developing themes for yourself or others to use, you want to make sure that the CSS you define for the menus can do things like account for subpages by creating drop-down menu effects. You can do this several different ways, and Listing 13-1 gives you just one example of a block of CSS that you can use to create a nice style for your menu (this CSS example assumes that you have a menu named “Main”; therefore, the HTML and CSS markup indicate ‘menu-main’).
Listing 13-1: Sample CSS for Drop-down Menu Navigation
#menu-main {
width: 960px;
font-family: Georgia, Times New Roman, Trebuchet MS;
font-size: 16px;
color: #FFFFFF;
margin: 0 auto 0;
clear: both;
overflow: hidden;
}
#menu-main ul {
width: 100%;
float: left;
list-style: none;
margin: 0;
padding: 0;
}
#menu-main li {
float: left;
list-style: none;
}
#menu-main li a {
color: #FFFFFF;
display: block;
font-size: 16px;
margin: 0;
padding: 12px 15px 12px 15px;
text-decoration: none;
position: relative;
}
#menu-main li a:hover, #menu-main li a:active, #menu-main .current_page_item a, #menu-main .current-cat a, #menu-main .current-menu-item {
color: #CCCCCC;
}
#menu-main li li a, #menu-main li li a:link, #menu-main li li a:visited {
background: #555555;
color: #FFFFFF;
width: 138px;
font-size: 12px;
margin: 0;
padding: 5px 10px 5px 10px;
border-left: 1px solid #FFFFFF;
border-right: 1px solid #FFFFFF;
border-bottom: 1px solid #FFFFFF;
position: relative;
}
#menu-main li li a:hover, #menu-main li li a:active {
background: #333333;
color: #FFFFFF;
}
#menu-main li ul {
z-index: 9999;
position: absolute;
left: -999em;
height: auto;
width: 160px;
}
#menu-main li ul a {
width: 140px;
}
#menu-main li ul ul {
margin: -31px 0 0 159px;
}
#menu-main li:hover ul ul, #menu-main li:hover ul ul {
left: -999em;
}
#menu-main li:hover ul, #menu-main li li:hover ul, #menu-main li li li:hover ul, {
left: auto;
}
#menu-main li:hover {
position: static;
}
The CSS you use to customize the display of your menus will differ; the example that I provide in the previous section is just that: an example. After you get the hang of using CSS, you can try different methods, colors, and styling to create a custom look of your own. (Find additional information about Basic CSS later in this chapter.)
Displaying Custom Menus using widgets
You don’t have to use the wp_nav_menu(); template tag to display the menus on your site because WordPress also provides you with Custom Menu widgets that you can add to your theme. You can therefore use widgets instead of template tags to display the navigation menus on your site. This feature is especially helpful if you have created multiple menus in and around your site in various different places. Have a look at Chapter 5 for more information on using WordPress widgets.
Your first step is to register a special widget area for your theme to handle the Custom Menu widget display. To register this widget, open your theme’s functions.php file and add the following lines of code:
// ADD MENU WIDGET
if ( function_exists(‘register_sidebars’) )
register_sidebar(array(‘name’=>’Menu Widget’,));
These few lines of code create a new widget area called Menu on the Widgets page on your Dashboard. At this point, you can drag the Custom Menu widget into the Menu widget to indicate that you want to display a Custom Menu in that area. The Available Widget area with the Custom Menu widget displayed is in Figure 13-5.
Figure 13-5: Widget page displaying the Custom Menu widget under Available Widgets.

To add the widget area to your theme, head over to the Theme Editor (Appearance⇒Editor) and open the header.php file; then add these lines of code in the area you want the Menu widget displayed:
<ul>
<?php if ( !function_exists(‘dynamic_sidebar’) || !dynamic_sidebar(‘Menu Widget’) ) : ?>
<?php endif; ?>
</ul>
These lines of code tell WordPress that you want information contained in the Menu widget area displayed on your site.
Changing Font Family, Color, and Size
You can change the fonts in your theme for style or readability. I’ve seen typographic (or font) design experts use simple font variations to achieve amazing design results. You can use fonts to separate headlines from body text (or widget headlines and text from the main content) to be less distracting. Table 13-5 lists some examples of often-used font properties.
Table 13-5 Fonts
|
Font Properties |
Common Values |
CSS Examples |
|
|
|
|
|
|
|
|
|
|
|
|
|
|
|
|
The web is actually kind of picky about how it displays fonts, as well as what sort of fonts you can use in the font-family property. Not all fonts appear correctly on the web. To be safe, consider sticking to some commonly used font families that appear correctly in most browsers:
![]() Serif fonts: Times New Roman, Georgia, Garamond, Bookman Old Style
Serif fonts: Times New Roman, Georgia, Garamond, Bookman Old Style
![]() Sans-serif fonts: Verdana, Arial, Tahoma, Trebuchet MS
Sans-serif fonts: Verdana, Arial, Tahoma, Trebuchet MS
Changing font color
With more than 16 million different HTML color combinations available, you can find just the right color value for your project. After some time, you’ll memorize your favorite color codes. I find that knowing codes for different shades of gray helps me quickly add an extra design touch. For example, I often use the shades of gray listed in Table 13-6 for backgrounds, borders on design elements, and widget headers.
Table 13-6 lists some of the CSS colors that I use often.
Table 13-6 My Favorite CSS Colors
|
Color |
Value |
|
White |
|
|
Black |
|
|
Grays |
|
You can easily change the color of your font by changing the color property of the CSS selector you want to tweak. You can use hex codes to define the colors.
You can define the overall font color in your site by defining it in the body CSS selector like this:
body {
color: #333333;
}
Changing font size
To tweak the size of your font, change the font-size property of the CSS selector you want to change. Font sizes are generally determined by units of measurement, as in these examples:
![]()
px: Pixel measurement. Increasing or decreasing the number of pixels increases or decreases the font size (12px is larger than 10px).
![]()
pt: Point measurement. As with pixels, increasing or decreasing the number of points affects the font size accordingly (12pt is larger than 10pt).
![]()
%: Percentage measurement. Increasing or decreasing the percentage number affects the font size accordingly (50% is the equivalent to 7 pixels; 100% is the equivalent to 17 pixels).
In the default template CSS, the font size is defined in the <body> tag in pixels, like this:
font-size: 12px;
When you put all three elements (font family, color, and font size) together in the <body> tag, they style the font for the overall body of your site. Here’s how they work together in the <body> tag of the default template CSS:
body {
font-size: 12px;
font-family: Georgia, “Bitstream Charter”, serif;
color: #666666;
}
Serif fonts have little tails, or curlicues, at the edges of letters. (This book’s text is in a serif font.) Sans-serif fonts have straight edges and are devoid of any fancy styling. (The heading in Table 13-6 uses a sans-serif font. . . no tails!)
When you want to change a font family in your CSS, open the stylesheet (style.css), search for property: font-family, change the values for that property, and save your changes.
In the default template CSS, the font is defined in the <body> tag like this:
font-family: Georgia, “Bitstream Charter”, serif;
Borders
Using CSS borders can add an interesting and unique flair to elements of your theme design. Table 13-7 illustrates common properties and CSS examples for borders in your theme design.
Table 13-7 Common Border Properties
|
Border Properties |
Common Values |
CSS Examples |
|
|
|
|
|
|
|
|
|
|
Hexadecimal values |
|
Finding additional CSS resources
The time may come when you want to explore customizing your theme further. Here are some recommended resources:
![]() WordPress Codex (
WordPress Codex (http://codex.wordpress.org): Official WordPress documentation
![]() W3Schools (
W3Schools (http://w3schools.com): A free and comprehensive online HTML and CSS reference
![]() WebDesign.com (
WebDesign.com (http://ewebscapes.com/webdesign): A premium library of WordPress video tutorials and training
![]() Smashing Magazine (
Smashing Magazine (http://smashingmagazine.com): Gives numerous tips and tricks for customizing a WordPress theme
Understanding Basic HTML Techniques
HTML can help you customize and organize your theme. To understand how HTML and CSS work together, think of it this way: If a website were a building, HTML is the structure (the studs and foundation) and CSS is the paint.
HTML contains the elements that CSS provides the styles for. All you have to do to apply a CSS style is use the right HTML element. For this example, I break down a very basic block of HTML:
<body>
<div id=”content”>
<header>
<h1>Headline Goes Here</h1>
</header>
<section>
<article>
<p>This is a sample sentence of body text. <blockquote>The journey of a thousand miles
starts with the first step.</blockquote> I’m going to continue on this sentence and end it
here. </p>
<p>Click <a href=”http://lisasabin-wilson.com”>here</a> to visit my website.</p>
</article>
</section>
</div>
</body>
All HTML elements must have opening and closing tags. Opening tags are contained in less-than (<) and greater-than (>) symbols. Closing tags are the same, except that they are preceded by a forward-slash (/).
For example:
<h1>Headline Goes Here</h1>
Note that the HTML elements must be properly nested. In line eight of the preceding example, a paragraph tag is opened (<p>). Later in that line, a block quote is opened (<blockquote>) and is nesting inside the paragraph tag. When editing this line, you could not end the paragraph (</p>) before you end the block quote (</blockquote>). Nested elements must close before the elements they are nested within close.
Finally, proper tabbing, or indenting, is important when writing HTML, mainly for readability so that you can quickly scan through code to find what you’re looking for. A good rule to follow is that if you didn’t close a tag in the line above, indent one tab over. This practice allows you to see where each element begins and ends. It can also be very helpful when diagnosing problems.
You will use several very basic HTML markup practices over and over in web design and putting together websites. Earlier in this chapter, I discuss how to combine CSS styling with HTML markup to create different display styles (borders, fonts, and so on). The following sections provide you with commonly used HTML markup samples that you will find helpful as a reference for using HTML in your website code.
Inserting images
You will probably want to insert an image into your website, whether it is within the body of a post or page, in the sidebar by using a widget, or within the template code itself. The HTML markup to insert an image looks like this:
<img src=”/path/to/image-file.jpg” alt=”Image File Name” />
I break down this code for you in easy snippets to help you understand what’s at work here:
![]()
<img src= — This is the HTML markup that tells the browser that the website is looking for an image file.
![]()
“/path/to/image-file.jpg” — This is the actual directory path through which the web browser will find the physical image file. For example, if you uploaded an image to your web server in the /wp-content/uploads directory, the physical path for that image file would be /wp-content/uploads/image-file.jpg.
![]()
alt=”Image File Name” — The alt tag is part of the HTML markup and provides a description for the image that search engines will pick up and recognize as keywords. The alt tag description will also display as text on a browser that cannot, for some reason, load the image file; for example, if the server load time is slow, the text description will load first to at least provide visitors with a description of what the image is.
![]()
/> — this HTML markup tag closes the initial <img src=” tag, telling the web browser when the call to the image file is complete.
Inserting hyperlinks
You will probably want to insert a link within the body of a website — commonly referred to as a hyperlink, which is a line of text that is anchored to a web address (URL) so that clicking the text takes a visitor to another website or page that appears in the browser window. The HTML markup to insert a hyperlink looks like this:
<a href=”http://wiley.com”>John Wiley & Sons, Inc. </a>
To break down that markup, here is a simple explanation:
![]()
<a href= — This is the HTML markup that tells the browser that the text within this tag should be hyperlinked to the web address provided in the next point.
![]()
“http://wiley.com” — This is the web address, or URL, that you intend the text to be anchored to. It needs to be surrounded by quotation marks, which define it as the intended anchor, or address.
![]()
> — This markup closes the previously opened <a href= HTML tag.
![]()
John Wiley & Sons, Inc. — In this example, this is the text that is linked, or anchored, by the web address, or URL. This text displays on your website and is clickable by your visitors.
![]()
</a> — This HTML markup tag tells the web browser that the hyperlink is closed. Anything that exists between <a href=”..”> and </a> will be hyperlinked, or clickable, through to the intended anchor, or web address.
Commonly, designers use URLs, or web addresses, to link words to other websites or pages; however, you can also provide hyperlinks to files such as .pdf (Adobe Acrobat) or .doc (Microsoft Word) or any other file type.
Inserting lists
Say you need to provide a clean-looking format for lists of information that you publish on your website. With HTML markup, you can easily provide lists that are formatted differently, depending on your needs.
Ordered lists are numbered sequentially. An example is a step-by-step list of things to do, like this:
1. Write my book chapters.
2. Submit my book chapters to my publisher.
3. Panic a little when book is released to the public.
4. Breathe sigh of relief when public reviews are overwhelmingly positive!
Ordered lists are easy to create in a program such as Microsoft Word, or even in the WordPress post editor because you can use the WYSIWYG editor to format the list for you. However, if you want to code an ordered list using HTML, the experience is a little different. My previous step list sample looks like this when using HTML markup:
<ol>
<li>Write my book chapters.</li>
<li>Submit my book chapters to my publisher.</li>
<li>Panic a little when book is released to the public.</li>
<li>Breathe sigh of relief when public reviews are overwhelmingly positive!</li>
</ol>
The beginning <ol> tells your web browser to display this list as an ordered list, meaning that it will be ordered with numbers starting with the number 1. The entire list ends with the </ol> HTML tag, which tells your web browser that the ordered list is now complete.
Between the <ol> and </ol> are list items designated as such by the HTML markup <li>. Each list item starts with <li> and ends with </li>, which tells the web browser to display the line of text as one list item.
If you don’t close an open HTML markup tag — for example if you start an ordered list with <ol> but don’t include the closing </ol> at the end — it messes up the display on your website because the web browser considers anything beneath the initial <ol> to be part of the ordered list until it recognizes the closing tag: </ol>.
Unordered lists are very similar to ordered lists, except that instead of using numbers, they use bullet points to display the list, like this:
![]() Write my book chapters.
Write my book chapters.
![]() Submit my book chapters to my publisher.
Submit my book chapters to my publisher.
![]() Panic a little when book is released to the public.
Panic a little when book is released to the public.
![]() Breathe sigh of relief when public reviews are overwhelmingly positive!
Breathe sigh of relief when public reviews are overwhelmingly positive!
The HTML markup for an unordered list is just like the ordered list, except that instead of using the <ol> tag, it uses the <ul> tag (UL = unordered list):
<ul>
<li>Write my book chapters.</li>
<li>Submit my book chapters to my publisher.</li>
<li>Panic a little when book is released to the public.</li>
<li>Breathe sigh of relief when public reviews are overwhelmingly positive!</li>
</ul>
Note that both the ordered and unordered lists use the list item tags, <li> and </li>, and the only difference is in the first opening and last closing tags:
![]() Ordered lists: Use
Ordered lists: Use <ol> and </ol>
![]() Unordered lists: Use
Unordered lists: Use <ul> and </ul>
![]() List items: Use
List items: Use <li> and </li>
Customizing Theme Style with Child Themes
A WordPress theme consists of a collection of template files, stylesheets, images, and JavaScript files. The theme controls the layout and design that your visitors see on the site. Almost every WordPress theme can be used as a parent theme (or main theme) and allows for the creation of a child theme, or a subset of instructions, to override its files. This structure ensures that a child theme can selectively modify the layout, styling, and functionality of the parent theme without touching any of the code of the main, parent theme. The reason you might want to create a child theme based on a parent theme is to keep the template features, functions, and styles of the parent intact so that when you upgrade it in the future, the upgrading doesn’t override any of the customizations or changes you made to the design of the child theme. You therefore maintain the integrity of the main theme while modifying the visual look using a child theme.
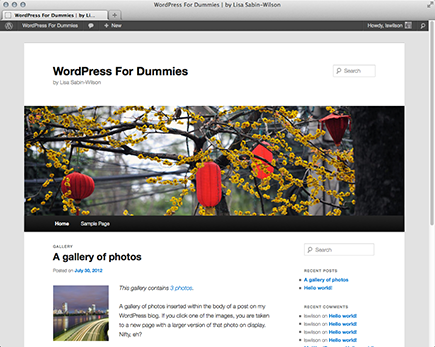
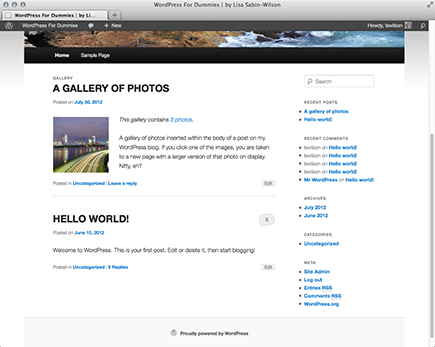
The quickest way to understand child themes is by example. In this section, you create a simple child theme using a modified style of the parent theme (but leaving the parent theme entirely intact). Currently, the default WordPress theme is Twenty Eleven. Figure 13-6 shows how the Twenty Eleven theme appears on a sample site, without any alterations in the style.
You likely have Twenty Eleven already installed on your WordPress site, and Twenty Eleven is child theme–ready; therefore, it’s a great candidate for creating an example child theme. To keep the names simple, I call the new child theme TwentyEleven Child (original, I know).
Figure 13-6: The Twenty Eleven theme.
Creating a child theme
As do regular themes, a child theme needs to reside in a directory inside the /wp-content/themes directory. The first step to creating a child theme is to add the directory that will hold it. For this example, create a new directory called twentyeleven-child inside the /wp-content/themes directory.
To register the twentyeleven-child directory as a theme and to make it a child of the Twenty Eleven theme, create a style.css file and add the appropriate theme headers. To do so, type the following code into your favorite code or plain-text editor, such as Notepad for the PC or TextMate for the Mac, and save the file as style.css:
/*
Theme Name: TwentyEleven Child
Description: My fabulous child theme
Author: Lisa Sabin-Wilson
Version: 1.0
Template: twentyeleven
*/
Typically, you’ll find the following headers in the stylesheet (style.css) of a WordPress theme:
![]()
Theme Name: The theme user sees this name on the WordPress Dashboard.
![]()
Description: This header provides the user with any additional information about the theme. Currently, it appears only on the Manage Themes page (Appearance⇒Themes).
![]()
Author: This header lists one or more theme authors. Currently, it is shown only in the Manage Themes page (Appearance⇒Themes).
![]()
Version: The version number is very useful for keeping track of outdated versions of the theme. It is always a good idea to update the version number when modifying a theme.
![]()
Template: This header changes a theme into a child theme. The value of this header tells WordPress the directory name of the parent theme. Because our child theme uses Twenty Eleven as the parent, our style.css needs to have a Template header with a value of twentyeleven (the directory name of the Twenty Eleven theme).
Now activate the new TwentyEleven Child theme as your active theme. You should see a site layout similar to the one shown in Figure 13-7 (refer to Chapter 11 for more on activating themes).
Figure 13-7 shows that the new theme doesn’t look quite right. The problem is that the new child theme replaced the style.css file of the parent theme, yet the new child theme’s style.css file is empty. You could just copy and paste the contents of the parent theme’s style.css file, but that method would waste some of the potential of child themes.
Loading a parent theme’s style
One of the great things about CSS is how rules can override one another. If you list the same rule twice in your CSS, the rule that comes last takes precedence.
For example:
a {
color: blue;
}
a {
color: red;
}
This example is overly simple, but it shows what I’m talking about nicely. The first rule says that all links (‘a’ tags) should be blue, whereas the second one says that links should be red. Because CSS says that the last instruction takes precedence, the links will be red.
Figure 13-7: My Twenty Eleven Child theme.

Using this feature of CSS, you can have your child theme inherit all the styling of the parent theme. You can also selectively modify those styles by overriding the rules of the parent theme. But how can you load the parent theme’s style.css file so that it inherits the parent theme’s styling?
Fortunately, CSS has another great feature that helps you do this with ease. Just add one line to the TwentyEleven Child theme’s style.css file, as in the following:
/*
Theme Name: TwentyEleven Child
Description: My fabulous child theme
Author: Lisa Sabin-Wilson
Version: 1.0
Template: twentyten
*/
@import url(‘../twentyeleven/style.css’);
A number of things are going on here, so let me break it down piece by piece:
![]()
@import: This tells the browser to load another stylesheet. Using the @import tag allows you to pull in the parent stylesheet quickly and easily from a particular source (url — explained in the next item).
![]()
url(‘...’): This file path indicates that the value is a location and not a normal value.
![]()
(‘../twentyeleven/style.css’);: This indicates the location of the parent stylesheet. Notice the /twentyeleven directory name. This name needs to be changed to match the Template value in the header so that the appropriate stylesheet is loaded.
With the Twenty Eleven theme’s stylesheet loaded into the TwentyEleven Child theme, your site now completely adopts the styles included in the parent Twenty Eleven, and you can use the TwentyEleven Child stylesheet to create your own styles while still using the parent theme for all the functions and features included in the template files.
Customizing the parent theme’s styling
Your TwentyEleven Child theme is set up to match the Twenty Eleven parent theme. Now you can add new styling to the TwentyEleven Child theme’s style.css file. A simple example of how customizing works involves adding a style that converts all h1, h2, and h3 headings to uppercase:
/*
Theme Name: TwentyEleven Child
Description: My fabulous child theme
Author: Lisa Sabin-Wilson
Version: 1.0
Template: twentyeleven
*/
@import url(‘../twentyeleven/style.css’);
h1, h2, h3 {
text-transform: uppercase;
}
Figure 13-8 shows how the child theme looks with the CSS style additions applied. Getting better, isn’t it?
As you can see, with just a few lines in a style.css file, you can create a new child theme that adds specific customizations to an existing theme. Not only was it quick and easy to do, but also you didn’t have to modify anything in the parent theme to make it work. Therefore, when upgrades to the parent theme are available, you can upgrade the parent to get the additional features without having to make your modifications again.
Figure 13-8: The updated child theme with uppercase headings.

More complex customizations work the same way. Simply add the new rules after the import rule that adds the parent stylesheet.
Using images in child theme designs
Many themes use images to add nice touches to the design. Typically, these images are added to a directory named images inside the theme. Just as a parent theme may refer to images in its style.css file, your child themes have their own images directory. The following sections provide examples of how these images can be used.
Using a child theme image in a child theme stylesheet
Including a child theme image in a child theme stylesheet is common. To do so, you simply add the new image to the child theme’s images directory and refer to it in the child theme’s style.css file. To get a feel for the mechanics of this process, follow these steps:
1. Create an images directory inside the child theme’s directory: /wp-content/themes/twentyeleven-child/images.
2. Add an image to use into the directory.
For this example, add an image called body-bg.png. I used a simple black-to-gray gradient that I created in Photoshop.
3. Add the necessary styling to the child theme’s style.css file, as follows:
/*
Theme Name: TwentyEleven Child
Description: My fabulous child theme
Author: Lisa Sabin-Wilson
Version: 1.0
Template: twentyeleven
*/
@import url(‘../twentyeleven/style.css’);
body {
background: #ffffff url(‘images/body-bg.png’) repeat-x;
}
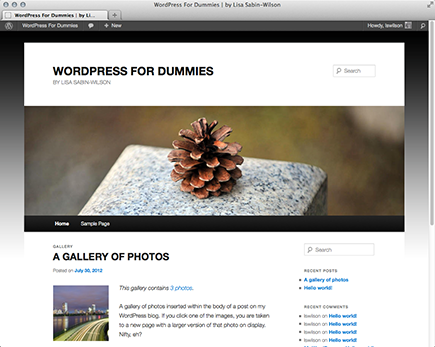
With a quick refresh of the site, you see that the site now has a new background. Figure 13-9 shows the results. You can see how the background has changed from plain white to a nice black-to-gray vertical gradient background image, with the background color changed to match the gray color in the image (indicated by the #bfbfbf code).
Figure 13-9: My Twenty Eleven Child theme after editing the background image and color.
Using a parent theme image in a child theme stylesheet
Child theme images are acceptable for most purposes. Sometimes, however, you’re better off using images supplied by the parent theme. You could just copy the parent theme image folder, with all its images, to the child theme, but that would prevent the child theme from matching the parent theme if the parent theme image ever changes, such as after an upgrade. Fortunately, you can refer to an image in the parent theme with the @import rule the same way you can reference the parent theme’s style.css file.
In the footer of the Twenty Eleven design, a line of text appears stating “Proudly powered by WordPress.” In this example, I want to add the logo image in front of the credit text in the footer. Because the logo image already exists inside the parent theme, you can simply add a customization to the child theme’s style.css file to make this change, as follows:
/*
Theme Name: Twenty Eleven Child
Description: My fabulous child theme
Author: Lisa Sabin-Wilson
Version: 1.0
Template: twentyeleven
*/
@import url(‘../twentyeleven/style.css’);
footer #site-generator a {
background: url(‘../twentyeleven/images/wordpress.png’) no-repeat
padding: 2px 25px;
}
Save the file and refresh your website. Now I’m showing my WordPress pride next to the credit text in the footer. (See Figure 13-10.)
Using a child theme image in a parent theme stylesheet
Looking at the previous examples, you might wonder whether replacing an image used in the parent’s stylesheet with one found in the child theme’s directory is possible. That would require a change to the parent theme’s stylesheet, and the idea behind a child theme is to avoid changes to the parent, so no, that isn’t possible. However, you can override the parent theme’s rule to refer to the child theme’s new image by simply creating an overriding rule in the child theme’s stylesheet that points to the new image.
The previous customization helped show my WordPress pride, and I can take that a step further. For example, I think that the WordPress logo in the footer (shown in Figure 13-10) is way too small. I can do better with a larger logo. I will use the Medium PNG: 100 x 100 (grey-m.png) WordPress button that appears on the WordPress.org Logos and Graphics page (http://word press.org/about/logos).
Figure 13-10: Showing the WordPress logo in the footer.
After you upload the desired logo to your child theme’s images directory (by going to /wp-content/themes/twentyeleven-child/images) as grey-m.png, the following style.css file replaces the WordPress logo on the parent theme’s footer with the new WordPress button:
/*
Theme Name: TwentyEleven Child
Description: My fabulous child theme
Author: Lisa Sabin-Wilson
Version: 1.0
Template: twentyeleven
*/
@import url(‘../twentyeleven/style.css’);
footer #site-generator a {
background: url(images/wp-logo.png) center left no-repeat;
padding: 2px 110px;
}
Now your child theme shows your WordPress pride loud and clear with the new, larger logo from the official WordPress.org website. If you ask me, the new look (shown in Figure 13-11) looks quite nice.
Figure 13-11: The new, larger WordPress footer icon.

You cannot directly replace parent theme images. Rather, you must provide a new image in the child theme and override the parent’s styling to refer to this new image.
Modifying Theme Structure with Child Themes
The previous section showed how to use a child theme to modify the stylesheet of an existing theme. This feature is tremendously powerful. A talented CSS developer can use this technique to create an amazing variety of layouts and designs.
However, this is just the beginning of the power of child themes. Although every child theme overrides the parent theme’s style.css file, the child theme can override the parent theme’s template files, too. However, child themes aren’t limited to just overriding template files; when needed, child themes can also supply their own template files.
Template files are PHP files that WordPress runs to render different views of the site (covered in Chapter 12). A site view is the type of content being looked at. Examples of different views are home, category archive, individual post, and page content.
Some examples of common template files are index.php, archive.php, single.php, page.php, attachment.php, and search.php. (You can read more about available template files, including how to use them, in Chapter 12.)
You might wonder what purpose is served by modifying template files of a parent theme. Although modifying a parent theme’s stylesheet allows for some very powerful control over the design, it can’t add new content, modify the underlying site structure, or change how the theme functions. To get that level of control, you need to modify the template files.
Overriding parent template files
When both the child theme and parent theme supply the same template file, the child theme file is used. The process of replacing the original parent template file is referred to as overriding.
Although overriding each of the theme’s template files can defeat the purpose of using a child theme — because updating those template files won’t enhance the child theme — sometimes you have to override to produce the results you need.
The easiest way to customize a specific template file in a child theme is to copy the template file from the parent theme folder to the child theme folder. After the file is copied, you can customize it as needed, and the changes are reflected in the child theme.
A good example of a template file that can typically be overridden is the footer.php file. Customizing the footer allows you to add site-specific branding.
Adding new template files
A child theme can override existing parent template files, but it can also supply template files that don’t exist in the parent. Although you may never need your child themes to do this, this option can open possibilities for your designs.
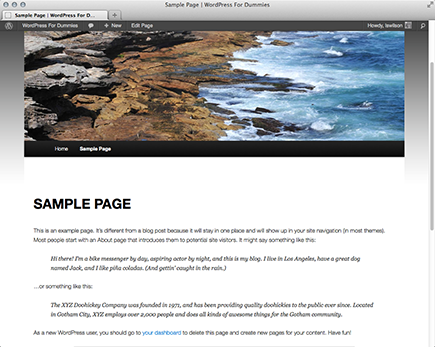
For example, this technique proves most valuable with page templates. The Twenty Eleven theme has a default page template named page.php. This page template removes the sidebar and centers the content on the page, as shown in Figure 13-12.
Having the content centered like that isn’t a design flaw. The layout was intentionally set up this way to improve readability. However, I like to have a full-width layout option that spans the entire width of the body of the site so that I can embed a video, add a forum, or add other content that works well with full width. To add the full-width layout feature to your child theme, simply add a new page template and the necessary styling to the style.css file.
A good way to create a new theme page template is to copy an existing one and modify it as needed. In this case, copying the page.php file of the parent Twenty Eleven theme to a new file, called fullwidth-page.php, is a good start. After a few customizations, the fullwidth-page.php file looks like this:
<?php
/**
* Template Name: Full width, no sidebar
*/
get_header(); ?>
<div id=”primary”>
<div id=”content” class=”full-width” role=”main”>
<?php the_post(); ?>
<?php get_template_part( ‘content’, ‘page’ ); ?>
<?php comments_template( ‘’, true ); ?>
</div><!-- #content -->
</div><!-- #primary -->
<?php get_footer(); ?>
Figure 13-12: The default page template in Twenty Eleven.

The key modification is adding class=”full-width” after the <div id=”content” markup. This new, full-width class allows you to style the page template without modifying other site styling in the parent theme.
The styling change to make this work is quick and easy. Simply add the following lines after the @import rule in the child theme’s style.css file:
#content.full-width {
margin: 0;
width: 100%;
}
#content.full-width .entry-header,
#content.full-width .entry-content,
#content.full-width .footer.entry-meta,
#content.full-width #comments-title {
margin: 0 auto;
width: 95%;
}
Switching to the new full-width page template produces the layout shown in Figure 13-13.
Figure 13-13: The new full-width, no-sidebar page template.
Removing template files
You may be asking why you would want to remove a parent’s template file. That’s a good question. Unfortunately, the Twenty Eleven theme doesn’t provide a good example of why you would want to do this. Therefore, you must use your imagination a bit here, just to understand the mechanics of removing a file from the parent theme, for future reference.
Imagine that you’re creating a child theme built off a parent theme called Example Parent. Example Parent is well designed, and a great child theme was quickly built off it. The child theme looks and works exactly the way you want it to, but there’s a problem.
The Example Parent theme has a home.php template file that provides a highly customized nonblog home page. This template works very well but isn’t what you want for the site. You want a standard blog home page. If the home.php file didn’t exist in Example Parent, everything would work perfectly.
There isn’t a way to remove the home.php file from Example Parent without modifying the Parent theme (which you never, ever want to do), so you have to use a trick. Instead of removing the file, override the home.php file and have it emulate index.php.
You may think that simply copying and pasting the Example Parent index.php code into the child theme’s home.php file would be a good approach. Although this would work, there is a better way: You can tell WordPress to run the index.php file so that changes to index.php are respected. This single line of code inside the child theme’s home.php is all you need to replace home.php with index.php:
<?php locate_template( array( ‘index.php’ ), true ); ?>
The locate_template function does a bit of magic. If the child theme supplies an index.php file, it is used. If not, the parent index.php file is used.
This approach produces the same result that removing the parent theme’s home.php file would have. The home.php code is ignored and the changes to index.php are respected.
..................Content has been hidden....................
You can't read the all page of ebook, please click here login for view all page.