
Figure 3-1: On the WordPress main page, click the Get Started button.
Chapter 3
Getting Started with WordPress
In This Chapter
![]() Signing up for a blog
Signing up for a blog
![]() Familiarizing yourself with the Dashboard
Familiarizing yourself with the Dashboard
![]() Understanding important options to set before you begin
Understanding important options to set before you begin
If you’re just starting out and don’t want to spend money purchasing a domain name and hosting your site with a third-party web host, WordPress has a great solution for you.
This book takes a complete look at the hosted service offered at WordPress, and in this chapter, you discover how to create a free blog through this service. You also find out how to get your hosted blog up and running.
 Don’t confuse WordPress with the blogging software available for download at
 WordPress.org! Both were created and developed by the same folks and they do have the same name; however, they are different varieties of WordPress. See Part III for information on installing and using the self-hosted version of WordPress.org.
Creating a WordPress Account
To create your WordPress user account, follow these steps:
1. In the address bar of your browser, enter the URL wordpress.com.
2. On the page that appears, click the Get Started button shown in Figure 3-1.

You’re taken to the WordPress signup page at wordpress.com/signup.
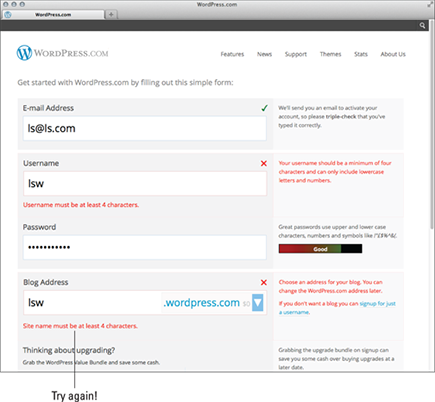
3. In the Blog Address text box, type the word you’ve chosen as your blog address.
Whatever you enter here becomes the URL address of your blog. It must be at least four characters (letters and numbers only), and don’t worry about choosing the perfect thing; you can change this later. You can use any blog address you want; however, if you choose a blog address that doesn’t follow certain rules, WordPress displays a message, as shown in Figure 3-2. If you see this message, you need to pick a new one because WordPress doesn’t allow duplicate blog addresses. Keep in mind that search engines catalog your content based on your chosen URL, so use a domain name that relates well to your site’s content.
Figure 3-2: WordPress has rules about the length of a site name.
4. Select the suffix for your blog address.
In the drop-down list to the right of the Blog Address text box, you have several options. One is free and the others cost you $18 to $25/year. In Figure 3-3, I typed lswtester as my blog address and chose the wordpress.com suffix, which creates the full blog address of http:// lswtester.wordpress.com. However, WordPress gives me the option to purchase the available domain name lswtester if I want to spend an additional $18. WordPress also makes the .net, .me, and .org suffixes available for purchase. See Chapter 6 for more information about domain names and suffixes. For now, select the free wordpress.com suffix; you can always upgrade to a paid domain later if you want.
Figure 3-3: Select the free WordPress suffix for your blog address.

5. In the Username text box, enter the name you want to use to log in to your blog from now until forever.
Your username must be at least four characters with letters and numbers only. WordPress automatically fills in the username box with the same username as the blog address you typed in Step 3; however, you don’t have to use that one and can choose to type in your own, unique username. For security purposes, choose a username that’s different from your blog address because that makes it more difficult for anyone to guess. You can change the username on the blog you’re creating right now after you log in and have access to the Dashboard. (See the “Setting your public profile: Tell us a little about yourself” section later in this chapter.)
6. Type a password of your choice, in the Password text box.
You use this password to log in to your new WordPress account. Choose and then type a password that you’ll remember, but not one that would be easy for anyone to guess. Your password must be at least four characters. WordPress gives you a visual indicator of the strength of your password choice, with strength meaning how easy or difficult it is for someone to guess what your password is.
7. Type your e-mail address in the E-mail Address text box.
This address isn’t made public on your blog; rather, it’s used for communication between you and WordPress. You can change this address later, in the Options section on your WordPress.com Dashboard.
8. Review upgrade options.
WordPress has several upgrade options such as domain names, space upgrades, and custom design. During the signup process, WordPress offers a Value Bundle that provides you with upgraded features for $99, which you can add to your blog by clicking the Upgrade button in this step. For now, though, click the Create Blog button to obtain a free blog and you can learn more about the upgrades offered by WordPress in Chapter 5.
9. Click the Create Blog button.
This completes the signup process, and a new page opens with a message that WordPress has sent you an e-mail containing a link to activate your account. As you wait for that e-mail to arrive, take a moment to fill out the Update Your Profile! form on this page. Enter your first name, last name, and a few sentences about yourself. Then click the Save Profile button. Later, you can choose to display your profile information on your blog. (See the later section “Setting your public profile: Tell us a little about yourself”.)
By clicking the Create Blog button, you also indicate that you fully agree to, and understand, the WordPress Terms of Service. If you’d like to read the fine print, you can find the Terms of Service at wordpress.com/tos.
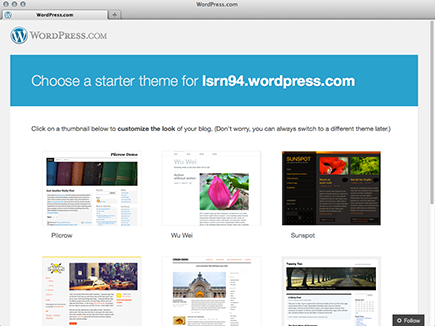
10. Choose a theme and start blogging.
The final signup step is to choose one of several themes (or template designs covered in Chapter 5) that WordPress provides for your blog. Don’t worry about your choice here because, as you discover later in this book, you can come back and change your theme anytime. For now, find the Twenty Eleven theme (on the screen shown in Figure 3-4) and select it for your blog by clicking its thumbnail.
Figure 3-4: Choose a theme and start blogging.
11. Check your e-mail and click the Activate Blog link in the e-mail message from WordPress to activate your new WordPress blog.
The Dashboard for your WordPress account loads in your browser window with a message welcoming you to WordPress. The Dashboard also displays a few helpful items to help you get started, including
• A video entitled “Welcome to WordPress.com” that gives you a quick tutorial of the WordPress.com services.
• A link to the WordPress Zero-to-Hero guide that gives you an introduction to WordPress: learn.wordpress.com
• A link to the WordPress 24/7 support documentation: support.wordpress.com
If you don’t want to see the Welcome box at the top of your Dashboard page, click the Hide This Screen link in the bottom-right corner of the Welcome to WordPress.com box, as shown in Figure 3-5.
Figure 3-5: The Welcome to WordPress.com box appears on your Dashboard when you first log in.

Your new blog is yours to use for the life of your blogging career on WordPress.com. You can log in to your blog anytime by going to wordpress.com and clicking the Log In button in the top-right corner of the WordPress website (refer to Figure 3-1).
 Have you ever signed up for a service on the web only to forget your username and/or password for that service mere weeks later? Yep, me, too. File that e-mail from WordPress in a safe place for future reference — just make sure you remember where you put it. Or you can tell WordPress to remember you each time you enter the site. To do so, select the Remember Me check box. WordPress places a cookie in your browser files that tells it to remember your login credentials the next time you visit the site. (You need to have cookies enabled in your browser configurations for this feature to work.)
If you delete your cookies in your browser and then visit WordPress again, you won’t see the WordPress menu bar and will have to log in again. Likewise, after you delete the cookies in your browser, when you visit your new blog, it appears to you as though you are a visitor (that is, you see no menu bar with quick links for logging on to your Dashboard). In this case, you have to revisit the WordPress main site to log in again.
You can get help and support for your WordPress account in the Support Forums here: wordpress.com/forums. Find answers to frequently asked questions here: learn.wordpress.com.
Navigating WordPress
When you successfully log in to your new account from the main WordPress home page, WordPress returns you to the main WordPress website — only this time, you see a slightly different display on the home page — a tabbed navigation menu shown in Figure 3-6. The navigation menu contains shortcut links to some important areas of interest:
![]() New Post: Click this tab to write and publish a post on your WordPress blog. The WordPress Dashboard, covered in the next section of this chapter, has the full post interface; however, this part of the WordPress home page provides you with a quick way to publish a quick post.
New Post: Click this tab to write and publish a post on your WordPress blog. The WordPress Dashboard, covered in the next section of this chapter, has the full post interface; however, this part of the WordPress home page provides you with a quick way to publish a quick post.
![]() Reader: Click this tab to discover new posts and updates from the WordPress.com blogs that you follow.
Reader: Click this tab to discover new posts and updates from the WordPress.com blogs that you follow.
![]() Notifications: Under this tab, you find updates from blogs that you subscribe to in the WordPress.com network, as well as discussions and comments that you subscribe to.
Notifications: Under this tab, you find updates from blogs that you subscribe to in the WordPress.com network, as well as discussions and comments that you subscribe to.
![]() Stats: Click this tab to view the statistics of your WordPress blog in graphical format. At a glance, discover who is visiting your blog and where they are coming from.
Stats: Click this tab to view the statistics of your WordPress blog in graphical format. At a glance, discover who is visiting your blog and where they are coming from.
![]() My Blog: This tab displays quick access links to blogs that you own within the WordPress network.
My Blog: This tab displays quick access links to blogs that you own within the WordPress network.
![]() Freshly Pressed: Click this tab and discover the latest posts from bloggers within the WordPress.com network.
Freshly Pressed: Click this tab and discover the latest posts from bloggers within the WordPress.com network.
You find the same links when you hold your mouse pointer over the small WordPress logo displayed at the top left of your browser window. The links appear in a drop-down menu for easy access.
Quick access links to important areas of your WordPress Dashboard appear after you log in to your WordPress account. You see a bar at the very top of your browser window, on the right side. This bar also appears at the top of any WordPress blog you surf to, as long as you are logged in to your WordPress account. This menu bar consists of several helpful quick links for you to access your account, your Dashboard, and various options.
Figure 3-6: Navigation tabs are on the WordPress home page.

Hover your mouse over your username at the top right of your browser and you see the following links in a drop-down menu:
![]() Your name: Click this to visit Account Settings where you can edit your own user profile, password, e-mail address, and applications (or third-party applications such as Twitter or Facebook).
Your name: Click this to visit Account Settings where you can edit your own user profile, password, e-mail address, and applications (or third-party applications such as Twitter or Facebook).
![]() Find Friends: Click this link to visit the Find Friends page where you can locate your friends in other networks such as Twitter, Facebook, and Google Plus. You can also find friends and/or blogs within the network by using the Recommended Blogs link, or explore the topics to find blogs of interest to you.
Find Friends: Click this link to visit the Find Friends page where you can locate your friends in other networks such as Twitter, Facebook, and Google Plus. You can also find friends and/or blogs within the network by using the Recommended Blogs link, or explore the topics to find blogs of interest to you.
![]() Manage My Blogs: This takes you to the My Blogs page on your WordPress Dashboard where you see a list of all the blogs you own; WordPress allows you to operate more than one blog in its network.
Manage My Blogs: This takes you to the My Blogs page on your WordPress Dashboard where you see a list of all the blogs you own; WordPress allows you to operate more than one blog in its network.
![]() Help: Click this link to visit the support area of WordPress.com at
Help: Click this link to visit the support area of WordPress.com at support.wordpress.com where you can find helpful articles and tutorials on using your WordPress account.
Using the WordPress Dashboard
When you click the Dashboard link under the My Blog navigation tab (covered in the preceding section), you go directly to your WordPress Dashboard page shown in Figure 3-7. Several modules on the Dashboard provide you with information about your blog, as well as actions you can take to navigate to other areas of the Dashboard, such as writing a new post and adding a new link or blogroll.
You can configure the Dashboard modules by moving them around on the page and changing the way they display. Hover your mouse pointer over the title bar of the module you want to move. Click and drag the module to the spot you’d like to move it and release the mouse button. This drag-and-drop capability is available not only on the Dashboard page but also on all the inner pages of the WordPress Dashboard, so you can truly configure the panel to suit your needs. You can also expand (open) and collapse (close) the individual modules by clicking the mouse anywhere within the gray title bar of the module.
This configuration feature is really nice because it allows you to use the Dashboard to see just those modules that you use regularly. The concept is easy: Keep the modules you use all the time open and close the ones that you use only occasionally — you can open those modules only when you really need them. Additionally, you can click the Screen Options tab at the top right of your Dashboard screen to configure other options for your Dashboard display, such as which modules you would like to show or hide.
The navigation menu on the WordPress Dashboard appears on the left side of your browser window. When you need to get back to the WordPress Dashboard, click the Dashboard link that appears at the top of the navigation menu of any page on your WordPress Dashboard. Each navigation item that appears in the menu has a submenu of links associated with it — hold your mouse pointer over a menu item and the submenu flies out on the right side of the menu, so you can click any of the submenu links.
Right Now
The Right Now module of the Dashboard gives you some stats on what’s happening in your blog this very second. Figure 3-7 shows what was happening in my WordPress blog when I took a picture of it.
Figure 3-7: The Dashboard page serves as the control center of your blog.

The Dashboard displays the following information under the Content header in the Right Now module:
![]() The number of posts: The number here always reflects the total number of posts you currently have in your WordPress blog. Figure 3-7 shows that I have 1 post on my blog. The number is blue; click the number, and you go to the Edit Posts page where you can edit the posts on your blog. I cover editing posts in Chapter 4.
The number of posts: The number here always reflects the total number of posts you currently have in your WordPress blog. Figure 3-7 shows that I have 1 post on my blog. The number is blue; click the number, and you go to the Edit Posts page where you can edit the posts on your blog. I cover editing posts in Chapter 4.
![]() The number of pages: This is the number of pages on your blog, which will change as you add or delete pages. Pages, in this context, refer to the static pages you created in your blog. Figure 3-7 shows that my blog has 1 page.
The number of pages: This is the number of pages on your blog, which will change as you add or delete pages. Pages, in this context, refer to the static pages you created in your blog. Figure 3-7 shows that my blog has 1 page.
Clicking this link takes you to the Edit Pages screen, where you can view, edit, and delete your current pages. Find the difference between WordPress posts and pages in Chapter 4.
![]() The number of categories: This is the number of categories you have on your blog, which will change as you add and delete categories. Figure 3-7 shows that I have 1 category for my blog.
The number of categories: This is the number of categories you have on your blog, which will change as you add and delete categories. Figure 3-7 shows that I have 1 category for my blog.
Clicking this link takes you to the Categories Page, where you can view, edit, and delete your categories or add brand new ones. For details about the management and creation of categories, see Chapter 4.
![]() The number of tags: This is the number of tags you have in your blog, which will change as you add and delete tags in the future. Figure 3-7 shows that I have 0 tags.
The number of tags: This is the number of tags you have in your blog, which will change as you add and delete tags in the future. Figure 3-7 shows that I have 0 tags.
Clicking this link takes you to the Tags page where you can add new tags and view, edit, and delete your current tags. You can find more information about tags in Chapter 4.
The Dashboard displays information about comments on your blog under the Discussion header in the Right Now module. Specifically, you find the total number of comments currently on your blog. Figure 3-7 shows that I have 1 Comment, 1 Approved, 0 Pending (waiting to be approved), and 0 Spam. Clicking any of these four links takes you to the Edit Comments page where you can manage the comments on your blog. I cover the management of comments in Chapter 4.
The last section of the Dashboard’s Right Now module shows the following information:
![]() Which WordPress theme you’re using: Figure 3-7 shows that I’m using the Twenty Eleven theme. The theme name is a link that takes you to the Manage Themes page where you can view and activate themes on your blog (see Chapter 5 for more).
Which WordPress theme you’re using: Figure 3-7 shows that I’m using the Twenty Eleven theme. The theme name is a link that takes you to the Manage Themes page where you can view and activate themes on your blog (see Chapter 5 for more).
![]() How many widgets you’ve added to your blog: This is the number of WordPress widgets you’re using in your blog. Figure 3-7 shows that I have 0 widgets. The number is a link that takes you to the Widgets page where you can change your widget options by editing them, moving them, or removing them. I cover widgets in detail in Chapter 5.
How many widgets you’ve added to your blog: This is the number of WordPress widgets you’re using in your blog. Figure 3-7 shows that I have 0 widgets. The number is a link that takes you to the Widgets page where you can change your widget options by editing them, moving them, or removing them. I cover widgets in detail in Chapter 5.
![]() Akismet spam stats: This is the last statement in the Right Now section and it gives you a quick look into how many spam comments and trackbacks the Akismet application has successfully blocked from your site. Figure 3-7 shows that Akismet hasn’t blocked any spam comments on my site; because it’s a pretty new blog, spammers haven’t found it yet.
Akismet spam stats: This is the last statement in the Right Now section and it gives you a quick look into how many spam comments and trackbacks the Akismet application has successfully blocked from your site. Figure 3-7 shows that Akismet hasn’t blocked any spam comments on my site; because it’s a pretty new blog, spammers haven’t found it yet.
Recent Comments
The next module is Recent Comments. Within this module, you find
![]() Most recent comments published to your blog: WordPress displays a maximum of five comments in this area.
Most recent comments published to your blog: WordPress displays a maximum of five comments in this area.
![]() The author of each comment: The name of the person who left the comment appears above the comment. This section also displays the author’s picture (or avatar) if she has one.
The author of each comment: The name of the person who left the comment appears above the comment. This section also displays the author’s picture (or avatar) if she has one.
![]() A link to the post the comment was left on: The post title appears to the right of the commenter’s name. Click the link and you go to that post on the Dashboard.
A link to the post the comment was left on: The post title appears to the right of the commenter’s name. Click the link and you go to that post on the Dashboard.
![]() An excerpt of the comment: This is a snippet of the comment left on your blog.
An excerpt of the comment: This is a snippet of the comment left on your blog.
![]() Comment management links: Hover your mouse pointer over the comment, and five links appear that give you the opportunity to manage those comments right from your Dashboard. (I discuss comment management in Chapter 4.)
Comment management links: Hover your mouse pointer over the comment, and five links appear that give you the opportunity to manage those comments right from your Dashboard. (I discuss comment management in Chapter 4.)
• Unapprove: This link appears only if you have comment moderation turned on.
• Reply: This link displays a text box in which you can quickly reply to the comment right from your Dashboard.
• Edit: This link opens the Edit Comments page (Chapter 4) where you can edit the comment.
• Spam: Clicking this link marks that comment as spam.
• Trash: Clicking this link deletes the comment from your blog.
![]() All link: Click this link to see all the comments that have been left on your blog. Clicking the All link takes you to the Comments page (Chapter 4), where you can view and edit, moderate, or delete any comments that have been left for your blog.
All link: Click this link to see all the comments that have been left on your blog. Clicking the All link takes you to the Comments page (Chapter 4), where you can view and edit, moderate, or delete any comments that have been left for your blog.
Your Stuff
Scroll further down the Dashboard page, and you find a module titled Your Stuff; in it, you see the following sections:
![]() Today: Click the links here to go to a page with options that let you manage today’s posts. This page contains new or updated posts you’ve made during the day.
Today: Click the links here to go to a page with options that let you manage today’s posts. This page contains new or updated posts you’ve made during the day.
![]() A While Ago: Click the links here to go to a page with options that let you manage posts and updates you made in past days.
A While Ago: Click the links here to go to a page with options that let you manage posts and updates you made in past days.
What’s Hot
Last but not least, the What’s Hot section provides information about happenings in and around WordPress, including WordPress news, top blogs, top posts, fastest-growing blogs, and the latest posts made to blogs on WordPress. This section helps you stay in touch with the WordPress community as a whole.
The tabs across the top of the What’s Hot Module include navigation for
![]() WordPress.com News: Listing of posts about WordPress from the official WordPress blog
WordPress.com News: Listing of posts about WordPress from the official WordPress blog
![]() Top Blogs: Listing of the top blogs within the global WordPress network
Top Blogs: Listing of the top blogs within the global WordPress network
![]() Top Posts: Listing of the most recent top blog posts (or most popular) from within the global WordPress network
Top Posts: Listing of the most recent top blog posts (or most popular) from within the global WordPress network
![]() Latest: Listing of the most recent posts from within the global WordPress network
Latest: Listing of the most recent posts from within the global WordPress network
QuickPress
The QuickPress module is a handy form that allows you to write, save, and publish a blog post right from your WordPress Dashboard. The options are very similar to the ones I cover in the section on writing posts in Chapter 4.
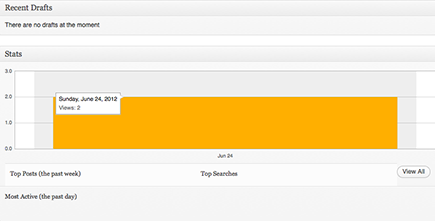
Recent Drafts
If you’re using a brand new WordPress blog, the Recent Drafts module displays the message There are no drafts at the moment because you have not written any drafts. As time goes on, however, and you have written a few posts in your blog, you may save some of those posts as drafts to be edited and published later. These drafts will be shown in the Recent Drafts module. Figure 3-7 shows the There are no drafts at the moment message in my Recent Drafts module.
WordPress displays up to five drafts in this module and displays the title of the post, the date it was last saved, and a short excerpt. Click the View All button to go to the Manage Posts page, where you can view, edit, and manage your blog posts. Check out Chapter 4 for more information on that.
Stats
The last module of the Dashboard page is Stats (Figure 3-8). It includes a visual graph of your blog stats for the past several days. These stats represent how many visitors your blog received each day. The bottom of the Stats module shows some specific information:
![]() Top Posts: This display lists the most popular posts in your blog, determined by the number of visits each post received. It also shows you exactly how many times each post has been viewed.
Top Posts: This display lists the most popular posts in your blog, determined by the number of visits each post received. It also shows you exactly how many times each post has been viewed.
![]() Top Searches: This area tells you the top keywords and search phrases people used to find your blog in search engines.
Top Searches: This area tells you the top keywords and search phrases people used to find your blog in search engines.
![]() Most Active: This area tells you which posts in your blog are the most active, determined by the number of comments left on each post. You can click the title of a post, and WordPress loads that post in your browser window.
Most Active: This area tells you which posts in your blog are the most active, determined by the number of comments left on each post. You can click the title of a post, and WordPress loads that post in your browser window.
![]() View All: Click this button to view all stats for your blog on the My Stats page.
View All: Click this button to view all stats for your blog on the My Stats page.
Figure 3-8: The Stats section of the WordPress Dashboard has an easy-to-read graph.
If you find that you don’t use a few modules on your Dashboard page, you can get rid of them altogether by following these steps:
1. Click the Screen Options tab at the top-right of the Dashboard.
Clicking this tab drops down the Screen Options menu, displaying the title of each module with check boxes to the left of each title.
2. Deselect the module you want to hide on your Dashboard by clicking the check mark in the check box.
The module you deselected disappears from your Dashboard. If you have hidden one module and find later that you really miss having it on your Dashboard, you can simply enable that module again by selecting it from the Screen Options menu.
Setting Important Options before You Blog
The options in this section help you get started managing your own WordPress blog. In this section, you discover how to set the primary options that personalize your blog including creating your user profile, setting the date and time stamp (based on your own time-zone settings), and uploading a picture of yourself.
Setting your General options
To begin personalizing your WordPress blog by setting the General options, follow these steps:
1. Hover your mouse pointer over the Settings menu item in the navigation menu.
2. Click the General link on the Settings submenu.
The General Settings page opens, as shown in Figure 3-9.
Figure 3-9: Personalize your blog with the General Settings page on the WordPress Dashboard.

3. Enter the name of your blog in the Site Title text box.
You can revisit this page anytime and change the blog name as often as you like.
4. In the Tagline text box, enter a slogan or a motto that describes you or your blog.
The tagline should be a short (one line) phrase that sums up the tone and premise of your blog. Figure 3-9 shows I used the tagline: Smile! You’re at the best WordPress.com site ever, which goes along with my chosen Site Title of lsrn94.
5. Enter your e-mail address in the E-mail Address text box.
Enter the e-mail address that you used to sign up with WordPress. You can change this address, but be warned: If you change the e-mail address here, it won’t become active until you confirm that you are in fact the owner of said e-mail address. Confirmation is simple: WordPress sends an e-mail to that address, providing a link you click to confirm that you are the owner. This e-mail address is used for administrative purposes only, which consists mainly of communication between you and WordPress.
Adjusting your Date and Time settings
After you configure the name, tagline, and e-mail options that I discuss in the preceding section, the remaining items on the General Settings page include setting your local time zone so that your blog posts are published with a time stamp in your own time zone no matter where in the world you are. Use the following options to establish your settings in this area, as shown in Figure 3-10.
![]() Timezone: Choose your UTC time from the drop-down menu. This setting refers to the number of hours that your local time differs from Coordinated Universal Time (UTC). This setting ensures that all your blog posts and comments left on your blog are time-stamped with the correct time. If you’re lucky enough, like me, to live on the frozen tundra of Wisconsin, which is in the Central time zone (CST), you would choose –6 from the drop-down menu because that time zone is 6 hours off UTC.
Timezone: Choose your UTC time from the drop-down menu. This setting refers to the number of hours that your local time differs from Coordinated Universal Time (UTC). This setting ensures that all your blog posts and comments left on your blog are time-stamped with the correct time. If you’re lucky enough, like me, to live on the frozen tundra of Wisconsin, which is in the Central time zone (CST), you would choose –6 from the drop-down menu because that time zone is 6 hours off UTC.
If you’re unsure what your UTC time is, you can find it at the Greenwich Mean Time website at wwp.greenwichmeantime.com. GMT is essentially the same thing as UTC. WordPress provides some major city names in the Timezone drop-down menu to help make it a bit easier to select your correct time zone. For those of you who live in areas that recognize daylight saving time, your WordPress blog will automatically update and make that adjustment when the time comes.
Figure 3-10: Choose Date and Time settings for your WordPress blog.
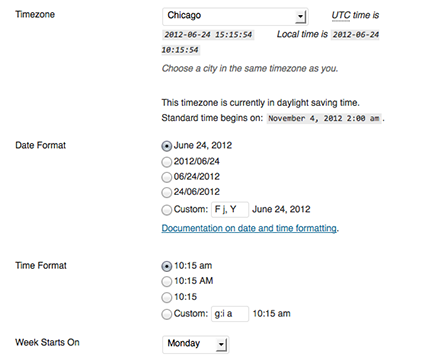
![]() Date Format: Select how you want to display the date. The default format is F j, Y (F = the full month name; j = the two-digit day; Y = the four-digit year), which gives you the output of June 24, 2012. Select a different format by clicking the circle to the left of the option.
Date Format: Select how you want to display the date. The default format is F j, Y (F = the full month name; j = the two-digit day; Y = the four-digit year), which gives you the output of June 24, 2012. Select a different format by clicking the circle to the left of the option.
![]() Time Format: Select how you want to display the time. The default format is g:i a (g = the two-digit hour; i = the two-digit minute; a = lowercase a.m. or p.m.), which gives you the output of 10:15 a.m. Select a different format by clicking the circle to the left of the option. You can also customize the date display by selecting the Custom option and entering your preferred format in the text box provided; find out how at
Time Format: Select how you want to display the time. The default format is g:i a (g = the two-digit hour; i = the two-digit minute; a = lowercase a.m. or p.m.), which gives you the output of 10:15 a.m. Select a different format by clicking the circle to the left of the option. You can also customize the date display by selecting the Custom option and entering your preferred format in the text box provided; find out how at
codex.wordpress.org/Formatting_Date_and_Time.
![]() Week Starts On: From the drop-down menu, choose the day the week starts in your calendar. The display of the calendar in the sidebar of your blog is optional. If you choose to display the calendar, you can select the day of the week you want your calendar to start with.
Week Starts On: From the drop-down menu, choose the day the week starts in your calendar. The display of the calendar in the sidebar of your blog is optional. If you choose to display the calendar, you can select the day of the week you want your calendar to start with.
Finally, set your language preference by clicking the Language drop-down menu and selecting from the several different language options provided by WordPress. This language is the language that your blog is primarily written in.
Click the Save Changes button at the bottom of any page where you set new options. If you don’t click Save Changes, your settings aren’t saved, and WordPress reverts to the previous options.
Setting your public profile: Tell us a little about yourself
The next set of options you need to update is your profile. In this area, you configure your personal settings to individualize your WordPress blog and tell the world a little more about yourself. This blog is, after all, about you, and this is your opportunity to brag and promote!
To get started telling the world about yourself, follow these steps:
1. Hover your mouse pointer over the Users menu item in the navigation menu.
2. Click the My Profile link on the Users menu.
The My Public Profile page opens, as shown in Figure 3-11.
You can adjust all sorts of personal settings to let your visitors get to know you better. You can be liberal with the information you share, or be as stingy as you want. It’s your blog, after all.
Figure 3-11: Brag about yourself on the My Public Profile page on the Dashboard.

Choose carefully the information you share on your blog, especially if you have a public blog on WordPress — public blogs can (and are) viewed by a worldwide audience! If you don’t want people to know your real name, use a nickname. If you don’t want to share a picture of yourself for fear of shattering computer monitors worldwide, you can choose not to upload any picture at all or to upload a picture of something that reflects the essence of you. (You can post a picture of a book if you’re an avid reader, a picture of a camera if you’re a photographer, and so on.)
Make your blog your own. Stake your claim and mark your territory in this section!
Basic Details
In the first section of the My Public Profile page, you can see seven settings for your blog, only six of which you can change:
![]() Username: This displays your current username; you can change your username by clicking the nearby Change link.
Username: This displays your current username; you can change your username by clicking the nearby Change link.
![]() First Name: Type your first name in the text box provided.
First Name: Type your first name in the text box provided.
![]() Last Name: Type your last name in the text box provided.
Last Name: Type your last name in the text box provided.
![]() Full Name: Type your full name in the text box provided.
Full Name: Type your full name in the text box provided.
![]() Display Name Publicly As: Type in the name you would like displayed publicly.
Display Name Publicly As: Type in the name you would like displayed publicly.
![]() Location: Type your location in the text box provided.
Location: Type your location in the text box provided.
![]() About You: In this section, you can provide a little biography, as well as change the password for your blog. Figure 3-11 shows this section in detail.
About You: In this section, you can provide a little biography, as well as change the password for your blog. Figure 3-11 shows this section in detail.
Contacts
In the Contacts section of the My Public Profile page, you can add different types of contact information and make them public on your profile. Followers of the blog use this information to keep in touch with you and ask you questions. Here’s what’s included (you don’t need to fill in all this information):
![]() Home Phone, Work Phone, Mobile Phone: Type these phone numbers if you so desire.
Home Phone, Work Phone, Mobile Phone: Type these phone numbers if you so desire.
![]() Public Email: Type your e-mail address in the text box.
Public Email: Type your e-mail address in the text box.
![]() AIM, Live Messenger, Yahoo!, ICQ, Jabber: If you want to share this information, enter your identities in the appropriate text boxes.
AIM, Live Messenger, Yahoo!, ICQ, Jabber: If you want to share this information, enter your identities in the appropriate text boxes.
![]() GTalk and Skype: Type your Google Talk and Skype names in the text boxes if you’d like to share them.
GTalk and Skype: Type your Google Talk and Skype names in the text boxes if you’d like to share them.
Photos
To include several different photographs on your WordPress.com profile, click the Add Photo Through Gravatar button to upload photos from your computer. Any photos you add in this section will be displayed on your Profile page on WordPress.
Links
Add any links to websites that you’d like to have listed on your Profile page. For example, if you have several different websites other than the one you’re creating on WordPress, you can add the links to those websites here so that they appear on your public profile for people to visit.
To add links, simply type the link URL in the URL text box, and the name of the page in the Title text box. Then click the Add Link button. You can edit and delete links in this area of the My Public Profile page anytime you want.
Verified external services
Verified external services are online services such as social networking and social bookmarking sites that you use in addition to your WordPress blog. WordPress wants you to include your online identities with these services because, in the words of WordPress, “they help people to confirm that you are in fact who you say you are.” Your verified external services will be listed on your public profile. The different types of external services available in this section include
![]() Blogger
Blogger
![]() Facebook
Facebook
![]() Flickr
Flickr
![]() foursquare
foursquare
![]() FriendFeed
FriendFeed
![]() Goodreads
Goodreads
![]() Google Profiles
Google Profiles
![]() LinkedIn
LinkedIn
![]() MySpace
MySpace
![]() Posterous
Posterous
![]() TripIt
TripIt
![]() Tumblr
Tumblr
![]() Twitter
Twitter
![]() Vimeo
Vimeo
![]() WordPress
WordPress
![]() Yahoo!
Yahoo!
![]() YouTube
YouTube
Current Gravatar
Want to show the world your pretty picture? In the Current Gravatar section of the My Public Profile page, you can upload a picture of yourself or an image that represents you. This image is called a gravatar. This section is located on the right side of the My Public Profile page (refer to Figure 3-11).
The picture/avatar that you insert into your WordPress blog is used in several ways:
![]() The WordPress Blogs of the Day page (
The WordPress Blogs of the Day page (botd.wordpress.com/ top-posts): This page lists the top posts from the top blogs of the day. If your blog is included in this list, a smaller version of the picture you’ve uploaded to your profile appears next to the listing.
![]() The Freshly Pressed: Also called a “fresh” post, this appears on the main page at
The Freshly Pressed: Also called a “fresh” post, this appears on the main page at wordpress.com, under the Freshly Pressed tab. If the WordPress spotlight shines in your direction, your picture is displayed here for your own 15 minutes of WordPress fame.
![]() The WordPress directory (by topic) of its community blogs: This directory is called the Tags page (
The WordPress directory (by topic) of its community blogs: This directory is called the Tags page (wordpress.com/tags). Bloggers on WordPress can tag their posts with keywords that help define the topics of their posts; WordPress collects all those tagged posts and sorts them by name on the Tags page.
![]() On Tag pages: This blogging page (
On Tag pages: This blogging page (wordpress.com/tag/blogging) allows you to find the most recent posts that WordPress bloggers have made on the topic of blogging. If your blog appears in this directory, a thumbnail of your picture appears, as well.
Follow these steps to insert a picture or avatar into your profile:
1. Choose the image you want to attach to your profile and save it to your computer.
Upload an image that’s at least 128 pixels wide and 128 pixels tall. Later in these steps, you see how you can crop a larger image to the perfect size.
2. In the Current Gravatar section of the My Public Profile page, click the Change Your Gravatar link.
The Gravatar.com window appears. Click the Upload a New Image from Your Computer link. The Select File from Your Computer window opens.
3. Click the Browse button and select an image from your computer.
4. Click the Next button.
No matter what size image you chose, the Gravatar.com page allows you to crop your image to the correct size and lets you decide which part of your image to use for your picture display. When you click the Next button, the Crop Your Photo page appears, and you can crop your chosen picture to the desired size. See Figure 3-12.
5. Use the crop tool to highlight the area of the picture that you want to remain after cropping.
In Figure 3-12, the box with a dotted line outlines the part of the image I’ve chosen to use. This dotted outline indicates the size the picture will be when I’m done cropping it. You can move that dotted box around to choose the area of the image you want to use as your avatar. The Gravatar.com crop tool gives you two previews of your cropped image on the right side of the window: Small Preview and Large Preview.
6. Click the Crop and Finish! button.
The Choose a Rating page opens, where you can choose a rating for your new Gravatar.
Figure 3-12: Using the WordPress image-cropping interface.

7. Choose a rating.
The rating system works very much like the movie rating system we’re all familiar with: G, PG, R, and X. A G rating means that your Gravatar is suitable for all ages, whereas an X rating means that your Gravatar contains some unmentionables that you would not want any kids to see.
8. Choose an e-mail address.
If you have more than one e-mail address associated with your WordPress account, you can assign your Gravatar to a particular e-mail address so that your Gravatar images appear on any blog you comment on, provided that you use your assigned e-mail address to do so.
When you’re done, you get a message from Gravatar.com that says Your new Gravatar is now being applied.
9. Click the X in the upper-right corner of the window to return to the Profile page on your WordPress Dashboard.
The My Public Profile page now displays your newly uploaded Gravatar. Visit this page again, anytime, to change your Gravatar.
Setting your preferences
WordPress gives you the capability to set a few different preferences based on your individual tastes for publishing, proofreading, and passwords. On the WordPress Dashboard, click the Personal Settings link in the Users menu to load the Personal Settings page. Here, you have several different options available to you.
Personal Options
This section gives you the opportunity to configure some basic settings for how you would like to manage your WordPress.com site, including the display color of the Dashboard, use of keyboard shortcuts, text messaging, and more.
![]() Fun: Select this box to tell WordPress to set up all of the options for you. This is called Fun Mode because WordPress sets random configurations for the Personal Settings, so you may be surprised with what you get.
Fun: Select this box to tell WordPress to set up all of the options for you. This is called Fun Mode because WordPress sets random configurations for the Personal Settings, so you may be surprised with what you get.
![]() Instant Feedback: Select this box to have WordPress display instant feedback details on your posts after you publish them. Information displayed includes things like social media sharing and tips for improving your posts.
Instant Feedback: Select this box to have WordPress display instant feedback details on your posts after you publish them. Information displayed includes things like social media sharing and tips for improving your posts.
![]() Admin Color Scheme: This option changes the colors on your WordPress Dashboard, which uses the Gray color scheme by default. The other option is Blue — the choice is yours!
Admin Color Scheme: This option changes the colors on your WordPress Dashboard, which uses the Gray color scheme by default. The other option is Blue — the choice is yours!
![]() Keyboard Shortcuts: These shortcuts are designed to save you time navigating through the different areas of the Dashboard. Click the More Information link to read about how you can use keyboard shortcuts on your WordPress Dashboard.
Keyboard Shortcuts: These shortcuts are designed to save you time navigating through the different areas of the Dashboard. Click the More Information link to read about how you can use keyboard shortcuts on your WordPress Dashboard.
![]() Text Messaging: Interact with your blog from your mobile phone by signing up for it here. Click the Text Messaging Settings link in this section and enter your mobile phone number. WordPress sends you an activation code, and after it’s activated, you can do things such as log in, moderate comments, create new posts, and more — all from your mobile phone. (Text messaging in WordPress is currently available only in the United States.)
Text Messaging: Interact with your blog from your mobile phone by signing up for it here. Click the Text Messaging Settings link in this section and enter your mobile phone number. WordPress sends you an activation code, and after it’s activated, you can do things such as log in, moderate comments, create new posts, and more — all from your mobile phone. (Text messaging in WordPress is currently available only in the United States.)
![]() Twitter API: Enable this option to connect to WordPress using the Twitter program of your choice. This option also allows you to follow other blogs via Twitter and to post status updates to the WordPress blog of your choice from Twitter. More information, including recommendations for Twitter programs for your desktop and mobile phone, can be found on the WordPress website here:
Twitter API: Enable this option to connect to WordPress using the Twitter program of your choice. This option also allows you to follow other blogs via Twitter and to post status updates to the WordPress blog of your choice from Twitter. More information, including recommendations for Twitter programs for your desktop and mobile phone, can be found on the WordPress website here: http://support. wordpress.com/twitter-api.
![]() Browser Connection: You can select whether to use the HTTPS connection when visiting your WordPress Dashboard. HTTPS (Hypertext Transfer Protocol over Secure Sockets Layer) refers to a secure browser connection called SSL-encrypt, which protects your Internet connection and keeps out potential hackers.
Browser Connection: You can select whether to use the HTTPS connection when visiting your WordPress Dashboard. HTTPS (Hypertext Transfer Protocol over Secure Sockets Layer) refers to a secure browser connection called SSL-encrypt, which protects your Internet connection and keeps out potential hackers.
![]() Interface Language: The Interface Language option refers to the language that you want to set for the Dashboard only. Don’t confuse this setting with the Language option on the General Settings page, which determines the language you publish your blog in. If you want to view the settings on your WordPress Dashboard in Italian but want your published blog to appear in English, set the Interface Language option on the Personal Settings page to Italian and the Language option on the General Settings page to English. Capiche?
Interface Language: The Interface Language option refers to the language that you want to set for the Dashboard only. Don’t confuse this setting with the Language option on the General Settings page, which determines the language you publish your blog in. If you want to view the settings on your WordPress Dashboard in Italian but want your published blog to appear in English, set the Interface Language option on the Personal Settings page to Italian and the Language option on the General Settings page to English. Capiche?
![]() Primary Blog: This option is the URL of your primary WordPress blog. Because WordPress allows you to have several blogs under one account, if you have more than one blog, a drop-down menu appears here, and you can use it to choose the blog you want to set as your primary blog.
Primary Blog: This option is the URL of your primary WordPress blog. Because WordPress allows you to have several blogs under one account, if you have more than one blog, a drop-down menu appears here, and you can use it to choose the blog you want to set as your primary blog.
![]() Proofreading: WordPress allows you to proofread your blog posts and page content. This section gives you several different options to choose from, such as
Proofreading: WordPress allows you to proofread your blog posts and page content. This section gives you several different options to choose from, such as
• Biased language
• Clichés
• Duplicate words
• Double negatives
• Jargon
• Redundant phrases
Click the link that says Learn more (about these options) to read about how the proofreader can help you publish better content on your blog. You can also select the box next to the words Use Automatically Detected Language to Proofread Posts and Pages to be sure that WordPress auto-detects your language preferences when proofreading.
![]() Additional Post Content: Select the box next to the words Help Me Find Related Content (Images, Links, Related Articles, and Tags) to Use in My Posts, and WordPress will include relevant, related content for you to refer to when writing and publishing new posts.
Additional Post Content: Select the box next to the words Help Me Find Related Content (Images, Links, Related Articles, and Tags) to Use in My Posts, and WordPress will include relevant, related content for you to refer to when writing and publishing new posts.
Account Details
In this section, you manage WordPress.com account items such as your username, password, e-mail, and website URL.
![]() Username: Your WordPress username is displayed here. Click the Change link to change your username.
Username: Your WordPress username is displayed here. Click the Change link to change your username.
![]() E-mail: Your e-mail address is displayed here. You can leave it as is or change it whenever you want.
E-mail: Your e-mail address is displayed here. You can leave it as is or change it whenever you want.
![]() Website: The URL address for your WordPress blog is displayed here; you can change it if you want. This is the link that’s attached to your name throughout your blog, such as when you leave comments.
Website: The URL address for your WordPress blog is displayed here; you can change it if you want. This is the link that’s attached to your name throughout your blog, such as when you leave comments.
![]() New Password: When you want to change the password for your blog, type your new password in the first text box. To confirm your new password choice, type it again in the second text field.
New Password: When you want to change the password for your blog, type your new password in the first text box. To confirm your new password choice, type it again in the second text field.
Directly below the two New Password text boxes is a password helper. WordPress assists you in creating a secure password by giving you a tip about the password you have chosen. WordPress alerts you if the password is too short or not secure enough (by telling you that it’s Bad).
When you create a new password, use a combination of letters, numbers, and symbols to make it hard for anyone to guess what it is (for example, Aty89!#4j). When you create a password that WordPress thinks is a good one, it says the password is Strong.
 Change your password frequently. I can’t recommend this practice strongly enough. Some people on the Internet make it their business to hijack blogs for their own malicious purposes. If you change your password monthly, you lower your risk by keeping the hackers guessing.
When you finish setting all the options on the Personal Settings page, don’t forget to click the Save Changes button to save your changes.
..................Content has been hidden....................
You can't read the all page of ebook, please click here login for view all page.