
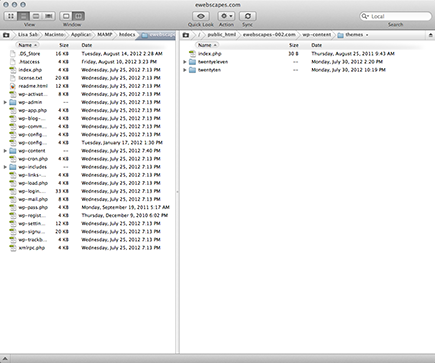
Figure 12-1: WordPress themes in the /wp- content/themes folder on your web server.
Chapter 12
Understanding Themes and Templates
In This Chapter
![]() Looking at the basic blog structure
Looking at the basic blog structure
![]() Exploring the required templates
Exploring the required templates
![]() Understanding The Loop and Main Index template
Understanding The Loop and Main Index template
![]() Putting together a basic theme
Putting together a basic theme
![]() Using common template tags
Using common template tags
There are those who like to get their hands dirty (present company included!). If you’re one of them, you need to read this chapter. WordPress users who create their own themes do so in the interest of
![]() Individuality: You can have a theme that no one else has. (If you use one of the free themes, you can pretty much count on the fact that at least a dozen other WordPress blogs will have the same look as yours.)
Individuality: You can have a theme that no one else has. (If you use one of the free themes, you can pretty much count on the fact that at least a dozen other WordPress blogs will have the same look as yours.)
![]() Creativity: You can display your own personal flair and style.
Creativity: You can display your own personal flair and style.
![]() Control: You can have full control of how the blog looks, acts, and delivers your content.
Control: You can have full control of how the blog looks, acts, and delivers your content.
Many of you aren’t at all interested in creating your own theme for your WordPress blog, however. Sometimes, it’s just easier to leave matters to the professionals and hire an experienced WordPress theme developer to create a custom look for your WordPress website or to use one of the thousands of free themes provided by WordPress designers (see Chapter 11). Chapter 15 also tells you where you can get ten free WordPress themes.
Creating themes requires you to step into the code of the templates, which can be a scary place sometimes — especially if you don’t really know what you’re looking at. A good place to start is by understanding the structure of a WordPress blog. Separately, the parts won’t do you any good. But when you put them together, the real magic begins! This chapter covers the basics of doing just that, and near the end of the chapter, you find specific steps to put your own theme together.
 You don’t need to know HTML to use WordPress. If you plan to create and design WordPress themes, however, you need some basic knowledge of HTML and Cascading Style Sheets (CSS). For assistance with HTML, check out HTML 4 For Dummies, 5th Edition, by Ed Tittel and Mary Burmeister, or HTML, XHML, and CSS Bible, 5th Edition, by Steven M. Schafer (both published by John Wiley & Sons, Inc.).
Using WordPress Themes: The Basics
A WordPress theme is a collection of WordPress templates made up of WordPress template tags. When I refer to a WordPress theme, I’m talking about the group of templates that makes up the theme. When I talk about a WordPress template, I’m referring to only one of the template files that contain WordPress template tags. WordPress template tags make all the templates work together as a theme (more about this topic later in the chapter).
Understanding theme structure
The rest of this chapter provides important information about the steps to building a WordPress theme, but here is a brief overview of the templates that make up a WordPress theme and where you find them, both on your server and within your WordPress Dashboard. Follow these steps:
1. Connect to your web server via FTP and have a look at the existing WordPress themes on your server.
The correct location is /wp-content/themes/ (see the right side of Figure 12-1). When you open this folder, you find the /twentyeleven theme folder.
 If a theme is uploaded to any folder other than
 /wp-content/themes, it won’t work.
2. Open the folder for the Twenty Eleven theme (/wp-content/themes/twentyeleven) and look at the template files inside.
When you open the Twenty Eleven theme folder, you see several files. At minimum, you find these five templates in the default theme:
• Stylesheet (style.css)
• Header template (header.php)
• Main Index (index.php)
• Sidebar template (sidebar.php)
• Footer template (footer.php)
These files are the main WordPress template files, and I discuss them in more detail in this chapter. There are several template files, however, and you should try to explore all if you can. Take a peek inside and see the different template functions they contain. These filenames are the same in every WordPress theme. See the “Contemplating the Structure of a WordPress Blog” section, later in this chapter, for more information about these template files.
3. Click the Editor link on the Appearance menu to look at the template files within a theme.
This Edit Themes page lists the various templates available within the active theme. (Figure 12-2 shows the templates in the default Twenty Eleven theme.) A text box on the left side of the screen displays the contents of each template, and this box is also where you can edit the template file(s). To view and edit a template file, click the template name in the list on the right side of the page.
Figure 12-2: A list of templates available in the default Twenty Eleven WordPress theme.
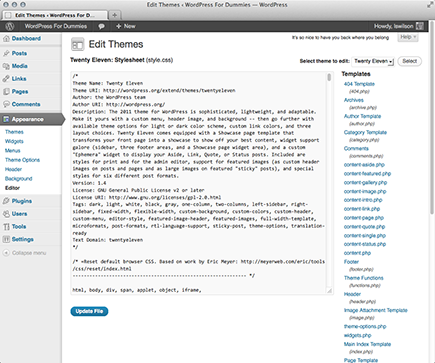
The Edit Themes page also shows the HTML markup (Chapter 13) and template tags within the template file. These tags make all the magic happen in your blog; they connect all the templates to form a theme. The next section of this chapter discusses these template tags in detail, showing you what they mean and how they function. A later section provides steps for putting them all together to create your own theme (or edit an existing theme).
Below the text box on the Edit Themes page is a drop-down menu labeled Documentation. Click the arrow on the right side of the menu, and a list drops down that contains all of the template tags used in the template you’re currently viewing. This list is helpful when you edit templates and it gives you some insight into some of the different template tags used to create functions and features within your WordPress theme. (Note: The Documentation menu does not appear when you view the Stylesheet because no template tags are used in the style.css template — only CSS, which I cover in Chapter 13.)
Connecting templates
The template files don’t work alone; for the theme to function, the files need one another. To tie these files together as one working entity, you use template tags to pull the information from each template — Header, Sidebar, and Footer — into the Main Index. I refer to this procedure as calling one template into another. (You can find more information in the “Getting Familiar with the Four Main Templates,” section, later in this chapter.)
Contemplating the Structure of a WordPress Blog
A WordPress blog, in its very basic form, has four main areas (labeled in Figure 12-3).
Figure 12-3: The four main sections of a WordPress blog.
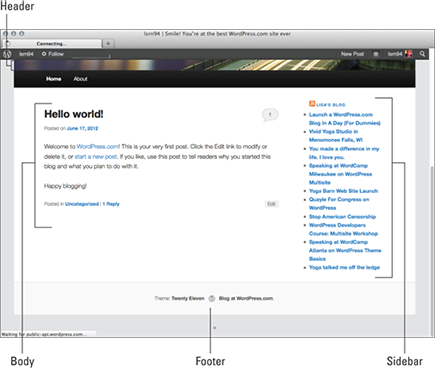
These four main areas appear in the default theme that comes in every version of WordPress:
![]() Header: This area usually contains the name of the site along with the site tagline or slogan. Sometimes the header also contains a graphic or image.
Header: This area usually contains the name of the site along with the site tagline or slogan. Sometimes the header also contains a graphic or image.
![]() Body: This area is where your blog posts appear in chronological order.
Body: This area is where your blog posts appear in chronological order.
![]() Sidebar: This area is where you find lists of blog-related elements, such as the blogroll, the archives, and a list of recent posts.
Sidebar: This area is where you find lists of blog-related elements, such as the blogroll, the archives, and a list of recent posts.
![]() Footer: This area, at the bottom of the page, often contains links to further information about the blog, such as who designed it, which company provides hosting for the blog, and copyright information.
Footer: This area, at the bottom of the page, often contains links to further information about the blog, such as who designed it, which company provides hosting for the blog, and copyright information.
These four areas are the absolute bare bones of a basic WordPress blog template. You can extend these areas and create new sections that carry more information, of course, but for the purpose of this chapter, I’m focusing on the basics.
The default WordPress theme is called Twenty Eleven, and in my opinion, it’s a pretty doggone wonderful starting point for you, especially if you’re just getting your feet wet in the blogosphere. I don’t cover all the tags and templates that the Twenty Eleven theme includes; rather, I touch on the basics to get you on your way to understanding templates and template tags for WordPress.
Many themes developed for WordPress are free for public use, and I strongly recommend finding one that you like and downloading it. Use the free themes as a jumping-off place to get started in theme development. Really, why reinvent the wheel? With the free themes available today, most of the work has already been completed for you, and you may find it easier to use one of these themes than to start a theme from scratch.
Each free theme available for download is different, depending on what the developer included (such as CSS styling, display options, format, and layout). So experimenting with a few themes is a fun and great way to learn more about the development of WordPress themes. A great place to find free WordPress themes is the official WordPress Free Themes Directory at http://wordpress.org/extend/themes.
To build a basic WordPress theme that covers the four basic areas of a blog, you need these five templates:
![]()
header.php
![]()
index.php
![]()
sidebar.php
![]()
footer.php
![]()
style.css
Each WordPress theme comes with a stylesheet (style.css), which drives the formatting and layout of your blog template in terms of where the elements are positioned on the page, what the font looks like, what colors your hyperlinks will be, and so on. As you may have already figured out, you don’t use CSS to put content on your site; rather, you use CSS to style the content that’s already there.
Chapter 13 provides information on tweaking the design of your theme by combining the template tags presented in this chapter with some CSS adjustments in your theme files.
Right now, I’m covering only the very basics; at the end of this chapter, however, I provide some ideas on how you can use various templates to further extend your blog functionality — using templates for categories, archives, static pages, multiple sidebars, and so on. After you build the basics, you can spread your wings and step into more advanced themes.
Examining the Anatomy of a Template Tag
Before starting to play around with template tags in your WordPress templates, it’s important to understand what makes up a template tag, and why.
WordPress is based in PHP (a scripting language for creating web pages) and uses PHP commands to pull information from the MySQL database. Every tag begins with the function to start PHP and ends with the function to stop PHP. In the middle of those two commands lives the request to the database that tells WordPress to grab the data and display it.
A typical template tag looks like this:
<?php get_info(); ?>
This entire example tells WordPress to do three things:
![]() Start PHP (
Start PHP (<?php).
![]() Use PHP to get information from the MySQL database and deliver it to your blog (
Use PHP to get information from the MySQL database and deliver it to your blog (get_info();).
![]() Stop PHP (
Stop PHP (?>).
In this case, get_info is the actual tag function, which grabs information from the database to deliver it to your blog. What information is retrieved depends on what tag function appears between the two PHP commands. As you may notice, a lot of starting and stopping of PHP happens throughout the WordPress templates. The process seems as though it would be resource intensive, if not exhaustive — but it really isn’t.
For every PHP command you start, you need a stop command. Every time a command begins with <?php, somewhere later in the code is the closing ?> command. PHP commands that aren’t structured properly cause really ugly errors on your site, and they’ve been known to send programmers, developers, and hosting providers into loud screaming fits.
Getting Familiar with the Four Main Templates
In the following sections, I cover some of the template tags that pull in the information you want to include in your blog. To keep this chapter shorter than 1,000 pages, I focus on the four main templates that get you going with creating your own theme or with editing the template tags in the theme you’re currently using. Here are those four main templates:
![]() Header
Header
![]() Main Index
Main Index
![]() Sidebar
Sidebar
![]() Footer
Footer
The difference between a template and a theme can cause confusion. Templates are individual files. Each template file provides the structure in which your content appears. A theme is a set of templates. The theme uses the templates to make the whole site.
The Header template
The Header template is the starting point for every WordPress theme because it tells web browsers the following:
![]() The title of your blog
The title of your blog
![]() The location of the CSS
The location of the CSS
![]() The RSS feed URL
The RSS feed URL
![]() The blog URL
The blog URL
![]() The tagline (or description) of the blog
The tagline (or description) of the blog
Every page on the web has to start with a few pieces of code. In every header.php file in any WordPress theme, you find these bits of code at the top:
![]() The
The DOCTYPE (which stands for document type declaration) tells the browser which type of XHTML standards you’re using. The Twenty Eleven theme uses <!DOCTYPE html>, which is a declaration for W3C standards compliance mode and covers all major browser systems.
![]() The
The <html> tag (HTML stands for Hypertext Markup Language) tells the browser which language you’re using to write your web pages.
![]() The
The <head> tag tells the browser that the information contained within the tag shouldn’t be displayed on the site; rather, that information is about the document.
In the header template of the Twenty Eleven theme, these bits of code look like the following example, and you should leave them intact:
<!DOCTYPE html>
<html <?php language_attributes(); ?>>
<head>
On the Edit Themes page, click the Header template link to display the template code in the text box. Look closely and you see that the <!DOCTYPE html> declaration, <html> tag, and <head> tag show up in the template.
The <head> tag needs to be closed at the end of the Header template, and the closing tag looks like this: </head>. You also need to include a fourth tag, the <body> tag, which tells the browser where the information you want to display begins. Both the <body> and <html> tags need to be closed at the end of the template, like this: </body></html>.
Using bloginfo parameters
The Header template makes much use of one WordPress template tag in particular: bloginfo();.
A parameter differentiates the type of information that a tag pulls in. Parameters are placed inside the parentheses of the tag, enclosed in single quotes. For the most part, these parameters pull information from the settings on your WordPress Dashboard. The template tag to get your blog title, for example, looks like this:
<?php bloginfo(‘name’); ?>
Table 12-1 lists the various parameters you need for the bloginfo(); tag and shows you what the template tag looks like. The parameters in Table 12-1 are listed in the order of their appearance in the Twenty Eleven header.php template file and pertain to the bloginfo(); template tag only.
Table 12-1 Tag Values for bloginfo(); in the Default Twenty Eleven Template Header
|
Parameter |
Information |
Tag |
|
|
Character settings set in Settings/General |
|
|
|
Blog title, set in Settings/General |
|
|
|
Tagline for your blog, set in Settings/General |
|
|
|
Your blog’s web address, set in Settings/General |
|
|
|
URL of primary CSS file |
|
|
|
Displays the trackback URL for your blog on single post pages |
|
Creating title tags
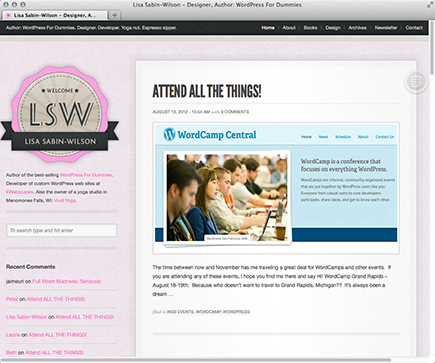
Here’s a useful tip about your blog’s <title> tag: Search engines pick up the words used in the <title> tag as keywords to categorize your site in their search engine directories.
The <title></title> tags are HTML tags that tell the browser to display the title of your website in the title bar of a visitor’s browser. Figure 12-4 shows how the title of my personal blog sits in the title bar of the browser window. The title bar is the top bar in your browser. In Figure 12-4, it says Lisa Sabin-Wilson — Designer, Author: WordPress For Dummies.
Search engines love the title bar. The more you can tweak that title to provide detailed descriptions of your site (otherwise known as search engine optimization, or SEO), the more the search engines love your blog site. Browsers show that love by giving your site higher rankings in their results.
Figure 12-4: The title bar of a browser.
The blog <title> tag is the code that lives in the Header template between these two tag markers: <title></title>. In the default Twenty Eleven theme, this bit of code looks like this (don’t let this code scare you! I promise to break it down for you!):
<title>
<?php
/* * Print the <title> tag based on what is being viewed. */
global $page, $paged;
wp_title( ‘|’, true, ‘right’ );
// Add the blog name.
bloginfo( ‘name’ );
// Add the blog description for the home/front page.
$site_description = get_bloginfo( ‘description’, ‘display’ );
if ( $site_description && ( is_home() || is_front_page() ) )
echo “ | $site_description”;
// Add a page number if necessary:
if ( $paged >= 2 || $page >= 2 )
echo ‘ | ‘ . sprintf( __( ‘Page %s’, ‘twentyeleven’ ), max( $paged, $page ) );
?>
</title>
It may help for me to put this example into plain English. The way the Twenty Eleven Header template displays the title is based on the type of page that’s being displayed — and it shrewdly uses SEO to help you with the browser powers that be. Table 12-2 breaks down what’s happening.
Table 12-2 Title Tags and What They Do
|
Title Tags and Parameters |
Tags Used |
What Is Displayed in the Title Bar |
|
|
|
If the reader is viewing any page or post, the title and site name appear. |
|
|
|
If the reader is viewing the home page or the front page, the site description appears along with the site name. |
|
|
|
If the reader is viewing any other page within the site other than what has already been defined in the previous tags, the title of the page followed by the blog name appear, and these tags also display the page number. |
The title bar of the browser window always displays your site name unless you’re on a single post page. In that case, it shows your site title plus the title of the post on that page.
Displaying your site name and tagline
The default Twenty Eleven theme header shows your site name and tagline. My site name and tagline are
![]() Site name: Lisa Sabin-Wilson
Site name: Lisa Sabin-Wilson
![]() Site tagline: Designer, Author: WordPress For Dummies
Site tagline: Designer, Author: WordPress For Dummies
Refer to Figure 12-4 to see these two elements in the header of the site.
You can use the bloginfo(); tag plus a little HTML code to display your site name and tagline. Most sites have a clickable title, which is a site title that takes you back to the main page when clicked. No matter where your visitors are on your site, they can always go back home by clicking the title of your site in the header.
To create a clickable title, use the following HTML markup and WordPress template tags:
<a href=”<?php bloginfo(‘url’); ?>”><?php bloginfo(‘name’); ?></a>
The bloginfo(‘url’); tag is your main site Internet address, and the bloginfo(‘name’); tag is the name of your site (refer to Table 12-1). So the code creates a link that looks something like this:
<a href=”http://yourdomain.com”>Your Site Name</a>
The tagline generally isn’t linked back home. You can display it by using the following tag:
<?php bloginfo(‘description’); ?>
This tag pulls the tagline directly from the one that you’ve set up on the General Settings page on your WordPress Dashboard.
This example shows how WordPress is intuitive and user-friendly; you can do things such as change the blog name and tagline with a few keystrokes on the Dashboard. Changing your options on the Dashboard creates the change on every page of your site — no coding experience required. Beautiful, isn’t it?
In the Twenty Eleven templates, these tags are surrounded by tags that look like these: <h1></h1> or <h2></h2>. These tags are <header> tags, which define the look and layout of the blog name and tagline in the CSS of your theme. I cover CSS further in Chapter 13.
The Main Index template
The Main Index template drags your blog posts out of the MySQL database and inserts them into your site. This template is to your blog what the dance floor is to a nightclub — where all the action happens.
The filename of the Main Index template is index.php. You can find it in the /wp-content/themes/twentyeleven/ folder.
The first template tag in the Main Index template calls in the Header template, meaning that it pulls the information from the Header template into the Main Index template, as follows:
<?php get_header(); ?>
Your theme can work without calling in the Header template, but it’ll be missing several essential pieces — the CSS and the blog name and tagline, for starters. Without the call to the Header template, your blog resembles the image shown in Figure 12-5.
Figure 12-5: A WordPress blog missing the call to the header. It’s naked!
The Main Index template in the Twenty Eleven theme calls in three other files in a similar fashion:
![]()
get_template_part( ‘content’, ‘get_post_format’ ); — this function calls in the template file named content.php as well as prepares the theme to accept special templates for a feature called Post Formats, which I cover in Bonus Chapter 1 on the companion website for this book.
![]()
get_sidebar(); — this function calls in the template file named sidebar.php.
![]()
get_footer(); — this function calls in the template file named footer.php.
Each of these three functions and template files is covered in upcoming sections of this chapter.
Earlier in this chapter, in the “Connecting templates” section, I explain the concept of calling in a template file using a function or template tag. That is exactly what the Main Index template does with the four functions for the header, loop, sidebar, and footer templates explained in this section.
The Loop
I’m not talking about America’s second-largest downtown business district, originating at the corner of State and Madison streets in Chicago. I could write about some interesting experiences I’ve had there . . . but that would be a different book.
The Loop in this case is a function that WordPress uses to display content on your site such as blog posts and page content. The Loop has a starting point and an ending point; anything placed in between is used to display each post, including any HTML, PHP, or CSS tags and codes.
Quite a few variations of the WordPress Loop are available, but I cover the most common use in this section. When you understand the common use, you can begin to push the envelope a bit further and use variations to suit your needs. This common use displays your posts in chronological order, starting with your most recent post and followed by less recent posts, ordered by date.
The basic and most common use of The Loop in WordPress is to pull blog posts from the database and display them on your website. In the default Twenty Eleven theme, you find the loop in a template called: loop.php. The beginning, or first line, of The Loop looks like this:
<?php while ( have_posts() ) : the_post(); ?>
At the bottom of the template, The Loop ends with one line of code:
<?php endwhile; ?>
Here’s a look at what the WordPress Codex calls “The World’s Simplest Index.”
<?php
get_header();
if (have_posts()) :
while (have_posts()) :
the_post();
the_content();
endwhile;
endif;
get_sidebar();
get_footer();
?>
First, the template starts by opening the php tag. Next, it includes the header, meaning that it retrieves anything contained in the header.php file and displays it. Now the good stuff starts happening. The Loop begins with the while (have_posts()) : bit. Anything between the while and the endwhile repeats for each post that displays. The number of posts displayed is determined in the settings section of the WordPress Dashboard.
 Misplacement of the
 while or endwhile statements causes The Loop to break. If you’re having trouble with The Loop in an existing template, check your version against the original and see whether the while statements are misplaced.
In your travels as a WordPress user, you may run across plugins or scripts with instructions that say something like this: “This must be placed within The Loop.” That’s The Loop that we discuss in this section, so pay particular attention. Understanding The Loop arms you with the knowledge you need for tackling and understanding your WordPress themes.
The Loop is no different from any other template tag; it must begin with a function to start PHP, and it must end with a function to stop PHP. The Loop begins with PHP and then makes a request: “While there are posts in my blog, display them on this page.” This PHP function tells WordPress to grab the blog post information from the database and return it to the blog page. The end of The Loop is like a traffic cop with a big red stop sign telling WordPress to stop the function completely.
If, then, and else
We deal with if, then, else situations every day, as in these examples:
![]() IF I have a dollar, THEN I’ll buy coffee, or ELSE I’ll drink water.
IF I have a dollar, THEN I’ll buy coffee, or ELSE I’ll drink water.
![]() IF it’s warm outside, THEN I’ll take a walk, or ELSE I’ll stay in.
IF it’s warm outside, THEN I’ll take a walk, or ELSE I’ll stay in.
![]() IF I understand this code, THEN I’ll be happy, or ELSE I’ll rip my hair out.
IF I understand this code, THEN I’ll be happy, or ELSE I’ll rip my hair out.
You can set the number of posts displayed per page in the Reading Settings page on the WordPress Dashboard. The Loop abides by this rule and displays only the number of posts per page that you’ve set.
The big if
PHP functions in a pretty simple, logical manner. It functions by doing what you and I do on a daily basis — making decisions based on questions and answers. PHP deals with three basic variables:
![]()
if
![]()
then
![]()
else
The basic idea is this: IF this, THEN that, or ELSE this.
If your blog has posts (and most do, even when you first install it), WordPress proceeds with The Loop, starting with the piece of code that looks like this:
<?php while (have_posts()) : the_post(); ?>
This code tells WordPress to grab the posts from the MySQL database and display them on your blog page.
Then The Loop closes with this tag:
<?php endwhile; ?>
Near the beginning of The Loop template is a template tag that looks like this:
<?php if ( ! have_posts() ) : ?>
The exclamation point (!) preceding the function: have_posts() means “does not.” So a translation of that template tag into plain English reads: If [this blog] does not have posts.
If your blog meets that condition (that is, if it doesn’t have any posts), WordPress skips The Loop and displays a message that no posts exist:
<div id=”post-0” class=”post error404 not-found”>
<h1 class=”entry-title”><?php _e( ‘Not Found’, ‘mytheme’ ); ?></h1>
<div class=”entry-content”>
<p><?php _e( ‘Apologies, but no results were found for the requested Archive. Perhaps searching will help find a related post.’, ‘mytheme’ ); ?></p>
<?php get_search_form(); ?>
</div><!-- .entry-content -->
</div><!-- #post-0 -->
WordPress displays the title Not Found, followed by the statement Apologies, but no results were found for the requested Archive. Perhaps searching will help find a related post, which in turn is followed by the template tag to include a search box that lets users search your blog for more information.
 Mixed within the template tags and functions explained in these sections of this chapter, you find basic HTML markup. For example
<div id=””>
<h1>
and
<div class=””>
HTML and CSS (Cascading Style Sheets) are explained in Chapter 13. HTML and CSS drive the formatting and style of your overall theme, from a visual standpoint (fonts, colors, images, and so on).
WordPress uses other template files besides the main index, such as the header, sidebar, and footer templates. The next section gives you a closer look at a few of them.
The Sidebar template
The filename of the default Sidebar template is sidebar.php. Typically, the sidebar is displayed on the right or left side of your WordPress template. In the default Twenty Eleven theme, the sidebar is displayed on the right side of the template, by default (refer to Figure 12-3).
Similarly to the Header template, the Sidebar template is called into the Main Index template with this function:
<?php get_sidebar(): ?>
This code calls the Sidebar template and all the information it contains into your blog page. Bonus Chapter 1 (on the companion website for this book — www.dummies.com/go/wordpressfd5e) addresses some additional ways you can call in the Sidebar template, including having multiple Sidebar templates and using an include statement to pull them into the Main Index template.
In the “Using Tags with Parameters for Sidebars” section, later in this chapter, you find information on template tags to use in the sidebar to display the usual sidebar elements, such as a list of the most recent posts or a list of categories.
The Footer template
The filename of the Footer template is footer.php. Usually, the footer sits at the bottom of the page (refer to Figure 12-3) and contains brief information about the site, such as copyright statements, credits to the theme designer or hosting company, or even a list of links to other pages within the site.
The default Twenty Eleven theme shows the site title and a statement that says “Proudly powered by WordPress.” You can use the footer to include all sorts of information about your site, however; you don’t have to restrict it to small bits of information. In this chapter, I cover the typical footer that you see in the default Twenty Eleven theme.
Similarly to the Header and Sidebar templates, the Footer template is called into the Main Index template through this bit of code:
<?php get_footer(); ?>
This code calls the Footer and all the information it contains into your blog page.
Other templates
Other templates are in the default Twenty Eleven theme, and I don’t cover all of them in depth in this chapter, but having at least a basic understanding of them is a good idea. The ones I list in this section give you that good, solid kick in the pants you need to get started with understanding WordPress templates. When you have that task licked, you can move on to learning the rest.
These other (optional) templates include
![]() Comments template (
Comments template (comments.php): The Comments template is required if you plan to host comments on your blog; it provides all the template tags you need to display those comments. The template tag used to call the comments into the template is <?php comments_ template(); ?>.
![]() Single Post template (
Single Post template (single.php): When your visitors click the title or permalink of a post you’ve published to your blog, they’re taken to that post’s individual page. There, they can read the entire post, and if you have comments enabled, they see the comments form and can leave comments.
![]() Page template (
Page template (page.php): You can use a Page template for static pages in your WordPress site.
![]() Search Results (
Search Results (search.php): You can use this template to create a custom display of search results on your site. When someone uses the search feature to search your site for specific keywords, this template formats the return of those results.
![]() 404 template (
404 template (404.php): Use this template to create a custom 404 page, which is the page visitors get when the browser can’t find the page requested and returns that ugly 404 Page Cannot Be Found error.
The templates in the preceding list are optional. If these templates don’t exist in your WordPress themes folder, nothing breaks. The Main Index template handles the default display of these items (the single post page, the search results page, and so on). The only exception is the Comments template. If you want to display comments on your site, you must have that template included in your theme.
Putting a Theme Together
In this section, you put together a basic theme by using the information on templates and tags I’ve provided so far in this chapter.
Template files can’t do a whole lot by themselves. The real power comes when they’re put together.
Connecting the templates
WordPress has built-in functions to include the main template files, such as header.php, sidebar.php, and footer.php, in other templates. An include function is a custom PHP function built in to WordPress, allowing you to retrieve the content of another template file and display it along with the content of another template file. Table 12-3 shows the templates and the functions to include them.
Table 12-3 Template Files and Include Functions
|
Template Name |
|
|
|
|
|
|
|
|
|
|
|
|
|
|
|
|
If you want to include a file that doesn’t have a built-in include function, you need a different piece of code. For instance, if you want to add a unique sidebar (different from the default sidebar.php file within your existing theme) to a certain page template, name the sidebar file sidebar-page.php. To include that in another template, use the following code:
<?php get_template_part(‘sidebar’, ‘page’); ?>
In this statement, the get_template_part(‘sidebar’, ‘page’); function looks through the main theme folder for the sidebar-page.php file and displays the sidebar. The beautiful part about the get_template_part() template tag is that WordPress looks for the sidebar-page.php template first, but if it doesn’t find it, it defaults to using the sidebar.php template.
In this section, you put together the guts of a basic Main Index template by using the information on templates and tags provided so far in this chapter. There seem to be endless lines of code when you view the loop.php template file in the Twenty Eleven theme, so I’ve simplified it for you with the following steps. These steps should give you a basic understanding of the WordPress Loop and common template tags and functions that you can use to create your own.
You create a new WordPress theme using some of the basic WordPress templates. The first steps in pulling everything together are as follows:
1. Connect to your web server via FTP, click the wp-content folder, and then click the themes folder.
This folder contains the themes that are currently installed in your WordPress blog. (See Chapter 6 if you need more information on FTP.)
2. Create a new folder and call it mytheme.
In most FTP programs, you can right-click and choose New Folder. (If you aren’t sure how to create a folder, refer to your FTP program’s help files.)
3. In your favored text editor (such as Notepad for the PC or TextMate for the Mac), create and save the following files with the lines of code I’ve provided for each:
• Header template: Create the file with the following lines of code and then save with the filename header.php:
<!DOCTYPE html>
<html <?php language_attributes(); ?>>
<head>
<meta charset=”<?php bloginfo( ‘charset’ ); ?>” />
<title><?php bloginfo( ‘name’ ); ?> <?php if ( is_single() ) { ?> » Blog Archive <?php } ?> <?php wp_title(); ?></title>
<link rel=”stylesheet” href=”<?php bloginfo( ‘stylesheet_url’ ); ?>” type=”text/css” media=”screen” />
<link rel=”pingback” href=”<?php bloginfo( ‘pingback_url’ ); ?>” />
<?php if ( is_singular() ) wp_enqueue_script( ‘comment-reply’ ); ?>
<?php wp_head(); ?>
</head>
<body <?php body_class() ?>>
<div id=”page”>
<header class=”masthead”>
<hgroup>
<h1><a href=”<?php bloginfo(‘url’); ?>”><?php bloginfo(‘name’); ?></a></h1>
<h2><?php bloginfo(‘description’); ?></h2>
</hgroup>
</header>
<div id=”main”>
• Theme Functions: Create the file with the following lines of code and then save it using the filename functions.php:
<?php
if ( function_exists(‘register_sidebar’) ) register_sidebar(array(‘name’=>’Sidebar’,
));
?>
The Theme Functions file registers the widget area for your site so that you’re able to add widgets to your sidebar using the WordPress widgets available on the Widget page on the Dashboard.
• Sidebar template: Create the file with the following lines of code and then save it using the filename sidebar.php:
<aside class=”sidebar”>
<ul>
<?php if ( !function_exists(‘dynamic_sidebar’) || !dynamic_sidebar(‘Sidebar’) ) : ?>
<?php endif; ?>
</ul>
</aside>
The code here tells WordPress where you would like the WordPress widgets to display in your theme; in this case, widgets are displayed in the sidebar of your site.
• Footer template: Create the file with the following lines of code and then save with the filename footer.php:
</div>
<footer>
<p>© Copyright <a href=”<?php bloginfo(‘url’); ?>”><?php bloginfo(‘name’); ?></a>. All Rights Reserved</p>
</footer>
<?php wp_footer(); ?>
</body>
</html>
• Stylesheet: Create the file with the following lines of code and then save it with the filename style.css (more CSS is covered in Chapter 13 of this book — this example gives you just some very basic styling to create your sample theme):
/*
Theme Name: My Theme
Description: Basic Theme from WordPress For Dummies example
Author: Lisa Sabin-Wilson
Author URI: http://lisasabin-wilson.com
*/
body {
font-family: verdana, arial, helvetica, sans-serif;
font-size:16px;
color: #555;
background: #ffffff;
}
#page {
width: 960px;
margin: 0 auto;
background: #ffffff;
border: 1px solid silver;
display:block
}
header.masthead {
width: 950px;
background: black;
color: white;
padding: 5px;
text-align:center;
}
header.masthead h1 a {
color: white;
font-size: 28px;
font-family: Georgia;
text-decoration: none;
}
header.masthead h2 {
font-size: 16px;
font-family: Georgia;
color: #eee;
}
header.masthead nav {
background: #ffffff;
text-align: left;
height: 25px;
padding: 4px;
}
header.masthead nav ul {
list-style:none;
margin:0;
}
#main {
width: 600px;
float:left;
padding: 20px ;
}
#main .hentry {
margin: 10px 0;
}
aside.sidebar {
width: 290px;
margin: 0 15px;
float:left;
}
aside.sidebar ul {
list-style:none;
}
footer {
clear:both;
width: 960px;
height: 50px;
background: black;
color: white;
margin: 0 auto;
}
footer p {
text-align:center;
padding: 15px 0;
}
footer a {
color:white;
}
Using the tags provided in Table 12-4, along with the information on The Loop and the calls to the Header, Sidebar, and Footer templates provided in earlier sections, you can follow the next steps for a bare-bones example of what the Main Index template looks like when you put the tags together.
When typing templates, use a text editor such as Notepad or TextMate. Using a word-processing program such as Microsoft Word opens a whole slew of problems in your code. Word-processing programs insert hidden characters and format quotation marks in a way that WordPress can’t read.
Now that you have the basic theme foundation, the last template file you need to create is the Main Index template. To create a Main Index template to work with the other templates in your WordPress theme, open a new window in a text editor and then go through the following steps. (Type the text in each of these steps on its own line. Press the Enter key after typing each line so that each tag starts on a new line.)
1. Type <?php get_header(); ?>.
This template tag pulls the information in the Header template of your WordPress theme.
2. Type <section>.
This is HTML5 markup that tells the browser that this is a grouping of content (in this case, blog posts).
3. Type <?php if (have_posts()) : ?>.
This template tag is an if statement that asks, “Does this blog have posts?” If the answer is yes, it grabs the post content information from your MySQL database and displays the posts in your blog.
4. Type <?php while (have_posts()) : the_post(); ?>.
This template tag starts The Loop.
5. Type <article <?php post_class() ?> id=”post-<?php the_ID(); ?>”>.
This is HTML5 markup that tells the browser that this is the start of a new, single article, along with the post_class CSS designation (covered in Bonus Chapter 1).
6. Type <h1><a href=”<?php the_permalink(); ?>”><?php the_title(); ?></a></h1>.
This tag tells your blog to display the title of a post that’s clickable (linked) to the URL of the post, surrounded by HTML Header tags.
7. Type Posted on <?php the_date(); ?> at <?php the_time(); ?>.
This template tag displays the date and time when the post was made. With these template tags, the date and time format are determined by the format you set on the Dashboard.
8. Type Posted in <?php the_category(‘,’); ?>.
This template tag displays a comma-separated list of the categories to which you’ve assigned the post — Posted in: category 1, category 2, for example.
9. Type <?php the_content(‘Read More..’); ?>.
This template tag displays the actual content of the blog post. The ‘Read More..’ portion of this tag tells WordPress to display the words Read More, which are clickable (hyperlinked) to the post’s permalink, where the reader can read the rest of the post in its entirety. This tag applies when you’re displaying a post excerpt, as determined by the actual post configuration on the Dashboard.
10. Type Posted by: <?php the_author(); ?>.
This template tag displays the author of the post in this manner: Posted by: Lisa Sabin-Wilson.
11. Type <?php comments_popup_link(‘No Comments’, ‘1 Comment’, ‘% Comments’); ?>.
This template tag displays the link to the comments for this post, along with the number of comments.
12. Type </article>.
This is HTML5 markup that tells the browser that the article has ended.
13. Type <?php endwhile; ?>.
This template tag ends The Loop and tells WordPress to stop displaying blog posts here. WordPress knows exactly how many times The Loop needs to work, based on the setting on the WordPress Dashboard. That’s exactly how many times WordPress will execute The Loop.
14. Type <?php next_posts_link(‘« Previous Entries’); ?>.
This template tag displays a clickable link to the previous page of blog entries, if any.
15. Type <?php previous posts link(‘» Next Entries’); ?>.
This template tag displays a clickable link to the next page of blog entries, if any.
16. Type <?php else : ?>.
This template tag refers to the if question asked in Step 3. If the answer to that question is no, this step provides the else statement — IF this blog has posts, THEN list them here (Step 3 and Step 4), or ELSE display the following message.
17. Type Not Found. Sorry, but you are looking for something that isn’t here.
This is the message followed by the template tag displayed after the else statement from Step 16. You can reword this statement to have it say whatever you want.
18. Type <?php endif; ?>.
This template tag ends the if statement from Step 3.
19. Type </section>.
This is HTML5 markup that closes the <section> tag opened in Step 2, and tells the browser that this grouping of content has ended.
20. Type </div>.
This is HTML markup closing the <div id=”main”> that was opened in the header.php file.
21. Type <?php get_sidebar(); ?>.
This template tag calls in the Sidebar template and pulls that information into the Main Index template.
22. Type <?php get_footer(); ?>.
This template tag calls in the Footer template and pulls that information into the Main Index template. Note: The code in the footer.php template ends the <body> and <html> tags that were started in the Header template (header.php).
When you’re done, the display of the Main Index template code looks like this:
<?php get_header(); ?>
<section>
<?php if (have_posts()) : ?>
<?php while (have_posts()) : the_post(); ?>
<article <?php post_class() ?> id=”post-<?php the_ID(); ?>”>
<h1><a href=”<?php the_permalink(); ?>”><?php the_title(); ?></a></h1>
Posted on: <?php the_date(); ?> at <?php the_time(); ?>
Posted in: <?php the_category(‘,’); ?>
<?php the_content(‘Read More..’); ?>
Posted by: <?php the_author(); ?> | <?php comments_popup_link(‘No Comments’, ‘1 Comment’, ‘% Comments’); ?>
</article>
<?php endwhile; ?>
<?php next_posts_link(‘« Previous Entries’) ?>
<?php previous_posts_link(‘Next Entries »’) ?>
<?php else : ?>
Not Found
Sorry, but you are looking for something that isn’t here.
<?php endif; ?>
</section>
</div>
<?php get_sidebar(); ?>
<?php get_footer(); ?>
23. Save this file as index.php and upload it to the mythemes folder.
In Notepad, you can save it by choosing File⇒Save As. Type the name of the file in the File Name text box and click Save.
24. Activate the theme on the WordPress Dashboard and view your blog to see your handiwork in action!
My Main Index template code has one template tag that I explain in Bonus Chapter 1 on the companion website for this book. That template tag is <article <?php post_class() ?> id=”post-<?php the_ID(); ?>”>. This tag helps you create some interesting styles in your template using CSS, so check out Bonus Chapter 1 to find out all about it!
This very simple and basic Main Index template that you just built does not have the standard HTML markup in it, so you will find that the visual display of your blog differs somewhat from the default Twenty Eleven theme. This example was used to give you the bare-bones basics of the Main Index template and The Loop in action. Chapter 13 goes into details about using HTML and CSS to create nice styling and formatting for your posts and pages.
If you’re having a hard time typing out the code provided on this page, I have made this sample theme available for download on my website. The zip file contains the files discussed in this chapter so you can compare your efforts with mine, electronically. You can download the theme zip file here: http://lisasabin-wilson.com/wp4d/my-theme.zip.
Using additional stylesheets
Often a theme uses multiple stylesheets for browser compatibility or consistent organization. If you use multiple stylesheets, the process for including them in the template is the same as with any other stylesheet.
To add a new stylesheet, create a directory in the root theme folder called css. Next, create a new file called mystyle.css within the css folder. To include the file, you must edit the header.php file. The following example shows the code you need to include in the new CSS file:
<link rel=”stylesheet” href=”<?php bloginfo(‘stylesheet_directory’);
?>/css/mystyle.css” type=”text/css” media=”screen” />
Additional stylesheets come in handy when working with a concept called Parent/Child themes, which is the practice of creating a child theme that depends upon a separate parent theme for features and functions. I write more about Parent/Child themes, as well as provide you with additional information on HTML and CSS, in Chapter 13.
Customizing Your Blog Posts with Template Tags
This section covers the template tags that you use to display the body of each blog post you publish. The body of a blog post includes information such as the post date and time, title, author name, category, and content. Table 12-4 lists the common template tags you can use for posts, available for you to use in any WordPress theme template. The tags in Table 12-4 work only if you place them within The Loop (covered earlier in this chapter and found in the loop.php template file).
Table 12-4 Template Tags for Blog Posts
|
Tag |
Function |
|
|
Displays the date of the post. |
|
|
Displays the time of the post. |
|
|
Displays the title of the post. |
|
|
Displays the permalink (URL) of the post. |
|
|
Displays the post author’s name. |
|
|
Displays the URL of the post author’s site. |
|
|
Displays the content of the post. (If you use an excerpt [next item], the words Read More appear and are linked to the individual post page.) |
|
|
Displays an excerpt (snippet) of the post. |
|
|
Displays the category (or categories) assigned to the post. If the post is assigned to multiple categories, they’ll be separated by commas. |
|
|
Displays a link to the comments, along with the comment count for the post in parentheses. (If no comments exist, it displays a No Comments message.) |
|
|
Displays the words Previous Entries linked to the previous page of blog entries.* |
|
|
Displays the words Next Entries linked to the next page of blog entries.* |
* These two tags aren’t like the others. You don’t place these tags in The Loop; instead, you insert them after The Loop but before the if statement ends. Here’s an example: <?php endwhile; ?> <?php next_posts_link(‘« Previous Entries’) ?> <?php previous_posts_link(‘Next Entries »’) ?> <?php endif; ?>
Using Tags with Parameters for Sidebars
If you’ve been following along in this chapter as I’ve covered the Header and Main Index templates and tags, you have a functional WordPress blog with blog posts and various metadata displayed in each post.
In this section, I give you the template tags for the items commonly placed in the sidebar of a blog. I say “commonly placed” because it’s possible to get creative with these template tags and place them in other locations (the Footer template, for example). To keep this introduction to sidebar template tags simple, I stick with the most common use, leaving the creative and uncommon uses for you to try when you’re comfortable with building the basics.
This section also introduces tag parameters, which are additional options you can include in the tag to control some of its display properties. Not all template tags have parameters. You place tag parameters inside the parentheses of the tag. Many of the parameters discussed in this section were obtained from the WordPress software documentation in the WordPress Codex at http://codex.wordpress.org.
Table 12-5 helps you understand the three variations of parameters used by WordPress.
Table 12-5 Three Variations of Template Parameters
|
Variation |
Description |
Example |
|
Tags without parameters |
These tags have no additional options available. Tags without parameters have nothing within the parentheses. |
|
|
Tags with PHP function-style parameters |
These tags have a comma-separated list of values placed within the tag parentheses. |
|
|
Tags with query-string parameters |
These types of tags generally have several available parameters. This tag style enables you to change the value for each parameter without being required to provide values for all available parameters for the tag. |
|
Identifying some blog-post metadata
Metadata is simply data about data. In WordPress, metadata refers to the data about each blog post, including:
![]() The author name
The author name
![]() The category or categories to which the post is assigned
The category or categories to which the post is assigned
![]() The date and time of the post
The date and time of the post
![]() The comments link and number of comments
The comments link and number of comments
You need to know these three types of parameters:
![]() String: A line of text that can be anything from a single letter to a long list of words. A string is placed between single quotation marks and sets an option for the parameter or is displayed as text.
String: A line of text that can be anything from a single letter to a long list of words. A string is placed between single quotation marks and sets an option for the parameter or is displayed as text.
![]() Integer: A positive or negative number. Integers are placed within the parentheses and either inside or outside single quotation marks. Either way, they’ll be processed correctly.
Integer: A positive or negative number. Integers are placed within the parentheses and either inside or outside single quotation marks. Either way, they’ll be processed correctly.
![]() Boolean: Sets the parameter options to
Boolean: Sets the parameter options to true or false. This parameter can be numeric (0=false and 1=true) or textual. Boolean parameters aren’t placed within quotation marks.
The WordPress Codex, located at http://codex.wordpress.org, has every conceivable template tag and possible parameter known to the WordPress software. The tags and parameters that I share with you in this chapter are the ones used most often.
The calendar
The calendar tag displays a calendar that highlights each day of the week on which you’ve posted a blog. Those days are also hyperlinked to the original blog post. Here’s the tag to use to display the calendar:
<?php get_calendar(); ?>
The calendar tag has only one parameter, and it’s Boolean. Set this parameter to true and it displays the day of the week with one letter (Friday = F, for example). Set this parameter to false and it displays the day of the week as a three-letter abbreviation (Friday = Fri., for example). Here are examples of the template tag used to display the calendar on your WordPress blog:
<?php get_calendar(true); ?>
<?php get_calendar(false); ?>
List pages
The <?php wp_list_pages(); ?> tag displays a list of the static pages you can create on your WordPress site (such as About Me or Contact pages). Displaying a link to the static pages makes them available so that readers can click the links and read the content you’ve provided.
WordPress has a very handy navigation menu–building tool that I cover in Chapter 13. It allows you to build different custom navigation menus. If you like the navigation tool, you may never need to use the wp_list_pages(); template tag. Still, I’m including it here because you may want to use it if you want to have complete control over how the list of pages appears on your website.
The <list> tag parameters use the string style. (Table 12-6 lists the most common parameters used for the wp_list_pages template tag.)
An alternative to using the wp_list_pages() template tag to create a navigation system is to use the built-in feature in WordPress called Menus, which enables you to build custom menus that aren’t completely dependent upon your WordPress pages but that can include links to posts, categories, and custom links that you define. Chapter 13 contains information about the Menus feature, along with the wp_nav_menu() template tag that you use to display menus.
Table 12-6 Most Common Parameters (Query-String) for wp_list_pages();
|
Parameter |
Type |
Description and Values |
|
|
integer |
Displays only the subpages of the page; uses the numeric ID for a page as the value. Defaults to |
|
|
string |
Sorts pages with one of the following options: |
|
|
string |
Lists the numeric page ID numbers, separated by commas, that you want to exclude from the page list display (for example, |
|
|
integer |
Uses a numeric value for how many levels of pages are displayed in the list of pages. Possible options: |
|
|
string |
Displays the date when the page was created or last modified. Possible options: |
|
|
string |
Sets the format of the date to be displayed. Defaults to the date format configured in the Options tab and General subtab of the Dashboard. |
|
|
string |
Types text for the heading of the page list. Defaults to display the text: |
Page lists are displayed in an unordered list (you may know it by the term bulleted list). Whichever term you use, it’s a list with a bullet point in front of every page link.
The following tag and query string displays a list of pages without the text heading “Pages”. In other words, it displays no title at the top of the page’s link list:
<?php wp_list_pages(‘title_li=’); ?>
The next tag and query string displays the list of pages sorted by the date when they were created; the date is also displayed along with the page name:
<?php wp_list_pages(‘sort_column=post_date&show_date=’created’); ?>
Take a look at the way query-string parameters are written:
‘parameter1=value¶meter2=value¶meter3=value’
The entire string is surrounded by single quotation marks, and no white space is within the query string. Each parameter is joined to its value by the = character. When you use multiple parameters/values, you separate them with the & character. You can think of the string like this: parameter1=valueANDparameter2=valueANDparameter3=value. Keep this convention in mind for the remaining template tags and parameters in this chapter.
Bookmarks (blogroll)
On the WordPress Dashboard, you can manage your links from the Blogroll tab. Before I forge ahead and dig in to the template tag for the blogroll display, I want to clear up a little terminology.
A blogroll is a list of links that you add to the Blogroll area on the Dashboard. The specific template tag used to call those links into your template, however, refers to bookmarks. So this begs the question “Are they links, or are they bookmarks?” The answer is “Both.” For simplicity, and to ensure that you and I are on the same wavelength, I refer to them the same way that half the planet does — as links.
Here is the tag used to display your blogroll:
<?php wp_list_bookmarks(); ?>
In Chapter 8, I show you how to add links to your blogroll as well as discuss the options you can set for each link. The parameters for this tag give you control of how the links are displayed and put some of the options to work. Table 12-7 shows the most common parameters used for the wp_list_bookmarks template tag.
In the Possible Values column of Table 12-7, values that appear in bold are the default values set by WordPress. Keep this convention in mind for all the parameter values in the rest of this chapter.
Table 12-7 Most Common Parameters (Query-String) for wp_list_bookmarks();
|
Parameter and Type |
Possible Values |
Example |
|
|
|
|
|
|
Category ID numbers separated by commas |
|
|
|
Text of the category names separated by commas |
|
|
|
|
|
|
|
|
|
|
|
|
|
|
|
|
|
|
|
If no ID numbers are listed, displays all links. |
|
|
|
If no ID numbers are listed, all links are displayed. |
|
|
|
|
|
|
|
|
|
|
|
|
|
Here are a couple of examples of tags used to set a link list.
The following tag displays a list of links in the category ID of 2 and orders that list by the length of the link name (shortest to longest):
<?php wp_list_bookmarks(‘categorize=1&category=2&orderby=length’); ?>
This next tag displays only the list of links in a category (the Espresso category, in this example):
<?php wp_list_bookmarks(‘category_name=Espresso’); ?>
Post archives
The <?php wp_get_archives(); ?> template tag displays the blog post archives in a number of ways, using the parameters and values shown in Table 12-8. Again, values that appear in bold are the default values set by WordPress. Here are just a few examples of what you can produce with this template tag:
![]() Display the titles of the last 15 posts you’ve made to your blog.
Display the titles of the last 15 posts you’ve made to your blog.
![]() Display the titles of the posts you’ve made in the past ten days.
Display the titles of the posts you’ve made in the past ten days.
![]() Display a monthly list of archives.
Display a monthly list of archives.
Table 12-8 Most Common Parameters (Query-String) for wp_get_archives();
|
Parameter and Type |
Possible Values |
Example |
|
Determines the type of archive to display. |
|
|
|
|
|
|
|
|
If no value, all are displayed. |
|
|
|
No default |
|
|
|
No default |
|
|
|
|
|
Here are a couple of examples of tags used to display blog-post archives.
This tag displays a linked list of monthly archives (for example, November 2011, December 2011, and so on).
<?php wp_get_archives(‘type=monthly’); ?>
This next tag displays a linked list of the 15 most recent blog posts:
<?php wp_get_archives(‘type=postbypost&limit=15’); ?>
Categories
WordPress lets you create categories and assign posts to a specific category (or multiple categories). Categories provide an organized navigation system that helps you and your readers find posts you’ve made on certain topics.
The <?php wp_list_categories(); ?> template tag lets you display a list of your categories by using the available parameters and values. (Table 12-9 shows some of the most popular parameters.) Each category is linked to the appropriate category page that lists all the posts you’ve assigned to it. The values that appear in bold are the default values set by WordPress.
Table 12-9 Most Common Parameters (Query-String) for wp_list_categories();
|
Parameter and Type |
Possible Values |
Example |
|
|
|
|
|
|
|
|
|
|
|
|
|
|
|
|
|
|
|
|
|
|
No default |
|
|
|
|
|
Here are a couple of examples of tags used to display a list of your categories.
This example, with its parameters, displays a list of categories sorted by name without showing the number of posts made in each category; the example also displays the RSS feed for each category title:
<?php wp_list_categories(‘orderby=name&show_count=0&feed=RSS’); ?>
This example, with its parameters, displays a list of categories sorted by name with the post count showing and shows the subcategories of every parent category:
<?php wp_list_categories(‘orderby=name&show_count=1&hierarchical=1’); ’>
Getting widgetized
About 99.99 percent of the WordPress themes available today are coded with widgetized sidebars — which means you can use the widgets within WordPress to populate your sidebar area with content, navigation menus, and lists. In Chapter 5, I go into detail about what widgets are and how you can use them to dress up your sidebar — so check out that chapter if you need more information about widgets.
With widgets in place, you generally have no reason to mess around with the code in the sidebar.php template file because most of the content you want to add into your sidebar can be added through the use of widgets.
In a WordPress theme, the Theme Functions template (functions.php) and the Sidebar template (sidebar.php) create the functionality and the possibility for widgets to exist within your theme. You’re not limited to where you place and use widgets, by and large. I am using the Sidebar template (sidebar.php) in this example.
First, you have to define the widgets in your theme. This means that you need to alert WordPress to the fact that this theme can handle widgets — which is known as registering a widget with the WordPress software. To register a widget, add the register_sidebar function to the Theme Functions template (functions.php). In the functions.php file in the Twenty Eleven theme, the code for registering a widget looks like this:
register_sidebar( array(
‘name’ => __( ‘Main Sidebar’, ‘twentyeleven’ ),
‘id’ => ‘sidebar-1’,
‘before_widget’ => ‘<aside id=”%1$s” class=”widget %2$s”>’,
‘after_widget’ => “</aside>”,
‘before_title’ => ‘<h3 class=”widget-title”>’,
‘after_title’ => ‘</h3>’,
) );
Within that code, you see seven different arrays. An array is a set of values that tells WordPress how you would like your widgets handled and displayed:
![]()
name: This name is unique to the widget and appears on the Widgets page on the Dashboard. It is helpful if you register several different widgetized areas on your site.
![]()
id: This is the unique ID given to the widget.
![]()
description (optional): This is a text description of the widget. The text that gets placed here displays on the Widgets page on the Dashboard.
![]()
before_widget: This is the HTML markup that gets inserted directly before the widget. It is helpful for CSS styling purposes.
![]()
after_widget: This is the HTML markup that gets inserted directly after the widget.
![]()
before_title: This is the HTML markup that gets inserted directly before the widget title.
![]()
after_title: This is the HTML markup that gets inserted directly after the widget title.
With that code in your functions.php file, WordPress now recognizes that you’ve registered a widget called Primary Widget Area for your theme and makes the widget area available for you to drag and drop widgets onto the Widgets page on the Dashboard. All that’s left to do now is to call that widget into your sidebar.php file. By doing so, you allow the widgets to display on your site. Follow these steps to call widgets to your site (these steps assume that the widget code isn’t already in the Sidebar template):
1. Click the Editor link below the Appearance menu.
The Edit Themes page opens.
2. Click the Sidebar (sidebar.php) template.
The Sidebar template opens in the text box on the left side of the page.
3. Type the following code in the Sidebar (sidebar.php) template:
<?php if ( ! dynamic_sidebar( ‘Primary Widget Area’ ) ) : ?>
<?php endif; ?>
The parameter within the dynamic_sidebar template tag corresponds to the name that you provided in the widget array called ‘name’ earlier in this section. It must be the same; otherwise, it will not display on your website.
4. Click the Update File button.
The changes you’ve made to the Sidebar (sidebar.php) template file are now saved.
You can register an unlimited number of widgets for your theme. This flexibility allows you to create several different widgetized areas and widget features in different areas of your site. Bonus Chapter 1 on the companion website for this book goes into more detail about using different sidebar templates to create different widgetized areas and features on your site.
..................Content has been hidden....................
You can't read the all page of ebook, please click here login for view all page.