Chapter 4
Writing and Managing Your Blog
In This Chapter
![]() Writing your first post and making it look nice
Writing your first post and making it look nice
![]() Organizing and categorizing your blog
Organizing and categorizing your blog
![]() Inviting friends and establishing their permissions
Inviting friends and establishing their permissions
![]() Moderating discussions — even when you aren’t logged in
Moderating discussions — even when you aren’t logged in
![]() Combating comment spam
Combating comment spam
![]() Deciding what appears on your front page
Deciding what appears on your front page
![]() Protecting your blog’s privacy
Protecting your blog’s privacy
![]() Sharing and publicizing with social media
Sharing and publicizing with social media
![]() Initiating trusting relationships with OpenID
Initiating trusting relationships with OpenID
Chapter 3 covers the signup process and a few important settings and options that you configure when you first log in to your new WordPress blog. Now it’s time to make a blogger out of you. In this chapter, I show you the tools you need to write your first post. When you understand the process, the blogging world is right at your fingertips.
This chapter also shows you the basics of categorizing your posts and links, uploading images to your blog posts, setting discussion and reading options for your blog, using static pages, and managing your users and authors. I don’t have the space in this chapter to cover every option available, but I hit the high points of what you need to know.
Ready? Set? Blog!
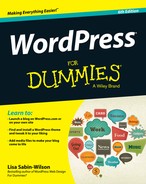
On the Dashboard, click the Add New link on the Posts menu to display the Add New Post page where you write, organize, and publish your first post. Start by thinking up a name for your post and entering it in the text box displayed under the Add New Post heading, shown in Figure 4-1.
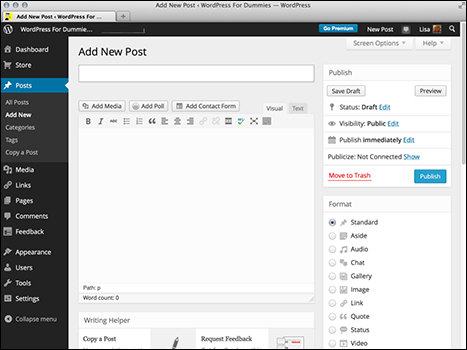
Figure 4-1: Add your post from this page.
 You can make the name snappy and fun if you want, but don’t be cryptic. Use titles that give your readers a basic idea of what they’re about to read in the posts. No set of hard-and-fast rules exists when it comes to creating titles for your blog posts, of course. Have fun with your title, and let it reflect your personality and writing style. After giving your post a title, write the content of your post in the large text box under the title.
The area in which you write your post is in Visual Editing mode, as indicated by the Visual tab above the text. Visual Editing mode is how WordPress provides WYSIWYG (What You See Is What You Get) options for formatting. Rather than embedding HTML code within your post, you can simply type your post, highlight the text you’d like to format, and click the buttons, shown in Figure 4-1, that appear above the box in which you type your post.
If you’ve ever used a word processing program such as Microsoft Word, you’ll recognize many of these buttons:
- Bold: Embeds the
<strong> </strong>tag to emphasize the text in bold (example: bold text). - Italics: Embeds the
<em> </em>tag to emphasize the text in italics (example: italic text). - Strikethrough: Embeds the
<strike> </strike>tag to put a line through your text (example:strikethrough text). - Unordered List: Embeds the
<ul><li> </li></ul>tag to create an unordered, or bulleted, list. - Ordered List: Embeds the
<ol><li> </li></ol>tag to create an ordered, or numbered, list. - Blockquote: Inserts the
<blockquote> </blockquote>tag to indent the selected paragraph or section of text. - Align Left: Inserts the
<p align="left"> </p>tag to align the selected paragraph or section of text against the left margin. - Align Center: Inserts the
<p align="center"> </p>tag to position the selected paragraph or section of text in the center of the page. - Align Right: Inserts the
<p align="right"> </p>tag to align the selected paragraph or section of text against the right margin. - Insert/Edit Link: Applies the
<a href=" "> </a>tag to the selected text to create a hyperlink. - Unlink: Removes a hyperlink from selected text.
- Insert More Tag: Inserts the
<!--more-->tag to split the display on your blog page. It publishes the text written above this tag with a Read More link, which takes the user to a page with the full post. This feature is good for really long posts. - Proofread Writing: This is a perfect tool for you if you make spelling errors while you type. Use it to check your spelling before you post.
- Distraction-Free Writing Mode: Expands the Post text box to occupy the full height and width of your browser screen. Use this tool to use the WordPress Distraction-Free Writing feature to focus on writing without being distracted by all the other options on the page. To bring that Post text box back to its normal state, click the Exit Fullscreen link, and voilà — it’s back to normal.
- Show/Hide Kitchen Sink: Displays a new formatting menu, providing options for underlining, font color, custom characters, undo and redo, and so on — a veritable kitchen sink full of options. I saw this option and thought, “Wow! WordPress does my dishes, too!” Unfortunately, the option’s name is a metaphor to describe the advanced formatting options available with the Visual Editor.
 If you’d rather embed your own HTML and skip the Visual Editor, click the Text tab to the right of the Visual tab above the Post text box. If you type HTML in your post — using a table or embedding video files, for example — click the Text tab before you insert that code. If you don’t, the Visual Editor formats your code, and it most likely looks nothing like you intended it to.
You can skip to the “Publishing your post” section later in this chapter for information on publishing your post to your blog, or continue with the following sections to discover how to include images in, and refine the options for, your post.
 WordPress.com has a nifty autosave feature that saves your work while you’re typing and editing a new post. If your browser crashes, or you accidentally close your browser window before you save your post, the post is there when you get back.
Inserting media files into your post
Pictures, images, video, and audio files can greatly enhance the content of a post by adding visual and/or auditory effects to go along with the words that you’ve written. Look right above the formatting buttons on the Add New Post page (refer to Figure 4-1), and you see three buttons above the WYSIWYG editor. This toolbar has a few small buttons:
- Add Media
- Add Poll
- Add Contact Form
 As of this writing, if you don’t purchase blog space upgrades for your account, you can upload only image (
.jpg, .jpeg, .png, .gif), document (.pdf, .doc), presentation (.ppt, .odt, .pptx, .pps, .ppsx, .key), and spreadsheet (.xls, .xlsx) files. If you purchase a space upgrade, you can upload other files — audio (.mp3, .mp4a, .wav) and video (.avi, .mp4, .mpg, .mov, .wmv) files. Chapter 5 has information on the upgrades available for your WordPress blog.
Adding an image
Adding an image or photo to your post is easy. Start by clicking the Add Media button, which is the first button on the left above the WYSIWYG editor. The Insert Media window opens, letting you choose images from your hard drive or from the web. See Figure 4-2.
To add an image from the web after you click the Add Media button, follow these steps:
- Click the Insert from URL link on the left.
- Type the URL (Internet address) of the image in the Image URL text box.
The image appears in the Insert from URL window, along with several other options for this image, explained in the next steps (see Figure 4-3).
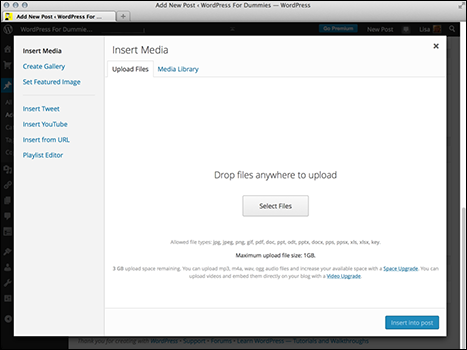
Figure 4-2: Add media to your post with the WordPress.com media uploader.
Type the full URL, including the httpandwwwportions of the address. You can find the URL of any image on the web by right-clicking it and selecting Properties. - Type a title for the image in the title text box.
Give the image a title so you can easily identify the image later when using the Media Library. A title also assists in search engine optimization because WordPress inserts a
<title>tag in the HTML markup that looks like this:title="your image title here", which helps search engines identify the type of content on your page.
Figure 4-3: Inserting an image from a URL.
- (Optional) Type a description of the image in the Alt Text box.
The Alt (alternate) Text, also referred to as the ALT tag, is shown only if a browser is unable to show the image itself. It provides a text description of the image; additionally, search engines read ALT tags easily, which helps them categorize your site in their search engine directory.
- (Optional) Type a description of the image in the Caption text box.
- Choose your alignment option by clicking the Left, Center, Right, or None button.
- Select the Link To option:
- Image URL: Choose this option if you want to link the image to its individual URL.
- Custom URL: Choose this option to type in your own URL.
- None: Choose this option if you don’t want to link the image to anything.
- Click the Insert into Post button.
To add an image from your hard drive after you click the Add Media button, follow these steps:
- Click the Upload Files tab on the Insert Media page (refer to Figure 4-2).
- Click the Select Files button.
A dialog box opens, letting you choose an image from your hard drive.
- Choose an image or multiple images to upload.
- Click Open.
The image uploads to your web server from your computer. WordPress displays a progress bar on the upload and displays an Attachment Details box when the upload is finished.
- Edit the details for the image(s) by filling in the fields in the Insert Media box (see Figure 4-4):
- Title: Type a title for the image.
- Caption: Type a caption for the image (such as Cute baby, as shown in Figure 4-4).
- Alt Text: ALT tags help search engines find and list your site in their directories. Type a description of the image if you can.
- Description: Type a description of the image.
- Alignment: Choose None, Left, Center, or Right.
- Link To: Type the URL you want the image linked to. Whatever option you choose from the following three options determines where your readers go when they click the image you’ve uploaded:
Media File: Readers can click through to the direct image itself.
Attachment Page: Readers can click through to the post that the image appears in. You can type your own URL in the Link URL text box.
Custom URL: Type in your own URL.
None: Choose this if you do not want the image to be clickable.
- Size: Choose Thumbnail, Medium, Large, or Full Size.
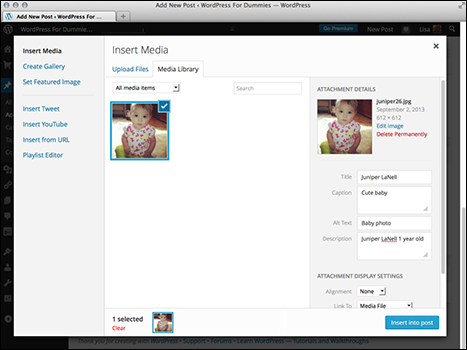
Figure 4-4: Set options for the image after you upload it.
- Click the Edit Image link, shown in Figure 4-4, to edit the appearance of the image.
Figure 4-5 shows the following image editor options:
- Crop: Click this button to cut the image down to a smaller size.
- Rotate counter-clockwise: Click this button to rotate the image to the left.
- Rotate clockwise: Click this button to rotate the image to the right.
- Flip vertically: Click this button to flip the image upside down, and back again.
- Flip horizontally: Click this button to flip the image from right to left, and back again.
- Undo: Click this button to undo any changes you’ve made.
- Redo: Click this button to redo image edits you’ve made.
- Scale Image: Click this link to see a drop-down menu that you can use to set a specific width and height for the image.
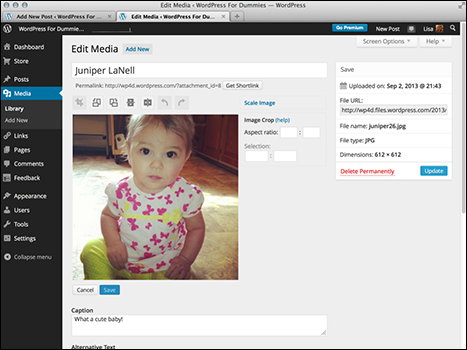
Figure 4-5: Edit the details for your image.
- Click the Insert into Post button.
The HTML code needed to display the image within your published post is inserted automatically. The Insert Media window closes and returns you to the Add New Post page. Alternatively, you can click the Save All Changes button to save the options you’ve set for the image(s) and then return at a later date to insert the image(s) in your post, without having to reset those options again.
Along with inserting just one image into your post, you can use the media uploader to insert a full gallery of images. Go through the steps I outline in this section to upload images, but don’t click the Insert into Post button. Instead, click the Create Gallery link at the top left of the Insert Media window (refer to Figure 4-2).
You can configure the options (as explained in Step 5 of the preceding steps) for each image by clicking the Show link to the right of the image. When you’re done, click the Insert Gallery into Post button. A short piece of code is inserted that looks like this: [gallery]. That piece of code tells WordPress to display your gallery of images inside the post you are about to publish.
Using audio, video, and other media files
The Upload/Insert toolbar (refer to Figure 4-1) contains two other buttons:
- Add Poll: You can automatically set up an account with WordPress.com’s sister company, Polldaddy, to create and insert polls on your WordPress.com blog.
- Add Contact Form: You can add a contact form that gives your visitors the capability to send you an e-mail directly from your website by simply filling out a form and clicking Send. You can create forms with your desired fields and insert them into a post or page to display on your site.
WordPress.com gives you 3GB of disk space for your free blog, and though it would take a lot of files to use up that amount of space, if you upload large image files, that space can go a lot quicker than you think. Keep the actual file size of the images you upload in mind when you upload media; you can eat up that disk space before you know it.
Refining your post options
After you write the post, you can choose a few extra options before you publish it for the entire world to see. These settings are applied only to the post you’re working on; they don’t apply automatically to any of your future or past posts. You can see these options in Figure 4-6.
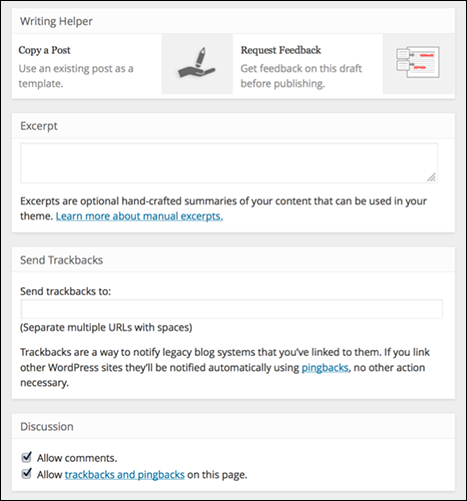
Figure 4-6: Several options for your blog post.
If you don’t see the modules for the options I list in this section, click the Screen Options tab at the top-right side of your Dashboard window and enable the display options.
Here are all the options:
- Writing Helper: WordPress wants you to be successful in your writing, so it provides two options to help you meet your writing goals:
- Copy a Post: Click this link to display a listing of posts you’ve already written on your blog and select one to use as a template for formatting.
- Request Feedback: Want to get feedback on your post before you publish it? Click the Request Feedback link and enter the e-mail addresses of the person (or people) you’d like to e-mail your draft to so that you can elicit their feedback before you publish it.
- Excerpt:Excerpts are short summaries of your posts. Many bloggers use snippets to show teasers of their blog posts, thereby encouraging the reader to click the Read More link to read posts in their entirety. Type your short summary in the Excerpt box. Excerpts have no word limit, but the idea is to keep them short and sweet.
- SendTrackbacks: If you want to send a trackback to another blog, enter that blog’s Trackback URL in the Send Trackbacks To text box. You can send trackbacks to more than one blog; just be sure to separate trackback URLs with spaces.
- Discussion: Decide whether to allow readers to submit feedback through the comment system and whether to allow pingbacks and trackbacks by selecting the boxes here or leaving them blank. Pingbacks differ slightly from trackbacks in that the software handles them more like comments; trackbacks are generally kept separate from comments.
- Slug: A slug is what WordPress calls the permalink, or URL address, of an individual post or page on your blog. By default, WordPress adopts the title of your blog post to use as a portion of the URL, or slug, for your post, but you can customize it in the Slug box if you’d like (for example, if you want a shorter URL with posts that have really long titles).
- Author: For multiauthor blogs, you can use a drop-down menu to select the person listed as the official author of an individual blog post.
- Likes and Shares: WordPress.com allows other WordPress.com members to Like and Share posts across its global network, and your blog is no exception. However, if you don’t want your readers to Like or Share your blog posts within the network, you can disable Likes and Shares in this section by deselecting the check boxes.
- Publish: These are the publishing options for your blog post. I cover these options in detail in the next section, “Publishing your post.”
- Format: Some of the themes on WordPress.com support Post Formats, which are different types of posts such as video posts, photo galleries, and asides (small, short status updates rather than long, full posts), that have special formatting and styling. If you are using a theme with Post Formats, you see a module on the right side of the Add New Post page titled Format (refer to Figure 4-1), where you can select the type of format you’d like to use.
- Categories: You can file your posts in different categories to organize them by subject. (See more about organizing your posts in the “Organizing Your Blog by Subject” section, later in this chapter.) Select the box to the left of the category name you want to use. Don’t see the category you need listed here? Click the Add New Category link at the bottom of the Categories box to add a new category.
- Tags: Tags are a nice feature of WordPress.com because they allow you to add searchable and archived keywords for your posts in small subtopics. Type your chosen tags (or keywords) in the Tags box. Tags can be single words or several words; just make sure to separate tags with commas (for example, enter books, movies, pop culture, entertainment).
- Featured Image: When uploading images to your blog posts, you can select one image to serve as a Featured Image for your post, and it displays as a thumbnail on your blog in areas such as archive listings and search results. Use the Featured Image module to assign the title to an image, if you are using one (or more).
When you finish setting the options for your post, don’t navigate away from this page because your options haven’t been fully saved. You need to scroll back up to the top and click the Save Draft button on the top-right side of the page. Before you do that, however, check out the next section, which discusses publishing options for your new blog post.
Publishing your post
You have given your new post a title and written the content of your new blog post. Maybe you even added an image or other type of media file to your blog post and configured the tags, categories, and other options. Now the question is: To publish or not to publish (yet)?
WordPress.com gives you three options for saving or publishing your post when you’re done writing it. Figure 4-7 shows the Publish section located on the right side of the Add New Post page.
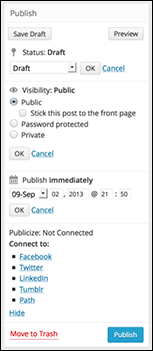
Figure 4-7: Check out these options in the Publish section before publishing your post.
The Publish menu offers three options:
- Status: Click the Edit link next to the Status option, and a new drop-down menu appears with the following options shown in Figure 4-6. (Note: The figure displays a
Cancellink; however, that link saysEditbefore you click it.)- Pending Review: Select this option to set the post status as Pending; the post shows up in your list of drafts next to a Pending Review header. This option lets the administrator of the blog know that contributors have entered posts that are waiting for administrator review and approval (helpful for blogs with multiple authors).
- Draft: Select this option to save the post but not publish it to your blog. Your post is saved in draft form, allowing you to return to it later.
Click OK when you’re done to save your settings.
- Visibility: Click the Edit link next to the Visibility option and a new menu appears with the following options shown in Figure 4-6; again, the link says
Editbefore you click it.- Public: Choosing this option publishes your post to your blog for the entire world to see. Select the Stick This Post to the Front Page check box if you want to publish this post to the very top of your blog and keep it there until you come back and edit the status later.
- Password Protected: You can password-protect a post by entering a password in this field. (Note: The text field appears after you select the option to password protect the post.) When you do, you can share the password with only the readers you want to let read that post. This feature is perfect for those times when you’d love to make a blog post about all the stupid things your boss did today but don’t want your boss to see it. This feature also hides the post from search engines so that it doesn’t show up in search results.
- Private: This option allows you to publish a post privately, which means the only person who can read the post is you — it is completely hidden from public view. I’ve known some writers who use their blogs for private journal entries, so this option would be helpful in that regard.
Click OK when you’re done to save your settings.
- Publish Immediately: Click the Edit link next to the Publish Immediately option. (Figure 4-7 displays a
Cancellink; however, that link saysEditbefore you click it.) A new menu appears where you can set the date (or time stamp) of the post and publish it right away. The date settings here allow you to set a date in the future for the post to publish, or you can back-date a post to publish on a date in the past.When you’re done, click OK to save your settings.
When you have chosen a publishing status, click the Publish button. WordPress saves your publishing-status option. Successfully published blog posts show up on the front page of your blog.
If you want to publish your blog post right away, skip the drop-down menu options and click the Publish button, which sends your new blog post to your blog in all its glory.
If you click Publish and for some reason don’t see the post you just published to the front page of your blog, you probably left the Publish Status drop-down menu set to Unpublished. Look for your new post among the draft posts.
Organizing Your Blog by Subject
Categorizing your posts in WordPress provides an organizational structure for your blog. Each blog post assigned to a category is grouped with other posts in the same category. When your blog is a few months old, this structure creates a nice topical directory of posts for you and your readers.
Category lists generally appear in two places on your blog, letting your readers find all your posts by subject very easily. Almost all WordPress themes list categories within the blog post itself. Most themes also provide a list of your categories in the sidebar of your blog so that your readers can click a topic of interest.
Each category in a WordPress.com blog has its own RSS feed, making it easy for your readers to subscribe to a feed and keep updated on what you have to say in your blog about a certain topic.
Creating categories and subcategories
A brand-new WordPress blog has only one category: Uncategorized, but you can add as many categories as you want and can manage those categories on the Categories page on your Dashboard, as shown in Figure 4-8.
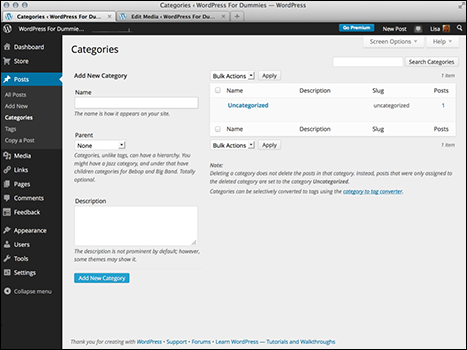
Figure 4-8: Add as many categories as you want on the Dashboard’s Categories page.
You can create new categories (and categories within those categories) by following these steps:
- Click the Categories link on the Posts menu.
The Categories page opens (refer to Figure 4-8).
- Under the Add New Category heading, type the name of your category in the Name text box.
- Leave the Parent drop-down menu set to the default option (None).
The Parent drop-down menu allows you to create subcategories. If you have a main category called Books, for example, Books appears in the Parent drop-down menu. To create a subcategory of the Books category, follow Steps 1 and 2 and then choose Books from the Parent drop-down menu.
- (Optional) Enter a description of the category in the Description text box.
It’s a good idea to do this step now so that later on you’ll know what you were thinking of when you created this category. A short summary will do. (Also, some WordPress themes are coded to display the category description in the sidebar of your blog.)
- Click the Add New Category button.
Categories you create now aren’t set in stone. You can edit or delete them by revisiting the Categories page and clicking the name of the category you want to edit. The Edit Category page opens, and you can edit the category name, category parent, and description.
Filing posts in categories and subcategories
Once you create categories and subcategories, you never have to re-create them — they are always there for you to assign your blog posts to. To assign existing posts to a category, follow these steps:
- Click the All Posts link in the Posts menu.
The Posts page appears in your browser window, displaying a list of posts you’ve made.
- Click the name of the post you want to categorize.
The Edit Post page opens, displaying your post content and saved options.
- In the Categories section to the right of the Post text box, select the check box next to the category or subcategory (you can select more than one category and subcategory) that you want to assign to the post.
You can also use the Categories section before you publish a new post to assign it to the categories you’d like.
- Scroll to the top of the Edit Post page and click the Update button.
WordPress refreshes the Edit Post page, displaying the post you just edited; it reflects the changes you just made.
Creating and Categorizing Your Blogroll
A blogroll is a list of links that you display on your blog. In this section, I show you how to add and manage the links in your blogroll. To view your default blogroll, click the Links menu on the Dashboard navigation menu. The Links page opens, and you see the default links already included in your WordPress blog (see Figure 4-9).
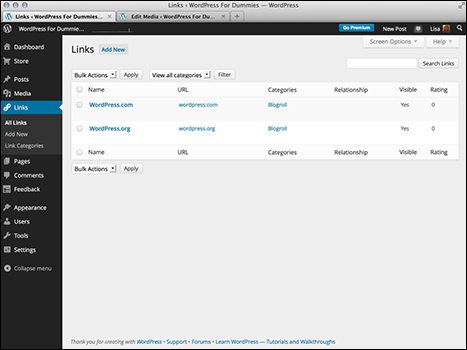
Figure 4-9: Manage your WordPress.com blogroll here.
If you want to remove a link from your blogroll, select the box to the left of the link name; select Delete from the Bulk Actions drop-down menu at the top of the page, and click the Apply button (refer to Figure 4-9).
Creating link categories
WordPress lets you have an unlimited number of link categories on your blog. Link categories, which function similarly to the post categories discussed in the previous section, allow you to separate your blogrolls (or list of links) into topical categories.
By default, WordPress sets up a link category for you called — by no coincidence — Blogroll. To add a new Link Category, click the Link Categories link on the Links menu to open the Link Categories page on your Dashboard.
You add a new link category the same way you add new post categories (see the “Creating categories and subcategories” section, earlier in this chapter).
Adding new links to your blogroll
To add a new link to your blogroll, click the Links subtab and then click the Add New link. The Add New Link page opens, as shown in Figure 4-10.
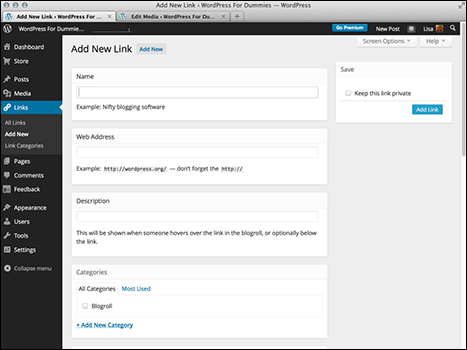
Figure 4-10: Add a link to your blogroll by using this tool from WordPress.
Follow these steps to add your new link:
- In the Name text box, type the name of the website you’re adding.
- In the Web Address text box, type the website’s URL, making sure to include the
http://part. - (Optional) In the Description text box, type a short description of the website.
- In the Categories box, select the check box to the left of the category you want this link to appear in.
- (Optional) Select the target for your link in the Target box.
The target tells your browser how you want this link to load in your visitor’s browser window after the visitor clicks it. You have three choices:
- _blank: Loads the link in a new browser window
- _top: Loads the link in the top frame (if your site is designed with frames)
- None: Loads the link in the same browser window (the default setting, should you choose to overlook this step)
The third option — None — is my preference and recommendation. I like to let my visitors decide whether they want a bunch of new browser windows to open every time they click a link on my site. - (Optional) Select the Link Relationship (XFN) option and define why you’re providing this link.
XFN, or XHTML Friends Network, allows you to indicate the relationship you have with the people you are linking to by defining how you know, or are associated with, them. Table 4-1 lists the different relationships you can assign to your links.
Table 4-1 Link Relationships (XFN) Defined
Link Relationship
Description
Identity
Select this check box if the link is to a website you own.
Friendship
Select the option (Contact, Acquaintance, Friend, or None) that most closely identifies the relationship.
Physical
Select this check box if you’ve met the person you’re linking to face to face. Sharing pictures over the Internet doesn’t count — this selection identifies a person you’ve physically met.
Professional
Select one of these check boxes if the person you’re linking to is a co-worker or colleague.
Geographical
Select Co-Resident if the person you’re linking to lives with you. Or select Neighbor or None, depending on which option describes your relationship with the person.
Family
If the blogger you’re linking to is a family member, select the option that tells how the person is related to you.
Romantic
Select the option that describes the type of romantic relationship you have with the person you’re linking to. Do you have a crush on him? Is she your creative muse? Is he someone you consider to be a sweetheart? Select the option that most closely identifies the romantic relationship, if any.
- (Optional) Select advanced options for your link in the Advanced box:
- Rel: Enter the link relationship in this text box. This adds a rel value to the hyperlink and allows you to style links based on the value. There are several link rel values you can use here — you can read more about rel values at www.w3schools.com/TAGS/att_a_rel.asp.
- Image Address: This option associates an image with the link, and some WordPress themes display the image on your site along with the link. Type the URL for the image in the Image Address box. For this purpose, you need to know the direct URL to the image (for example, http://yourdomain.com/images/image.jpg).
- RSS Address: Type the RSS feed URL for the blog you are linking to. WordPress displays the link to the site’s RSS feed alongside the link that appears on your site. Not all WordPress themes accommodate this feature.
- Notes: Type your notes in the Notes box. These notes aren’t displayed on your site, so feel free to leave whatever notes you need to further define the details of this link. A month from now, you may not remember who this person is or why you linked to her, so you can add notes to remind yourself.
- Rating: Use the Rating drop-down menu to rate this link from 0 to 10, 0 being the worst and 10 being the best. Some WordPress themes display your blogroll in the order you rate your links, from best to worst.
- Scroll to the top of the page, and click the Add Link button.
Your new link is saved and a blank Add New Link page opens, ready for you to add another new link to your blogroll(s). Additionally, in the Save section at the top right, you can choose to keep this link private; this option, if selected, keeps the link from being displayed publicly on your blog. The link would be kept protected and for your eyes only.
You can find more information on XFN at http://gmpg.org/xfn.
Revisit the Manage Links page anytime you want to add a new link, edit an old link, or delete an existing link. You can create an unlimited amount of blogroll categories to sort your blogrolls by topics. I know one blogger who has 50 categories for his links, so the options are limitless.
Managing and Inviting Users
What’s a blog without blog users? Of course, your WordPress.com blog always has at least one user: you. To see your list of users, click the Users link in the navigation menu. The Users page opens and the Users menu expands to show three different links:
- All Users
- Invite New
- My Profile
- Personal Settings (See Chapter 3)
Managing authors and users
The Users page tells you about all the users on your blog. It lists each user’s username, name, e-mail address, role on your blog, and number of posts made to your blog.
To manage user roles, you need to understand the type of access each role provides:
- Follower: This default role is assigned to anyone not logged in or anyone who leaves a comment. Followers receive e-mail updates whenever you update your blog with new content, but they don’t have any editing privileges.
- Contributor: A contributor can upload files and write/edit/manage her own posts. When a contributor writes a post, however, that post is saved as a draft to await administrator approval; contributors can’t publish their posts. This feature is a nice way to moderate content written by new authors.
- Administrator: An administrator has the authority to change any of the Administration options and settings in the WordPress blog. As the account owner, you are already listed as an administrator. You can also assign other users as administrators.
- Editor: In addition to having the access and permissions of an author, an editor can moderate comments, manage categories, manage links, edit pages, and edit other authors’ posts. Editors can also read and edit private posts.
- Author: In addition to having the access and permissions of a contributor, an author can publish his own posts without administrator approval. Authors can also delete their own posts.
WordPress lets you have an unlimited number of users and authors on one blog, which is a nice feature if running a multiauthor blog is something you’d like to do.
To change a user’s role, follow these steps:
- Click the All Users link in the Users submenu.
Locate the name of the user that you’d like to edit.
- Select the check box next to the username.
- From the Change Role To drop-down menu at the top of the page, choose the role you want to assign; then click the Change button.
The Users page refreshes with the new role assignment applied.
To view all the posts made by an author, click the number that appears below the Posts column for that user.
Inviting friends to WordPress.com
Now that you’ve experienced the fun, ease, and excitement of having your very own WordPress.com blog, why not tell your friends so that they can tell their friends, and their friends can tell their friends, and so on?
Click the Invite New link in the Users submenu to load the Invite New Users to Your Blog page, as shown in Figure 4-11. This page gives you the tools you need to add new users to your blog. By user, WordPress means simply a person who is a member of your blog as a contributor, an author, an editor, or an administrator. You can have an unlimited amount of users on one WordPress blog.
Enter up to 10 e-mail addresses for people you’d like to invite to your blog, assign a user role, add an optional message to them, and click the Send Invitation button. If the person you invite already has a WordPress.com account, your blog is added to his Dashboard after he accepts your invitation. If you enter someone who doesn’t have a WordPress.com account yet, WordPress sends that person an invitation to become a member, along with instructions on how to sign up. (The WordPress people have thought of everything, haven’t they?)
At the bottom of the Invite New Users to Your Blog page, in the Past Invitations section, you can review users you’ve previously invited to your blog and their current status (whether or not they’ve accepted your invite and the date they accepted it).
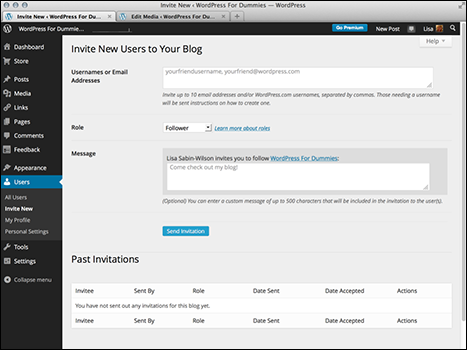
Figure 4-11: WordPress.com Invite New Users to Your Blog page.
Follow these instructions to invite as many people as you want to join WordPress.com:
- Click the Invite New link in the Users menu.
The Invite New Users to Your Blog page opens.
- In the Usernames or Email Addresses text box, enter either a user’s WordPress.com username (if that user already has an account) or the prospective member’s e-mail address.
- Select the appropriate role in the Role drop-down menu.
- Type a special note to the user in the Message text box.
This message appears in the e-mail that the user receives.
- Click the Send Invitation button to send the invitation to the prospective member via e-mail.
When you complete these steps, WordPress sends you confirmation that the invitation was sent.
Managing Comments and Comment Spam
Comments provide a great way for readers to interact with you, and vice versa. Readers of your blog can post comments by using the comment form that appears on the same page as each of the published posts on your blog. You need to be able to control the comments that appear, however, and I tell you how to do that in this section.
Setting discussion options for your blog
Click the Discussion link on the Settings submenu. On the Discussion Settings page, you can set the options (such as notification settings) for your posts, determine how comments and comment spam are handled, and specify whether you want to use avatars on your blog. The Discussion Settings page has 10 settings that you can configure for your blog, each of which I discuss in the following sections.
When you’re done setting up your options, click the Save Changes button at the bottom of the page to put the changes into effect. You can revisit this page as often as needed so that you can keep your settings current and to your liking.
Default Article Settings
The Default Article Settings section is where you tell WordPress.com how to handle post notifications. Three options are available to you:
- Attempt to Notify Any Blogs Linked to from the Article: Enabled by default, this option makes your blog send a notification, via a ping, to any site you’ve linked to in your blog post. This feature is very similar to a trackback (which I discuss in Chapter 2) and can slow the process of posting just a bit because of the time it takes for your blog to talk to another blog to let it know that you’re talking about it.
- Allow Link Notifications from Other Blogs (Pingbacks and Trackbacks): Enabled by default, this option tells WordPress that you want your blog to be notified via pings and trackbacks that other people have linked to you. WordPress lists any ping and trackback notifications on your site as comments in the Comments section. If you deselect this option, your ears may tingle, but you won’t know when other people are talking about, or linking to, you on other blogs.
- Allow People to Post Comments on the Article: Enabled by default, this option lets people leave comments on your blog.
Other Comment Settings
The Other Comment Settings tell WordPress how to handle comments:
- Comment Author Must Fill Out Their Name and Email: Enabled by default, this option requires everyone who comments on your blog to fill in the Name and Email field when leaving a comment. This option is very helpful in combating comment spam. See Chapters 2 and 10 for information on comment spam. Deselect this check box to disable this option.
- Users Must Be Registered and Logged in to Comment: Not enabled by default, this option allows you to accept comments on your blog from only those people who have registered and are logged in as users on your blog. If a user is not logged in, she sees a message that says:
You must be logged in in order to leave a comment. - Automatically Close Comments on Articles Older Than X Days: Select the box next to this option to tell WordPress that you want comments on older articles to be automatically closed. Fill in the text box provided with the number of days you would like to wait before WordPress closes comments on older articles.
This is a very effective anti-spam technique that many bloggers use to limit the comment and trackback spam on their blogs.
- Enable Threaded (Nested) Comments X Levels Deep: This drop-down menu allows you to choose the level of threaded comments you’d like to have on your blog. The default is 3; you can choose up to 10 levels. Instead of all comments being displayed on your blog in chronological order (as it is by default), nesting them allows you and your readers to reply to comments within the comment itself.
- Break Comments into Pages with X Comments Per Page: Fill in the text box with a number of comments you want to display on one page. Setting a limit is very helpful for blogs that receive a large number of comments. It lets you break the long string of comments into several pages, which makes it easier to read and helps speed up the load time of your site because the page isn’t loading such a large number of comments simultaneously.
- Comments Should Be Displayed with the Older/Newer Comments at the Top of Each Page: Use the drop-down menu to select Older or Newer. Selecting Older displays the comments on your blog in the order of oldest to newest. Selecting Newer displays comments from newest to oldest.
Email Me Whenever
There are five options in the Email Me Whenever section:
- Anyone posts a comment
- A comment is held for moderation
- Someone Likes one of my posts
- Someone reblogs one of my posts
- Someone follows my blog
The e-mail feature settings tell WordPress that you want to receive an e-mail anytime anyone leaves a comment on your blog, when a comment awaits your moderation, or when someone Likes or subscribes to your blog. The e-mail feature can be very helpful, particularly if you don’t visit your blog daily. Everyone likes to get comments on their blog posts, and it’s good to be notified when it happens so that you can revisit that post, respond to your readers, and keep the conversation active.
All five options in this section are enabled by default; you can easily disable any, or all, of them by deselecting the check box to the left of each option.
Before a Comment Appears
The two options in the Before a Comment Appears section tell WordPress how you want WordPress to handle comments before they appear in your blog:
- Comment Must Be Manually Approved: Selecting this option holds every new comment on your blog in the moderation queue until you log in and approve it. This feature is particularly helpful if you want to review the content of comments before they’re published to your blog.
- Comment Author Must Have a Previously Approved Comment: When this box is selected, the only comments approved and published on your blog are those left by commenters who are already approved by you. Their e-mail addresses are stored in the database, and WordPress runs a check on their e-mails. If the e-mail address matches a previously approved comment, the new comment is published automatically. If no match occurs, WordPress places the comment in the moderation queue, awaiting your approval. This measure is yet another feature that helps prevent comment spam.
Comment Moderation
In the Comment Moderation section, you can set options to specify what types of comments are held in the moderation queue to await your approval. Frequently, comment spammers try to spam your blog with a ton of links in the hope of promoting their own sites through your comment form. You can set the number of links allowed in a comment before it’s tossed into the moderation queue to await approval. The default is 2. Give that a try, and if you’re getting lots of spam comments with multiple links, you may want to revisit this page and increase that number.
You can set keywords, URLs, e-mail addresses, or IP addresses to be flagged for moderation in the text box below the link setting. Check out the previous sidebar, “A case for moderation over blacklisting,” for an example of how moderation helps you distinguish the real spam.
By default, WordPress.com automatically discards spam on older posts on your blog. You can switch this option off by selecting the Don’t Discard Spam on Old Posts check box at the top of this section.
Comment Blacklist
In contrast to the Comment Moderation list, the Comment Blacklist is a list of words, URLs, e-mail addresses, and IP addresses that you want to flat-out ban from ever making it to your blog. Items placed here don’t even make it into your Comment Moderation queue; they’re filtered as spam by the system and completely disregarded. (The words I placed in my Blacklist are not family-friendly and have no place in a nice book like this.)
Are you getting the feeling that comment spam is a real issue for bloggers? It’s huge — probably bigger than you imagine it to be. Much of the comment-spam prevention is done behind the scenes, so you don’t even see half of what’s going on. All the options on the Discussion Settings page are geared toward decreasing or eliminating comment or trackback spam from your blog. If, during the course of your blogging experience on WordPress.com, you find that you’re having an issue with spam, you may want to revisit these options and make adjustments.
Follow Comments
Select the Show a ‘Follow Comments’ Option in the Comment Form check box if you want to allow the readers of your blog to subscribe to individual comment threads on your blog. When you enable this option, a check box appears in your comments section allowing your readers to opt to receive e-mails every time a new comment is posted to a specific post on your blog. This option also puts a comment subscription management page on your blog that allows readers to view and manage their comment subscriptions. This is a really great tool to keep readers coming back to your blog over and over again, and a good way to keep lively discussions going!
Follow Blog
Select the Show a ‘Follow Blog’ Option in the Comment Form check box if you want to give your readers an easy way to subscribe to your blog via e-mail. With this option enabled, readers who select this option receive an update in their e-mail box every time you publish a new post to your blog. This is a fantastic way to keep your readers informed and coming back to your blog time and time again for more of your great published content.
Markdown
Use markdown for comments. Markdown is a way for you to use text to create HTML formatting. You can read about markdown here: http://en.support.wordpress.com/markdown-quick-reference/.
Avatars
Avatars are photos or images that represent your commenters (and you) on your blog. You can choose to display avatars on your blog by selecting the Show Avatars option. You can also set the maximum rating for the avatars; it’s much like the movie rating system we’re all used to. You can select a G, PG, R, or X rating for the avatars that display on your blog; if your site is family-friendly, you probably don’t want to display R- or X-rated avatars. You can also select an image to use as the default avatar for those users who do not yet have avatars assigned to their e-mail.
For WordPress.com users, the avatars displayed are the images that users uploaded to their profiles (see Chapter 3). Users who are not registered with WordPress can still display an avatar when they comment on your blog by signing up for one at http://en.gravatar.com.
Comment Form
The text field here displays Leave a Reply by default, and it’s the prompt your readers see on your blog that encourages them to leave a comment. You can leave this as is, or you can type your own prompt in this box to change the wording that displays in your comment area.
Viewing comments
Open the Comments page by clicking the Comments link on the Dashboard navigation menu. The Comments page shows all the comments on your blog from the very first day you started. Here you can view the comments, edit them, mark them as spam, or flat-out delete them.
If you set your Comments options so that comments aren’t published until you approve them, you can approve comments in this section as well. To do this, of course, you have to have comments on your blog, and if your blog is new, you may not have any yet. Figure 4-12 shows what a comment looks like in this area.
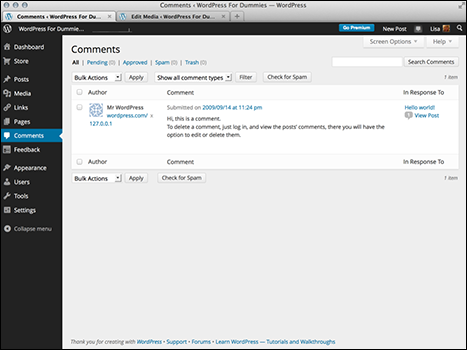
Figure 4-12: Looking at comments on the Comments page on the Dashboard.
To manage a comment, find one that you want to edit, delete, unapprove (that is, remove it from your blog page), or mark as spam. If you need to, you can find a specific comment by using the search feature. Just type a keyword in the search box located in the top-right corner of the page and then click the Search Comments button.
When you find the comment you want to manage, hover your mouse pointer over the comment. Six different links appear beneath the comment text as follows:
- Approve or Unapprove: If the comment hasn’t been approved, the Approve link appears here. Click Approve to publish the comment to your blog. If the comment is approved, click the Unapprove link to … well, unapprove it. This link puts the comment back into the moderation queue.
- Reply: This link drops a text box down on the same page to allow you to reply to the comment right from the Comments page.
- Quick Edit: This link accomplishes the same as the Edit link, except that instead of taking you to a new Edit Comment page on your Dashboard, it drops down a Quick Edit text box that allows you to do a fast edit right on the same page.
- Edit: Clicking this link takes you to the Edit Comment page, where you can edit the text of the comment if you need to (correcting typos, anyone?).
- Spam: This link tells WordPress that this comment is spam and removes it from your blog.
- Trash: This link deletes the comment from your blog.
Creating a Static Page
You can create pages on your blog that are treated differently from posts. These pages, called static pages, appear as separate pages on your blog rather than as posts within your blog. You use nearly the same process of writing a static page as you do to write a post. You can easily create an unlimited number of static pages, which can serve as nice complements to your overall site content.
You can use this feature to write, for example, an About page, on which you give all the wild and wooly details about yourself. If you use the Page Sidebar widget, the pages you create are listed in your sidebar; you can also add pages to the main navigation menu. (See Chapter 5 for more about widgets and menus.)
You can create static pages by logging on to your WordPress Dashboard and following these steps:
- Click the Add New link in the Pages menu.
The Add New Page screen appears, and you can compose your static page.
- Type the title of your page in the Title text box.
- Type the body of your page in the Page text box.
You can use the Visual Text Editor and insert media files into your page by using the same techniques discussed in the “Ready? Set? Blog!” section, earlier in this chapter.
- Set the options for your page by using the options in the Page Attributes module on the left side of the page:
- Parent: Choose the page’s parent from the drop-down menu if you want to make the static page a subpage of another page you’ve created.
- Template: If the WordPress.com theme you’re using has page templates available, choose the template you want to use from this drop-down menu.
- Order: Enter a number in the text box that reflects the order in which you want this page to display on your site. If you want this page to be the third page listed, for example, enter 3.
- Scroll back to the top of the page and choose options from the Publish Status drop-down menu.
These options are the same as the Publish Status options available when you’re writing a new blog page. I cover the available options in the “Ready? Set? Blog!” section, earlier in this chapter.
- Click the Save or Publish button when you’re done to save your work.
Your static pages aren’t included in your Recent Posts list, in categories, or in your monthly archive. Figure 4-13 shows an example of a static page on the Pages section of the Dashboard.
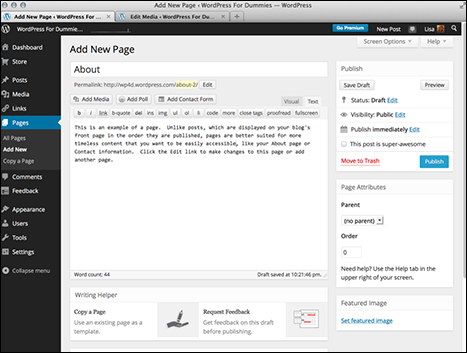
Figure 4-13: Edit your static pages here.
Setting Up Your Front Page
On the Reading Settings page (click the Reading link in the Settings menu), you can set how many blog posts show up on the front page of your blog and/or change your front page to display a static page rather than your most recent blog posts. (See the preceding section, “Creating a Static Page.”) You can also determine how many blog posts your readers can see in your RSS feed. Figure 4-14 shows the available options.
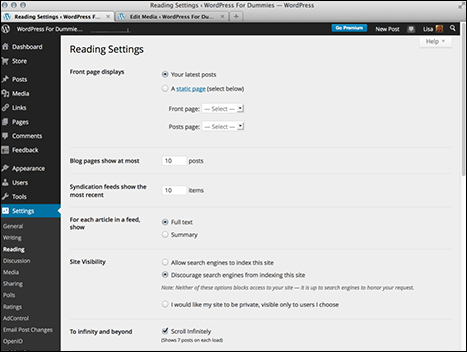
Figure 4-14: The Reading Settings page.
The Reading Settings page gives you control of the settings that let you make these decisions for your blog:
- Front Page Displays: This setting determines what appears on the front page of your site.
- Your Latest Posts: Select this radio button if you want your blog posts to display on the front page of your blog.
- A Static Page: Select this radio button if you want a static page instead of a listing of your recent blog posts to display on the front page of your site.
- Front Page: If you choose to display a static page, choose from this drop-down menu which page to display.
- Posts Page: If you choose to display a static page, use this drop-down menu to tell WordPress which page to display your posts on.
- Blog Pages Show at Most: If you choose to display your blog posts on your front page, this step is where you set the number of blog posts to display per page. Figure 4-14 shows that I decided to display 10 posts on my front page.
- Syndication Feeds Show the Most Recent: This setting determines how many posts show in your RSS feed at one time. (See Chapter 2 for details on RSS.)
- For Each Article in a Feed, Show: Indicate here which portion of each article you want to show in your feed:
- Full Text: Select this radio button if you want the entire text of each post to be displayed in your RSS feed.
- Summary: Select this radio button if you want only excerpts of your posts to be displayed in your RSS feed.
- Site Visibility: See the next section, “Publishing a Public or Private Blog.”
- To Infinity and Beyond: Select this option to tell WordPress to automatically display more posts once the reader gets to the very bottom of your site. WordPress detects when the readers reach the end of the page and automatically displays the next seven posts on your blog (this option is selected by default).
- Enhanced Feeds: Here, you have the option of showing several more details about your blog in your RSS feed:
- Categories
- Tags
- Comment Count
- Follower Settings: When people subscribe to your blog for the first time, they receive an e-mail welcoming them to your blog. The text box in the E-mail Settings area provides default text for that e-mail. You can change this text to suit your needs. You can also select the option to show a Follow button to users who are logged out to give them the option of following your blog.
After you change any settings in the Reading Settings page, click the Save Changes button in the bottom-left corner to save your preferences.
Publishing a Public or Private Blog
This section describes three very simple options, and the option you choose lets you determine how you want to deal with publicity on your blog. To access the privacy options for your blog, click the Reading link on the Settings menu. You can choose one of these three options in the Reading Settings page (refer to Figure 4-14) in the Site Visibility section (about midway down the page):
- Allow Search Engines to Index This Site: Select this radio button if you want to freely allow search engines to visit your blog and include its content in their search directories.
- Discourage Search Engines from Indexing This Site: Select this radio button if you don’t want search engines to visit and include your site in their directories. This option is helpful if you want normal (read: human) visitors but don’t want the publicity that search engines provide.
- I Would Like My Site to Be Private, Visible Only to Users I Choose: Select this radio button if you want to make your blog available only to the people you choose. This option keeps your blog completely private and away from prying eyes — except for those users you allow. When you select and save this option, WordPress.com provides a form in which you can enter the WordPress.com usernames for the people you want to invite to view your private blog. (With WordPress.com, you can add up to 35 users at no cost; you can pay an annual fee to add more.)
When you finish making your decision, be sure to click the Save Changes button to have the changes take effect.
Publicizing through Social Media
WordPress gives you the ability to easily integrate your WordPress blog with various social networks such as Facebook, Twitter, and LinkedIn. Click the Sharing link in the Settings submenu on your Dashboard to load the Sharing Settings page.
In the Sharing section, connect your blog to popular social networks to automatically share your new posts with your friends within that network. WordPress allows you to share your blog on the following networks:
- Google+
- Tumblr
- Path
Click the icon for the social network you want to connect to and follow the steps provided to authorize your WordPress blog with that network.
Making sharing easy
Users of social media like to share the interesting content they find around the web with their friends on other social media sites, and the Sharing feature on WordPress.com gives you the tools that make it easy for your readers to share links to your content in different ways:
- E-mail: Allows readers to e-mail your blog content to a friend
- Print: Allows readers to print your blog posts
- Digg: Allows readers to share your content on the Digg social media site at http://digg.com
- Facebook: Allows readers to share your content on the Facebook social media site at http://facebook.com
- LinkedIn: Allows readers to share your content on the LinkedIn social media site at http://linkedin.com
- Reddit: Allows readers to share your content on the Reddit social media site at http://reddit.com
- StumbleUpon: Allows readers to share your content on the StumbleUpon social media site at http://stumbleupon.com
- Twitter: Allows readers to share your content on the Twitter social media site at http://twitter.com
- Press This: Gives readers a button they can click to easily use the WordPress.com Press This feature, allowing them to post links to your content on their own WordPress.com blog
- Google +1: Allows readers to share your content on the Google+ social media site at http://plus.google.com
- Tumblr: Allows readers to share your content on the Tumblr social media site at http://tumblr.com
- Pinterest: Allows readers to share your photos and graphics on the Pinterest social media website at http://pinterest.com
- Pocket: Allow readers to share your content on the Pocket network at http://getpocket.com/
None of the sharing services are enabled by default. To enable any other service, click its button in the Available Services section and drag and drop it into the Enabled Services section. After you’ve done that, small, convenient buttons display within each blog post on your site; your visitors can click these buttons to share your content with their friends on their own social networks.
Clicking the Like button
If you’re a Facebook user, as I am, you’ll find that the WordPress Like feature is very similar to the Facebook Like feature that you use within your Facebook account to indicate that you Like a friend’s Facebook status.
On the bottom of the Sharing Settings page you can set your preference for WordPress.com Likes — select whether you want them turned on for all posts (by default), or turned on per post (so that you determine the placement of the WordPress.com Like on a per-post basis). This feature does exactly what it says: It displays a Like button on your blog posts, allowing readers to click it and Like your posts within the WordPress.com network.
You can disable the WordPress Like feature at any time. Also, you can disable the Like feature on a per-post basis. This means that you can enable it globally, but disable it on individual posts if you publish a post that you don’t want people to be able to Like.
Establishing Trust Relationships with OpenID
OpenID is a third-party, Internet-community identification system that allows an Internet user to create an online identity that she can use anywhere on the web where OpenID is supported. OpenID is commonly used with larger sites that receive a lot of traffic and public comments. With WordPress.com, you already have an OpenID identity.
On the WordPress Dashboard, click the OpenID link on the Settings menu to see the OpenID Trusted Sites page, which tells you what your OpenID is. (It’s usually your main WordPress.com domain: for example, http://lsrn94.wordpress.com.) You can also add the URLs of what you consider to be trusted sites. After you enter the URL of a trusted site and click the Add Site button, you aren’t asked whether you trust the site when you attempt to log in to it. In a nutshell, this setting means that you can use your WordPress.com OpenID to log in to any website that supports OpenID.